Schlagwort: Nano Every
-

This wild haptic system can be used to build vehicles
Reading Time: 2 minutesAs virtual reality (VR) and mixed reality (MR) slowly grow in adoption, their shortcomings become more obvious. Most glaringly, they only engage users’ sense of sight and hearing. Haptic tactile feedback is almost non-existent and so picking up a “sword” in VR feels like picking up a VR controller, because that’s what…
-

Building a DIY GPU with Arduino
Reading Time: 2 minutesA GPU (graphics processing unit) is a specialized computer component for, primarily, rendering graphics. That RTX 5090 that you took out a second mortgage to buy is one example. But GPUs are useful for far more than just playing the newest games at max settings; their parallel processing capabilities make them desirable…
-

This unique electronic toy helps children learn their shapes
Reading Time: 2 minutesIt isn’t a secret that many kids find math to be boring and it is easy for them to develop an attitude of “when am I ever going to use this?” But math is incredibly useful in the real world, from blue-collar machinists using trigonometry to quantum physicists unveiling the secrets of…
-

This DIY standing desk controller provides luxury car-style memory settings
Reading Time: 2 minutesOne of the best features you’ll find on a fancy luxury car is seat position memory. Typically, there are at least two profiles that “save” the position of the seat. When switching drivers, the new seat occupant can simply push the button for their profile and the seat will automatically move to…
-

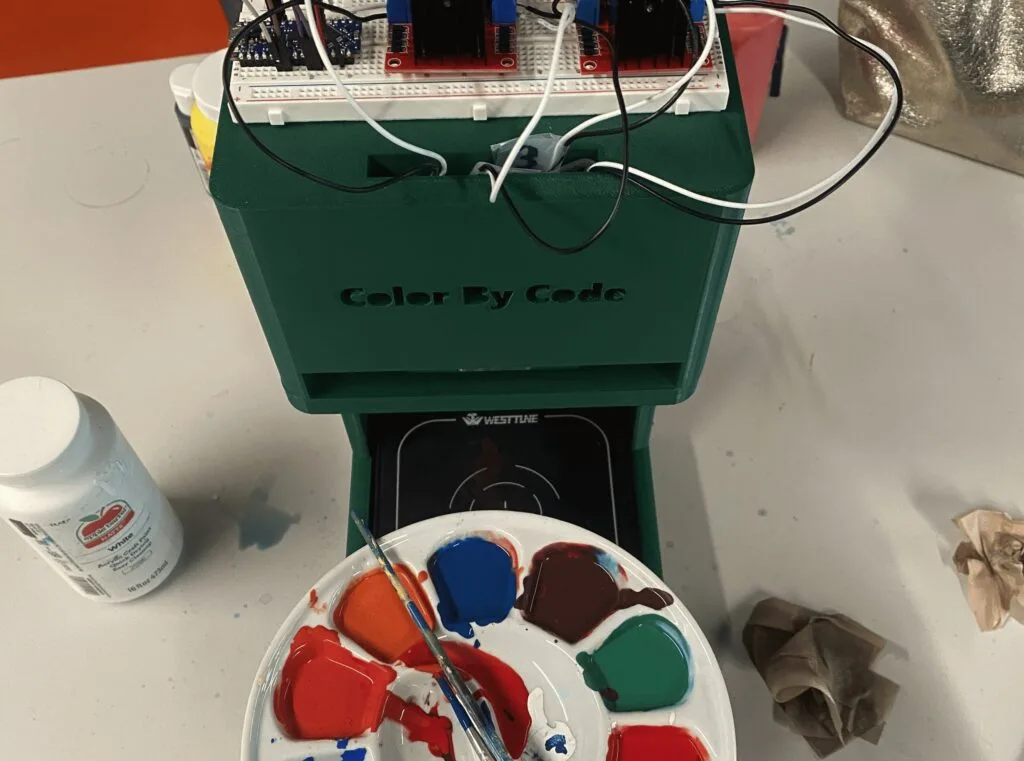
This Arduino Nano Every-controlled machine automatically mixes acrylic paint of any color
Reading Time: 2 minutesWhen you want to paint the walls in your bedroom that very specific shade of Misty Irish Green, all you have to do is head to your local hardware store and have them scan the corresponding card. The paint-mixing machine will then add the pigment to a white base and, a few…
-

This device prevents garage door security breaches
Reading Time: 2 minutesYour automatic garage door is almost certainly the most vulnerable access point in your house. Traditional systems are notorious for their susceptibility to replay attacks, but even more sophisticated modern garage door openers and those that lack remote functionality entirely are still prone to human error — you may simply forget to…
-

How makers can use AR and VR
Reading Time: 4 minutesAugmented reality (AR) and virtual reality (VR) are both currently experiencing a meteoric rise in popularity, with the combined market expected to reach $77 billion by 2025, from just $15.3 billion in 2020. For makers, AR and VR represent exciting opportunities to build new types of projects, tapping into entirely new possibilities…
-

This device helps ski lift operators attach chairs to the cable
Reading Time: 2 minutesMost ski lifts are pretty simple systems: they use big ol’ motors to pull cables with chairs or hangers attached. More advanced detachable designs let the chairs come off the cable temporarily while in the terminal, so skiers can hop on at a leisurely pace. But basic fixed-grip chairlifts don’t have that…
-

LanderShot is an out-of-this-world espresso machine
Reading Time: 2 minutesIf you think coffee people are opinionated, then you’ve never met an espresso person. There is a lot of art and science that goes into making the perfect little cup of espresso and a good barista will control every factor, from temperature to pressure to pour rate. It isn’t rocket science, but…
-

Turning an old car into a powerful generator
Reading Time: 2 minutesGenerators are expensive pieces of equipment. You can get a small low-quality model for a few hundred dollars, but powerful high-quality generators cost thousands or even tens of thousands of dollars. Old cars, on the other hand, can be very cheap — especially if they aren’t roadworthy anymore. Jake von Slatt has…
-

This kinetic sculpture is incredibly mesmerizing
Reading Time: 2 minutesThe great thing about art is that it doesn’t have to serve a purpose. When utility is irrelevant, the artist is free to express their creativity in whatever way they like. A painting doesn’t have to inspire introspection or revolution — it can just be something pretty to look at. In the…
-

DIY parachute system saves drones and rockets
Reading Time: 2 minutesToday’s consumer and professional drones are very stable. They’re easy to pilot and we’re past the era of rampant out-of-control drone crashes. But drones can still fail and benefit from a system that lets them return safely to the ground without damage. That is also true for hobby rockets, which still have…
-

This Bluetooth tank is a perfect first robot
Reading Time: 2 minutesMany kids and adults have an interest in electronics because they want to build robots. But it can be difficult to figure out where to even start. There are hundreds of kits on the market and the options are endless where you veer into custom territory. But if you’re looking for a…
-

Building an experimental magnetic loop antenna with a stepper motor and an Arduino
Reading Time: 2 minutesHam radio allows for the broadcast and reception of non-commercial radio signals across vast distances with relatively inexpensive equipment. As the name implies, ham radio relies on antennas to function, and most designs can take up large amounts of space. An alternative antenna is the magnetic loop design which has a tall…
-
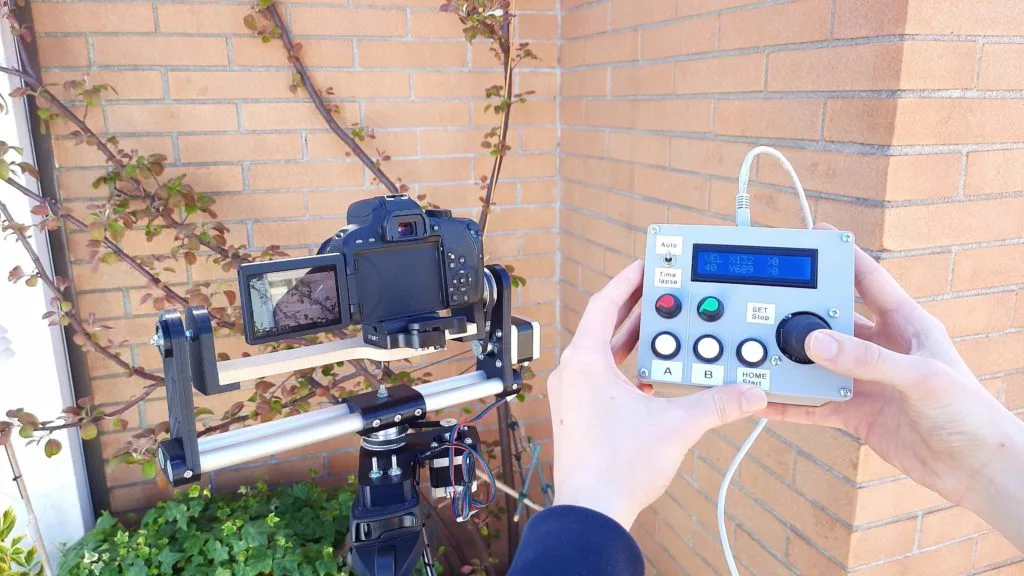
Easily create your own robotic camera operator
Reading Time: 2 minutesIf you do any kind of video content creation and you still rely entirely on static shots, then you’re missing out on an opportunity to generate visual interest that draws viewers in. Dynamic shots can do a lot to increase the production value of your videos, but most people can’t afford to…
-

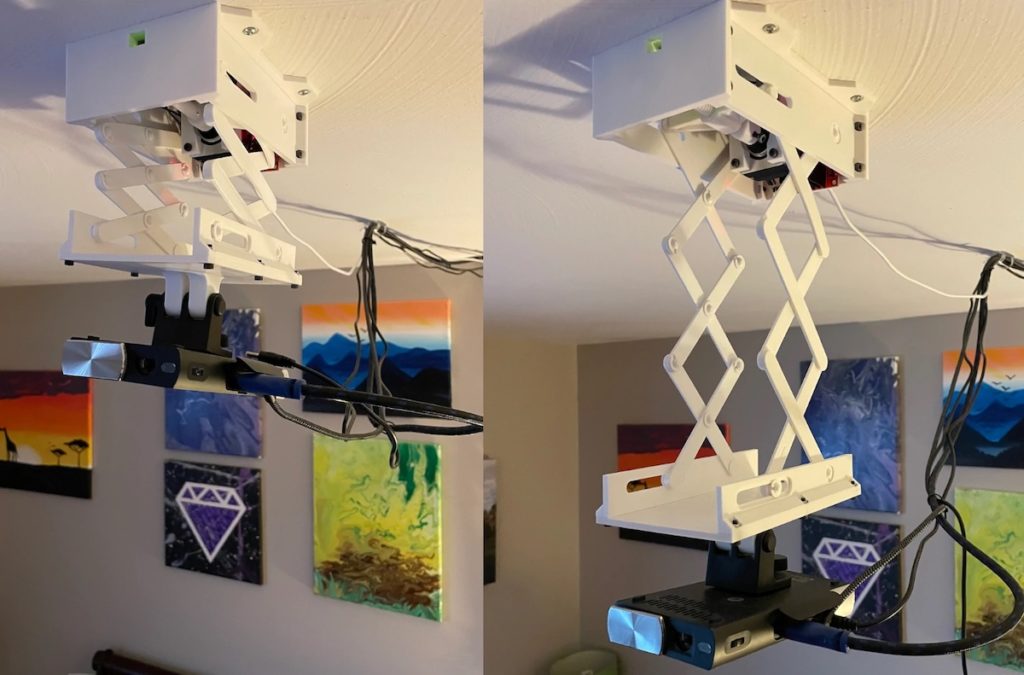
A DIY scissor lift for home theater projectors
Reading Time: 2 minutesWhile their popularity seems to be waning as LCD and OLED TVs grow in size and shrink in price, projectors can still be a good choice for home theaters. They can give you a screen bigger than any TV on the consumer market and at a lower price than large TVs. But…
-

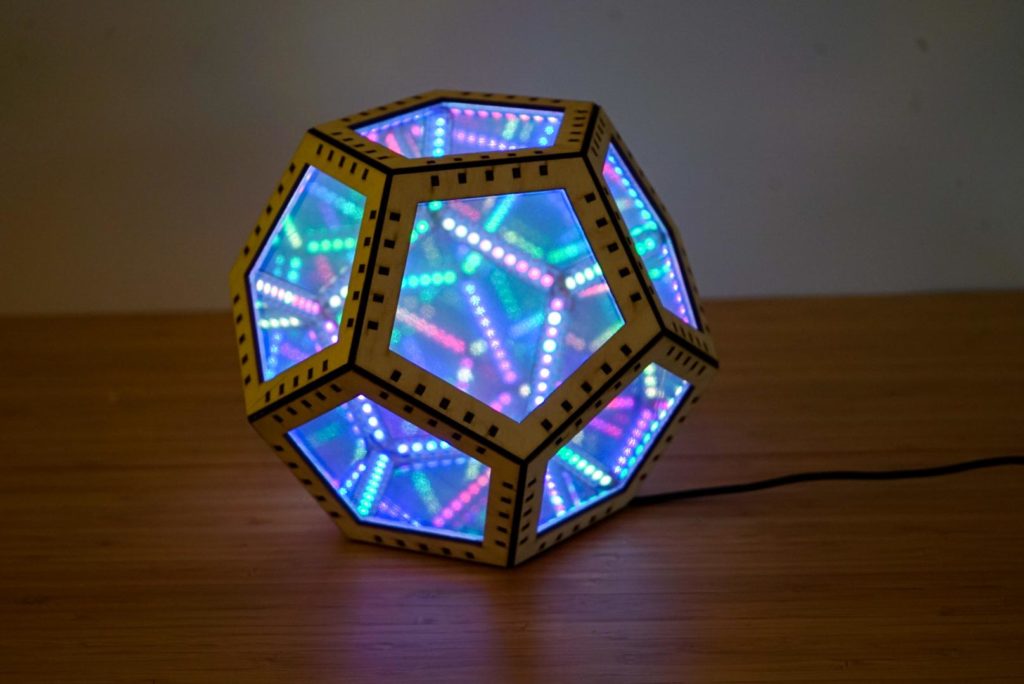
Infinity dodecahedron puts on a mesmerizing light show
Reading Time: 2 minutesIf you’ve ever stood in an elevator with mirrored walls and saw your reflection bouncing back and forth endlessly, then you’ve experienced an “infinity mirror” from the inside. If you were standing outside of the elevator and one of the walls were a one-way mirror, you’d be able to peer inside as the interior…
-

HEXA LEDs make Bluetooth-controlled accent lighting affordable
Reading Time: 2 minutesLED accent lighting is very trendy right now, as it can add quite a lot of visual interest to a room without introducing clutter. But commercial products are often either very expensive or subpar in quality and capability. Fortunately for makers, this kind of project is perfect for a DIY weekend build.…
-

Arduino Nano Every brings Knight Rider sound effects to Knight Rider RC car
Reading Time: 2 minutesKITT (Knight Industries Two Thousand) was a fictional car based on a 1982 Pontiac Trans Am in the Knight Rider television series. KITT featured an artificial intelligence, voiced by the legendary William Daniels, and some iconic styling. Savall21 built a replica RC KITT and used Arduino boards to add sound and light effects that…
-

Get connected to your Nano with the Screw Terminal Adapter
Reading Time: 3 minutesThe brand new Nano Screw Terminal Adapter turns up the speed on your prototyping efforts by giving you a fast, reliable way to hook up your boards. This awesome add-on is exactly what seasoned makers have been crying out for, and is now available from the Arduino Store. Let’s take a look…
-

eXaDrums is an open source, low-latency electronic drum system
Reading Time: 2 minutesArduino Team — June 29th, 2022 For apartment-dwelling drummers, electronic drums are really the only option. While cheap electronic drum sets are on the market, they aren’t much more than noise-making toys. High-end sets, on the other hand, cost thousands of dollars. To make high-end hardware and software accessible to DIYers, Jeremy…
-

Designing a DIY watch with a brass ‘cyberpunk-y’ aesthetic
Reading Time: 2 minutesDesigning a DIY watch with a brass ‘cyberpunk-y’ aesthetic Arduino Team — June 20th, 2022 The cyberpunk aesthetic, like several other genres, often takes the form of heavy and metallic body modifications or devices that are meant to signify a more futuristic society. Inspired by the video game Deus Ex, Redditor Star_11 had…