Schlagwort: Machine Learning
-

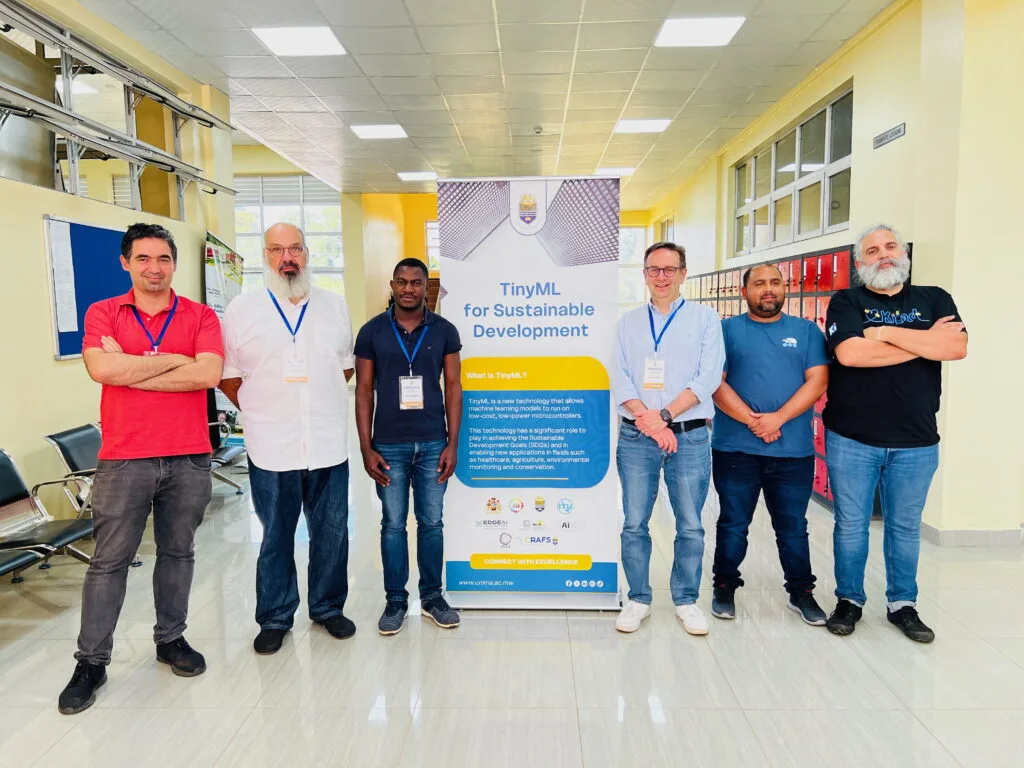
tinyML in Malawi: Empowering local communities through technology
Reading Time: 3 minutesDr. David Cuartielles, co-founder of Arduino, recently participated in a workshop titled “TinyML for Sustainable Development” in Zomba, organized by the International Centre for Theoretical Physics (ICTP), a category 1 UNESCO institute, and the University of Malawi. Bringing together students, educators, and professionals from Malawi and neighboring countries, as well as international…
-

How can we teach students about AI and data science? Join our 2025 seminar series to learn more about the topic
Reading Time: 4 minutesAI, machine learning (ML), and data science infuse our daily lives, from the recommendation functionality on music apps to technologies that influence our healthcare, transport, education, defence, and more. What jobs will be affected by AL, ML, and data science remains to be seen, but it is increasingly clear that students will…
-

Introducing new artificial intelligence and machine learning projects for Code Clubs
Reading Time: 4 minutesWe’re pleased to share a new collection of Code Club projects designed to introduce creators to the fascinating world of artificial intelligence (AI) and machine learning (ML). These projects bring the latest technology to your Code Club in fun and inspiring ways, making AI and ML engaging and accessible for young people.…
-

Making fire detection more accurate with ML sensor fusion
Reading Time: 2 minutesThe mere presence of a flame in a controlled environment, such as a candle, is perfectly acceptable, but when tasked with determining if there is cause for alarm solely using vision data, embedded AI models can struggle with false positives. Solomon Githu’s project aims to lower the rate of incorrect detections with a multi-input…
-

This desk lamp automatically adjusts its brightness using AI on an Arduino UNO
Reading Time: 2 minutesWhen you hear about all of the amazing things being accomplished with artificial intelligence today, you probably assume that they require a massive amount of processing power. And while that is often true, there are machine learning models that can run on the edge — including on low-power hardware like microcontrollers. To…
-

Machine learning makes fabric buttons practical
Reading Time: 2 minutesThe entire tech industry is desperate for a practical wearable HMI (Human Machine Interface) right now. The most newsworthy devices at CES this year were the Rabbit R1 and the Humane AI Pin, both of which are attempts to streamline wearable interfaces with and for AI. Both have numerous drawbacks, as do…
-

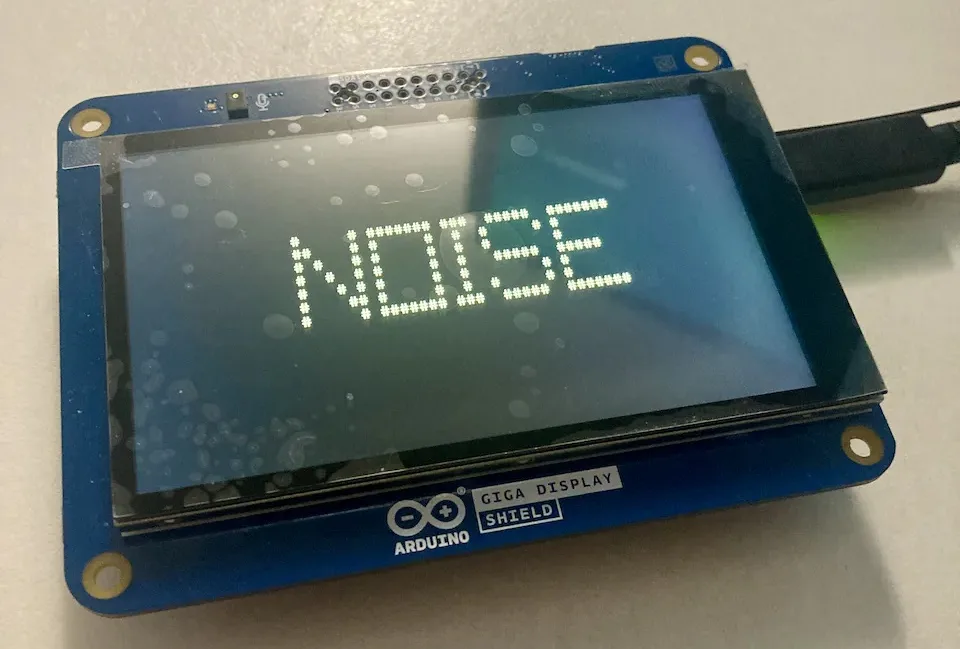
Classify nearby annoyances with this sound monitoring device
Reading Time: 2 minutesSoon after a police station opened near his house, Christopher Cooper noticed a substantial increase in the amount of emergency vehicle traffic and their associated noises even though local officials had promised that it would not be disruptive. But rather than write down every occurrence to track the volume of disturbances, he came up with…
-

The Experience AI Challenge: Find out all you need to know
Reading Time: 3 minutesWe’re really excited to see that Experience AI Challenge mentors are starting to submit AI projects created by young people. There’s still time for you to get involved in the Challenge: the submission deadline is 24 May 2024. If you want to find out more about the Challenge, join our live webinar…
-

Teaching about AI explainability
Reading Time: 6 minutesIn the rapidly evolving digital landscape, students are increasingly interacting with AI-powered applications when listening to music, writing assignments, and shopping online. As educators, it’s our responsibility to equip them with the skills to critically evaluate these technologies. A key aspect of this is understanding ‘explainability’ in AI and machine learning (ML)…
-

Classifying audio on the GIGA R1 WiFi from purely synthetic data
Reading Time: 2 minutesOne of the main difficulties that people encounter when trying to build their edge ML models is gathering a large, yet simultaneously diverse, dataset. Audio models normally require setting up a microphone, capturing long sequences of sounds, and then manually removing bad data from the resulting files. Shakhizat Nurgaliyev’s project, however, eliminates the…
-

Improving comfort and energy efficiency in buildings with automated windows and blinds
Reading Time: 2 minutesWhen dealing with indoor climate controls, there are several variables to consider, such as the outside weather, people’s tolerance to hot or cold temperatures, and the desired level of energy savings. Windows can make this extra challenging, as they let in large amounts of light/heat and can create poorly insulated regions, which…
-

Teaching an Arduino UNO R4-powered robot to navigate obstacles autonomously
Reading Time: 2 minutesThe rapid rise of edge AI capabilities on embedded targets has proven that relatively low-resource microcontrollers are capable of some incredible things. And following the recent release of the Arduino UNO R4 with its Renesas RA4M1 processor, the ceiling has gotten even higher as YouTuber Nikodem Bartnik has demonstrated with his lidar-equipped mobile robot. Bartnik’s…
-

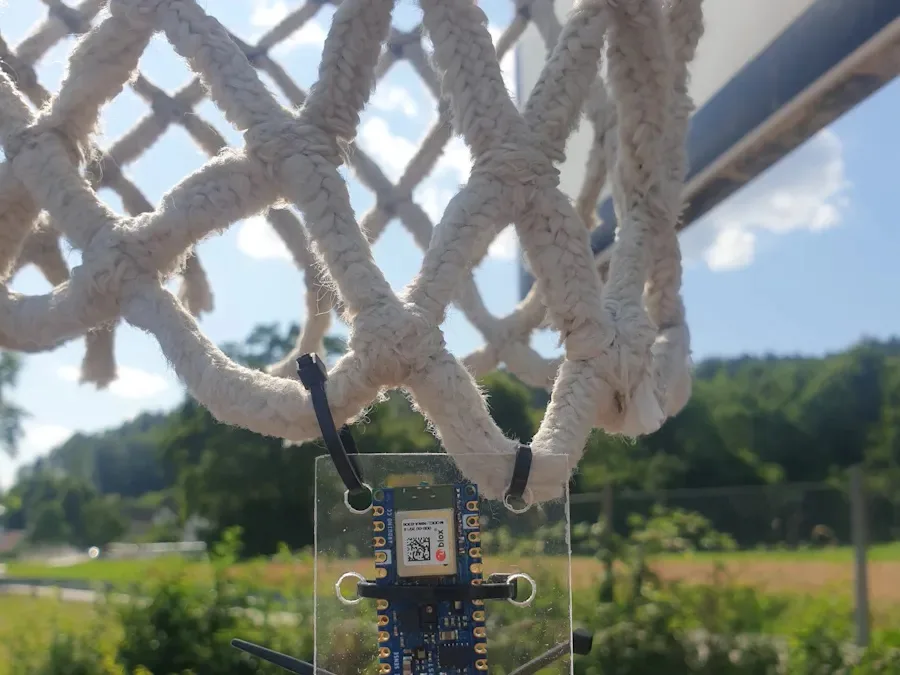
Nothin’ but (neural) net: Track your basketball score with a Nano 33 BLE Sense
Reading Time: 2 minutesWhen playing a short game of basketball, few people enjoy having to consciously track their number of successful throws. Yet when it comes to automation, nearly all systems rely on infrared or visual proximity detection as a way to determine when a shot has gone through the basket versus missed. This is…
-

Helping robot dogs feel through their paws
Reading Time: 2 minutesYour dog has nerve endings covering its entire body, giving it a sense of touch. It can feel the ground through its paws and use that information to gain better traction or detect harmful terrain. For robots to perform as well as their biological counterparts, they need a similar level of sensory…
-

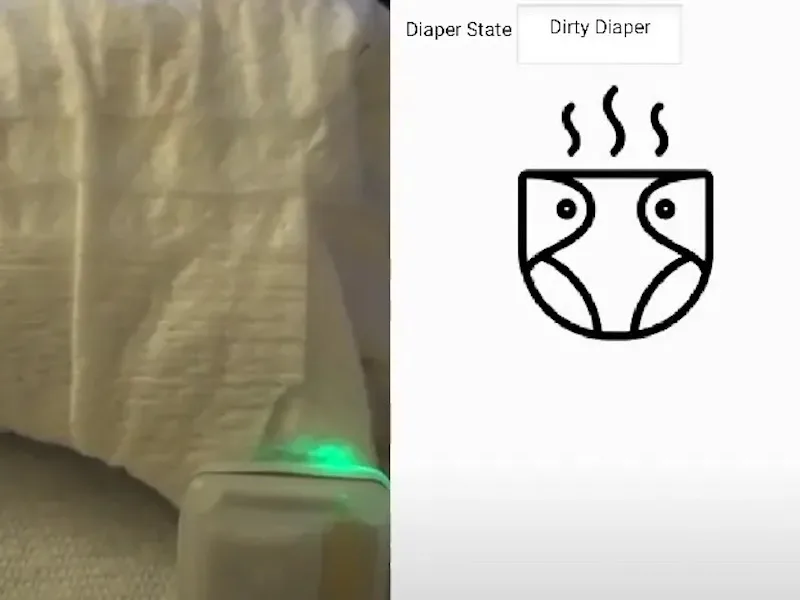
This smart diaper knows when it is ready to be changed
Reading Time: 2 minutesThe traditional method for changing a diaper starts when someone smells or feels the that the diaper has been soiled, and while it isn’t the greatest process, removing the soiled diaper as soon as possible is important for avoiding rashes and infections. Justin Lutz has created an intelligent solution to this situation by designing…
-
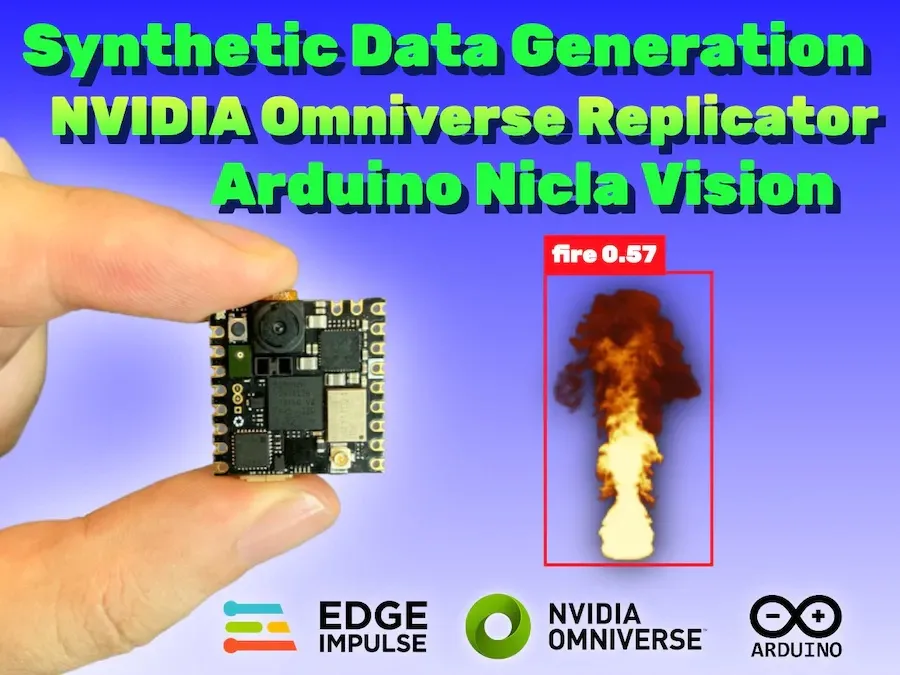
This Nicla Vision-based fire detector was trained entirely on synthetic data
Reading Time: 2 minutesDue to an ever-warming planet thanks to climate change and greatly increasing wildfire chances because of prolonged droughts, being able to quickly detect when a fire has broken out is vital for responding while it’s still in a containable stage. But one major hurdle to collecting machine learning model datasets on these…
-
Predicting soccer games with ML on the UNO R4 Minima
Reading Time: 2 minutesBased on the Renesas RA4M1 microcontroller, the new Arduino UNO R4 boasts 16x the RAM, 8x the flash, and a much faster CPU compared to the previous UNO R3. This means that unlike its predecessor, the R4 is capable of running machine learning at the edge to perform inferencing of incoming data.…
-

Intelligently control an HVAC system using the Arduino Nicla Vision
Reading Time: 2 minutesShortly after setting the desired temperature of a room, a building’s HVAC system will engage and work to either raise or lower the ambient temperature to match. While this approach generally works well to control the local environment, the strategy also leads to tremendous wastes of energy since it is unable to…
-

Meet Arduino Pro at tinyML EMEA Innovation Forum 2023
Reading Time: 3 minutesOn June 26th-28th, the Arduino Pro team will be in Amsterdam for the tinyML EMEA Innovation Forum – one of the year’s major events for the world where AI models meet agile, low-power devices. This is an exciting time for companies like Arduino and anyone interested in accelerating the adoption of tiny…
-

How we’re learning to explain AI terms for young people and educators
Reading Time: 6 minutesWhat do we talk about when we talk about artificial intelligence (AI)? It’s becoming a cliche to point out that, because the term “AI” is used to describe so many different things nowadays, it’s difficult to know straight away what anyone means when they say “AI”. However, it’s true that without a…
-

This AI system helps visually impaired people locate dining utensils
Reading Time: 2 minutesPeople with visual impairments also enjoy going out to a restaurant for a nice meal, which is why it is common for wait staff to place the salt and pepper shakes in a consistent fashion: salt on the right and pepper on the left. That helps visually impaired diners quickly find the…
-
Enabling automated pipeline maintenance with edge AI
Reading Time: 2 minutesPipelines are integral to our modern way of life, as they enable the fast transportation of water and energy between central providers and the eventual consumers of that resource. However, the presence of cracks from mechanical or corrosive stress can lead to leaks, and thus waste of product or even potentially dangerous…