Schlagwort: boing

  • Play Pong with ultrasonic sensors and a Raspberry Pi | HackSpace magazine

    Play Pong with ultrasonic sensors and a Raspberry Pi | HackSpace magazine

    Reading Time: 4 minutes

    Day three of our Pong celebration leads us here, to HackSpace magazine’s ultrasonic hack of Eben’s Code the Classics Pong tribute, Boing!

    If you haven’t yet bought your copy of Code the Classics, you have until 11:59pm GMT tonight to get £1 off using the discount code PONG. Click here to visit the Raspberry Pi Press online store to secure your copy, and read on to see how you can use ultrasonic sensors to turn this classic game into something a lot more physical.

    Over to the HackSpace magazine team…

    Code the Classics is an entertaining book for a whole bunch of reasons, but one aspect of it that is particularly exciting to us makers is that it means there are some games out there that are really fun to play, but also written to be easy to understand and have high-quality game art to go along with them. Why does this excite us as makers? Because it makes them ideal candidates for testing out novel DIY games controllers!

    Pong

    We’re going to start right at the beginning of the book (and also at the beginning of computer game history) with the game Pong. There’s a great chapter on this seminal game in the book, but we’ll dive straight into the source code of our Boing! tribute game. This code should run on any computer with Python 3 (and a few dependencies) installed, but we’ll use a Raspberry Pi, as this has GPIO pins that we can use to add on our extra controller.

    Download the code here by clicking the ‘Clone or download’ button, and then ‘Download ZIP’. Unzip the downloaded file, and you should have a directory called Code‑The‑Classics-master, and inside this, a directory called boing-master.

    Open a terminal and navigate to this directory, then run:

    python3 boing.py

    If everything works well, you’ll get a screen asking you to select one or two players – press SPACE to confirm your selection, and have a play.

    Hacking Code the Classics

    So that’s how Eben Upton designed the game to be played. Let’s put our own spin on it. Games controllers are basically just sensors that take input from the real world in some way and translate that into in-game actions. Most commonly, these sensors are buttons that you press, but there’s no need for that to be the case. You can use almost any sensor you can get input from – it sounds trite, but the main limitation really is your imagination!

    We were playing with ultrasonic distance sensors in the last issue of HackSpace magazine, and this sprung to mind a Pong controller. After all, distance sensors measure in one dimension and Pong bats travel in one dimension.

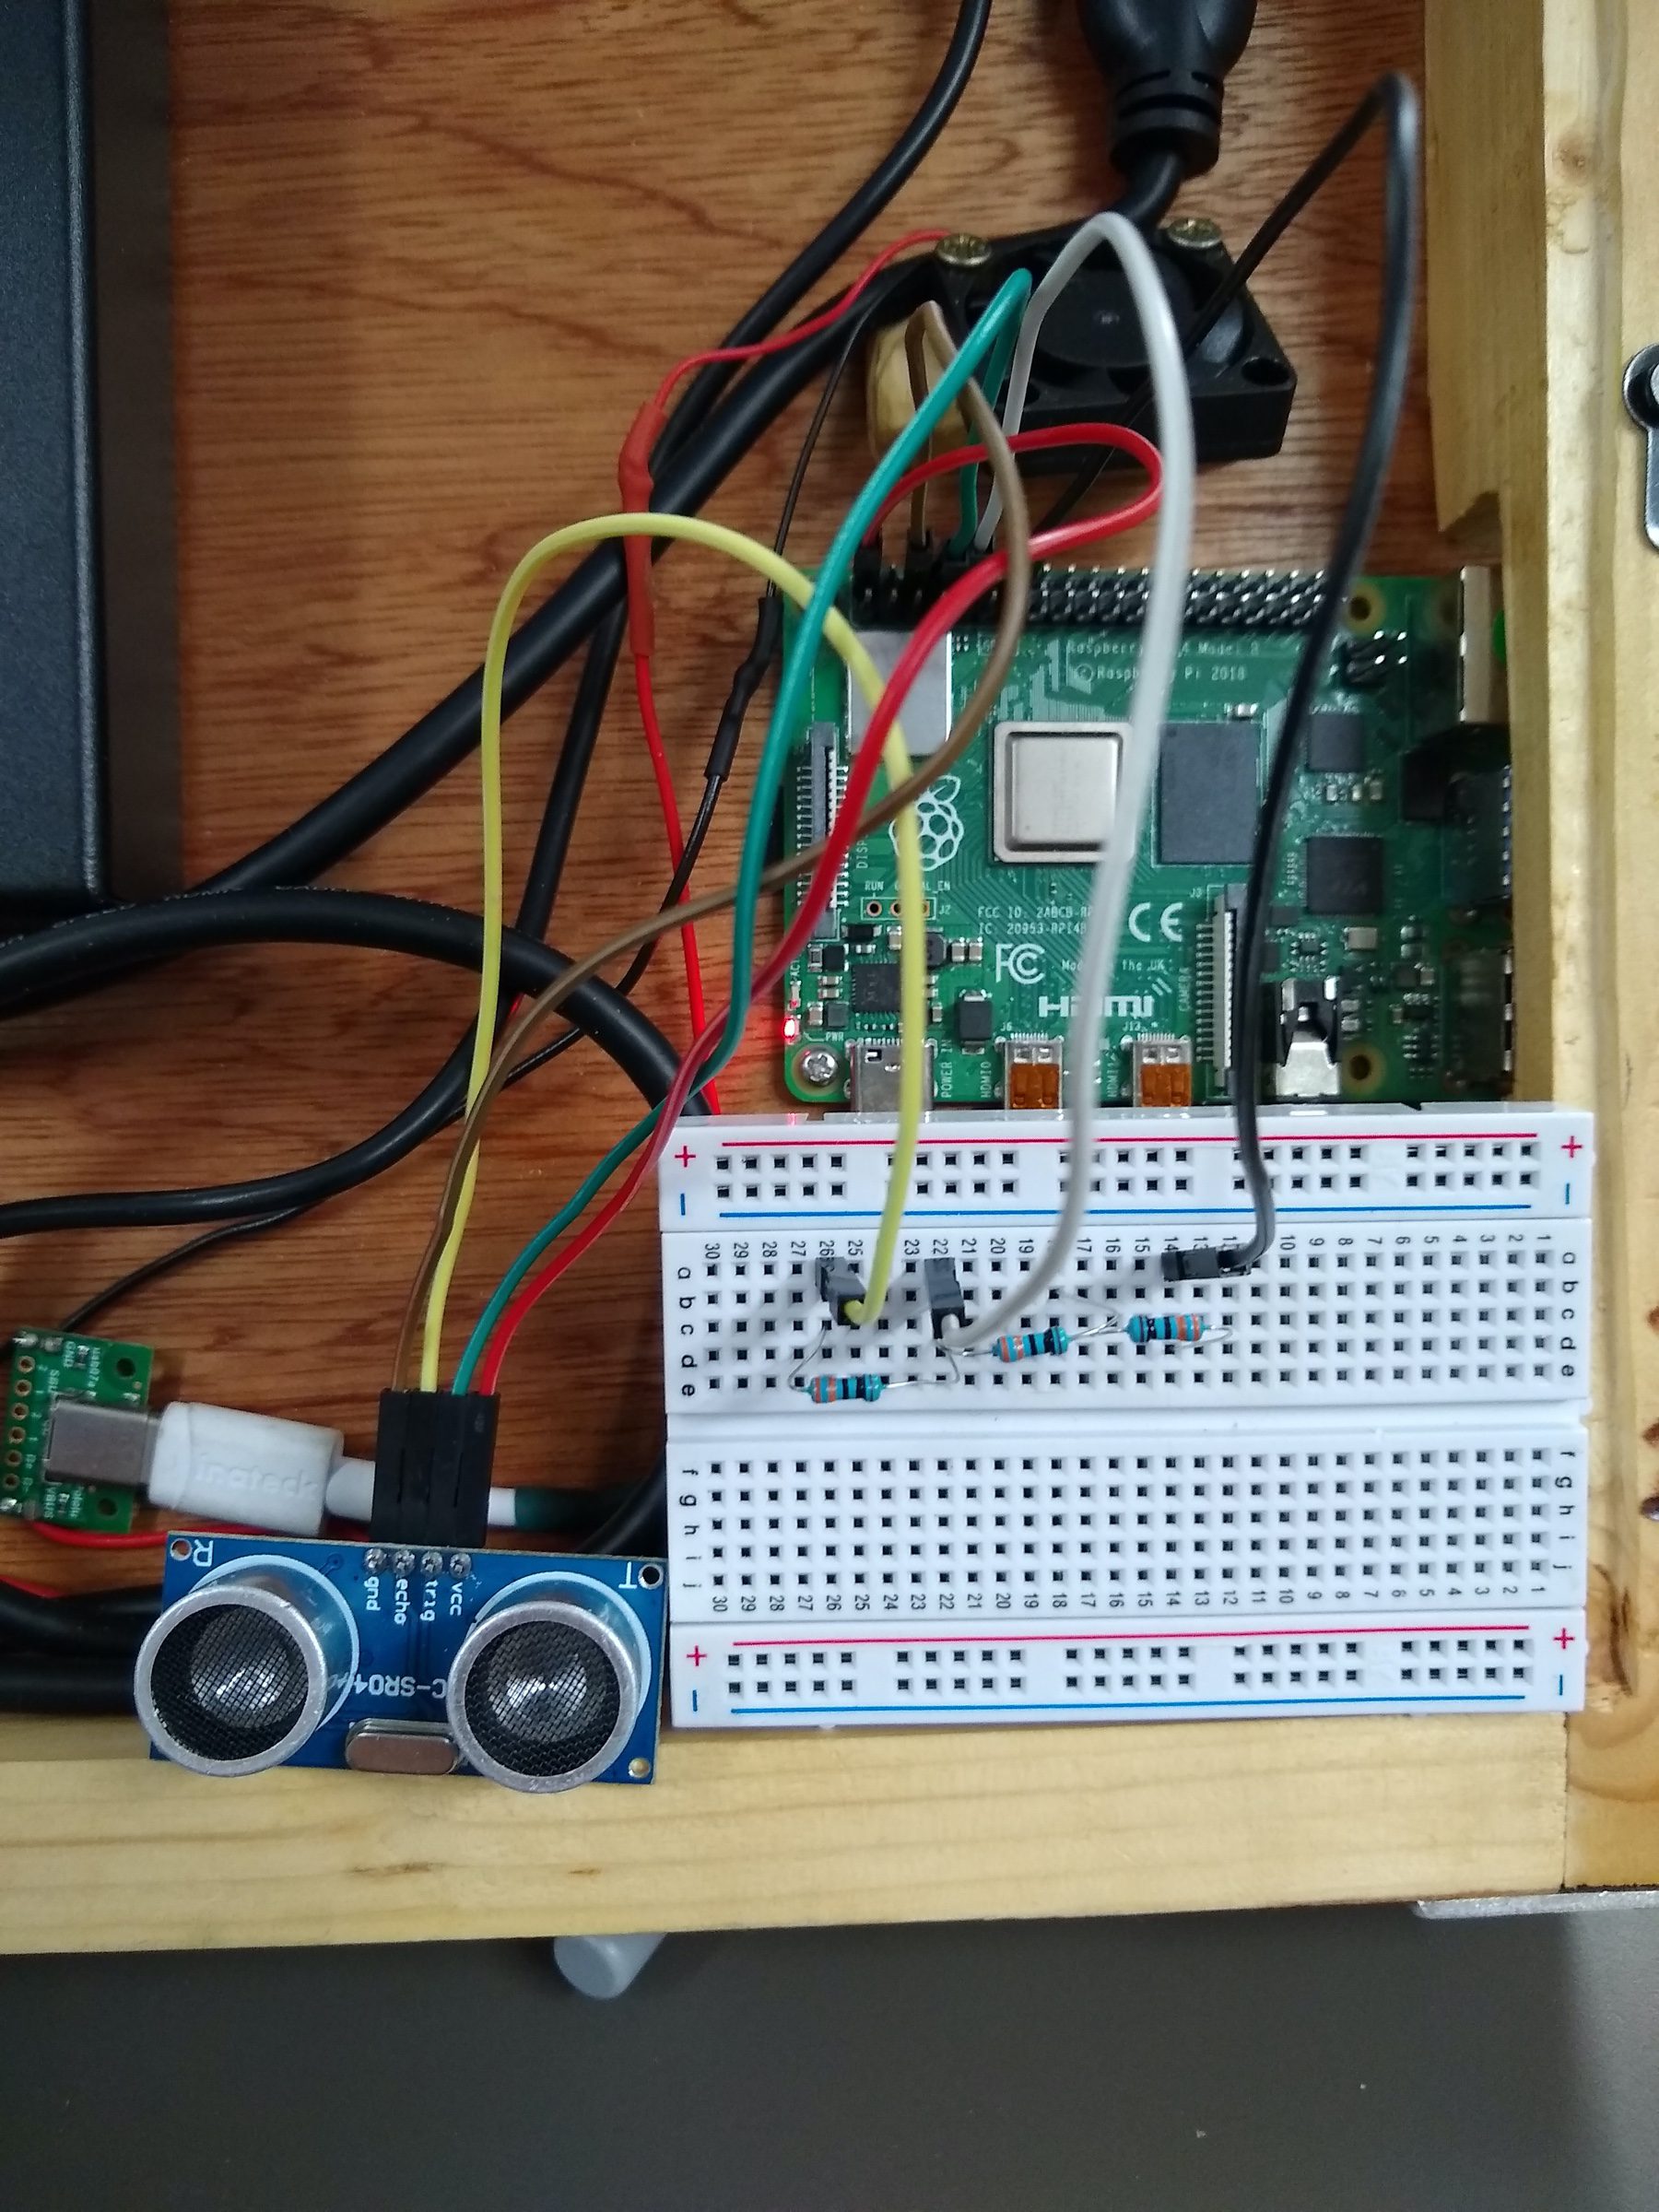
    Last issue we learned that the main challenge when using the cheap HC-SR04 sensors with 3.3V devices is that they use 5V, so we need to reduce their output to 3.3V. A simple voltage divider does the trick, and we used three 330Ω resistors to achieve this – see Figure 1 for more details.

    There’s support for these sensors in the GPIO Zero Python library. As a simple test, you can obtain the distance with the following Python code:

    import gpiozero import time sensor = gpiozero.DistanceSensor(echo=15,trigger=14) while True: print(sensor.distance) time.sleep(0.1)

    That will give you a constant read-out of the distance between the ultrasonic sensor and whatever object is in front of it. If you wave your hand around in front of the sensor, you’ll see the numbers changing from 0 to 1, which is the distance in metres.

    So far, so straightforward. We only need to add a few bits to the code of our Boing! game to make it interact with the sensor. You can download an updated version of Boing! here, but the changes are as follows.

    Add this line to the import statements at the top:

    import gpiozero

    Add this line to instantiate the distance sensor object at the end of the file (just before pgzrun.go()):

    p1_distance = DistanceSensor(echo=15,trigger=14,queue_len=5)

    We added the queue_len parameter to get the distances through a little quicker.

    Finally, overwrite the p1_controls function with the following:

    def p1_controls(): move = 0 distance = p1_distance.distance print(distance) if distance < 0.1: move = PLAYER_SPEED elif distance > 0.2: move = -PLAYER_SPEED return move

    This uses the rather arbitrary settings of 10 cm and 20 cm to define whether the paddle moves up or down. You can adjust these as required.

    That’s all there is to our ultrasonic Pong. It’s great fun to play, but there are, no doubt, loads of other versions of this classic game you can make by adding different sensors. Why not see what you can come up with?

    Code the Classics

    Today is the last day to get £1 off Code the Classics with the promo code PONG, so visit the Raspberry Pi Press online store to order your discounted copy before 11:59pm GMT tonight.

    You can also download Code the Classics as a free PDF here, but the book, oh, the book – it’s a marvellous publication that deserves a physical presence in your home.

    Website: LINK

  • Create Boing!, our Python tribute to Pong

    Create Boing!, our Python tribute to Pong

    Reading Time: 7 minutes

    Following on from yesterday’s introduction to Pong, we’re sharing Boing!, the Python-based tribute to Pong created by Eben Upton exclusively for Code the Classics. Read on to get a detailed look at the code for Boing!

    You can find the download link for the Boing! code in the Code the Classics book, available now in a variety of formats. Be sure to stick with today’s blog post until the end, for a special Code the Classics offer.

    From Pong to Boing!

    To show how a game like Pong can be coded, we’ve created Boing! using Pygame Zero, a beginner-friendly tool for making games in Python. It’s a good starting point for learning how games work – it takes place on a single screen without any scrolling, there are only three moving objects in the game (two bats and a ball), and the artificial intelligence for the computer player can be very simple – or even non-existent, if you’re happy for the game to be multiplayer only. In this case, we have both single-player and two-player modes.

    The code can be divided into three parts. First, there’s the initial startup code. We import from other Python modules so we can use their code from ours. Then we check to make sure that the player has sufficiently up-to-date versions of Python and Pygame Zero. We set the WIDTH and HEIGHT variables, which are used by Pygame Zero when creating the game window. We also create two small helper functions which are used by the code.

    The next section is the largest. We create four classes: Impact, Ball, Bat, and Game. The first three classes inherit from Pygame Zero’s Actor class, which amongst other things keeps track of an object’s location in the game world, and takes care of loading and displaying sprites. Bat and Ball define the behaviour of the corresponding objects in the game, while Impact is used for an animation which is displayed briefly whenever the ball bounces off something. The Game class’s job is to create and keep track of the key game objects, such as the two bats and the ball.

    Further down, we find the update and draw functions. Pygame Zero calls these each frame, and aims to maintain a frame rate of 60 frames per second. Gameplay logic, such as updating the position of an object or working out if a point has been scored, should go in update, while in draw we tell each of the Actor objects to draw itself, as well as displaying backgrounds, text, and suchlike.

    Our update and draw functions make use of two global variables: state and game. At any given moment, the game can be in one of three states: the main menu, playing the game, or the game-over screen. The update and draw functions read the state variable and run only the code relevant to the current state. So if state is currently State.MENU, for example, update checks to see if the SPACE bar or the up/down arrows are pressed and updates the menu accordingly, and draw displays the menu on the screen. The technical term for this kind of system is ‘finite state machine’.

    The Game class’s job is to create and keep track of the key game objects

    The game variable references an instance of the Game class as described above. The __init__ (constructor) method of Game optionally receives a parameter named controls. When we create a new Game object for the main menu, we don’t provide this parameter and so the game will therefore run in attract mode – in other words, while you’re on the main menu, you’ll see two computer-controlled players playing against each other in the background. When the player chooses to start a new game, we replace the existing Game instance with a new one, initialising it with information about the controls to be used for each player – if the controls for the second player are not specified, this indicates that the player has chosen a single-player game, so the second will be computer-controlled.

    Two types of movement

    In Boing!, the Bat and Ball classes inherit from Pygame Zero’s Actor class, which provides a number of ways to specify an object’s position. In this game, as well as games in later chapters, we’re setting positions using the x and y attributes, which by default specify where the centre of the sprite will be on the screen. Of course, we can’t just set an object’s position at the start and be done with it – if we want it to move as the game progresses, we need to update its position each frame. In the case of a Bat, movement is very simple. Each frame, we check to see if the relevant player (which could be a human or the computer) wants to move – if they do, we either subtract or add 4 from the bat’s Y coordinate, depending on whether they want to move up or down. We also ensure that the bat does not go off the top or bottom of the screen. So, not only are we only moving along a single axis, our Y coordinate will always be an integer (i.e. a whole number). For many games, this kind of simple movement is sufficient. Even in games where an object can move along both the X and Y axes, we can often think of the movement along each axis as being separate. For example, in the next chapter’s game, Cavern, the player might be pressing the right arrow key and therefore moving along the X axis at 4 pixels per frame, while also moving along the Y axis at 10 pixels per frame due to gravity. The movement along each axis is independent of the other.

    Able to move at any angle, the ball needs to move at the same speed regardless of its direction

    For the Ball, things get a bit more complicated. Not only can it move at any angle, it also needs to move at the same speed regardless of its direction. Imagine the ball moving at one pixel per frame to the right. Now imagine trying to make it move at a 45° angle from that by making it move one pixel right and one pixel up per frame. That’s a longer distance, so it would be moving faster overall. That’s not great, and that’s before we’ve even started to think about movement in any possible direction.

    The solution is to make use of vector mathematics and trigonometry. In the context of a 2D game, a vector is simply a pair of numbers: X and Y. There are many ways in which vectors can be used, but most commonly they represent positions or directions.

    You’ll notice that the Ball class has a pair of attributes, dx and dy. Together these form a vector representing the direction in which the ball is heading. If dx and dy are 1 and 0.5, then each time the ball moves, it’ll move by one pixel on the X axis and a half a pixel on the Y axis. What does it mean to move half a pixel? When a sprite is drawn, Pygame Zero will round its position to the nearest pixel. So the end result is that our sprite will move down the screen by one pixel every other frame, and one pixel to the right every frame (Figure 1).

    We still need to make sure that our object moves at a consistent speed regardless of its direction. What we need to do is ensure that our direction vector is always a ‘unit vector’ – a vector which represents a distance of one (in this case, one means one pixel, but in some games it will represent a different distance, such as one metre). Near the top of the code you’ll notice a function named normalised. This takes a pair of numbers representing a vector, uses Python’s math.hypot function to calculate the length of that vector, and then divides both the X and Y components of the vector by that length, resulting in a vector which points in the same direction but has a length of one (Figure 2).

    Vector maths is a big field, and we’ve only scratched the surface here. You can find many tutorials online, and we also recommend checking out the Vector2 class in Pygame (the library on top of which Pygame Zero is built).

    Try Boing!

    Update Raspbian to try Boing! and other Code the Classics games on your Raspberry Pi.

    The full BOING! tutorial, including challenges, further explanations, and a link to the downloadable code can be found in Code the Classics, the latest book from Raspberry Pi Press.

    We’re offering £1 off Code the Classics if you order it before midnight tomorrow from the Raspberry Pi Press online store. Visit the store now, or use the discount code PONG at checkout if you make a purchase before midnight tomorrow.

    As always, Code the Classics is available as a free PDF from the Wireframe website, but we highly recommend purchasing the physical book, as it’s rather lovely to look at and would make a great gift for any gaming and/or coding enthusiast.

    Website: LINK

  • 8 Pictures, Video of the Futuristic Boeing 777X with Folding Wings

    8 Pictures, Video of the Futuristic Boeing 777X with Folding Wings

    Reading Time: < 1 minute

    Boeing has just revealed its latest airliner, the 777X, at the 2013 Dubai Airshow. It’s the first by the company to boast folding wing-tips (based on the 787 Dreamliner), which increase wingspan and, as a result, fuel efficiency, without limiting airport access. The 777X will be both the largest and most efficient twin-engine jet in the world. This model will be powered by GE’s GE9X engine.

    241w4Qk

    Here’s what Boeing Commercial Airplanes President and CEO Ray Conner has to say about the aircraft: „The airplane will build on the market-leading 777 and will provide superior operating economics. The airplane will be 12 percent more fuel efficient than any competing airplane.“ The company has already received a reported 342 orders for the new aircraft.

    Official Source: http://www.gizmag.com/boeing-launches-777x/29818/

    http://www.youtube.com/watch?v=Fop6Qu2CN0E#t=0