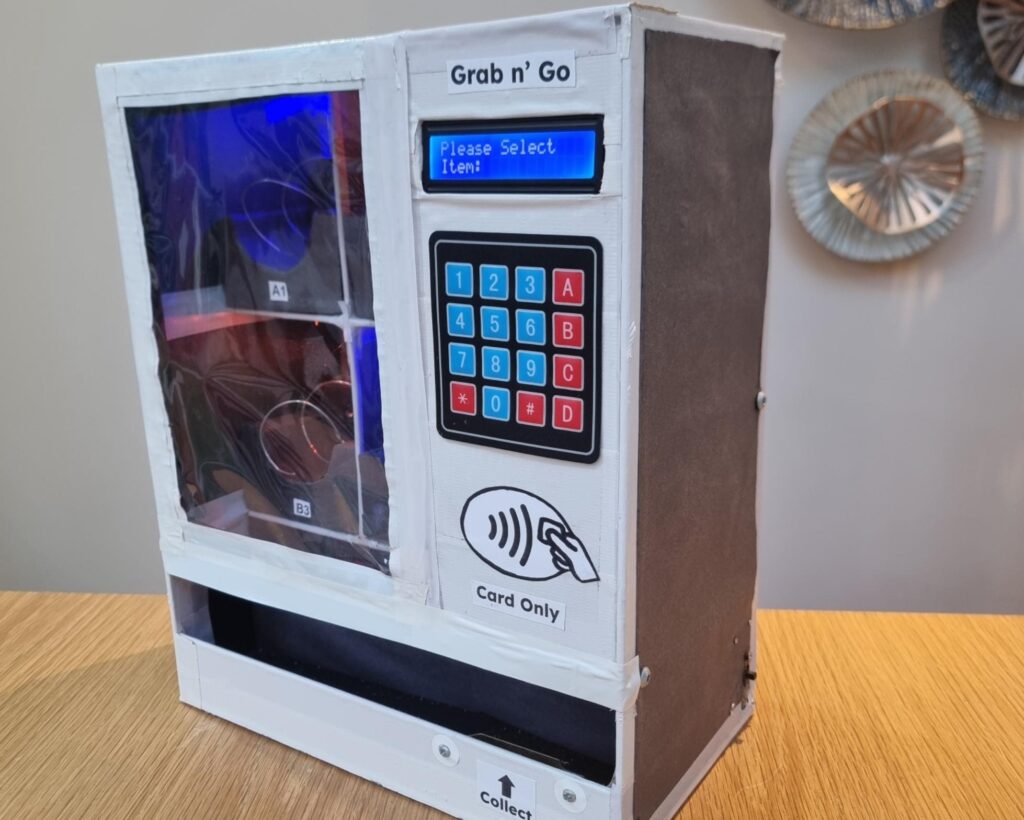
Have you ever wanted your very own vending machine? If so, you likely found that they’re expensive and too bulky to fit in most homes. But now you can experience vending bliss thanks to this miniature vending machine designed by m22pj, which you can craft yourself using an Arduino and other materials lying around the house.
This project is fun, because it gives makers the opportunity to experiment with vending machine features without a big budget. That even includes more modern payment options, like one might see on a college campus with vending machine that charge to student identification cards. This design lets DIYers work with those features to learn about RFID, security, and more. And, of course, this is a chance to get hands-on experience with vending mechanisms, too.
The best part is that you can build this with some cardboard and off-the-shelf electronic components. The enclosure and almost all of the mechanical parts are cardboard. The electronics include an Arduino Mega 2560 board, a keypad, an RFID reader module, LEDs, and servo motors. The servos must be full-rotation models, so they can drive the vending mechanisms.
As designed, this vending machine can serve up to four different treats. But it would be possible to expand that to include many more. The Arduino has plenty of pins available to control additional servo motors, so the sky is the limit.
Total solar eclipses are rare — at least from the perspective of any specific point on the planet. A total eclipse will occur somewhere on Earth once every 18 months or so, but that is more likely to track across the middle of the Pacific Ocean than wherever you happen to be. That made Bernd Kraus feel like he was missing out, so he used an Arduino to build this machine that produces a personal solar eclipse every day.
This is a kind of robot that can move a cutout of the moon to any point on the 2D plane of Kraus’s window. Like the sun and actual moon, the size relationship is important and the cutout is the precise diameter necessary to block the sun. And also like the real deal, the position of the viewer is important. Luckily, Kraus tends to sit in the exact same location whenever he is in that room and the sun’s path (or, rather, Earth’s rotation and orbit) is predictable. A bit of fancy math is all it takes to determine where to place the cutout to project a shadow over the area where Kraus’s face should be.
The hardware of the robot consists of two stepper motors, a solar panel with charger, an 18650 lithium battery, an HM-10 module, and an Arduino Nano board to control everything. The solar panel attaches to the back side of the moon cutout so it gets good exposure. It sends power up through the wires from which it hangs. The Arduino receives position data from Kraus’s smartphone via Bluetooth, calculates the point where the cutout should be, and then moves the cutout to that point using the two stepper motors.
School’s out for summer – at least for most of us. While the majority of children (and teachers!) will probably be breathing a huge sigh of relief, parents face a new challenge: how to keep kids engaged during the long break. Of course, downtime is important, but there are also loads of fun ways to keep those brains fired up and prevent the summer slide.
As we explain in this article, incorporating STEAM education (Science, Technology, Engineering, Arts, and Mathematics) into your child’s summer routine is a great place to start. Read on for our top tips for success, along with some interesting summer STEAM activities to try at home.
The benefits of STEAM education
As most parents will know, STEAM education has numerous benefits for children of all ages. In addition to stimulating their natural curiosity and creativity, it helps to build critical thinking and problem-solving skills. STEAM activities also allow kids to understand how scientific theory applies to real-world applications and scenarios. This makes the learning experience more relevant and enjoyable. Who knows, it might even spark a lifelong passion for STEAM or open their eyes to potential future careers.
With so much to offer, it’s no wonder STEAM education has become an integral part of the curriculum. But that doesn’t mean you have to keep it to the classroom.You can bring STEAM learning to life at home too. And with the extended summer break now upon us, there’s never been a better time to give it a go!
Exploring STEAM at home: advice for parents
Whether you’re a parent/carer to an enthusiastic elementary-aged youngster or a fiercely independent middle schooler, here are six practical tips for you:
1. Prioritize interactive activities
Hands-on projects are always popular with kids, regardless of age. To make STEAM education as interesting as possible, choose interactive projects that encourage children to get stuck in. Classic summer STEAM activities like making bath bombs, a volcano or a lava lamp are all great examples – just be prepared for things to get messy!
2. Let children take the lead
Where possible, give children the freedom to explore STEAM activities independently. This is an excellent way to build their self-confidence and problem-solving skills, which will serve them in the future. While younger children may need support, you can still encourage open-ended play. Their creativity and ingenuity might just surprise you.
3. Try a new activity together
Although independent exploration is important, collaborating on a STEAM project with your child can be equally beneficial. As well as being an ideal bonding opportunity, tackling something new together also shows children how it’s possible to work through challenges and new situations. This popular egg drop challenge might be a good option if you really want to test your problem-solving abilities and don’t mind the inevitable clean-up afterwards!
4. Opt for something tangible
In today’s digital world, pick an activity that lets kids play with a physical object. The Arduino Alvik robot is perfect for starting a coding journey with your kids. It provides hands-on experience as they build their own robot – whether it’s an automated mug delivery car, an autonomous patrol vehicle, or even a customized moon rover.
5. Make the connection to the real world
You only have to glance around your home to see STEAM in practice. Why not encourage your teenager to explore this further with our Oplà IoT Kit? The kit comes with eight IoT projects that demonstrate how to make everyday appliances smart. Older children can easily control them with a mobile app. Plus, they have access to all the advanced features of Arduino Cloud to easily control their projects in a single platform.
6. Connect activities to your child’s interests
Another way to stimulate an interest in STEAM is to relate it to something your child already enjoys, such as coding, baking, sports, gaming, music etc. Find hands-on activities that demonstrate how their passion relates to key STEAM concepts. For example, this Bluetooth-controlled LEGO® toy car project is ideal for introducing LEGO®-loving kids to the basics of electronics. Meanwhile, music fans might want to try making and playing their own keyboard with the Arduino Starter Kit.
Experimenting with STEAM education at home helps to keep children’s minds active and engaged over the long summer break. Just remember that the goal is for them to have fun, play and explore – anything else is a bonus. So be patient, flexible, and supportive, and celebrate the process of discovery and learning together.
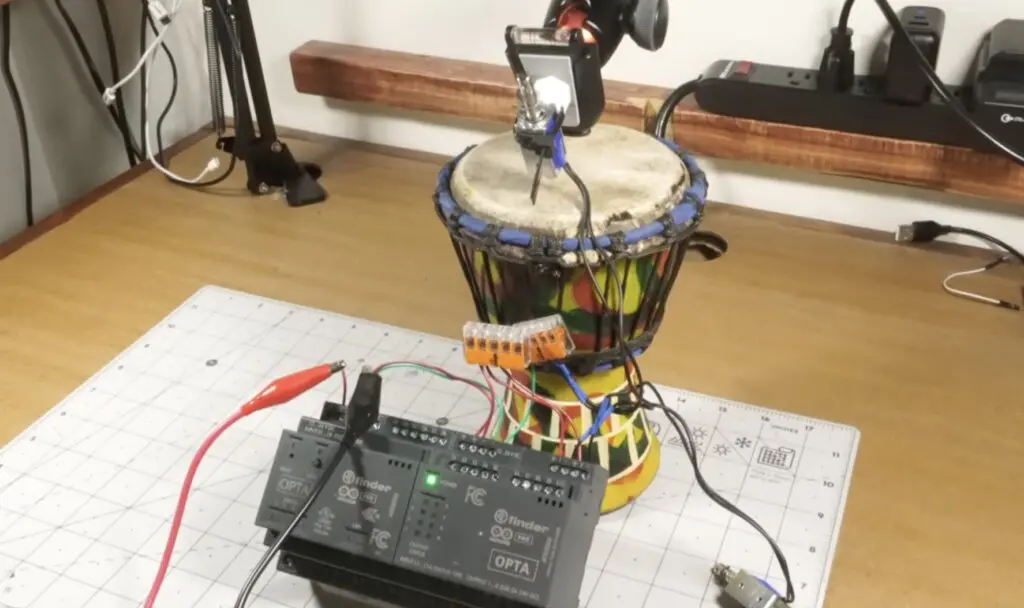
Makers have long asked the question “why bother with an expensive PLC when I can just use an Arduino?” The answer comes down to the priorities and needs of industrial clients. In a factory automation setting, the client will prioritize durability, reliability, and serviceability over the one-time purchase price of the device itself. But to prove that Arduino’s professional turnkey solutions are just as easy to use as their developer-focused educational counterparts, Jeremy Cook leveraged an Arduino Opta micro PLC to build a drum machine.
This isn’t any old drum machine that plays sound samples or synthesized notes, but rather a robotic drum machine that makes noise by banging on stuff like a true percussion instrument. Cook could have built this with any Arduino board and a few relays, but instead chose to implement the Opta and new Opta Digital Expansion. That is robust enough for serious commercial and industrial applications, but is still simple to program with the familiar Arduino IDE. Programmers can also use conventional PLC languages if they prefer.
In this case, Cook made noise with relays and solenoids. The Opta has four built-in relays and Cook’s sketch flips one of them to make a sound analogous to a hi-hat. Cook added an Arduino Pro Opta Ext D1608S module with its solid-state relays for the other two “drums.” One of those fires a solenoid that taps a small hand drum (the kick drum sound), while the other controls a solenoid that hits a power supply enclosure (the snare sound).
Together, those three sounds can cover the basics of a drum track. Cook’s sketch is a drum sequencer program that stores each sound sequence as array, looping through them until turned off.
An Opta may be overkill for a project like this one, but this does a great job of demonstrating the ease at which an Arduino user can transition to professional PLC work.
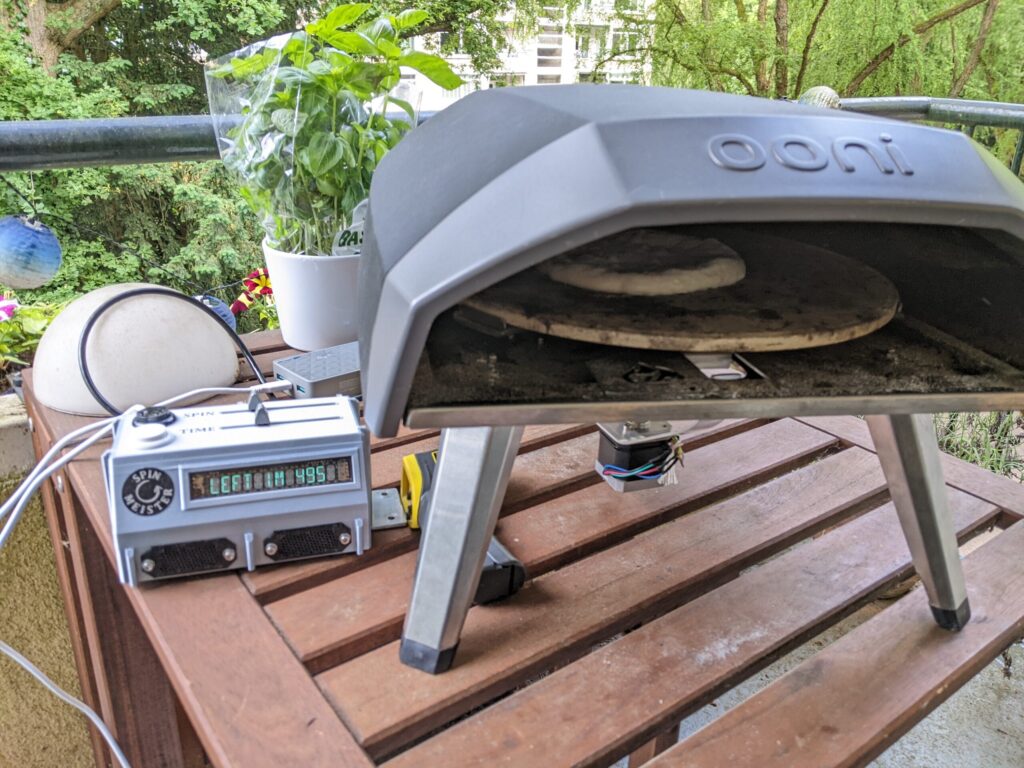
Dedicated pizza ovens are all the rage right now, as they provide a better-distributed and higher heat that many find more preferable than a conventional kitchen oven. But even a nice gas-powered pizza oven like the Ooni Koda 12 will have some hot spots and cold spots. To get an even bake every time, Yvo de Haas designed the Spin Meister rotation controller for the Ooni Koda 12 pizza oven.
The Spin Meister is a DIY device that controls the rotation of a pizza stone in the oven. The Ooni Koda 12 doesn’t come with any hardware to spin the pizza, so it is susceptible to uneven cooking. With the Spin Meister, the user can set a specific rotation speed and time to ensure that the pizza moves constantly and cooks consistently.
An Arduino Nano R3 board controls a stepper motor through a TMC2100 drive. That stepper motor’s shaft goes through the bottom of the oven to the pizza stone, which sits on a Lazy Susan-style turntable bearing. To avoid heat damage, the Arduino and other electronic components sit in a 3D-printed enclosure that the user can place a couple of feet away from the oven.
The controls consist of two buttons and two linear potentiometer sliders — one set for spin, the other for time. The status and time information shows up on a bright 12-digit vacuum fluorescent display (VFD). Power comes from a USB battery back, so users can cook anywhere. Finally, a DFRobot DFPlayer Mini MP3 player gives the Spin Meister the ability to play sound effects, like button press tones and a timer alarm.
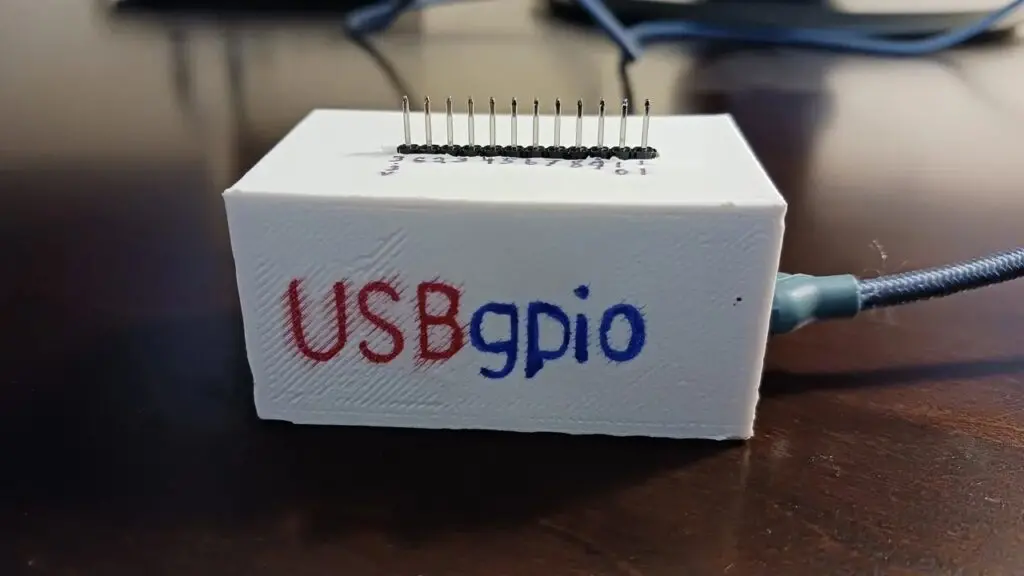
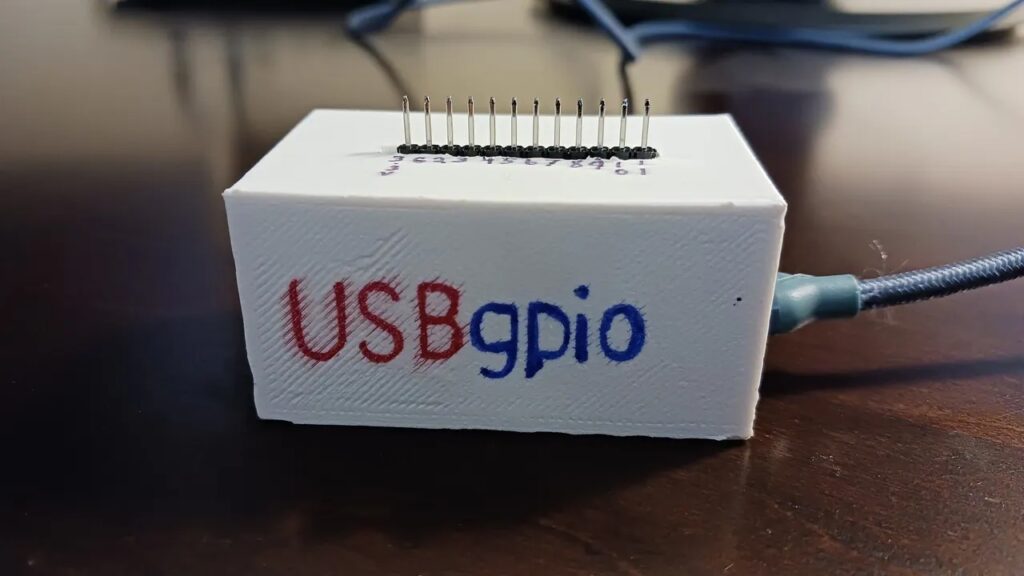
Let’s say that, hypothetically, you wanted to use your computer to blink an LED or read the state of a button. Could you? Almost certainly not — at least not without additional hardware. Most modern computers don’t provide any interface for direct interaction with low-level components. That’s why Nick Bild developed a device called USBgpio that lets users easily add Python-controlled GPIO pins to any computer.
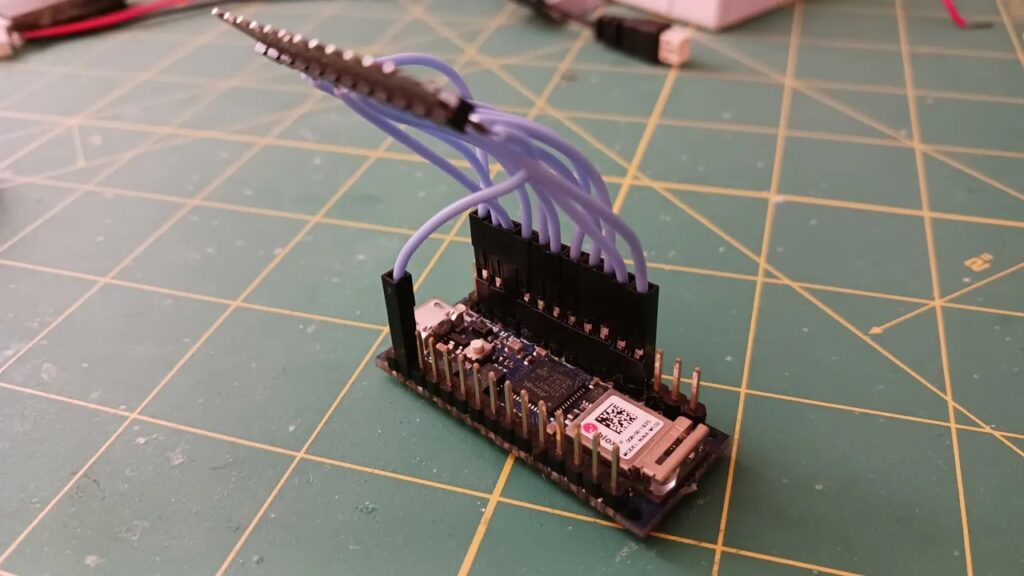
USBgpio connects to any modern PC via USB. It has a row of exposed GPIO pins and users can control their states programmatically using Python. If you noticed that this sounds a lot like connecting an Arduino board to a computer, then you’re most of the way to understanding the concept. That’s because the enclosure does, indeed, contain a Nano 33 IoT. The header pins on the top of the USBgpio device connect directly to their counterparts on the Arduino.
This provides utility (beyond the Arduino alone) because of the sketch that accepts serial commands sent by Python code. By using the USBgpio library, a user can set the state of any of the GPIO pins with a simple command. Of course, it is also possible to read the value of a pin.
Instead of flashing a new sketch to the Arduino every time they want to do something, a user can run a Python script directly on their computer. Or they can send commands in real-time using a Python interpreter. This provides an interesting interaction style that may appeal more to some users than traditional workflows.
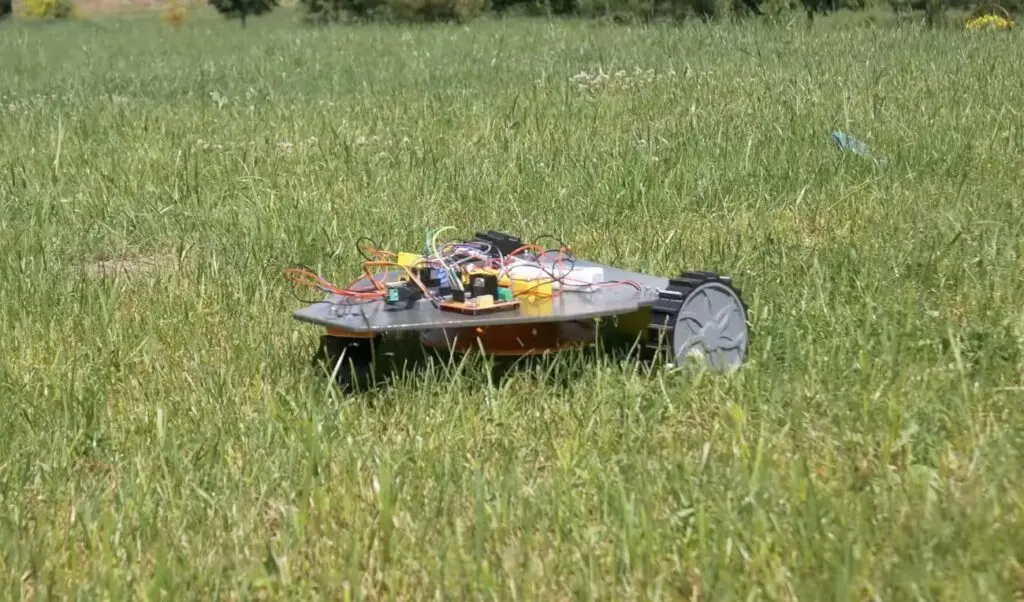
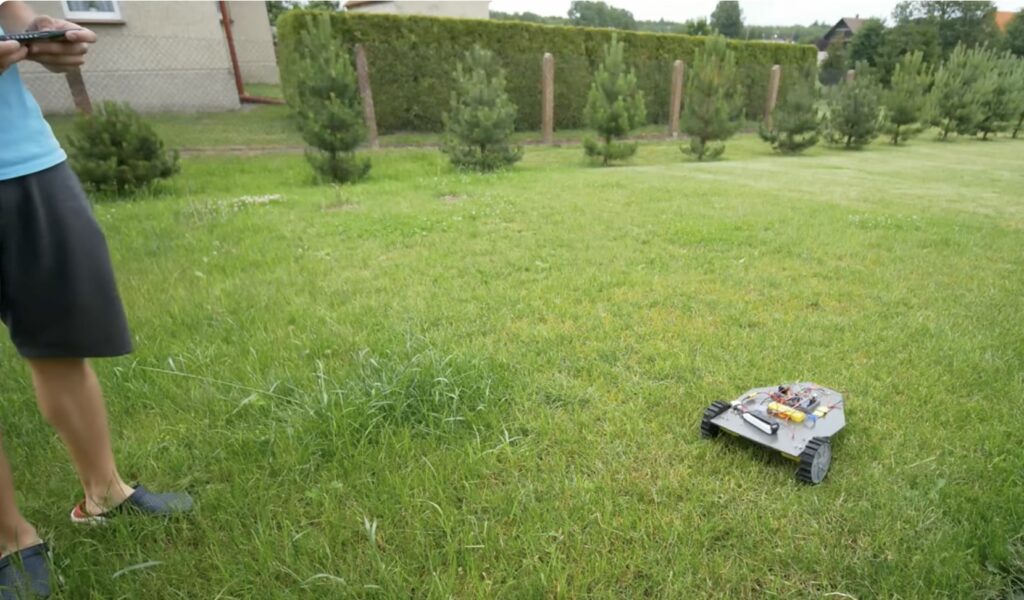
We’re finally starting to see robotic lawn mowers gain a little bit of traction as prices come down and consumer trust goes up. They work a bit like Roomba vacuums and pathfinding sophistication varies from one model to the next. But even the most basic models are still a lot more expensive than their secondhand gasoline powered cousins. So, Nikodem Bartnik decided to cut costs by making his DIY lawn mower robot very small.
To keep this prototype simple and affordable, Bartnik decided not to bother with any kind of mapping, pathfinding, object avoidance, or perimeter detection capabilities. It has no autonomous navigation features and instead the user must control the robot themselves. But sitting on a chair in the shade is still a lot better than pushing around a heavy lawn mower. Though the robot is only about the size of a dinner plate, so mowing an entire lawn will take a while.
Bartnik constructed the robot out of a sheet of plywood and 3D-printed parts. It has two driven wheels and each is turned by a small geared DC motor. The third wheel on the front is a caster that spins freely. An Arduino UNO Rev3 board controls both of those, as well as the brushless DC motor that spins the blades. Those blades swivel where they attach to the central hub, so centrifugal force causes them to swing outwards. Finally, the Arduino can communicate with the user’s smartphone through an HC-05 module for remote operation.
This won’t rival your dad’s zero-turn mower when it comes to power, but that wasn’t Bartnik’s intention. Instead, he sees it as a machine for giving the lawn a light trim every day or two before it can get too long. It’s slow, but that won’t be an issue if Bartnik implements autonomous navigation in the future.
Digital manufacturing consultancy and solutions provider, Axiom Manufacturing Systems, based in the United States, has recently joined our System Integrators Partnership Program. As Gold-level partners, Axiom will supercharge their mission – to empower manufacturers to rapidly transform their operations through the practical adoption of digital technologies – with Arduino’s versatility, developing custom solutions for clients of all sizes.
The partnership is born out of a solid foundation of shared goals and values, which seem to naturally intertwine educational inspiration and industrial needs.
“Being selected as a key partner by Arduino is significant for several reasons,” commented Axiom Managing Partner Ryan Cahalane. “We look forward to serving Arduino’s broad, established user base. Many of those who started with Arduino in education and DIY projects have moved into manufacturing and industrial solutions, creating a ready-made community and support network. Moreover, the Arduino platform integrates seamlessly with other high-quality, cost-effective partners – from specialized sensor manufacturers to cloud service providers – expanding our capabilities and enabling us to bring transformation to a wider audience, especially in the small and midsize markets. Arduino’s focus on education and knowledge sharing aligns perfectly with Axiom’s mission to accelerate the practical adoption of digital technologies in manufacturing and help customers become self-sufficient.”
John Dyck, CEO of the Clean Energy Smart Manufacturing Innovation Institute, shared his positive outlook: “Axiom is a longtime advocate and CESMII member, and we are thrilled to see this new partnership tackle some of the big barriers to democratizing smart manufacturing: cost, complexity, and not knowing where to invest first. People all over the world use Arduino to learn technology, prototype ideas without fear of failure, and bring great solutions to life. Combining that with Axiom’s focus on education, smart manufacturing roadmapping, and helping customers help themselves is exactly what many people need to get started.”
“Axiom has the expertise and proactive approach to bring any manufacturing business into the digital age,” said Arduino’s Strategic Partnerships Advisor, Paul Kaeley. “More than just a partner, they are ‘smart manufacturing sherpas’ for companies across various fields. We are proud to support them and excited to see their success.”
The System Integrators Partnership Program by Arduino Pro is an exclusive initiative designed for professionals seeking to implement Arduino technologies in their projects. This program opens up a world of opportunities based on the robust Arduino ecosystem, allowing partners to unlock their full potential in collaboration with us.
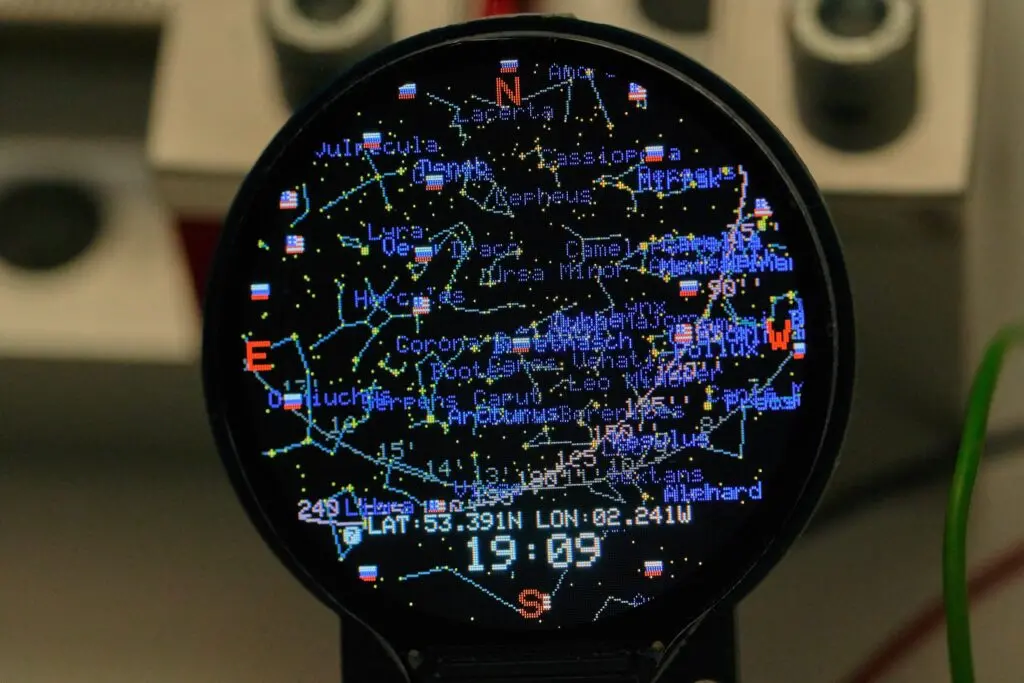
Estimates vary, but there are generally a few thousand stars bright enough to see in the sky on a clear, moonless, cloudless night away from city lights. You might be able to identify a couple of them, along with a handful of constellations. But what about the rest? If they intrigue you, you might want to build this Starmap designed by Shabaz over on element14.
Star charts aren’t anything new and astronomers (both amateur and professional) use them all the time. But we like the portable nature of Shabaz’s Starmap, which would be easy to carry along on a camping trip to a dark sky area. It doesn’t require any internet connectivity to work, so it is perfect for use in rural settings. And the round LCD display is pretty darn attractive.
That screen is a 1.28” GC9A01 round TFT LCD with a resolution of 240×240, intended for use in smartwatches. It receives its graphics from an Arduino UNO R4 Minima, modified for 3.3V logic levels to suit the display. Shabaz also added a flash memory chip large enough to contain the star chart data.
The stars visible in the night sky at any given time depend on where you are on the planet, so this uses a GPS receiver module to find the user’s coordinates. Its Arduino sketch then determines the positions of the visible stars and draws them to the display.
Shabaz doesn’t provide one, but a simple 3D-printed enclosure would make StarMap ready for the road. Power can come from a USB battery bank for off-grid use.
An actually level workbench is critical for many different jobs, such as pouring resin or calibrating sensors. But it is difficult enough to level a stationary workbench and that becomes a nightmare for a workbench that needs to roll around a shop on casters, as shop floors definitely aren’t level. That’s why Firth Fabrications crafted this self-leveling workbench to eliminate such headaches.
Firth Fabrications made this workbench because he needed a level rolling platform for his projects, but his garage floor is too far from level to rely on. Instead of manually leveling the workbench every time he moves it, he built this workbench than can level itself.
It does this with four heavy duty linear actuators — one at each corner of the table constructed of CNC-cut OSB (oriented strand board). Those extend or retract as necessary to tilt the top (relative to the base) to achieve level. It would have been possible to implement that leveling capability with just three linear actuators, but this is more robust and stable.
An Arduino Nano board uses an MPU6050’s gyroscope to monitor pitch and roll. In automatic leveling mode, it makes adjustments until both register as level. There are also two other modes: lift and manual. Lift raises and lowers the entire top, like a standing desk. Manual lets Firth Fabrications tilt the table in any way he wishes using a joystick. Power comes from an old 18V/4Ah Ryobi power tool battery, so the workbench is untethered.
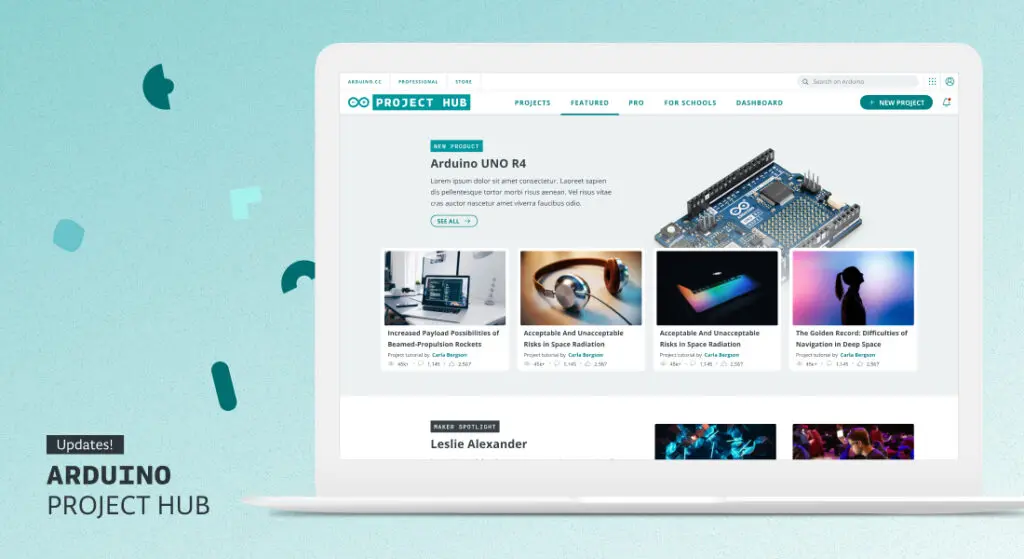
Arduino’s Project Hub is more than just a platform; it’s a vibrant community where members share their ideas and achievements, contributing to our knowledge base and inspiring everyone to make, learn, and try something new.
With close to 5,400 projects, including tutorials, examples, and resources for all skill levels, Project Hub is the perfect place to spark your next idea!
Just like our community, the portal constantly improves. That’s why, starting today, you’ll find a brand new release of the Project Hub online. Our team has been working behind the scenes to bring you:
• New look and feel: a sleeker interface makes it easier than ever to discover the most exciting projects handpicked by our experts. Whether you’re interested in a specific board, theme, or creator, our new featured section allows you to dive right in.
• Dedicated sections for projects tailored to both professional and educational settings too! Arduino users are branching out into a huge array of industries and applications, making us proud of how much and how many different goals can be accomplished with our open-source ecosystem of hardware, software and cloud products. Check out the new “pro” and “for school” tabs!
• Easier navigation and search function to sift through the vast repository. Some days it’s great to just browse and see what you stumble upon. Other times you know exactly what you are looking for and want to get to it quickly! In any case, the new Project Hub has you covered.
We invite you to explore the new Project Hub and share your thoughts in the comments below. Better yet, join hundreds of makers and creators by submitting your next great idea for publication! See you on the Project Hub.
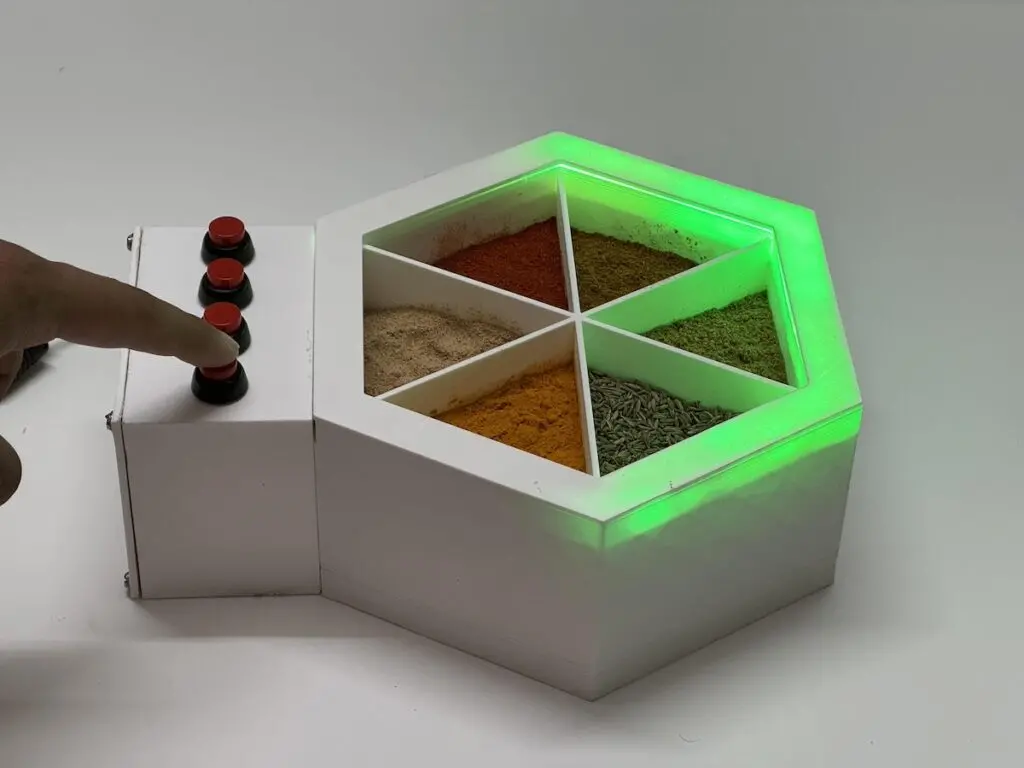
Many people shy away from cooking because they’re overwhelmed by all of the different steps and ingredients. Recipes are useful, but they aren’t very intuitive to those who are more comfortable with visual thinking. To help these people enjoy the cooking experience, Purdue University students Riddhi Gupta and Aarav Garg created a smart spice box.
This is a hexagonal spice storage box divided up into six individual compartments. Four buttons on the front of the spice box let the cook select a pre-programmed recipe. The edges of the corresponding compartments will then light up in green, indicating that they’re necessary for the recipe. For example, a tikka masala chicken marinade recipe might illuminate turmeric, cumin, chili powder, and garam masala.
An Arduino UNO Rev3 board makes this possible. It monitors the buttons to determine which recipe was chosen, then triggers the appropriate RGB LED strips to guide the user as they prepare the meal.
These components fit inside a 3D-printed hexagonal enclosure that Gupta and Garg designed in Autodesk Fusion 360. In theory, the Arduino sketch can support up to 999 different recipes. The user must enter each recipe’s spice combination within that sketch. After that, they just tap the buttons to enter the recipe’s identification number and the proper spice containers will light up.
The Honda Insight was the first hybrid car released in North America and Honda put serious effort into making it as efficient as was practical at the time. That meant aerodynamic streamlining, which is why the first-generation Insight had very distinct covers over the rear wheels. It even had special tires with very low rolling resistance. Those factors made the Honda Insight the perfect platform for Robot Cantina’s Kubota diesel engine swap with a homemade Arduino ECU.
Engine swaps are common in the car enthusiast community, but this is an unusual one. Instead of trying to make the Honda Insight more powerful, Robot Cantina went in the opposite direction. Their project replaces the original engine with a 700cc Kubota diesel engine. That’s the kind of power plant you would typically find in industrial machines and vehicles. For reference, that engine has less displacement than any motorcycle currently offered by Harley-Davidson.
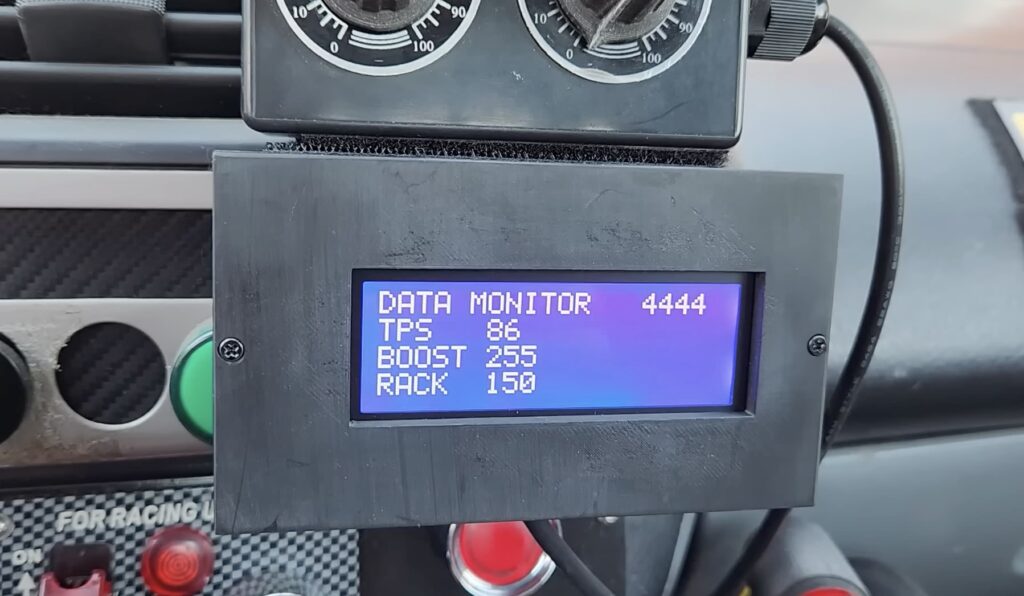
To help this Kubota diesel engine run efficiently and cleanly in the Honda Insight, Robot Cantina needed to construct a custom engine control unit (ECU). They used an Arduino UNO Rev3 for the job. It physically adjusts the boost valve and fuel rack limiter using stepper motors through stepper driver modules. It also monitors the throttle position sensor (TPS) to determine how much the driver is pushing the accelerator. For testing and refinement, an LCD screen shows the current positions and potentiometer knobs let the driver manually set the values.
But while the driver can set boost and rack manually, the goal is to develop a formula to automatically adjust those two values in response to the TPS value. Like a production vehicle’s ECU, this will let the engine run at maximum efficiency without direct driver involvement. It will also reduce visible smog, which is an important factor for a diesel Honda Insight that the driver doesn’t want to drawing attention.
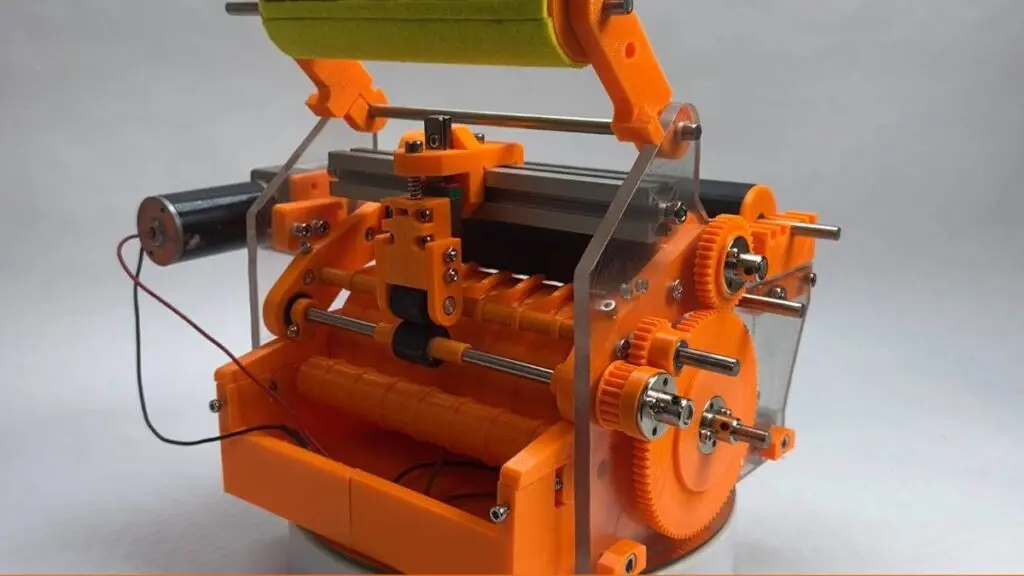
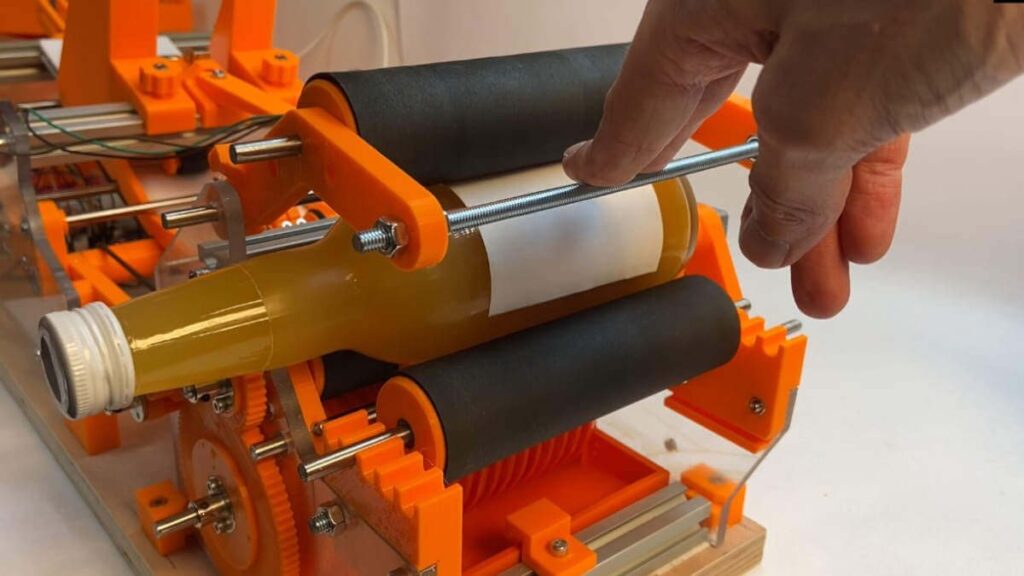
While it is certainly possible (and common) to put homebrewed beer into kegs, that requires regulated gas and large refrigeration space. A keg is also more difficult to transport and overkill if you just want to bring a few beers to a friend’s backyard BBQ. For those reasons, many homebrewers bottle their beer. Those homebrewers will want to check out this very impressive wet labeling machine built by Franz Hirschböck (AKA Fraens).
This machine is mesmerizing to watch in action and would be genuinely useful to most homebrewers — or anyone else with a reason to label bottles. It works with standard printer paper, so users can print their own labels on an inkjet or laser printer at home. When a user places a bottle, the machine will automatically grab a new label, apply the glue, and then attach the label. It is even possible to adjust the amount of glue and the glue pattern by swapping out rollers.
Hirschböck designed this bottle labeler as a mostly electromechanical machine, meaning that it doesn’t need much electronic sophistication to work. That’s all thanks to electric motors and an ingenious set of 3D-printed mechanical parts. But there are two exceptions: the button that starts the labeling process and an infrared sensor that detects the end of the label. An Arduino board monitors the button and sensor.
If you want to build this machine for your own bottling needs, Hirschböck has the files and plans available on Etsy and Cults3D. He even provides glue recipes to get started.
Bob Clagett of the “I Like to Make Stuff” YouTube channel has recently undertaken an extensive shop renovation project where he is rearranging tools, tidying up various spaces, and even creating a dedicated “clean” room for his collection of 3D printers/electronics work. With its jet-black walls, Clagett felt it needed some RGB lighting to keep it interesting, and after taking inspiration from the Tron movie franchise, he had a few ideas.
Before anything could be built, he first needed to select the ideal type of LED strip since the typical WS2812B strip lacks a diffuser and therefore emits harsh light. Rather, an RGBIC strip allows for individual segments of LEDs to be controlled from an Arduino UNO R4 WiFi and illuminate through a built-in diffuser. Five strips were attached to the ceiling and programmed to display a quickly-moving pixel that starts its animation sequence at a random interval. Clagett was also able to line the room’s large window pane with another one of these RGBIC strips, and thanks to the UNO’s Wi-Fi connectivity, indicate if it has an active internet connection.
The final piece of specialty lighting was made by 3D printing a custom drum featuring various cutouts and placing it around a UV bulb. From here, a secondary Arduino UNO R4 Minima slowly rotates it using a 5V stepper motor that gives nearby fluorescent objects a flickering effect.
To see how Clagett revamped his room’s lighting in more detail, watch his video below!
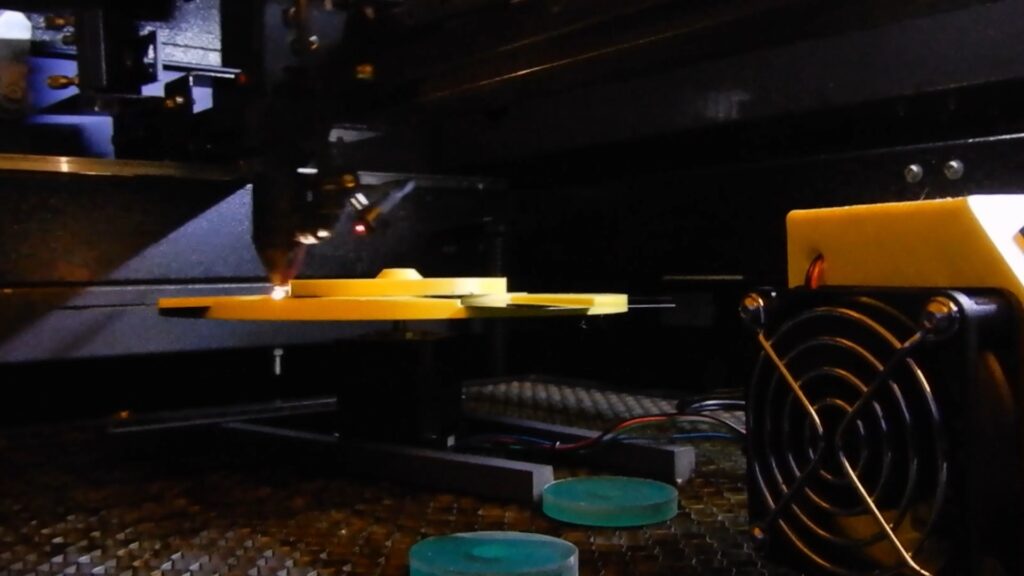
Engraving items with a laser-based system at home is amazingly convenient for one-off parts, but what happens when the production volume needs to increase? For element14 Presents host Clem Mayer, this usually meant preparing many uniform pieces of engraving stock, opening the laser’s enclosure, placing down the material, and then finally running the machine. In doing so, the process could introduce errors and was simply inefficient, leading Mayer to think of a way to automate things instead.
The limiting factor was mostly about how long it took to change the material, so Mayer got to work designing a carousel-like device that could house up to four sheets of stock and rotate each one into place after the previous one had finished. A stepper motor driven by a Trinamic TMC2100 was responsible for moving the drum while an Arduino UNO Rev3 received inputs from external switches and then sent pulses to the motor driver accordingly.
Once placed into the laser cutter’s enclosure, Mayer quickly discovered that his vertical drum design was too tall and interfered with the toolhead. This necessitated swapping the orientation to a flat disc where material could be positioned around a spinning turn table. The original spring-loaded clamps were also exchanged for a magnetic system that is strong yet easily removable.
To see more about this project, you can watch Mayer’s build log video below!
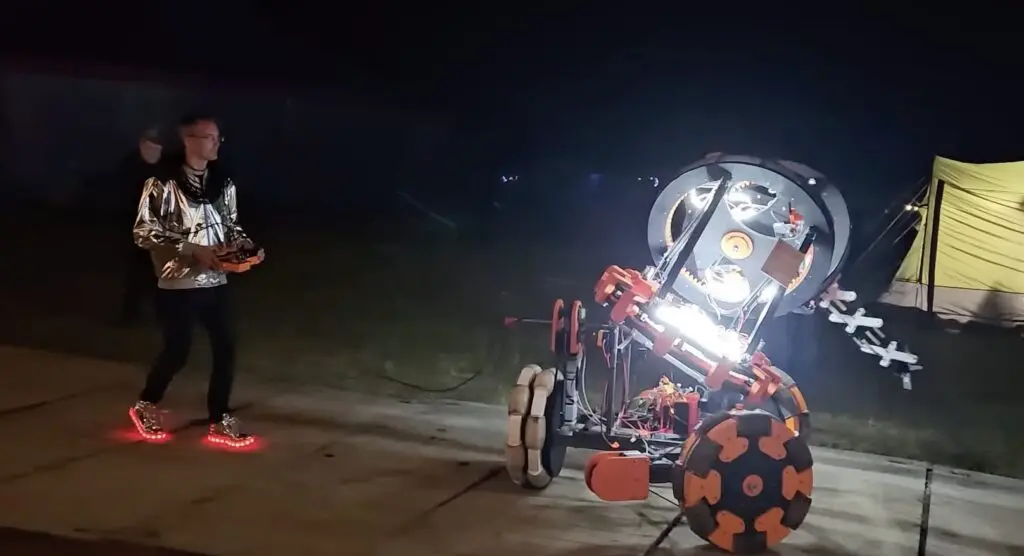
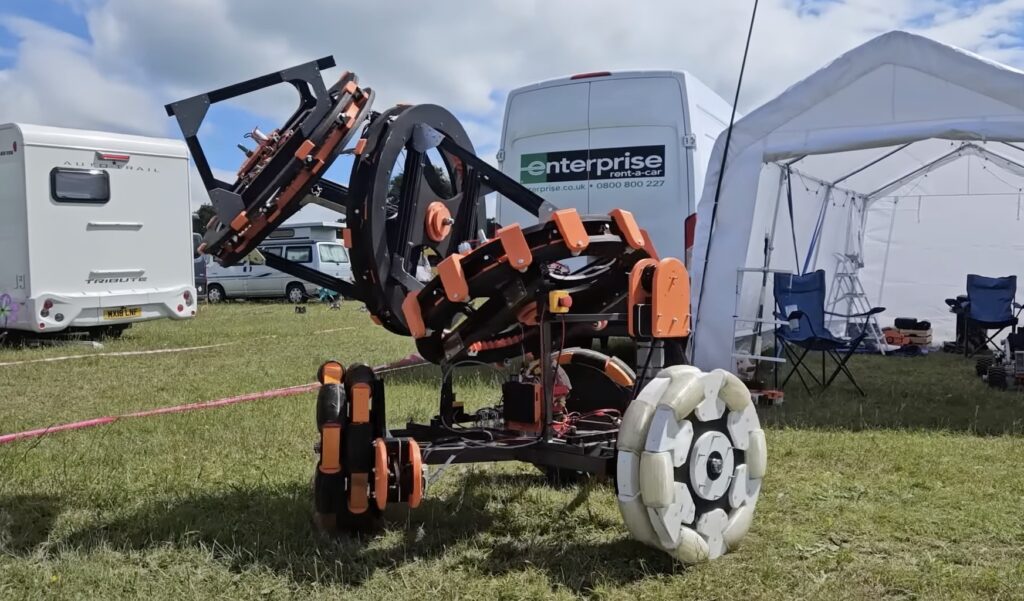
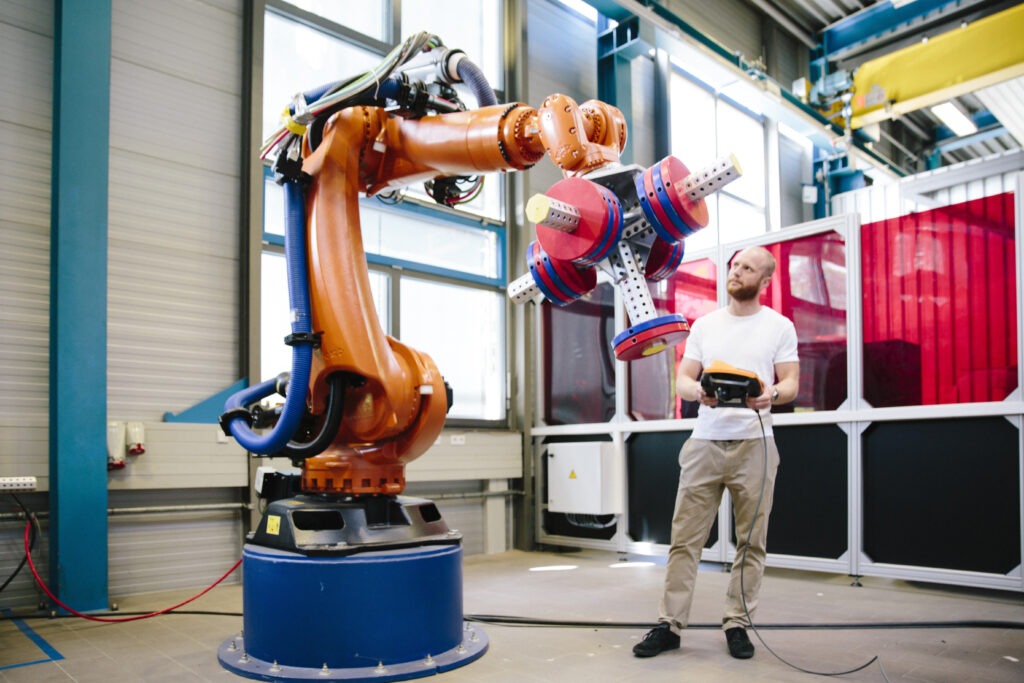
Most of the robots we feature only require a single Arduino board, because one Arduino can control several motors and monitor a bunch of sensors. But what if the robot is enormous and the motors are far apart? James Bruton found himself in that situation when he constructed this huge “tentacle” robot and his solution was to put an Arduino in each joint.
This is an oblique swivel joint robot arm, which means that each joint sits at an angle relative to the axes of the preceding and succeeding segments. This creates movement that is unlike any other kind of robot arm.
Bruton took this concept and scaled it up to ludicrous proportions. Each joint is a big ring made of plywood and 3D-printed parts, driven by a DC motor geared down 1600:1 and controlled through an ODrive module.
Because the robot is so large, it would have been difficult to run wires from a single Arduino to all of the motor drivers — especially because those have to go through slip rings to allow for continuous joint rotation. Instead, Bruton put an Arduino Mega 2560 board in each joint to control that joint’s motor driver. Those operate under the control of a primary Mega 2560 located in the base, with communication handled through a CAN bus system.
There is also another Mega 2560 in the remote control that Bruton built for the robot. That reads control input from switches and rotary encoders, then sends commands to the robot through a direct Wi-Fi connection (established via two ESP32 development boards).
Bruton designed this robot to exhibit at EMF Camp in the UK, where it was a popular attraction.
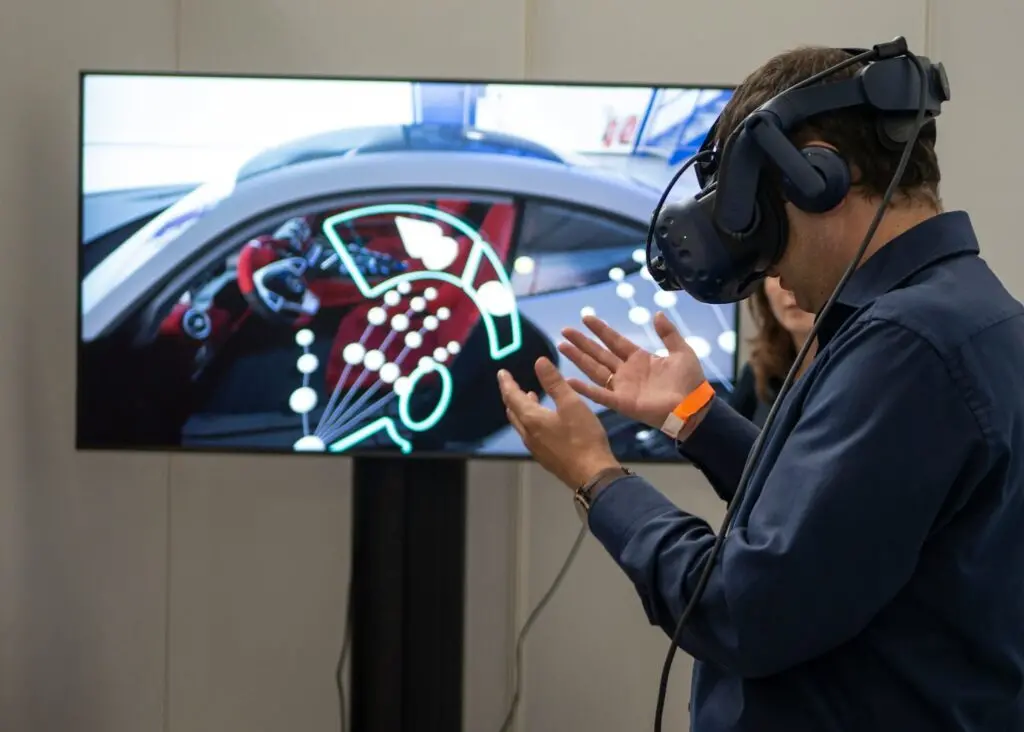
Augmented reality (AR) and virtual reality (VR) are both currently experiencing a meteoric rise in popularity, with the combined market expected to reach $77 billion by 2025, from just $15.3 billion in 2020.
For makers, AR and VR represent exciting opportunities to build new types of projects, tapping into entirely new possibilities and learning skills that will only become more valuable as time goes on.
We’ll explore the significance of AR and VR for makers and look at some of the ways in which makers can integrate these technologies into their projects, rounding off with some real-world examples.
AR and VR — what’s the difference?
AR and VR are similar technologies, but they’re crucially different. Let’s take a quick look at what sets them apart.
Augmented reality involves overlaying digital elements onto the physical world, allowing us to observe and even interact with these virtual objects in the context of our actual environments.
Virtual veality is much more immersive — typically you will put on a headset and enter a completely virtual world, totally different from your actual physical environment.
How can makers use AR and VR in their projects?
Let’s take a look at some of the specific ways makers can leverage AR and VR to improve their projects, along with some examples from Arduino users.
Gaming and fun
AR and VR are both making a massive impact in the world of gaming, allowing for far more immersive, novel, and fun experiences. This represents a great opportunity for makers to play around with an entirely new trend, playing a small role in shaping this next chapter of video gaming.
Probably the best example of this is Pokémon GO — where players track down Pokémon in real-world locations. But this is just the beginning. Ryan Chan decided to design a way for Minecraft — the best-selling video game of all time — to start using AR.
Thanks to Chan’s work, Minecraft players can now control their in-game movements via their real-life actions. For example, taking physical steps forward will translate into in-game movement. Ryan’s project uses an Arduino MKR Zero board, a MPU-6050 IMU (inertial measurement unit), and two force-sensitive resistors.
It’s an awesome approach to bringing a fresh set of features to an already established and popular game, and could mark a new generation of smart individual gamers making adjustments to their favorite games.
Training safety, and education
Developing new skills is essential if you want to keep making progress as a maker, but it can be tricky. After all, making is a highly technical and complex activity with no real rules.
The good news is that AR and VR can be massively helpful here. AR can help make learning more interactive, intuitive, and visual by overlaying instructions and visual augmentations onto real-world objects. VR, meanwhile, can help by constructing immersive virtual environments where makers can practice technical tasks in a risk-free setting.
Let’s check out an example. Kids typically don’t take fire drills too seriously, which means they miss out on important information. This is where AR can come in. This project from a team of engineers at Sejong University created an augmented reality fire drill system based on video games to make fire safety training more realistic and effective.
By combining virtual reality, AR, and the real world, you can conduct fire drills that simulate smoke-filled rooms and other realistic elements, mimicking the actual experience of a fire much more than standard drills.
On top of that, the team also made a fire extinguisher that works with the VR system but also looks and feels like the real thing. It connects to an Arduino UNO WiFi Rev2 and can give users the realistic sensation of operating a real extinguisher to put out flames.
Data visualization and analytics
It’s important for makers to be able to gain and analyze data related to their projects. This might be a central part of the project’s function — like with a wearable health monitor or a thermostat — or it may just be a way to learn more about your creation to make improvements.
AR and VR can massively improve your ability to interact with and understand data. By representing data in an entirely new, much more immersive, and more visual way, these technologies can allow you to spot new insights, make connections, and learn more about your projects.
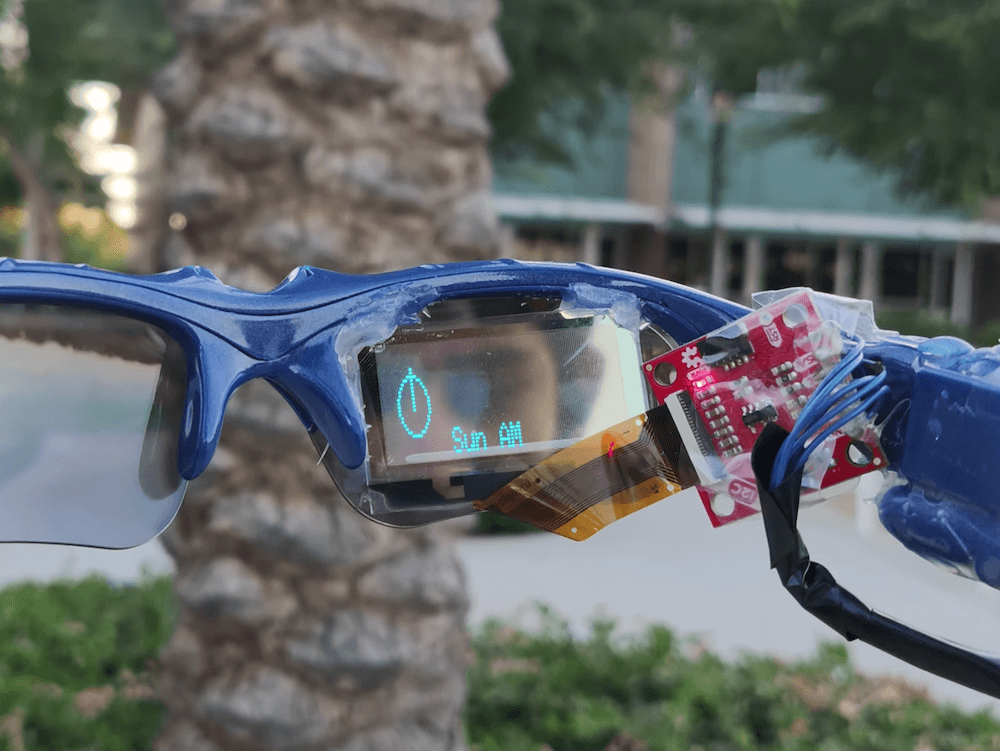
Mars Kapadia chose to build his own set of smart glasses for a school science fair, using a transparent OLED display paired with Retro Watch software running on an Android phone and powered by an Arduino Nano Every and an HC-05 Bluetooth® module.
Mars’ glasses also come with darkened lenses to keep the glare of the sun at bay when outdoors, which can also be lifted up when in darker environments.
Get started today
With Arduino, you can start bringing AR and VR into your own projects, expanding your horizons and opening up fascinating new possibilities to use this tech as it continues to grow.
In our Project Hub, you can browse other people’s projects according to category, including AR and VR, and share your own work, too.
For children who experience certain developmental delays, specific types of physical therapies are often employed to assist them in improving their balance and motor skills/coordination. Ivan Hernandez, Juan Diego Zambrano, and Abdelrahman Farag were looking for a way to quantify the progress patients make while simultaneously presenting a gamified approach, so they developed a standalone node for equilibrium evaluation that could do both.
On the hardware side of things, an Arduino Nano BLE 33 Sense Rev2 is responsible for handling all of the incoming motion data from its onboard BMI270 six-axis IMU and BMM150 three-axis magnetometer. New readings are constantly taken, filtered, and fused together before being sent to an external device over Bluetooth Low Energy. The board was also connected to a buzzer and buttons for user inputs, as well as an RGB LED to get a real-time status.
The patient begins the session by first putting on the wearable and connecting to the accompanying therapist application. Next, a game starts in which the user must move their torso to guide an image of a shark over the image of a stationary fish within a time period — ultimately trying to get the highest score possible. Throughout all of this, a vision system synchronizes its readings with the IMU sensor readings for an ultra-detailed look at how the patient responds to the game over time.
Imagine you’ve just installed your state-of-the-art lighting control system, perfectly hidden in a box inside a wall, and everything seems to be working like a charm. But then, you spot a bug in the firmware. The thought of pulling the hardware back out sends shivers down your spine. You start wondering for how long you can just ignore the issue. The good news is you don’t have to, and there is a simple solution: over-the-air (OTA) updates!
OTA updates are a crucial aspect of IoT (Internet of Things) devices, allowing you to remotely update the firmware or software of your connected devices without the need for physical access. This technology is a game-changer for both makers and businesses because it offers seamless maintenance, enhanced security, and improved user experience.
At Arduino, we’ve long recognized the importance of OTA updates and do our best to assist users implement this technology. Over time, this has allowed us to identify some common questions on the topic: let’s dive into the top 10!
#1: What are OTA updates, exactly?
OTA updates refer to the process of delivering code updates to IoT devices remotely, without the need for physical connections or manual interventions. This can be achieved through wireless communication protocols such as Wi-Fi®, cellular, or Bluetooth®.
The process typically involves uploading the updated firmware or software to a server, and then pushing it to the target devices over the internet or a local network. The device then updates itself without the need for manual intervention.
#2: Why do we need OTA?
Firmware updates are essential for IoT devices to maintain their functionality, security, and relevance over time. However, traditional methods of firmware updates, which require physical access or manual intervention, can be costly, time-consuming, and impractical in many scenarios.
OTA updates make it easier to keep devices up-to-date, bug-free, secure and capable of adapting to evolving requirements throughout their lifecycle.
#3: What types of devices benefit from OTA updates?
OTA updates are particularly critical for the following scenarios:
IoT devices deployed in remote locations or difficult-to-access areas, such as industrial equipment, medical devices, or agricultural sensors.
High-value devices such as industrial robots or complex medical equipment, and critical infrastructure systems – such as power grids, water treatment plants, or financial systems – which demand frequent security updates and patches to ensure the highest level of protection against cyber threats.
Smart home devices like thermostats, security cameras, or voice assistants, which often undergo frequent software updates to introduce new features or enhance user experiences.
Devices with limited power or resources: IoT devices with constrained power or computational resources, such as wearables or environmental sensors, can benefit from OTA updates that minimize power consumption and extend battery life.
Systems that require continuous operation and minimal downtime, such as financial systems (ATMs, point-of-sale terminals), healthcare systems (electronic health records, medical imaging equipment).
#4: What are the main challenges in using OTA updates for IoT?
While OTA updates offer numerous benefits, there are several challenges and issues to consider in order to mitigate any risks or avoid potential pitfalls.
Device heterogeneity: IoT devices come in various forms, with different hardware and software configurations, making it challenging to develop and deploy updates that work seamlessly across all.
Connectivity and bandwidth limitations: Some IoT devices may have limited or intermittent internet connectivity, or operate on low-bandwidth networks, which can make it difficult to deliver large firmware updates.
Security concerns: OTA updates introduce potential security risks, such as unauthorized access or malicious code injection, if not implemented with proper security measures (we’ll explain more at #6!).
Scalability and management: As the number of IoT devices grows, managing and deploying OTA updates to large fleets can become a significant challenge.
Simplicity: Many OTA systems require complex infrastructure or elaborate operations. Finding the right platform to simplify the process can be challenging.
#5: What are the benefits of over-the-air updates?
Despite the challenges, OTA updates offer numerous benefits for IoT devices:
Increased device lifespan: By enabling remote updates, OTA updates can extend the usable lifespan of IoT devices, reducing the need for frequent replacements or costly on-site maintenance.
Deployment of bug and security fixes: OTA updates allow for the prompt distribution of bug fixes, security patches, and vulnerability remediation, ensuring that IoT devices remain secure and up-to-date.
Improved device performance and functionality: OTA updates can introduce new features, performance enhancements, and functionality improvements, keeping IoT devices competitive and valuable for users.
Reduced maintenance costs: By eliminating the need for on-site visits or device replacements, OTA updates can significantly reduce maintenance costs associated with IoT deployments.
Enhanced user experience: With seamless updates and continuous improvements, OTA updates can enhance the overall user experience by providing the latest features and addressing issues promptly.
#6: Are OTA updates safe?
Security is a legitimate concern when it comes to OTA updates, as they can potentially introduce vulnerabilities or be exploited by malicious actors. Hackers, for example, can potentially exploit the update process to gain unauthorized access or introduce malicious code. However, with proper security measures in place, OTA updates can be safe and secure.
When choosing an OTA update solution for your IoT devices, look for features that ensure encrypted transmissions and secure authentication protocols, such as encrypted communication channels, secure boot mechanisms, code signing, and secure authentication and authorization processes.
#7: What do makers typically use OTA updates for?
OTA updates are particularly beneficial for makers working on IoT projects in various scenarios.
Home automation: Smart home devices like lighting systems, thermostats, and security cameras can benefit from OTA updates to introduce new features, fix bugs, or enhance functionality.
Gardening: IoT devices used for monitoring and controlling garden systems, such as automated irrigation solutions or greenhouses, can be updated remotely without disrupting the growing environment.
Devices hidden inside wall boxes or cabinets: IoT devices installed in hard-to-reach locations can be easily updated without the need for physical access.
Outdoor monitoring: Environmental monitoring devices deployed in remote or inaccessible areas, such as weather stations or wildlife tracking systems, can be updated wirelessly without requiring on-site visits.
#8: What are the typical use cases of OTA for enterprises?
OTA updates are equally crucial for enterprises deploying IoT solutions across various industries:
Industrial IoT (IIoT) applications: In industrial settings, OTA updates can help maintain and enhance IoT devices used for process monitoring, predictive maintenance, and automation without disrupting operations.
Agriculture: IoT devices used in precision agriculture, such as soil moisture sensors, weather stations, and automated irrigation systems, can be updated remotely to improve efficiency and crop yield.
Automotive and transportation: Connected vehicles and transportation systems can benefit from OTA updates to enhance safety features, improve performance, and address security vulnerabilities.
Healthcare and medical devices: OTA updates can ensure that medical IoT devices, like wearables or implantable devices, remain compliant, secure, and up-to-date with the latest software and firmware versions.
For enterprises with large-scale IoT deployments, orchestrating mass over-the-air (OTA) updates is a critical capability, enabling them to seamlessly roll out new firmware or software versions simultaneously across their entire fleet of devices.
#9: What is OTA in Arduino?
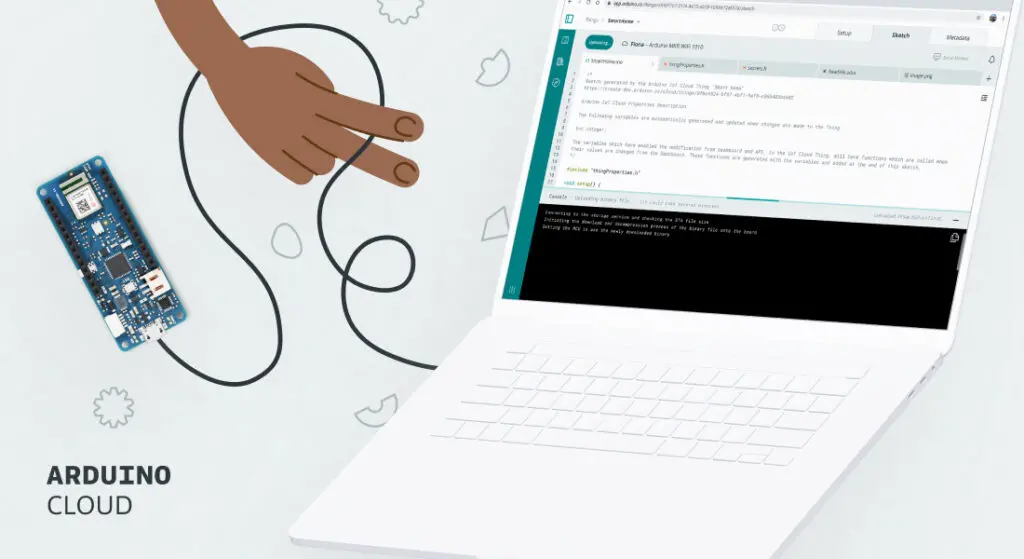
Most of the applications described above can be implemented using Arduino boards, popular among makers and increasingly adopted by enterprises worldwide. The Arduino Cloud seamlessly supports these boards and offers a comprehensive and secure solution for their OTA updates.
And there’s more! The Arduino Cloud is a powerful platform that can be used to monitor and control devices across many applications, from personal hobbies at home to energy management solutions in the factory.
Arduino Cloud OTA is designed to be both secure and robust. It uses end-to-end encryption to protect firmware updates during transmission, ensuring that only authorized devices receive updates. Additionally, the cloud-based platform provides a centralized management system, allowing users to track and monitor updates in real-time. Finally, it ensures that firmware updates are delivered efficiently and reliably, minimizing the risk of errors or failures.
To perform an OTA firmware update for a board supported by the Arduino Cloud, such as the Arduino UNO R4 WiFi, simply follow these steps:
1. Add your device to the Arduino Cloud. 2. Create your Thing, configure your network credentials and develop your code. 3. In the Cloud Editor, select OTA (over-the-air) as the programming method. 4. Compile your code clicking on the VERIFY icon. 5. Upload your new firmware to your device.
The Arduino Cloud will handle the rest, securely delivering the new firmware to your device(s) over the air, without any physical intervention required.
Note: The first programming must be done via USB cable. After that, provided that the board is connected to the Arduino Cloud, OTA can be used.
ESP32 is a very popular hardware architecture for IoT because it’s compact, affordable and powerful. And ESP32 boards are fully supported by Arduino Cloud, so you can follow just a few simple steps to perform OTA updates on their firmware: the process is similar to the one we saw at #9 for Arduino boards!
1. Add your device to the Arduino Cloud as a “third-party device.” 2. Create your Thing, configure your network credentials and develop your code. 3. In the Cloud Editor, select OTA (over-the-air) as the programming method. 4. Compile your code clicking on the VERIFY icon. 5. Upload your new firmware to your device.
That’s it! The Arduino Cloud will deliver the new firmware to your device(s) over the air, without any physical intervention required.
Note: The first programming must be done via USB cable. After that, provided that the board is connected to the Arduino Cloud, OTA can be used.
If you’re ready to upgrade your IoT projects, explore the Arduino Cloud today. Arduino Cloud is a secure and user-friendly all-in-one IoT solution to create from anywhere, visualize your sensor data with unlimited IoT dashboards, receive alerts on your phone … and of course, deploy OTA updates.
Weather stations are popular projects in the maker community because they’re useful and usually quite affordable to construct. But most that we see are really weather information displays that gather data through the internet from stations in the region. That data is fairly accurate, but there can be minor differences due to microclimate zones. So, Wilson Malone decided to build his own system with a dedicated outdoor sensor station.
Malone’s system consists of two units: the indoor display and the outdoor sensor station. The latter receives its power from a solar panel and battery backup, so Malone can place it anywhere that gets good sunlight within wireless range of his home. It has a sensor to detect wind speed, another sensor to detect wind direction, and a PHT (pressure, humidity, temperature) combination sensor. An Arduino UNO Rev3 board reads those sensors and then transmits the data using a 915MHz radio transceiver.
Inside the home, the indoor display unit receives that data with a radio transceiver of its own. An Arduino UNO R4 WiFi parses that and then shows each value on a four-digit seven-segment display. The Arduino will also publish the values to a self-hosted webpage every eight seconds. Any users on the same local network can visit that page to view the current information.
We are excited to announce that RIoT Secure has joined Arduino’s System Integrators Partnership Program at the Gold level. Founded in 2017 in Stockholm, Sweden, RIoT Secure is at the forefront of IoT security, especially in regards to resource-constrained microcontrollers, providing sophisticated lifecycle management solutions that enhance device functionality and security across various industries.
RIoT Secure’s platform has been meticulously designed and developed around the Arduino MKR platform, renowned for its modular approach to connectivity. This has allowed the company to harness the flexible and powerful capabilities of the Arduino MKR series, which were integral to the successful deployment of solutions for clients as demanding as SAS ground service handling at the Stockholm Arlanda Airport – as highlighted in our case study here.
Additionally, RIoT Secure continuously explores the full spectrum of Arduino hardware possibilities, incorporating the recently launched Arduino UNO R4 WiFi into their comprehensive device management platform – underscoring their commitment to utilizing cutting-edge technology to enhance IoT device management and security.
As a Gold-level partner, RIoT Secure is set to expand its influence and capabilities within the IoT sector, driving innovation through advanced integration of Arduino’s robust technology suite. The collaboration not only brings enhanced scalability and efficiency to their operations but also aligns with the mission to deliver top-tier IoT solutions that are secure, reliable, and easy to manage.
“The inclusion in Arduino’s System Integrators Partnership Program marks a significant step forward for RIoT Secure,” said co-founder Aaron Ardiri. “This partnership enables us to tap into Arduino’s vast resources, development community and support services, propelling our development of revolutionary IoT solutions.”
Arduino’s Strategic Partnerships Advisor, Paul Kaeley, was proud to add, “RIoT Secure’s innovative use of our MKR series and dedication to advancing IoT security make them a valuable addition to our program. We look forward to the great advancements this partnership will bring to the IoT landscape.”
Through this partnership, RIoT Secure aims to continue advancing the field of IoT, providing clients with reliable and innovative solutions that are ready to meet the technological challenges of today and tomorrow. With Arduino, they are set to redefine the possibilities of IoT integration and management, making it more accessible, secure, and efficient for everyone involved.
The System Integrators Partnership Program by Arduino Pro is an exclusive initiative designed for professionals seeking to implement Arduino technologies in their projects. This program opens up a world of opportunities based on the robust Arduino ecosystem, allowing partners to unlock their full potential in collaboration with us.
Um dir ein optimales Erlebnis zu bieten, verwenden wir Technologien wie Cookies, um Geräteinformationen zu speichern und/oder darauf zuzugreifen. Wenn du diesen Technologien zustimmst, können wir Daten wie das Surfverhalten oder eindeutige IDs auf dieser Website verarbeiten. Wenn du deine Einwillligung nicht erteilst oder zurückziehst, können bestimmte Merkmale und Funktionen beeinträchtigt werden.
Funktional
Immer aktiv
Die technische Speicherung oder der Zugang ist unbedingt erforderlich für den rechtmäßigen Zweck, die Nutzung eines bestimmten Dienstes zu ermöglichen, der vom Teilnehmer oder Nutzer ausdrücklich gewünscht wird, oder für den alleinigen Zweck, die Übertragung einer Nachricht über ein elektronisches Kommunikationsnetz durchzuführen.
Vorlieben
Die technische Speicherung oder der Zugriff ist für den rechtmäßigen Zweck der Speicherung von Präferenzen erforderlich, die nicht vom Abonnenten oder Benutzer angefordert wurden.
Statistiken
Die technische Speicherung oder der Zugriff, der ausschließlich zu statistischen Zwecken erfolgt.Die technische Speicherung oder der Zugriff, der ausschließlich zu anonymen statistischen Zwecken verwendet wird. Ohne eine Vorladung, die freiwillige Zustimmung deines Internetdienstanbieters oder zusätzliche Aufzeichnungen von Dritten können die zu diesem Zweck gespeicherten oder abgerufenen Informationen allein in der Regel nicht dazu verwendet werden, dich zu identifizieren.
Marketing
Die technische Speicherung oder der Zugriff ist erforderlich, um Nutzerprofile zu erstellen, um Werbung zu versenden oder um den Nutzer auf einer Website oder über mehrere Websites hinweg zu ähnlichen Marketingzwecken zu verfolgen.