Schlagwort: arduino

  • Star Trek TOS sickbay display on a breadboard

    Star Trek TOS sickbay display on a breadboard

    Reading Time: 2 minutes

    Star Trek TOS sickbay display on a breadboard

    Arduino TeamJuly 8th, 2019

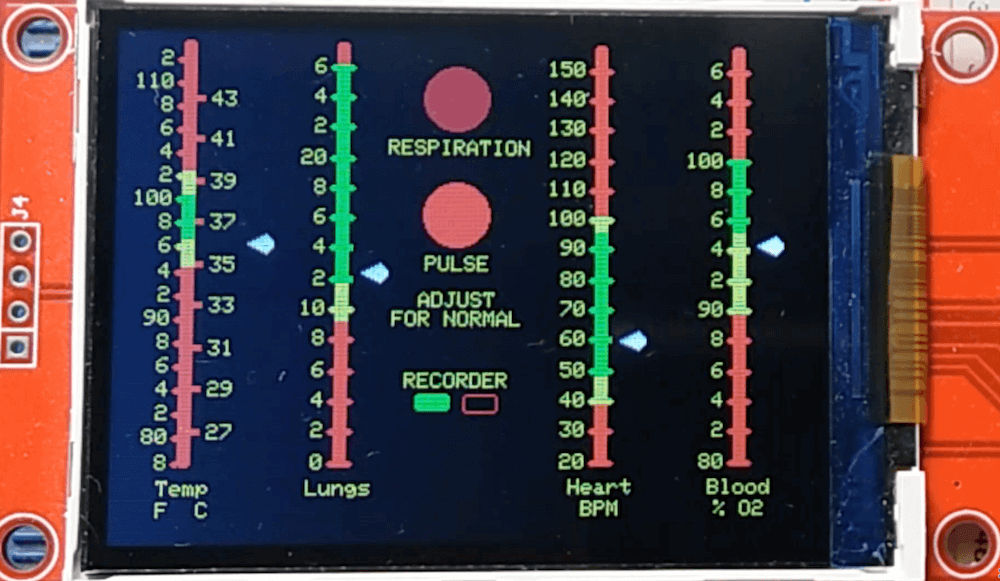
    The future envisioned in the original Star Trek included, among other things, a shipboard sickbay with electronic monitors strangely reminiscent of the machines that medical personnel use today. To recreate a functional mini-replica of these displays, YouTuber Xtronical turned to a 2.8” TFT screen, a breadboard, and an Arduino Nano—noting that an Uno would also work.

    The LCD display nails the look of Dr. McCoy’s device, and heartbeat sound can be played along with an onscreen flashing “PULSE” circle. A MAX30100 pulse/oximeter sensor and a temperature sensor take body readings, while a second DS18B20 is implemented to read ambient conditions for increased accuracy. 

    It’s a fun Trekkie project, and Xtronical plans to elaborate on how it was made in future videos. 

    A build of a working original Star Trek display with real sampled heart beat sound. Uses various sensors to get the readings from your body (via just your fingers) and displays them in the style of the 60’s sick bay screen. This bare “Bones” system could be built into a model unit or even a replica Tricorder.

    [youtube https://www.youtube.com/watch?v=0zNeVVHoLgE?feature=oembed&w=500&h=281]

    Website: LINK

  • Random sticks made to walk under Arduino control

    Random sticks made to walk under Arduino control

    Reading Time: 2 minutes

    Random sticks made to walk under Arduino control

    Arduino TeamJuly 5th, 2019

    What if you were to neglect a robot’s mechanical design entirely and instead construct it out of unusual materials like random sticks? Researchers from the University of Tokyo and Preferred Networks have done just that. To accomplish this feat, the engineers first scanned and weighed the branches, then used deep reinforcement learning to teach the new contraption to walk.

    The branch-bots were then constructed in the real world using generic servos, and controlled via an Arduino Mega tether setup with a motor driver and a separate power supply.

    You can see one of these bots moving around in the video below, though this configuration ironically seems to have more trouble when dropped off at its native forest habitat. Be sure to read more about this research in IEEE Spectrum‘s article here.

    This project aims at creating bricolages of robots out of tree branches found at hand. Through the process in which natural objects learn how to walk by themselves, the artwork portrays the perspectives of objects. Unlike the top-down process where functions of mechanical systems are explicitly defined by designers, this project puts an emphasis on the emergence of functions, which is a bottom-up process where found objects seek for the function as a whole.

    [youtube https://www.youtube.com/watch?v=-kg8ndan1UY?feature=oembed&w=500&h=281]

    Images: Azumi Maekawa/University of Tokyo

    Website: LINK

  • LoRa security camera detects and transmits trespasser data

    LoRa security camera detects and transmits trespasser data

    Reading Time: 2 minutes

    LoRa security camera detects and transmits trespasser data

    Arduino TeamJuly 4th, 2019

    Security cameras are a great way to deter theft and vandalism, but what if the camera is out of WiFi range, or otherwise would need long cables to transmit pictures? As explained here, Tegwyn Twmffat has an interesting solution–taking advantage of neural network processing to recognize moving objects, along with a LoRa connection to sound the alarm when there is a potential problem.

    Images are captured by a Raspberry Pi and camera, then processed with the help of an Intel Movidius Neural Compute Stick for identification. If it’s something of interest—a human, for example—a relatively small amount of data is transmitted to a MKR WAN 1300 base station, beeping faster and faster as the person approaches. 

    As seen in the video below, it’s able to properly ignore the ‘test dog,’ while it beeps away when a person approaches! 

    [youtube https://www.youtube.com/watch?v=U6KapET2udQ?feature=oembed&w=500&h=281]

    Website: LINK

  • This electric soapbox car can reach a top speed of 35 km/h

    This electric soapbox car can reach a top speed of 35 km/h

    Reading Time: 2 minutes

    This electric soapbox car can reach a top speed of 35 km/h

    Arduino TeamJuly 2nd, 2019

    If Elon Musk was to design a soapbox car, the prototype might look something like this by David Traum.

    Traum’s project is powered by a 500W motor which is fed by a pair of 12V batteries and a 40 W solar cell, allowing it to attain a top speed of 35 km/h and a range of 10 to 15km. Although that might not sound like a huge number, it looks pretty fast at the end of the video below!

    But that’s not all. The vehicle features a rather unique control system, with front wheel steering actuated by a stepper and cable assembly. An Arduino Mega is the brains of the operation, while user input is via a small touchscreen, a joystick, and even a steering wheel (equipped with an Uno, a 9V battery, radio module, and gyro sensor) that can work wirelessly as needed—perhaps to park remotely, or simply as a gigantic RC car

    The clip here is in German, but you can read more in this English-translated article.

    [youtube https://www.youtube.com/watch?v=-OYcVw4WjuE?feature=oembed&w=500&h=281]

    Website: LINK

  • Experience the world like a cat with this whisker-style sensory extension

    Experience the world like a cat with this whisker-style sensory extension

    Reading Time: 2 minutes

    Experience the world like a cat with this whisker-style sensory extension

    Arduino TeamJuly 2nd, 2019

    Imagine if you had whiskers. Obviously, this would make you something of an oddity in today’s society. On the other hand, you’d be able to sense nearby objects via the transmission of force through these hair structures.

    In order to explore this concept, Chris Hill has created a whisker assembly for sensory augmentation, substituting flex sensors for the stiff hairs that we as humans don’t possess. The sensors—four are used here—vary resistance when bent, furnishing information about their status to the Arduino Uno that controls the wearable device. Forehead-mounted vibratory motors are pulsed via PWM outputs in response, allowing the user to feel what’s going on in the surrounding environment.

    If this looks familiar, Hill is quick to credit Nicholas Gonyea’s Whisker Sensory Extension Wearable as the basis for this project. He hopes his take on things improves the original, making it lighter, more cost-effective, and easier to construct. 

    The purpose of this project was to focus on the creation of novel, computationally-enriched “sensory extensions” that allow for augmented-sensing of the natural world. My major effort with this project was devoted to the fabrication and implementation of sensory augmentations that will extend a sense through sensors and respond with a tactile output for the user. The intent is to enable anyone to fabricate their own sensory extensions, and thusly map intrinsically human/animal senses onto hardware. Effectively extending our senses in new and exciting ways that will lead to a better understanding of how our brain is able to adapt to new external senses.

    Website: LINK

  • Computer 1.0 explores the relationship between textile and technology

    Computer 1.0 explores the relationship between textile and technology

    Reading Time: 2 minutes

    Computer 1.0 explores the relationship between textile and technology

    Arduino TeamJuly 1st, 2019

    While you might have never considered the idea, looms—especially the punchcard-driven Jacquard loom, which helped inform both Ada Lovelace and Charles Babbage’s pioneering work—are an important part of computing history. As reported here, Victoria Manganiello and Julian Goldman have created an awe-inspiring ode to this computing heritage in the form of a handwoven tapestry that constantly changes the way it looks, aptly named “Computer 1.0.”

    The tapestry, which was recently on display at the Museum of Arts and Design in New York City, stretches nine meters in length and features tubing woven throughout. An Arduino actuates pumps and valves to produce familiar patterns in this tubing with blue-dyed water and air.

    These patterns soon become abstract and perhaps more open to interpretation, though with more development it’s noted that images and even smartphone-readable designs could be possible. 

    Be sure to see the short demo of this incredible installation in the video below! 

    A handwoven textile activated by computer code, Computer 1.0 explores connections between weaving and technology. For the project, Victoria Manganiello invited designer Julian Goldman to collaborate on designing and programming a pump controlled by Arduino microcomputers to move precise sequences of air and liquid through the approximately 2,000 feet of tubing woven through the cloth. The movement of the air and liquid evokes traditional weaving patterns such as bird’s eye, monk’s cloth, and twill. And the operating system—the computer and the pump—is not kept out of sight in the service of the woven screen and the pixelated patterns that run across it, but rather are an integral part of the work; nothing is hidden.

    Manganiello’s textile reflects and expands on the ob­scured history of weaving and coding, calling attention to the “under-over, under-over” movement of thread becoming cloth that originally inspired the “zero-one-zero-one” of binary code. The jacquard loom of 1801, which used punch cards to program the movement of thread into increasingly complex woven patterns, is a direct, though frequently forgotten, ancestor of modern computers.

    Website: LINK

  • This Amazon engineer made an AI-powered flap to keep his cat’s “gifts” outside

    This Amazon engineer made an AI-powered flap to keep his cat’s “gifts” outside

    Reading Time: 2 minutes

    This Amazon engineer made an AI-powered flap to keep his cat’s “gifts” outside

    Arduino TeamJuly 1st, 2019

    Amazon senior product manager Ben Hamm has a cat named Metric. While this adorable feline friend helped with a rat infestation problem in his apartment, he also likes to take his hunting skills out into nature, bringing… whatever home around one out of 10 nights.

    To combat this situation, Hamm used an Amazon DeepLens camera to detect the cat, then examine whether or not it’s carrying something extra, based on a machine learning algorithm trained with over 23,000 images.

    If the cat is carrying prey, an Arduino locks the cat out for 15 minutes, while the system texts Hamm pictures. It also gives a donation to the National Audubon Society, described by Hamm in his presentation below, as “blood money.” Currently it only works with Metric, but could be generalized with more cat data if you’re having the same problem.

    [youtube https://www.youtube.com/watch?v=1A-Nf3QIJjM?feature=oembed&w=500&h=281]

    Website: LINK

  • Smart motorcycle helmet lighting follows your signals

    Smart motorcycle helmet lighting follows your signals

    Reading Time: < 1 minute

    Smart motorcycle helmet lighting follows your signals

    Arduino TeamJune 28th, 2019

    When riding a motorcycle, it’s important to be seen, and if other vehicles can see your brake lights and turn signals as well, all the better. To help with visibility, YouTuber “MechTools” outfitted his helmet with a brake light and turn indicators that activate along with the motorcycle’s built-in signals.

    The video below shows off how it was built, using an Arduino Uno onboard the motorcycle, plus a Nano embedded in the helmet. A pair of nRF24L01 transceivers enable the two Arduinos to communicate wirelessly, and three TIP122 transistors controls the lighting directly for sufficient power output.

    While a neat concept, be sure that you don’t compromise your helmet’s structural integrity or legality if you try something similar! Code is available in the video’s description.

    [youtube https://www.youtube.com/watch?v=5geGTYatvg4?feature=oembed&w=500&h=281]

    Website: LINK

  • Cycloid-O-Matic creates spirograph-like patterns

    Cycloid-O-Matic creates spirograph-like patterns

    Reading Time: < 1 minute

    Cycloid-O-Matic creates spirograph-like patterns

    Arduino TeamJune 20th, 2019

    If you’ve been waiting for a new way to generate geometric art, then be sure to check out the Cycloid-O-Matic from InventorArtist Darcy Whyte.

    This three-axis cycloid drawing machine is something of an update on the classic spirograph toy, but instead of (only) using an arrangement of gears, it incorporates stepper motors to create smooth curving patterns.

    Control is accomplished via an Arduino Uno and GRBL shield, while a single motor rotates the paper in a circle on top of a lazy Susan. A pen is held above in a linkage system, actuated by two steppers that spin to move the linkages and draw in the X/Y plane.

    Website: LINK

  • This robotic fish is powered by its own artificial circulatory system

    This robotic fish is powered by its own artificial circulatory system

    Reading Time: 2 minutes

    This robotic fish is powered by its own artificial circulatory system

    Arduino TeamJune 20th, 2019

    Hydraulically-actuated robots are nothing new, but normally they come with a battery or external supply of some sort. This lifelike robotic lionfish developed by Cornell and the University of Pennsylvania researchers, however, has its own artificial circulatory that pumps synthetic ‘blood’ to help flap its fins and as the device’s power source itself. 

    The trick is that the liquid is actually the cathode of a battery built into the fish, which powers its two hydraulic actuators, as well as the Arduino Uno control system. This integral battery—which would be analogous to blood in a real fish—gives it enough energy to operate untethered for 36 hours, though as it swims at 1.56 body lengths per minute, so it can use all the time it can get!

    As James Pikul, a co-author on the study and researcher at Penn, told Gizmodo:

    In our synthetic vascular system, the fluid stores chemical energy which we can use to power the fish robot. As the fluid is pumped through the fish robot, the moving fluid also causes the robot to move. The vascular system, therefore, is multifunctional. It is these multiple functions that allow the robot to maintain its dexterity while also having a long operational time.

    You can also read more in IEEE Spectrum‘s article here.

    Website: LINK

  • Intuitive Arduino clock has seven alarms and three LED displays

    Intuitive Arduino clock has seven alarms and three LED displays

    Reading Time: 2 minutes

    Intuitive Arduino clock has seven alarms and three LED displays

    Arduino TeamJune 19th, 2019

    Alarm clocks of old—and certainly many of those today—require several button pushes to set things up properly. Maker Michael Wessel, however, decided to implement his own take on a more intuitive clock, creating a device that features three separate eight-digit seven-segment LED panels. Eight buttons allow for direct manipulation of each of the digits, with their own dedicated LEDs.

    The info on display includes time and date, as well as temperature, and it can even show how many days, hours, or minutes have passed since a special pre-programmed day. Up to seven audible alarms are available, which can be silenced by a loud noise (e.g. clapping your hands) via a sound sensor. 

    The clock is controlled via an Arduino Mega, along with an RTC module to keep things accurate.

    I remember I always had to set all digital clocks for my grandparents in the ’80s — these clocks and watches always required some complicated button juggling! So, here it is: a DIY LED alarm clock that my grandparents would have been able to set and use without my help! 

    An Arduino-based LED clock with 7 individual alarms, highly intuitive user interface, temperature display, and display of days / hours / minutes passed since a special date, e.g., your birthday. An active / ringing alarm can be disabled by making a loud noise, e.g., by clapping your hands. Timer-based PWM sound output for alarm melodies. 

    The Arduino’s EEPROM is being used to store the alarms of course, and the DS3231 RTC is battery backed up, so it survives a temporary power outage and you won’t be late for work the next morning. 

    This was put together rather quickly, thanks to off the shelf components, Velcro and existing Arduino libraries for them! The clock can be built for about $30 – 40. 

    [youtube https://www.youtube.com/watch?v=Uzu9-YZ3jMU?feature=oembed&w=500&h=281]

    Website: LINK

  • Portable Arduino Bot lets you test ideas on the go

    Portable Arduino Bot lets you test ideas on the go

    Reading Time: 2 minutes

    Portable Arduino Bot lets you test ideas on the go

    Arduino TeamJune 19th, 2019

    As you experiment with Arduino boards and programming, you’ll likely have ideas that you want to test right now. Unfortunately, you can’t always have the entire project with you to try out. With that in mind, Khang Nguyen has designed the Portable Arduino Bot.

    This sci-fi-inspired device packs an Arduino Nano inside, along with an on/off switch, a microswitch, three LEDs, and a LiPo battery for power. To protect these components, the bot features a nice 3D-printed enclosure, complete with foldable feet that make it look like a small robot or even spaceship. 

    While it won’t replace all the tools you have at home, it appears to be a great way to carry out testing, and as shown in the videos below, to play sounds with the addition of a buzzer!

    [youtube https://www.youtube.com/watch?v=tFqlLbhJgwI?feature=oembed&w=500&h=375]

    [youtube https://www.youtube.com/watch?v=4fv4zDYVLHY?feature=oembed&w=500&h=375]

    Website: LINK

  • Synchronized bike lighting inspired by nature

    Synchronized bike lighting inspired by nature

    Reading Time: 2 minutes

    Synchronized bike lighting inspired by nature

    Arduino TeamJune 18th, 2019

    Having a light on your bike at night is important for safety, but what if those headlights could talk to others sharing the road with you? Well now it can, using the [Bike] Swarm by Alex Berke, Thomas Sanchez, and Kent Larson from the MIT Media Lab.

    Their device—or collection of devices—controls a bicycle’s lighting via an Arduino and LED driver, and features an nRF24L01 wireless module to communicate with others in the vicinity. When another rider is encountered, the bikes sync their lights up automatically. 

    The team has already designed and fabricated prototypes, then strapped them onto local city bike share program bikes for testing. 

    It’s an interesting effect when two bikes pass, but as shown in the video below, things get much more fascinating when a handful of bikes can coordinate both their direction and light pattern.

    [youtube https://www.youtube.com/watch?v=wUl-CHJ6DK0?feature=oembed&w=500&h=281]

    As bikes navigate city streets after dark, they are often equipped with lights. The lights make the bikes visible to cars or other bikers, and the hazards of traffic less dangerous.

    Imagine that as solitary bikes come together, their lights begin to pulsate at the same cadence. The bikers may not know each other, or may only be passing each other briefly, but for the moments they are together, their lights synchronize. The effect is a visually united presence, as groups of bikes illuminate themselves with a gently pulsing, collective light source.

    Website: LINK

  • A surfing “desk toy” that you can actually ride

    A surfing “desk toy” that you can actually ride

    Reading Time: 2 minutes

    A surfing “desk toy” that you can actually ride

    Arduino TeamJune 18th, 2019

    If you’ve ever played with desk toys portraying a beach with liquids that splash around, this project by Lena Strobel, Gabriel Rihaczek and Guillaume Caussarieu takes things up several levels as a surf simulator that you can actually ride.

    The device features two parts — an oil/water wave diorama which sloshes around using a servo actuator and a wooden “surfboard” large enough for a person to stand on.

    The board is curved on the bottom enabling for someone to tilt it back and forth with their body movement, while a three-axis accelerometer handles angle measurement. This data is then passed from an onboard Arduino Uno to a second Uno that drives the diorama’s servo via nRF24L01 radio transceivers. 

    The result is an actual body-controlled wave motion, and a distraction that looks like a lot more fun than simply pushing a tank around with your finger!

    [youtube https://www.youtube.com/watch?v=VN4mC1hA1mg?feature=oembed&w=500&h=281]

    [youtube https://www.youtube.com/watch?v=Y–hHNTg_Mo?feature=oembed&w=500&h=281]

    Do you feel a sudden urge of going surfing, but there is no large body of water nearby? Are you scared of deep and turbulent waters? Or are you just to lazy to go outside? Then the Ultra Realistic Surfing Simulator is the perfect solution for you! It allows for a close to reality surfing experience from any place imaginable. As a two part system, motion is sensed by a board and translated into wave motions of an ocean diorama.

    Website: LINK

  • Microscopic gigapixel photography with this X/Y stage setup

    Microscopic gigapixel photography with this X/Y stage setup

    Reading Time: 2 minutes

    Microscopic gigapixel photography with this X/Y stage setup

    Arduino TeamJune 17th, 2019

    Normally the 10-50 gigapixels of a DSLR are good enough for nearly any photo you can imagine, but if you need more—and don’t want to spend many thousands of dollars—then this clever setup by Jon Bumstead may be just the thing.

    His contraption uses a Nikon D5000 camera situated above a small photographic subject, which progressively moves in front of the lenses using an X/Y stage. Motion is handled by pair of stepper motors, under the control of an Arduino Nano and two L9110 driver boards. The Nano also commands the camera to snap a picture when the subject in position, producing an array of photos that can be stitched together to form an image with extreme detail.

    In optical microscopes, there is a fundamental trade-off between field-of-view and resolution: the finer the detail, the smaller the region imaged by the microscope. One way to overcome this limitation is to translate the sample and acquire images over a larger field-of-view. The basic idea is to stitch together many high resolution images to form a large FOV. In these images, you get to see both the full sample, as well as fine detail in any portion of the sample. The result is an image consisting of about a billion pixels, much larger in comparison to the pictures taken by a DSLR or smartphone, which typically have around 10 to 50 million pixels.

    In this Instructable, I will go over how to build a microscope capable of imaging a 90mm x 60mm field-of-view with pixels corresponding to 2 micrometer at the sample (although, I think the resolution is probably closer to 15 micrometer). The system uses camera lenses, but the same concept can be applied using microscope objectives to get even finer resolution.

    [youtube https://www.youtube.com/watch?v=mKXoA6zDu98?feature=oembed&w=500&h=281]

    Website: LINK

  • This self-balancing mech is piloted by an insect

    This self-balancing mech is piloted by an insect

    Reading Time: < 1 minute

    This self-balancing mech is piloted by an insect

    Arduino TeamJune 14th, 2019

    You’ve seen self-balancing robots, where a pair of wheels suspend a mass above them in what’s known as an inverted pendulum configuration. As neat as they are, the “Augmented Arthropod” by Grzegorz Lochnicki and Nicolas Kubail Kalousdian puts a new spin on things. 

    The structure for the build consists of three platforms separated on threaded rod and a couple of rather standard DC gear motors. Electronics include an Arduino Uno, a BNO055 IMU, and an L298N motor driver. 

    Where things get a bit interesting, though, is that the mech is piloted by the movements of an insect placed inside a plastic case using two HC-SR04 ultrasonic sensors. 

    [youtube https://www.youtube.com/watch?v=esiqaSfpYD4?feature=oembed&w=500&h=281]

    Perhaps the most valuable part of the project write-up is the discussion about how it balances via PID, or proportional, integral, and derivative control. 

    Website: LINK

  • Building gas thruster-controlled drone

    Building gas thruster-controlled drone

    Reading Time: 2 minutes

    Building gas thruster-controlled drone

    Arduino TeamJune 13th, 2019

    In the Earth’s atmosphere, a drone can adjust its heading by varying the speed of the propellers, and thus the thrust output of each. If you wanted to land something on a lunar surface, or maneuver a spaceship, the lack of atmosphere means a different technique must be used.

    While not going to space (yet), Tom Stanton decided to create a demonstrator for this technique, similar to how the manned Lunar Landing Research Vehicle (LLRV) operated in the 1960s and ’70s. Stanton’s device employs a central electric ducted fan (EDF) to hold the craft up, while three compressed air nozzles provide most of its directional control. 

    In action, an RC flight controller’s signals are modified by an Arduino Nano to accommodate this unique control scheme, pulsing out bursts of air via three solenoid valves.

    Check out the build and experimental process in the video below, culminating with untethered tests starting at around 17:30.

    [youtube https://www.youtube.com/watch?v=XpA6qpNlNOE?feature=oembed&w=500&h=281]

    Website: LINK

  • Wake up to this unique VFD alarm clock!

    Wake up to this unique VFD alarm clock!

    Reading Time: < 1 minute

    Wake up to this unique VFD alarm clock!

    Arduino TeamJune 11th, 2019

    If you’re a fan of novel timepieces, then you’ll want to check out Christine Thompson’s VFD Alarm Clock.

    The device features a USSR-manufactured IV-27V 7-segment tube, capable of displaying 13 numbers or letters via a 24V supply, though the MAX6921 chip used here means that only 10 grids are used.

    10 characters, however, are plenty to show time, date, humidity, temperature, and pressure, plus the text “WAKE UP!” when an audible alarm sounds.

    The clock runs on an Arduino Mega, along with an RTC module, a keypad, and secondary LCD screen on the back to assist with setting it up.

    [youtube https://www.youtube.com/watch?v=Wv_HT8QRedc?feature=oembed&w=500&h=281]

    Website: LINK