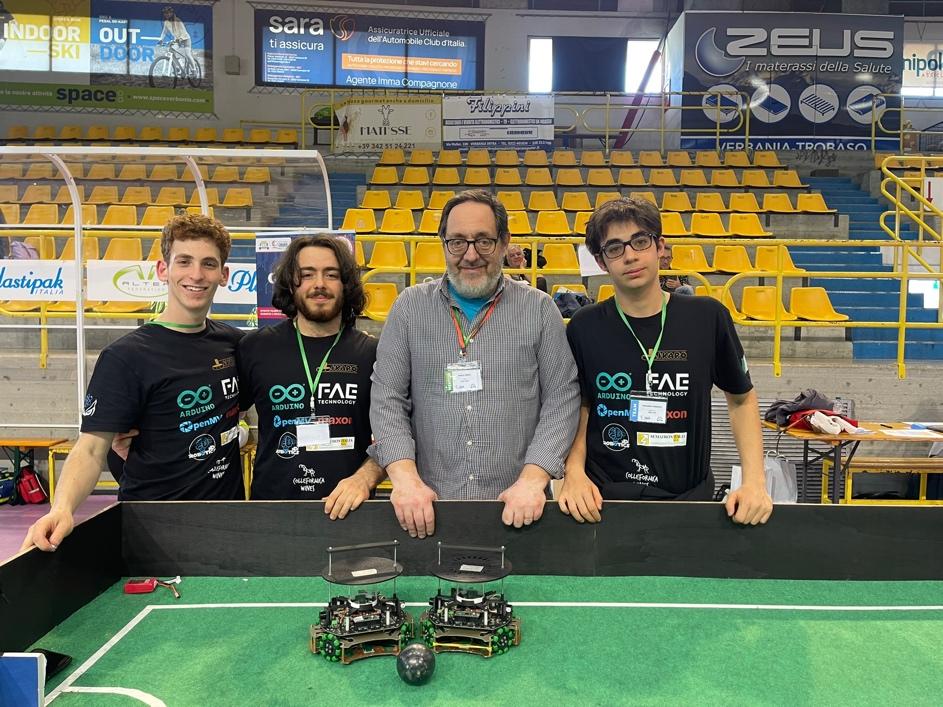
Team Ikaro is a vibrant group of high school students from the Pacinotti Archimede Institute in Rome, sharing a strong passion for electronics and turning heads in the world of robotics! Specializing in Soccer Lightweight games (where robot-soccer players compete to score goals on a miniature field), they clinched the first place at the Romecup 2024 and won Italy’s national Robocup in Verbania earlier this year – earning the right to compete in the world championships in Eindhoven, where they placed third in the SuperTeam competition.
The brains behind the bots
Utilizing the versatile Arduino Nano RP2040 Connect, the team has crafted highly efficient robots that feature ultrasound sensors, PCB boards, a camera, four motors, a solenoid kicker and omni-directional wheels, all meticulously assembled in the school’s FabLab.
Mentored by professor Paolo Torda, Team Ikaro exemplifies the spirit of innovation and teamwork bringing together three talented students: Francesco D’Angelo, the team leader, focuses on system design and mechanics; Flavio Crocicchia, the software developer, ensures the robots’ brains are as sharp as possible; Lorenzo Addario specializes in camera software, making sure the robots can “see” and react swiftly on the field. Their combined efforts have led to a seamless integration of hardware and software, and established a foundation of passion and ambition for future success in their careers.
Future goals
After their first taste of global competition, Team Ikaro is determined to continue refining their robots, leveraging every bit of knowledge and experience they gain – whether in the classroom, lab, or live challenges. At Arduino, we are proud to sponsor such brilliant young minds and look forward to seeing what they will accomplish next!
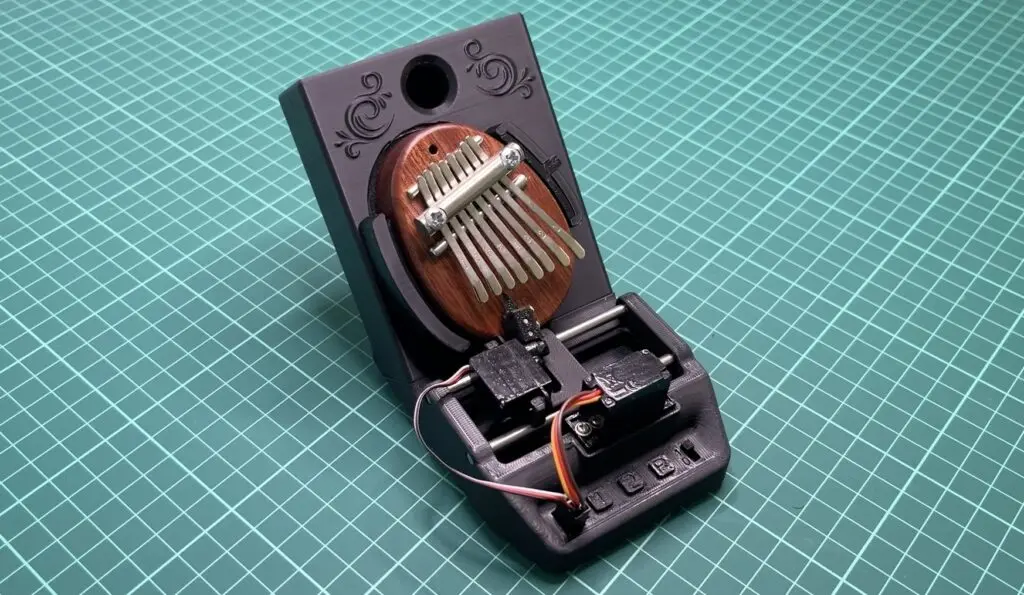
With roots in Africa, the kalimba is a type of hand piano featuring an array of keys that are each tuned for a specific note, and upon plucking or striking one, a pleasant, xylophone-like sound can be heard. Taking inspiration from his mini kalimba, Axel from the YouTube channel AxelMadeIt sought to automate how its keys are struck and produce classical melodies with precision.
The design process started out with Axel determining the best mechanism for interacting with the small keys, and after hitting/plucking them using a range of objects, he settled on plucking individual keys with a small plastic actuator. Two servo motors were utilized to perform the action, with one motor sliding a gantry left-and-right, and the other moving a small plastic pick across the keys. Axel’s design underwent several iterations to get the sound correct since material thickness, the lack of a resonant backing, and a loud servo motor all contributed to reduced quality initially.
After perfecting the physical layout, Axel assembled the electronic components into a custom 3D-printed case, which includes spaces for the Arduino Nano, battery, charging circuit, and pushbuttons. The first two buttons cause the kalimba to play preprogrammed melodies, while the last one plays random notes with a random amount of delay in between.
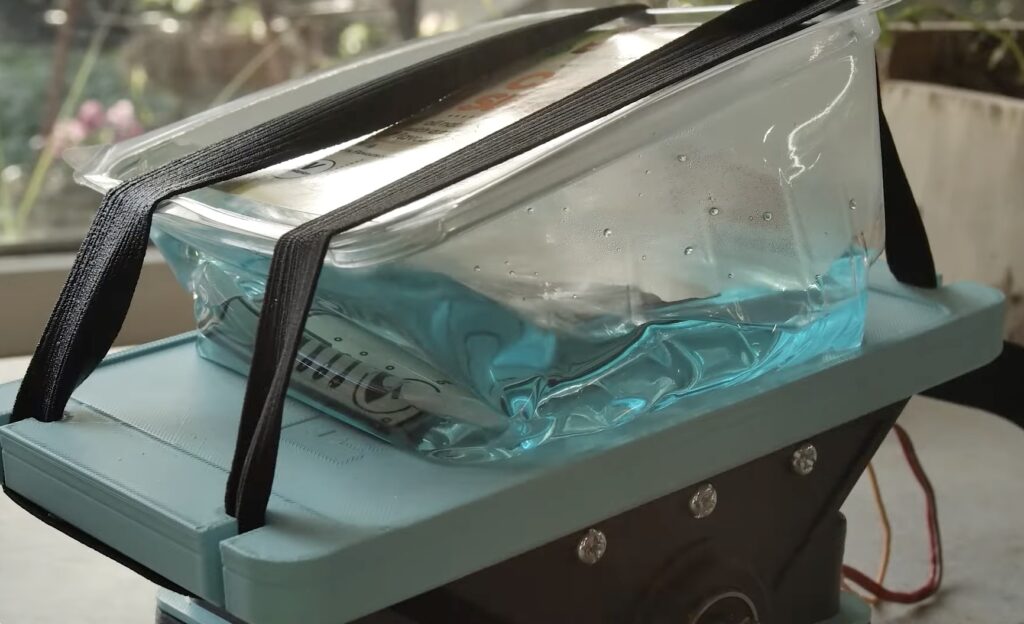
If you want to make PCBs at home and you don’t happen to own a CNC mill, then you’ll probably need to turn to chemical etching. Use one of several different techniques to mask the blank PCB’s copper that you want to keep, then toss the whole thing into a bath to dissolve away the unmasked copper. Unfortunately, the last step can be slow, which is why Chris Borge built this PCB agitator.
Alton Brown’s philosophy on “unitaskers” is wise when it comes to the kitchen, but things are different in the workshop. Sometimes a tool or machine is so useful that it is worth keeping around—even if it only does one job. That’s the case here, because Borge’s machine only does one thing: tilts back and forth. If a container with a PCB in an etchant bath is sitting on top of the machine, that action will slosh the chemicals around and the agitation will dramatically speed up the process.
On a mechanical level, this is extremely simple. It only requires a handful of 3D-printed parts, some fasteners, and a couple of bearings. The bearings provide a rotational interface between the stationary base (weighed down with poured concrete) and the pivoting platform. The electronics are even simpler and consist of an Arduino Nano board and a small hobby servo motor. The Arduino just tells the servo motor to move back and forth endlessly, tilting the platform and providing constant agitation.
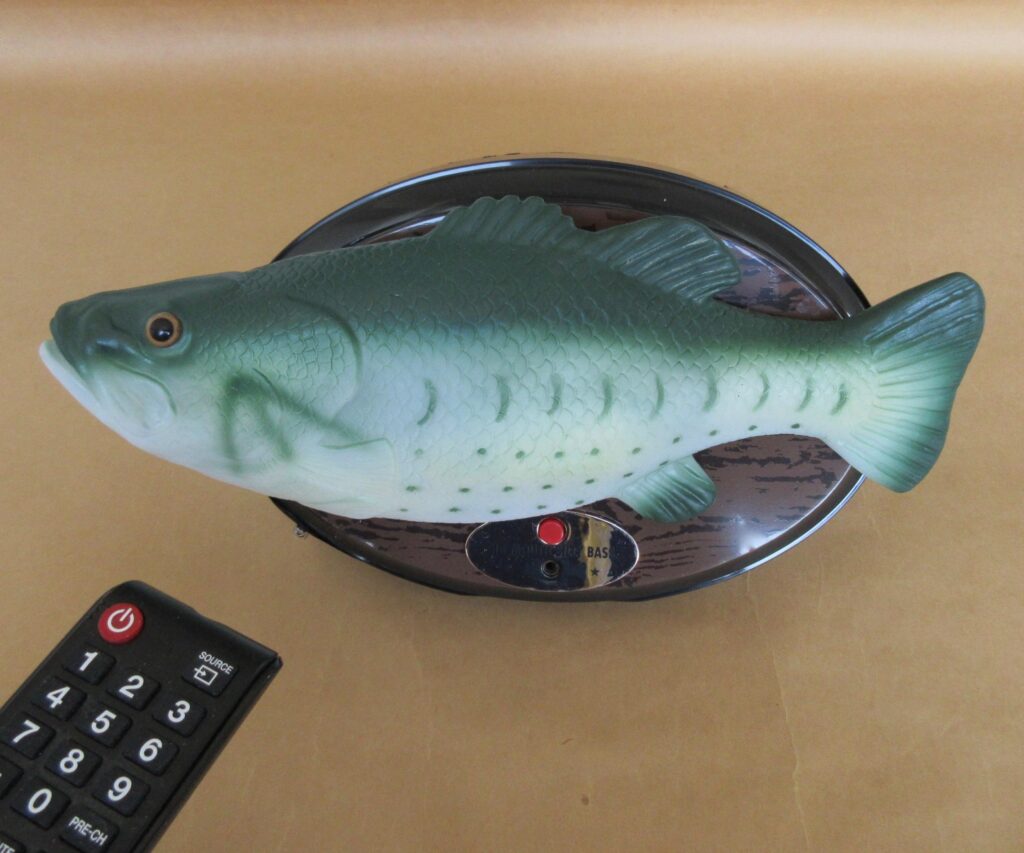
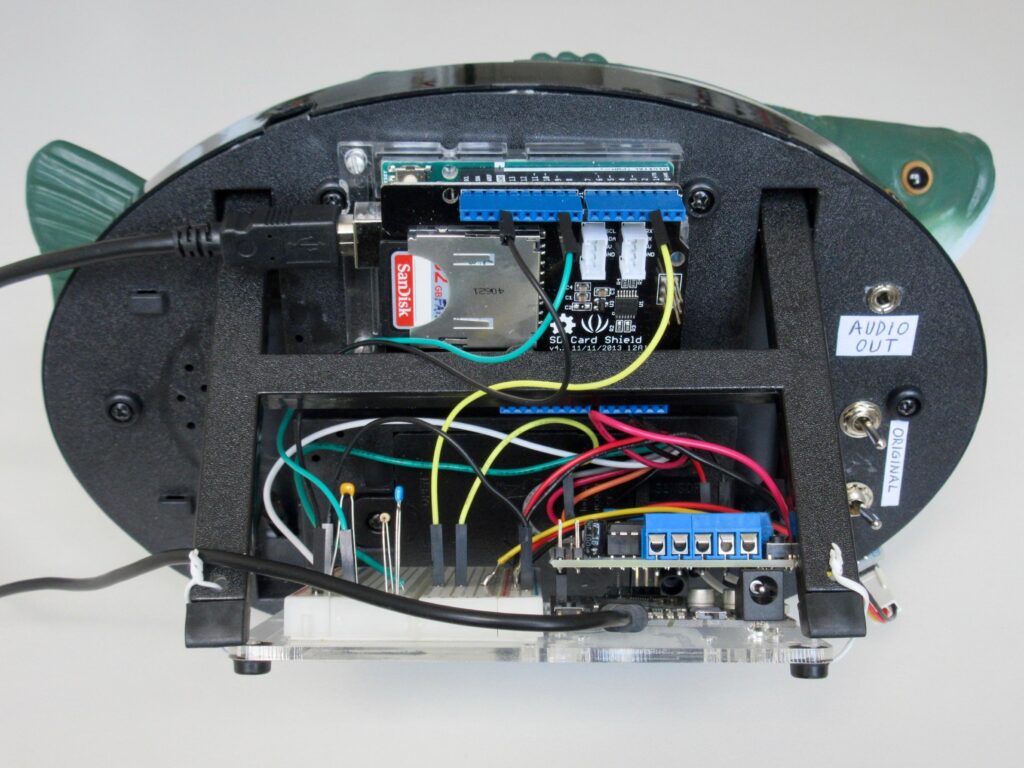
If you were unlucky enough to visit a big box retail store or goofy uncle’s home around the turn of the century, you would have undoubtedly come across a Big Mouth Billy Bass. That’s an animatronic fish that wiggles on a plaque while older, very licensable hit songs play. But while ol’ Billy was wildly popular at the time and spawned a whole new market segment, he wasn’t very sophisticated. Tony–K decided to address those cognitive shortcomings by giving Billy Bass an ‘arti-fish-al intelligence’ upgrade.
Internally, the original Big Mouth Billy Bass is quite simple. It has a single electric motor that drives the animatronic movement through a plastic mechanism, with a cheap sound chip that has Al Green’s “Take Me to the River” burned in. Tony–K’s modification gives the user fully control over everything, so they can program whatever behavior they like and use any audio. Using a standard infrared remote control, the user can activate those programmed sequences. If desired, Billy can be switched back to his normal routines.
Tony–K achieved that using two Arduino UNO Rev3 boards. One handles motor control, while the other plays audio. Tony–K chose to do that so he could use a motor driver shield with one Arduino and an SD card shield with the other. This takes advantage of the TMRpcm library, which makes it possible to play PCM and WAV files without a dedicated audio DAC (digital-to-analog converter). The audio quality won’t be stellar, but it is good enough for this purpose.
What to play all comes down to the builder’s ability to think up fish-related puns. If you can find a way to incorporate a Jimmy Buffett song, you’ll be golden!
In today’s busy world, getting students or engineers to work together is key to tackling complex IoT projects. Traditional code sharing and editing methods, like using offline IDEs or swapping files manually, often slow down projects and lead to mistakes. This can be a hassle and take up a lot of time, often getting in the way of students or developers learning together. To address these challenges, Arduino Cloud introduces Collaborative Coding — a new feature available in the Cloud Editor, the online alternative to the traditional Arduino IDE, that enables real-time, collaborative coding.
So, what is Collaborative Coding?
In Arduino Cloud, Collaborative Coding allows multiple users to work on the same code at the same time. For example, industrial automation professionals can enhance project efficiency, reduce errors, and accelerate development cycles while streamlining the collaborative experience and enhancing the overall efficiency of group projects. But not only enterprises, also teachers can work closer with their students by sharing and reviewing code, or finding ways to teach how the code works.
Advantages of code collaborations:
It streamlines the coding process.
It foster innovation through teamwork.
It ensures projects are on track and boosts continuity.
Is Collaborative Coding available for users with a Shared Space?
Yes, Collaborative Coding can only be accessed if you have a Shared Space created for your organization or school.
A Shared Space in Arduino Cloud is a collaborative environment designed for organizations or educational institutions. It allows team members or students to work together on projects while sharing many resources such as dashboards, things, sketches,…. There is no limit to the number of members who can join a Shared Space.
If you are on a paid Arduino Cloud plan and you have created a Shared Space, Collaborative Coding will already be enabled for you. Just open a sketch file from your organization space and start editing.
If you haven’t created a Shared Space for your organization yet, you can purchase an Arduino Cloud School or Business plan on this page.
How does Collaborative Coding work ?
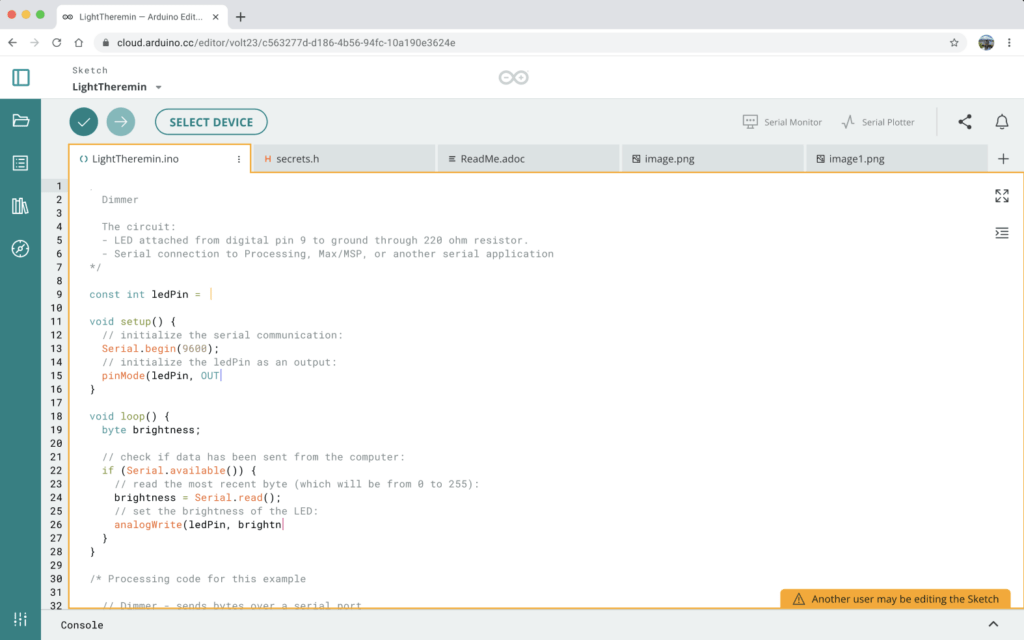
Let’s say that you’re in the middle of editing a sketch, when another user tries to access it. They will be notified right away that the sketch is being edited by someone else. How? With a message displayed in the lower hand corner of Arduino Cloud Editor (see screenshot below). Once you complete your changes or you have verified and uploaded the sketch, the other user will be able to edit the code.
4 ways to make the best out of Collaborative Coding
1. Boost IoT team project development
Facilitate collaboration among team members located in different parts of the world, ensuring that everyone is on the same page. Conduct code reviews in real time, improving code quality and knowledge sharing.
2. Engage in pair programming
Pair programming is the practice of pairing up students to work on programming activities. This is the most common approach used by teachers to foster collaboration in the classroom.
Collaborative coding helps students to be more actively involved in projects, making the learning process interactive and engaging. They can leverage each other’s knowledge and skills, resulting in more effective problem-solving and innovation. The development cycle accelerates as well, allowing for quicker iterations and refinements.
3. Deliver interactive workshops and training
Use the collaborative editor for training new hires and students who are learning to code allowing them to follow along and participate in real-time. Conduct hands-on workshops where participants can actively engage with the code, enhancing their learning experience.
4. Enhance client collaborations
Collaborate with clients on specific projects, enabling them to see progress and provide feedback in real-time. Quickly prototype and demonstrate solutions to clients, incorporating their feedback instantly.
Collaborative Coding in action
Explore how our new Collaborative Coding feature can revolutionize your workflow. Access short clips on our documentation site, customized for your specific needs:
This isn’t news: In both educational and professional realms, working with multiple users in real-time is key to success. The new Collaborative Coding feature in Arduino Cloud bridges the gap. It offers learning, helps debugging and improves communication.
By integrating this tool into your workflow, whether you’re a student working on group projects or a developer in the industrial automation sector, you will get a better development experience
Ready to revolutionize the way you collaborate on code? Check out this tutorial on how to Collaborate using the Cloud Editor.
Don’t have a Shared Space?
Visit our plans now and upgrade to a Pro or School plan depending on your profile and needs. If you’re a student or an educator, you can also sign-up for a free trial now and start collaborating within Arduino Cloud Editor.
For any information, our team is here to support you. Get in touch!
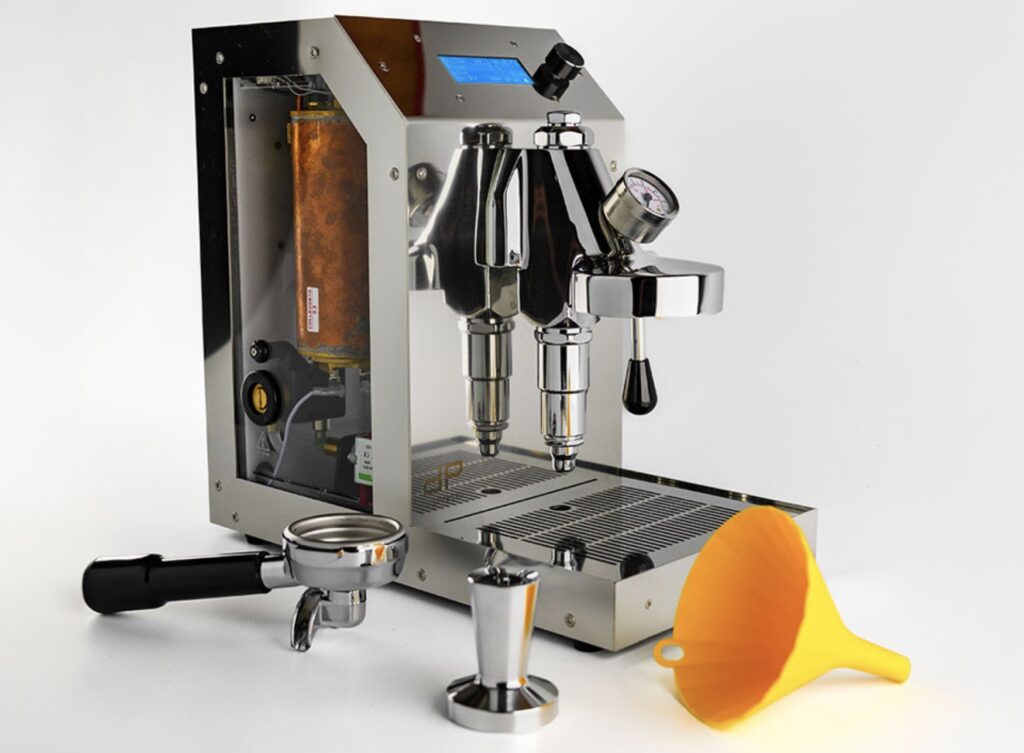
Caffeine lovers take their coffee very seriously and that is most apparent when you dive into the world of espresso machines. To satisfy enthusiasts, an espresso machine needs to provide precise control over temperature, pressure, and flow to enable the perfect pull. But if you’re the type of true aficionado that isn’t satisfied with any consumer off-the-shelf option, then you’ll be interested in the diyPresso One machine.
The diyPresso One kit costs €1,250.00 (about $1,390) and it isn’t meant to be a budget option. But it is more affordable than many of the high-end machines on the market. And, more importantly, its DIY and hackable nature means that you can tweak it and tinker with it until you have it exactly the way you like it. If you can’t make your perfect cup of espresso with the diyPresso One, then your perfect cup simply doesn’t exist.
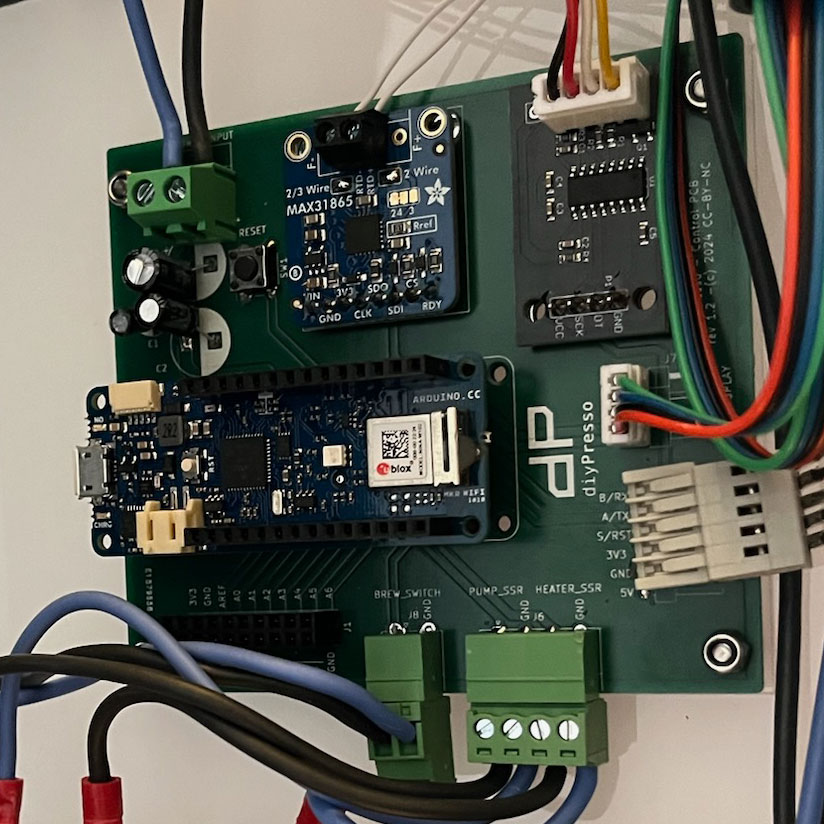
That all starts with the open-source controller and software, which monitor the machine’s various sensors and oversee the brewing process. That controller is built around an Arduino MKR WiFi 1010 board, programmed with the Arduino IDE. The choice to use Arduino was critical, because it lets users easily modify the machine’s behavior through simple sketch changes.
The rest of the parts are of equally high quality. The enclosure is stainless steel formed into a beautiful minimalist design, with side windows so everyone can see the stunning copper boiler that was custom-made for the diyPresso One. And the machine takes advantage of E61 brewing group components, so users can swap them based on preferences or requirements.
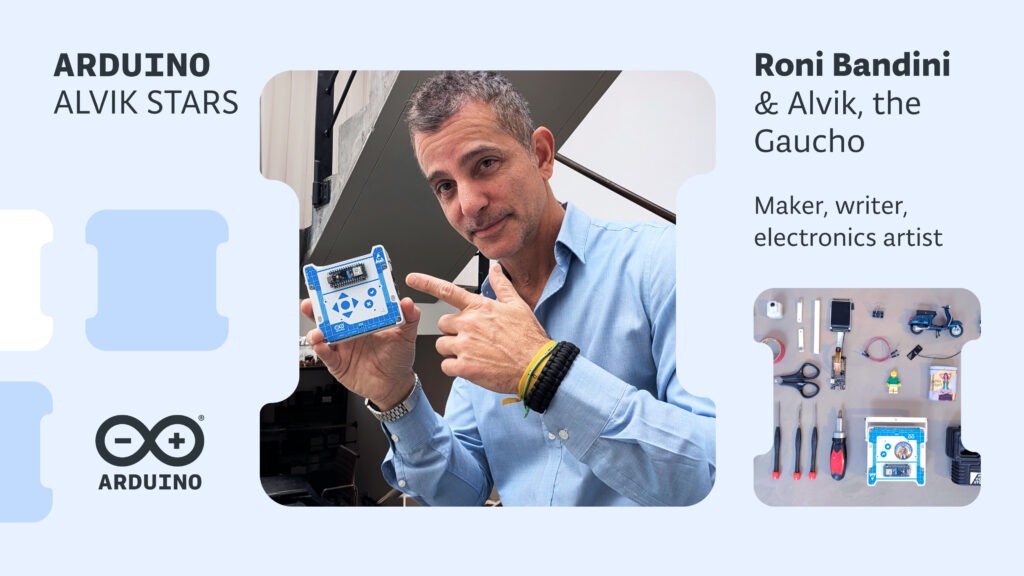
Have you ever discovered a cool piece of tech buried in your drawer and thought, “This could make for an awesome project”? That’s exactly what happened to Roni Bandini, maker, writer, electronics artist – and Arduino Alvik Star!
Bandini began coding at 10 years old, and has always found automatons and robots fascinating. About Alvik, he has said, “I really like this little robot—the elegance of its concept and design. As soon as I encountered it, I dove into several projects aimed at expanding its default capabilities.”
One of those projects in particular caught our attention, and we are excited to share it with you.
Getting the building blocks ready
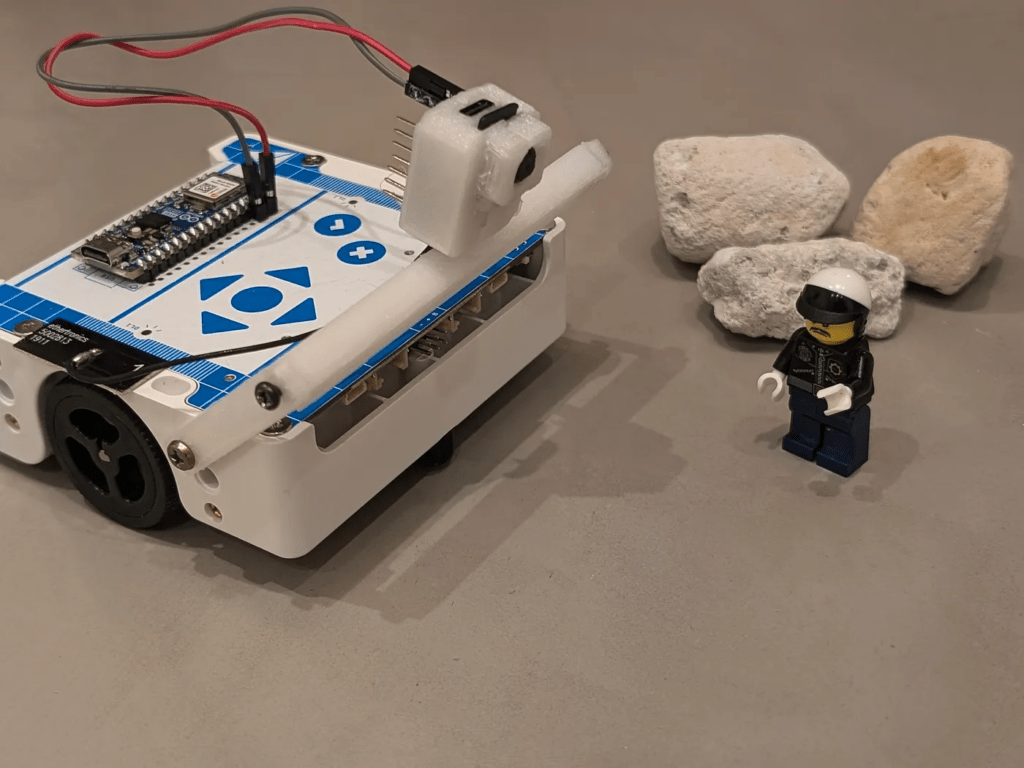
After stumbling upon a tiny Seeed Studio XIAO ESP32S3 with an OV2640 camera sensor, Bandini saw its potential right away. It was the perfect tool to upgrade Arduino’s Alvik robot with computer vision. His mission? To teach Alvik to evade law enforcement officials – or at least a LEGO® police figure!
Since both the Alvik main board and the XIAO cam board use ESP32, Bandini used ESPNow – a fast communication protocol – to connect the camera with the robot. He then 3D-printed two support bars and attached them with a pair of M3 screws.
Learning to react fast!
But before the epic police chase could begin, Alvik needed some training. Bandini took pictures of the LEGO® police figure and a ball and uploaded them to Edge Impulse. He then exported the trained model as an Arduino library using the EON compiler, before importing the zip file into the Arduino IDE.
Once everything was set up and the MicroPython script created, Alvik was ready to roll. As it moved forward, the robot took pictures and processed them through a machine learning (ML) model. If it detected the police figure, Alvik would turn around and flash a red light. In other words, it was time to make a quick getaway!
For more details on this exciting project, including a link to a YouTube demo, visit Bandini’s blog post here.
Making it useful
However, the action doesn’t stop there. Although Alvik can drive autonomously, Bandini has also adapted a remote control from the 1980s to give himself even more control. How? By writing C++ routines that translate the remote’s coordinates into commands. These commands are then sent via ESPNow to the MAC address of the ESP32 in Alvik, where they trigger functions to move the robot.
Inspired by an old-school advertisement for the Omnibot 2000 robot, Bandini has even taught Alvik to bring him a glass of whiskey! While we don’t recommend this for anyone under the legal drinking age, there’s no reason why you can’t substitute it for your favorite refreshments!
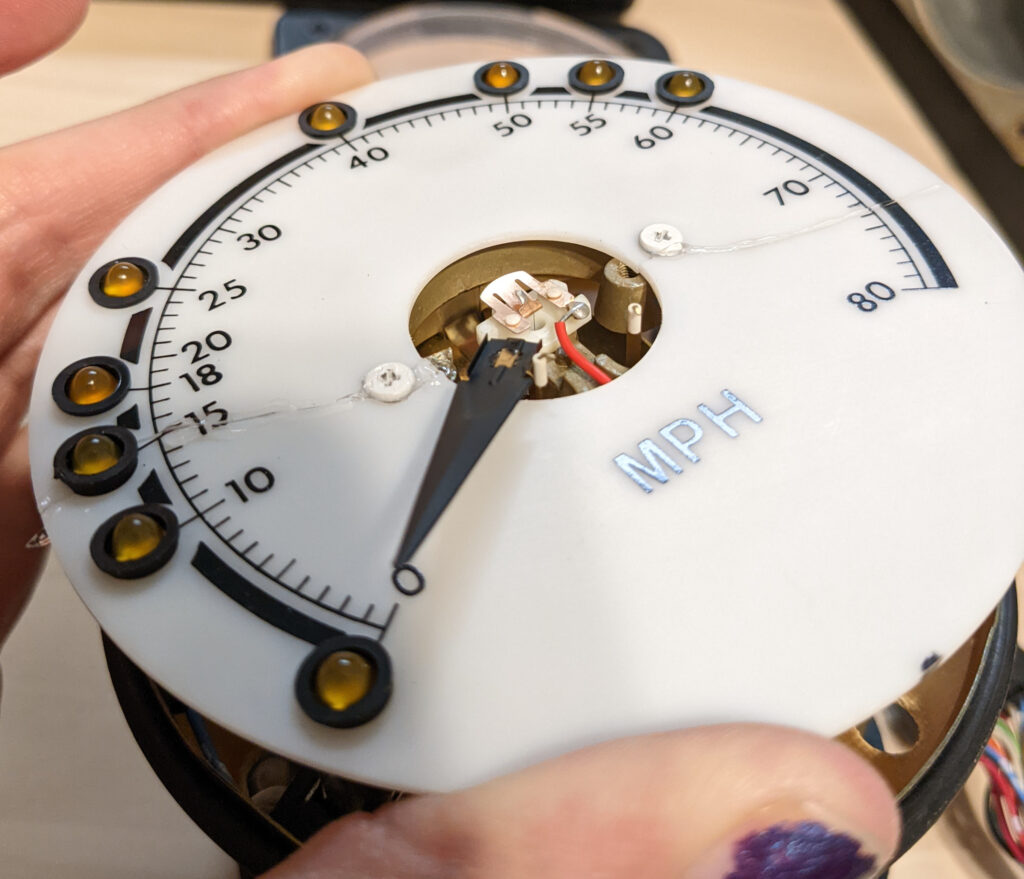
We’re just now getting semi-autonomous self-driving capabilities in cars, which let them adhere to posted speed limits and maintain their lanes. But trains have been doing the same thing for a long time — well before machine learning and computer vision became ubiquitous. How did they do it? With ATC (automatic train control), which Philo Gray and Tris Emmy Wilson demonstrated by repurposing an ATC unit from an MBTA Red Line train as a car speedometer.
Trains don’t need help steering, because they’re on rails. Those rails are also the secret to ATC operation. Being conductive, the rails provide a path for communicating data. That’s actually bidirectional in a way, as railway control systems use the circuit completed by the presence of a train as a switch to determine the train’s position. At the same time, it sends data to the train through the “audio frequency track circuit.” The ATC unit reads that data and controls the train speed accordingly, while also indicating the speed limit and current speed on the gauge.
Cars don’t have the benefit of rails for data transmission, so the Gray and Wilson recreated the functionality by using an Arduino to emulate the appropriate signal for the ATC unit to read. It has to communicate two data streams to the ATC unit: the speed limit and the vehicle’s current speed. The unit has a pretty standard-looking speedometer for the latter and uses small lights at intervals to indicate the former.
Gray and Wilson used a laptop with OpenStreetMap and the current GPS location to find the speed limit of the road their vehicle is on. It then tells the Arduino to set the corresponding speed limit light. The speedometer functionality, surprisingly, proved to be more challenging. The original plan was to use a Bluetooth OBD2 reader to pull the information directly from the car, but the adapter was very unreliable. They then tried to estimate the speed using GPS readings, but that was also unreliable and so they returned to the OB2 adapter.
This isn’t reliable or practical by any means, but it is very cool to see the old ATC unit working inside of a car.
The field of neurotechnology has been advancing rapidly in recent years, opening up to safe and effective non-invasive interfaces that can deliver tiny milliamp currents to the right stimulation location on the head, neck or body. One example of the new players in this field is BrainPatch.AI, a Cambridge-based neurotech startup, which has developed an advanced brain stimulation headset that aims to give wearers a meditative and stress-free state of mind.
BrainPatch co-founder and CEO, Dr Nickolai Vysokov, explains: “Our innovative headphones are designed to gain indirect access to the vagus and the vestibular nerves via electrodes placed just behind the ears. The vagus nerve regulates the ‘rest and digest’ response of the nervous system, and stimulating it is known to lead to reduction of stress, improvement of heart rate variability, better communication between the mind and the body, and an improved overall state of wellbeing in general.”
Prototyping at mind-bending speed
Ordinarily, the time and effort required to produce a range of working prototypes would take larger companies years to accomplish, let alone a startup, which is why BrainPatch.AI chose to use a range of Arduino boards for their initial designs and testing. What began as a simple Arduino UNO-based circuit quickly evolved into an AI-enabled neuromodulator, leveraging the Arduino Nano 33 IoT’s built-in internet connectivity. Mobile devices are connected to the board via Bluetooth® Low Energy to allow precision protocol delivery and ability to adjust the protocol through Python® and integration with other devices. Altogether, the capability to leverage Arduino’s vast collection of libraries and hardware ecosystem ensured rapid progress could be made in a cost-effective manner.
Finding like-minded partners is the key to success!
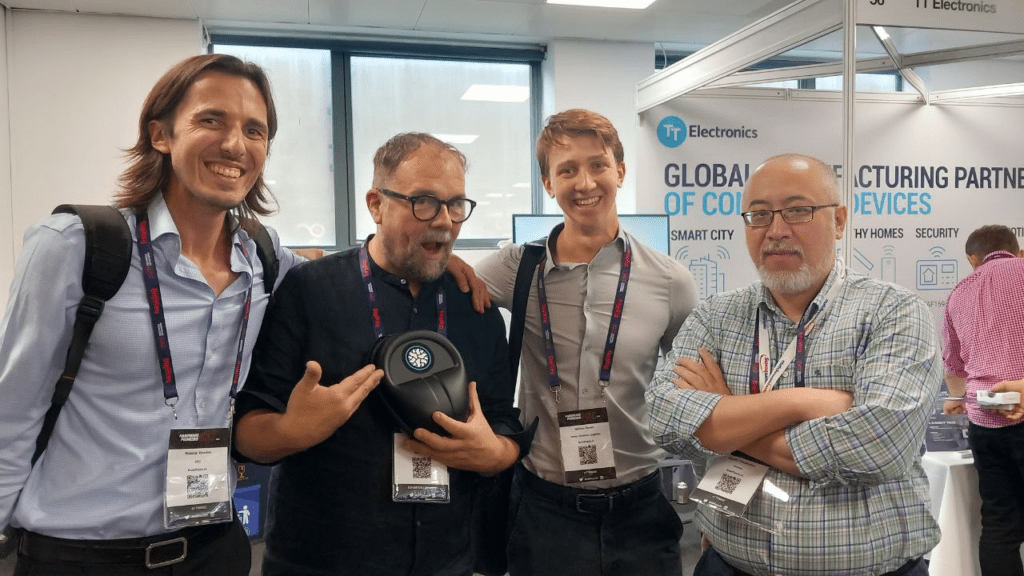
As a leading startup in the emerging neurotechnology space, BrainPatch.AI had the opportunity to meet with Arduino co-founder Massimo Banzi at Hardware Pioneers Max 2023 in London. The team was eager to demonstrate how effective their neuro stimulation device is, and to share how integrating Arduino hardware enabled them to move quickly – and can also be the go-to solution for many other startups and neurotechnology enthusiasts in the future. Nickolai adds, “Arduino is simply the best solution for any hardware / middleware / software startup prototyping, and we were blessed to have Arduino products and third-party libraries available when we needed them the most, to kickstart the process of transformation from ideas onto the physical objects. And now, we are ready to share our technology and our libraries with the world and other startups. If you are a co-founder of a startup, you must try our device when you get overstretched and overstressed. It’s life changing – and all thanks to Arduino.”
The current iteration of the company’s e-Meditation and VR enhancement products along with more information about the science behind non-invasive neuromodulation can be found here on BrainPatch’s website.
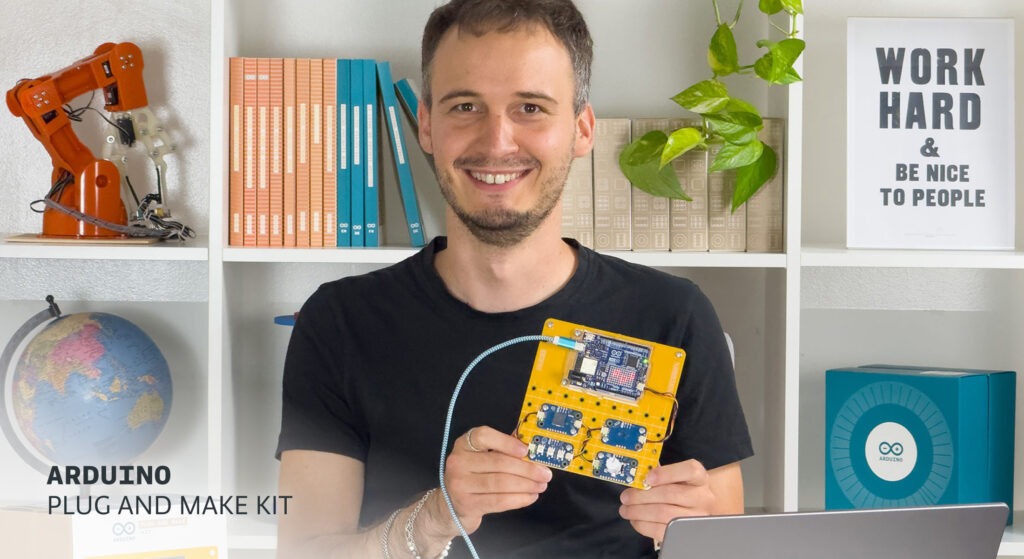
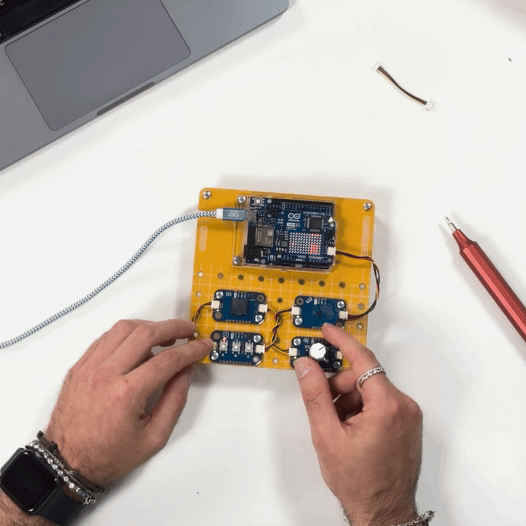
The Plug and Make Kit is a toolbox you can use for infinite ideas. So what happens if you ask a mix of Arduino designers, engineers, and managers to sit down and brainstorm new projects to have fun with it? Well, at least one of them is guaranteed to come up with an adorable, old-school, slightly addictive video game.
That’s exactly how Luca Doglione developed Flappy LED and LED Pong, during a “Make Tank” workshop we held in our Turin, Italy office a few weeks ago!
Meet Luca Doglione, Plug and Make Kit Star
Doglione is an engineering manager for the Arduino software and cloud teams, and one of the key people behind our website, cloud services, and course platform. He likes games in any shape or form, from board games to competitive computer games to vintage 2D arcade games. During the workshop, he was inspired by the different types of Modulino nodes and how they can be used together.
Flappy LED
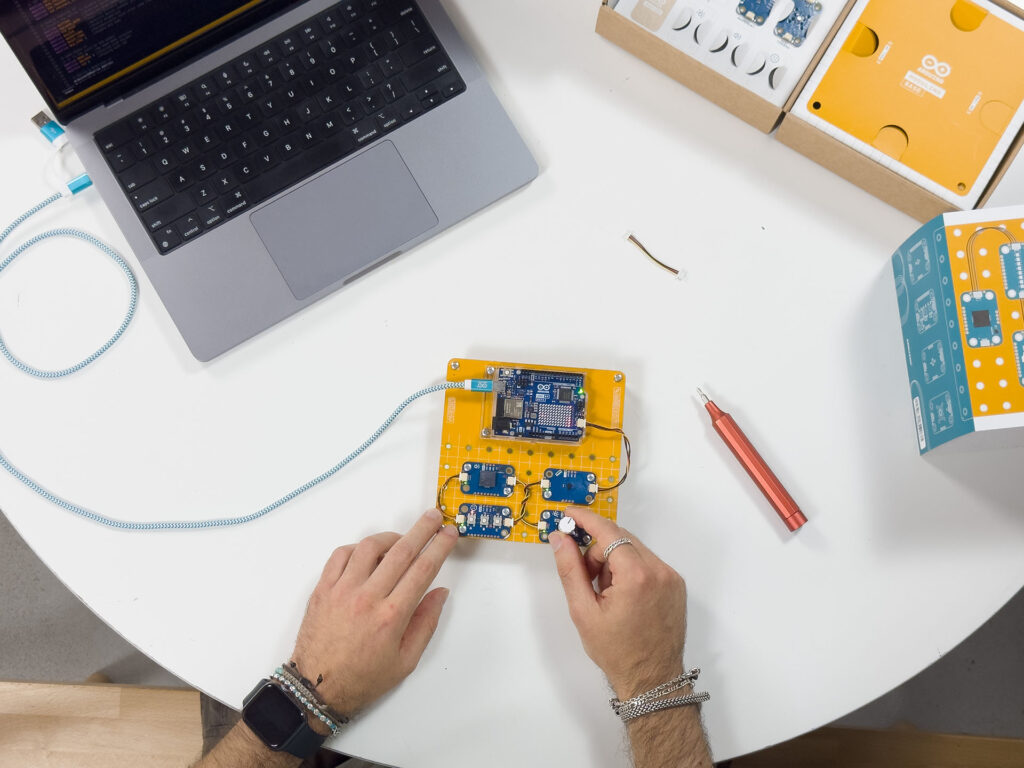
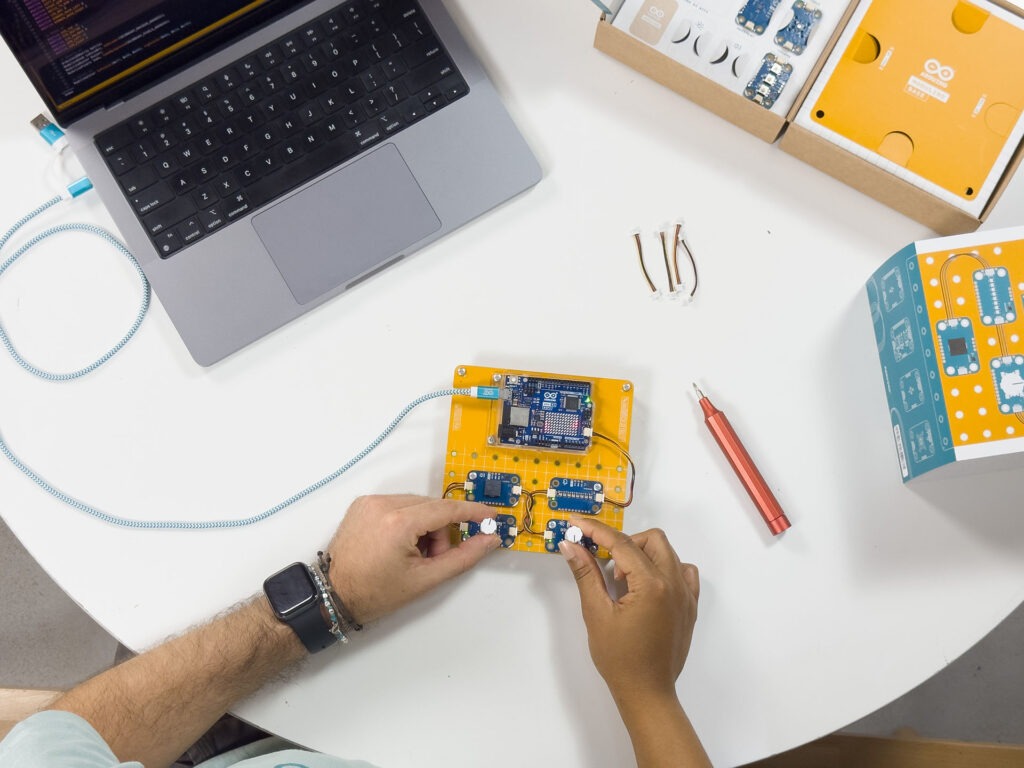
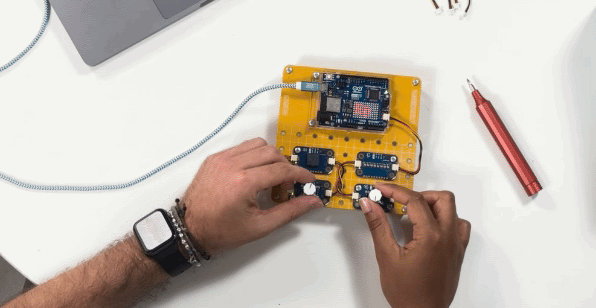
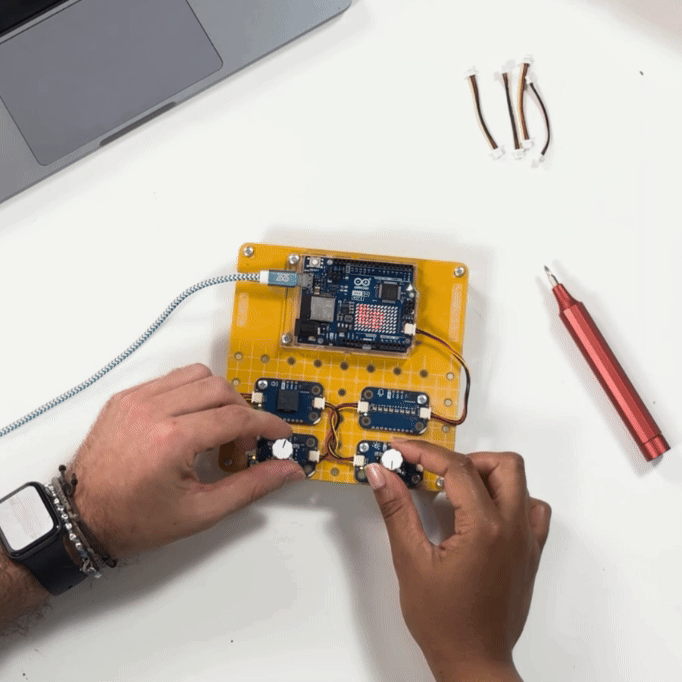
Using Modulino Distance, Modulino Knob, Modulino Buzzer, and Modulino Buttons, Doglione quickly came up with a simple way to interact with the LED matrix on the Arduino UNO R4 WiFi, all of which are included in the kit.
The goal of the game is to guide an LED dot up and down to avoid obstacles as you go – just like you would do with the bird in Flappy Bird. The longer you are able to avoid collisions and keep the LED moving, the higher the score!
You can control the movement of the LED light in two alternative ways: turning the knob, or moving your hand up and down above the distance sensor. You choose which mode you prefer by simply pressing the corresponding button on Modulino Buttons (A for the encoder or C for the distance sensor).
Follow the full tutorial on Project Hub to build this quirky game yourself, and let us know how you customize or expand it. The sky’s the limit!
LED Pong
Doglione worked out Flappy LED so quickly that he had time to ideate a second game. He immediately thought of the classic Pong, and created his own version with Plug and Make Kit. This project is just as portable and easy to recreate as the first, and can be played by two people together.
LED Pong requires two Modulino Knob: since each kit includes one per type of the seven nodes currently available, it is also a great idea for a collaborative making session with a friend!
The knobs are used to move the paddle and bounce the ball back and forth. Missing the ball gives the other player one point – as neatly displayed on the Modulino Pixel. The first to reach five points wins!
The full tutorial is here on Project Hub: try it out, and you’ll quickly bounce from nostalgia to excitement over how many new ideas Plug and Make Kit will unlock!
From reimagining old games to learning new tricks!
After seeing his playful ideas come together so easily, Doglione says, “My favorite part of Plug and Make Kit was being able to bypass the electronics to focus on user experience and interaction. This really unleashed my creativity. Having to figure out circuits always stopped me from tackling complex hardware projects – and I have a degree in computer science! Having that little yellow base and modular Modulino nodes made it really satisfying to see my project looking neat.”
What do you think about Doglione’s games? And what vintage games could you recreate with Arduino Plug and Make Kit?
More than 30 years ago, Dutch artist Theo Jansen began astounding the world with his Strandbeesten walking sculptures. Even after decades, they have an almost mythical allure thanks to the incredibly fluid way in which they walk. They’re clearly constructs, but with gaits that are almost organic. Inspired by his fellow Dutchman, Giliam de Carpentier built a motorized Strandbeest-style coffee table capable of delivering drinks.
This coffee table, dubbed “Carpentopod,” walks on six leg mechanisms that look and operate a lot like those of a Strandbeest. They convert rotary motion into complex foot movement through a series of rigid linkages.
de Carpentier was able to develop the legs’ gait and physical geometry using software he first created way back in 2008. It automatically optimizes the design through a process very similar to natural selection, with the most successful descendants going on to reproduce and ultimately yield very effective geometry for the giving constraints. de Carpentier’s software was efficient enough to evolve dozens of generations every single second, so it produced an optimized leg design in short order.
In this case, “optimal” mostly means “smooth.” When walking, it almost looks as stable as if it were rolling on wheels. It is, therefore, perfectly capable of carrying drinks without spilling them.
In contrast to the classic Strandbeesten, de Carpentier wanted this coffee table to be controllable. So, it has a pair of geared brushless DC motors to drive the legs. Like a tank, it steers by turning one side’s motor faster than another. An Arduino Nano board controls those motors, which have Hall effect encoders for closed-loop feedback, according to input that it receives from a Nintendo Wii Nunchuk via a Bluetooth module. With power from a large hobby LiPo battery back, it can roam around de Carpentier’s living room at his command.
If B. F. Skinner’s famous research proved anything, it is that virtually all animals are capable of some degree of training. Training is really just taking advantage of an animal’s natural inclination to adapt for survival, which is something all living organisms do. With that in mind, YouTuber Bao’s Builds constructed a box to give his teenage pet turtle a synthetic voice capable of ordering pizza.
The turtle, Lightning, just reached its 18th birthday and Bao decided that this would be the perfect gift. Like those mats covered in buttons that really smart dogs press with their paws to talk, Bao wanted Lightning to have a device with buttons assigned to specific requests, like “feed me” or “play with me.” Turtles aren’t quite as intelligent as border collies, so Bao decided the device only needed four buttons — turtles have pretty modest wants and needs, anyway.
Aside from the buttons themselves, which are standard arcade buttons, the key hardware components for this project are an Arduino Nano, a generic sound module, and a speaker. That sound module stores audio clips on an SD card to play whenever the Arduino makes a request. It also has a built-in amplifier, so it can feed a signal directly to the speaker. The sound clips contain realistic AI-generated voices: one for requesting food, one for requesting pets, and one for expressing love.
The final button orders pizza, which is the favorite food of teenage turtles (mutant or otherwise). That works by playing a sound file that tells an Amazon Echo to have Alexa place an order at Dominos.
Sadly, Lightning seems to have struggled to grasp the concept — maybe Skinner was wrong, after all. But that’s probably a good thing for limiting the Bao’s Dominos budget.
We are excited to share some incredible news with you all! We recently released the Arduino CLI version 1.0.0, marking a significant milestone for our software. This release is a big deal because it signifies the stabilization of the software API, bringing greater reliability and predictability to our users and developers leveraging it in their projects.
The Arduino CLI offers multiple ways to integrate and utilize its capabilities:
Command line interface: The most straightforward way to use Arduino CLI is through its command line interface. This allows you to manage boards, libraries, compile sketches, and upload code to your Arduino boards with ease.
gRPC interface: For more advanced use cases, the Arduino CLI provides a gRPC interface. This enables developers to interact with the CLI using their preferred programming language, allowing for the creation of custom applications and services that leverage the full functionality of the Arduino ecosystem. The gRPC interface is particularly useful for building complex workflows and creating custom IDEs or plug-ins.
Go module: You can also use Arduino CLI’s packages within your own applications written in the Go programming language. By importing the source code, you can embed the functionality of the Arduino CLI directly into your projects. This approach is beneficial for developers who want to integrate the tool seamlessly into their own software.
You can find more information about the different ways the Arduino CLI can be integrated in your software in the official documentation.
It’s been almost two months since the release of version 1.0.0, and we are now at version 1.0.4. In this short time, we have been working hard to address issues, fix bugs, and enhance the software. We are committed to delivering the best possible experience for our users, and each new version brings us closer to that goal.
For a comprehensive overview of the features included in Arduino CLI version 1.0.0, please refer to the official release notes. This list details all the enhancements, improvements, and new functionalities that make this release a significant step forward for our community.
To minimize the impact on our users, we accumulated almost all of the breaking changes for the 1.0.0 release, allowing us to clean up early design errors and other issues in one major event. From now on, our backward compatibility policy is designed to ensure stability and predictability for our community, specifically for the Arduino CLI. For more details about this policy, you can refer to the relevant documentation.
As we continue to build upon this foundation, we are looking forward to delivering even more improvements and new features in future releases. Thank you to our amazing community for your support and feedback – we couldn’t have reached this milestone without you. Stay tuned for future updates, and thank you for being part of this journey!
Motion-based controls for games have been around for decades, but even with the latest generation of virtual reality headsets, gaming is still done with relatively limited movement unless one has access to an expensive VR walking/running setup. As an effort to get more physical activity in, Iacopo Guarneri has developed a motion-capturing add-on that can be worn while on a treadmill, stationary bike, or elliptical to control in-game actions.
The wearable device itself is comprised of two components: an Arduino Nano and a six-axis MPU-6050 inertial measurement unit (IMU), which captures changes in velocity and orientation. Both of these parts are housed in a custom 3D-printed case that can be attached to the user’s back via a strap. In the sketch, the Nano continuously reads motion data from the IMU, packs it into a serialized representation, and sends it over serial to the host machine for further processing.
Unlike how running in a video game is performed by holding the left joystick up, the accelerometer outputs a sine wave in the Z-axis while the user is bobbing up and down, which necessitated the use of a smoothing function to prevent sudden stops and starts. Turns, however, are much simpler, as the user’s left or right tilt can be directly translated into sideways motion. Once both axes have been calculated, the virtual gamepad’s inputs are updated with the new values and sent to the game.
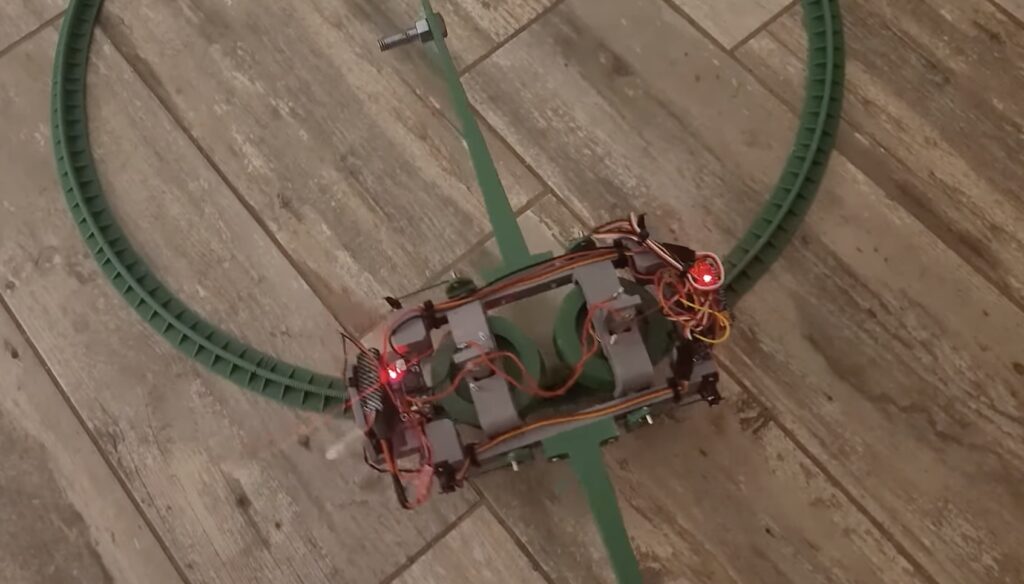
Most monorail systems, like the kind at Disney and in Las Vegas, stay upright because the “rail” is actually a very wide beam. The car’s load tires (often literal truck or trailer tires) roll on top of that beam and guide tires clamp the sides of the beam, preventing the car from getting tippy. But what if the rail were more like a conventional train track? In the case of Hyperspace Pirate’s monorail model, active gyro stabilization is the key.
Nobody has really produced a working full-scale gyroscope-stabilized monorail system since first conceived by Louis Brennan in 1903, because the idea simply isn’t practical at that size. Active gyroscope stabilization requires a lot of energy and is quite complex. If anything goes wrong, disaster is just around the corner. But on a small model scale, such considerations are much less relevant.
Hyperspace Pirate took advantage of that fact to create a small model of the 20th century experimental monorail that travels along a 24? track. It uses a control moment gyroscope (CMG) to keep the car upright on the single narrow rail. A CMG like this one uses a spinning mass’s inertia to resist torque that would change the axis of rotation. If you’ve ever played with one of those gyroscope hand exercise balls, this works in a similar manner. This monorail utilizes two of them to counteract side-to-side tipping, while cancelling out the tendency of them to reduce forward-backward tilting.
The challenge with this design is that it requires active actuation of the individual CMG flywheels, which is a major reason why it would be impractical at a full-scale. But Hyperspace Pirate was able to solve that problem by using an Arduino Nano board to tilt the spinning flywheels using servo motors. It does so in response to any tipping, which it detects using an MPU6050 IMU (Inertial Measurement Unit) sensor.
With some added outrigger weights, similar to a tightrope-walker’s pole, Hyperspace Pirate was able to build a monorail that seems to work fairly well.
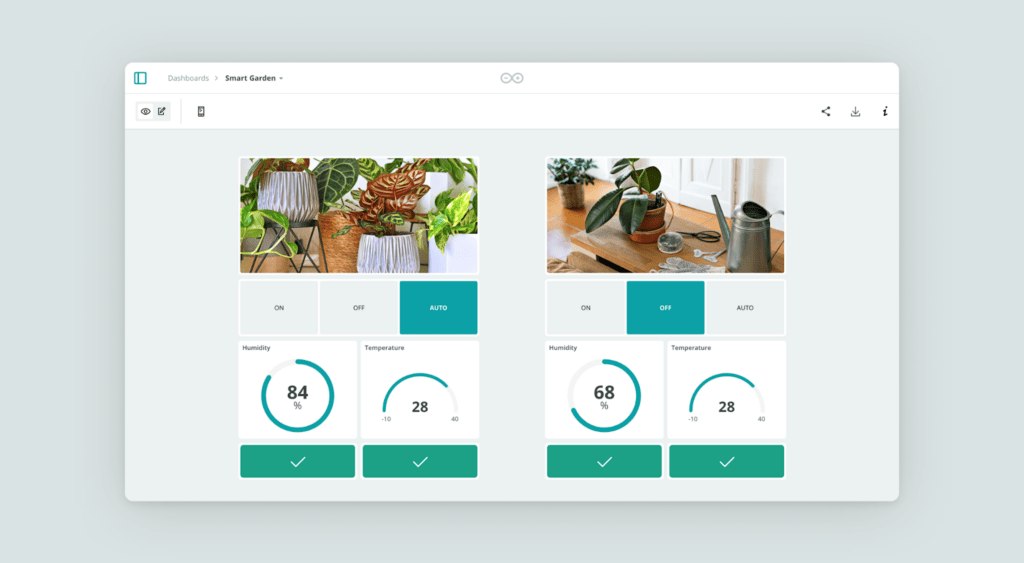
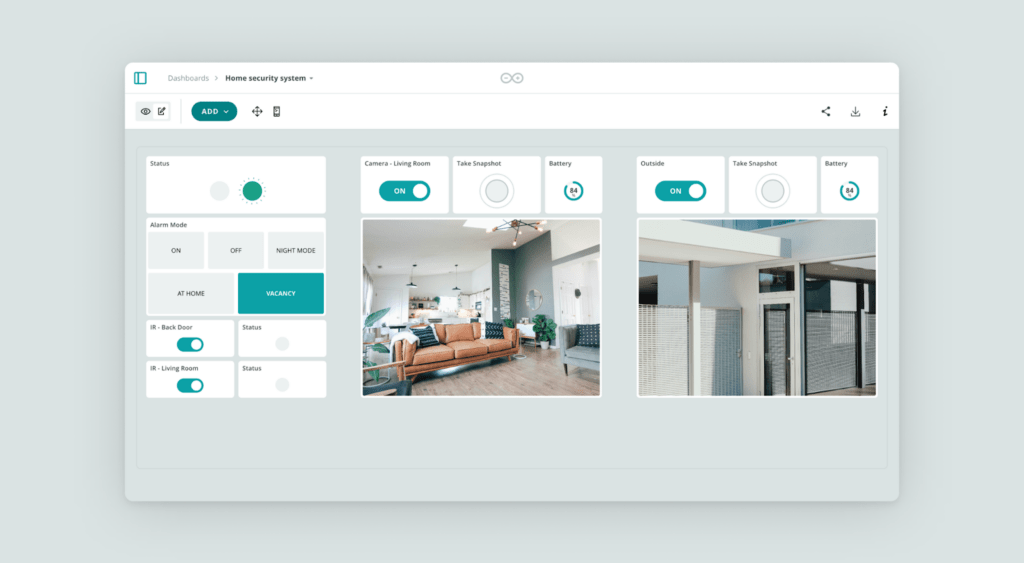
At Arduino, we’re constantly working to improve your IoT management experience. Today, we’re excited to announce a new feature for Arduino Cloud that will allow you to enhance your IoT dashboards: the Image widget.
The new Image widget
The Image widget is a simple yet powerful addition to your Arduino Cloud toolkit.
With this new widget, you can either upload a static image in formats like GIF, JPG, or WEBP, with a size limit of 5MB or specify a URL where the image is located.
You can choose between two display options:
Fill the widget frame (cropping may occur).
Fit the image within the frame (no cropping).
You can customize the widget frame by showing or hiding it, and select a white or gray background. Best of all, no Thing variable is needed!
5 tips to enhance your IoT dashboards in Arduino Cloud
The Image Widget isn’t just about aesthetics; it brings several practical advantages to your Arduino Cloud experience. Here’s how this simple addition can make your IoT dashboards look better:
1. Create a banner for your dashboard: Add a personalized header to your dashboard with your company or project logo.
2. Identify sections of your dashboard with descriptive pictures: Use icons or images to visually categorize different parts of your dashboard, making it more intuitive to navigate.
3. Separate sections with an image acting as a separator: Improve the visual organization of your dashboard by using images as dividers between different sections.
4. Make your dashboards look prettier: Enhance the overall aesthetic appeal of your dashboards with carefully chosen images that complement your data visualizations.
5. Show camera snapshots: You can upload a picture taken from a camera at regular intervals or specific events, upload it to a fixed URL on a web server and display the picture in the dashboard.
How to use the Image widget
Adding the Image widget to your Arduino Cloud dashboard is a fairly straightforward process:
1. Open your Arduino Cloud dashboard. 2. Click on the “Add Widget” button. 3. Select “Image Widget” from the list of available widgets. 4. Upload your desired image (mind the 5MB size limit and file format) or indicate the image URL. 5. Choose your display option: Fill widget or Fit image. 6. Fine tune the final appearance: Decide whether to show or hide the widget frame and select your preferred background color (white or gray). 7. Position and resize the widget on your dashboard as needed.
Wait, what is Arduino Cloud?
New to Arduino Cloud? Arduino Cloud is an all-in-one IoT solution that empowers makers, IoT enthusiasts, and businesses to create, monitor, and control their IoT devices from anywhere in the world. With its intuitive interface, stunning customizable dashboards, and sharing capabilities, Arduino Cloud makes it easy to bring your IoT projects to life and collaborate with others.
Customizable dashboards with a variety of widgets, including our new Image widget
Over-the-air updates for connected devices
Secure data and sketch storage and management
Easy sharing and collaboration tools for team projects
Get started with the new Image widget
The new Image widget is just one of the many ways we’re working to improve your experience with Arduino Cloud. By allowing you to personalize and organize your dashboards more effectively, you can make your IoT projects not just functional, but also visually appealing and intuitive. Check our documentation to learn more.
Ready to try out the new Image widget? Log in to your Arduino Cloud account today and start enhancing your dashboards for free. If you’re new to Arduino Cloud, there’s never been a better time to start. Sign up now and discover how Arduino Cloud can streamline your IoT development process.
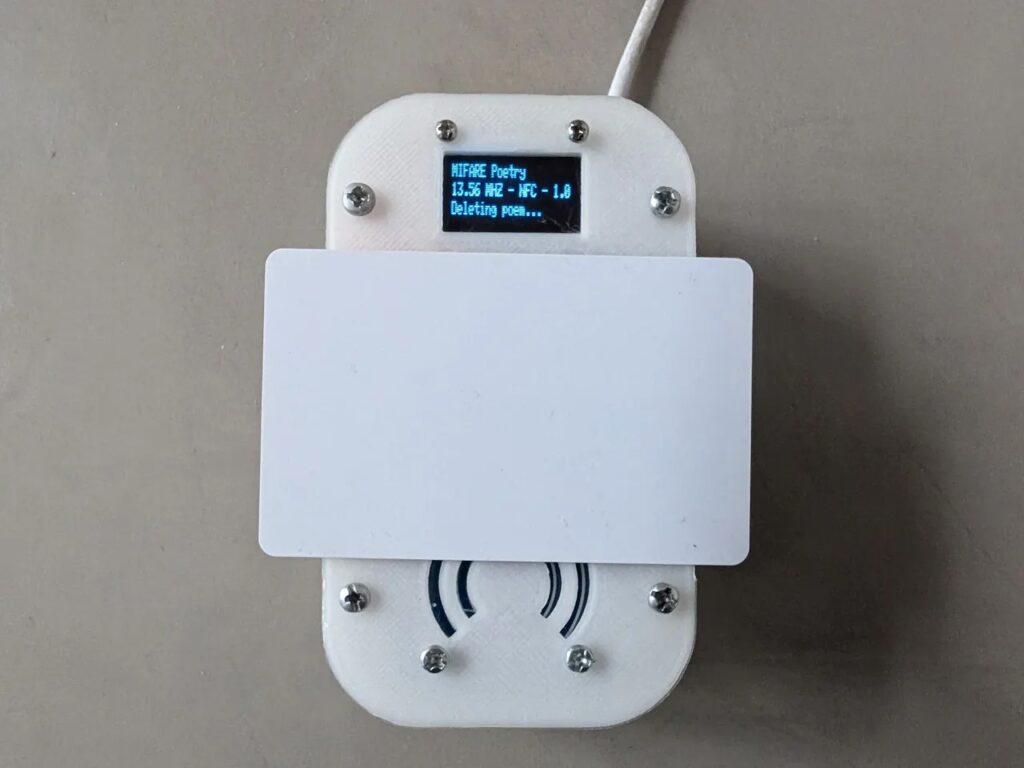
Most people don’t consume poetry in the same way that they do novels. Instead of reading a book of poetry from cover-to-cover over the course of a few sessions, the majority of people seem to prefer enjoying poetry in occasional little chunks. And unlike the epic poems of Greek antiquity, those tend to be short and sweet. Leaning into those tendencies, Roni Bandini built this RFID device to read micropoetry.
“Micropoetry,” in this context, is a style of short poem consisting of three lines. Each of those lines can contain up to 16 characters. That is roughly similar in overall length to a haiku, but doesn’t have any rules regarding syllables. In fact, some haikus couldn’t fit in this micropoem structure, as the lines would contain too many characters.
If these rules seem awfully specific, that’s because they aren’t arbitrary. Bandini created them so that the poems can fit within the limited storage of MIFARE Classic 1k RFID chips. MIFARE didn’t design those to store any significant amount of data, but rather for saving critical attributes like IDs. These rules ensure that MIFARE Classic 1k RFID tags can contain micropoems. Bandini even created a handy utility to write the poem’s lines into a card’s memory.
With that structure defined, Bandini built a device to let users read the stored poetry. When someone is in the mood for some poetry, they can simply place a micropoem RFID card on the device. An Arduino UNO R4 WiFi board will then scan the RFID chip using an MFRC522 module, read the stored data, and display the poem’s lines on a 1.3” 128×64 OLED screen.
As an added dramatic bonus, one datum in the RFID chip’s memory is a counter. On each read, the device increments that counter. When it reaches three, the device deletes the poem from the chip’s memory forever.
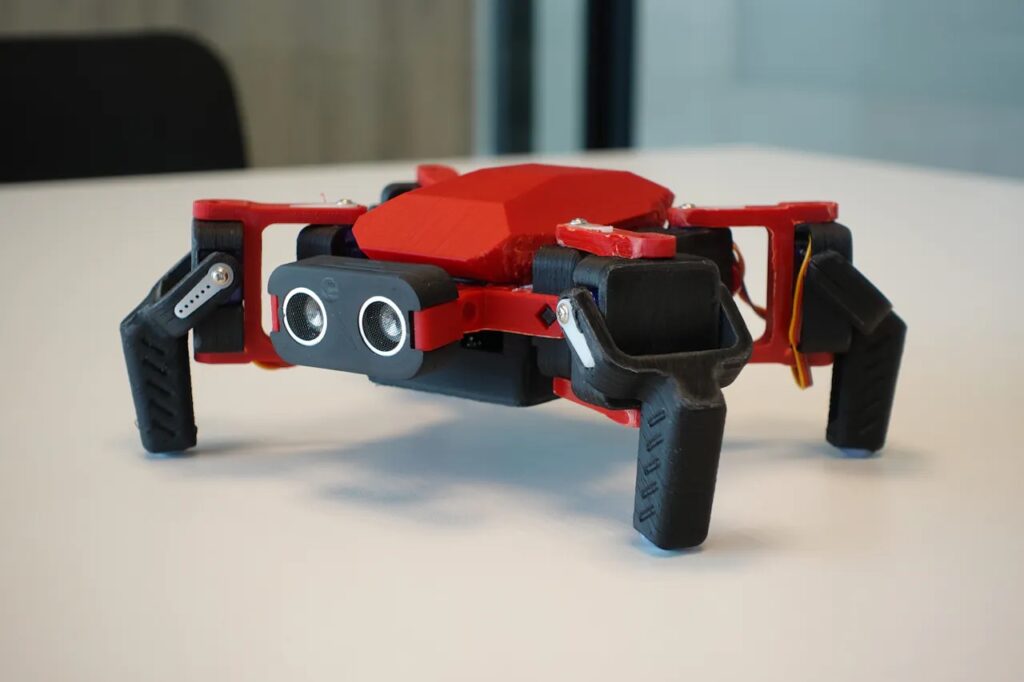
Robotics kits like the Screwless/Screwed Modular Assemblable Robotic System (SMARS) are great tools for learning more about how electronics, mechanics, and software can combine to perform useful tasks in the physical world. And in his latest project, Edge Impulse’s senior embedded software engineer Dmitry Maslov shows how he was able to take this platform and give it both speech recognition and Wi-Fi control capabilities using an Arduino Nano RP2040 Connect.
Constructed from an array of 3D-printed parts and eight servo motors, the SMARS Quad Mod robot is a small, blocky quadruped that uses two LiPo battery cells, a step-down converter, and an IO expansion board to move based on simple directional commands such as “forward” and “left,” among others. Normally, these would come from an IR remote or a preprogrammed sequence, but by leveraging AI at the edge, it can respond in real-time to audible commands. And to achieve this, Maslov imported a dataset containing many samples of people saying directions along with background noise before training a keyword spotting model on it.
Once exported as a C++ library, the model was embedded into the robot’s sketch. Thanks to the RP2040’s dual-core architecture, the first core continuously reads new data from the microphone, performs inferencing, and sends the result to the second core when available. Then when the value is received, the other core maps the direction to a sequence of leg movements.
Channeling his inner Gru, YouTuber Electo built a robotic minion army to terrorize and amuse the public in local shopping malls.
Building one minion robot is, in theory, pretty straightforward. That is especially true when, like these, that robot isn’t actually bipedal and instead rolls around on little wheels attached to the feet. But creating 10 robots is more of a challenge. Assuming a limited budget, the robots would have to be relatively inexpensive. So, how could Electo give them the ability to run around causing mayhem?
Electo’s solution was to make one smart minion, called King Bob, to lead all of the other minions of lesser intelligence. The basic design consists of an Arduino that controls the two drive motors and that can communicate with other Arduino boards via radio transceiver modules. Those components fit inside a 3D-printed shell and this basic minion is pretty affordable to construct.
But King Bob has more advanced hardware and special abilities. He can receive explicit movement commands from Electo’s radio transmitter controller, but also has some intelligence thanks to a single-board computer and a camera. That lets it run a computer vision application to detect and follow specific things that it sees. In this case, that is a banana.
King Bob could follow explicit commands or a banana, but what about the other minions? Electo gave them the ability to follow their leader by simply mimicking its movements. Any movement that King Bob makes is also transmitted over radio to the other minions, so they can make the same movements. This is intentionally clumsy (because minions), but lets the group move together in an entertaining way as they traverse shopping malls and movie theaters.
Kinetic sand art tables are pretty hot right now, because they look really cool. They’re like zen gardens that rake themselves in intricate patterns. But most of the builds we’ve seen use a conventional cartesian CNC layout or polar layout. This table by Newsons Electronics takes a different approach inspired by spirograph drawing machines.
A spirograph is drawing template mechanism made up of at least two gears (and often several). By placing a pen in the hole, the user can draw a line that traces the path created by the gear movement. That path varies based on the gear parameters and can be extremely intricate. The geometric beauty is appealing and this table produces those patterns in sand.
Like other kinetic art tables, this draws in the sand by using a magnet to pull a ball bearing through the sand. In this case, that magnet attaches to a motor-driven spirograph mechanism underneath the table. One motor rotates the mechanism, while another motor actuates a rack-and-pinion that affects the path and ultimately the drawn pattern.
Those are both stepper motors and an Arduino UNO Rev3 board controls them through a stepper shield. The Arduino also controls the LED accent lighting, with potentiometer knobs to adjust brightness and the speed of animated transitions.
Newsons Electronics designed the table’s structure and frame to be made from stacked sheets of plywood cut out with a laser for precision, but it would be possible to make the parts with a CNC router or even a scroll saw. The result is a gorgeous piece of kinetic art.
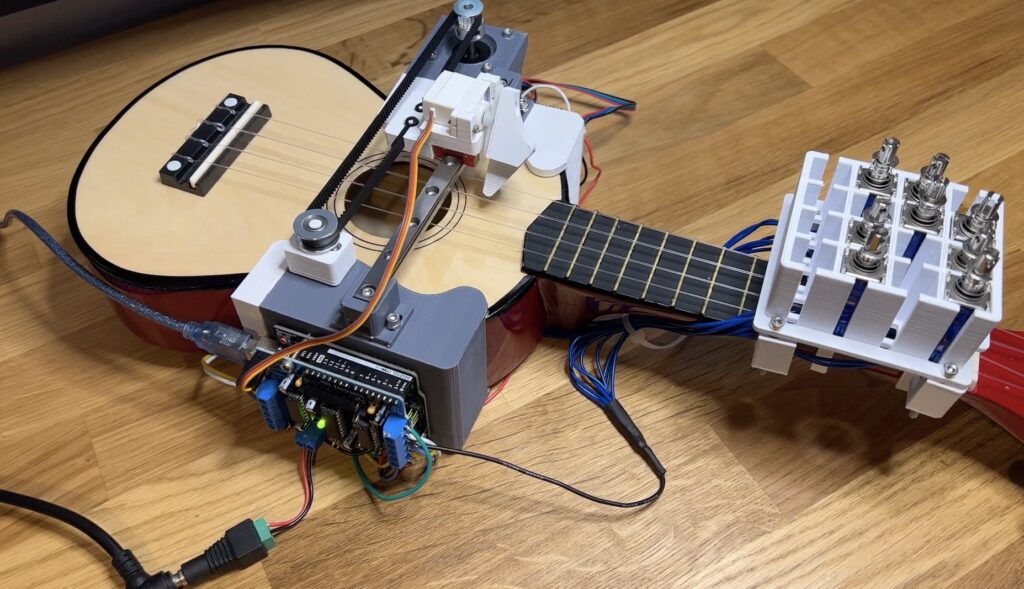
The ukulele has a bit of a reputation for being quaint, but it is a legitimate instrument like any other and that means it takes a lot of practice to play competently. Zeroshot is too busy building cool stuff to bother with all of that, so he put his skills to use constructing this robotic ukulele that plays itself.
Like a guitarist, a ukulelist can play a note by strumming multiple strings at once or by picking individual strings. More exotic techniques are also possible, but uncommon and outside the scope of this project. The key to Zeroshot’s design is the mechanism that can both pick and strum. It does so by using two actuators: a servo motor to lift and drop the pick, and a stepper to slide the pick back and forth perpendicular to the strings.
An Arduino UNO Rev3 board controls those motors through a HiLetgo L293D motor shield, with a TMC2208 driver module for the stepper. The Arduino can lower the pick and strum it across all of the strings, or it can move to a specific string and pluck just that one.
But it would be limited to only a handful of songs if it could only play open strings, so Zeroshot also needed to add hardware to hold the strings down on the fretboard. He chose solenoids for that job, held in a 3D-printed mount. With power coming from the motor shield, the Arduino can extend the solenoids to play any required notes.
Zeroshot designed the mount to accommodate up to 16 solenoids, for the first four frets across the four strings. When including open strings, that would give the robot up to 20 notes to work with. But a lot of songs only require a handful of solenoids, as Zeroshot demonstrated by performing Celine Dion’s “My Heart Will Go On.”
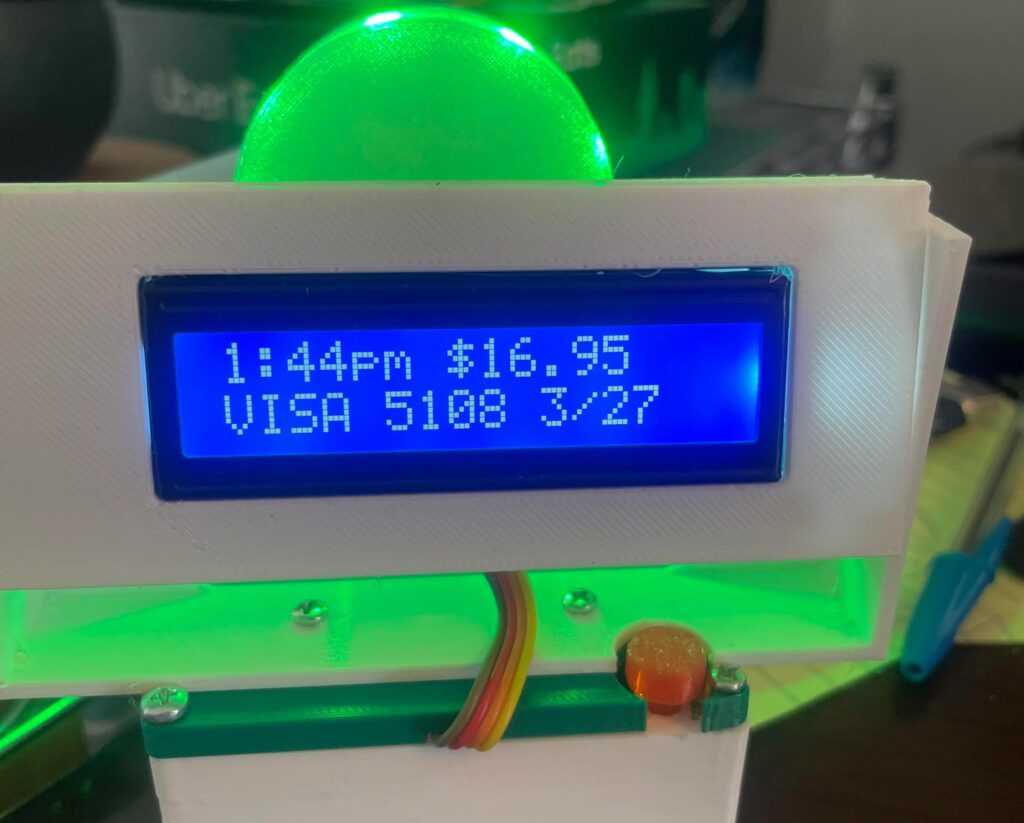
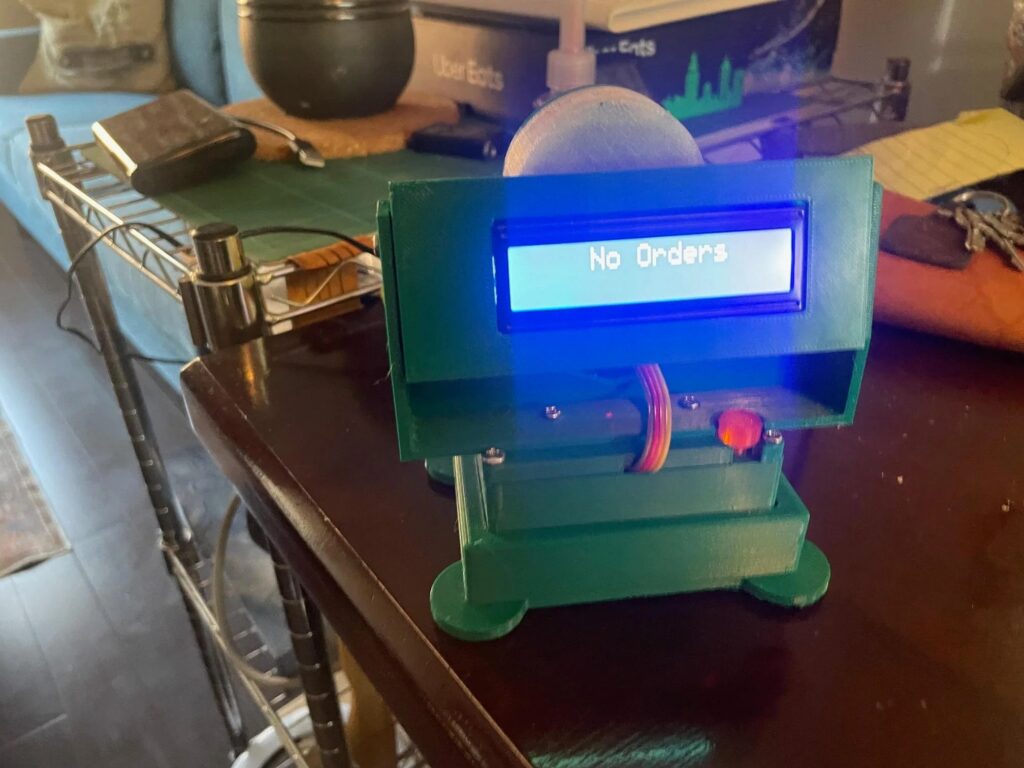
Most successful restaurants operating today have to take advantage of online ordering, as a huge chunk of customers have switched to takeout and delivery. But point-of-sale (POS) systems don’t always integrate well into a kitchen’s workflow and that can lead to missed orders — one of the worst things a restaurant can do. To help streamline a POS for a friend’s fried chicken takeout restaurant, Redditor UncleBobbyTO developed this affordable notification bot.
UncleBobbyTO’s friend uses a Square system in her restaurant, which has an online interface and sends an email for each new order. But the kitchen staff is busy and they sometimes fail to notice the emails. This device solves that problem. It can sit in the kitchen or by the expo window and connects to the Square API, checking for new orders every three minutes. When the device detects a new order, it lights up green and displays basic information about that transaction. Staff can then look up the order and press a button on the device to clear the notification.
That’s all possible because the device contains an Arduino UNO R4 WiFi board, which has built-in Wi-Fi capabilities that lets it connect to the internet and the Square API. It resides inside of a sturdy 3D-printed enclosure that also contains an RGB LED strip and a 16×2 character LCD screen.
Now UncleBobbyTO’s friend can run her restaurant without worrying that staff might miss an order.
Um dir ein optimales Erlebnis zu bieten, verwenden wir Technologien wie Cookies, um Geräteinformationen zu speichern und/oder darauf zuzugreifen. Wenn du diesen Technologien zustimmst, können wir Daten wie das Surfverhalten oder eindeutige IDs auf dieser Website verarbeiten. Wenn du deine Einwillligung nicht erteilst oder zurückziehst, können bestimmte Merkmale und Funktionen beeinträchtigt werden.
Funktional
Immer aktiv
Die technische Speicherung oder der Zugang ist unbedingt erforderlich für den rechtmäßigen Zweck, die Nutzung eines bestimmten Dienstes zu ermöglichen, der vom Teilnehmer oder Nutzer ausdrücklich gewünscht wird, oder für den alleinigen Zweck, die Übertragung einer Nachricht über ein elektronisches Kommunikationsnetz durchzuführen.
Vorlieben
Die technische Speicherung oder der Zugriff ist für den rechtmäßigen Zweck der Speicherung von Präferenzen erforderlich, die nicht vom Abonnenten oder Benutzer angefordert wurden.
Statistiken
Die technische Speicherung oder der Zugriff, der ausschließlich zu statistischen Zwecken erfolgt.Die technische Speicherung oder der Zugriff, der ausschließlich zu anonymen statistischen Zwecken verwendet wird. Ohne eine Vorladung, die freiwillige Zustimmung deines Internetdienstanbieters oder zusätzliche Aufzeichnungen von Dritten können die zu diesem Zweck gespeicherten oder abgerufenen Informationen allein in der Regel nicht dazu verwendet werden, dich zu identifizieren.
Marketing
Die technische Speicherung oder der Zugriff ist erforderlich, um Nutzerprofile zu erstellen, um Werbung zu versenden oder um den Nutzer auf einer Website oder über mehrere Websites hinweg zu ähnlichen Marketingzwecken zu verfolgen.