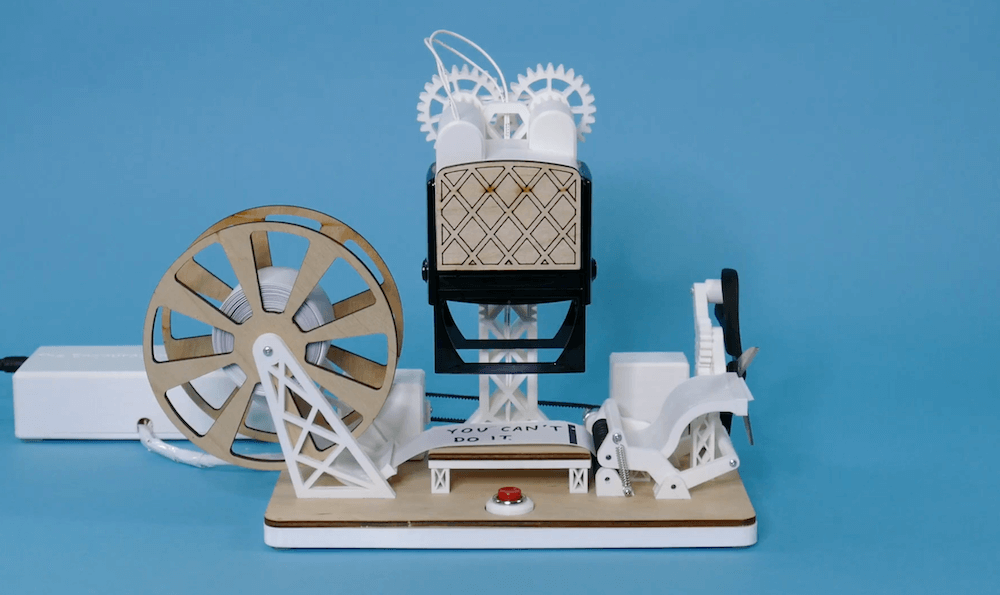
While 2020 may seem like a very futuristic year, we still don’t have robotic maids like the Jetsons’ Rosie the Robot. For his latest element14 Presents project, DJ Harrigan decided to create such a bot as a sort of animatronic character, using an ESP8266 board for interface and overall control, and a MKR ZERO to play stored audio effects.
The device features a moveable head, arms and eyes, and even has a very clever single-servo gear setup to open and close its mouth.
UI is via smartphone running a Blynk app, and Rosie’s antennas can light up along with a “beep beep” sound to let you know it needs your attention!
Juuke is an Arduino-powered RFID music player for the elderly
Arduino Team — August 1st, 2020
While many of us take playing tunes for granted, whether via MP3s, CDs, or streaming services, for others — such as many that are very young or old — actually figuring out the interface can be a challenge. To make it easier for the elderly (and children) to enjoy music, Ananords and his girlfriend created the Juuke box.
The Juuke features an RC522 RFID reader to trigger specific songs stored on an SD card via a DFPlayer Mini, using a stereo jack and external powered speakers. The device is controlled by an Arduino Uno, and includes a volume potentiometer along with two light-up buttons — red to play/pause tracks, green for random playback.
The PongMate CyberCannon Mark III is a surefire way to never lose at beer pong
Arduino Team — July 31st, 2020
If you participate in beer pong, and your skills aren’t up to the challenge, you might be in for a rough time. While “practice makes perfect,” if you’d rather shortcut this process then engineers Nils Opgenorth and Grant Galloway have just the solution with their Arduino-powered PongMate CyberCannon Mark III.
This wrist-mounted launcher uses a time-of-flight sensor, along with an inertial measurement unit to calculate the vertical and horizontal distance to the red Solo cup, marked with a small laser. Bubble levels help users fix the device in the horizontal direction and five programmable RGB LEDs indicate when it’s ready to shoot.
To fire, it pushes a ball forward using a small servo, which is then flung out using a pair of spinning wheels. Distance is set by varying the speed of driving motors, in order create the appropriate shot velocity.
Dave Darko designs a 16-button keep-alive switch with a Nano Every
Arduino Team — July 29th, 2020
It’s generally not advisable to leave equipment running when unattended. As a safeguard against this possibility at hackerspaces and elsewhere, element14 Presents’ Dave Darko built a custom switch that requires users to intermittently push a button in order to produce additional ‘on’ time.
The trick here is that instead of having one keep-alive button, the unit has a matrix of 16 buttons that light up randomly to be pressed. The idea is to prevent someone from setting up a second device to simply poke the same key over and over.
The ‘unhackable’ switch, which resembles a MIDI sequencer input, runs on an Arduino Nano Every and uses a relay to directly control the power state. It’s demonstrated toward the end of the video below, where Darko plays a sort of simple button-based game to keep an LED fixture on.
Add Arduino to your resume – the Arduino Certification Program is now available in Bengali
Arduino Team — July 29th, 2020
With thousands of users around the world entering the Arduino Certification Program, we are excited to announce the availability of the Arduino Certification Program: Arduino Fundamentals in Bengali, the seventh language now available.
Localized in partnership with our Education partner in Bangladesh – Code19, this first release of the ACP in Bengali opens up the opportunity for our huge Bengali speaking user base to become Arduino certified.
The Arduino Certification Program: Fundamentals is a structured way to enhance and validate your Arduino skills, and receive official recognition as you progress. Anyone interested in engaging with Arduino through a process that involves study, practice, and project building is encouraged to pursue this official certificate.
The Fundamentals Certification offers the right balance of academic excellence and real-world skills to give participants the confidence and motivation they need to succeed both in educational and professional environments. Successful entrants receive an official certificate verifying their skills and knowledge on Arduino, which can be referred to in a resume for academic or professional purposes.
Based upon the Arduino Starter Kit, the official assessment covers three main subjects: theory and introduction to Arduino, electronics, and coding. During the exam, entrants are asked to answer 36 questions of varying difficulty and formats in 75 minutes.
Questions will test knowledge on the following topics:
Electricity
Reading circuits and schematics
Arduino IDE
Arduino boards
Frequency and duty cycle
Electronic components
Programming syntax and semantics
Programming logic
Want to learn more? You can find additional supporting information on how to take the program in Bengali via our partner Code19 here, or purchase the Arduino Certification Program: Fundamentals from our store.
Researchers develop a simple logger for greenhouse gas flows
Arduino Team — July 28th, 2020
Researchers at Linköping University in Sweden have developed an Arduino-based logger to measure levels of methane and carbon dioxide in greenhouse environments. The device also implements a DHT22 temperature and humidity sensor, data from which can be correlated with gas readings. Figures are stored on an SD card using an Adafruit data logging shield.
Importantly, the team’s study outlines a procedure for calibrating the methane sensor module at atmospheric concentrations, much lower than its normal use. The entire unit can be made for around €200, or about $235 USD. While an inexpensive method for monitoring CO2 has been available for some time, this fills in the need for a low-cost methane sensor that could be used for distributed measurements.
This ‘crazy’ spectrum analyzer visualizes tunes with four Arduinos and 504 LEDs
Arduino Team — July 26th, 2020
Spectrum analyzers are a great way to visualize music, and “TUENHIDIY” came up with an interesting take on this device using not one, but four Arduino Unos.
Each board receives the same sound input via a 3.5mm audio jack, and separately processes it to break out the left and right channels, as well as upper and lower frequency ranges using fast Fourier transforms, or FFTs.
36 different bands are shown on four LoL Shields, with each 9×14 Charliexplexed LED matrix attached to an Uno, for a total of up to 504 individual points of light. Everything is put together on an acrylic plate, and powered by a portable USB battery.
TUENHIDIY is quick to note that it’s a “crazy project,” but as seen in the video below, it looks like a lot of fun!
The wearable device, which went on to place in the state competition, uses a transparent OLED display to show info from Retro Watch software running on an Android phone. They’re controlled by an Arduino Nano Every with an HC-05 Bluetooth module to communicate with the mobile app. Power is provided via a LiPo battery.
One unusual feature is that the darkened lenses can be flipped down for sun protection in outdoor environments, then up to allow easy viewing in darker areas. Kapadia demonstrates how his glasses work, plus discusses the technology used in the video below.
His USB device extends a joystick with a length of threaded rod through a custom-cut wooden plate, restricting movements to a 1-5/reverse/neutral layout. The shifter is held in different gear positions using magnets, in order to keep it from automatically springing back to center.
An Arduino Leonardo reads the switch states, and passes along the shift positions as a simulated joystick in HID mode. Possible future improvements include extra buttons, mode selection switches, and even an LCD screen for feedback.
Control your Internet of Things projects from anywhere with the new Arduino IoT Cloud Remote app
Arduino Team — July 22nd, 2020
The perfect companion to the Arduino IoT Cloud! Develop your IoT solution online via a desktop, then monitor and control your dashboards on your mobile with the new Arduino IoT Cloud Remote app.
Initially available for free for iPhone on the App Store (Android to follow in the next few weeks), the Arduino IoT Cloud Remote app gives you with the ability to access, monitor or control your IoT projects regardless of the time or place:
In the field: you can read the data from your soil sensors or start your irrigation system directly from anywhere.
In the factory: constant visibility of the state of your manufacturing process status, with the ability to control your automation remotely.
In the home: monitor your home automation systems, check your previous or actual energy consumption from the convenience of your sofa.
The latest dashboard for the Arduino IoT Cloud comes with a host of enhanced features. Creating your dashboard via a desktop or tablet is quick and easy. The tool automatically configures your devices (including the secure crypto element) and automatically generates the main code for your project, making setup as straightforward as possible. A broad set of simple widgets to connect to the properties provides maximum versatility and enables you to set up a new dashboard in minutes.
Your dashboards, how you like them — all dashboards are fully customizable, it’s possible to group devices and organize them in any sequence — just drag and drop to arrange the layout, and select from multiple options including graphs to visualize the data. You can gather and display data from multiple IoT devices in one dashboard, and control those devices as required through your dashboard to fully integrate your solution.
The addition of the Arduino IoT Cloud Remote app to access, monitor, and control dashboards on the go via your phone is the final piece of the jigsaw.
Mechanical 7-segment display made using electromagnets
Arduino Team — July 21st, 2020
When you think of a “7-segment” display, your mind naturally goes to something involving LCD or LED technology. As seen here, however, this 0-9 pattern can also be duplicated mechanically using a series of electromagnets.
Neeraj Rane’s 3D-printed device is controlled by an Arduino Nano, along with a shift register. These activate seven hand-wound coils that push the magnet-embedded segments in and out, via a series of IRF540N MOSFETs.
As of now, the display simply cycles through numbers. If a few more digits were added, and perhaps a user interface and/or an RTC module, it could form the basis of an even more interesting project. Check it out in action below!
This Arduino-powered machine folds your shirts at the push of a button
Arduino Team — July 21st, 2020
Inspired by an old FlipFold TV ad, YouTuber Ty Palowski decided to make his own automated shirt folding machine.
Palowski’s device is made in four folding sections, which lie flat to accept the unfolded piece of laundry. When the shirt is properly placed, a capacitive touch sensor starts the process, which is controlled via an Arduino and motor drivers.
Two motors bring in the sides sequentially, then a third motor flips the bottom up. Activation is based simply on timing, with no sensor feedback. As seen at the end of the video, the project does save folding time and it works even better once Palowski gets some practice with it!
This automated perpetual calendar is a beautiful way to watch the years pass by
Arduino Team — July 20th, 2020
Troy Hawkins (AKA “tomatoskins”) had come across an interesting wooden perpetual calendar, which used a trio of rings to show the month, day, and day of the week. The only problem is that it’s manually operated, subject to human error or neglect. So when he decided to construct his own version, he added an Arduino to take care of this task for him.
His automated design uses a trio of stepper motors to turn three rings via independent gearing systems. Correct rotation is regulated by an RTC module that links up to the Nano inside. Magnets embedded within each wheel’s gears trigger a Hall effect sensor to further ensure that “date data” is properly on display.
Creating a convenient calculator for unit conversions
Arduino Team — July 19th, 2020
Whether you work in meters, feet, inches, or kilometers — or any number of other units corresponding to properties that you need to convey — conversions are a fact of life when making things. While this could mean pulling up a Google tab or flipping open a Machinery’s Handbook and doing a few hand calculations, neither is particularly convenient for shop use.
As an alternative, Kaleb Clark over at element14 came up with a dedicated desktop conversion calculator using an Arduino Uno and Cherry MX switches in a matrix arrangement as the main input method. A rotary encoder is also implemented to swap between functions and output is via a 4×20 LCD screen.
Although the device still needs a bit of programming work to be called “complete,” it’s currently able to handle an impressive variety of conversions.
The Physical Twin travels on a three-wheeled chassis and mounts a four-axis arm with a brush. An operator controls the arm to dip the brush into an onboard paint container, and can then manipulate it for application.
The controller consists of a joystick for movement as well as a mini version of the arm. Four potentiometers measure arm input angles, which are duplicated on four corresponding servos on the robot. A pair of Arduino Mega boards are used for the setup — one on the mobile robot and another in the remote unit.
You can see the device in action in the videos below, showing off direct operation and the ability to play back prerecorded movements.
As you work on a project, lighting needs change dynamically. This can mean manual adjustment after manual adjustment, making do with generalized lighting, or having a helper hold a flashlight. Harry Gao, however, has a different solution in the form of a novel robotic task lamp.
Gao’s 3D-printed device uses a USB camera to take images of the work area, and a Python image processing routine running on a PC to detect hand positions. This sends instructions to an Arduino Nano, which commands a pair of small stepper motors to extend and rotate the light fixture via corresponding driver boards.
The solution means that he’ll always have proper illumination, as long as he stays within the light-bot’s range!
DIY cable cam made from RC car and 3D-printed parts
Arduino Team — July 14th, 2020
Cable-mounted cameras can be a lot of fun for capturing moving footage. Although commercial cable cam options can be expensive, this system by Kasper Mortensen of MAKESOME is comprised of 3D-printed components with a receiver and wheel salvaged from an RC car.
The build was meant to use some of the toy vehicle’s other components, however after some trial and error outlined in the clip below, more involved measures had to be taken.
Everything is powered by a Tattu 650mAh 3S LiPo battery, while an Arduino Nano and an L298N dual H-bridge are used to control the motor (taken from an old HP printer) speed, adjustable between multiple settings by engaging the transmitter’s throttle switch. Final results come around the 13:40 minute mark in the video, and the footage looks fantastic!
Deck out your ride with an Arduino-controlled spoiler
Arduino Team — July 14th, 2020
Car spoilers can provide downforce for better performance, or simply give the appearance of speed. To take things to another level, Michael Rechtin designed his own custom wing that doesn’t just sit there, but pitches up and down via a pair of servos.
The system utilizes an Arduino Nano along with an MPU-6050 for control, adjusting itself based on his Mazda’s movement, and powered is supplied by a LiPo battery. Suction cups are used to attach the spoiler, so installation appears to require no actual modification of the car whatsoever.
The MemGlove detects hand poses and recognizes objects
Arduino Team — July 14th, 2020
Hand movements have long been used as a computer interface method, but as reported here, the MemGlove from a team of MIT CSAIL researchers takes things several steps further. This augmented glove can sense hand poses and how it’s applying pressure to an object.
The wearable uses a novel arrangement of 16 electrodes to detect hand position based on resistance, and six fluid filled tubes that transmit pressure depending on how an item is gripped.
An Arduino Due is used to sense these interactions, which pass information on to a computer for processing. Pose verification is accomplished with a Leap Motion sensor. By training neural networks with TensorFlow, the glove is able to identify various hand poses, as well as distinguish between 30 different household things that are grasped.
Seven-segment displays are normally diminutive items, able to show info from a clock or other device, in a size that’s easily tucked away when not needed. Jegatheesan Soundarapandian’s single-digit display, however, is just the opposite standing at nearly seven feet tall.
The project is constructed out of cardboard, with a PVC spine for extra strength. Inside, addressable LED lighting illuminates each segment under Arduino control, with an HC-05 module used to interface with an Android app. Two 18550 batteries provide power for the unit, along with a DC-DC voltage regulator to supply the strip with 5V.
One of the simplest ways to make a mobile robot involves differential steering, where two wheels move at different speeds as needed to turn and a ball caster keeps it from tipping over. The MrK_Blockvader is an excellent take on this type of bot — demonstrated in the first clip below — featuring a nice blocky body comprised out of 3D-printed parts, RC truck wheels driven by tiny gear motors, and an integrated roller on its back.
The MrK_Blockvader is controlled via an Arduino Nano, along with an nRF24 breakout that allows it to receive signals from a radio transmitter unit. The build includes LED lighting as well as a piezo buzzer for all the beeps and boops. It can also take advantage of various sensors if necessary.
The eventual goal is to use the MrK_Blockvader in a network of robots, hinted at in the second video with a worker at its side.
Don’t try this at home: Colin Furze creates a semi-automatic potato cannon
Arduino Team — July 9th, 2020
Colin Furze decided that he needed a potato cannon for his DIY screw tank, and after making a manually loaded version, he automated the process.
What he came up with uses a pair of linear actuators to push the barrel forward under Arduino control, allowing a potato-projectile to drop into the device’s chamber assembly. After a short delay, it closes up again, cutting the roundish vegetable into a cylindrical plug. Flammable gas then enters via a solenoid valve for a carefully regulated amount of time.
With the gas mixed, the cannon is then fired, and a single button press starts the process over again. The powerful cannon creates a mess in his test area after a few shots, actually taking a plug out of the mattress he used to absorb the impact. It should be quite impressive once mounted on the screw tank, though it’s a project that you probably shouldn’t try at home.
Um dir ein optimales Erlebnis zu bieten, verwenden wir Technologien wie Cookies, um Geräteinformationen zu speichern und/oder darauf zuzugreifen. Wenn du diesen Technologien zustimmst, können wir Daten wie das Surfverhalten oder eindeutige IDs auf dieser Website verarbeiten. Wenn du deine Einwillligung nicht erteilst oder zurückziehst, können bestimmte Merkmale und Funktionen beeinträchtigt werden.
Funktional
Immer aktiv
Die technische Speicherung oder der Zugang ist unbedingt erforderlich für den rechtmäßigen Zweck, die Nutzung eines bestimmten Dienstes zu ermöglichen, der vom Teilnehmer oder Nutzer ausdrücklich gewünscht wird, oder für den alleinigen Zweck, die Übertragung einer Nachricht über ein elektronisches Kommunikationsnetz durchzuführen.
Vorlieben
Die technische Speicherung oder der Zugriff ist für den rechtmäßigen Zweck der Speicherung von Präferenzen erforderlich, die nicht vom Abonnenten oder Benutzer angefordert wurden.
Statistiken
Die technische Speicherung oder der Zugriff, der ausschließlich zu statistischen Zwecken erfolgt.Die technische Speicherung oder der Zugriff, der ausschließlich zu anonymen statistischen Zwecken verwendet wird. Ohne eine Vorladung, die freiwillige Zustimmung deines Internetdienstanbieters oder zusätzliche Aufzeichnungen von Dritten können die zu diesem Zweck gespeicherten oder abgerufenen Informationen allein in der Regel nicht dazu verwendet werden, dich zu identifizieren.
Marketing
Die technische Speicherung oder der Zugriff ist erforderlich, um Nutzerprofile zu erstellen, um Werbung zu versenden oder um den Nutzer auf einer Website oder über mehrere Websites hinweg zu ähnlichen Marketingzwecken zu verfolgen.