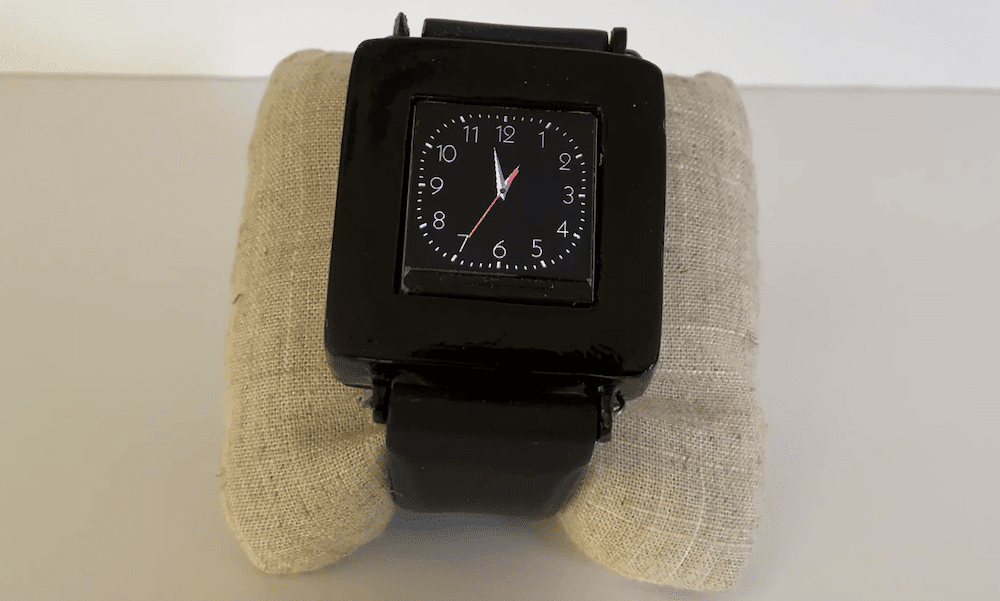
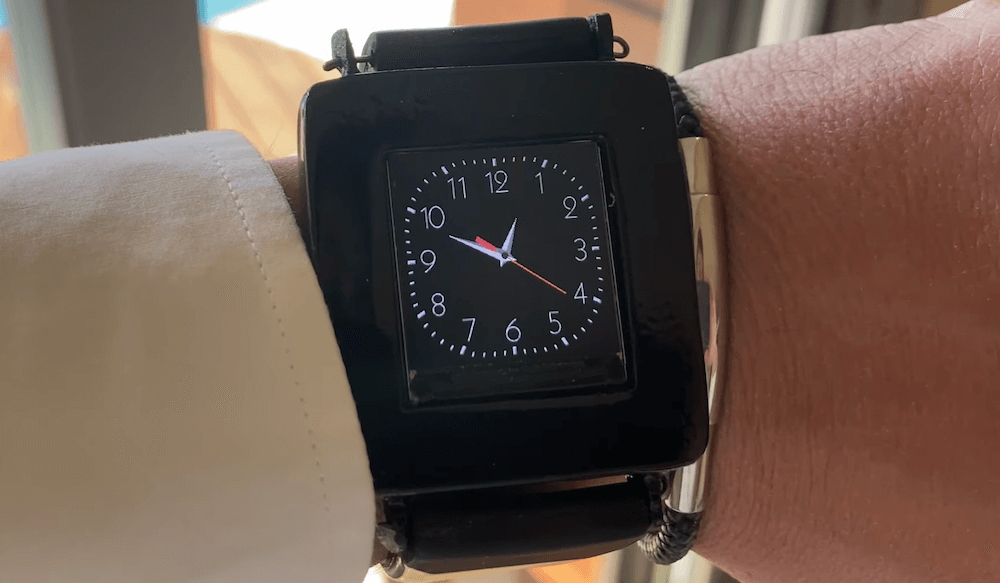
This DIY watch works but for only a limited amount of time
Arduino Team — December 5th, 2020
The Nano is one of our smallest boards, and as YouTuber Craft Channel has proven, it’s tiny enough to act as the brains of a wristwatch. This DIY wearable device features a nicely made wooden enclosure, with power supplied by a 1S 300mAh LiPo battery, and the face itself shown on a 1.3″ ST7789 display.
Its lack of a real-time clock unit, along with a fairly limited battery, means that the watch will only work for a short time before needing attention. However, creator Craft Channel notes that the build is an experimental project, and it’s a great demo of what can be done with a short bill of materials and a bit of ingenuity!
If you enjoy all things Disney and would love to bring some of its park magic into your home, then look no further than Dominick Civitano’s recent project.
Because of travel limitations due to the pandemic, Civitano decided to create a replica of a MagicBand reader that uses an NFC card reader module to recognize a programmed MagicBand, which triggers a ring of LEDs, audio output, and a relay for Christmas lighting. This setup could likely be applied to other devices, opening up its possibilities into January and beyond.
Electronics for the build — including an Arduino Mega that runs the show — are hidden inside of a 3D-printed, property-themed enclosure that resembles those found outside of any Disney theme park. This would potentially preserve a sense of wonder at the device, and diffuses the LEDs nicely.
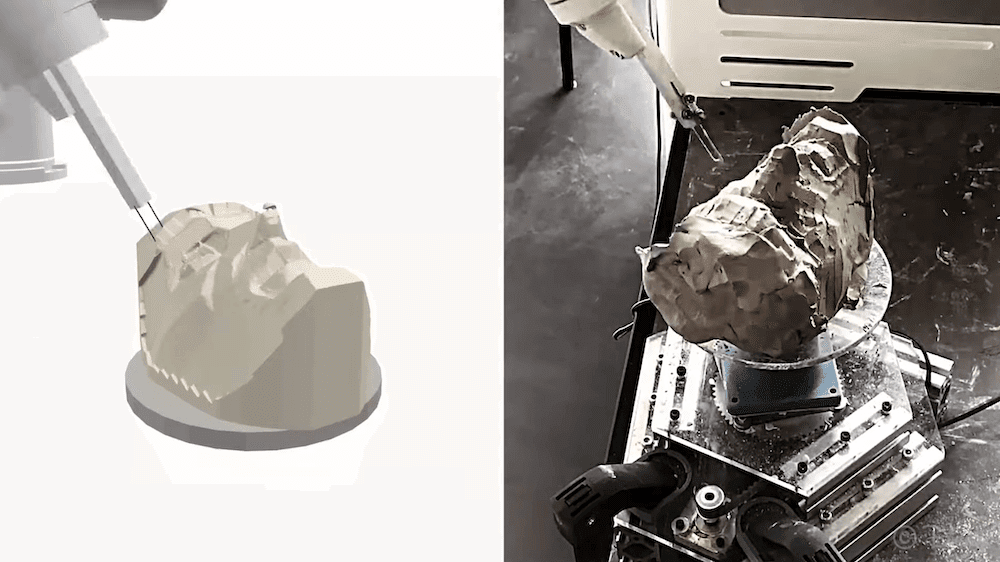
RobotSculptor uses a six-axis robot arm to sculpt clay models
Arduino Team — December 3rd, 2020
Robotic fabrication techniques such as 3D printing enable you to make a copy of a wide variety of items. Actually sculpting something out of clay, however, remains a largely human pursuit. One might also miss the individual style of a sculptor in a finished product.
RobotSculptor, developed by a team of engineers from ETH Zurich and Disney Research, attempts to address both challenges. The system generates toolpaths from a base mesh design and allows artistic input via mouse strokes during the process. A six-axis robot arm then incrementally removes clay from the model-in-progress, using a custom loop tool.
An Arduino Uno-controlled turntable acts as a seventh axis for the robot, giving it the ability to reach different areas of the model in order to create complex 3D shapes.
This article was written by Valentina Chinnici, Arduino Education Product Manager
Arduino acquired the Science Journal app from Google on August 5th, and the final handover takes place on December 11th, 2020.
From that date, the Science Journal will no longer be supported by Google. If you haven’t exported your experiments and imported them into the Arduino Science Journal, we strongly encourage you to do so now, as your data will no longer sync with Google Science Journal after that date.
Here’s a short guide to help you transition to the Arduino Science Journal:
1. How to export your experiments
We’ve created a series articles to help you export your experiments:
You’ll find these articles – and many more – on the official Arduino Help Center. If you experience issues with your export, you can contact us using this contact form.
2. Why you need to export your experiments
From December 11th, the Science Journal app will be made available, maintained, and supported by Arduino. This means that the Arduino Science Journal app will only be available on the main app stores.
You can rest assured that we’ll stay loyal to Google’s principles, and ensure high quality standards for the community we inherited.
In this current climate of remote learning and as advocates for openness, the app will be available for free, and the repositories are publicly available on GitHub.
We strongly believe that every student has the ability to reach their full potential, and we’re pleased to support the next generation of STEAM leaders with tools that help their learning process.
3. What’s coming next for the Arduino Science Journal app?
While we can’t disclose too much about our future plans for the app, we can tell you that we’ll ensure it will offer easy access to a stream of data that leverages your smartphone sensors, as well as Arduino sensors. The aim is to help learners understand the importance of an inquiry-based educational method rather than passive consumption of information.
We’ll also continuously improve the accessibility of the app for all users, and find new ways of experimenting with science.
In the near future, we’ll be interacting more with users, so you’ll hear more from us soon! We’ll also be adding more tutorials on our platform dedicated to Science Journal!
Last, but not least…
…if you want to support us, leave a feedback or simply rate the app, don’t forget to add a review on the app store of your choice: App Store, Play Store, Huawei App Gallery.
We’re looking forward to supporting your teaching in the future, and welcome you to this amazing community of Arduino educators!
P.S. Do you use the Science Journal as a teaching tool? Are you planning on using it for teaching in the future? Let us know!
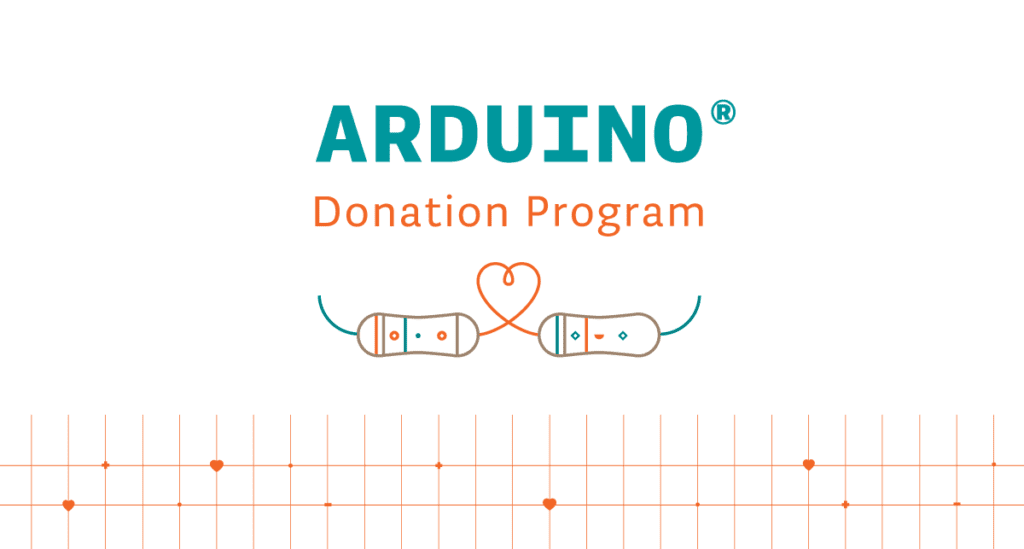
Arduino Donation Program: Making a difference in the open-source community!
Arduino Team — December 1st, 2020
As an open-source company, Arduino aims to ensure that open-source continues to thrive and remains sustainable for the long term. The Arduino Donation Program is intended to fund projects and institutions that make a lasting difference in the worldwide open-source community.
Arduino’s corporate giving efforts are focused on not-for-profit and charitable organizations supporting the free and open-source software movement. Arduino Donation Program recipients have been selected according to the importance of their project, and above all, their dedication to making technology accessible to everyone.
A giving back program
Free and open-source software is created as a collaborative effort in which programmers improve upon the code and share the changes within the community. Arduino endorses the philosophy of creating free tools that allow users to focus on “what” they are developing rather than the “how.”
Arduino continuously releases open-source products and code, which thanks to community members buying original products, enables Arduino to continue to invest in R&D and develop new innovative hardware and software. Arduino benefits from the continuous contribution of the Arduino community along with many other projects. We are infinitely grateful for these efforts, and are aware that the rich and diverse Arduino ecosystem would not exist without their contributions.
From now on, Arduino will donate to the free software and open-source projects that it collaborates with as well as those that embody the Arduino approach and philosophy.
Arduino has donated $55,000 to date in 2020. The institutions who have received a $5,000 grant from Arduino are:
The Processing Foundation promotes software literacy within the visual arts, and visual literacy within technology-related fields — and makes these fields accessible to diverse communities. The Processing software is free and open-source.
Creative Commons is a non-profit organization devoted to expanding the range of creative works available for others to build upon legally and to share. The Creative Commons licenses let creators communicate which rights they reserve and which rights they waive for the benefit of recipients or other creators.
Founded in 2015, the RISC-V Foundation is a free and open ISA enabling a new era of processor innovation through open standard collaboration.
The Free Software Foundation is a charity that empowers users to control technology. Free Software gives everybody the rights to use, understand, adapt, and share software. These rights help support other fundamental freedoms like freedom of speech, press and privacy.
The Linux Foundation is dedicated to building sustainable ecosystems around open-source projects to accelerate technology development and industry adoption. Founded in 2000, it provides support for open-source communities through financial and intellectual resources, infrastructure, services, events, and training.
The Open Source Security Foundation (OpenSFF) is a cross-industry effort hosted by the Linux Foundation to improve the security of open source software. The foundation includes technical initiatives and working groups that address vulnerability disclosures, security tooling, security best practices, and the identification of security threats to the open-source project.
At Arduino, we really hope that more companies involved in open-source hardware and software will follow Arduino’s example.
“Open-source exists if all of us participate,” said Arduino co-founder Massimo Banzi. “The open-source creators have to be supported but also incentivized: effectively doing open-source is a lot of work. There are multiple ways to keep open-source alive; we decided to take 50,000 dollars and donate back to a bunch of open-source projects and I am sort of challenging other companies whose business model benefits from open-source to also donate to such causes. If we all donate, these open-source projects can thrive and grow to the benefit of all.”
If you need more information about the program, please contact press@arduino.cc.
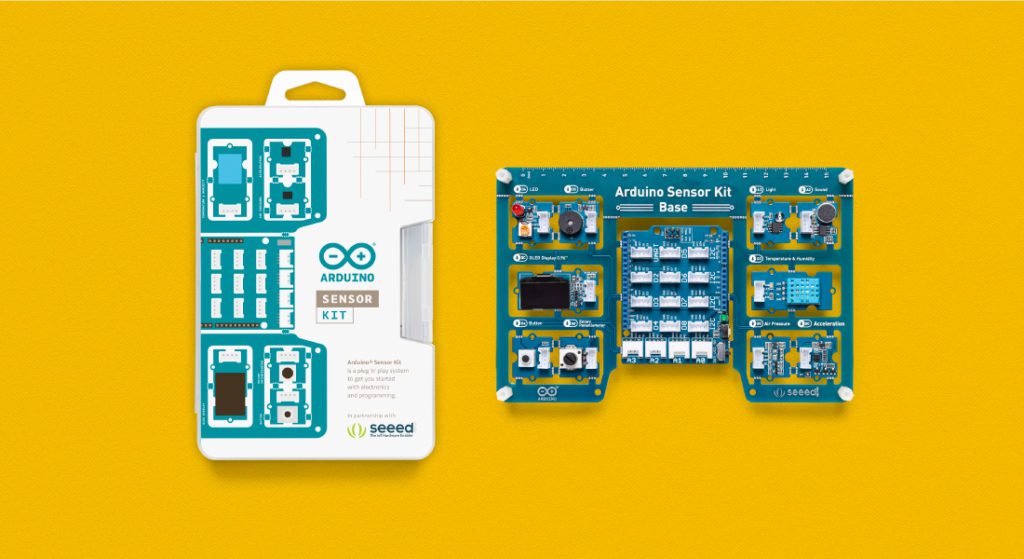
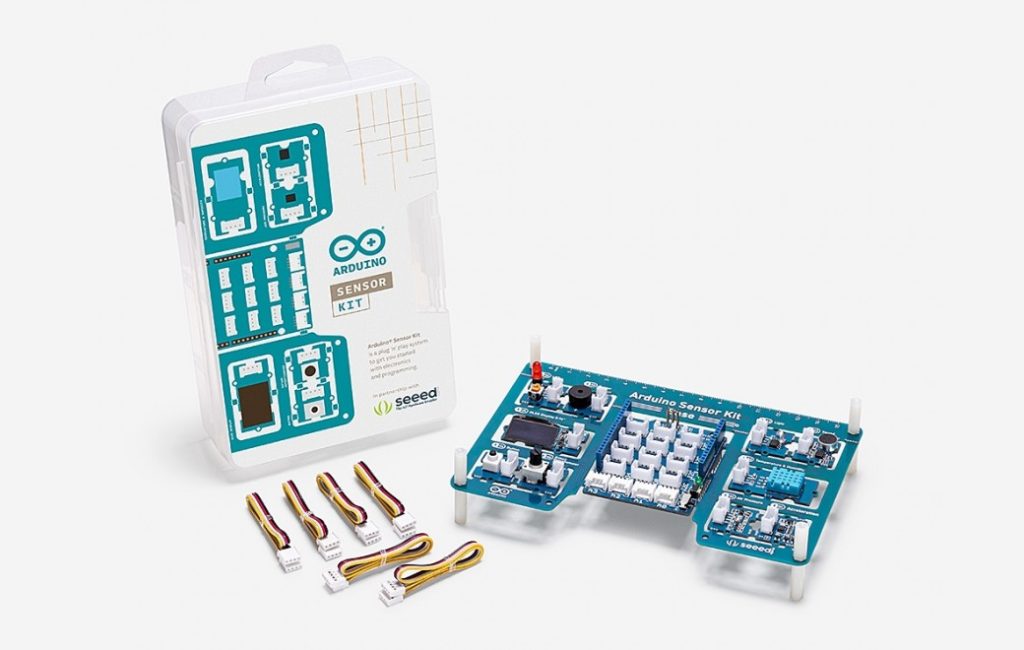
10 most popular modules and sensors for the Arduino UNO all on one board
Arduino Team — December 1st, 2020
Getting started with electronics and sensing the world around you is now easier than ever with the new all-in-one Arduino Sensor Kit from Arduino, in partnership with Seeed.
The 10 most popular modules and sensors for your Arduino UNO have been integrated onto a single board, providing plug-and-play convenience without the need for any soldering or wiring! Combining basic Grove sensors and actuators for the Arduino UNO, the kit contains a base shield featuring the following modules that can be connected either through the digital, analog, or I2C connectors:
An OLED screen
4 digital modules (LED, button, buzzer and potentiometer)
5 sensors (light, sound, air pressure, temperature, and accelerometer)
Just plug the Arduino Sensor Kit into the Arduino UNO, then you’re ready to follow the Plug, Sketch & Play online lessons that make getting started a breeze.
The kit is equipped with 16 Grove connectors, which when placed on the board, offer functionality to the various pins. With seven digital connections, four analog connections, four I2C connections, and a UART connection, the base shield can be easily mounted onto an Arduino UNO board and programmed through the Arduino IDE.
Now available from the Arduino Store, the Arduino Sensor Kit comes as a standalone kit for only €23.00 / US$23.00, or can be purchased with the Arduino UNO Rev3 board as a great value bundle for €38.70 / US$38.70. For more details, check out our website here.
Arduinoliday Calendar: discover a new Arduino surprise every day!
Arduino Team — December 1st, 2020
Celebrate the holiday season with Arduino and enjoy a new surprise every day!
Let the holiday countdown begin! With the Arduinoliday Calendar, everyday is a new window, and every window is a new surprise…
To unlock the surprises, click on the Arduinoliday window on the Arduino homepage. The calendar is packed with inspiration, projects, and wonderful surprises for makers — and their beloved ones — who love to create with Arduino!
The Arduinoliday Calendar will start today and will end on December 31st. Don’t forget to click quickly on the windows, as some ‘’surprises’’ will only be available only for a limited amount of time!
As a surprise for December 1st, we are happy to announce the launch of the Arduino Sensor Kit from Arduino in partnership with Seeed. This kit packs 10 popular modules and sensors for the Arduino Uno onto a single board, providing plug-and-play convenience without the need for any soldering or wiring!
Ever thought that getting started with electronics and sensing the world around you could be easy and extremely fun? Well, now it is!
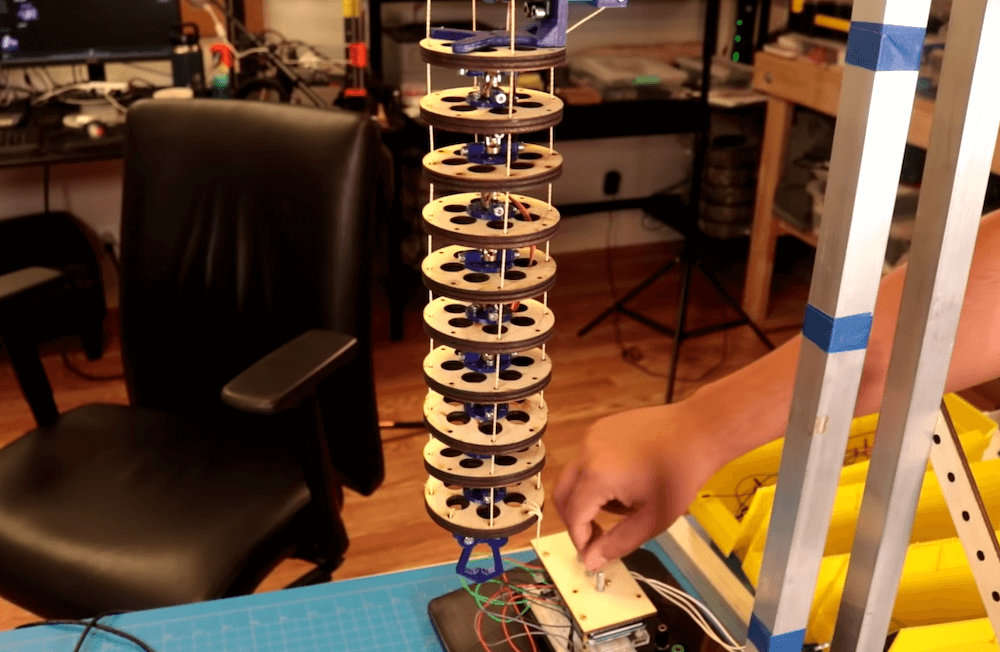
Creating a continuum tentacle-like robot with Arduino
Arduino Team — November 30th, 2020
Continuum robots — which look like a tentacle or perhaps an elephant’s trunk — use a series of linkage sections and internal tendons to move both horizontally and vertically. While they may seem quite exotic, in the video below element14 Presents’ DJ Harrigan breaks down how he built one with an Arduino Mega and a fairly simple list of parts.
The robotic mechanism hangs down from a support structure, with universal joints allowing each section to bend, but not twist, with respect to the next one. These 10 sections are pulled in different directions using two servos and Kevlar cord, with user interface provided by two potentiometers. A third pot actuates another motor attached to the tentacle, acting as a gripper for tools, or whatever else Harrigan needs at the time!
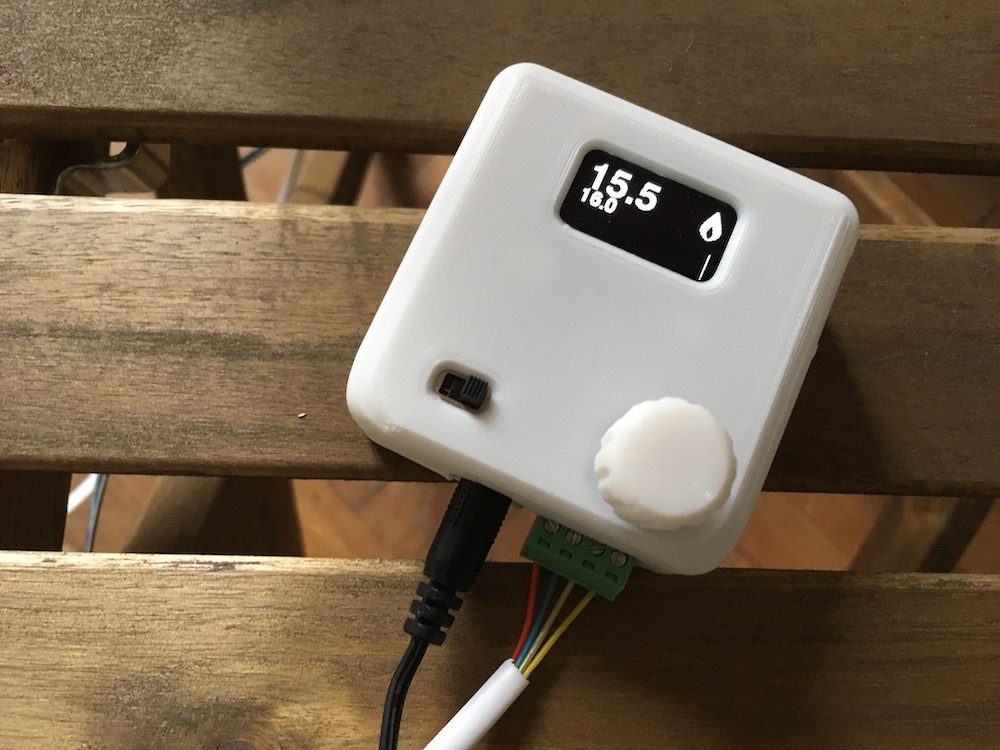
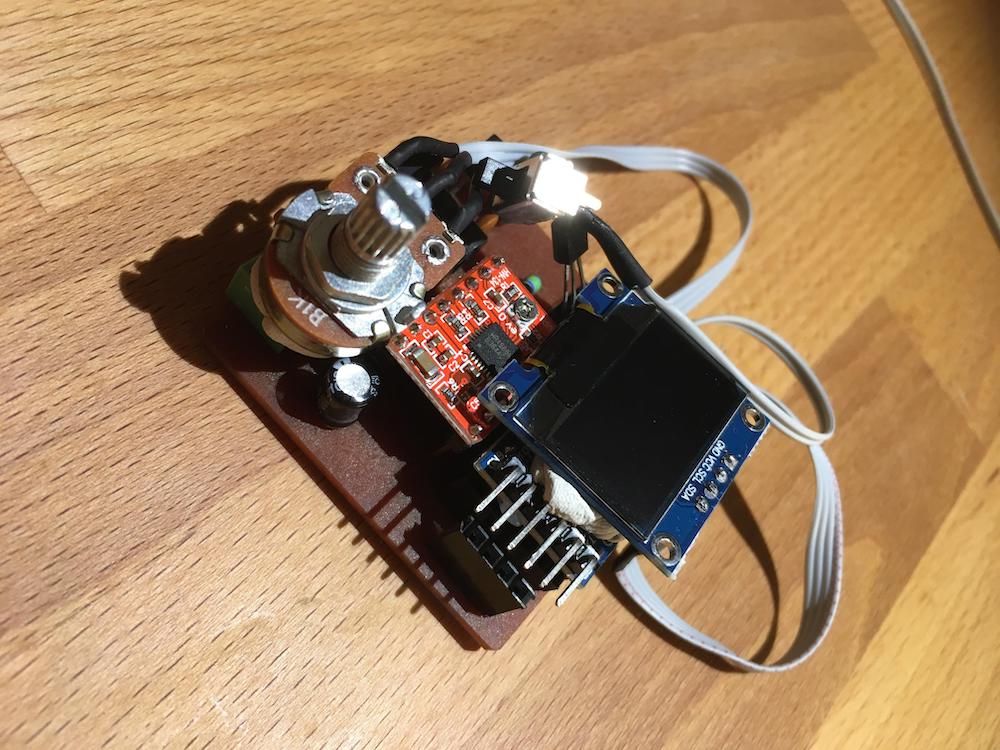
Controlling a gas convection heater with a custom thermostat
Arduino Team — November 27th, 2020
Redditor “Higgs8” had a gas convection heater that is (or was) controlled manually, but they wanted something a bit more. To accomplish this, they came up with a small Arduino-based thermostat.
This allows you to set the desired temperature using a potentiometer, and it senses the current temperature value via a DS18B20 thermometer unit. It then adjusts the formerly manual knob with a stepper motor and custom gear reduction in response, maintaining the desired comfort level.
Feedback is displayed on a small OLED screen, which charts the room’s temperature over a 24-hour period. It also shows if the heater was on, letting you see if it was working properly.
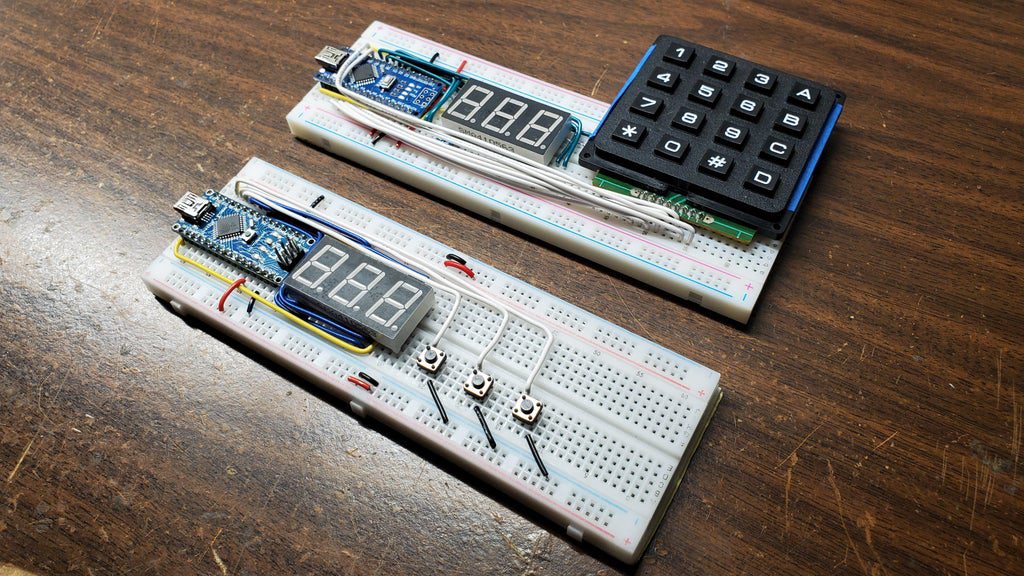
Arduino psychic ‘magically’ guesses random numbers
Arduino Team — November 26th, 2020
Standard Arduino Nanos can be used for many purposes, but they do not feature wireless capabilities. Somehow, though, Hari Wiguna’s Arduino psychic system is apparently able to pass data between two of them. No external communication hardware is implemented, yet one Nano is able to recognize when a random number chosen on the other Nano setup is input via an attached keypad.
As noted by Wiguna, it’s easier shown than explained, and you can see this techno-magic trick in action in the first clip. How things work is revealed in the second video, but can you guess how it’s done?
Code is available in the project’s write-up, which may provide some insight, however the hardware schematics – that appear to be accurate – will likely leave you amazed!
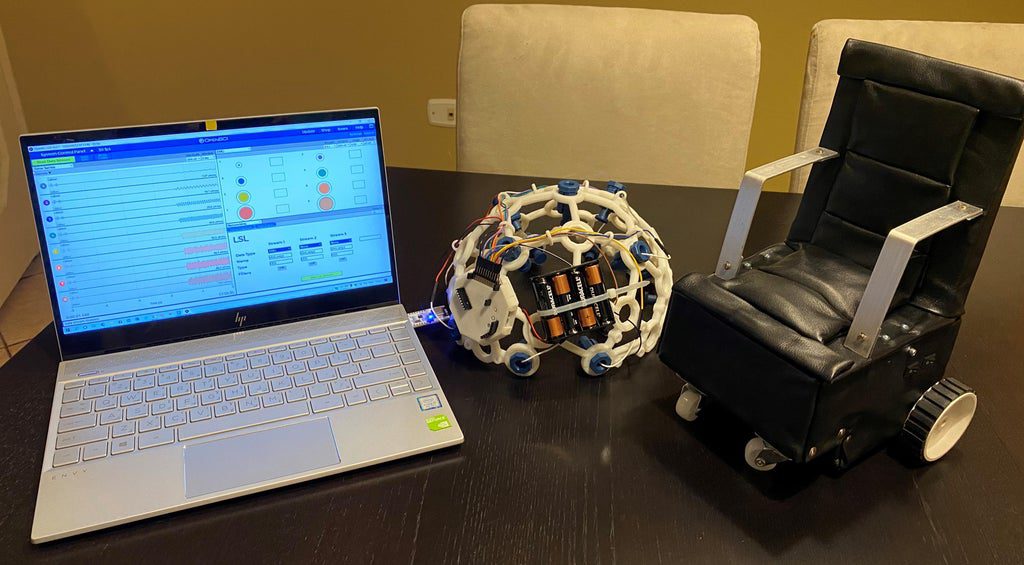
Control a wheelchair using an EEG headset and Arduino
Arduino Team — November 25th, 2020
In an effort to help provide paralyzed patients with an easier way to operate their wheelchairs, these makers have developed a system that uses an OpenBCI brainwave cap to collect electroencephalogram (EEG) and electromyography (EMG) signals, literally from a user’s head. Data is then sent to a PC running OpenBCI software and passed along to an Arduino Uno via Bluetooth for control.
The project is outlined in its Instructables post, starting off with four controlling four LEDs and progressing to a simple two-wheel drive vehicle. From there, a rather impressive model of a wheelchair was constructed, and moved in much the same way.
You can see it in action, starting at around 4:30 in the video below.
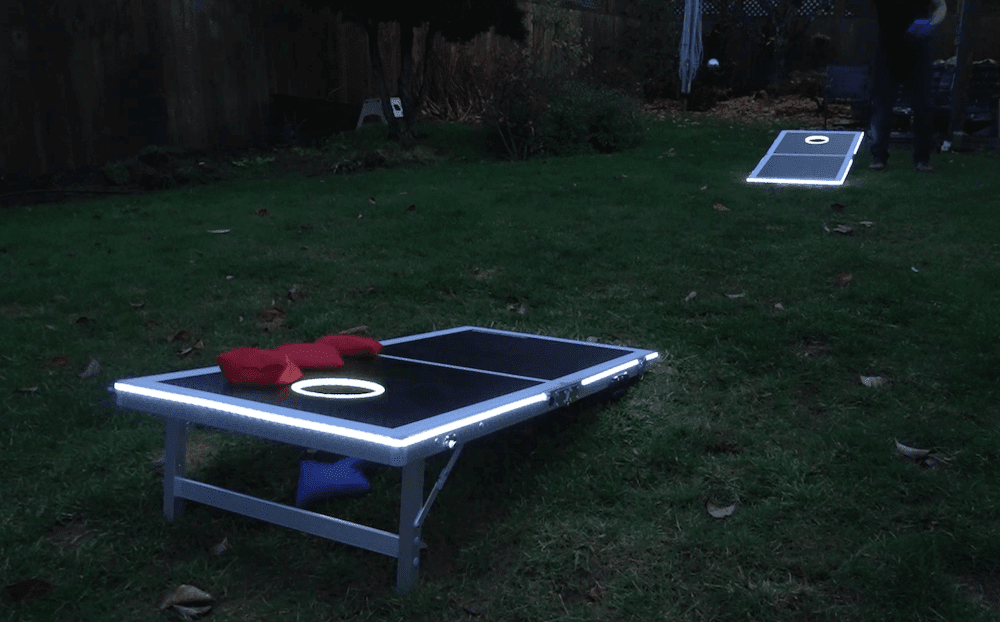
These cornhole boards react to your bean bag tosses
Arduino Team — November 25th, 2020
The lawn game of cornhole has seen a surge in popularity over the last couple of decades. But if you’ve ever thought about raising its cool factor, then YouTuber Hardware Unknown has just what you’ve been waiting for: light and audio effects that react to your throws.
Hardware Unknown’s foldable boards each feature an Arduino Nano for control. A vibration sensor is used to tell when a bean bag hits the board, and an IR break-beam setup senses when one goes into the hole.
After a shot is made, the board “celebrates” by blinking its built-in LED ring and the strips of white LEDs that were added along the edges, while victory sounds are produced with the help of an MP3 module and a small speaker. A pair of nRF24L01 radios are also implemented to coordinate signals between both Arduinos and properly activate the opposing board’s sequence.
More details on the project can be found in Hardware Unknown’s video below!
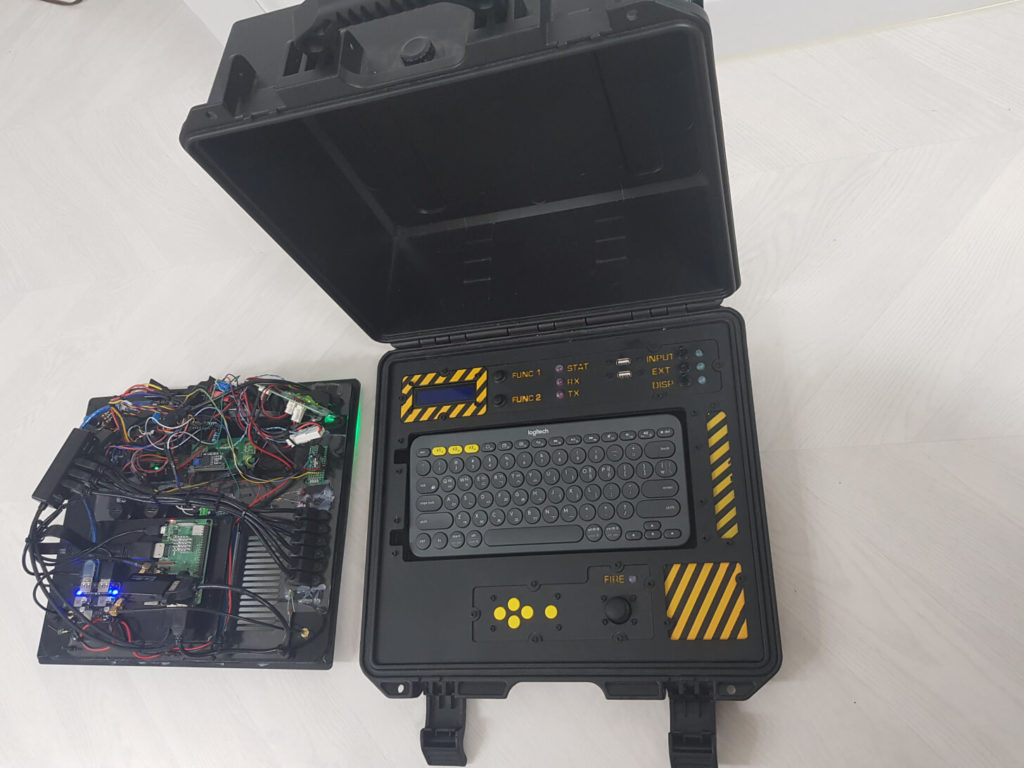
The build supposedly has its roots in the 1970s South African nuclear program, where it was used for radiation measurement and encrypted satellite data transfer. Given the luggable cyberdeck’s superb quality, one could almost believe it was military equipment.
Looking inside the rugged case reveals a Raspberry Pi 3 that provides computing power along with an Arduino Leonardo for a custom joystick input device. While there’s no satellite uplink (at least not without WiFi), it does feature a functional Geiger counter, which allows one to monitor local conditions for dangerous radiation levels.
The keyboard (quite nicely shoehorned into the lid of the waterproof case, unlike the, um, actual main panel…) is a combination of wireless Logitech keyboard bunker (a carefully planned slot with magnets holds the keyboard in place), and an Arduino Leonardo connected to a small joystick, click function being right-click, a left-right-up-down set of buttons, and a FIRE button connected to a red LED when pressed. All of which becomes a USB controller when connected with USB to the main panel. This means that you could survive without a mouse, having the same functions available. Of course, the entire thing is reprogrammable, and the little panels were supposed to be removeable for prototyping, but I kinda just got tired and never developed it further. Maybe next time….
This remote-controlled storytelling apparatus is made up of Arduino-driven toy animatronics
Arduino Team — November 24th, 2020
As an exhibit at the Phaneo Science Center in Wolfsburg, Germany, Niklas Roy and Felix Figus created a remotely-operated storytelling apparatus dubbed “Smart Fairy Tale.”
When initiated, a little red ball rolls down the installation’s transparent tubing, triggering different interactions based on the interruption of light sensors along its path. 25 Arduino Nanos are used to control each individual animatronic part of the “story,” making the code manageable and allowing the overall machine to still work if there’s a malfunction in one section.
To start the Smart Fairy Tale, people can log on to its Raspberry Pi server, where they can also change how it works. Animations were designed with the help of donated toys, inspirational drawings from kids, and the participation of artist Wolfgang Kowar – a truly public art exhibit!
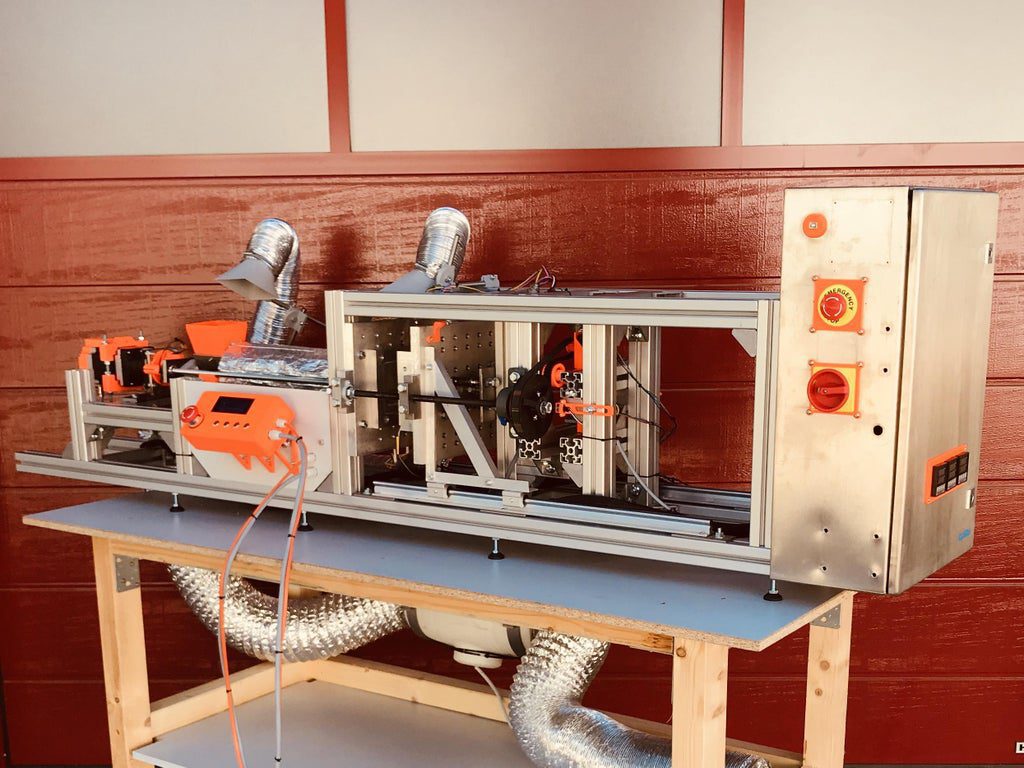
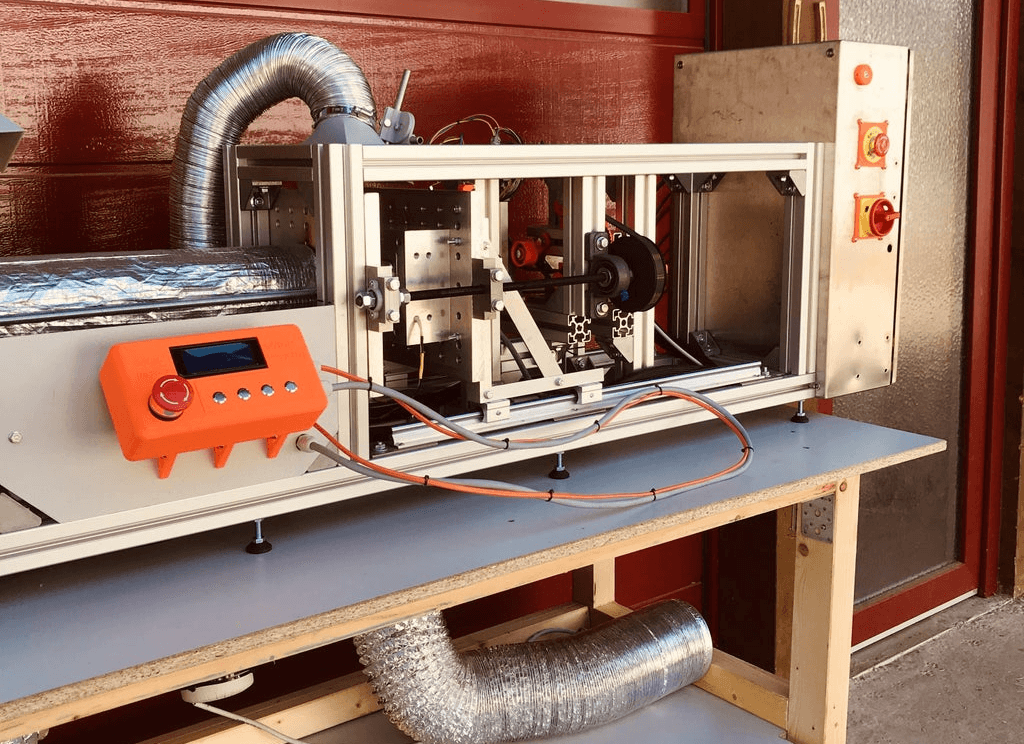
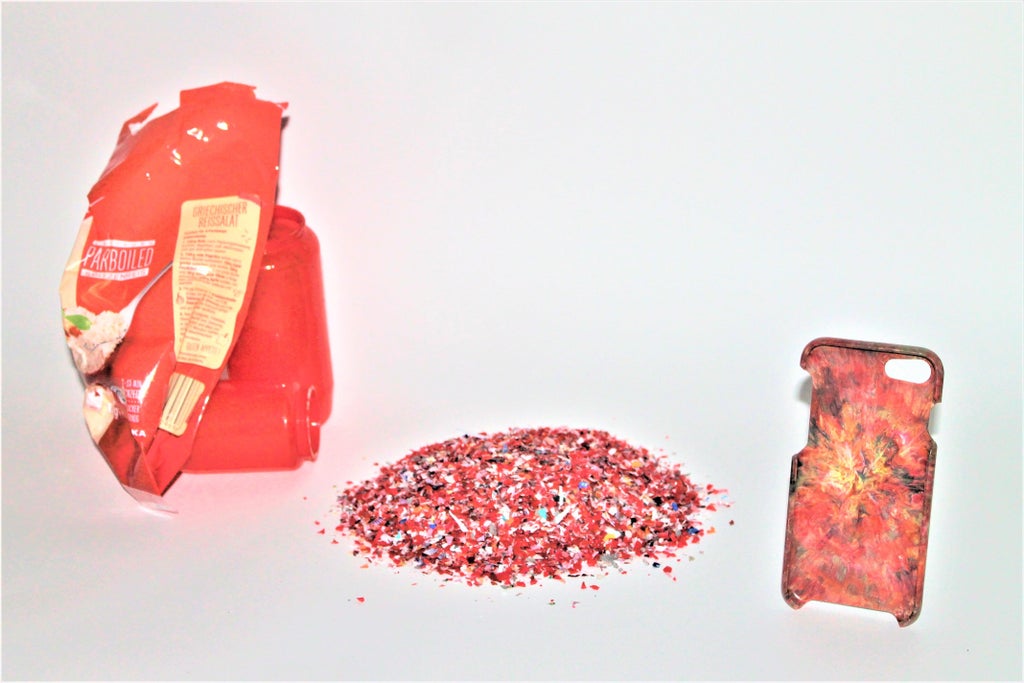
Homemade recycling rig turns plastic waste into new products
Arduino Team — November 24th, 2020
While that plastic cup, bag, dish, or other item may have served its purpose, more than likely it could be formed into something new. With this in mind, the SOTOP-Recycling team of Manuel Maeder, Benjamin Krause, and Nadina Maeder developed an automated injection molding machine that can be built at home and is small enough to allow you to run your own recycling operation!
The “Smart Injector” receives shredded pieces of plastic in a small hopper, then transports them down an extrusion pipe where heat is applied. This material is clamped together via a pair of stepper motors, with screws and timing belts implemented to apply sufficient pressure. Everything is controlled by an Arduino Mega.
As shown in the video, the plastic waste is converted into phone covers in just minutes, though other things could also be made depending on the form tooling used.
Have you ever wondered what your heart rate looked like when you were catching some Zs? Or perhaps you would like to check up on how someone nearby is sleeping, without actually disturbing that person. The ZazHRM monitoring system by Alan Do lets you do both, with a pulse sensor hooked up to an Arduino Uno, which in turn sends data to an Android phone in almost real-time via Bluetooth.
The receiving device runs an MIT App Inventor routine, which can output alarms if the person under observation’s heart rate goes out of range. Results are also logged for later analysis.
While interesting, Do does note that ZazHRM is not a piece of medical equipment, nor is it intended for medical diagnosis. Code and App Inventor info are available on GitHub.
What’s not to love about this realistic beating heart?
Arduino Team — November 20th, 2020
Your heart is an amazing organ, pumping blood through your body and literally keeping you alive. However, building a realistic model of one — as explained in this write-up by Holiday McAllister — can actually be pretty simple.
Here, silicone is poured into a four-inch heart mold to create the structure, partially hollowed out to accommodate a metal gear micro servo.
This little motor rotates back and forth under control of an Arduino Uno, making it appear to pulse up and down on a table. One could see this enhanced in a variety of ways, perhaps with a bit of fake blood for an even more lifelike look, or with inputs to the Arduino for interactive capabilities.
Transgender Awareness Week, which culminates today with the Transgender Day of Remembrance (TDOR), aims at raising the visibility of the transgender and gender non-conforming people, and address the issues their community faces.
At Arduino, we believe that technology should improve the lives of everyone, regardless of their gender, sexuality, race, age, ability, nationality, and body. Being inclusive is at the core of our mission: making technology easy to use, we want to empower everybody to be free to innovate.
We have decided to join the Transgender Awareness Week and the TDOR because we feel a duty to our community, and to all its members, including the GNC and trans community. Our goal today is not only to celebrate all the diversities of our community — in particular the trans and GCN community — but also to start a conversation with our users about inclusivity in general. Finally, our celebration wants to empower our community members to spread awareness by being everyday their authentic self.
At Arduino, we believe role models are important to inspire people, to show the way, to reveal what’s possible so we’re going to talk more and more about the people who helped build the technologies who make what we do possible.
Today, we celebrate two trans women that, even indirectly, have contributed to the Arduino Project. Sophie Wilson and Lynn Conway not only represent a fundamental inspiration for us, but are also a beacon of hope for the next generation of trans and GNC scientists in our community.
Sophie Wilson studied computer science at the University of Cambridge; in 1978, she designed the Acorn Micro-Computer, System 1, an early 8-bit microcomputer for hobbyists and, later, co-designed with Steve Furber the prototype of what became the BBC Microcomputer. In 1983, Wilson started to design the instructions set for the “Acorn RISC Machine” processor that became popular as Arm. The Arm became one of the most successful microprocessor architecture in history and is now used in billions of different products, from mobile phones to laptops, from digital TV to video games and our beloved Arduino boards. (All of our latest boards are based on Arm.) Wilson was listed in 2011 in Maximum PC as number 8 in an article titled “The 15 Most Important Women in Tech History.”
Lynn Conway studied at the M.I.T. and Columbia University and was then recruited by IBM Research to co-design the architecture of the Advanced Computing Systems (ACS) project. With the invention of the multiple out-of-order dynamic instruction scheduling, used by most computers to improve their performance, she made foundational contributions to computer architecture. In 1969 she underwent gender transition and was fired. This didn’t stop here and the work she did with Carver Mead led to the so-called “Mead & Conway revolution.” Their book “Introduction to VLSI Systems” was the first VLSI chip design textbook usable by non-physicists and resulted in a worldwide restructuring of academic materials in computer science and electrical engineering education, and was paramount for the development of industries based on the application of microelectronics. She was also recognized by Time Magazine in 2014 as one of the most influential LGBTQ figures in American Culture. Lynn is a gender activist and has always worked to protect and expand the rights of transgender people.
As Arduino users, we have to thank Lynn for “democratizing” the design of complex silicon chips, which paved the way for people like Sophie who we must thank for designing the Arm processor architecture that is central to all of the work we do now. Without them, we wouldn’t be where we are today in technology!
So, Lynn and Sophie, thank you from the bottom of our open source hearts here at Arduino. 🙂
The celebration of the Transgender Awareness Week and the TDOR is only the beginning of an important journey that will mark Arduino’s commitment to inclusivity. Stay tuned for more!
(NOTE: The biographies are edited from Wikipedia articles used under the Creative Commons Attribution-ShareAlike License.)
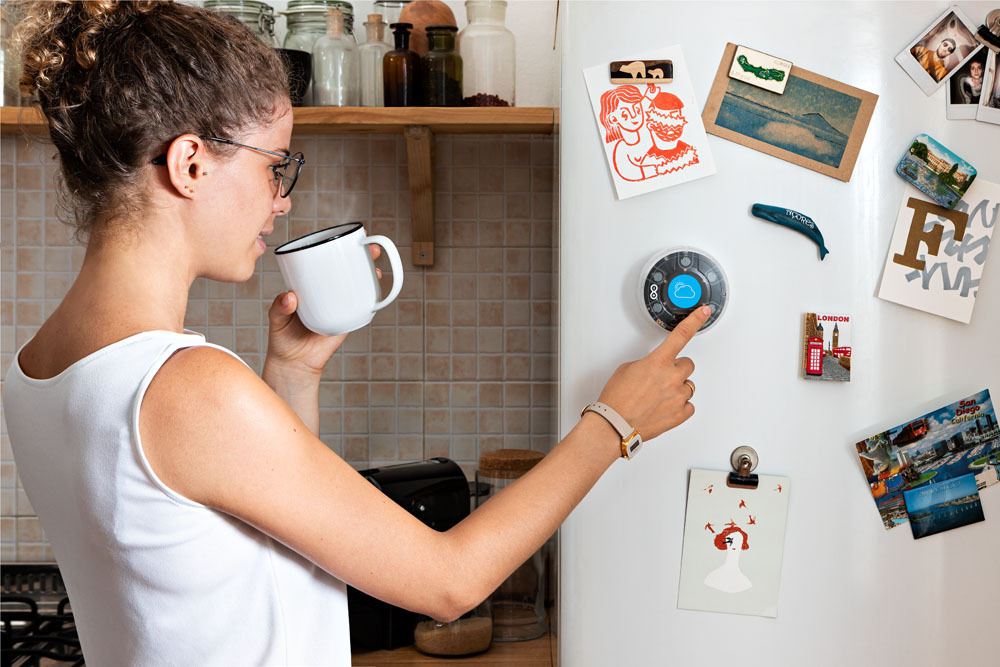
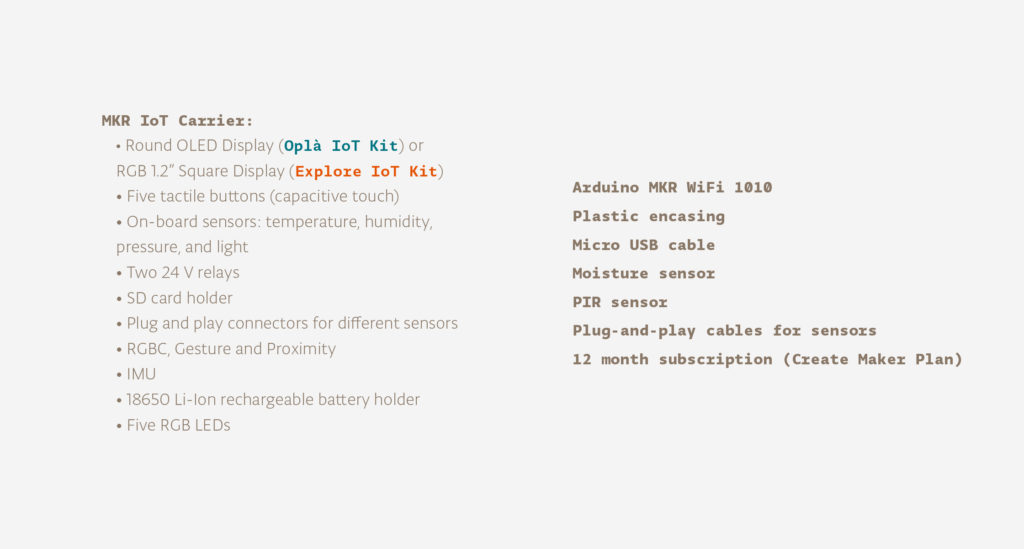
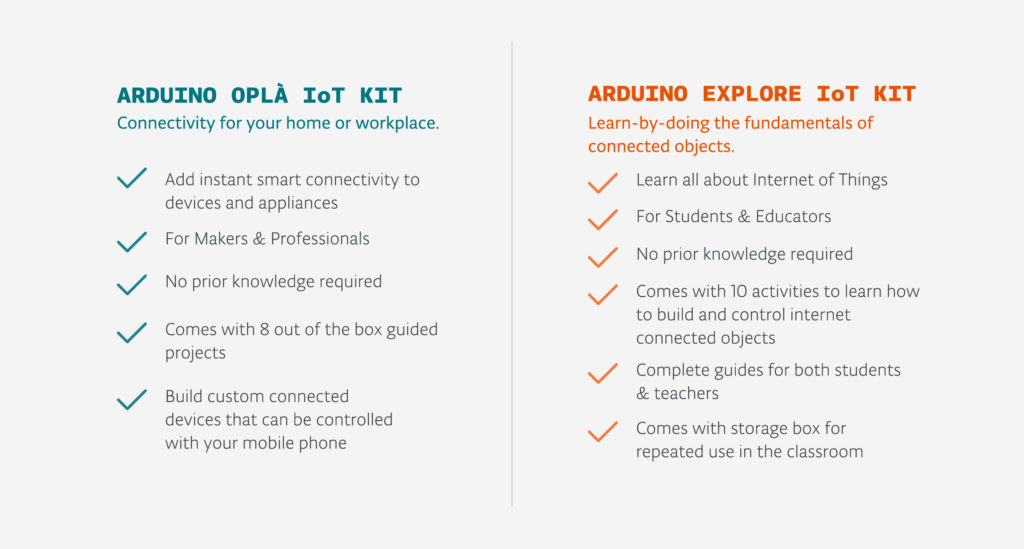
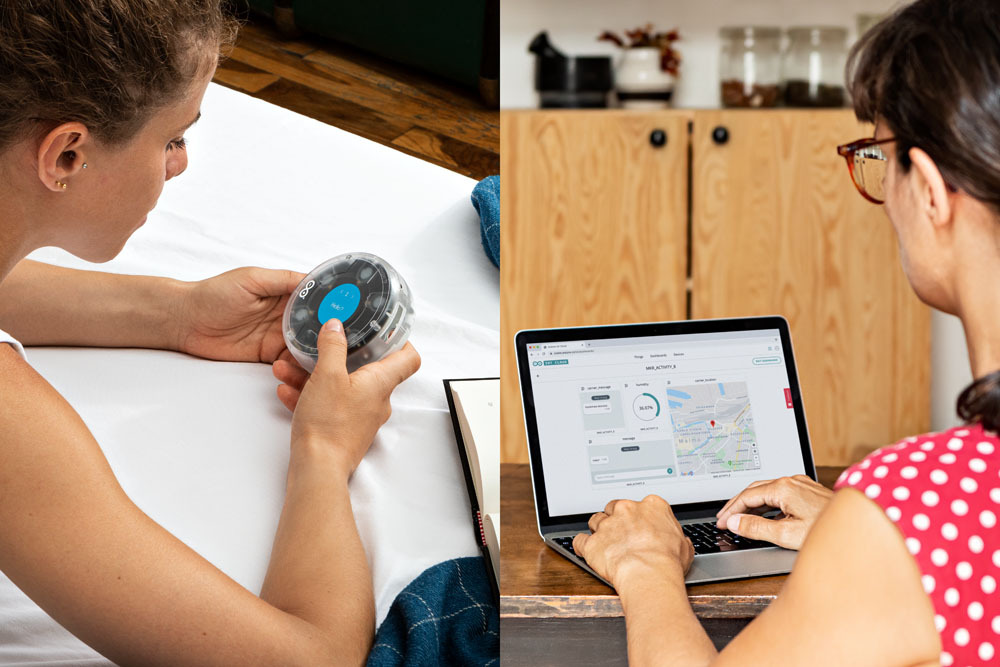
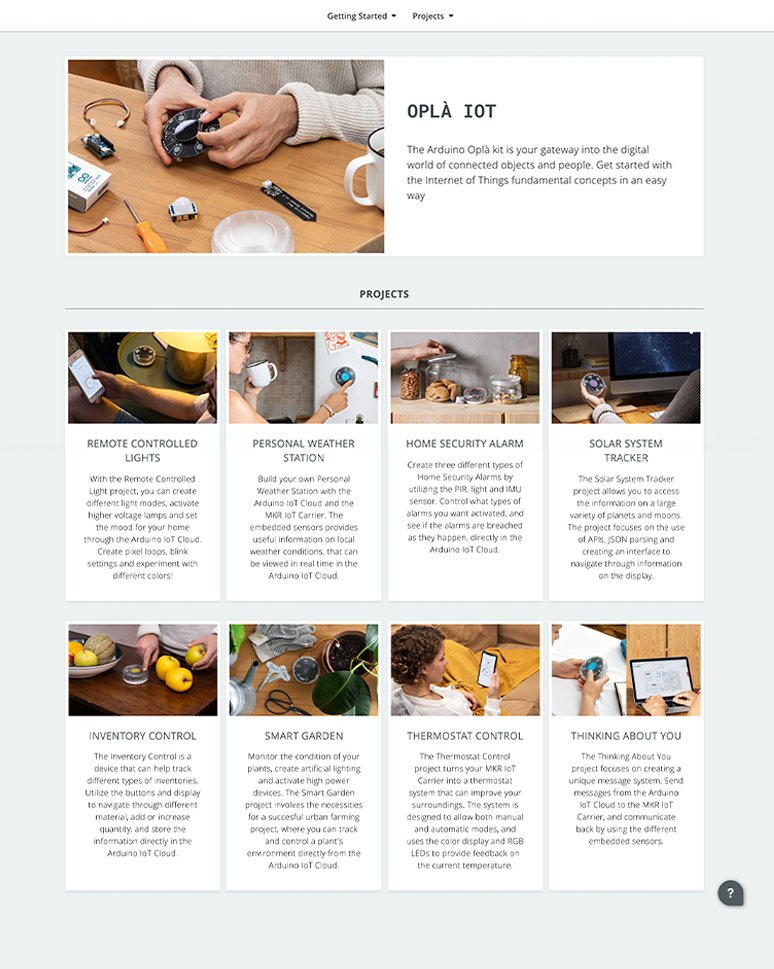
Arduino Explore IoT Kit vs. Oplà IoT Kit: a detailed comparison
Arduino Team — November 18th, 2020
If you are looking for a solution to learn and experience the Internet of Things, there are two popular choices: the Explore IoT Kit and the Oplà IoT Kit. But which one should you pick? Here‘s a handy guide.
The kits share a very similar set of hardware and are in the same price range; moreover, they both offer a free one-year subscription to the Arduino Create MKR Plan, Arduino premium coding platform.
That is where the similarities end though! The Oplà IoT Kit is designed for individuals to use to add connectivity to the devices around the home or in the office, while the Explore IoT Kit is an educational kit developed for students to learn how to control objects remotely using digital dashboards and learn the fundamentals of the Internet of Things. Furthermore, they offer different online platforms and different projects — in other words, a completely different experience.
We’ve created a super simple guide to help you decide which is the right kit for you and your projects!
Both kits include:
And now, let’s explore what you can do with the Explore IoT Kit and the Oplà IoT Kit.
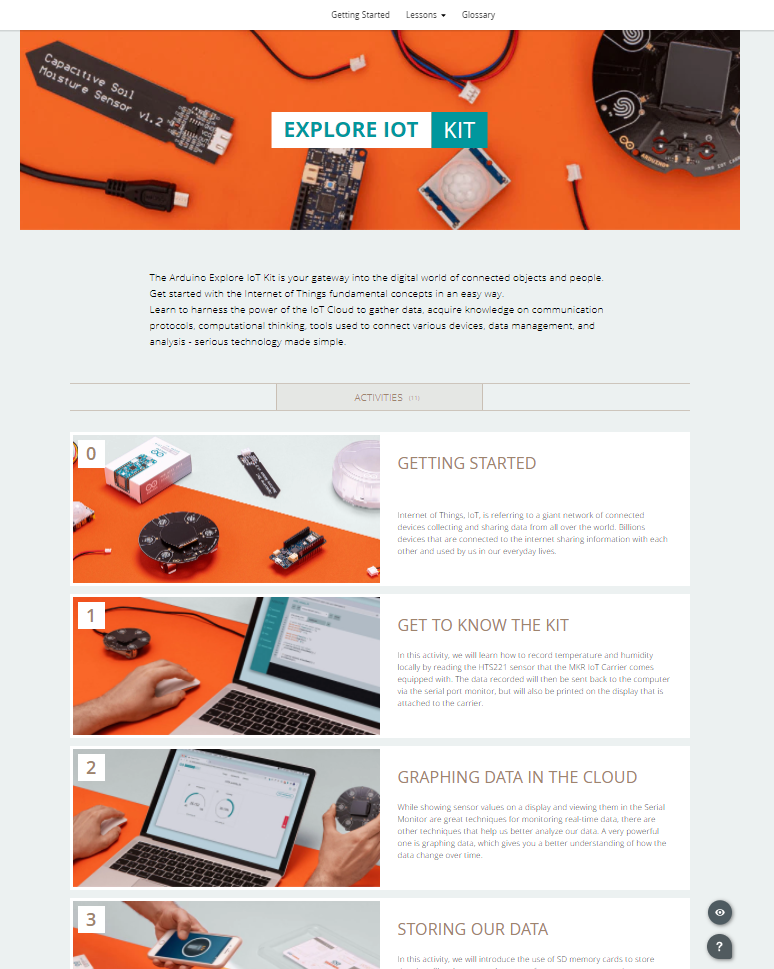
The Explore IoT Kit teaches you fundamental concepts to control objects remotely.
This educational kit includes 10 online student activities that adopt a learning-by-doing approach.
Step-by-step students will acquire knowledge by constructing fully functional solutions, including experiments, challenges, and building real-life applications. Students also learn to control objects remotely using a digital dashboard: the Arduino IoT Cloud.
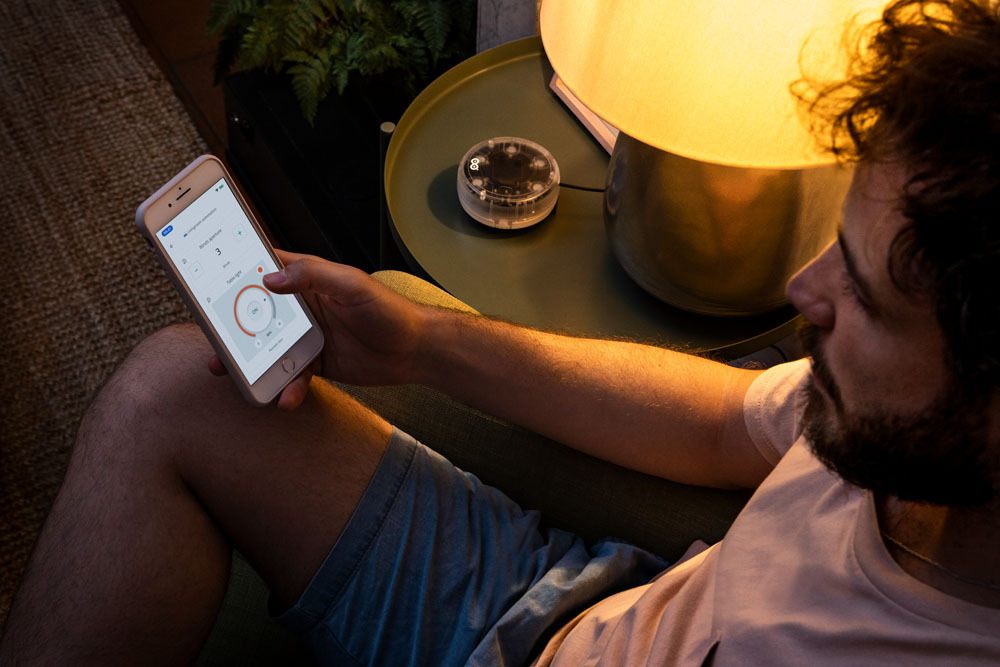
The Oplà IoT Kit adds connectivity to your home, office appliances, and applications without the need for soldering.
This kit comes with a complete set of eight Internet of Things projects ready to turn everyday appliances into ‘smart’ appliances, e.g. a thermostat. More advanced users can create their own connected devices.
The two kits are currently available on the Arduino Store, priced at $114. Get yours today!
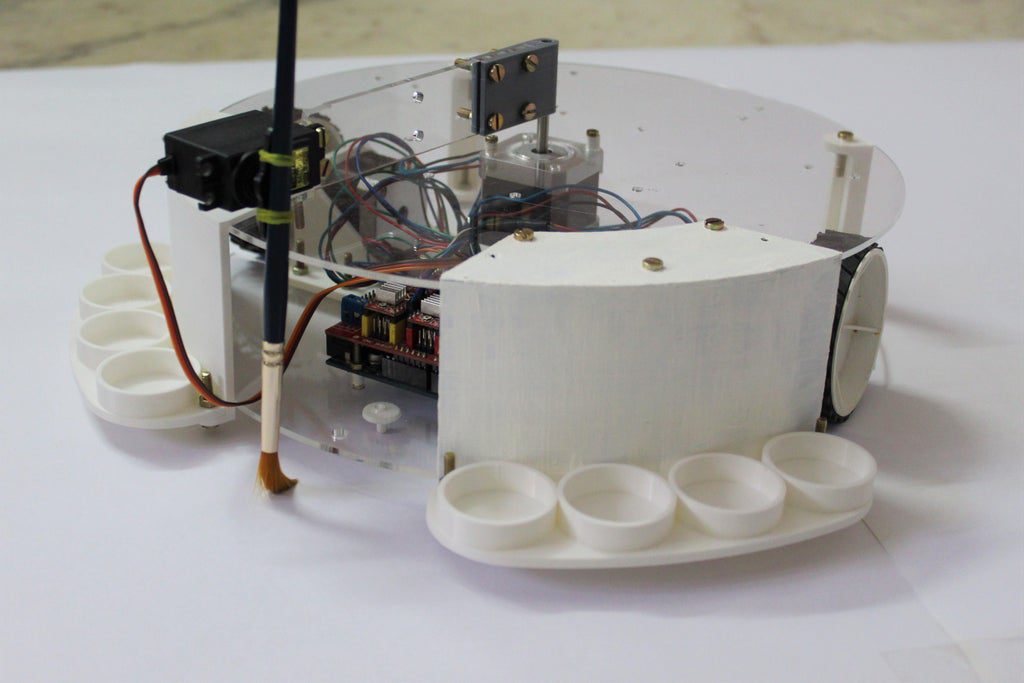
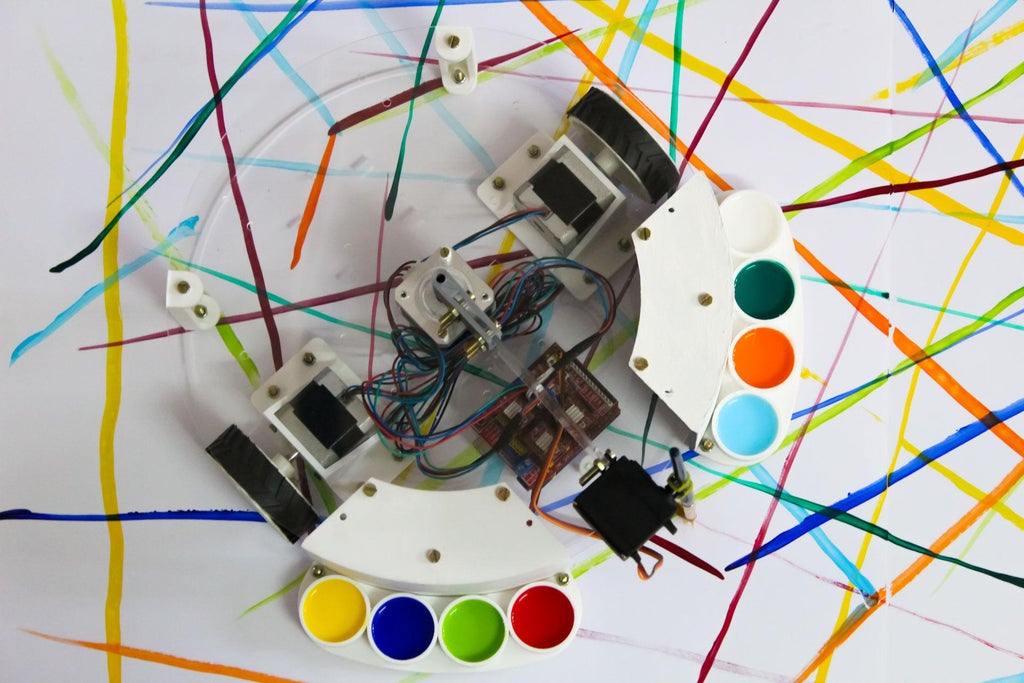
This Arduino-powered robot is like a Roomba with a paintbrush
Arduino Team — November 16th, 2020
Can robots paint? More specifically, can they create art? The second question is, of course, open for debate, but Technovation’s robotic build shows that they can indeed wield a paintbrush.
The device, shaped vaguely like a Roomba vacuum cleaner, uses a pair of NEMA 17 motors for movement and a third to rotate a sort of brush turret. A servo attached to the pivoting arm positions a brush up and down, dipping it into paint, and bringing it to the drawing surface as needed.
Control is via an Arduino Uno with a CNC shield. The project is capable of producing art randomly, or be programmed to execute pre-defined patterns.
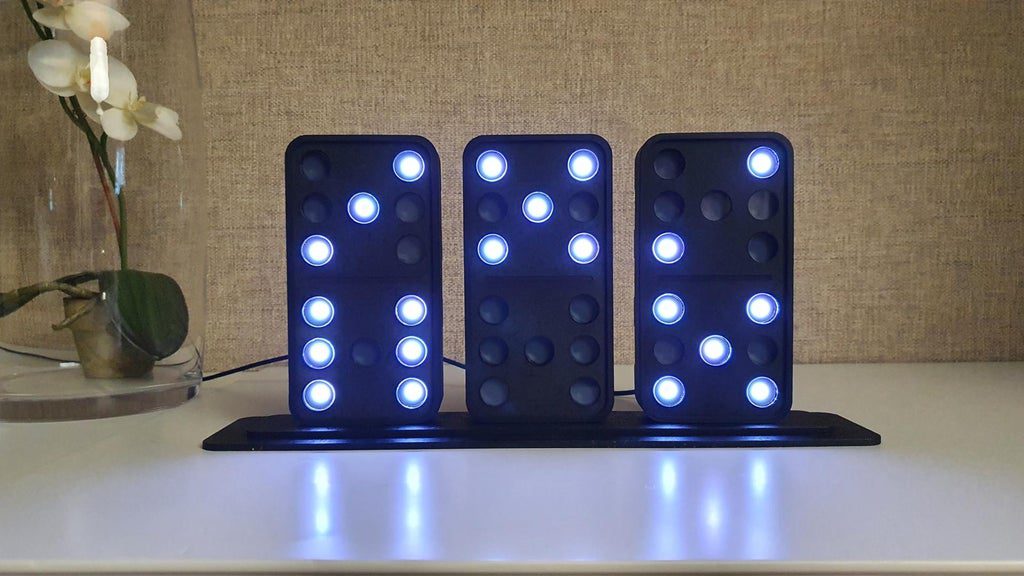
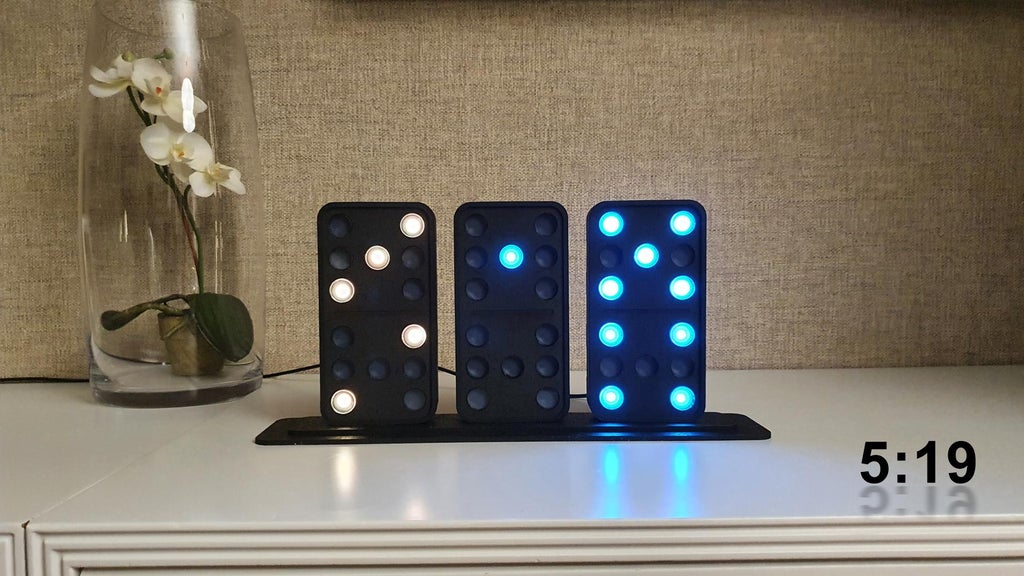
This DIY domino clock tells the time using three LED-lit tiles
Arduino Team — November 14th, 2020
After coming across Carbon Design Group’s Domino Wall Clock, which uses electronic magnetic coil motors to reveal white dots, Instructables member “Kothe” decided to create a simplified version of their own.
The clock is comprised of three custom dominoes — the first tile for hours, the second and third for minutes. Unlike its inspiration, Kothe’s device uses addressable RGB LEDs as dots that allow for a variety of colors to shine through.
The unique timepiece is made out of cut MDF, acrylic, and 3D-printed outer sections. Everything is controlled by an Arduino Nano, along with a DS1307 RTC unit for accurate timekeeping.
This automated table makes beer pong more challenging
Arduino Team — November 12th, 2020
If you play beer pong, whether with adult beverages, water, or soda, it’s possible you find it too repetitive or too easy. While one might see this as a self-correcting problem, to take things up a few notches Ty Palowski created a specialized table with moving cups.
The custom setup oscillates the cup pyramids back and forth under the power of a stepper motor, belt, and magnet assembly under the table. These magnets pull on corresponding magnets attached to the bottom of each cup, causing them to slide “like magic” on top of an acrylic surface.
Palowski’s system is controlled by an Arduino Nano with a rotary encoder and OLED interface. As shown in the video below, both sides of the table are motorized in the same manner for a two-player challenge!
Um dir ein optimales Erlebnis zu bieten, verwenden wir Technologien wie Cookies, um Geräteinformationen zu speichern und/oder darauf zuzugreifen. Wenn du diesen Technologien zustimmst, können wir Daten wie das Surfverhalten oder eindeutige IDs auf dieser Website verarbeiten. Wenn du deine Einwillligung nicht erteilst oder zurückziehst, können bestimmte Merkmale und Funktionen beeinträchtigt werden.
Funktional
Immer aktiv
Die technische Speicherung oder der Zugang ist unbedingt erforderlich für den rechtmäßigen Zweck, die Nutzung eines bestimmten Dienstes zu ermöglichen, der vom Teilnehmer oder Nutzer ausdrücklich gewünscht wird, oder für den alleinigen Zweck, die Übertragung einer Nachricht über ein elektronisches Kommunikationsnetz durchzuführen.
Vorlieben
Die technische Speicherung oder der Zugriff ist für den rechtmäßigen Zweck der Speicherung von Präferenzen erforderlich, die nicht vom Abonnenten oder Benutzer angefordert wurden.
Statistiken
Die technische Speicherung oder der Zugriff, der ausschließlich zu statistischen Zwecken erfolgt.Die technische Speicherung oder der Zugriff, der ausschließlich zu anonymen statistischen Zwecken verwendet wird. Ohne eine Vorladung, die freiwillige Zustimmung deines Internetdienstanbieters oder zusätzliche Aufzeichnungen von Dritten können die zu diesem Zweck gespeicherten oder abgerufenen Informationen allein in der Regel nicht dazu verwendet werden, dich zu identifizieren.
Marketing
Die technische Speicherung oder der Zugriff ist erforderlich, um Nutzerprofile zu erstellen, um Werbung zu versenden oder um den Nutzer auf einer Website oder über mehrere Websites hinweg zu ähnlichen Marketingzwecken zu verfolgen.