IKEA sells – among many, many other items – a motorized sit/stand desk called the BEKANT. Although it seems like a nice item, creator “Hardware Unknown” found having to hold a button down the entire time that it goes from one position to another to be a bit inconvenient.
To remedy this situation, he cannibalized the stock PCB out of a spare control panel, then hooked up an Arduino Nano to emulate button presses to the board via a pair of MOSFETs. Four user input buttons were added, along with a 3D-printed enclosure for a custom controller.
Two buttons are used for manual up/down adjustment as before, while the other pair make the desk rise or fall for a set amount of time, automatically moving it to a sitting or standing position.
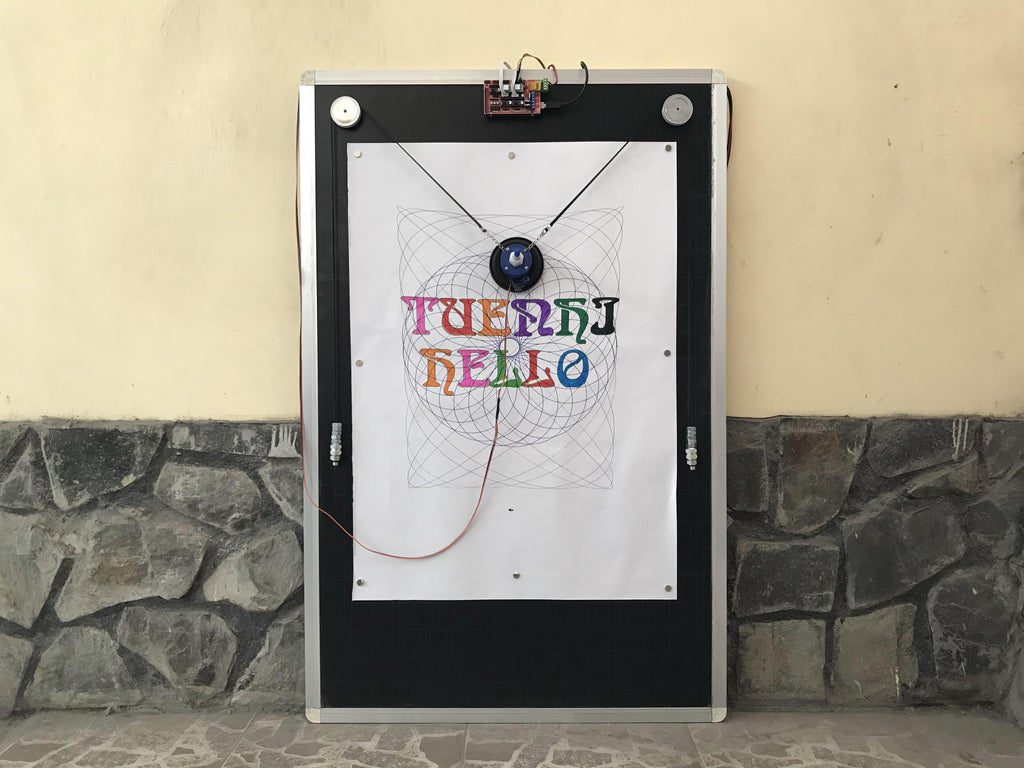
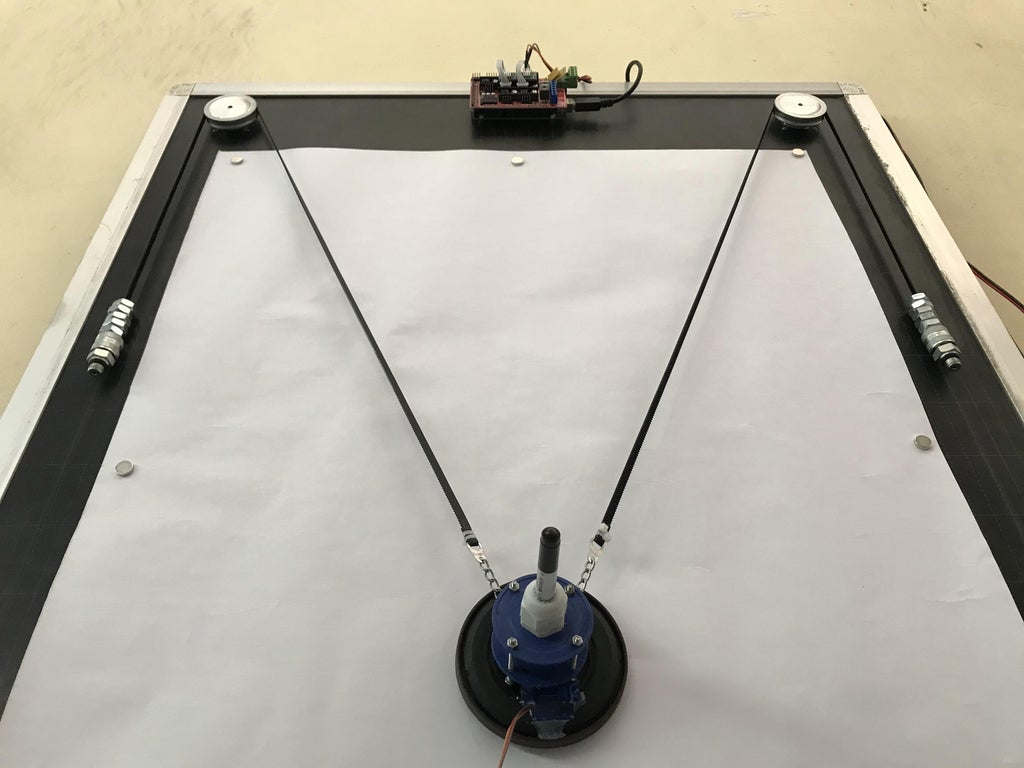
Vertical pen plotters, which work by suspending a drawing device between two variable lengths of cable, can be a lot of fun. When his kids stopped using a 780x1200mm blackboard, ‘tuenhidiy’ had the perfect surface on which to create his own!
The project uses a pair of NEMA 17 motors to dictate the lengths of timing belt that suspend the drawing instrument, with counterweights help keep it in position. An Arduino Mega running Makelangelo firmware controls the device, using a RAMPS 1.4 board and two A4988 stepper drivers.
It’s a nice clean build, which looks fairly straightforward to reproduce. Results, as seen in the videos below, are quite impressive!
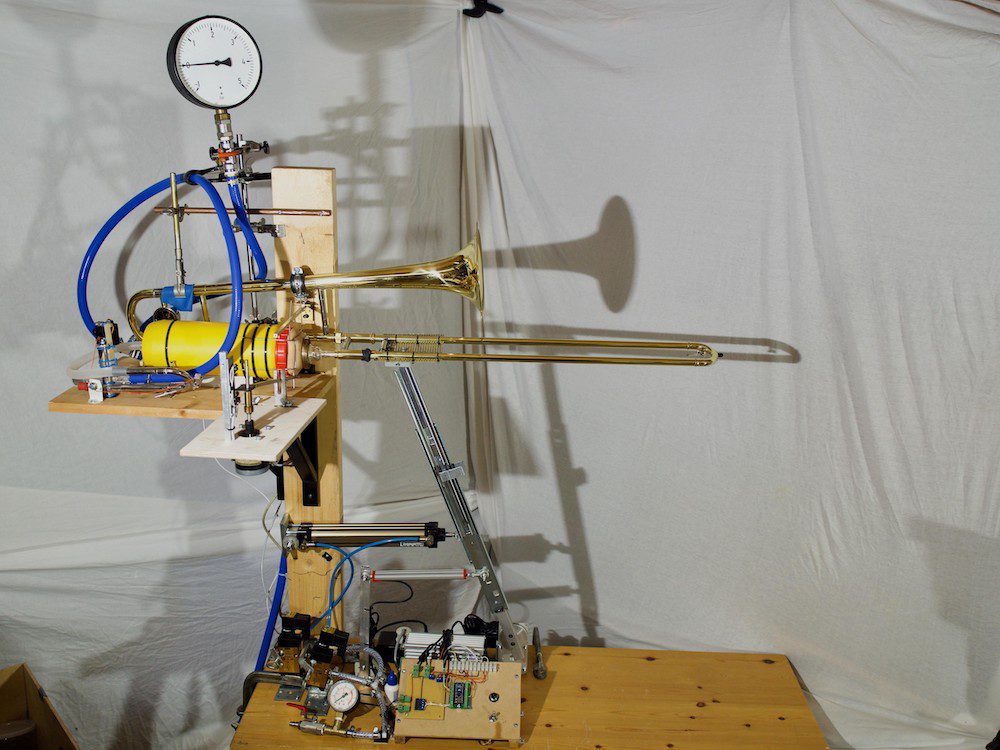
The RoboTrombo is a MIDI-controlled robotic trombone
Arduino Team — December 29th, 2020
Inspired by Wintergatan’s Martin Molin, iSax set out to create a MIDi-controlled robotic trombone of his own. Although the aptly named RoboTrombo may not replace professional trombone players anytime soon, it’s nonetheless an impressive musical hack.
The instrument is controlled by an Arduino Nano running Firmata, along with a host computer, and employs a variety of pneumatic and electrical actuators to produce the tunes.
When played, air flows through the mouthpiece via artificial lips, and turned on and off with a trumpet valve and servo. The lips can be manipulated for different sounds using a stepper motor setup. A slide mechanism is driven by a pneumatic actuator, with a linkage system that pushes it in and out, and a potentiometer provides positional feedback.
While it can’t reliably play songs on command, it’s a very entertaining project that makes a bunch of fun semi-random noises! More details on the design and construction of the RoboTrombo can be found in PDF form on iSax’s Hackaday page.
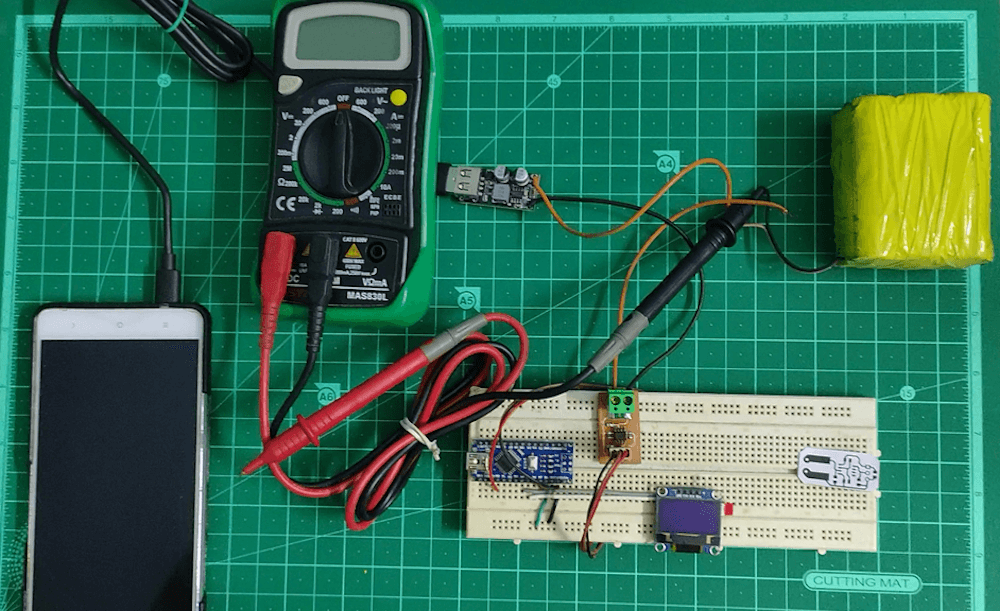
This DIY current sensor measures up to 15A and displays it on an OLED screen
Arduino Team — December 28th, 2020
When working with electronics, voltage is fairly easy to measure, but current often takes a bit more finesse. For this purpose, Utsav Shah decided to create his own current sensor capable of handling up to 15A.
The DIY device uses a shunt resistor, a voltage divider, and an LM358 op-amp to produce a voltage that corresponds to the current value. An Arduino Nano reads this voltage, calculates the current via a calibration factor, and shows it on an OLED screen for feedback.
The video below goes over the board’s design, and how it was constructed using an etched PCB method. It’s evaluated at the end of the clip with a multimeter, which corresponds nicely to what’s on display with the Nano/op-amp setup.
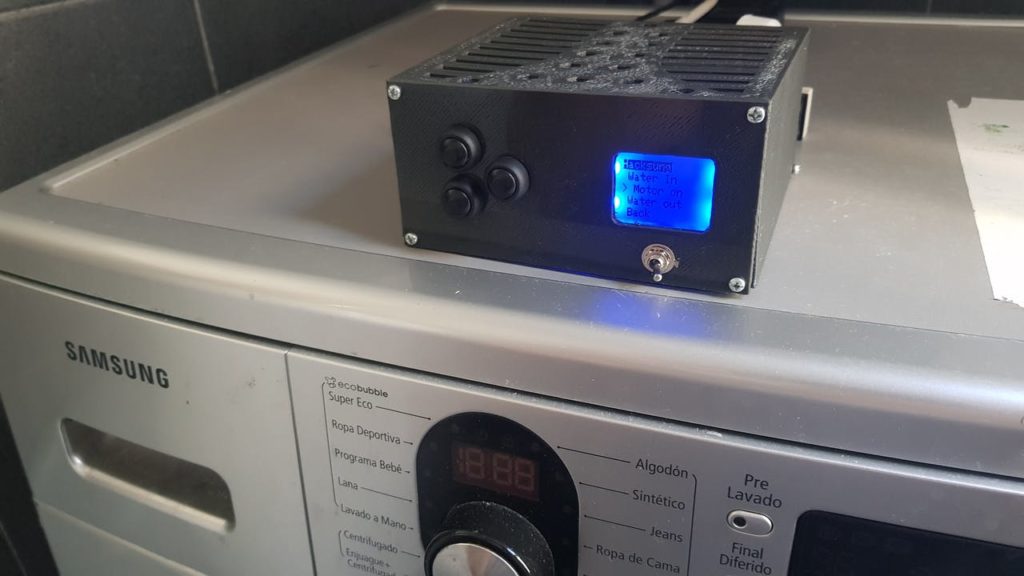
Arduino control system puts defunct washing machine back into operation
Arduino Team — December 28th, 2020
After three short years of use, Roni Bandini’s Samsung washing machine started to act erratically, and several technicians looked at it without really fixing the problem. Bandini then decided to take matters into his own hands and replaced its brains with a MKR WiFi 1010 board, along with four relays and a trio of buttons.
This new system can control the motor and valves to progress through a wash cycle. It also takes advantage of the Arduino’s WiFi abilities to integrate with Telegram, sending a message to the entire family when the laundry is done.
Future goals for the project include varying the motor speed and making it reverse, but so far it’s a brilliant way to keep a large hunk of metal and plastic out of the junkyard. Code is available on GitHub, and print files for the enclosure are up on Thingiverse.
Over-the-air (or OTA) programming is a very useful feature in all those cases where your devices are located in places that are not easily accessible. For example, you built a weather station using the Oplá IoT Kit, installed it on your rooftop, and started monitoring the weather from an IoT Cloud dashboard. That’s great until you find a bug or want to modify something and have to climb on your roof with a laptop to do so. Here’s where OTA becomes handy.
If you have connected an Arduino Nano 33 IoT or a MKR WiFi 1010 to the Arduino IoT Cloud, you can now update the sketch wirelessly from the web.
How it works
To use OTA, you need to do two things: enable a device and create a Thing.
To enable a device, you need to connect a board to the IoT Cloud and update the firmware. Just plug the device into the USB, go to the Device tab, and click Add Device. A wizard will guide you through the process — at the end, your board will be available as a target for the upload over-the-air and you will be able to update the sketch remotely!
A Thing is a component that manages the dialogue between the cloud and the physical device thanks to a dedicated library (the Arduino Connection Handler), and stores the data into the cloud. Creating a Thing is simple: just select the voice from the IoT Cloud’s main menu, configure the variables that you want to exchange with the device, and pair the board that you have just enabled.
Devices that can be updated via OTA will appear in the dropdown list of all updatable devices in the online editors of Create — the full Web Editor and the new Sketch Editor have been introduced in the Thing configuration page to make minor changes to the code.
This Sketch Editor is one of the innovations that we have introduced in the IoT Cloud with two objectives in mind:
1. Help those who are learning to program with Arduino follow the tutorials of IoT projects, such as those included in the Oplà IoT Kit.
2. Allow users to quickly make small changes to the sketch, which do not require access to libraries or more sophisticated editing functions.
More resources
If you want to know more about OTA and the redesign of the IoT Cloud, we have prepared a couple of detailed tutorials that will walk you through the exploration of the new features.
New to Arduino Create? It’s a platform that helps you develop and manage connected projects with Arduino, featuring tools to code, monitor, and control devices from the Internet and your smartphones. Sign up for free now!
Arranging dominoes in such a way that they knock each other down in sequence can be a fun pastime, but what if you would like a machine to take care of lining them up for you? As seen in the video below, Lewis of DIY Machines has come up with just such a device featuring 3D-printable parts and an Arduino Uno for control.
The project uses a single gearmotor to both move the robot over the floor and actuate the stacking mechanism, creating consistent spacing without the need for additional sensors. A steering servo points it in the right direction, and its motion can be pre-programmed via the Arduino IDE.
What’s more, the machine can be driven from a Blynk smartphone app over Bluetooth (to be explained in an upcoming video). It’s capable of holding around 140 dominoes at a time, and includes a carousel setup that can be changed to keep the placement going!
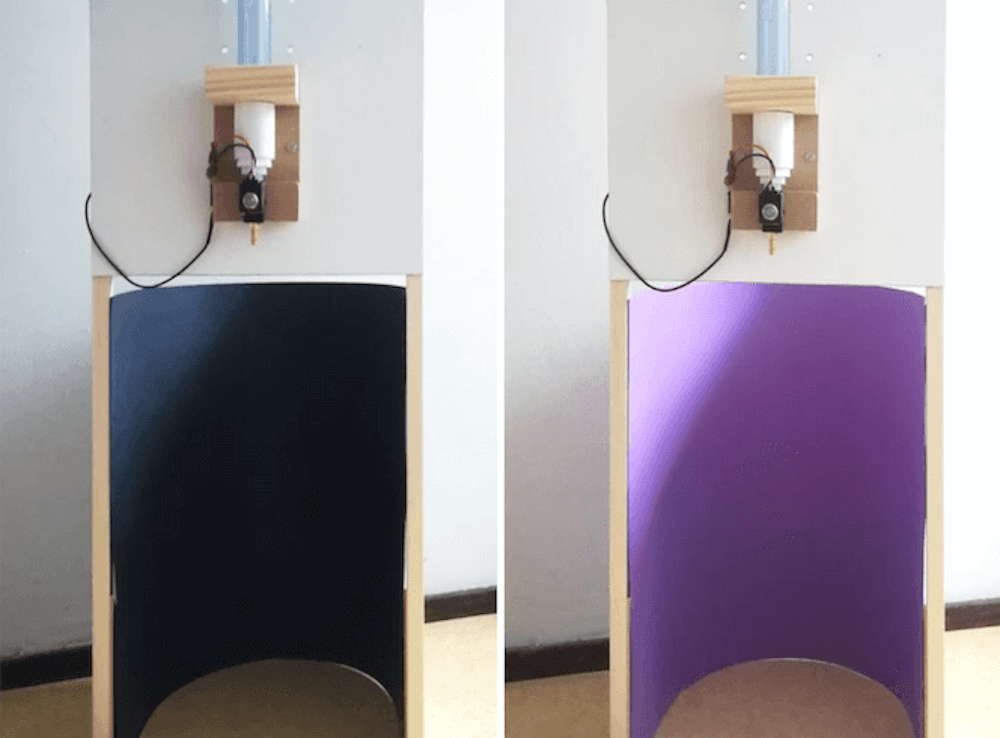
Mesmerize your holiday guests with these motor-driven rheoscopic fluid ornaments
Arduino Team — December 23rd, 2020
We’ve all see Christmas ornaments shaped like a ball – interesting, but a bit passive. Will Donaldson, however, has created an amazing enhancement for these “orbaments,” adding a rheoscopic fluid inside that shows turbulent swirling patterns as it moves.
The fluid is simply tap water and food coloring, plus the special rheoscopic concentrate that contains an array of light reflecting particles. To maintain a state or turbulence, Donaldson affixed a small drone-style motor to the hanger assembly on top of each orb using hot glue.
Motors were inserted with propellers attached, which were bent to fit inside. To vary the speed of the turbulence, Donaldson added an Arduino Nano, along with an L293 driver, using the analogWrite() function for PWM control.
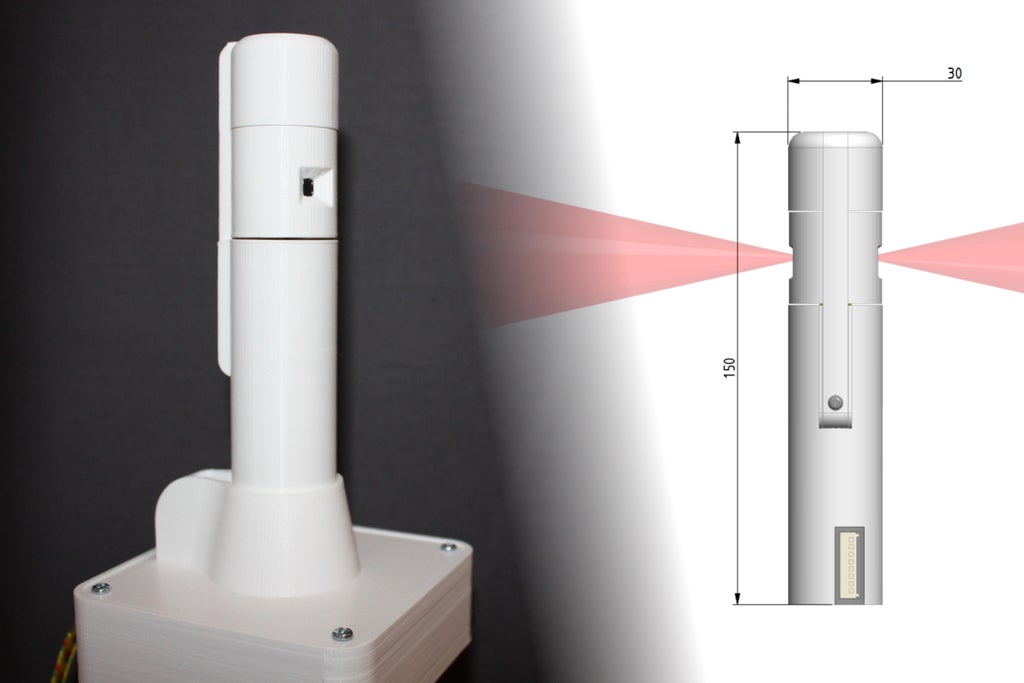
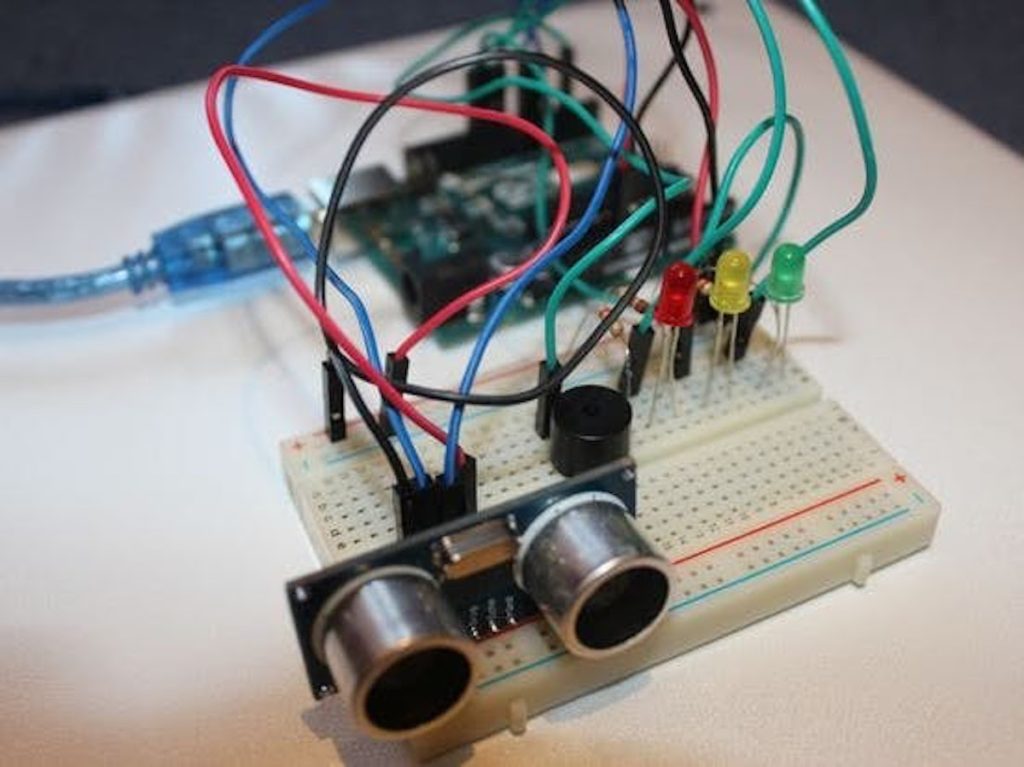
LiDAR (or “light detection and ranging”) sensors are all the rage these days, from their potential uses in autonomous vehicles, to their implementation on the iPhone 12. As cool as they are, these (traditionally) spinning sensors tend to be quite expensive, well out of reach for most amateur experimenters. Daniel Hingston, however, has managed to build his own unit for under $40, using an Arduino Uno and a pair of VL53L0X time-of-flight (ToF) sensors.
The lighthouse employs a small gearmotor to rotate the two sensors on top of its cylindrical 3D-printed housing, passing signals to the Arduino via a slip ring. Data can then be visualized using a Processing sketch running on a nearby computer.
As seen at around the 10:00 mark in the video, the setup has been utilized to map out different test enclosures, and could be excellent for use in small robotic applications. More details can be found in Hingston’s tutorial here.
Use an Arduino and a pair of stepper motors to automatically wind pickups
Arduino Team — December 18th, 2020
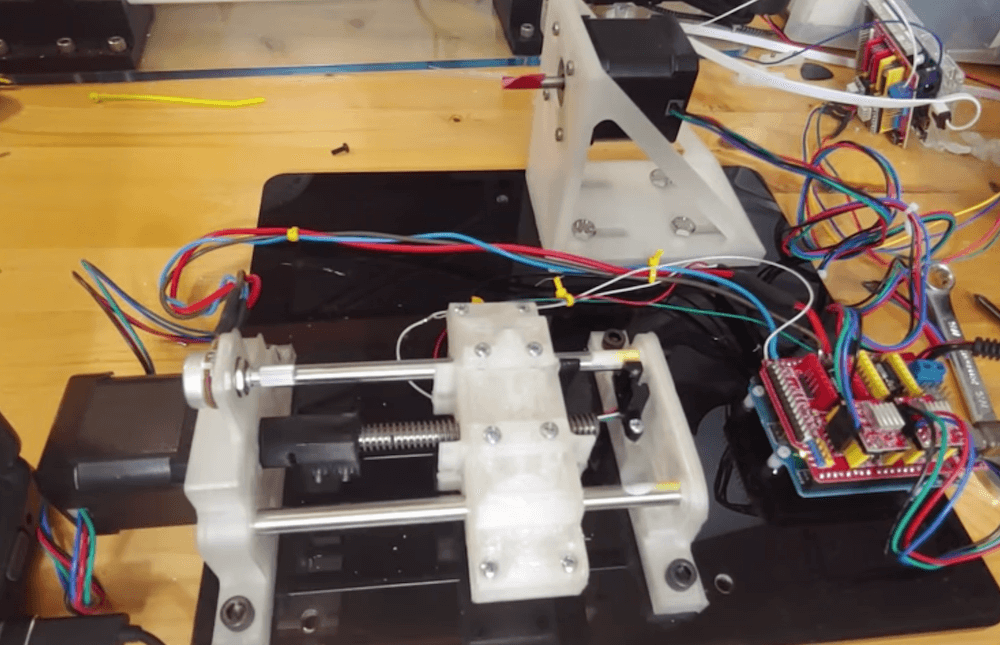
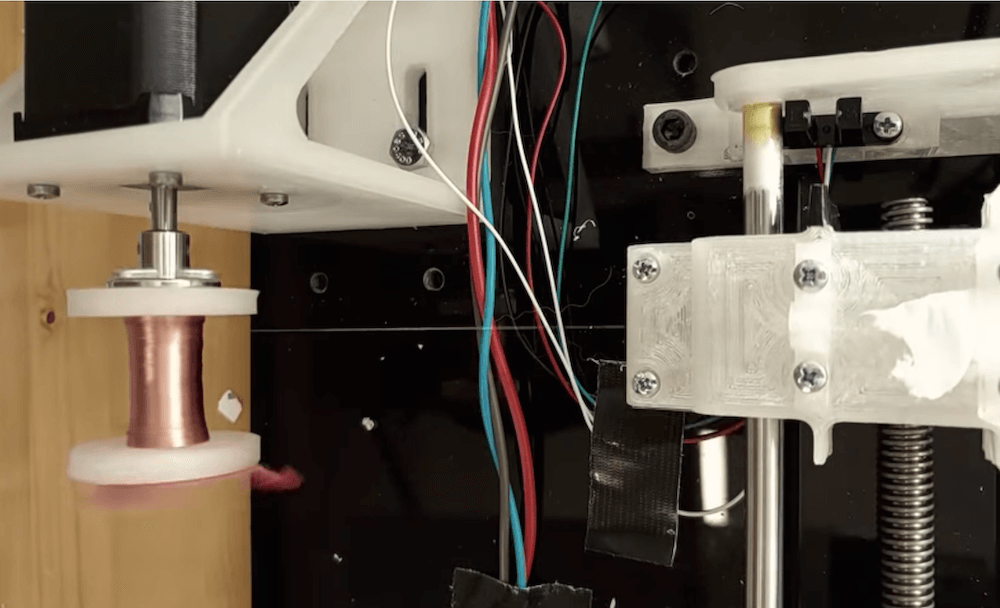
Electric guitars use pickups to sense string vibrations and make music. While a wide variety are available for purchase, what if you would like to make your own custom device for audio experimentation? In the video below, Ezra Spencer from the Mixed Signal shows how to do just that by automatically winding a pickup coil with an Arduino Uno, a CNC shield, and a pair of stepper motors.
Here, the winding-in-progress is mounted on one of the steppers, which spins in the neighborhood of 10,000 times to create a spool of pickup wire. Meanwhile, the carriage is moved left and right by the other stepper to produce an even wire distribution. If all goes well, after 20 minutes or so you can return to find your new pickup assembly, wound and ready for further exploration!
Home for the holidays? This is the perfect time to make something!
The Arduino Project Hub offers around 6,000 projects for levels: each tutorial includes detailed assembling instructions and the Arduino code. We have selected the top five Arduino projects for beginners; you don’t need a degree in engineering — these are an easy and safe way to express your creativity, and entertain yourself and your loved ones).
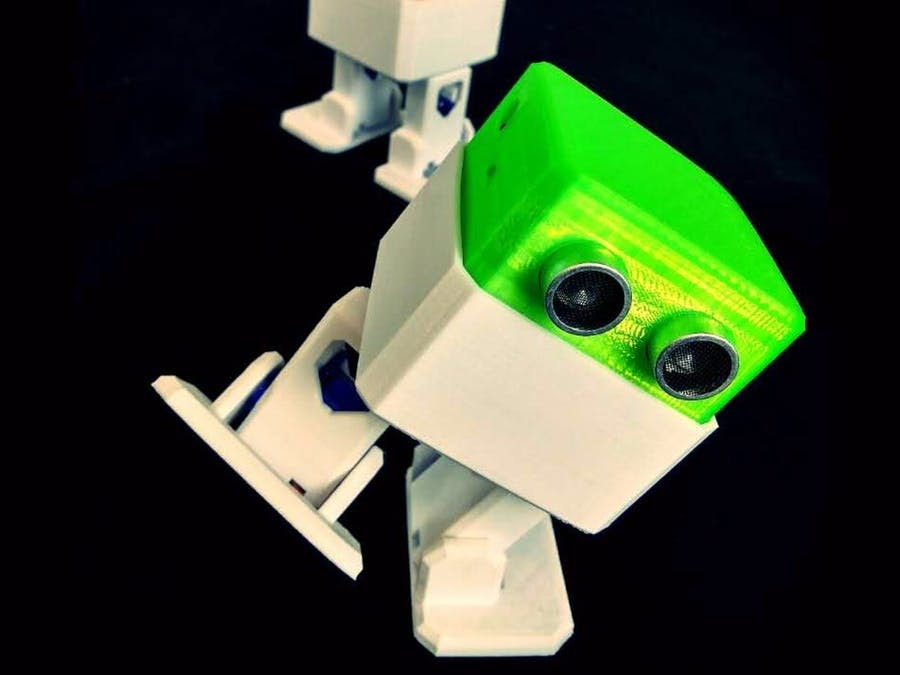
Otto by Camillo Carlo Palacio is a little robot that walks, dances, makes sounds, and avoids obstacles thanks to a Nano Every, a micro servo motor, and a buzzer.
Always lose count while exercising? The team of Mod Natao, Peter Ma, Sarah Han, and Kevin Vo has come up with a solution! This setup works with an Uno, a WiFi Shield, and a proximity sensor to track your push-ups.
This basic security device by Ivan is based on an Uno along with an ultrasonic sensor that detects objects or eagerly awaited guests in an indoor environment via ultrasonic waves.
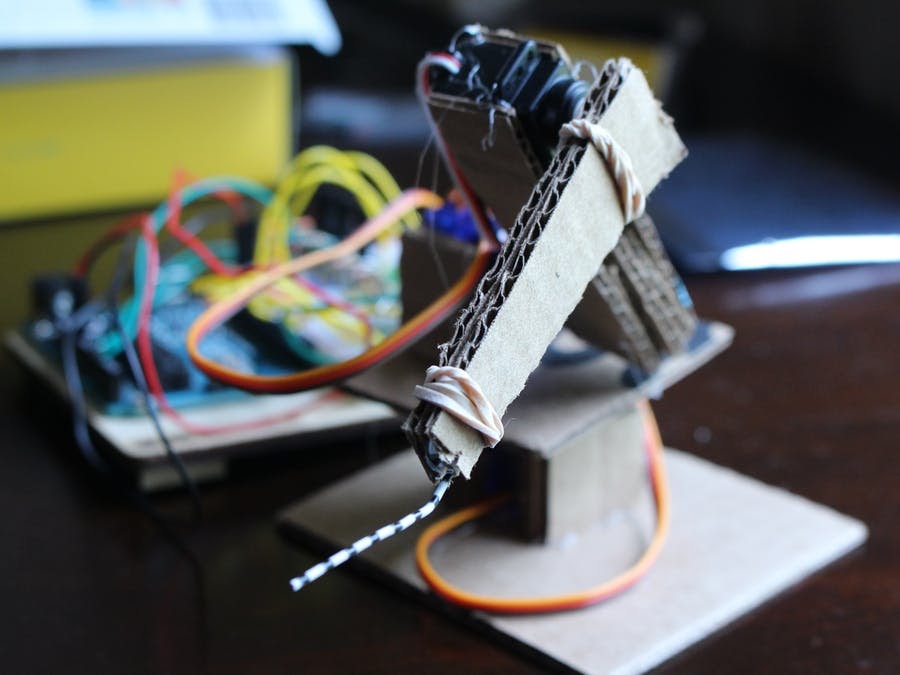
Have some leftover boxes? Here’s an idea! Ryan Chan minimalistic robotic arm is constructed out of cardboard, and powered by an Uno, a micro servo, and a potentiometer. It’s capable of recording and replaying five positions.
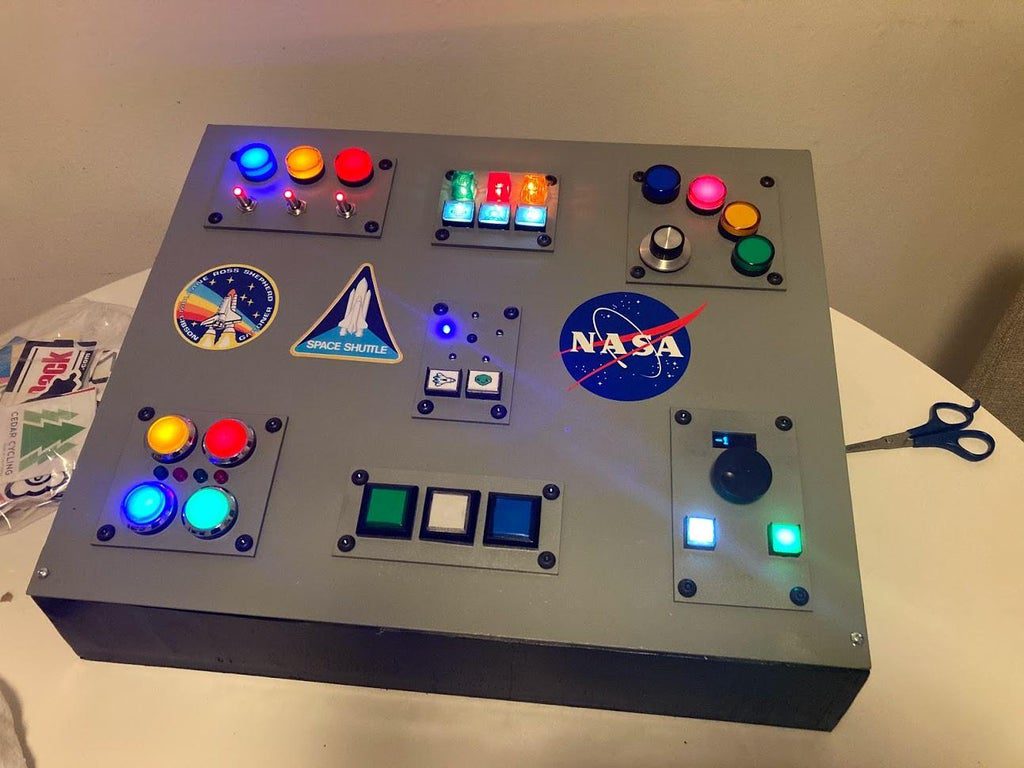
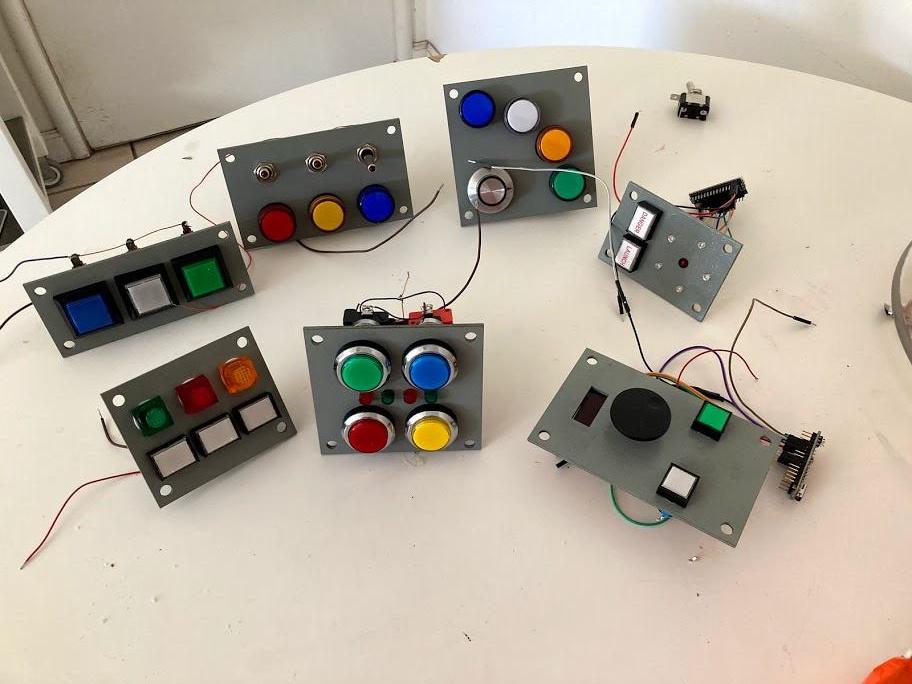
As a gift for his sister-in-law who runs a daycare, “r570sv” built a NASA-inspired control panel for the kids there to use. She had enjoyed seeing an earlier – and perhaps less kid-friendly – version that he made, so this would seem to be a great Christmas present.
The device is constructed out of plywood, painted, and decorated with various space emblems. Electronics are attached via six bolt-on panels, with four containing simple lights and switches, and the other two featuring individual Arduino boards. One of these flashes different LED patterns depending on which of its two buttons are pushed, and the other uses an encoder and screen to scroll through numbers.
As shown in the video below, with a little child-like imagination, it would be perfect for all kinds of adventures!
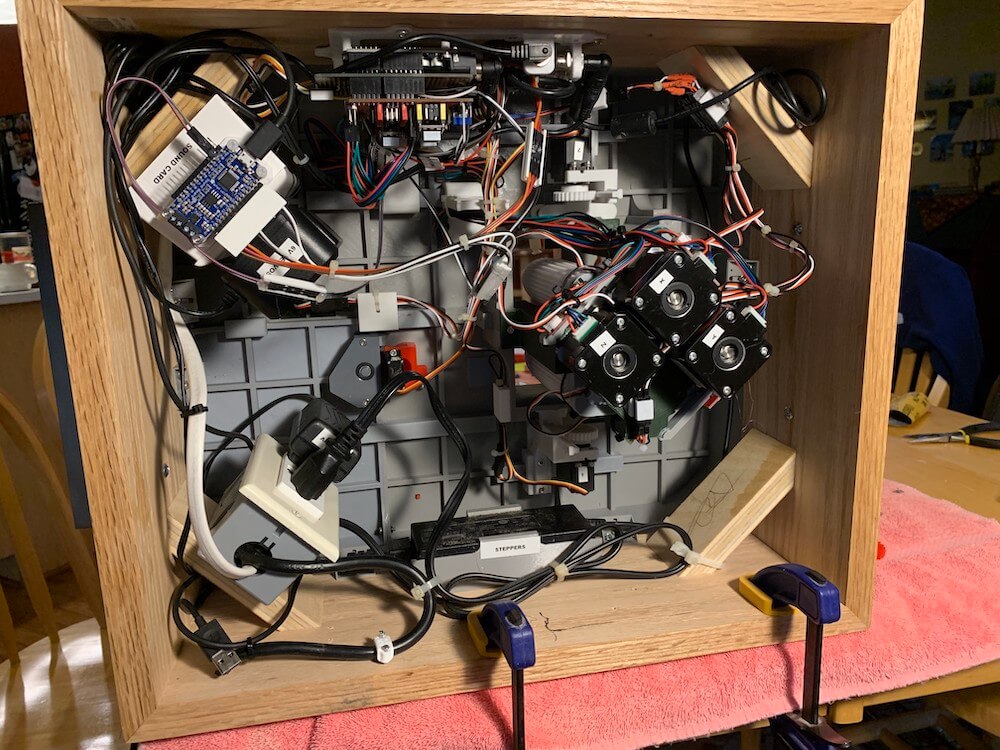
A fully-animated, Arduino-powered launchpad for the LEGO Saturn V model rocket
Arduino Team — December 16th, 2020
Approximately 18 months ago, Mark Howe embarked on a journey to build an animatronic launchpad and gantry for a LEGO Saturn V model rocket. After approximately 1,000 hours of CAD work, hundreds of hours of 3D printing, and a major redesign, he’s created a truly impressive setup that resembles one of NASA’s.
Howe’s rocket and structure stand several feet tall, with a crane, sway bar, crew walkway, gantry arms, and service arms that move out of the way using servos. Everything is controlled by Arduino Uno, along with an MP3 shield to play the Apollo 11 countdown audio.
Once ready for liftoff, the rocket rises via a trio of stepper motor-driven linear actuators, simulating the real thing with a fiery plume of NeoPixels underneath.
This system lets you take close-up photos of water droplets with a DSLR camera
Arduino Team — December 16th, 2020
Rain comes and goes, but as shown in alexpikkert’s water droplet photography write-up, the exact moment of impact can look spectacular when magnified. Capturing that, however, takes a specialized system — and his latest build facilitates shots nicely with an Arduino Uno controller and solenoid valve.
The rig, which is based on a design from photobuilds.co.uk, positions the solenoid dropper at a certain distance off of the ground. The DSLR camera and flash can then be configured to shoot the splash.
To snap a pic, the Arduino opens the valve to release up to three drops at carefully timed intervals. After an appropriate delay, it triggers the photography setup using opto-isolators to capture the action.
Living Pixels is a light frame that comes alive when you leave
Arduino Team — December 15th, 2020
As smart devices become more ingrained in our everyday lives, it’s perhaps only natural that we start to think of them as living things. What if such gadgets actually did have personalities and emotions that we as humans don’t ever see?
Zekun Yang’s “Living Pixels” project illustrates this idea in luminescent style, as a picture frame that shows a static pattern of lights when anyone is around. When people aren’t present, it displays a range of emotions on its 16×16 LED matrix, from sleepy, to relaxed, and even angry.
The unit uses a passive infrared sensor to pick up on human activity, while an Arduino Uno is implemented for control. More info on the build is available in Yang’s write-up, and you can see it in action in the video below.
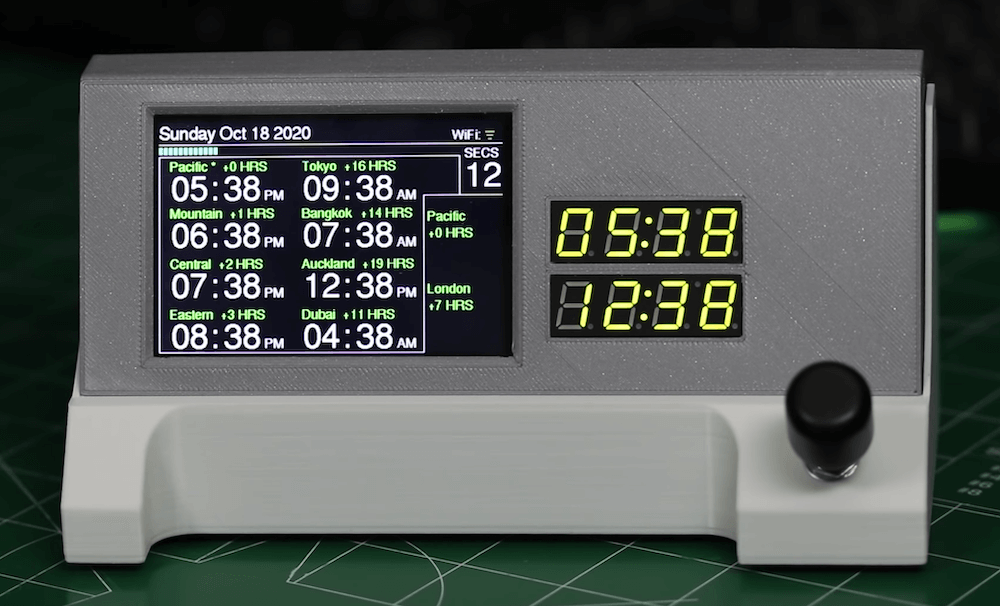
Know what time it is anywhere in the world with this Nano 33 IoT-based NTP clock
Arduino Team — December 14th, 2020
Kaleb Clark, like many of us, works with others from all around the globe. While he could view any number of websites or commercial options to see what time it is for these other people, he decided to make a world clock to get this info at a glance.
What he came up with uses a 3.5″ SPI TFT screen to show eight time zones in the device’s main section, plus a pair of 7-segment displays for two more “slots.” The unit runs on an Arduino Nano 33 IoT, which checks the time over WiFi via the Network Time Protocol, or NTP.
In theory, Clark will never have to set this clock, but user interface is provided by an encoder to select the times on display, and whether they are shown in a 12 or 24-hour format.
This 12X scale model Arduino runs on an actual Arduino
Arduino Team — December 11th, 2020
When you need a way to fit a microcontroller into a small space, the Arduino Nano is a great choice. If you need significant IO, the Mega is a go-to option. But if you need something physically very large, with the power and look of an Uno, the “Arduino Giga” by Zach Hipps of byte sized may fulfill your requirements nicely.
Hipps’ device scales up the Arduino Uno 12 times, including 3D-printed models of connectors and other onboard components. Lettering is engraved with a CNC router, and after a bit of paint work, the finished product could be mistaken for the real thing (if you didn’t know the scale, of course).
Hidden within its structure is an actual Nano. This is connected by wires to gigantic female pin header models, with 1/4 inch audio jacks embedded inside as connectors. Towards the end of the build video, Hipps demonstrates its capabilities by using it to control an RGB Christmas tree lighting setup!
arduino-cli 0.14.0 is out and ready for the public!
Arduino Team — December 11th, 2020
This article was written by Silvano Cerza from the Arduino Tooling team.
It’s been a while, so this time around you’re in for a treat. Don’t forget to go through the list of breaking changes and the new upgrade guide, this might save you some headaches.
Highlights for our latest release include:
Added flags to install libraries from a local zip file or git url
Added a `–clean` flag for the `compile` command
Added a `–dest-file` flag to the `config init` command
As you may know, the Arduino CLI is still in “alpha” state, meaning that the tool is under heavy development. This is the reason why here and there we still introduce some breaking changes:
Use debug “configurations” instead or “recipes” (#1033)
Local binaries export (a `build` folder in your sketch) must now be explicitly specified (#1042)
Programmers can’t be any longer listed using using the `burn-bootloader` programmers list flag (`-P list`) (#982)
`lib install –git-url` or `–zip-file` must now be explicitly enabled (#1075)
Might seem like a lot, but not to worry! We’ve prepared an upgrade guide that you can find here.
3D-printed Super Mario star twinkles atop the tree
Arduino Team — December 11th, 2020
Christmas trees normally have a star on top, and Super Mario famously becomes invincible when he grabs the star power-up. Naturally, for retro game enthusiasts, these two are begging to be united.
In this project, Doug Lenz (AKA “Freshanator”) did just that by morphing the Mario star into something that can be placed atop a tree, using a 3D-printed body and addressable WS2812B LEDs to provide the “twinkles.”
The unit is printed in yellow PLA, with a pair of black eyes glued on. Inside, LEDs are arranged near the tip of each of the star’s five points, which diffuse through the printed material. Power is supplied by a Micro USB breakout, and the lighting is controlled via an Arduino Nano. The device runs on the “Fire2012” example program from the FastLED library, though Lenz may revisit its operation in the future.
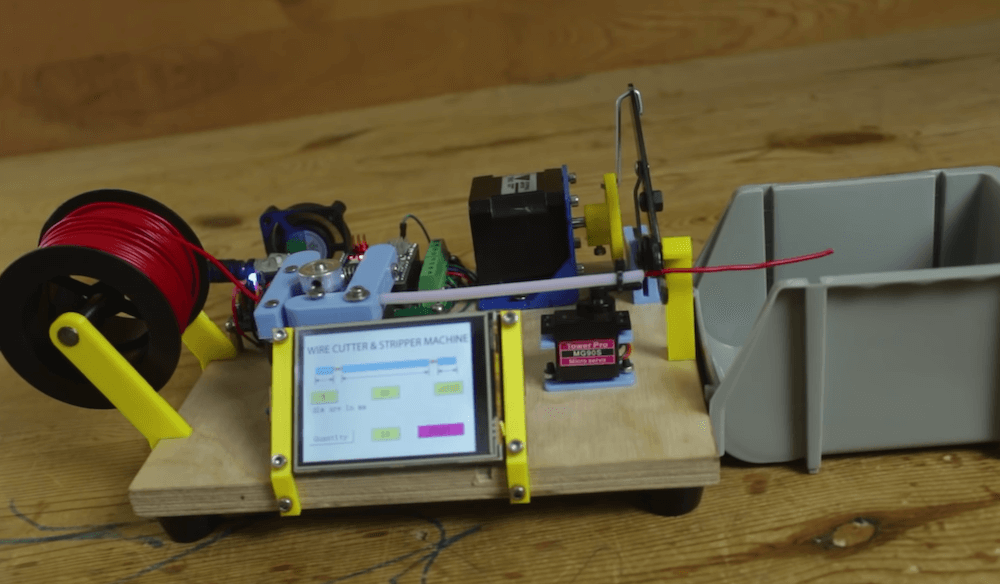
Arduino-based machine makes cutting and stripping wires easy
Arduino Team — December 9th, 2020
If you need to strip a wire or two, that’s easy enough. However, what if you need tens or hundreds of wires stripped to the exact same length? Such a task would quickly become tedious, but with Mr Innovative’s Arduino Nano-based machine all you have to do it pop in a few numbers and it takes care of the rest!
The automated device uses a 3D printer-like stepper mechanism to feed wire though a flexible length of tubing, which comes out on the other side positioned under a wire stripper. A servo is employed to aim the tubing and wire at either the cutting or stripping portion of the tool, which clamps down via a stepper and linkage setup. User interface consists of a 2.8″ touchscreen, allowing one to define the wire and stripped lengths, as well as how many individual wires are required.
These side glow fiber optic panels make beautiful wall decor
Arduino Team — December 9th, 2020
Side glow fiber optics – unlike their cousins that efficiently transmit light from one point to another – emit a glow along the length of each strand when light is applied. This creates a beautiful effect, which Andrei Erdei implemented nicely in his wall decoration project.
Erdei’s build consists of a series of nine square frames, inside of which 3mm fiber optic strands are connected, looping gracefully from one edge to another. Each strand is lit by an addressable WS2812B LED module, under the control of an Arduino Nano.
This dad’s button game box keeps the kiddo entertained
Arduino Team — December 7th, 2020
Yuval Tsur made this excellent game box comprised of four oversized LED-lit arcade buttons, as a gift to his son to celebrate the arrival of his little brother.
The box features both Simon and a reaction game where you must quickly press the button that lights up. In addition to gaming, the device can play the Super Mario Brothers theme, or react with light and sound to button presses in free play (or “baby brother”) mode.
Controlled by an Arduino Nano, the rest of electronics include an LCD display interface and a pair of 5W, 4? speakers. The project is constructed out of acrylic top and bottom faces — fastened together using long standoffs for extra strength — and MDF sidewalls decorated with printed paper.
More details on the music and game box can be found in Tsur’s write-up. From the looks of the video below, his son loved it!
Um dir ein optimales Erlebnis zu bieten, verwenden wir Technologien wie Cookies, um Geräteinformationen zu speichern und/oder darauf zuzugreifen. Wenn du diesen Technologien zustimmst, können wir Daten wie das Surfverhalten oder eindeutige IDs auf dieser Website verarbeiten. Wenn du deine Einwillligung nicht erteilst oder zurückziehst, können bestimmte Merkmale und Funktionen beeinträchtigt werden.
Funktional
Immer aktiv
Die technische Speicherung oder der Zugang ist unbedingt erforderlich für den rechtmäßigen Zweck, die Nutzung eines bestimmten Dienstes zu ermöglichen, der vom Teilnehmer oder Nutzer ausdrücklich gewünscht wird, oder für den alleinigen Zweck, die Übertragung einer Nachricht über ein elektronisches Kommunikationsnetz durchzuführen.
Vorlieben
Die technische Speicherung oder der Zugriff ist für den rechtmäßigen Zweck der Speicherung von Präferenzen erforderlich, die nicht vom Abonnenten oder Benutzer angefordert wurden.
Statistiken
Die technische Speicherung oder der Zugriff, der ausschließlich zu statistischen Zwecken erfolgt.Die technische Speicherung oder der Zugriff, der ausschließlich zu anonymen statistischen Zwecken verwendet wird. Ohne eine Vorladung, die freiwillige Zustimmung deines Internetdienstanbieters oder zusätzliche Aufzeichnungen von Dritten können die zu diesem Zweck gespeicherten oder abgerufenen Informationen allein in der Regel nicht dazu verwendet werden, dich zu identifizieren.
Marketing
Die technische Speicherung oder der Zugriff ist erforderlich, um Nutzerprofile zu erstellen, um Werbung zu versenden oder um den Nutzer auf einer Website oder über mehrere Websites hinweg zu ähnlichen Marketingzwecken zu verfolgen.