Your automatic garage door is almost certainly the most vulnerable access point in your house. Traditional systems are notorious for their susceptibility to replay attacks, but even more sophisticated modern garage door openers and those that lack remote functionality entirely are still prone to human error — you may simply forget to close the door. This “auto closer” system developed by SébastienL42 prevents such errors.
At its heart, this setup’s purpose is to close a garage door that a homeowner mistakenly left open. That’s a common problem, as you can see for yourself if you drive around a suburban residential neighborhood at night. If a homeowner forgets to close their garage door, SébastienL42’s device will sound a notification through an indoor dashboard. If enough time passes, it will go ahead and close the door itself.
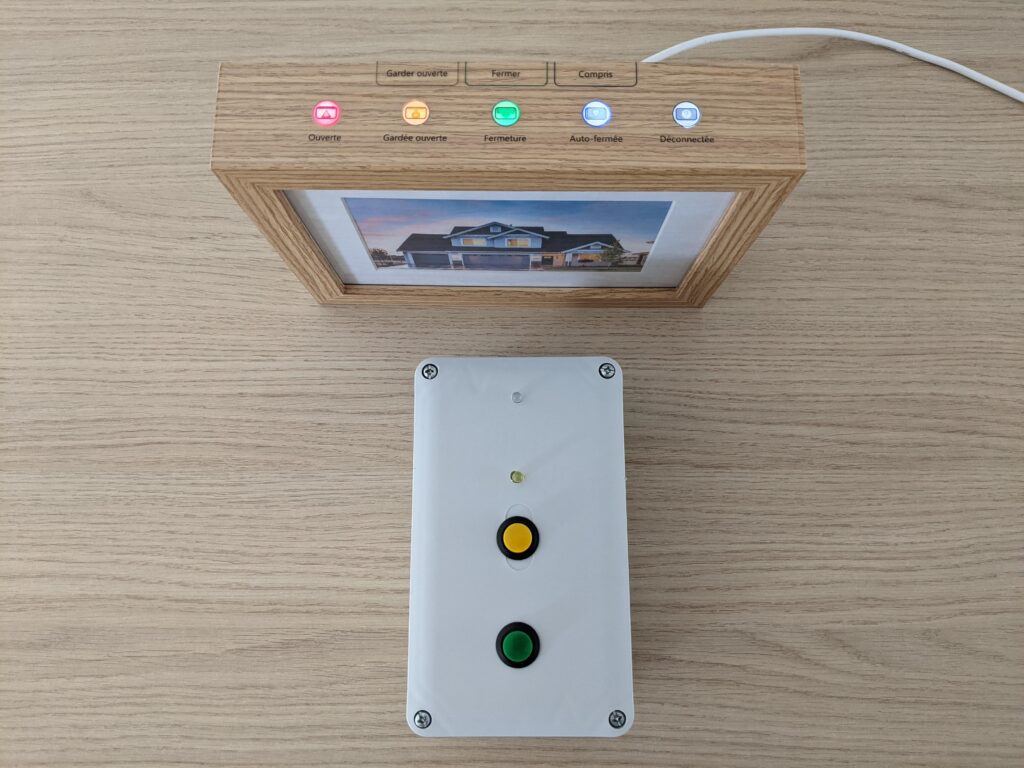
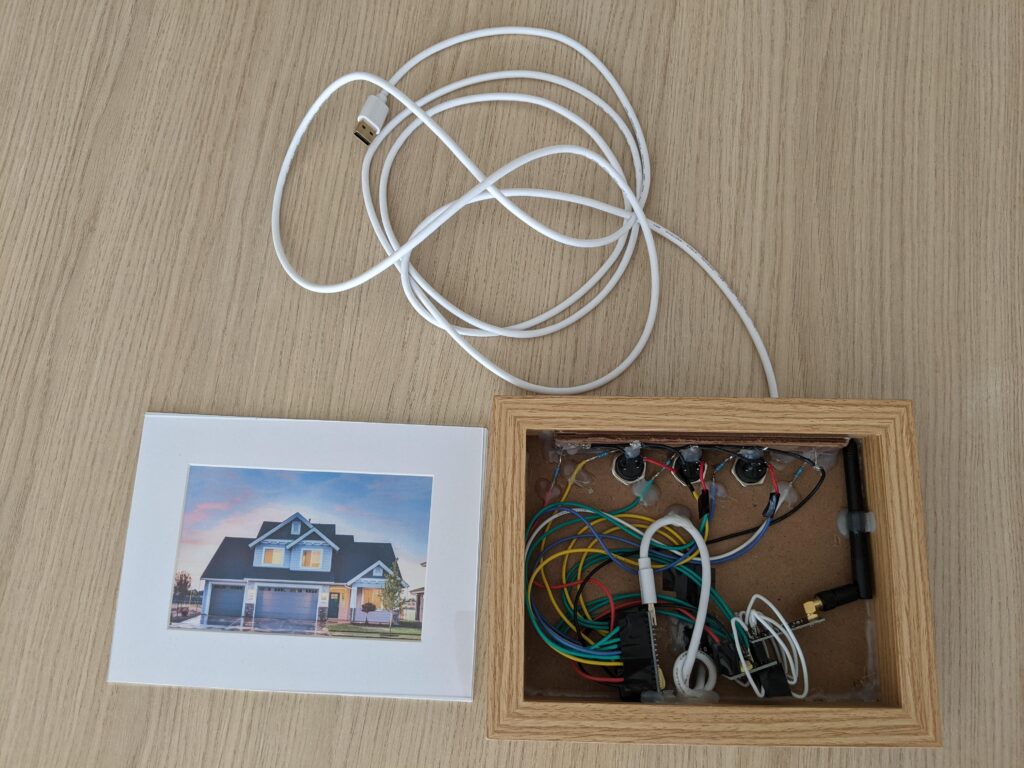
That functionality requires two Arduino Nano Every boards. The first goes in the garage and connects to the garage door opener so it can close to the door. It detects a closed door using a pair of microswitches. The second Arduino is for the indoor dashboard, which provides notifications and control buttons. SébastienL42 designed that dashboard to fit into a picture frame and it looks really nice.
The two Arduino boards communicate with each other via nRF24L01 radio transceiver modules, which could potentially create a new vulnerability. But SébastienL42 put serious thought into that possibility and eliminated exposure by simply making the system incapable of opening the garage door — it can only close it. If a bad actor somehow gained access, they wouldn’t be able to do anything more nefarious than close the door for the homeowner. And the garage door opener’s standard safety features remain in place, so there shouldn’t be any danger.
With Halloween just around the corner, we’ve got the perfect project to make your decorations more fun and interactive. All you have to do is take the Arduino UNO R4 WiFi and Modulino nodes included in your Plug and Make Kit to create an awesome jack-o’-lantern that will light up and cackle with evil laughter when someone walks by!
Connect it to Arduino Cloud and you’ll be able to check on it and even remotely trigger some spooky surprises.
This is an easy project that anyone can do, and we’ll walk you through the steps to make it happen.
A step-by-step guide to make spooky super simple
This project is a great introduction to making interactive things. You won’t just be setting up some store-bought props, you’ll be creating technology and bringing your pumpkin to life!
To get started, you’ll need:
Plug and Make Kit (including UNO R4 WiFi, Modulino Pixels for the glowing eyes, and Modulino Distance to trigger the action when someone approaches)
An MP3 module and a small speaker for the creepy sounds
A microSD card to store your sounds (feel free to use the ones we provide, or record your own!)
The Modulino Distance sensor detects when someone approaches your jack-o’-lantern, and that’s when the magic begins. The Modulino Pixels light up the eyes, syncing with the spooky sounds played from the MP3 module. Everything is controlled with an UNO R4, and thanks to Arduino Cloud, you can even control the pumpkin remotely, change the sounds, and keep track of how many people you’ve scared.
All the code and details are ready for you to download from Arduino’s Project Hub. We’ve also created a template that will help you set everything up quickly. This template automatically uploads the code to your UNO board and creates a custom dashboard so you can monitor and control your creation. Just follow the link to get started!
Unleash your creativity!
Sure to make a lasting impression on your trick-or-treating visitors, this project offers you the chance to have fun while actuallylearning a lot about electronics, coding, and the Internet of Things (IoT).
Why just buy interactive objects when making your own is so rewarding? So grab your tools, start building, and give your Halloween the high-tech twist it deserves!
As always, we highly encourage you to customize the project with your own ideas: with the UNO R4 WiFi and Modulino nodes included in the Plug and Make Kit, you have all the tools you need.
For example, you could use Modulino Buttons to change scary sounds locally, or make your scary jack-o’-lantern even smarter. It can check the weather from an online forecast and change the LEDs’ color to let you know if it’s going to rain, help you use your smartphone to monitor the temperature outside in real time via Arduino Cloud… and much more!
The Arduino Cloud has long been a trusted platform for makers, engineers, and developers to manage their IoT projects with ease. From tracking sensor data to automating smart devices, the cloud enables seamless connectivity. Complementing this, the Arduino IoT Remote mobile app gives users the power to monitor and interact with their dashboards from anywhere. Now, we’re excited to announce a new feature that enhances your experience even further: the ability to change dashboard layouts directly through the mobile app!
Let’s dive into this exciting new update, along with some other minor features recently added to improve your experience.
Change your dashboard layouts from the IoT Remote app
Previously, modifying or rearranging the layout of your IoT dashboards was only possible through the browser on a PC. While this worked well for desktop users, it wasn’t convenient for those who needed to make changes on the go. With the latest update, you can now modify the “mobile view” of your dashboard directly through the Arduino IoT Remote app.
It’s important to note that Arduino Cloud dashboards have two distinct views: mobile and desktop. This new feature allows you to customize the layout specifically for your mobile devices, without affecting the desktop version. So whether you’re monitoring your projects on your phone or tablet, you can now optimize the layout for a mobile-friendly experience.
By customizing the mobile view, you gain more control over how your data is displayed and interacted with on your phone—perfect for users who need a quick overview and control of their IoT systems while away from their desktops.
How to use the new layout feature
Using this new feature is simple. Here’s how you can rearrange your dashboard layout in the IoT Remote mobile app:
1. Open the Arduino IoT Remote app and log into your account. 2. Navigate to the dashboard you want to modify. 3. On the Settings menu of the dashboard, tap the Rearrange button. 4. Select a widget by clicking on it, and move it around the dashboard to the new location or change its size. 5. Click on CANCEL to discard your changes or on SAVE to save your changes, and your updated layout will be visible across all your mobile devices.
What else is new on the IoT Remote app?
In addition to the layout customization feature, during the past months we’ve introduced several minor updates to make your app experience even smoother:
Sync dashboard cover image: Now, you can set a cover image for your dashboard, and it will automatically sync across all your devices. Whether for branding, personalization, or easy recognition, this feature ensures visual consistency on every device you use.
Disable trigger from Notification Detail: You can now enable or disable a trigger directly from the Notification Detail screen. This feature provides quick control over automated actions, helping you fine-tune your project with minimal hassle.
Clear notifications via the Activity Manage Panel: Keep your notifications organized by clearing them all from the new Activity Manage Panel. This helps you stay focused by removing unnecessary clutter from your feed.
Install the Arduino IoT Remote on your mobile phone
These new features make it easier than ever to stay on top of your IoT projects from anywhere with your mobile phone. Whether you’re monitoring, controlling, or tweaking your dashboard, the Arduino IoT Remote app is the perfect tool for the job, and it’s free!Ready to experience these new updates? Download the Arduino IoT Remote app today from the App Store or Google Play and take full control of your IoT projects from the convenience of your mobile device.
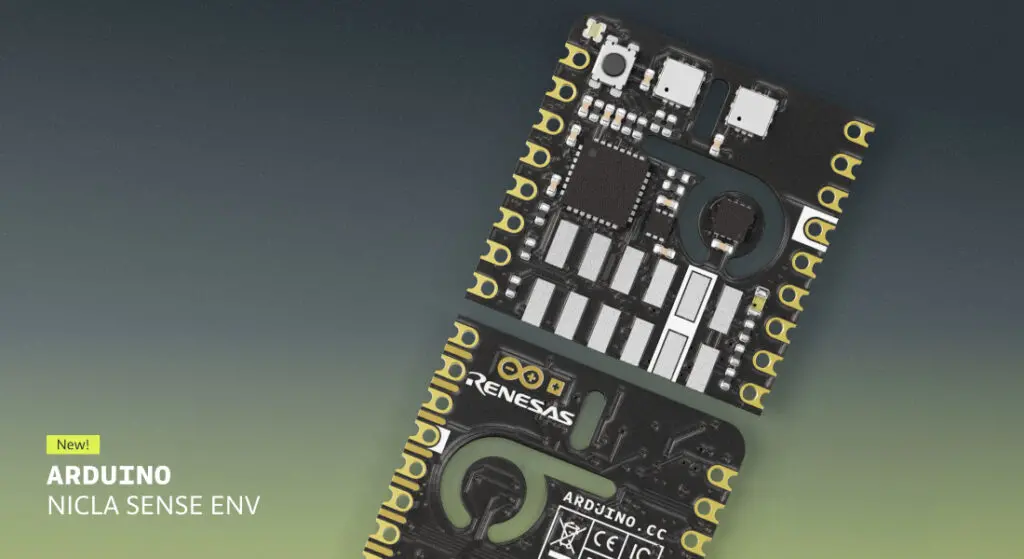
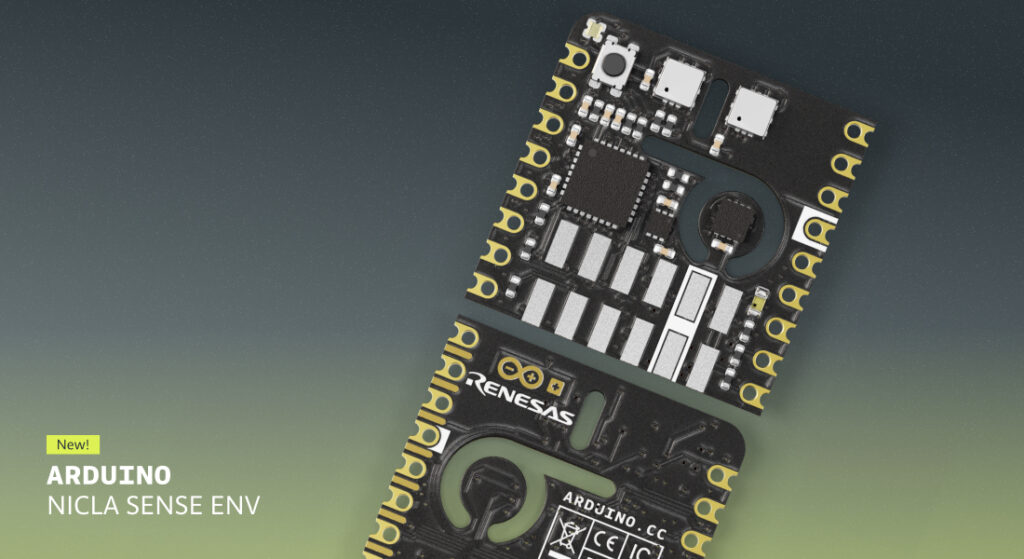
We’re thrilled to announce the launch of Nicla Sense Env: the latest addition to our portfolio of system-on-modules and sensor nodes, empowering innovators with the tools to unlock new possibilities. This tiny yet powerful sensor node is designed to elevate your environmental sensing projects to new heights. Whether you’re a seasoned professional or just starting your journey with Arduino, Nicla Sense Env is here to help sense the world around you with precision and ease.
“With Nicla Sense Env, we’re taking a critical step toward addressing one of the most pressing challenges of our time: protecting the environment. This powerful module allows developers to monitor air quality and environmental conditions with precision, paving the way for smarter, more sustainable solutions. By equipping professionals, educators, and makers with the right tools, we’re helping to build a future where technology and environmental stewardship go hand in hand. The compact nature of the Nicla form factor broadens the number of possible applications, spanning from prototyping to testing and volume production for OEMs.” – Fabio Violante, CEO of Arduino
“Renesas is proud to be the technology supplier of choice for the Arduino Nicla Sense Env, the new modular board to measure real-time indoor air quality, temperature, and humidity at the edge of the IoT network. Renesas’ system architecture, based on the RA2E1 microcontroller and environmental industrial-grade sensors with onboard AI including the ZMOD4410, ZMOD4510 and HS4001, enables Nicla Sense Env to be deployed in a variety of smart building applications, HVAC and air purifier systems, gas leak detection systems, fumes and fire detection systems, and smart city air quality management, with little integration effort.” — Brad Rex, Senior Director of Global Systems and Solutions Team at Renesas
Nicla Sense Env might be small in size, but it’s packed with advanced features that make it a powerhouse for environmental monitoring.
Monitor indoor and outdoor environments with AI-ready Renesas sensors. Nicla Sense Env offers temperature and humidity monitoring through the HS4001 sensor and AI-enabled gas detection with the ZMOD4410AI1V and ZMOD4510AI1V sensors. These provide real-time data on air quality, including the detection of TVOCs, NO2, O3, and other gasses, both indoors and outdoors.
22.86 x 22.86 mm = huge potential. With the tiny form factor the Nicla family is known for, Nicla Sense Env can easily fit into any project, allowing you to integrate environmental sensing without compromising on space or design.
Robust, reliable, and ready to stand the test of time. Built with industrial-grade sensors, Nicla Sense Env is engineered for durability and accuracy, ensuring reliable performance even in challenging conditions. What’s more, it was designed for 24/7 operation: ultra-low power consumption makes it ideal for long-term deployments in any situation.
Fits right in, with seamless integration and wide compatibility. Whether you’re working with Portenta SOMs or MKR products, Nicla Sense Env connects effortlessly via ESLOV (I2C) or header pins. It’s also compatible with Arduino IDE and MicroPython, so you can start programming right out of the box. And of course, it works great with a variety of libraries and tutorials available through the Arduino ecosystem.
Real-world applications? We sense endless possibilities!
Nicla Sense Env is a versatile and accessible tool for environmental monitoring: it’s your new ally whether you’re developing something new or enhancing an existing project, working on a prototype or full-fledged industrial-scale solution.
Nicla Sense Env fits perfectly into HVAC systems, helping you monitor air quality, humidity, and temperature to keep smart buildings comfortable and compliant with environmental regulations. In air purifiers, it provides real-time data that allow for energy-efficient operation and better air quality by detecting harmful gasses and adjusting the system as needed. When it comes to safety, it can play a critical role in detecting fumes and smoke, triggering early warnings to prevent potential hazards both indoors and outdoors. In industrial settings, it can monitor air quality and detect toxic substances, ensuring that machinery runs safely and efficiently. And these are only the first examples of applications that come to mind!
Add a breath of fresh air to your projects
We look forward to seeing how you will leverage the capabilities of the Arduino Nicla Sense Env to create innovative solutions – whether you’re developing climate control systems, enhancing air quality monitoring, or ensuring safety in industrial environments.
So, head to the Arduino Store to check out full product details and specifications, and let’s continue to push the boundaries of innovation together – one “tiny” step at a time!
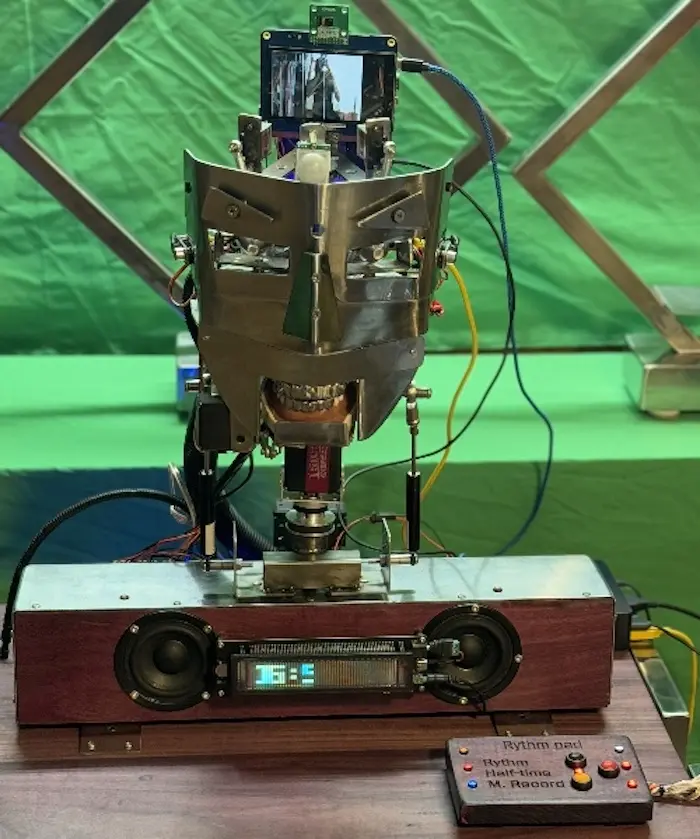
Every decade or two, humanity seems to develop a renewed interest in humanoid robots and their potential within our world. Because the practical applications are actually pretty limited (given the high cost), we inevitably begin to consider how those robots might function as entertainment. But Jon Hamilton did more than just wonder, he actually built a robotic performer called Syntaxx and it will definitely make you feel things.
It is hard to describe this robot without sounding like a Mad Libs game filled out by a cyberpunk-obsessed DJ. Hamilton designed it to give performances, primarily in the form of synthetic singing accompanied by electronic music. It looks like a crude Halloween mask given life by a misguided wizard sometime in the 1980s. It is pretty bonkers and you should probably watch the video of it in action to wrap your head around the concept.
Hamilton needed three different Arduino development boards to bring this robot to life. The first, an Arduino Giga R1 WiFi, oversees the robot’s operation and handles voice interaction, as well as audio playback. The second, an Arduino Mega 2560, moves the robot’s neck according to input from two microphones (one on the left, the other on the right). The third, an Arduino Uno R4 WiFi, controls the rest of the servo movement.
The result is a robot that is both impressive and also pretty disconcerting.
Recently, we announced the exciting new Image widget for Arduino Cloud. This powerful feature opens up a world of possibilities for enhancing your IoT dashboards. But the true potential of the Image widget lies in the applications that you create.
Today, we’re excited to dive deeper and show you what kind of IoT dashboards your can create with the Image widget. Whether you’re using it for smart homes, enterprise solutions, or educational tools, the possibilities are endless—and we’re here to help you discover its full potential!
As a maker, the Image widget can be a game-changer for your smart home projects. Here are a few examples:
1. Home security dashboard: Detect intrusion with camera photos
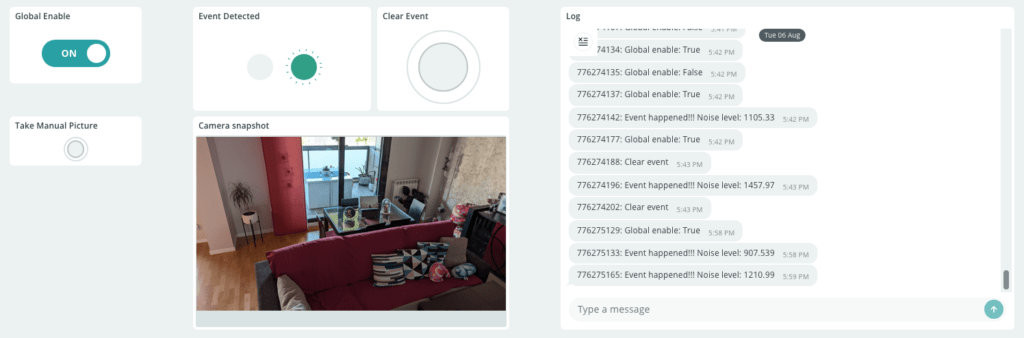
Here’s our first IoT dashboard idea: Display live snapshots from a home-made security camera, updating the image at regular intervals or triggering updates based on motion or sound detection. This allows you to keep a close eye on your property, even when you’re away. You can control the whole system from an Arduino Cloud dashboard.
In this project, you’ll learn how to build a security system using the Arduino Nicla Vision‘s camera. The system captures snapshots when it detects sound levels above a set threshold, and everything is managed through an Arduino Cloud dashboard. From enabling or disabling the system, viewing event history, to receiving alerts, Arduino Cloud makes it easy to control and monitor your security setup. Check out the full project for all the details and step-by-step instructions!
Image 1: Arduino Cloud intrusion detection dashboard with snapshot of a living room
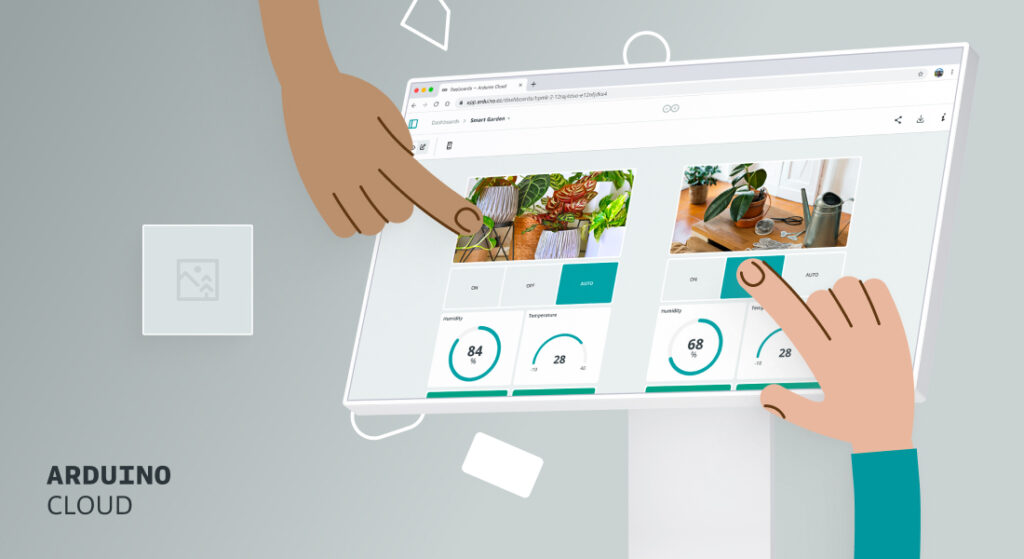
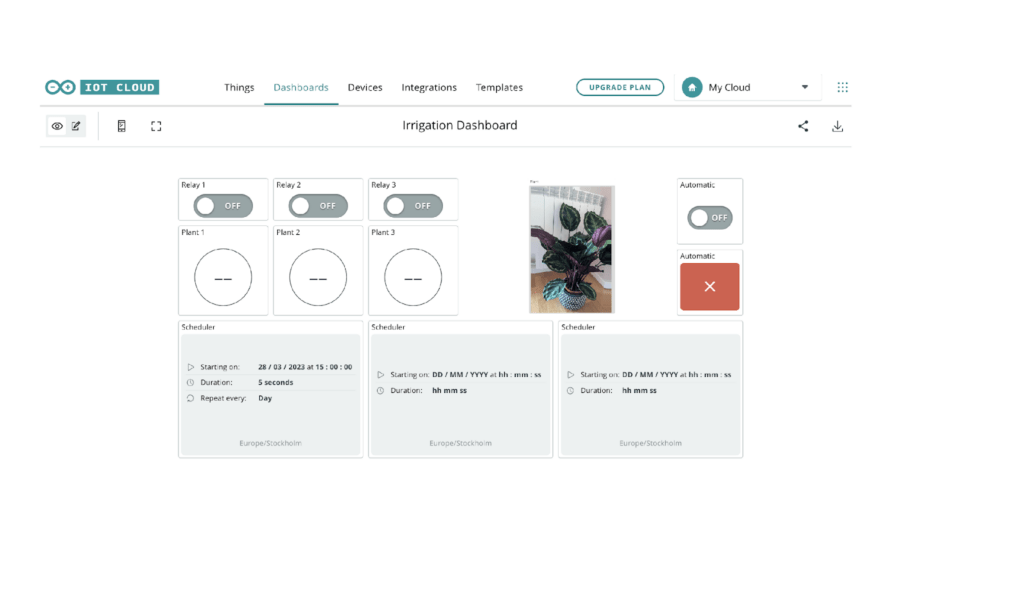
2. Plant visual growth diary dashboard
In this second IoT dashboard idea, you can bring your indoor or outdoor garden into the digital realm. Use the Image widget to create a visual growth diary, displaying daily or weekly photos of your plants. Combine this with soil moisture sensors to get a comprehensive view of your plants’ health and progress over time.
Image 2: Arduino Cloud irrigation dashboard with snapshot of a plant
NOTE: This dashboard above is based on this original project and has been modified to include the Image widget. These adjustments were made to demonstrate the potential of this new feature in enhancing your Arduino Cloud dashboards.
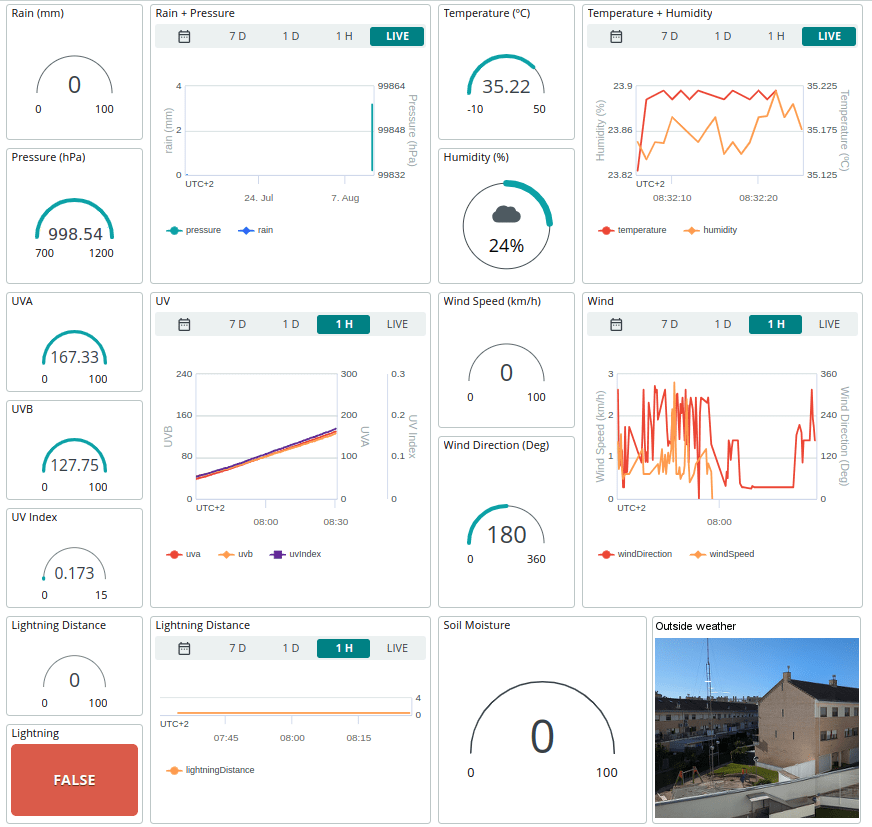
3. DIY Weather station dashboard with outside daily photos
In this 3rd example, you can turn your Arduino-powered weather station into a visually engaging dashboard. That’s right, display real-time weather icons and images of the current sky conditions. You can even integrate sensor data to provide a complete picture of your local microclimate, making your DIY weather station a must-have for any maker’s smart home.
Image 3: Local weather station Arduino Cloud dashboard with daily photo
NOTE: This IoT dashboard idea above is based on this original project and has been modified to include the Image widget. These adjustments were made to demonstrate the potential of this new feature in enhancing your Arduino Cloud dashboards.
By adding a camera, following the instructions of the intrusion detection project described in the first IoT dashboard idea above, you can take your weather dashboard to the next level.
4. More ideas to use the Image Widget in your Arduino Cloud IoT dashboards
The new Cloud image widget offers powerful ways to integrate real-time imagery into your data-driven workflows. Below are five additional examples of how the Image widget can enhance your Arduino Cloud
5. Industrial equipment monitoring: Embed real-time visuals of critical machinery, like thermal imaging data, in your dashboard to quickly identify and address potential issues.
6. Smart agriculture: Integrate drone or satellite imagery to monitor crop growth, soil conditions, and irrigation systems, helping make data-driven decisions for your farm.
7.Supply chain visualization: Create interactive maps displaying the real-time location and status of products and materials, while tracking inventory levels and shipment progress.
8. Quality control: Compare images of acceptable and defective products to enhance visual inspections and streamline quality control processes.
9. Education: Use real-time or time-lapse visuals to bring live science experiments into digital learning, enriching students’ engagement with STEM subjects.
Community Spotlight
We’re excited to see what you, our innovative Arduino community, will create with the Image widget. Share your projects and ideas on the Arduino Project Hub or in the Arduino Cloud forum, and inspire others with your creative applications. Who knows, you might just end up being featured in our next Community Spotlight!
Conclusion
The Image widget is more than just a pretty face — it’s a powerful tool that can transform the way you approach IoT projects, whether you’re a maker, an enterprise, or an educator. By unleashing your creativity and leveraging this feature, you can breathe new life into your dashboard or create new breeds of projects.
So, what are you waiting for? Sign up for Arduino Cloud for free today, start exploring the Image widget and let your imagination run wild. The possibilities are endless, and we can’t wait to see what you create. For more information and tutorials, check out the Arduino Cloud documentation.
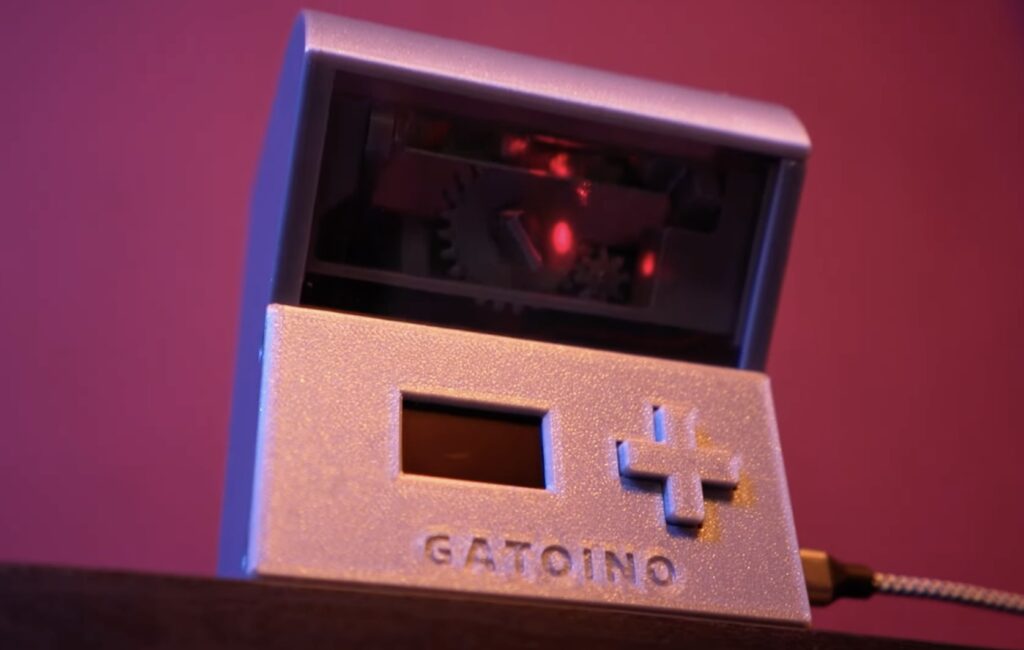
Cats may be adorable, but they evolved to be predators. Unfortunately, responsible owners keep their cats indoors to avoid decimating the local wildlife population and that means Mr. Whiskers and Ms. Socks don’t get much opportunity to express their hunting urges. That’s why Sascha at Small Batch Factory designed Gatoino, which is an automatic laser turret toy that lets cats hunt for red dots indefinitely.
Gatoino automates laser cat toy playtime, putting less strain on owners’ wrists and keeping the fun going for as long as the furry felines want to keep up the chase. It moves the laser dot in two axes and does so in an unpredictable (pseudo-random) way, so it will keep the cats on their toe beans. And an onboard control interface lets the human adjust the playing field size and the movement speed, along with session schedules.
An Arduino Nano board controls all of that through a custom PCB to keep the wiring tidy. It moves the laser using two small SG90 hobby servo motors in an arrangement similar to a mirror galvanometer. Those parts all fit into a simple 3D-printed enclosure that can be placed on a shelf or mounted onto a wall out of the way.
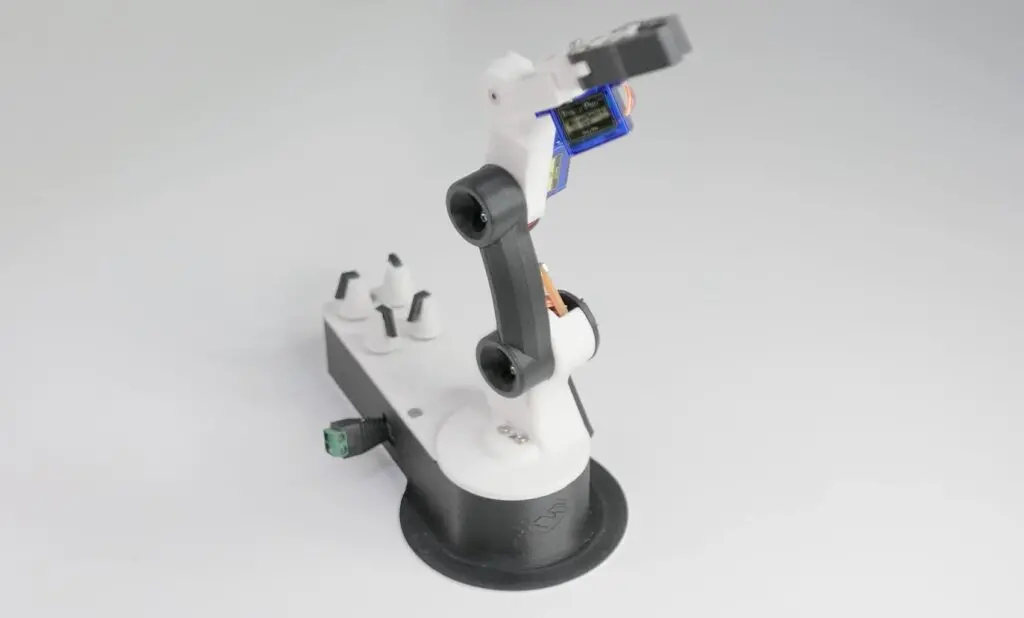
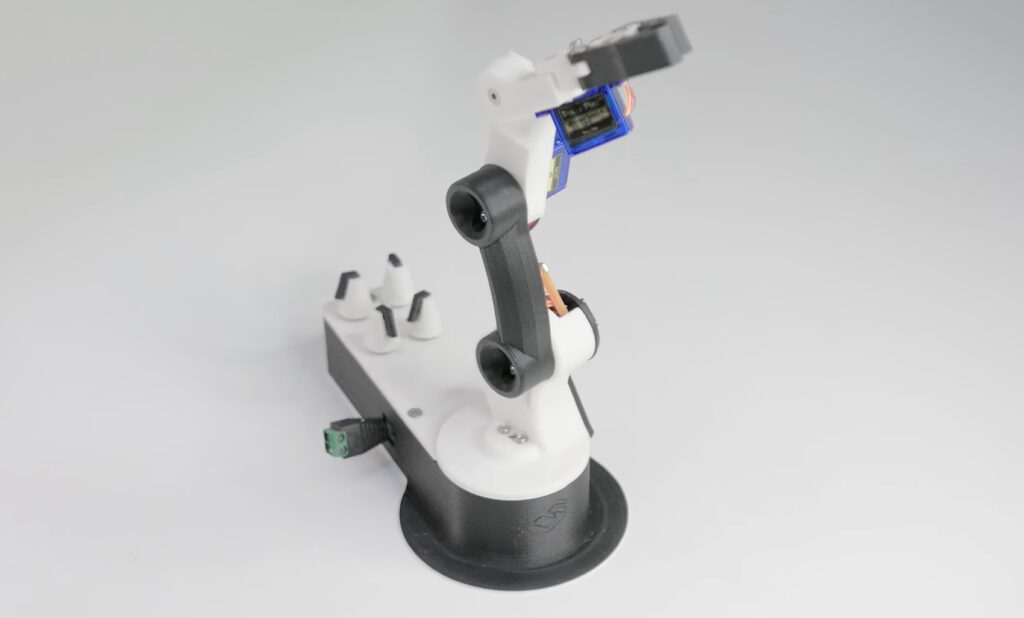
Robotics is already an intimidating field, thanks to the complexity involved. And the cost of parts, such as actuators, only increases that feeling of inaccessibility. But as FABRI Creator shows in their most recent video, you can build a useful robotic arm with just a handful of inexpensive components.
This is pint-sized robotic arm that has some of the same features as big and expensive industrial robots, just on a smaller scale. Users can operate the four joints manually, but can also record a series of positions and let the robot automatically move from one to the next. That is a popular programming technique in many industries, making this robot useful for learning real methodology and for performing practical tasks.
The best part is that this robot is very affordable. All of the parts, with the exception of fasteners and electronic components, are 3D-printable. The electronic components include an Arduino Nano board and four SG90 hobby servo motors that can be found for just a couple of dollars each. FABRI Creator designed a custom PCB to host the Arduino, to provide power input, and to simplify the wiring. That PCB isn’t strictly necessary, but it results in a much tidier robot.
The assembled robot is small, but has enough reach to be useful and enough strength to lift light objects. It is a perfect starting point for people who want to learn robotics basics on a budget.
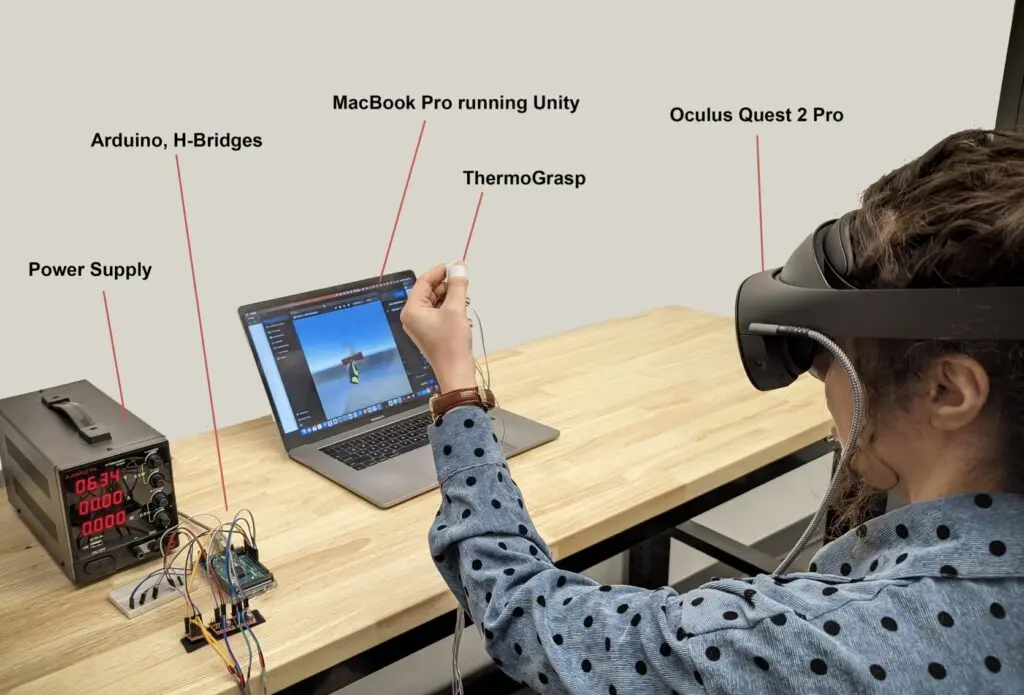
Imagine playing Half-Life: Alyx and feeling the gun heat up in your hand as you take down The Combine. Or operating a robot through augmented reality and feeling coldness on your fingers when you get close to exceeding the robot’s limits. A prototype device called ThermoGrasp brings that thermal feedback to the mixed reality applications.
ThermoGrasp is a wearable thermal feedback system designed for virtual reality and augmented reality, created by Arshad Nasser and Khalad Hasan of the University of British Columbia. It consists of thermoelectric modules attached to the user’s fingers with Velcro straps. Those are capable of creating thermal sensations — both warm and cold — in response to what happens in the virtual world. Those sensations can relate to any condition or event that the developer chooses, whether for immersion or utility.
Nasser and Hasan built the prototype using an Arduino Mega 2560 board, which controls the thermoelectric modules through custom H-bridge drivers. Those thermoelectric modules are Peltier devices, which are normally associated with cooling. They can create a cooling feeling on the skin, but can also do the opposite and produce a warm feeling. The Arduino controls the drivers through pulse-width modulation (PWM), allowing for granular adjustment. The thermoelectric modules are capable of changing temperature at a rate of 3.5°C per second and so can produce a noticeable sensation within just a couple of seconds.
In testing, users found that cool sensations were easier to detect than warm sensations, but that both were useful and increased immersion.
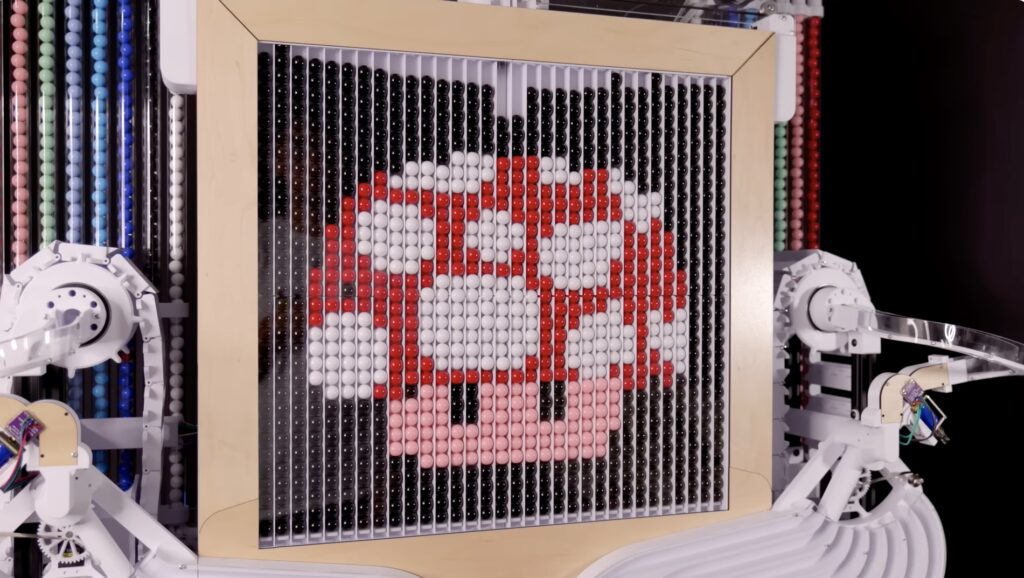
Marbles are underrated. They’re very round, roll well, tend to be pretty shiny, and come in all sorts of neat colors. That last characteristic makes them suitable for artwork, like orbicular pixels. In his most ambitious project to date, Engineezy took advantage of those attributes (roundness and colorfulness) to build this amazing machine that automatically produces marble art displays.
Engineezy has made a name for himself with his impressive and often complex mechanical design, and this project certainly fits that bill. It is enormous and the entire thing is basically a stack of fascinating mechanisms. There are mechanisms to separate the marbles by color (there are eight colors), elevator mechanisms to lift the marbles to the top of the sorters, pump mechanisms to move the sorted marbles up, feed mechanisms to drop the appropriate marbles into the displays area columns, and a mechanism to dump all the marbles from the bottom to start the process over.
All of those mechanisms require a whole bunch of motors and drivers, along with several development boards to direct them. The feed mechanisms at the top, for example, operate under the control of an Arduino Nano ESP32. It oversees the movement of the two stepper motors that slide two guides back and forth — a design inspired by IDEX (Independent Dual-Extruder) 3D printers. Those use funnel-like ramps created by two coil springs that adapt to the movement — a rather ingenious idea.
The mechanisms all work in concert to drop the marbles into the display area, creating images of 32×32 pixels (1,024 “pixels” in total) and up to eight colors. The machine can automatically reset itself and then display a new image, so it can keep going indefinitely while spectators watch the intricate dance play out.
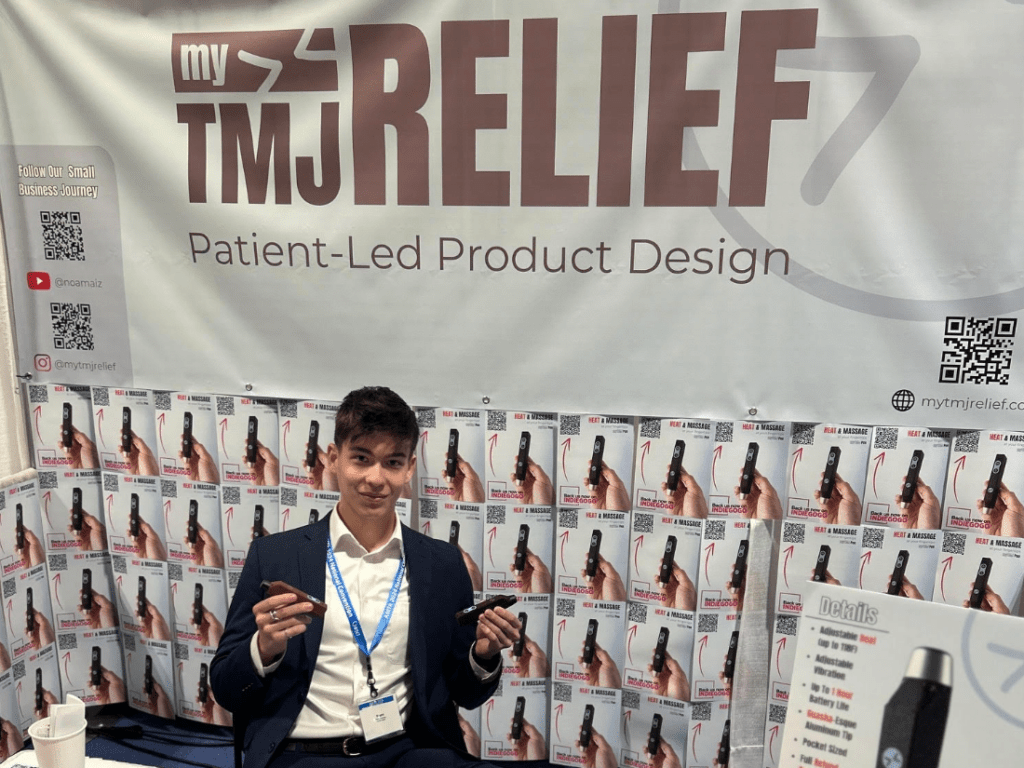
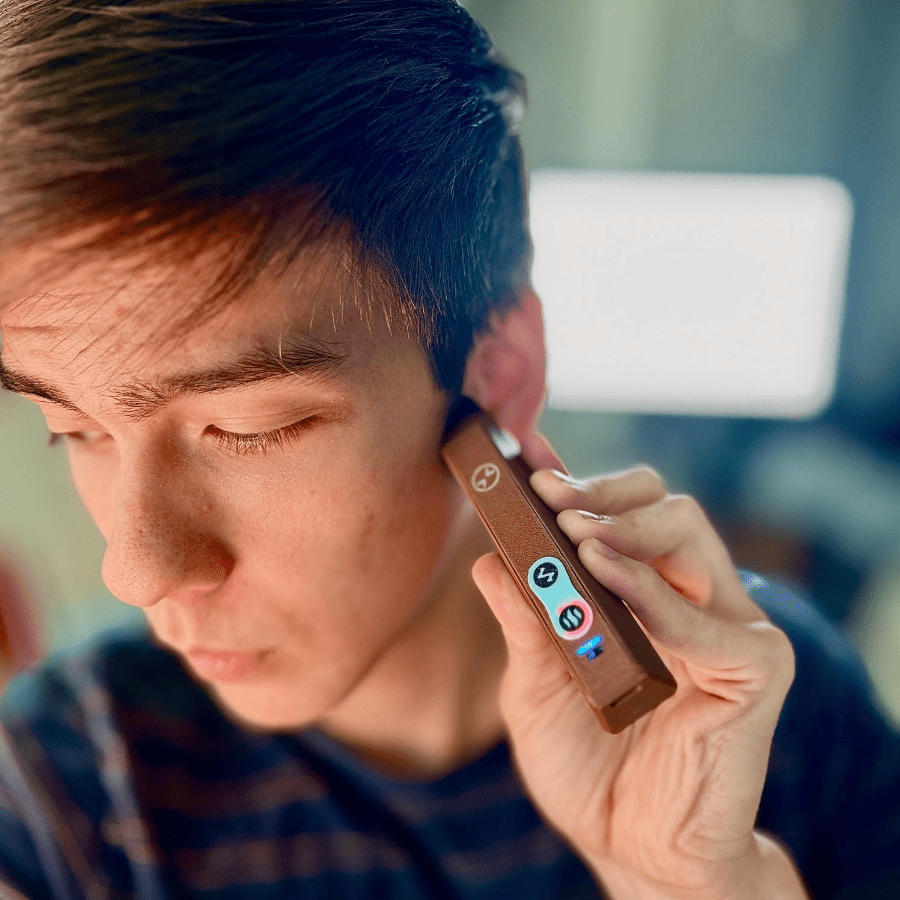
To the average person, invention and new product development seem like pretty straightforward processes; you come up with a killer idea, do the engineering work to cobble together a working prototype, have a truckload of units manufactured, and then sell those to turn a profit. But the reality is far, far more complicated than that. However, Noam Aizenberg was able to ease some of the pain by turning to Arduino when he developed the myTMJ Pen.
The temporomandibular joint (TMJ) connects your jawbone to your skull and any disorders affecting it can cause a great deal of pain. Those disorders are surprisingly common and may affect as much as 12% of the human population, but there aren’t many good therapy solutions available to sufferers. As a TMJ patient himself, Aizenberg designed myTMJ Pen to provide relief.
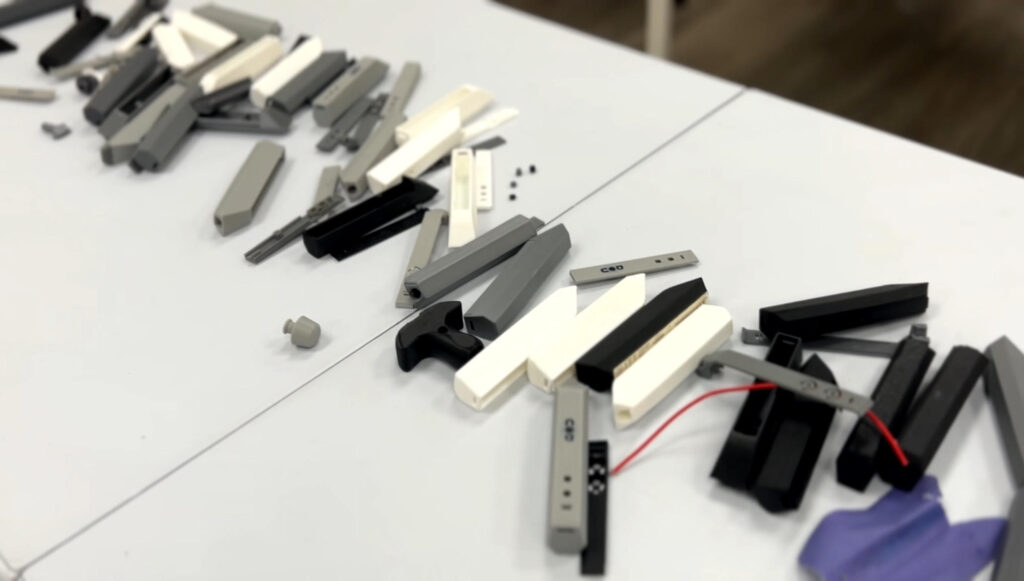
As Aizenberg discovered, it takes a tremendous amount of work to bring a product to market — especially one designed for therapeutic use on the jaw muscles. myTMJ Pen combines pinpoint heat and massage, so Aizenberg also had to take safety into consideration. But Aizenberg is a recent mechanical engineering graduate and also has experience with Arduino development boards and the Arduino IDE, helping him to speed through prototype development.
The production myTMJ Pen will not contain an Arduino board, because space is at a tremendous premium. But Aizenberg did use the Arduino IDE to program the Microchip ATmega48 microcontroller that resides on the device’s custom PCB. That let Aizenberg take advantage of the familiar programming environment, the many available libraries, and the vast amount of documentation in the Arduino ecosystem.
For those interested in what it actually takes to bring a product to market, Aizenberg has documented every step of the process on his Instagram and YouTube channel.
Aizenberg is currently seeking funding for the product launch on Indiegogo. Those funds will go towards everything from PCB fabrication to regulatory compliance testing.
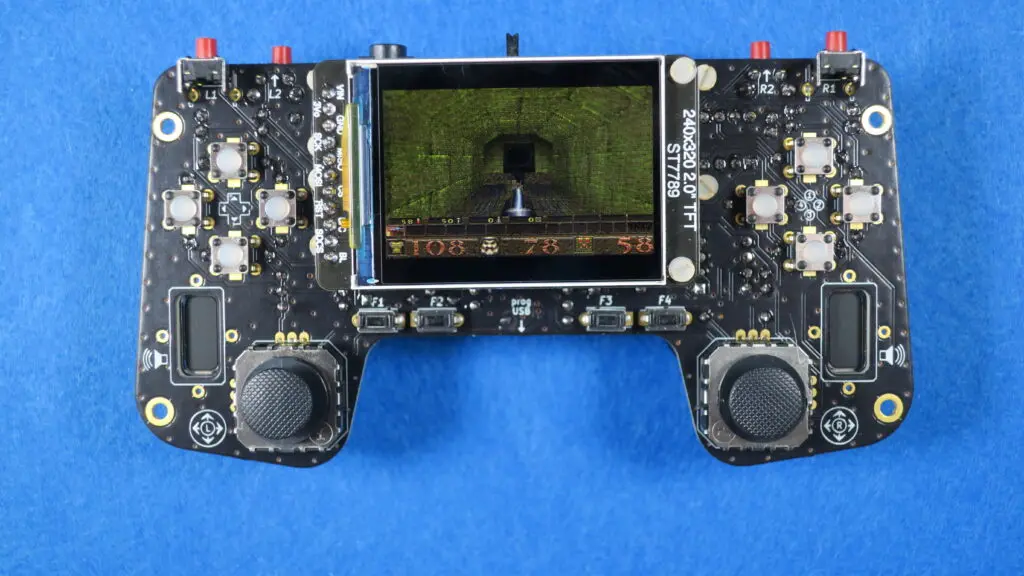
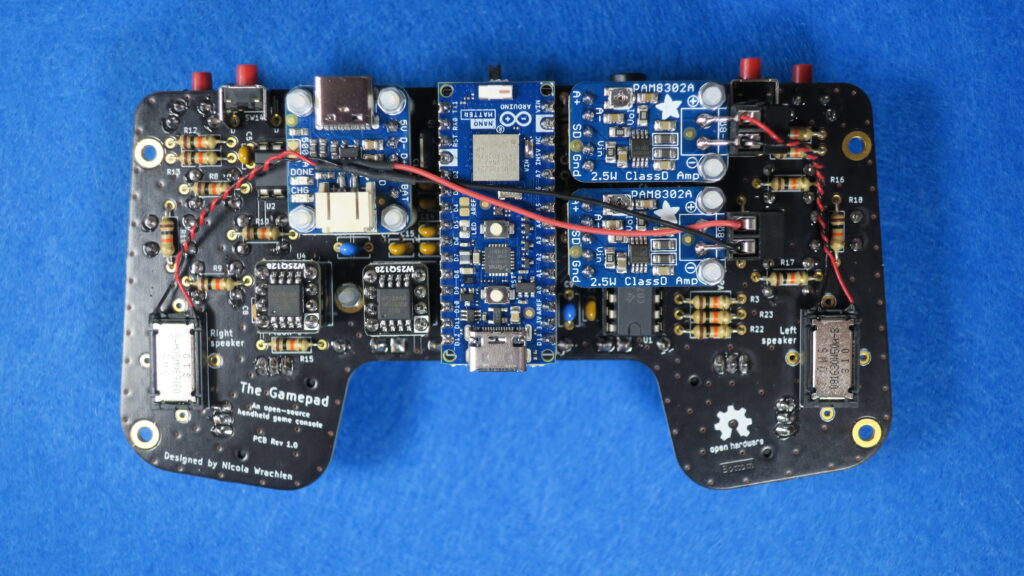
Following up on his successful Doom port last year, engineer Nicola Wrachien – who works at Silicon Labs, a leader in secure, intelligent wireless technology for a more connected world and long-time Arduino partner – has now tackled an even bigger challenge: porting Quake, the iconic 1990s’ first-person shooter, to an Arduino gamepad.
What a great warm-up for the upcoming Matter Challenge! If this kind of project sounds like fun, follow the competition or submit your own entry by October 31st.
Sponsored by Mouser Electronics, Silicon Labs and Arduino, the Matter Challenge is open to all skill levels. Take the opportunity to inspire others, by creating an incredible project with the Arduino Nano Matter board.
Released just three years after Doom, Quake was a huge leap forward in gaming technology. It introduced full 3D environments complete with dynamic lighting effects, and its enemies and weapons were 3D models rather than 2D sprites. The game also featured a scripting engine that gave modders a lot of creative freedom. But with more realistic graphics, a particle engine, and more complex sound effects, Quake was also a far bigger technical challenge to port.
In the face of demanding requirements, Wrachien turned to the Arduino Nano Matter, developed with the powerful Silicon Labs® MGM240S as part of a partnership to better enable seamless development of Matter over Thread applications on the Arduino platform, which also led to the release of Arduino’s first-ever Matter software library earlier this year.
Reflecting on the Arduino Nano Matter board, Wrachien said: “The Nano Matter board, featuring the Silabs xG24, offers impressive processing power and versatility in a compact size, making it a fantastic tool for both simple and complex projects like this one.”
If you’re intrigued and want to explore more technical details, dive into Wrachien’s full post and get into the nitty-gritty of this remarkable project on his blog. You can get your Arduino Nano Matter from our store and replicate his idea thanks to all the information he shares, or imagine a new challenging project of your own!
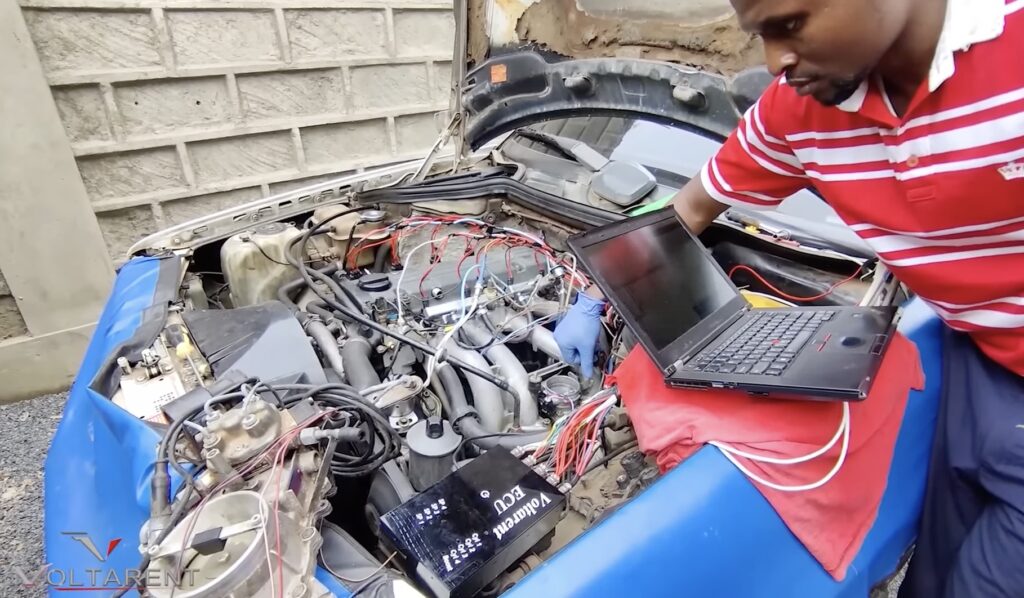
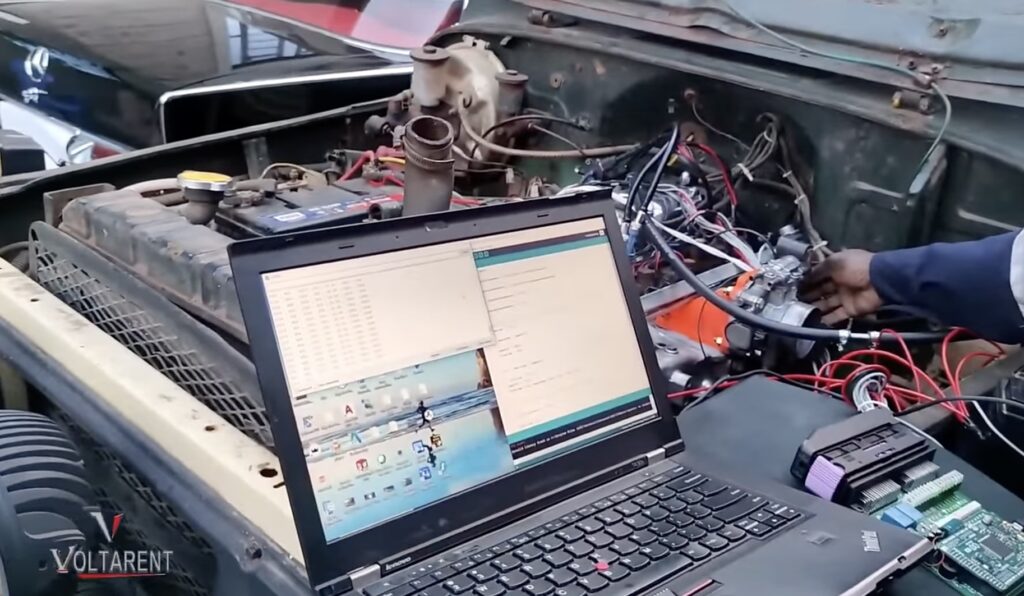
The automotive industry’s switch from carburetion to fuel injection was one of the most effective advancements of the 20th century. Electronic fuel injection allows for precise control over an internal combustion engine’s air-fuel mixture, which dramatically improves fuel efficiency and performance. But that requires computer oversight, which is why Kenyan engineer Peter Mbiria developed his own Arduino-based custom engine control unit (ECU) for upgrading vintage cars.
Electronic fuel injection conversions — from either carburation or mechanical fuel injection — aren’t very common, because they require computer control and that has to be tailored to the specific engine. With the exception of a few very popular models that warrant turnkey solutions, it simply isn’t worth upgrading most engines. But Mbiria’s custom ECU makes the process much easier, to the point where it can be worthwhile to convert older engines. The conversion gives them new life, increasing economy and power.
Mbiria’s Voltarent ECU can work with four-cylinder, six-cylinder, and eight-cylinder engines. After the conversion, it controls the injectors and ignition. A small OLED screen, mounted by the car’s dash, displays information and the driver can switch modes (economy, comfort, sport) using a knob.
Those modes, and the injector control in general, are only possible because of sophisticated algorithms running on the firmware that Mbiria developed himself. He chose to use an Arduino Due board to take advantage of the many I/O pins, but also for the processing power of the AT91SAM3X8E microcontroller that is necessary to perform the calculations fast enough to keep up with the engine. Mbiria designed a custom PCB to host the Arduino and provide an interface to the injectors, ignition system, and user interface. And with relatively simple tweaks to the Arduino sketch, Mbiria can make the ECU’s firmware suitable for whatever car he’s working on.
This new release is packed with improvements, including one feature we’re particularly proud of: support for shared spaces in Arduino Cloud. If you have a Cloud Business plan or School plan, you can now view and edit shared space sketches directly within the IDE, making collaboration with your team even easier and more efficient.
In addition, Arduino CLI 1.x is part of this release, alongside several fixes and performance enhancements. Some highlights include a cancelable verify and upload process, improved handling of custom board options, and more (you can check out the full list of changes in the release notes on GitHub).
By the community, for the community
We want to extend a heartfelt thank you to everyone who contributes to the ongoing development of the Arduino IDE. Your feedback, testing, and contributions help make the Arduino platform what it is today – a tool for everyone.
Finally, a reminder: Arduino IDE, like many of our projects, is open-source and free for the entire community. If you’re passionate about innovation and want to support initiatives like this, we encourage you to contribute and donate to the open-source cause: a dedicated page will open when you download the new version, but you can simply access it at this link at any time as well. Together, we can keep improving and making tools like Arduino IDE available to everyone.
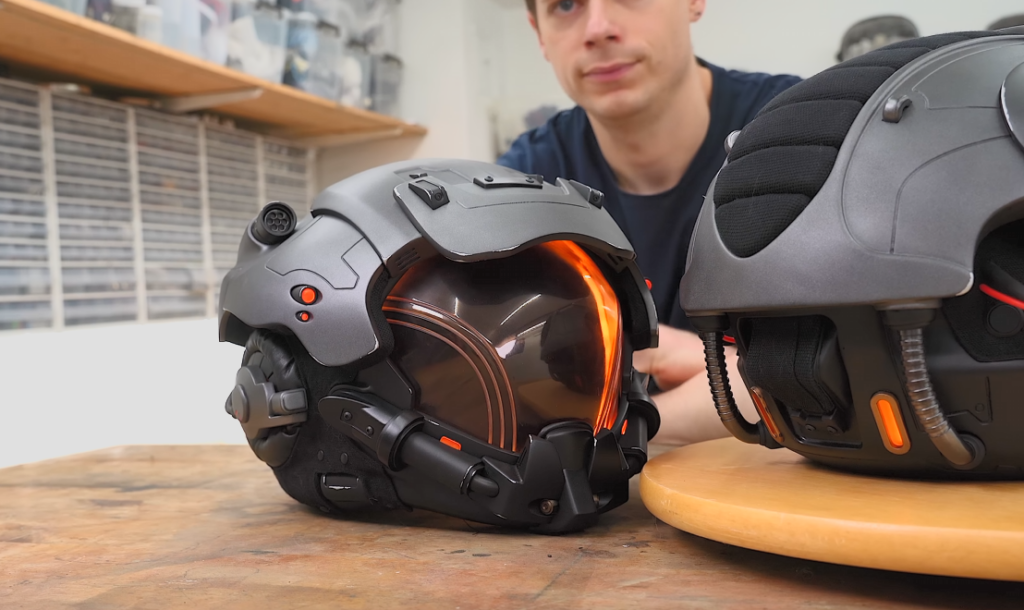
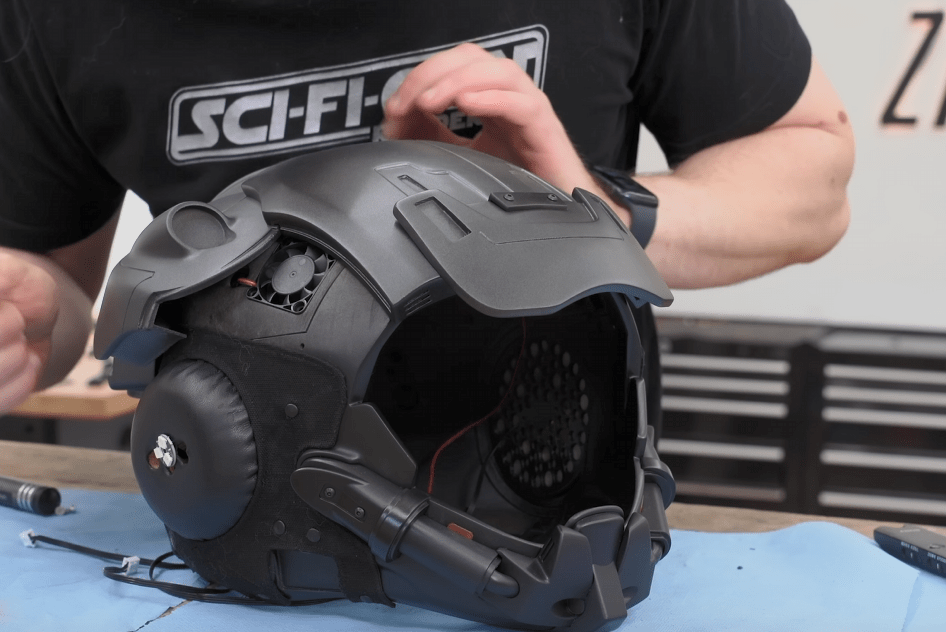
Starfield, a game set in the vast expanse of our galaxy, is receiving a new expansion called “Shattered Space” in which players can don novel weapons and gear to take on the latest challenge. As part of its release, the expansion’s publisher Bethesda reached out to cosplayer Jonas Zibartas and tasked him with creating a pair of render-accurate helmets that could be worn all day at conventions.
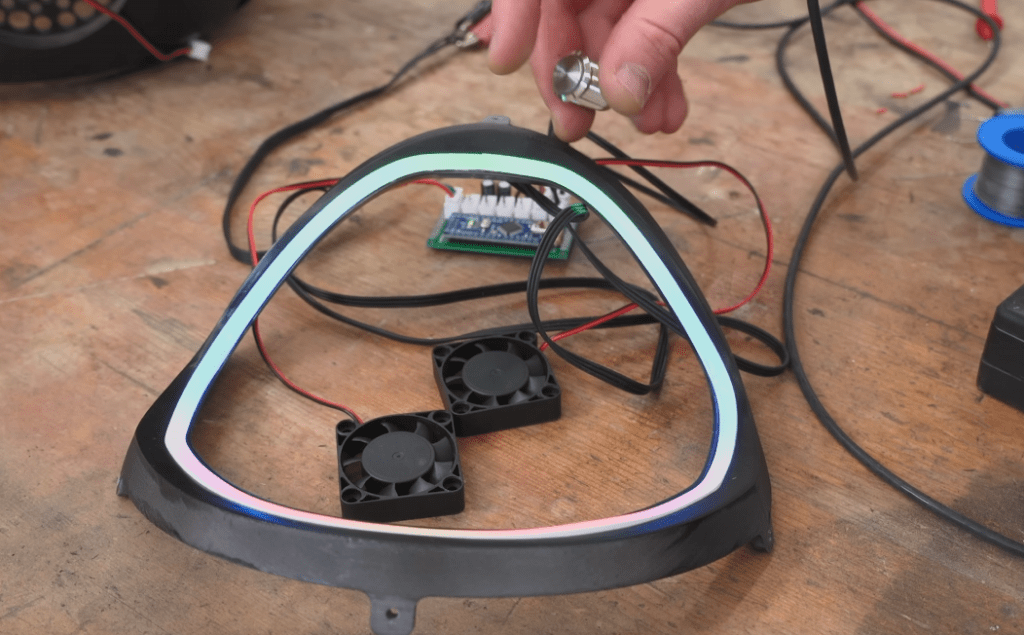
Within the first couple weeks of nonstop designing and test fits, Zibartas had a helmet model that consisted of 130 individual parts and where airflow was a major priority. Similar to a motorcycle helmet, the inner layer is comprised of soft fabric overlayed on top of a rigid, yet porous, helmet shell. Two fans near the front bring in fresh air from the outside and help prevent the transparent visor layer from becoming too foggy due to the wearer’s breathing. Raised just above this shell is a secondary set of 3D-printed accent pieces that give the helmet its finer details/form.
In Shattered Space, these helmets have lighting accents both inside the visor and at various points outside the helmet which act as indicators or headlamps. Zibartas was able to embed all of these features thanks to a dense strip of LEDs and an Arduino Nano.
The meticulous process of constructing these incredibly detailed helmets can be found here in Zibartas’s YouTube video below!
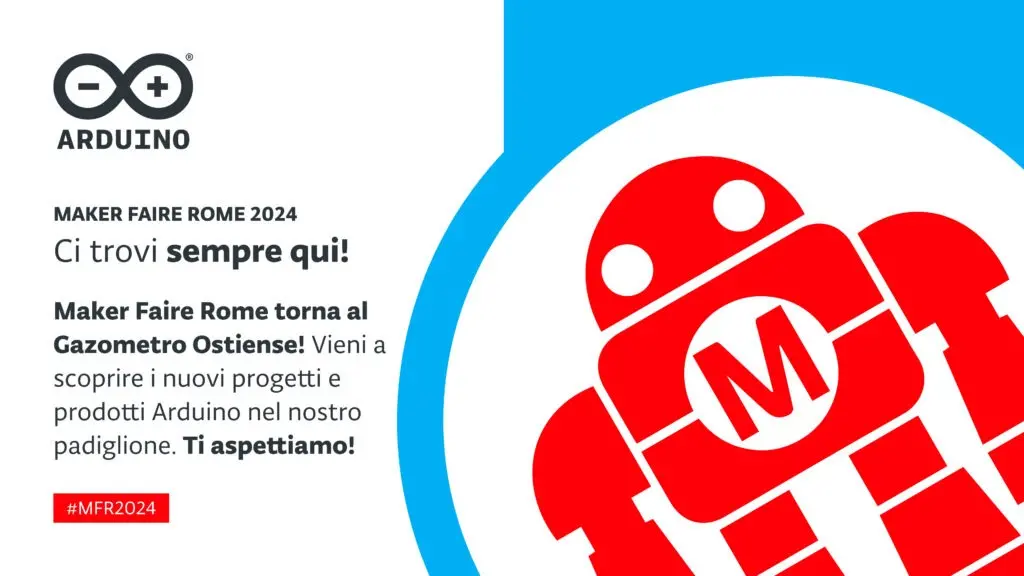
We’re excited to be back at Maker Faire Rome as a Gold Sponsor of the 12th edition (October 25-27, 2024), with some memorable experiences lined up for all makers, innovators, and creators who attend!
Learn by playing at our booth
Visit us at the fair for a playful, interactive experience where you can explore the world of Arduino through fun, hands-on demos and games.
We want to offer a creative approach to learning how to use technology, and give everyone a chance to draw inspiration from some simply fantastic projects: have you seen the new spin Luca Doglione, our Plug and Make Kit Star, has put on vintage arcade games? That’s just one example of what you’ll find at the Arduino booth in Hall 41. So, join us to have fun and let your imagination soar, as you create your own personalized projects!
Within a complete ecosystem of easy-to-use hardware, software solutions and cloud services, we will turn the spotlight on some of our most exciting product launches for the year, designed to make innovation more accessible than ever: Alvik robot and Plug and Make Kit.
Our latest maker kit has something for everyone, whether you’re a seasoned engineer or a beginner just starting your journey! So be sure to come check out our growing range of tools, and discoverfirsthand how fun, quick and easy it can be to make – not just use – technology.
Don’t miss exclusive product discounts
We’ll be offering unprecedented discounts on Arduino products, available through our official resellers at Maker Faire Rome. This is a unique opportunity to get your hands on the latest tech, at prices you won’t find anywhere else!
Meet the Arduino team and community
Come meet the Arduino staff, connect with content creators, and interact with fellow fans at this year’s Maker Faire Rome. Whether you’re seeking technical advice, creative inspiration, or just want to geek out with like-minded people, our booth will be the place to be.
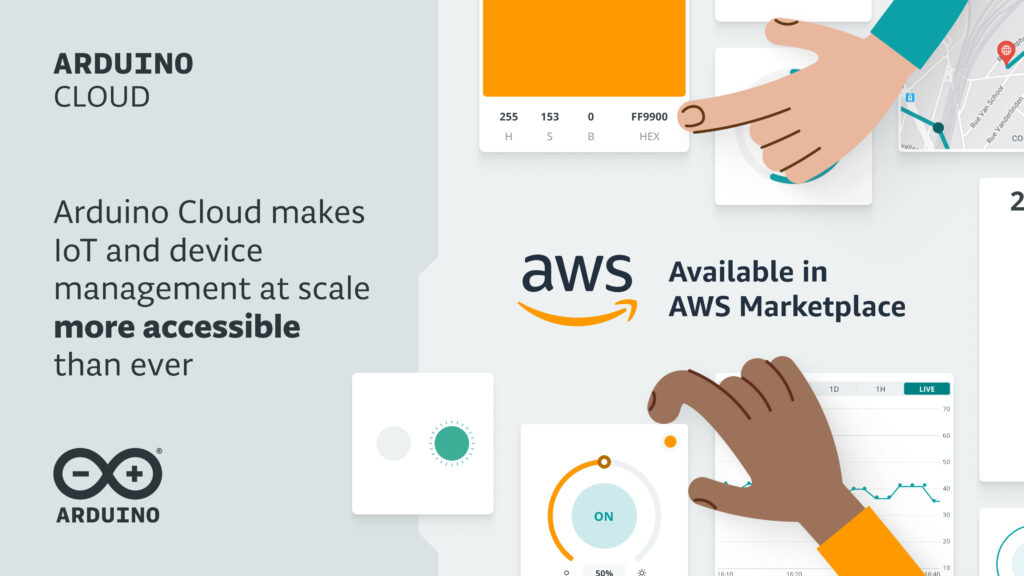
We’re excited to announce that Arduino Cloud is now available in AWS Marketplace, making it easier than ever for developers and businesses worldwide to integrate our powerful IoT platform into their AWS infrastructure. This development is particularly relevant for those in industrial manufacturing, energy management, supply chain, and logistics sectors who are looking to streamline the deployment and management of IoT solutions.
Develop your cloud solutions faster and easier than ever
With Arduino Cloud now available in AWS Marketplace, users can benefit from a low-code platform that accelerates time-to-value, enables easy device management, and supports OTA (Over-The-Air) updates, digital twin creation, and real-time data visualization. For AWS customers, this availability simplifies the process of purchasing, deploying, and scaling IoT applications using Arduino’s robust cloud infrastructure.
As our CEO Fabio Violante explains: “Our mission at Arduino is to remove barriers to innovation, reducing friction and enabling people to focus on their business outcomes. By making Arduino Cloud available in AWS Marketplace, we are improving accessibility for organizations to deploy and manage their IoT devices at scale, dramatically accelerating the journey from ideation to production. With Arduino Cloud, we also aim to enable IoT and edge AI projects that previously never materialized due to complexity and costs.”
Many of our customers have already seen the impact of this integration. Atlas Machine, for example, successfully implemented a “split cloud” architecture using both Arduino Cloud and AWS IoT Core, allowing them to manage sensor data efficiently. Danny Kent, their Product Development Engineer, noted that Arduino Cloud was “indispensable for OTA and device management at scale,” significantly boosting their operational efficiency.
How can Arduino Cloud benefit your business?
Arduino Cloud offers key benefits such as faster go-to-market times, seamless integration with enterprise architecture, comprehensive support for edge and hardware solutions, and cost-effective scalability. Whether you are prototyping or managing large-scale IoT deployments, the service is designed to meet your needs.
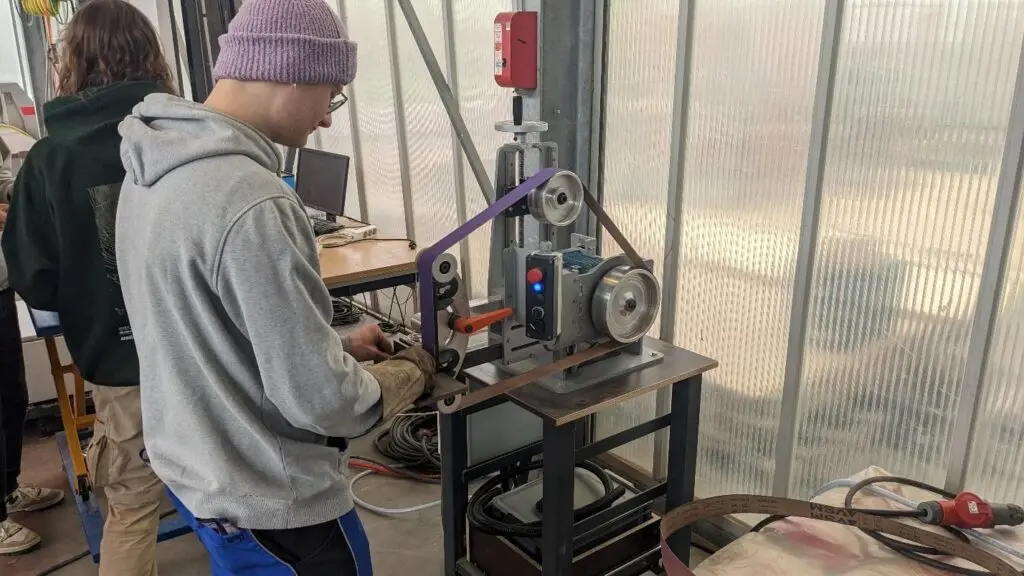
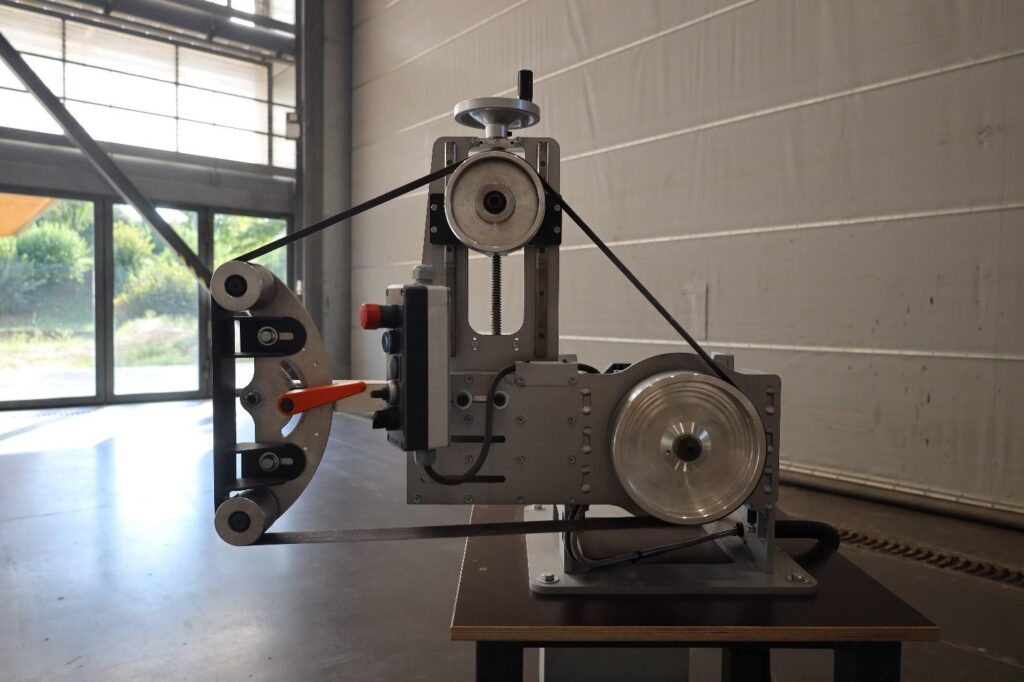
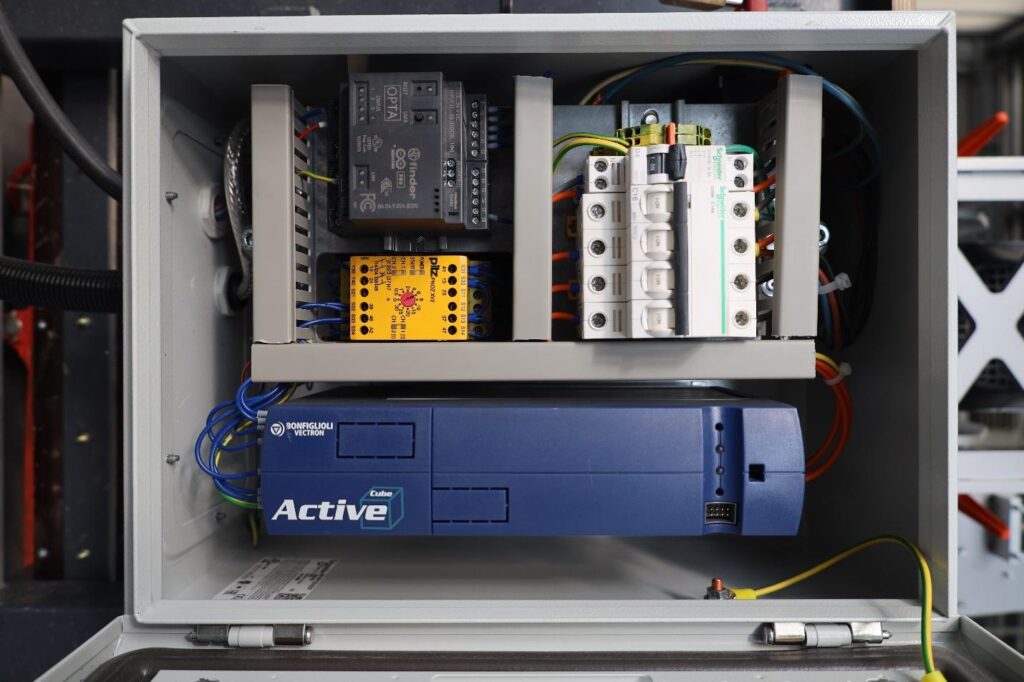
A mainstay in most machine shops, the belt grinder assists in greatly increasing the speed at which parts can be ground down in a safer, more controlled manner compared to an angle grinder. As an effort to build a tool like this one for the first time, Julien Alexandre chose to use Arduino Opta as its controller while designing it from the ground up.
Belt grinders, as the name implies, use a rapidly moving, abrasive belt that has been wound around a set of pulleys and gets driven by a large motor. The main drive pulley was mounted at the rear of the machine and securely connected to a three-phase AC motor. Above it is a height-adjustable point for controlling the belt’s tension, which also aids in swapping belts when needed. The last two pulleys are situated across from the motor and can be tilted vertically to alter the grinding angle. Lastly, the entire assembly can pivot to lay flat on the table or raised at an angle to it.
Facilitating the belt grinder’s operation is an Arduino Opta micro PLC. It receives a signal from two digital inputs that, when either is active, cause the Opta to blink a blue LED indicating to the operator that an error occurred in the security relay that manages the safety chain.. The motor controller (a variable-frequency drive) receives its values from a switch and a potentiometer located on the control panel, with the former dictating if the system is active and the latter being used for adjusting the speed. To see more about Alexandre’s ongoing projects, you can visit his Instagram page here.
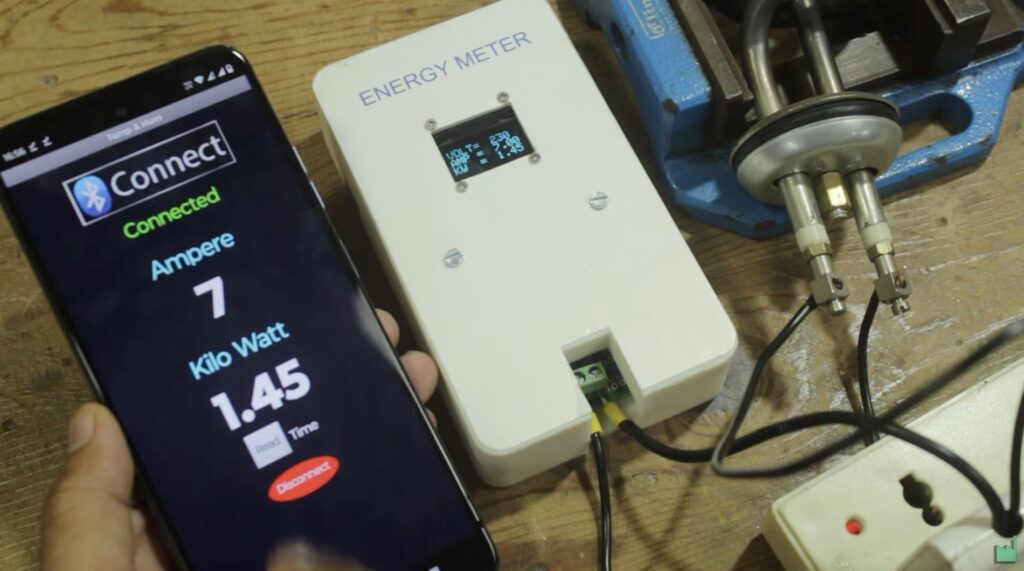
The primary appeal of microcontrollers is their versatility. They are, essentially, the embedded equivalent of computers — general purpose devices that can perform a wide range of functions. And to get the most out of a microcontroller, you’ll also want connectivity suitable for your application. That’s why we released the Arduino Nano Matter and YouTuber Mr Innovative has shared a great video illustrating how easy it is to build an energy meter using this new development board.
The Nano Matter is based on the powerful Silicon Labs MGM240S, which has an Arm Cortex-M33 processor and support for a number of wireless connectivity options, including 802.15.4 (Zigbee and Thread), Bluetooth® Low Energy 5.3, Bluetooth® Mesh, and Matter. That makes the Nano Matter perfect for smart home and other Internet of Things applications. To demonstrate that, Mr Innovative created an energy meter that would be useful to many people around the world.
This unit monitors the power flowing to any device or appliance connected to mains AC power. It displays information about that power consumption on a small OLED screen, and also sends the data over Bluetooth to a connected smartphone for logging. The Nano Matter can’t monitor mains AC voltage directly, so Mr Innovative used a ZMCT103C current transformer for the job. The Arduino receives its power from a 9V battery and the components fit inside a 3D-printed enclosure. A printed sticker label gives that a nice, smooth top finish.
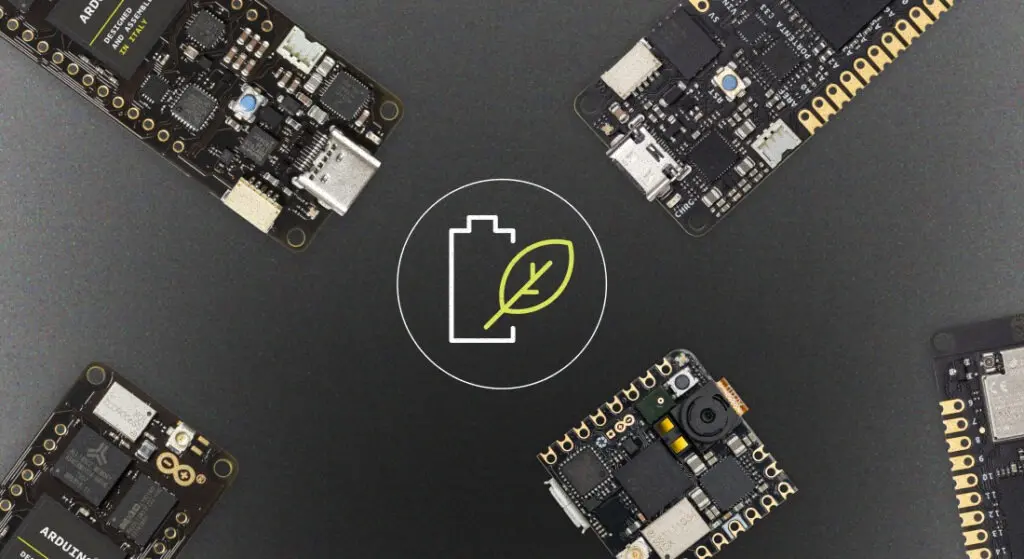
Developing energy-efficient IoT and wearable devices is complex and time-consuming, yet it is essential for creating high-quality products that stand out in today’s market. A key part in this process is optimizing power consumption without sacrificing performance or functionality. Fortunately, Arduino Pro modules help address this challenge by offering powerful chips and efficient regulators, enabling developers to fine-tune power settings and maximize efficiency for their specific needs.
To further support these efforts, we’re excited to introduce a powerful new power management library designed specifically for Arduino Pro modules. The currently supported models are Arduino Portenta H7, Portenta C33, and Nicla Vision. With this library, you can easily monitor battery usage and health, fine-tune charging parameters, toggle components to reduce power consumption, and even enable sleep and standby modes on supported devices. In fact, when in deep sleep mode, some boards consume under 100 microamperes, enabling months or even years of continuous runtime on a single charge.
Ready to optimize your IoT and wearable devices? Keep reading to learn how our new power management library for Arduino Pro modules can help you extend battery life and boost efficiency. Discover the tools to take control of your device’s power usage and try it for yourself!
Watt’s in store: key features you’ll love
Here are some of the standout features that will help you maximize efficiency and extend battery life:
Battery monitoring: Keep track of vital battery metrics, including voltage, current, percentage, and temperature, in real-time.
Battery health tracking: Monitor battery health with detailed insights into temperature, and reported capacity.
Charging control: Take charge of your device’s battery management by monitoring and adjusting charging parameters.
Sleep and Standby modes: Save significant power by putting Portenta C33 or Portenta H7 into low-power Sleep and Standby modes. Support for Nicla Vision will be added in an upcoming update.
Power rail control: Fine-tune power usage by toggling and setting voltages on various power rails of the board.
Juice it up: monitor battery health like a pro
Managing your device’s battery health has never been easier. With the dedicated battery management class, you gain real-time insights into your battery’s usage and health, empowering you to optimize energy efficiency and prolong battery life. This powerful tool lets you track essential metrics such as current and average voltage, battery percentage, current draw, temperature, and even provides estimates for time-to-full and time-to-empty, allowing you to predict charging and discharging times with accuracy. By keeping a close eye on these parameters, you can make informed decisions to maximize your device’s performance and longevity.
Monitoring battery health is crucial for ensuring the long-term reliability and efficiency of your devices. Poor battery health can lead to reduced performance, shorter runtimes, and even unexpected shutdowns, which can negatively impact user experience. By proactively tracking battery metrics, you can identify potential issues before they become critical, extend the lifespan of your batteries, and maintain optimal energy usage – whether your device is in constant use or running intermittently over long periods. Staying on top of battery health means fewer disruptions, lower maintenance costs, and more sustainable, high-performing products.
Charging your LiPo battery effectively is key to maintaining long-term health and maximizing runtime. The power management library gives you control over your battery’s charging process by monitoring each stage and allowing you to adjust crucial parameters to suit your specific needs. With this tool, you can confidently charge your devices, knowing you’re getting the most out of your batteries without risking damage or reduced lifespan.
The three stages of charging
LiPo batteries charge in three stages, each critical for ensuring the battery is properly and safely charged:
Pre-Charge: The first phase begins by charging the battery at a low current, gradually increasing until it reaches the appropriate charging level. This gentle start ensures that the battery is brought up to full charge safely.
Constant Current: In this stage, the battery charges at a consistent current until it reaches the designated “fully charged” voltage – typically 4.2 V for most LiPo batteries. This is where the bulk of the charging occurs.
Constant Voltage: Once the battery hits its target voltage, it transitions to constant voltage mode, where the current is gradually reduced. This final stage ensures that the battery is topped off and ready to go without overcharging.
Understanding these stages helps you manage your battery more effectively and ensures optimal charging every time.
Why monitoring matters
The library allows you to check what stage of charging your battery is in at any time. Knowing whether your battery is pre-charging, fast-charging, or maintaining its full charge can help you monitor its health and ensure it is not being overstressed. The ability to monitor charging status also alerts you to potential issues like overvoltage, overheating, or timer faults, so you can intervene and protect your system before any damage occurs.
By giving you control over parameters such as charge voltage, charge current, and end-of-charge current, the library ensures that your battery is charged in the safest and most efficient manner possible. Whether you’re tweaking the current limit for a more gentle charge or adjusting the voltage for a custom battery, these settings help you get the best performance while extending battery life.
With this level of control, you’ll be able to keep your batteries healthy, your devices powered, and your projects running smoothly.
Powering down, saving up: discover power-saving modes for longer life
With modern IoT devices, power efficiency is critical, especially when running on battery for extended periods. That’s where sleep modes come in. The Renesas and ST chips supported by this library feature two essential low-power states – Sleep and Standby – each optimized to help you manage power consumption without sacrificing functionality.
Whether you’re developing an energy-conscious wearable or a long-lasting sensor network, these modes help you strike the perfect balance between performance and efficiency.
Sleep mode: ready when you are
In Sleep mode, your module significantly reduces its power consumption to about half of its normal usage. The best part? When it wakes up, it resumes execution right where it left off. This makes Sleep mode ideal for applications that need to remain responsive while conserving energy. Wake-up triggers can vary depending on your specific board, allowing you to customize how and when your device springs back to life.
Standby mode: for maximum power saving
Standby mode takes energy conservation to the next level, dropping power consumption to as low as 50 uA to 300 uA when peripherals are turned off. This mode is perfect for long-term, battery-dependent applications where energy use is a major concern. Unlike Sleep mode, Standby resets the board upon waking, triggering the setup() function again. This full reset is well-suited for scenarios where occasional wake-ups are acceptable, such as data logging or remote monitoring.
Fine-tuning your sleep strategy
Both the Portenta H7 andPortenta C33 offer flexible wake-up options. You can use a real-time clock alarm for scheduled wake-ups or external stimuli such as sensor input to trigger activity. On the Portenta C33, multiple pins can be configured as wake-up sources, allowing you to seamlessly integrate peripherals like motion sensors or buttons to bring your board out of sleep.
For even more control, toggle your peripherals on and off as needed, ensuring that features like the ADC, RGB LED, Secure Element, Wi-Fi®, and Bluetooth® are only active when required. This granular level of power management means you can tailor your device’s behavior to its environment, making sure energy isn’t wasted.
In both sleep modes, managing your wake-up sources, peripherals, and configurations can significantly extend your device’s battery life, making it a key factor in creating sustainable, long-lasting IoT solutions.
Mbed and Portenta H7: automated efficiency
On Mbed-enabled STM32-based boards like the Portenta H7 and Nicla Vision, sleep management is automatic. The system enters a sleep-like state during idle periods, but you can enhance this by manually managing sleep locks – peripherals or processes that might prevent the module from sleeping. Unlocking these will ensure your board sleeps whenever possible, maximizing efficiency without compromising essential tasks. Check out this example from the underlying Arduino_LowPowerPortentaH7 library for more information about sleep locks.
Power consumption comparison
To give you a clear idea of how power consumption varies across different Arduino Portenta modules, here is a breakdown of current usage with and without power optimizations. This table highlights how effectively sleep modes and peripheral management can reduce power draw, helping you extend battery life in your projects.
Note: Sleep measurements are not available on the Portenta H7 modules because they go to sleep automatically when idling.
Note: These measurements have been taken using a Nordic Power Profiler Kit II through the JST power connector of the Portenta boards. The numbers might be higher when powering through the VIN or 5V pin because it involves more power regulators that are not as efficient as the PF1550’s integrated regulators.
Conclusion
Efficient power management is key to unlocking the full potential of your Arduino Pro projects! With advanced tools like customizable sleep modes, detailed battery monitoring, and flexible peripheral control, you can significantly extend battery life and optimize energy usage across your devices. Whether you’re working with the Portenta H7, Portenta C33, or Nicla Vision, these features allow you to create smarter, more sustainable IoT and wearable solutions that stand the test of time.
Now it’s your turn to put these powerful features to work: elevate your designs, reduce energy consumption, and build products that last longer and perform better. And don’t forget to share your results on Project Hub or the Arduino Forum!
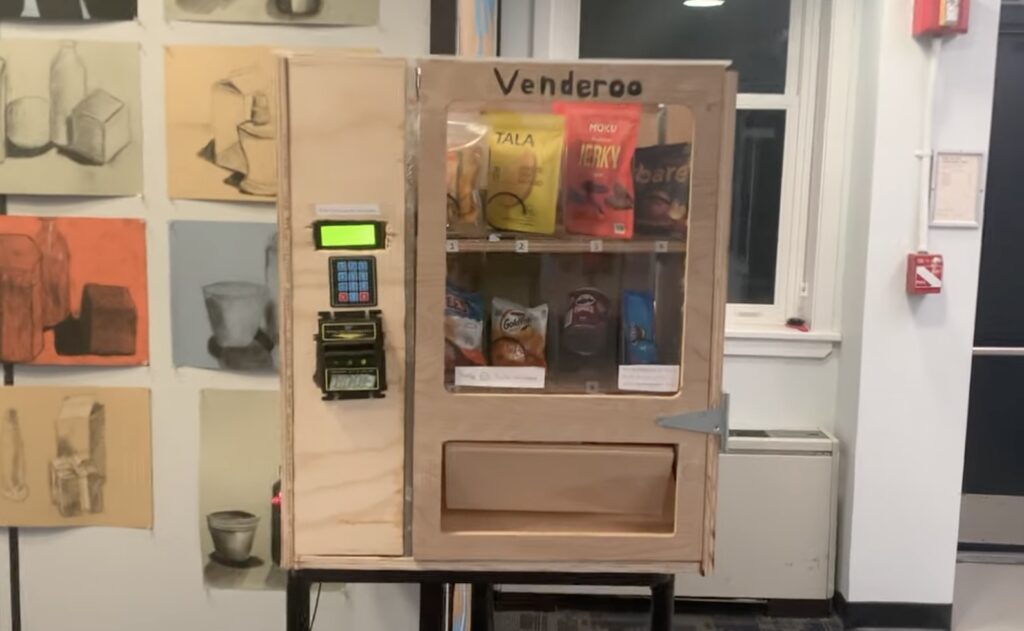
For now-college student Joel Grayson, making something that combined his interests in mechanics, electronics, and programming while being simultaneously useful to those around him was a longtime goal. His recent Venderoo project is exactly that, as the creatively named vending machine was designed and built from the ground-up to dispense snacks in his former high school to fellow classmates.
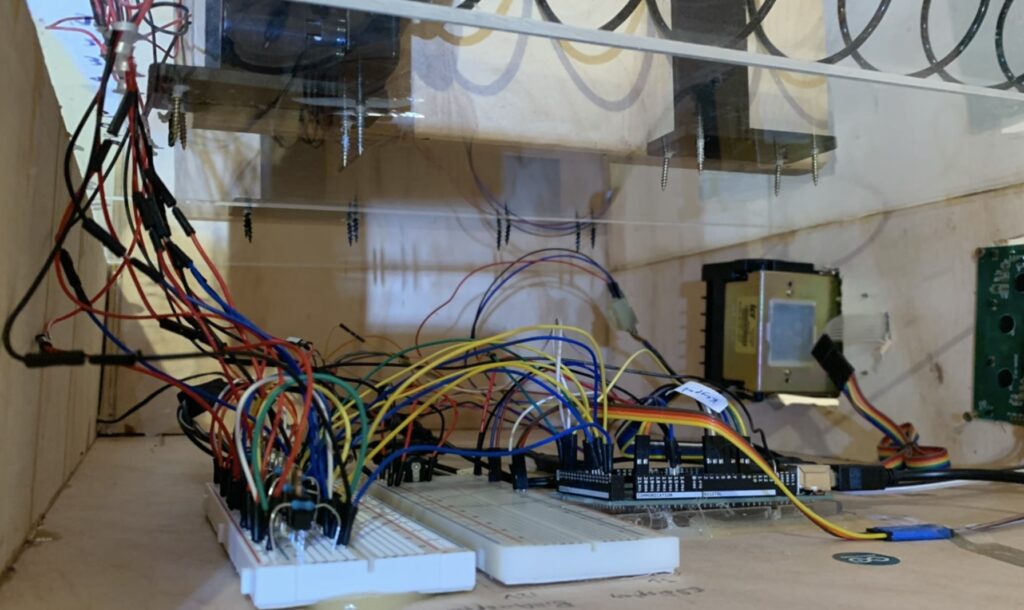
Constructing Venderoo started with a sketch that featured the dimensions, vending mechanism, and the electronics panel on the left. Then through a combination of a CNC router and a jigsaw, Grayson meticulously cut out each plywood panel and assembled them together along with clear acrylic sheets so students could observe the machine in-action. On the electronics side, an Arduino Mega 2560 is responsible for handling selections on the keypad, displaying commands/feedback to users via the character LCD, accepting money, and rotating the motors when it’s time to dispense.
When a student first approaches Venderoo, they are greeted by a message instructing them to select their snack of choice, after which the price will appear and ask for a combination of $1 or $5 bills, depending on the price. Once the balance has met the threshold, Venderoo will find the location of the snack and spin the appropriate motor thanks to powerful MOSFET drivers.
To see more about how Grayson’s Venderoo vending machine works, watch the video below!
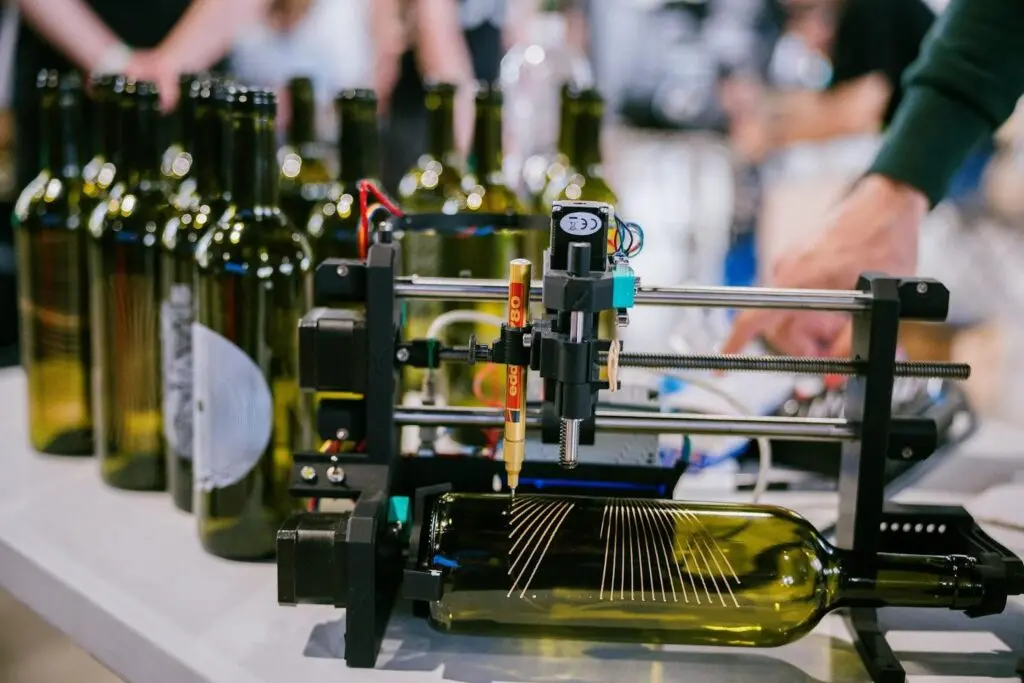
Manufacturers put a lot of effort into their packaging (there is an entire engineering discipline just for that) and some of it can be quite beautiful. But it usually still ends up in the landfill or, at best, in a recycling center. However, if you’re the type of person who can see the beauty in wine bottles, mason jars, and tin cans, then you can build the Bottle Plotter to transform trash into treasure.
This machine, developed by VGaman, is a CNC pen plotter with one linear axis swapped out for a rotary axis. That means that instead of plotting on a traditional XY plane, it plots around a cylinder. The “pen” can be anything that fits in the holder and the possibilities are almost endless. Paint markers seem especially well-suited to this kind of work, but there are certainly other options that may produce interesting results on some materials.
The Bottle Plotter is relatively affordable to build, as most of the parts are 3D-printable. The exceptions are fasteners, bearings, rods, and the electronic components. Those electronics include an Arduino UNO Rev3 board, a CNC shield, and stepper motors. VGaman’s design does include a Z axis (to move the pen closer to and further from the workpiece surface), so the machine requires three stepper motors.
The Arduino runs GRBL firmware and can accept any compatible G-code. The easiest way to generate that G-code is with a plugin for Inkscape, which will let users create artwork and then plot that all within one piece of software. Swap pens between toolpaths to make cool multicolor designs!
Um dir ein optimales Erlebnis zu bieten, verwenden wir Technologien wie Cookies, um Geräteinformationen zu speichern und/oder darauf zuzugreifen. Wenn du diesen Technologien zustimmst, können wir Daten wie das Surfverhalten oder eindeutige IDs auf dieser Website verarbeiten. Wenn du deine Einwillligung nicht erteilst oder zurückziehst, können bestimmte Merkmale und Funktionen beeinträchtigt werden.
Funktional
Immer aktiv
Die technische Speicherung oder der Zugang ist unbedingt erforderlich für den rechtmäßigen Zweck, die Nutzung eines bestimmten Dienstes zu ermöglichen, der vom Teilnehmer oder Nutzer ausdrücklich gewünscht wird, oder für den alleinigen Zweck, die Übertragung einer Nachricht über ein elektronisches Kommunikationsnetz durchzuführen.
Vorlieben
Die technische Speicherung oder der Zugriff ist für den rechtmäßigen Zweck der Speicherung von Präferenzen erforderlich, die nicht vom Abonnenten oder Benutzer angefordert wurden.
Statistiken
Die technische Speicherung oder der Zugriff, der ausschließlich zu statistischen Zwecken erfolgt.Die technische Speicherung oder der Zugriff, der ausschließlich zu anonymen statistischen Zwecken verwendet wird. Ohne eine Vorladung, die freiwillige Zustimmung deines Internetdienstanbieters oder zusätzliche Aufzeichnungen von Dritten können die zu diesem Zweck gespeicherten oder abgerufenen Informationen allein in der Regel nicht dazu verwendet werden, dich zu identifizieren.
Marketing
Die technische Speicherung oder der Zugriff ist erforderlich, um Nutzerprofile zu erstellen, um Werbung zu versenden oder um den Nutzer auf einer Website oder über mehrere Websites hinweg zu ähnlichen Marketingzwecken zu verfolgen.


