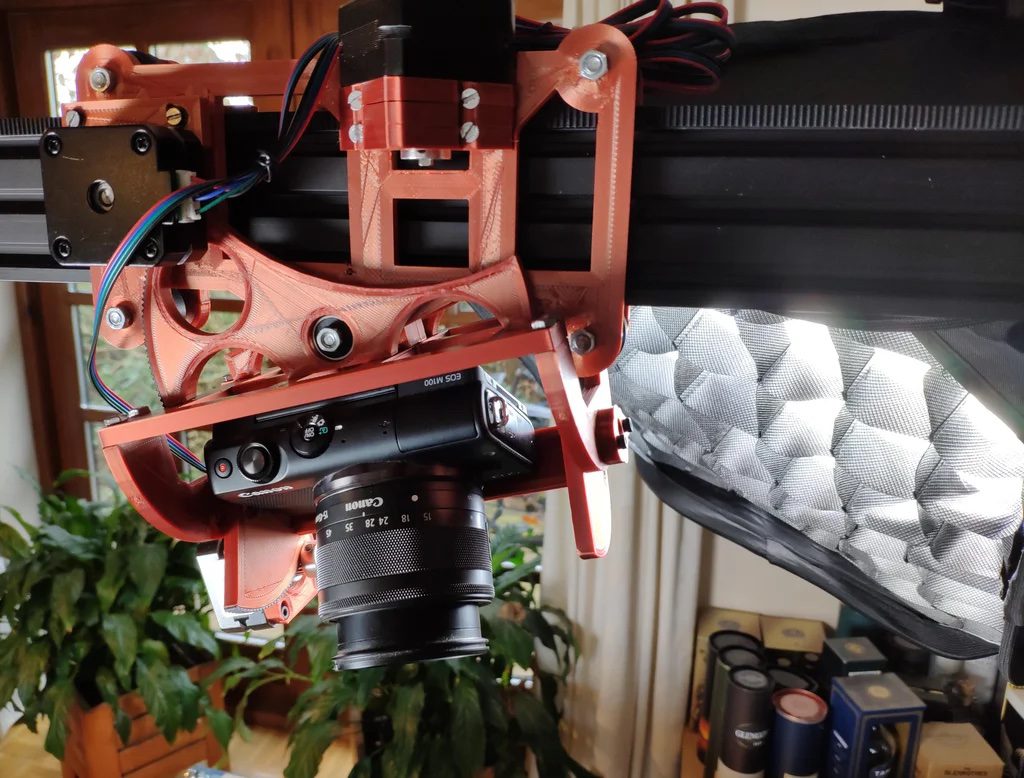
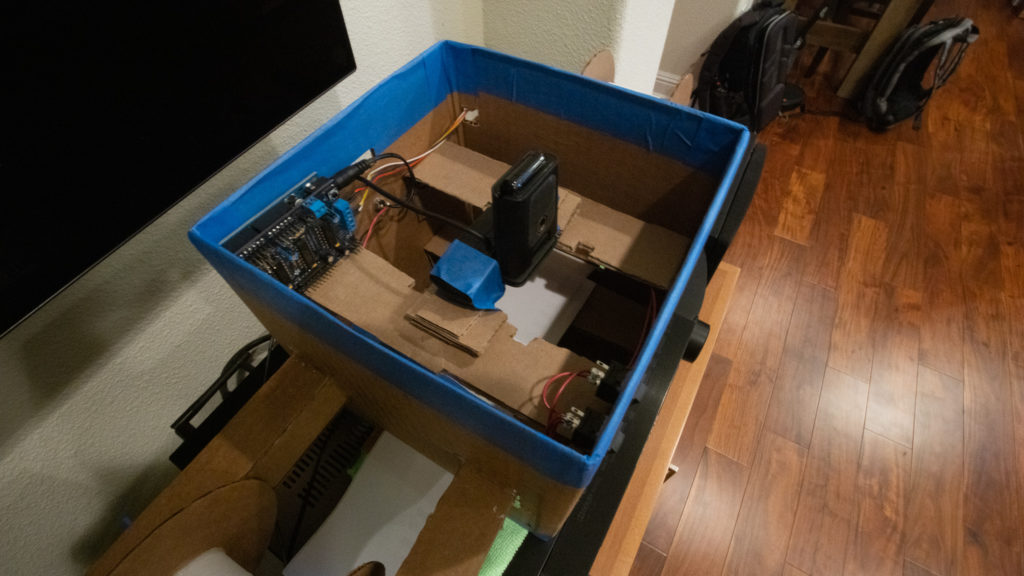
“Have you ever wished you had an extra pair of hands in the workshop to handle the camera, while you were concentrating on your project?” KronBjron has, which led them to create an automated overhead camera assistant to help document instructional videos.
The device hangs a camera overhead and uses a trio of stepper motors to pan, tilt, and slide it around for extra interesting shots. It’s all controlled by an Arduino Mega and RAMPS 1.4 board, with user interface implemented via the serial monitor. Users can set up to 10 keyframe positions, and the camera rig will move from one point to another while it captures what’s going on below.
The assistant is made out of readily-available components, along with a structure that can either be 3D-printed or CNC’ed. However you construct it, this build looks like just the thing to take your videos to the next level!
Arduino helps control the world’s largest Nintendo Switch
Arduino Team — April 5th, 2021
Do you enjoy playing your Nintendo Switch, but get tired of losing it due to its small size? Michael Pick may have just the answer with his massive version of the console — which measures in at 70″ x 30″ — and features a 4K display and functional Joy-Con controllers.
The frame is constructed out of wood, with 3D-printed buttons and joysticks. Inside of one of the giganto Joy-Cons is an actual Nintendo Switch for running games, while a Joy-Con is used for input. The large outer joystick is hooked up to it mechanically and the outer buttons are connected to an Arduino. In response to external button presses, the Arduino activates servos that physically push the controller’s buttons, interfacing with the system and keeping the Nintendo hardware intact.
Making it all the better, Pick donated the finished product to St. Jude’s Children’s Hospital!
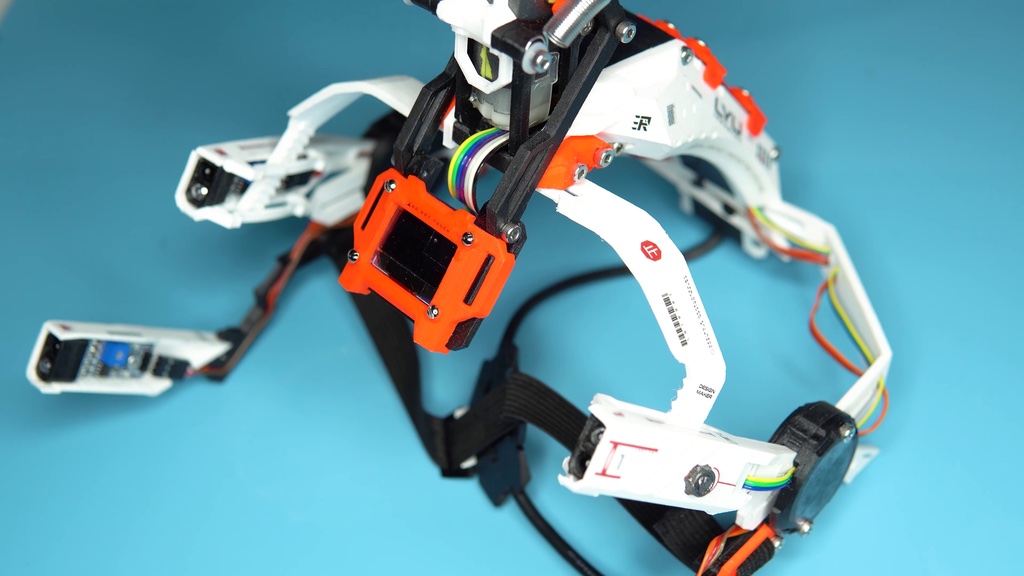
For a variety of reasons, including potential virus transmission, it’s a bad idea to touch your face too often. If you need a little “help” to break this habit, then you might consider the STOP Face Touching Device by DesignMaker.
The system takes the form of a very sci-fi-looking helmet, which monitors the area around the user’s face with four IR sensors. An Arduino Nano is used for control of the device, and when you do touch your face, it responds by smacking your forehead with a motor/spring device. It also increases the number of touches on an OLED display.
Between a slight amount of pain and the public shaming, perhaps your behavior will be modified. Alternatively, you can just check out the build/demo below for a bit of a laugh and maybe some inspiration!
April 6th: Scheduled maintenance planned for the Arduino website
Arduino Team — April 2nd, 2021
Some areas of the Arduino website will be temporarily unavailable on Tuesday, April 6th.
Don’t worry if you’re unable to access certain areas of the Arduino website next Tuesday. We’re carrying out some scheduled maintenance to bring you a few exciting new features.
Areas Affected by Maintenance
Login will be offline between 7am and 10am CET (any service requiring login like Arduino Store, Create Editor and IoT Cloud are impacted).
Other Arduino services might also experience a reduced performance during the day, as part of the maintenance work.
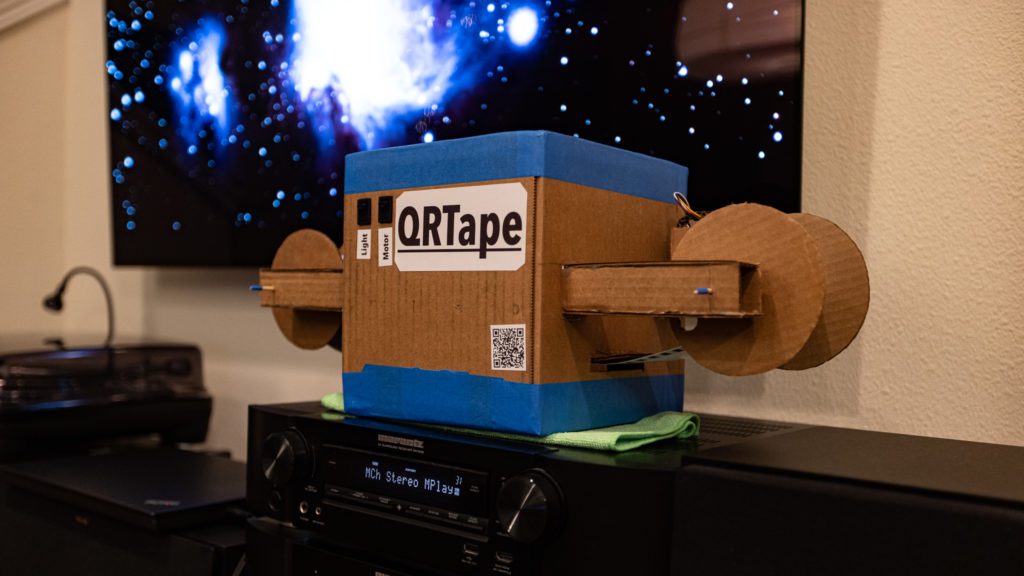
QR codes are normally used to convey short snippets of information, such as web addresses. Chain a few of them together, as “The Resistor Network” was able to do in the video below, and you can produce a non-negligible amount of storage.
Dubbed QRTape, the project employs custom software to break up a song, encoded using the efficient Opus codec, into small chunks that can be embedded onto individual QR codes. These are printed on a continuous strip of paper by a thermal printer and read for audio playback via a webcam.
To keep the music flowing, this hacker created a cardboard reel-to-reel player that pulls the ribbon of codes past the camera with the help of an Arduino-controlled stepper setup.
YouTuber Gavin Scott (AKA Make Fun Stuff) and his friend Kevin have been pranking each other with garden gnomes for years. In the video below, Scott decided to take things to a new level, placing an Adafruit sound board and speaker into one of these small ceramic creatures to make it scream when picked up. The system is triggered via an LDR sensor, along with an Arduino Nano to interpret this input and start the sound.
It’s a fairly straightforward project, though it was certainly a challenge actually getting all the electronics stowed inside the gnome. Results are seen at the end of the clip, where Kevin seems genuinely confused as to how this little guy showed up on his doorstep.
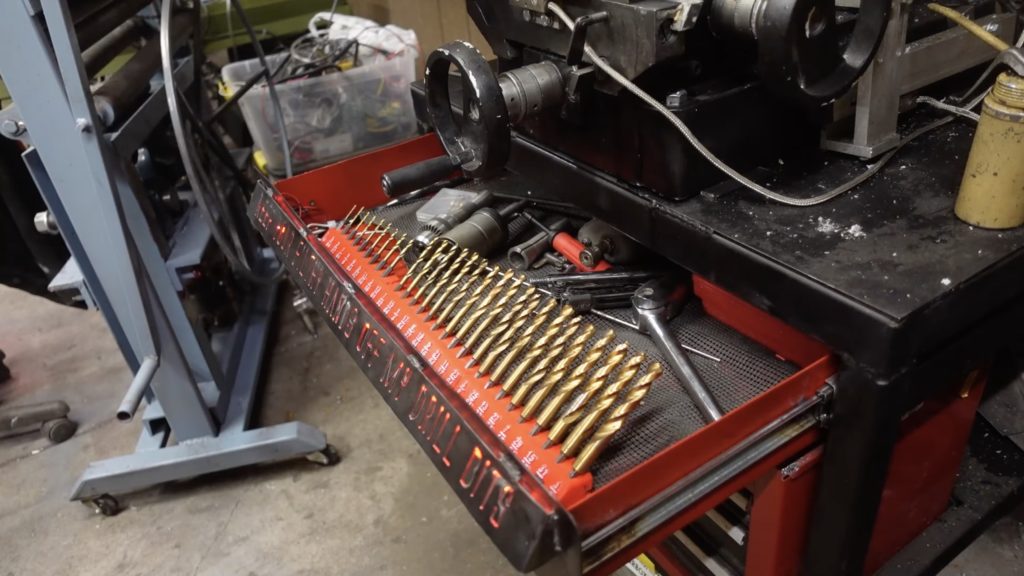
Custom machine stand yells at you if the drill bits aren’t stored properly
Arduino Team — March 30th, 2021
YouTuber Cranktown City recently acquired a new milling machine/drill press, and needed somewhere sturdy to place it. Rather than buying something, he went to work making a nice custom stand with a drawer on top and space for a toolbox below that.
To help keep things organized, this top drawer features a 3D-printed drill index with an interesting trick. In addition to providing storage for the drill bits, it “encourages” you to put them back. Each drill cavity has a small switch, all of which are daisy-chained together. The switch signal is fed to an Arduino Nano, which reads high when all drills are present, and low if one or more is missing. If one is missing for too long, it triggers a sound module that insults him into proper organization, and lights up a strip of LEDs as an extra reminder.
Arduino World Gathering 2021: the official community conference you can’t miss
Arduino Team — March 27th, 2021
We’re proud to announce the Arduino World Gathering, taking place everywhere in October 2021. Multiple days packed with workshops, lightning talks and project demos; a virtual event for everyone to enjoy.
This is a conference made by you. Whether you built a cool project with Arduino for fun or profit, you want to share a neat hack with the novice users, or you want to host a workshop a particular skill, technique, or special know-how you’ve acquired – we want you.
Hackers, creators, designers, engineers, educators. Stop what you’re doing and start putting your ideas together now. A call for proposals will open soon.
We’ll talk about hardware, software, open source, creative technology, interactive art, smart products, professional applications, education, home automation, Internet of Things, artificial intelligence and more. All things Arduino!
Enter your email to get notified about the call for proposals and any other AWG updates:
Interested in sponsoring the conference? Contact us.
The Official Arduino Day live stream will be hosted on the Arduino website and social media channels from 4pm CET on March 27th, 2021.
Arduino Day 2021 explores the idea of “undistancing,” with a packed roster of talks, demos, presentations, interviews and more that show us how Arduino can bring us together, even when we’re apart.
Who says an alarm clock just has to beep, or annoy you in the mornings? Certainly not MakeUnited, who’s put together an Arduino Nano verbal reminder project over on Instructables. His device lets you program a whole bunch of alarms that each play a specific MP3 file.
The REMIND-INO is styled to look like a vintage radio, as the maker’s target audience is his grandparents. That being said I’m not a grandparent, and this would be an ideal way to substitute my inability to keep track of what time it is… ever.
There’s no limit to the reminders or alarms you might program into the REMIND-INO, but MakeUnited has a couple of suggestions:
Reminding people to perform tasks at specific times.
Tell stories, read books, teach cooking recipes and even play songs.
Keep track of appointments.
Anything else you might need a timely verbal prompt for.
And because it’s designed for an older demographic, he’s kept the controls super simple.
When an alarm goes off, it continues to repeat the message until you hit the big, illuminated button on top. Or after five minutes, just so it doesn’t become a major annoyance.
It’s an amusing project, as you can see from the build-along video. But it’s also easy to see how useful and practical it is. We see his grandparents being reminded to take pills, and to set off for an appointment. Alarms that anyone would find useful, regardless of age, and the verbal alert just makes it all the more effective.
The simplicity of the project would really keep the costs down too, and there’s loads of room for expansion and innovation if you wanted to build on this ingenious project.
Everything’s in place and ready for the global celebration of Arduino’s sweet sixteenth birthday, including some amazing interviews, demos and talks. See you on March 27th at 4 p.m. CET on Arduino’s online channels.
It’s Arduino’s sweet sixteenth on March 27th, and after such a tough 2020 we wanted to make it an extra special event.
As you’ve probably already seen, we’ve themed this year’s Arduino Day around “Undistancing: open makes us close”, which is all about using everyone’s favorite tech to bring people together and find new ways to connect while we’re physically apart.
Presentations
There are so many topics the Arduino team wanted to cover this year that we’ve got lots of great presentations in the works for you.
Not least of them being a new inclusivity program called #include, that’s being integrated into Arduino as we speak, but there are big plans to bring it out into the community too. Isabela Freire from the Arduino Design Team will be with us to tell you all about that, and how it can benefit your projects, causes and communities.
We also want to show you around some of the top new Arduino devices, with some big reveals that are guaranteed to get people excited across the maker, education and professional sectors. The Nano RP2040 Connect is definitely going to be a highlight you won’t want to miss.
Interviews
Arduino Day is just as exciting to those of us inside the company, as well as you guys out there in the community. It’s at events like this where we get to talk to brilliant people who are making a genuine difference to the world through open-source tech.
Among them is the ever-inspiring Judi Girò Benet and Billy Chen, co-founders of the amazing breast cancer testing device The Blue Box. This incredible project recently won the international James Dyson Award, and it’s a remarkable tale of a first-time maker who brought her vision to life through Arduino and prototyping her own electronics.
We’ll also be revealing the 10 winners of this year’s Arduino Day Community Challenge. So if you’ve submitted a project to the competition make sure you’re online to find out if a treasure trove of Arduino gear is on its way to you.
Talks
Our very own Massimo Banzi is ready to give you a personal tour of the Tiny Machine Learning (TinyML) Kit. Together with Prof. Vijay Janapa Reddi of Harvard University – who specializes in mobile, cloud and edge-centric computing systems – they’ll discuss the impact that devices like TinyML can have in the education sector.
Ubi de Feo from Arduino Tooling Team will then follow with a first-hand demo of the exciting new Arduino IDE 2 beta, in which he’ll show us how this awesome platform represents the next evolution in accessible firmware development. Everything you ever wanted to know about the new IDE, plus a few new features in the pipeline.
Arduino Day Live Stream
So set the day aside on March 27th to join in with the Official Arduino Day live stream, which launches at 4:00 p.m. CET on the Arduino channels.
Get your seat on the front row at day.arduino.cc, and if you’ve any comments or questions in the meantime, just let us know.
Oh, and if you want to see your face on the live stream, why not record a short video clip of yourself saying a big happy birthday to Arduino, and we’ll add you to the celebrations!
Just post it on social media with the hashtag #ArduinoD21 and we’ll stick a virtual candle in the sweet 16th birthday cake just for you!
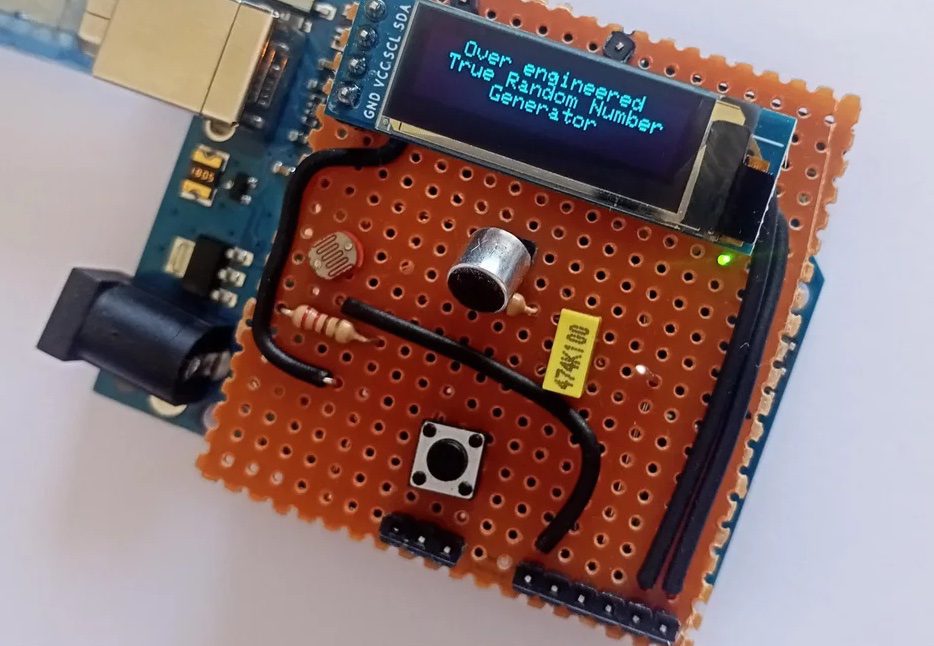
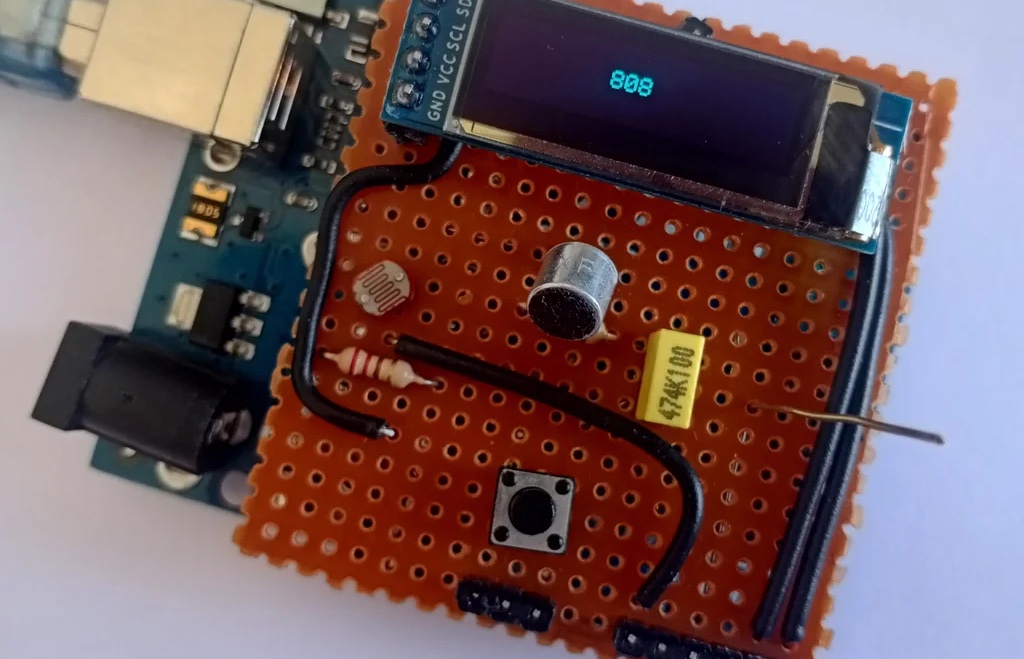
Creating an over-engineered random number generator Arduino shield
Arduino Team — March 17th, 2021
Often when working with Arduino projects, you’ll need to generate a random number. There’s a random() function built into the IDE that works acceptably in many cases, but maker_ATOM wanted to take things to the next level, creating an “over engineered true random value generator.”
This device sits on top of an Arduino Uno as a shield, and features input from a floating pin a seed value. It adds light input as a second seed value with an LDR, and ambient noise via a microphone as a third value. These are used to choose from an array of Pi digit values, which are also random, revealing outputs on its OLED display at the push of a button that would be exceedingly difficult to predict!
Arduino Day isn’t just Arduino’s birthday. It’s a celebration of the Arduino Community and its achievements. Creativity is the fuel that motivates our users to experiment, build amazing projects, push the boundaries of open-source hardware and software and have a positive impact on people’s lives.
Arduino Undistancing
We’re excited to announce that this year’s Arduino Day contest (you can apply with this form) will be all about highlighting the incredible creativity of our community. This is our way of thanking our amazing users, whose passion, innovation and vision inspire us every day.
Inspiration and community participation have never been more vital than during the pandemic, so this year we’ve made a special effort to instill a feeling of inclusivity and bringing people together. So the whole event this year has been given a theme of “undistancing”. We want Arduino Day to encourage people to collaborate, and create as one; to close the distance between us all virtually, until we’re all able to get back together physically.
The community challenge embodies this same principle of bringing people together, which we’re hoping will provide a great source of inspiration for your projects.
Get Creative with Arduino
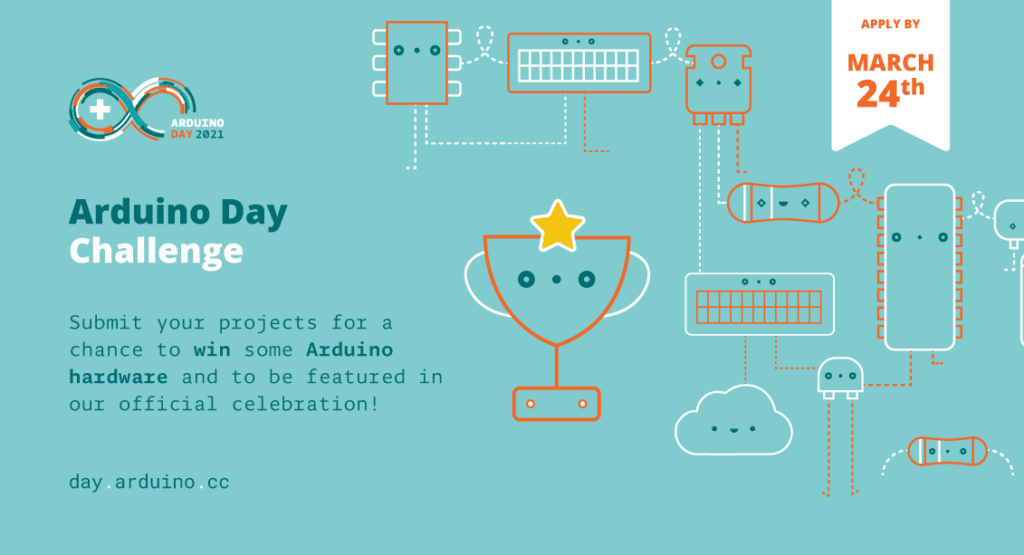
TheArduino Day 2021 Challenge will award the top 10 community projects that stand out for their creativity and innovation. The contest is open to everybody, whether you’re a beginner, a pro user, a student, or an artist. Everyone’s welcome to join the contest and share their innovative projects, big and small, with the rest of the community.
We’ll select 10 projects that we feel demonstrate the most creative, innovative ideas, and send them an awesome Arduino Day box packed with our favorite boards, kits, and goodies, to a value of around €250 EUR/$280 USD. Moreover, the videos of the best projects will be featured on the official Arduino Day live stream that will take place on March 27th across all our channels!
If you want to join in, please fill out this form and submit your project by March 24th.
Aside from a description, you’ll need to upload a video demonstrating your finished project (and if you’d like to add a happy birthday message to Arduino at the end, that’d be great!). The winners of the contest will be announced on Arduino Day during the live streaming (around 4pm CET).
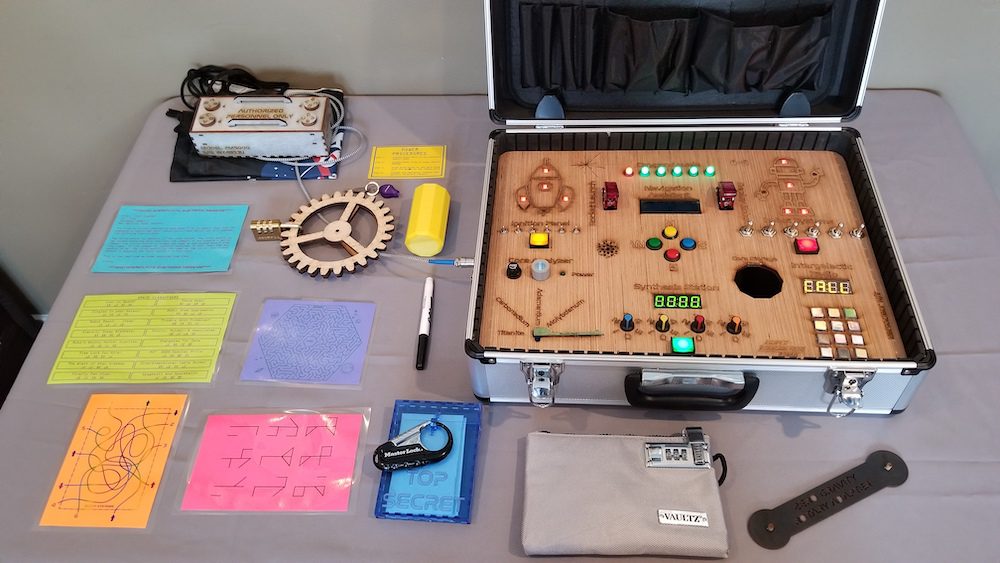
Escape rooms can be a lot of fun, though with today’s conditions, you may instead be staying at home. As seen in the video below, the Spacecase gives you the best of both worlds as an entirely portable escape “room” in a box.
The Spacecase consists of only a hard suitcase, along with a NASA tote bag. Each of these contain different elements that allow you to “repair your spaceship and escape before you and your crew run out of oxygen.”
Inside the bag is an emergency power module, which must be opened to reveal the key to the suitcase, and plugged in to power it. Hidden within the suitcase is about 20 puzzles that are solved interactively via the Arduino Mega-based electronics under the control panel.
The build features voice feedback, as well as a variety of knobs, LEDs, switches, and more, providing what looks like a fun and challenging puzzle to get your spaceship off the ground!
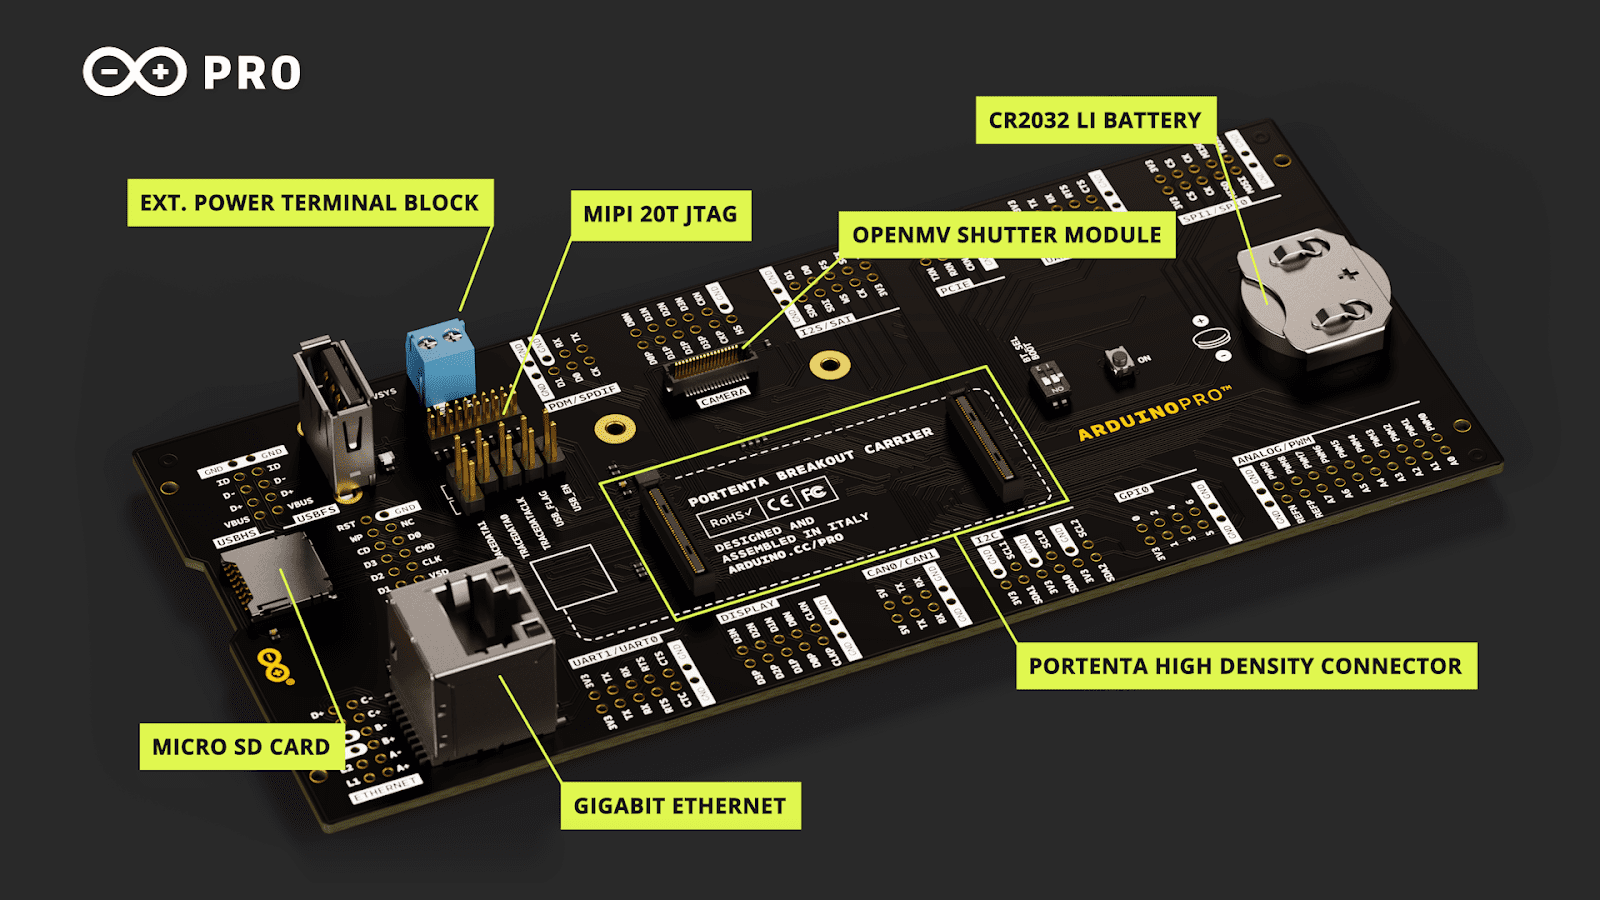
We are pleased to announce the launch of the new Arduino Portenta Breakout, designed for developing hardware projects, testing, and debugging on Portenta family boards.
The Portenta Breakout exploits all the capabilities of the input and outputs, making all high density connectors’ signals individually accessible.
The Portenta Breakout reduces development time for industrial grade solution automation based on the Portenta line. Designed to help the hardware engineers and makers who want to develop a proprietary device for Portenta family boards or interfacing external devices to the Portenta family boards (e.g. the Portenta H7). It is now quick and easy to connect and test external hardware components and devices in the lab using all the high density connectors’ signals of the Portenta individually.
Rapid development for machine vision
Connectivity to the OpenMV Global Shutter Camera Module is provided on the Portenta Breakout, allowing for rapid development of machine vision applications alongside the Portenta family.
Test external hardware and devices
The Portenta Breakout enables easy debugging through the JTAG connector and allows for inspection of the bus lines through the breakout pins. In addition to the breakout pins, the Portenta Breakout features Ethernet, USB and SD sockets, a coin cell, a power button, an external power supply, an OpenMV camera socket, and configurable boot selection modes.
Features include:
Power ON button
Boot mode DIP switch
Connectors
USBA
RJ45 GBit Ethernet
MicroSD card
OpenMV shutter module
MIPI 20T JTAG with trace capability
Power
CR2032 RTC lithium battery backup
External power terminal block
I/O
Break out all Portenta high density connector signals
Male/female HD connectors for interposing breakout between Portenta and shield to debug signals
Beyond use in the development lab, the Portenta Breakout can act as a first point of entry for educating technicians in industrial grade control and embedded systems.
The new Portenta Breakout is now available on the Arduino Store.
This digital clock uses 24 Arduino-controlled analog faces
Arduino Team — March 5th, 2021
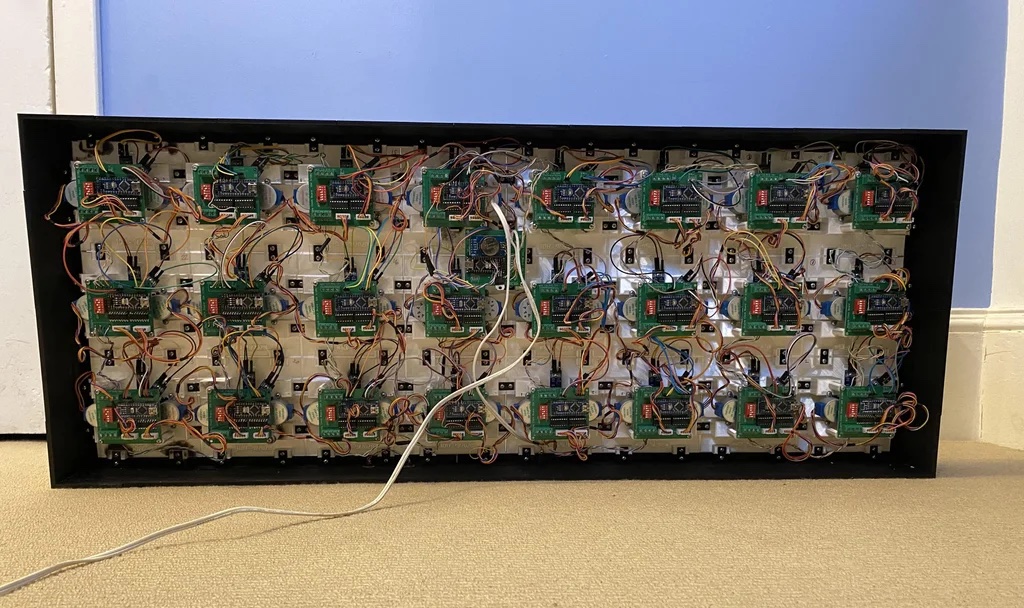
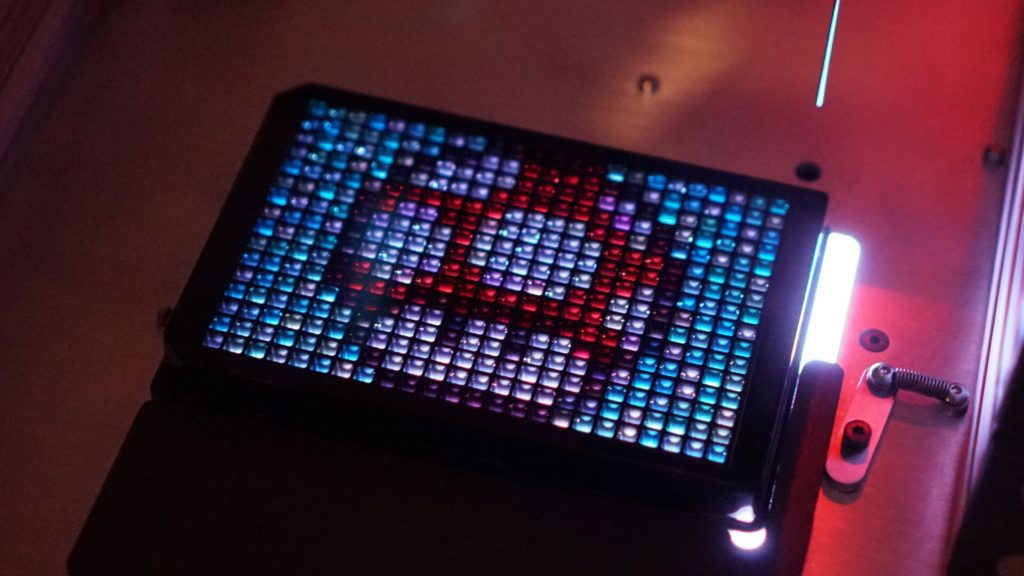
After being inspired by a beautiful, if rather expensive timepiece, Ira Hart decided to make a 3D-printed clock with 24 analog faces that combine to form a single digital display. The overall device is controlled by a single Arduino Nano, which keeps track of the time using a RTC module. This unit coordinates 24 other Nanos on custom carrier boards, which in turn drive their own little clock face via a pair of steppers and a gear system.
When working together, these 24 clocks can tell the time in very large characters, and even show a variety of kinetic art as it changes from one minute to the next. It looks awesome in the video below, and build info is available in Hart’s project write-up.
Time to get creative – the Arduino Day Community Challenge is coming
Arduino Team — March 5th, 2021
Every year, one of Arduino Day’s biggest highlights is the Community Challenge, and 2021 is no different.
As you read this, we’re working feverishly behind the scenes to get this year’s challenge ready, so you can start submitting your projects for a chance to win some awesome Arduino goodies.
Keep an eye out right here on the Arduino blog early next week for all the details, and how to enter your projects into the competition. But in the meantime, why not spend the weekend deciding what kind of cool, creative and crazy contraptions you might want to build?
As you’ve probably already seen, Arduino Day 2021 is themed around the idea of “undistancing;” investigating all the amazing ways the open-source community can connect, collaborate and create as one, even when we’re physically separated.
So that might give you some inspiration for your Community Challenge projects, but most importantly try to think of something that’s uniquely creative, and offers a solution that makes a real social impact.
Your projects don’t have to be big, flashy or complex. Something small, handmade, creative and fun is just as likely to win, so plug your imagination directly into the Arduino IDE, and casually blow our minds!
Stop back next week for more info on how to submit, and until then have a great weekend of Arduino building bliss.
Zach Frew’s Liquid Lite Brite creates low-res art out of liquid dye
Arduino Team — March 4th, 2021
As a child, chances are you came across a Lite-Brite at some point. The toy consisted of a light box with small plastic pegs that fit into a panel and lit up to form a picture. Drawing inspiration from that, mechatronics engineer Zach Frew thought “it would be cool to make a robot that consumes a digital image and outputs a watercolor painting.” What he came up with as a “first step along that path” is a homemade liquid handling workstation to dispense and mix a CMYK dye solution in a 384-well microplate “canvas.”
Liquid distribution is calculated with the help of a Python script that takes a 24×16 pixel image as input and assigns each pixel an RGB value. The “printing” is handled by the common RepRap configuration of an Arduino Mega and a RAMPS 1.4 shield, plus a PCA9685 expander chip. The X, Y, and Z axes move via stepper motors and rails, while color mixing is accomplished using five servo-actuated valves. A stepper-driven peristaltic pump is employed for liquid placement, producing low-resolution yet no less beautiful art.
Avoid eyestrain with the help of the Eyesight Guardian
Arduino Team — March 4th, 2021
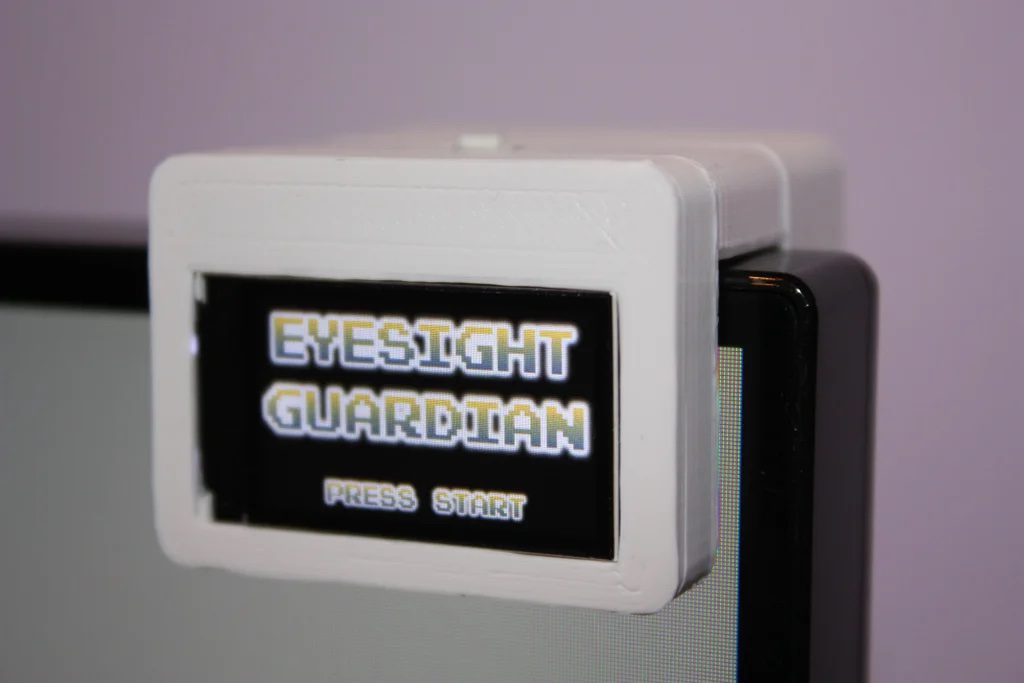
Many of us spend all day staring at a computer screen, entering data, watching YouTube, writing blog articles, or any number of other tasks. According to Daniel Hingston, computer-induced eye strain can be a real problem, and to combat this, you should follow the 20/20/20 rule. That is for ever 20 minutes of computer time, look away at a distance of 20 feet or more for 20 seconds.
To help remind him to do just that, Hingston invented the “Eyesight Guardian.” This little device sits on top of your computer like a webcam, and uses an Arduino board along with a small TFT display to command you to “Look away now!” every 20 minutes. The system is then restarted via the press of a button on top, again counting down the 20 minutes until it’s time for the next “eye break.”
The Arduino IDE is the well-known software we all use to program our boards. Its development started in 2005 based on the graphical interface of the Processing project and has never stopped since. During these years, countless hours of development by the Arduino team with the help of a vibrant community made the Arduino IDE the de facto standard for electronics prototyping. Thanks to an extensible framework based on modular board support packages, the IDE supports more than 1,000 official and non-official boards; it’s translated in 66 languages, mentioned by more than 3,000 books, and is still growing: during the last year, it was downloaded more than 39 millions of times. More than ever.
First off, a big thank you to the Arduino community that makes development possible with donations and — even more important — by buying original Arduino boards: we use your money to pay the developers that work daily on the Arduino open source software for the benefit of everyone. Keep supporting our work!
The path from a simple IDE to an advanced IDE
While the Arduino IDE provides a simple and clear interface that is ideal for the novice users, the more advanced users often report that the editing capabilities are a bit limited compared to modern editors. This includes features like code indentation, block folding, auto-closing brackets, regular expression search and replace, comment toggling. In addition to this, many users have been asking for live debugging, i.e. the ability to run code on an attached board and stop it at a given line to check the contents of variables, memory and registers.
The IDE 1.x is developed in Java, and its monolithic codebase makes it difficult to implement such features. Java is also becoming an obsolete technology for desktop applications and is being phased out by newer operating systems and app stores, which forces us to spend time on working around compatibility issues.
In 2018 we started to refactor the toolchain by announcing a big game changer: arduino-cli, the Arduino command line tool written in Golang that exposes all the core functionalities of the IDE, providing advanced users with a flexible tool they can integrate into their professional IDE of choice. Since then, we maintain and improve arduino-cli on a daily basis (try it now if you haven’t!).
In 2019 we announced the alpha release of a new IDE built on top of arduino-cli and based on a modern software stack (Theia and Electron) under the code name of “Arduino Pro IDE” and we got a lot of positive feedback about it. 2020 has been a busy development year, and a dedicated team of developers has been working behind the scenes to bring the new IDE from a proof-of-concept to a fully functional tool.
The time has come: please welcome the Arduino IDE 2.0 (beta)
We’re pleased to announce that as of today the Arduino IDE 2.0 beta is available for download and its code repositories become open source. It carries a modern editor and provides a better overall user experience thanks to a responsive interface and faster compilation time. Don’t be afraid of trying it today: the upgrade will be frictionless as the interface will look very familiar. But let’s see some of the goodies you’ll find.
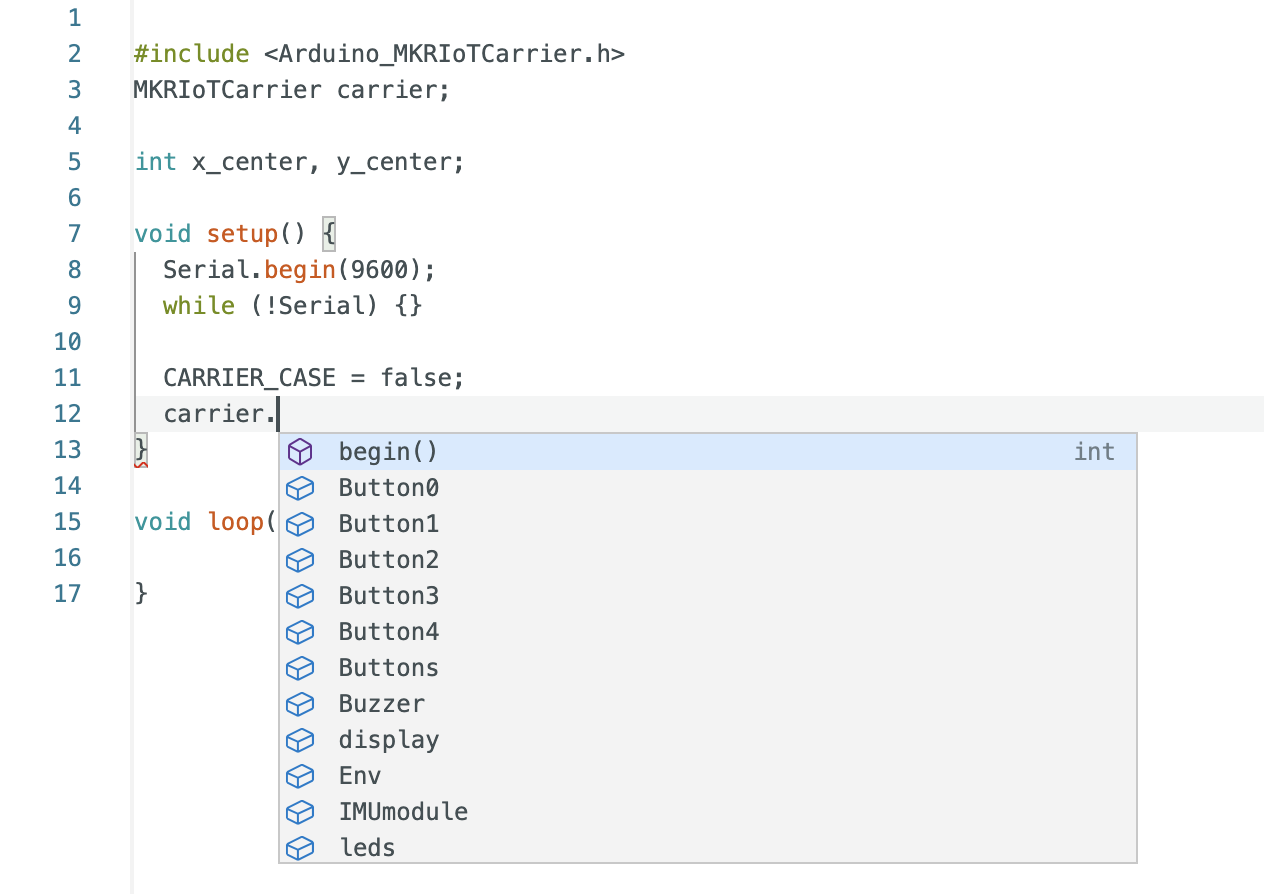
While typing, the editor suggests the autocompletion of variables and functions according to the libraries you included:
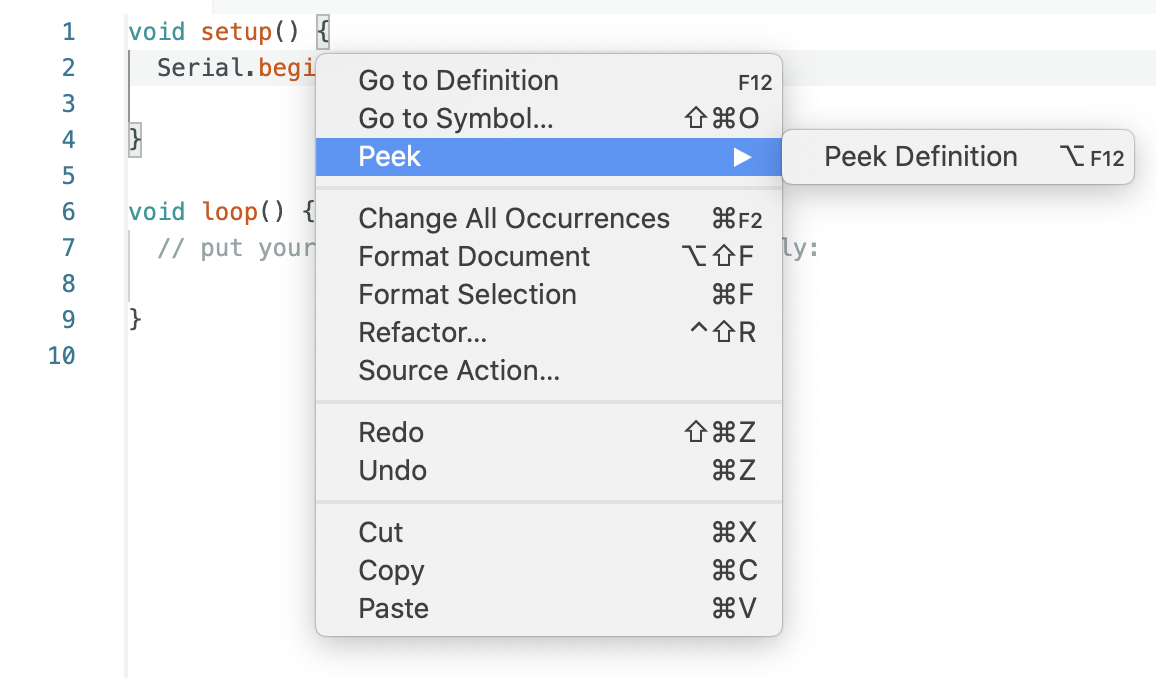
When right-clicking on a variable or a function, a contextual menu will provide navigation shortcuts to jump to the line (and file) where they are declared:
See this page to learn more about the new editing tools.
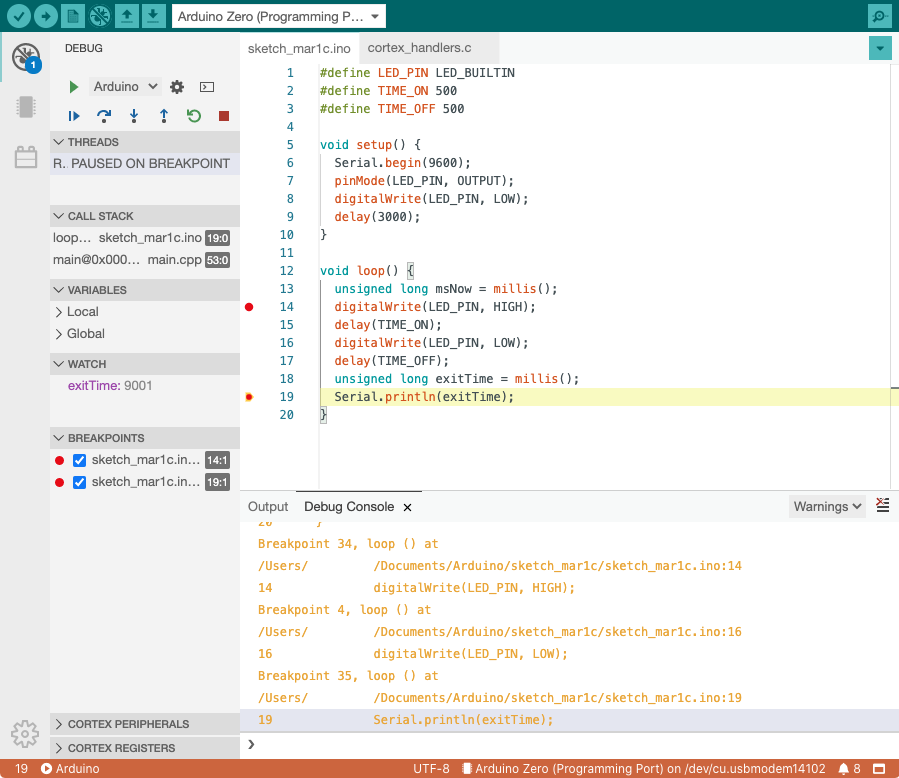
But there’s another big feature in the new IDE: a live debugger that allows you to run your code interactively on a board and inspect its execution without writing tens of “Serial.println()” statements. Just fire the debug panel, set breakpoints where you want to pause the execution and inspect the content of variables. Oh, you can even change the content of variables on the fly and resume execution!
As of today, the debugger supports all the Arduino boards based on the SAMD and Mbed platforms (MKR family, Nano 33 IoT, Nano 33 BLE, Portenta, Zero). Maintainers of Arduino cores for third-party boards can add support for debugging by adding the relevant configuration parameters; a technical guide for this is coming. You’ll need to connect a debugging probe such as the Segger J-link to the JTAG pins on the board and you’ll be ready to go.
The new IDE is based on the Eclipse Theia framework, which is an open source project based on the same architecture as VS Code (language server protocol, extensions, debugger). The front-end is written in TypeScript, while most of the backend is written in Golang.
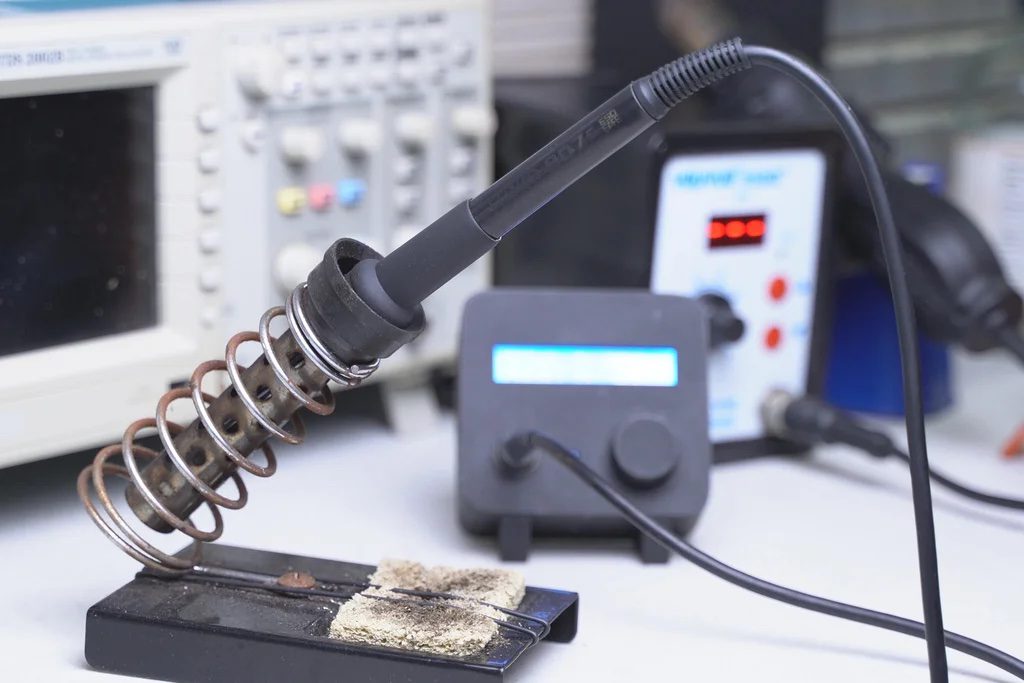
If you want to upgrade your soldering setup without spending a lot of money, then be sure to check out Angelo AKA TechBuilder’s DIY Hakko 907 station.
This low-cost device features an Arduino Nano to read the iron temperature via an LM358 op-amp, and regulates power to the handle and tip under PWM control using an IRFZ44N MOSFET. A potentiometer is implemented as a variable temperature knob, with the actual and preset temperature displayed on a 16×2 LCD screen, while an LED indicates whether the heating element is active.
Everything is encased in a nicely printed and painted enclosure, which forms a brilliant little station that one could be proud to use. Full build instructions can be found here, including the PCB, code, and print files.
Monitor your hoverboard’s power draw with this Arduino-based meter/logger
Arduino Team — February 27th, 2021
If you look at your car’s dashboard, there’s a good chance you’ll find an efficiency rating for how you’re driving. However, what if you instead ride a hoverboard? This functionality is certainly not stock equipment, yet Niklas Roy wanted to understand the power consumption of his transporter during different riding situations. For that reason, he decided to develop a power monitor that not only graphs his stats when scooting around, but records the data for later viewing and analysis.
Roy’s handheld device is controlled by an Arduino Nano and utilizes a Hall effect ammeter for current sensing. The measurements are shown as numbers and as oscillograms on a 1.8” TFT screen, which can also be logged to the display’s built-in SD card. An RTC module provides timestamp information for these readings, which can be produced using Processing and overlaid on video.
Um dir ein optimales Erlebnis zu bieten, verwenden wir Technologien wie Cookies, um Geräteinformationen zu speichern und/oder darauf zuzugreifen. Wenn du diesen Technologien zustimmst, können wir Daten wie das Surfverhalten oder eindeutige IDs auf dieser Website verarbeiten. Wenn du deine Einwillligung nicht erteilst oder zurückziehst, können bestimmte Merkmale und Funktionen beeinträchtigt werden.
Funktional
Immer aktiv
Die technische Speicherung oder der Zugang ist unbedingt erforderlich für den rechtmäßigen Zweck, die Nutzung eines bestimmten Dienstes zu ermöglichen, der vom Teilnehmer oder Nutzer ausdrücklich gewünscht wird, oder für den alleinigen Zweck, die Übertragung einer Nachricht über ein elektronisches Kommunikationsnetz durchzuführen.
Vorlieben
Die technische Speicherung oder der Zugriff ist für den rechtmäßigen Zweck der Speicherung von Präferenzen erforderlich, die nicht vom Abonnenten oder Benutzer angefordert wurden.
Statistiken
Die technische Speicherung oder der Zugriff, der ausschließlich zu statistischen Zwecken erfolgt.Die technische Speicherung oder der Zugriff, der ausschließlich zu anonymen statistischen Zwecken verwendet wird. Ohne eine Vorladung, die freiwillige Zustimmung deines Internetdienstanbieters oder zusätzliche Aufzeichnungen von Dritten können die zu diesem Zweck gespeicherten oder abgerufenen Informationen allein in der Regel nicht dazu verwendet werden, dich zu identifizieren.
Marketing
Die technische Speicherung oder der Zugriff ist erforderlich, um Nutzerprofile zu erstellen, um Werbung zu versenden oder um den Nutzer auf einer Website oder über mehrere Websites hinweg zu ähnlichen Marketingzwecken zu verfolgen.