Our recently launched “Arduino Project of the Month” initiative adds a pinch of competition to our community’s passion for sharing. Out of the dozens of new entries added in February, we are now happy to announce our first top three selections, highlighting interesting projects for everyone to learn, test, and improve upon!
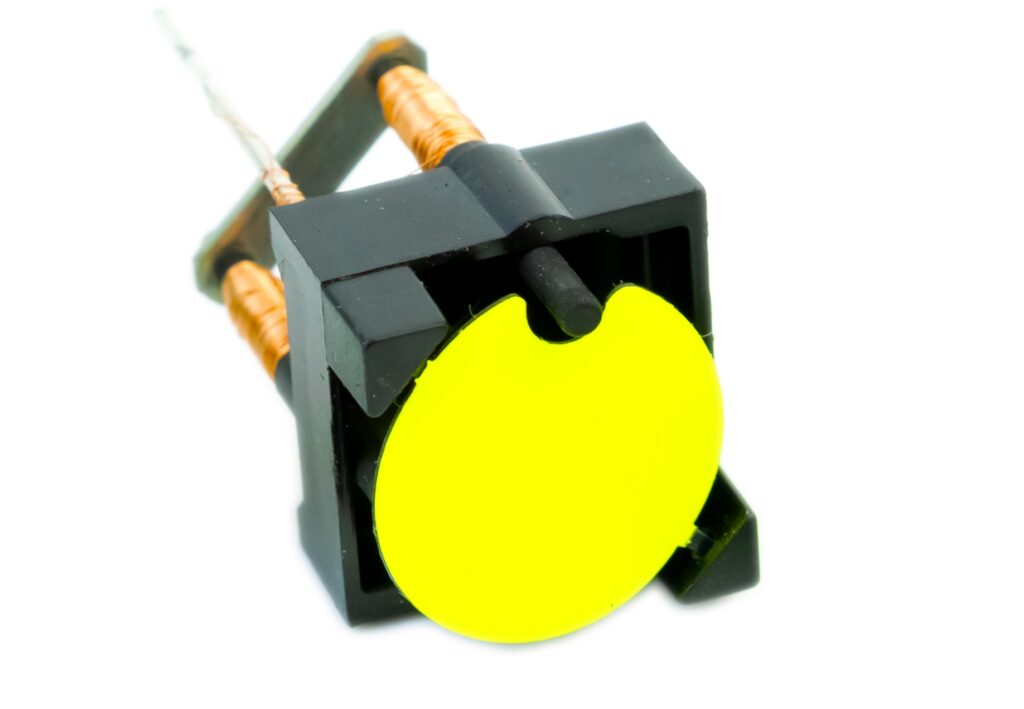
Flip-disc (or flip-dot) displays leverage electromagnetism to set the position of thousands of discs in seconds, showing dynamic text and minimalist graphics with great flexibility and a wonderful retro vibe. For this project, all you need are an Arduino Uno, the Arduino IDE 2.0, and some soldering skills to get your own flip-disc sign up and running.
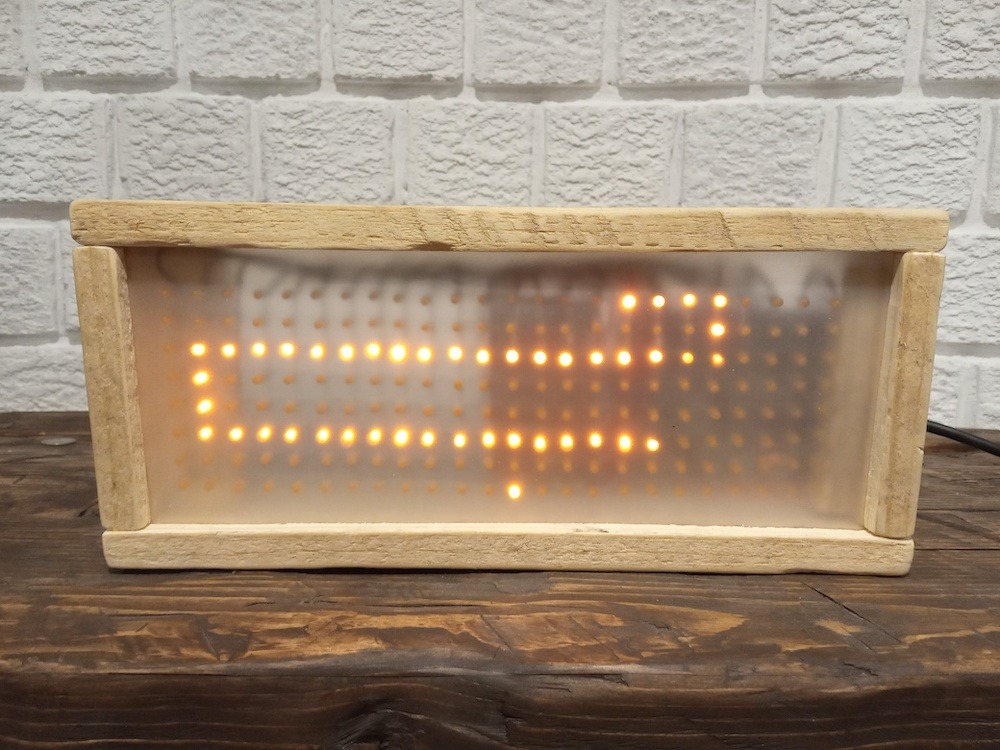
Originating in 1976, Snake is almost 50 years old but is still a lot of fun! This build brings the game back in a shiny and bright version, based on a 192-LED matrix combined with a library to control it.
Following the instructions is a great way to learn about multiplexing, shift registers, and of course, electric circuits. Not to mention, the same project can be adapted to display stationary or scrolling text: have your name in lights, thanks to Arduino Nano and the Arduino IDE.
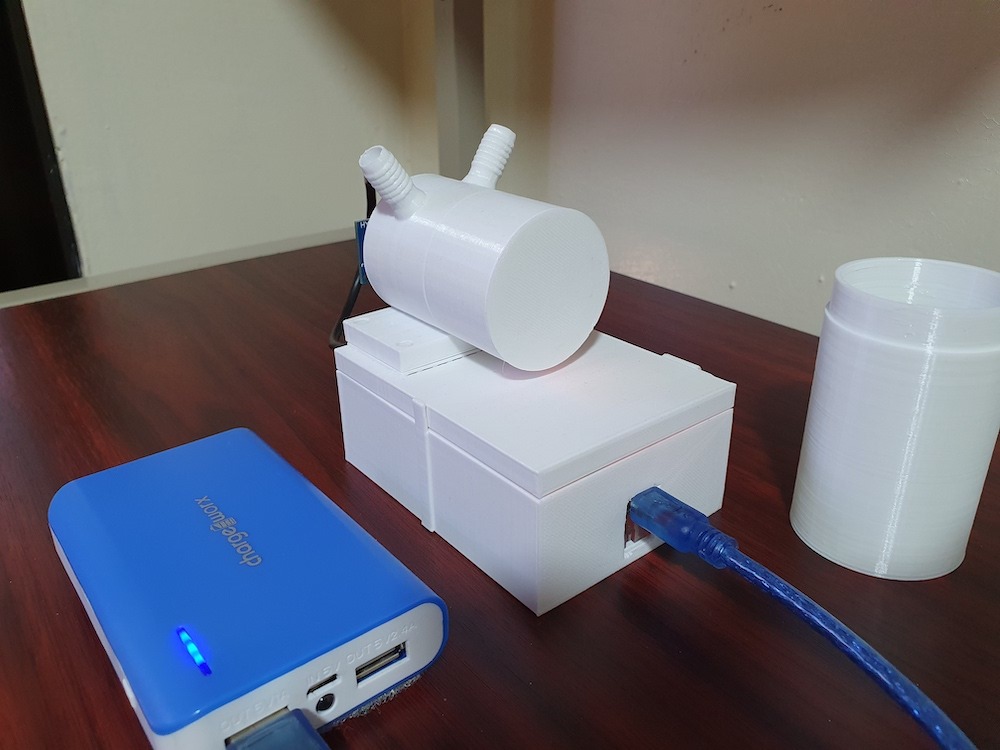
How many times have you just needed to know what gas is in the air? Okay, it may not be an everyday situation for most of us, but we thought this project really deserved gold for our February selection.
It starts like a beautiful physics lesson on sound speed in gasses, and ends with a solution that’s portable, 3D-printed, and connected to your smartphone. Upload the code to an Arduino Nano, powered by battery charger, and test it out yourself.
For your chance to be selected for a $100, $300 or even $500 gift card to spend on the Arduino Store, submit your best project on Project Hub! We will be awarding three new entries every month, as detailed in the complete terms and conditions. Good luck!
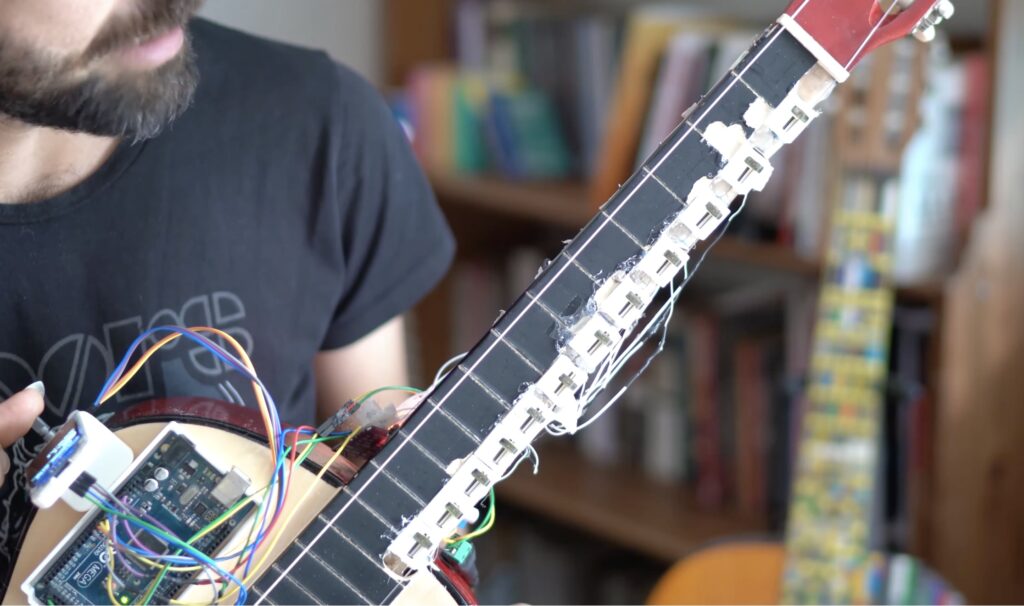
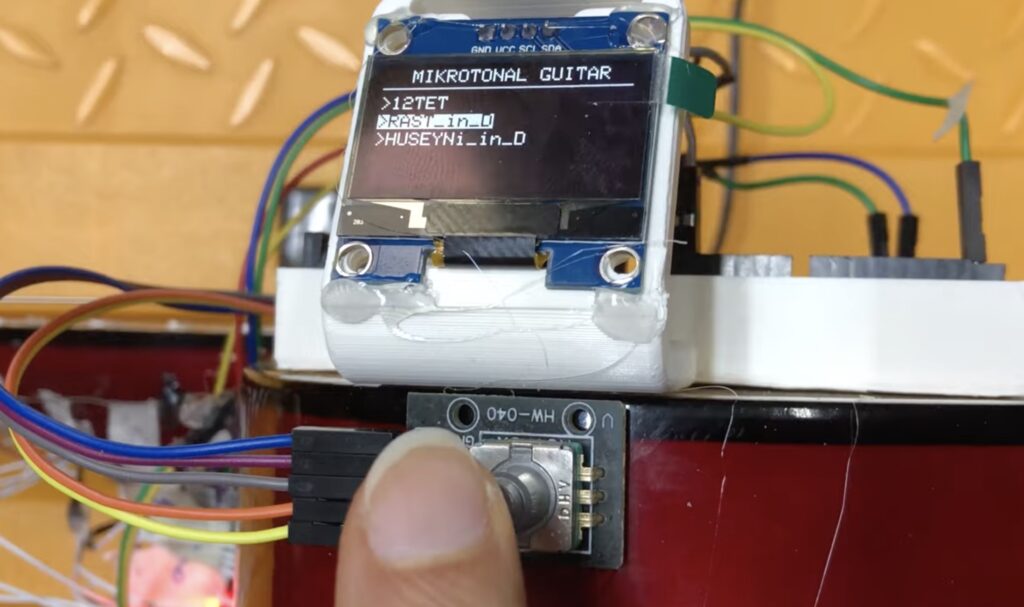
Playing the guitar is a great way to impress people at beach parties, but learning to play the guitar isn’t easy. Even grasping the basic theory is a big task and that’s before you even start to practice finger positioning and movement. That’s why Tolgahan Çogulu and Selçuk Keser built this Automatic Microtonal Guitar to make things a little easier.
This guitar isn’t fully automatic in the way the same way as a player piano. At this time, the prototype only has a single automatic string (the high E) and so it is very limited in range. And the guitarist still has to do a lot of the work. They have to pluck the string and push buttons in the correct sequence as they do. But the guitar is able to adjust the exact point that those buttons push the string down onto the fret board. Because that point alters the length of the string, the guitar can alter the note for each button the guitarist presses as they play.
The prototype works by using an Arduino Mega 2560 board to control a series of tiny servo motors attached to the guitar’s fret board with 3D-printed mounts. The servos move small sliders back and forth along the string to change the pitch. The guitarist pushes down on the sliders like buttons, forcing them to push the string against the fret board at the set point. It is useful mostly for adjusting the tuning prior to the start of a song, but future iterations may be able to alter the tuning during a song.
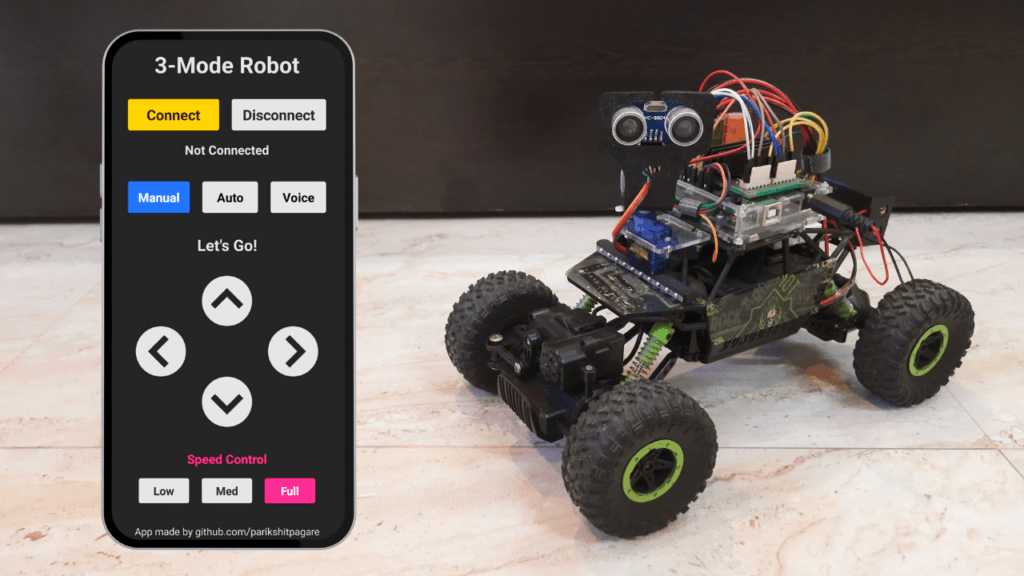
The fantastic thing about Arduino boards and maker hardware as a whole is that they make creativity accessible. Just a few decades ago, it would take serious expertise and a generous budget to build even a simple robot. But with the technology available today, Parikshit Pagare was able to create this robot car that can be controlled manually, by voice, or operate autonomously.
Pagare started with the kind of RC car that you can find at any toy store or online retailer. That provided a platform to build upon, with a frame, wheels, and motors. But the original RC control was very rudimentary, which is why he replaced all of the electronics. The upgraded vehicle has an Arduino Uno that controls the two DC motors through L298N motor drivers. An HC-05 modules allows for Bluetooth® communication with a smartphone and an ultrasonic sensor mounted on a servo arm provides some feedback.
A custom app, developed with the MIT App Inventor platform, enables the different control modes. The manual mode lets the user operate the vehicle directly, just like the original RC control. The voice mode lets the user speak commands like “move forward.” Before following such commands, the robot checks the ultrasonic sensor to ensure that there isn’t an obstacle in the way. In autonomous mode, the robot will perform its own pathfinding with the help of the ultrasonic sensor, similar to a Roomba.
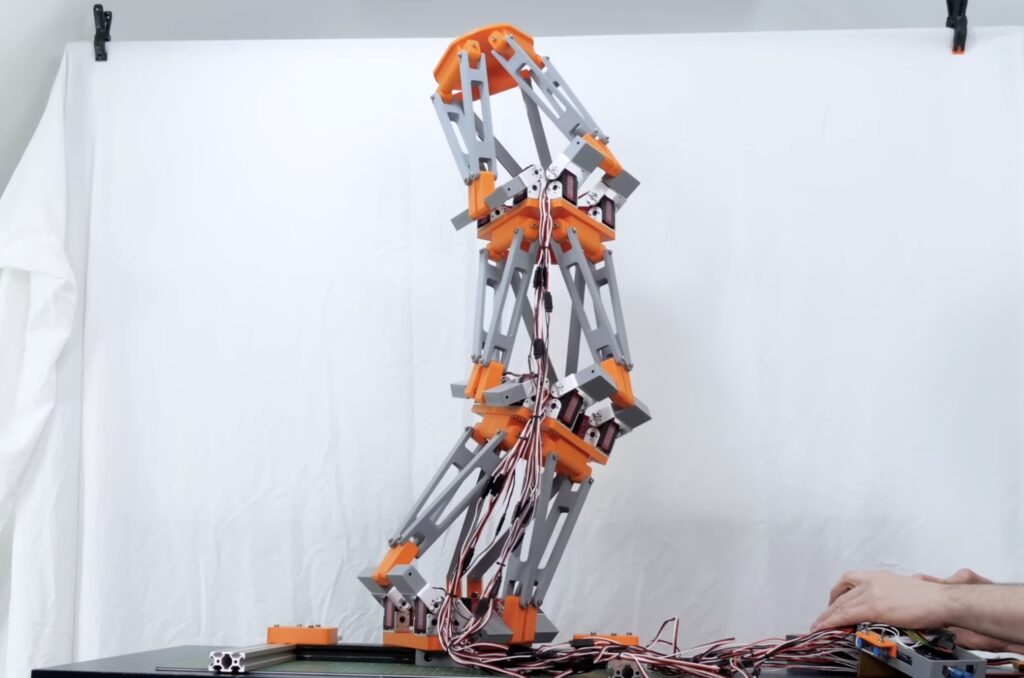
Octopus tentacles are, essentially, long continuous muscles — a bit like your tongue. That anatomy gives octopuses incredible dexterity, but it is very difficult to replicate in robots. Artificial “muscle” fiber isn’t very practical yet, which is why roboticists turn to more conventional means of actuation. Cable-driven tentacles are popular, but they require many powerful cable motors. For his newest project, James Bruton took a different approach and utilized Stewart platforms.
Stewart platforms are somewhat common in industrial settings, because they can work with hydraulic pistons that handle a lot of weight. Six linear actuators arranged between two plates let the second plate move at any angle relative to the first plate, with the exact angle depending on the current lengths of the actuators. By chaining together several Stewart platforms, Bruton created a tentacle-like structure with complete freedom in every joint.
The current prototype only has three Stewart platforms, but those are enough to demonstrate the concept. Bruton used servos instead of linear actuators to keep the costs down. An Arduino Mega 2560 board controls those: a total of 18 servo motors. The entire structure is made up of 3D-printed parts.
But expanding this design into a full Doc Ock tentacle (much less four of them) would come with challenges. As with any robot arm, the motors closer to the base experience more load as the weight and the length of the arm increase. Those would probably need to be replaced with beefier models. And with six servos for every joint, even an Arduino Mega 2560 would quickly run out of pins. That could, however, be solved by using multiple Arduino boards or an IO expander.
“May the Fourth be with you” is one of those sayings that has been ingrained into our culture thanks to the popularity of Star Wars, and few things represent its impact more than the custom props, costumes, and projects that fans from around the world have constructed. To celebrate this year’s “holiday,” here is a list of Arduino-powered builds from a makerspace in a galaxy far, far away that’ll awaken the DIY force in you!
A Virtual Platform for Blaster Props
The plasma/laser blaster is an iconic weapon in the Stars Wars universe, with nearly every character having used one at some point. To make the creation of blaster props easier, YouTuber CCHobbyFun came up with a system based on the Arduino Nano Every which allows for an ammo counter, animated scope display, and LEDs to be connected. In addition to these features, it also supports sound effects via an MP3 player and speaker combination.
Ever wanted to listen in on conversations by enemy storm troopers and battle droids? This device by The Last Outpost Workshop on YouTube now lets you by presenting users with a switch to go between storm trooper or droid mode. After making a selection, various conversations are played in a loop using an Arduino Nano and MP3 player and audio levels are displayed via an LED matrix at the top.
Apart from R2-D2 and C-3PO, no other droid is quite as recognizable as BB-8 from the sequels. However, rather than just building another BB-8 clone, Eric Ameres blended the droid with the shape of DO to create a self-balancing platform. He incorporated an Arduino Uno, a gyroscope, and some motors to drive the two hemispheres and tilt/rotate the head on top.
Two years ago, maker Manguel Ahumada set about devising a fully autonomous Baby Yoda robot inspired by the Mandalorian TV series that uses AI to follow him around. Beyond processing image data and sending commands to the motors via a Raspberry Pi, the robot also employs an Arduino Pro Micro to read incoming sensor data.
Wanting to combine all of the most notable imagery of the Star Wars universe into a single project, Kutluhan Aktar developed his own smart lamp with a twist. Each component, including the Arduino Nano 33 BLE Sense, fans, and more, were soldered to the amazingly-designed Millenium Falcon PCB and then attached to the 3D-printed base. With this, he could view environmental data in real-time thanks to a mobile app and turn the lights on or off.
One of the reasons why assembling working models of BB-8 is so difficult is due to how the droid is able to roll in any direction while still keeping its head upright. Ilge Ipek’s innovative design moves his custom Arduino Nano board and two motors inside of the main ball while using magnets at the top to maintain the head’s position in addition to providing fully wireless control over Bluetooth.
YouTuber James Bruton is famous for his robot-building abilities, and his B2EMO chassis from the Andor series takes this to the next level. Based on the Arduino Mega 2560 and an nRF24L01 radio transceiver module, his robot can drive in any direction thanks to its omnidirectional wheels while also being able to stretch and tilt in a lifelike manner.
Widely regarded as one of the most “out-there” making YouTube channels, the Hacksmith specializes in building the impossible, and their Mandalorian-themed jetpack is no exception. It was constructed from a pair of nozzles which are actuated by a solenoid valve and a gimbal mechanism- all controlled via an Arduino Mega 2560.
Everybody loves a cute companion robot that can accompany you anywhere, so better to combine that idea with than the BD-1 droid from the Star Wars: The Fallen Order video game. The robot is primarily built using a Raspberry Pi 4, although an Arduino Leonardo and a Nano Every also make appearances to do everything from speaking to moving its arms and even project images onto a wall.
We’re excited to announce the release of two new widgets to the Arduino IoT Cloud: the Value Selector and Value Dropdown Widgets.
In this blog post, we’ll be exploring the benefits of the new widgets, how to use them, and how you can take advantage of this latest feature.
The Arduino IoT Cloud dashboards
The Arduino Cloud is an all-in-one platform that streamlines the development, deployment, and management of IoT devices. The platform supports various hardware, such as Arduino boards, ESP32, and ESP8266-based boards, which makes it easy for makers, IoT enthusiasts, and professionals to build connected projects without much hassle.
What makes Arduino Cloud stand out is its user-friendly and intuitive interface. This simplifies complex tasks and ensures that even those with little coding experience can use the platform. Moreover, the platform offers a low-code approach and a comprehensive catalogue of templates and examples that enable users to get started quickly.
The IoT Cloud application of the Arduino Cloud platform allows easy management and monitoring of connected devices via customizable dashboards. This feature provides real-time data visualizations of the device’s data, making it easy for users to monitor and keep track of their devices. Plus, with the mobile app Arduino IoT Cloud Remote — available for Android and iOS — users can manage their devices remotely from anywhere.
The Arduino Cloud platform also offers a range of widgets, including switches, buttons, color selectors, status, gauges, maps, and a chart widget that allows users to plot the temporal evolution of one variable of one device. This rich palette of widgets makes it easy for users to build dashboards that suit their needs.
The new widgets
The new Value Selector and Value Dropdown Widgets simplify the task of creating a map between variable values and their real-world representations, providing users with greater flexibility and ease of use. With them, you can decouple the internal values of the variables in the sketch from the representation on the dashboard. This simplifies the code and prevents developers from updating the code if a change on the visible value is needed.
The Value Selector Widget offers a more visual way of representing values and choices, making it easier for users to understand and work with their data. This feature simplifies the code and allows for greater flexibility in representing data.
The Value Dropdown Widget is a compact and organized way of presenting a list of options to users. This feature is particularly useful when designing for smaller screens or when there are many options to choose from. Dropdown menus allow for clear categorization and organization of options, making it easier for users to find what they are looking for.
Both of these new features are incredibly convenient for predefining a list of values that the user can choose from. The meaningful names and values assigned to each option simplify the process of selecting data, making it more intuitive and accessible to users.
In summary, the Value Selector and Dropdown Widgets are powerful new features that provide users with greater flexibility, ease of use, and clarity when working with their data. We are excited to see how these new tools will enhance the user experience and improve the way users work with their data. These new widgets add up to the recently announced improvement of the percentage widget and the new advance chart widget. You can read the full story in the blog post.
Try the now widgets today
Ready to take your IoT projects to the next level? Check out the official Arduino Cloud website for more information on the Arduino IoT Cloud and all the resources available to you. You can also explore the documentation to learn more about the exciting new widgets that are available.Dive in and try out the new Arduino IoT Cloud widgets for yourself! We’d love to hear your feedback, so don’t forget to share your thoughts and experiences with us on the forum.
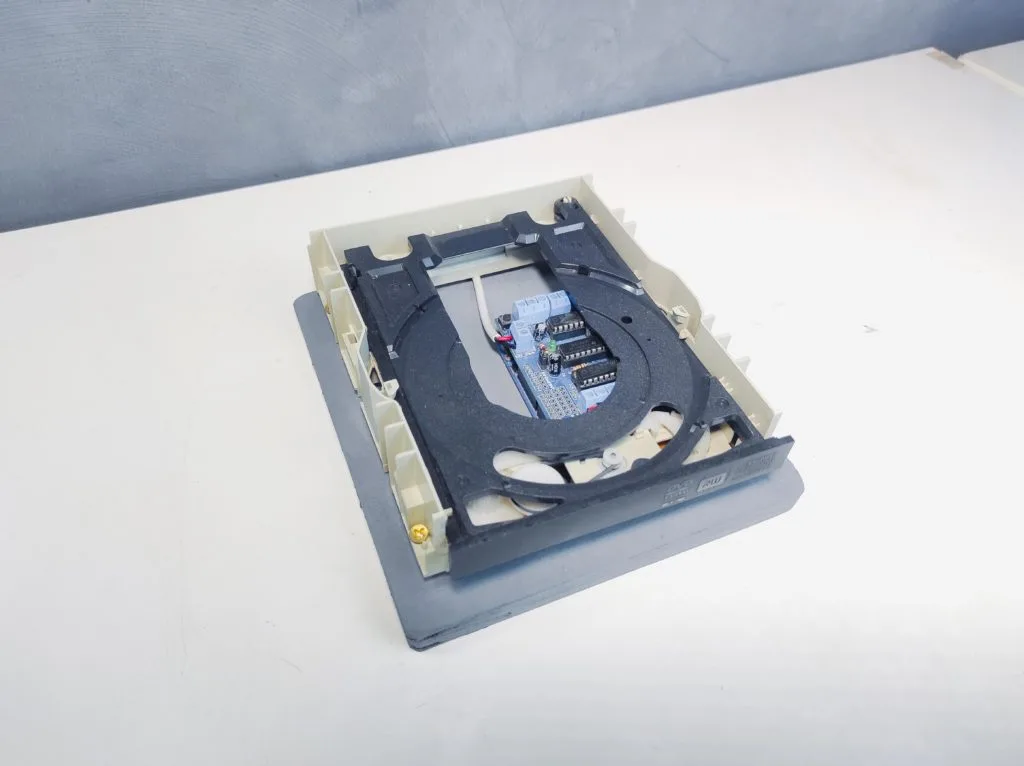
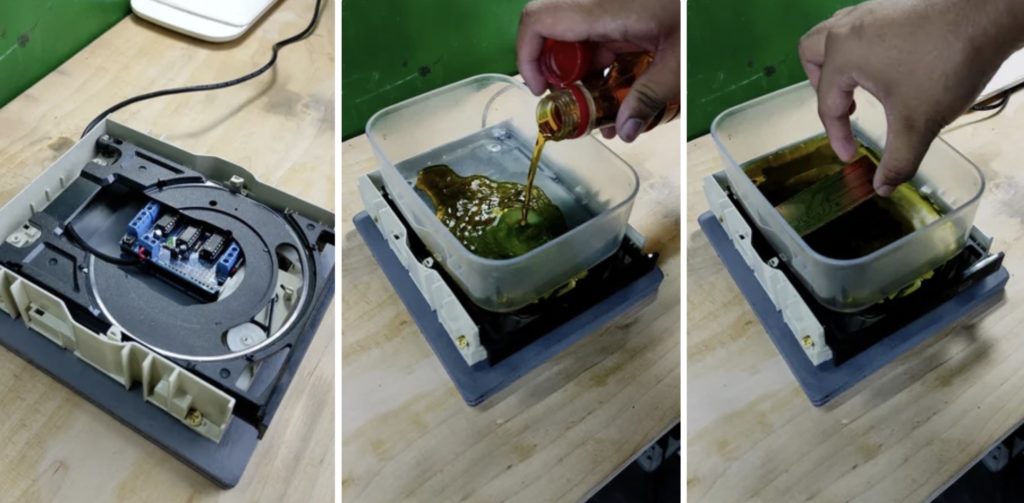
There are a few approaches to making your own PCBs at home, and perhaps one of the most interesting yet potentially tedious methods involves making a UV-resistant mask and then etching away the non-copper areas with an acid bath. This etching step requires constantly moving the acid across the board’s surfaces for up to 30 minutes at a time, which is why Earl Daniel Villanueva made a small machine to handle this automatically.
Villanueva began by gathering together an old CD-ROM drive, an Arduino Uno, an Adafruit Motor Shield, and a 5V power supply. The disc drive was chosen because it not only had an easily accessible DC motor, but also due to the disc ejection assembly being able to rapidly move in or out. After desoldering the motor from the drive’s mainboard and connecting it to the motor shield, he wrote a simple sketch for the Arduino that caused the motor to quickly oscillate between directions, thus creating the desired shaking motion.
Satisfied with the electronics, he then moved onto building a base plate from scrap wood and mounted the drive on top. Lastly, he attached a plastic container full of acid to the drive tray and watched as it continually swirled the solution across the PCB, resulting in a clean finished product.
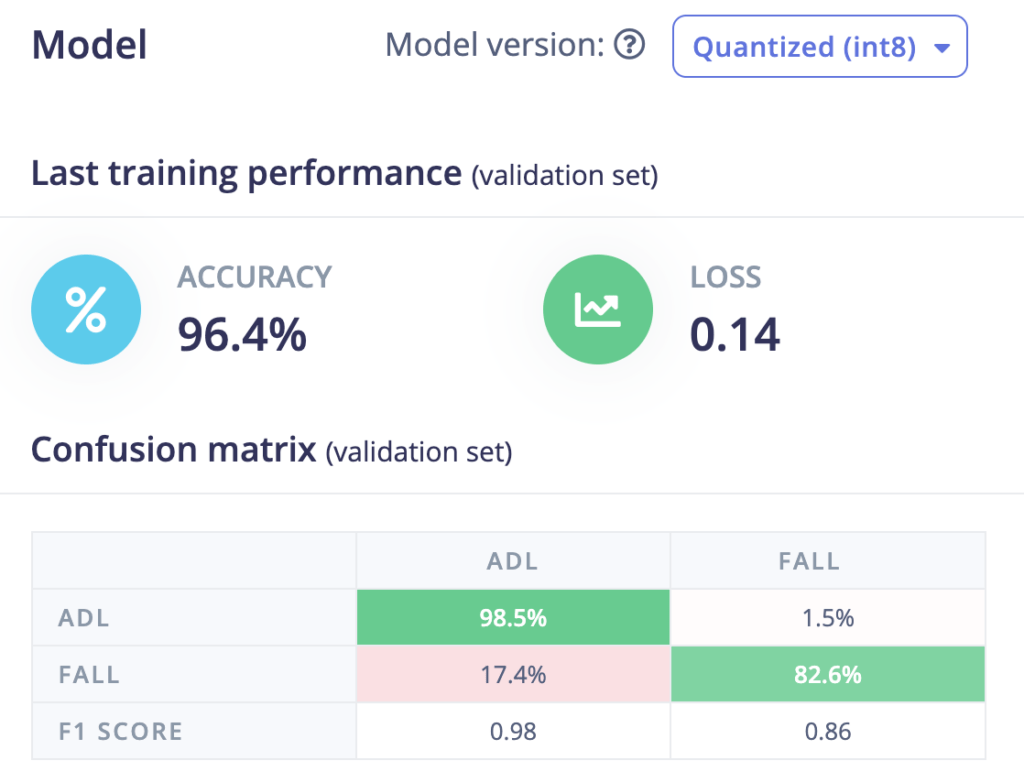
For those aged 65 and over, falls can be one of the most serious health concerns they face either due to lower mobility or decreasing overall coordination. Recognizing this issue, Naveen Kumar set out to produce a wearable fall-detecting device that aims to increase the speed at which this occurs by utilizing a Transformer-based model rather than a more traditional recurrent neural network (RNN) model.
Because this project needed to be both fast and consume only small amounts of current, Kumar went with the new Arduino GIGA R1 WiFi due to its STM32H74XI dual-core Arm CPU, onboard WiFi/Bluetooth®, and ability to interface with a wide variety of sensors. After connecting an ADXL345 three-axis accelerometer, he realized that collecting many hours of samples by hand would be far too time consuming, so instead, he downloaded the SisFall dataset, ran a Python script to parse the sample data into an Edge Impulse-compatible format, and then uploaded the resulting JSON files into a new project. Once completed, he used the API to split each sample into four-second segments and then used the Keras block edit feature to build a reduced-sized Transformer model.
The result after training was a 202KB large model that could accurately determine if a fall occurred 96% of the time. Deployment was then as simple as using the Arduino library feature within a sketch to run an inference and display the result via an LED, though future iterations could leverage the GIGA R1 WiFi’s connectivity to send out alert notifications if an accident is detected. More information can be found here in Kumar’s write-up.
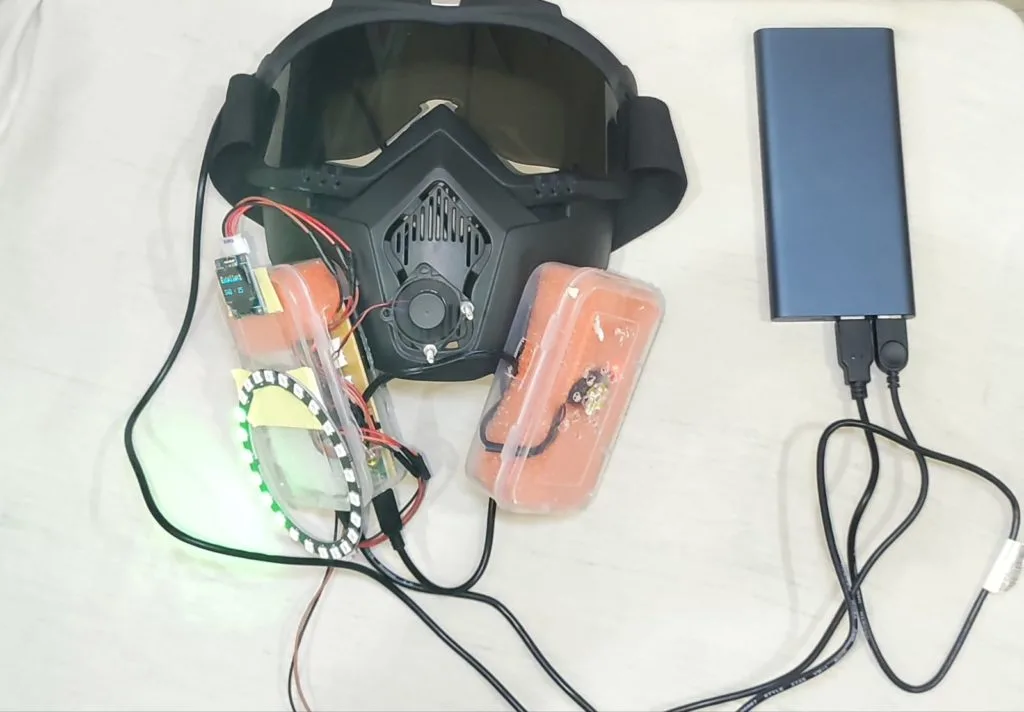
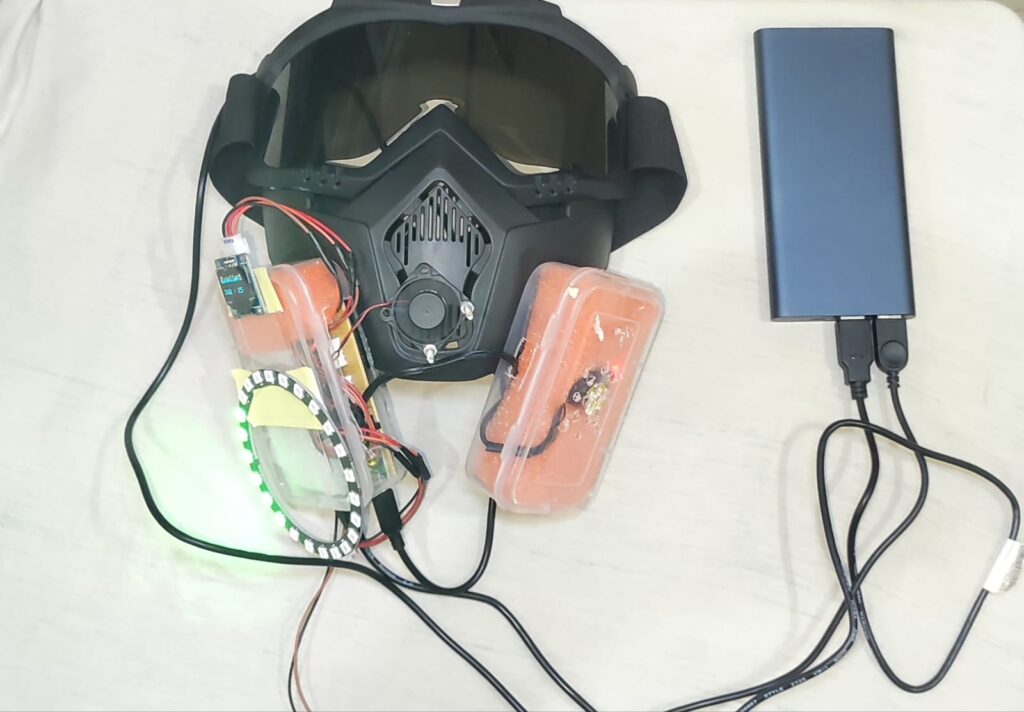
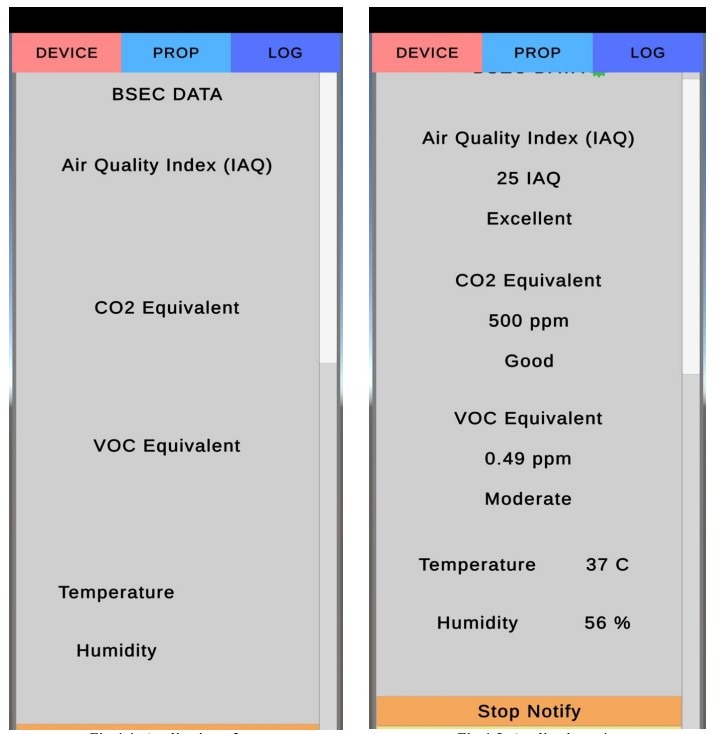
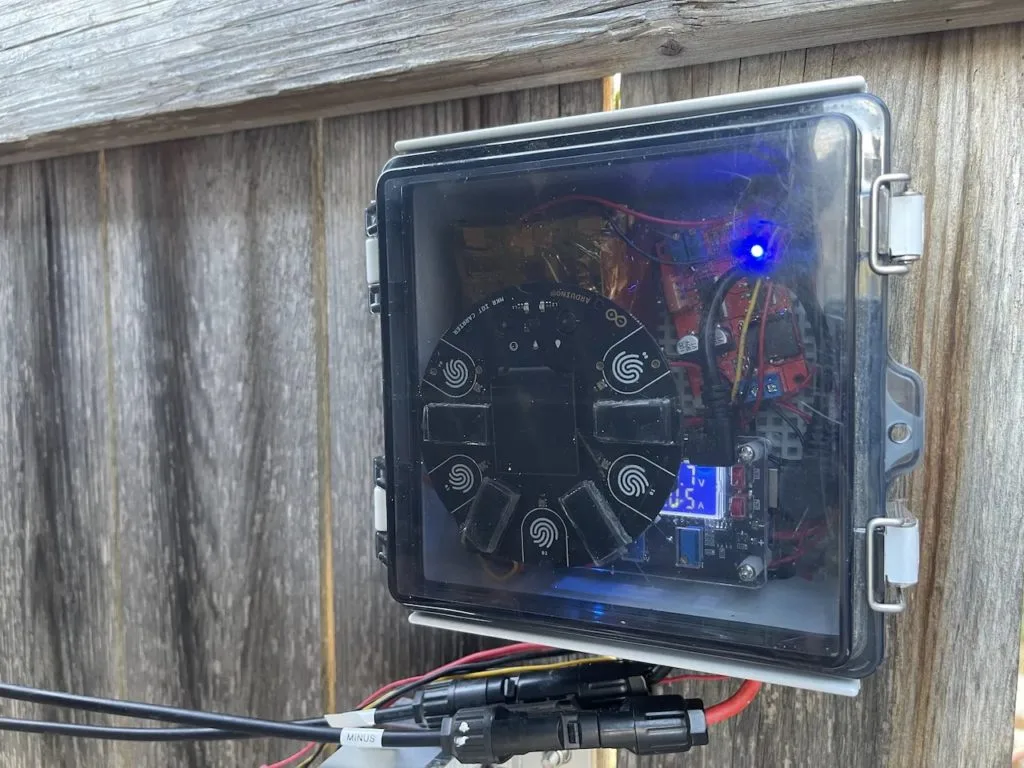
Hazardous pollution in the form of excess CO2, nitrogen dioxide, microscopic particulates, and volatile organic compounds has become a growing concern, especially in developing countries where access to cleaner technologies might not be available or widely adopted. Krazye Karthik’s Environmental Sense Mask (ES-Mask) focuses on bringing attention to these harmful compounds by displaying ambient air quality measurements in real-time.
In order to get values for the air quality index (AQI), CO2, volatile organic compounds (VOCs), and temperature/humidity, Karthik selected the Nicla Sense ME due to its onboard Bosch BME688 sensor module. In addition to providing this data over Bluetooth® Low Energy, the Nicla Sense ME also sends it over I2C to a MKR WiFi 1010 which is responsible for parsing the data. Once done, a comment is generated for the current AQI ranging from “excellent” to “hazardous.” This reading is displayed on an attached OLED screen and a ring of 24 NeoPixel LEDs are illuminated according to the level of dangerous pollutants.
Beyond the microcontroller and sensor components, Karthik added a 5V fan to a mask along with a few air filters to help increase the cleanliness of the air he was breathing. Last of all, he built a mobile app that grabs the data via BLE and shows it in an organized format.
Energy crises are nothing new, but they’re always painful. Right now, the world is dealing with a serious energy crisis that has led to skyrocketing utility bills, economic uncertainty, and widespread questions about how we supply our homes with power.
One of the biggest questions being asked right now is, “how do we avoid this kind of energy crisis in the future?” What steps can we take — as individuals and societies — to mitigate energy crises and deal with them more effectively when they do come around?
Automation is one powerful tool at our disposal here. It can be used not just by governments and energy companies, but also by individual households. The good news is that tools like Arduino and the Arduino Cloud can help you build automated devices to better manage your energy usage and save money in times of crisis.
In this article, we’ll take a look at how automation can help us use our energy more efficiently, avoid major crises, and pave the way to a more sustainable and reliable energy future.
What’s going on with the current energy crisis?
The energy crisis of 2022 is the culmination of several unfortunate recent trends. As demand for energy bounced back hard after the pandemic, the world simultaneously saw a reduction in natural gas supply — largely related to the Russia-Ukraine conflict and associated disruptions. As a result, gas prices have increased significantly, and the prices of other fossil fuels like coal and oil have followed suit. This has left millions of families around the globe facing an uncertain winter and some pretty tough financial conditions.
How automation can help with an energy crisis
Smart grids
Energy grids are the source of power for most of our homes. When you switch on the lights, turn on the heat, and take a hot shower — the energy for all these tasks is drawn from the grid of power that services your region.
If we can find ways to run energy grids more efficiently and reliably, we can do more with less energy, leading to lower costs and minimal disruption even during periods of energy uncertainty.
One way to do this is through smart grids. This is when ordinary energy grids are enhanced with technology like sensors that continuously monitor performance, collecting huge amounts of data on things like energy usage and wastage while predicting issues before they even arise.
By feeding this data back to control centers, smart grids allow energy providers to run their grids much more effectively. They can anticipate and fix issues before they become serious problems, identify areas where energy is being wasted, and make plans based on concrete data.
Digitize the oil and gas industry
The oil and gas industry is enormous and like most large, established industries it can be slow to adapt and modernize in many ways.
While more agile companies have been quick to embrace digital transformation and all the advantages it brings, giant energy companies are much more slow-moving and rely on often outdated processes and technology. This results in inefficiencies, higher costs, and increased environmental damage.
But what if the oil and gas sector can harness digital tools to run more effectively? A more well-oiled fossil fuel industry could be a major factor in mitigating energy crises and moving towards a cleaner and more sustainable energy future. Here are some ways digital transformation could benefit oil and gas:
Maintain equipment and monitor conditions. With technologies like the Internet of Things, it’s possible for oil and gas companies to monitor their processes more closely in real-time. This enables them to predict issues and make repairs before any problems arise, tweak processes to optimize performance, avoid downtime and delays, and save money.
Be more sustainable and environmentally conscious. Technology can help oil and gas companies become more sustainable in many ways — from tracking waste and monitoring energy use to removing harmful compounds from their processes and even combining fossil fuels with cleaner energy sources.
Improve access to energy reserves. Digital transformation gives energy companies the tools to tap into more energy reserves than before, helping tackle shortages and supply issues around the world.
Artificial intelligence
AI has the potential to improve our lives and societies in all kinds of ways, and the way we use energy and avert future crises is just one example.
Here are just a few of the ways AI can be used to mitigate, manage, and even avert energy crises:
By monitoring energy usage, AI tools can radically reduce energy wastage. For example, by automatically reducing energy usage during non-peak hours, we can save a great deal of energy — a valuable ability when supply is tight.
Make renewable energy sources like wind power more reliable and productive by predicting failures and making data-based decisions via AI models. This will allow us to pivot away from fossil fuels and the energy crises that stem from our overreliance on this type of power.
Optimize energy usage in data centers — something which accounts for around 1% of electricity demand worldwide — enabling us to save significant amounts of power during times of crisis.
It’s not all about energy. Water supply is also a major challenge in many parts of the world, and in the future, we’re likely to face many more water crises.
AI can help here, too. Water wastage is an enormous issue around the world, especially in regions where access to clean water is already limited. AI can help tackle this by closely monitoring and analyzing water supplies and systems, quickly identifying things like leaks, blockages, and other problems that can interrupt supply and lead to wasted water.
By managing water supplies in as effective and data-driven a way as possible, and taking appropriate action in real-time to deal with issues, AI systems can preserve much more water than we currently do, helping every liter stretch further. This can help reduce the risk and severity of water crises and also help us mitigate them when they do inevitably occur.
Take control of your energy
There are many tools available to us when it comes to dealing with energy crises, and they’re not confined to governments and corporations. There’s a lot you can do with automation and technology to manage your own energy usage better — from sensors that track consumption and adjust energy expenditure in your home to more efficient appliances.
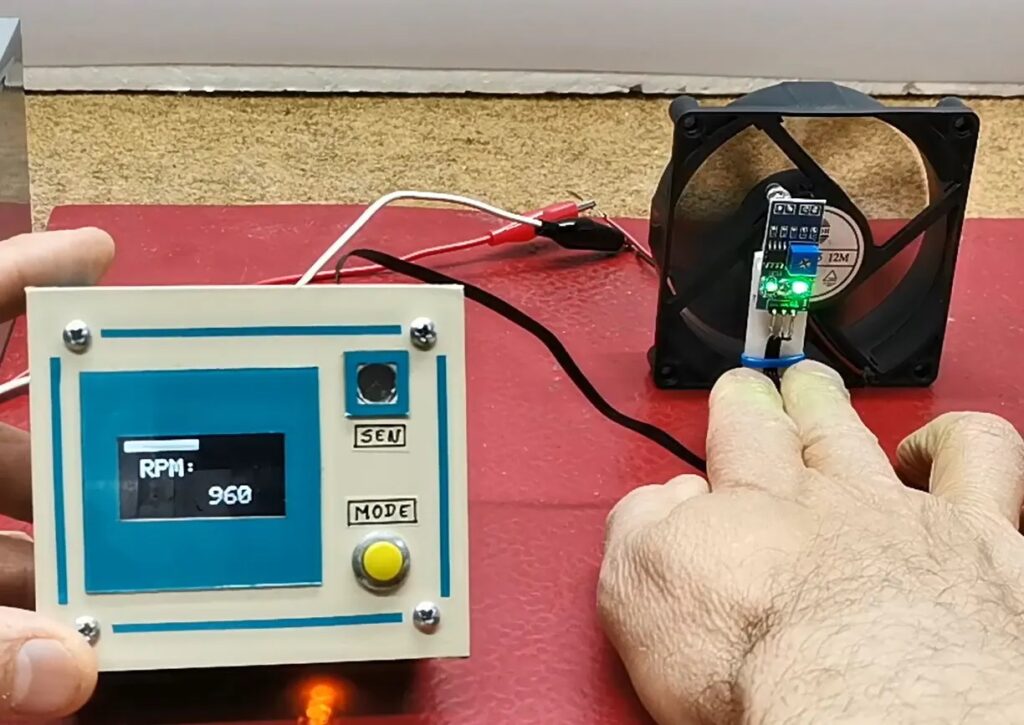
A tachometer is a device that display the speed of a rotating object. The most well-known example is the automotive tachometer, which shows a driver the RPM of the engine — information that is particularly useful when the car has a manual transmission. But there are many other uses for tachometers and this tutorial from Mirko Pavleski explains how to build a tachometer with an infrared sensor.
To calculate the rotational speed of something like a wheel, you need to monitor at least one point on that wheel and time the interval between passes by a static reference point. A common way to achieve that is with a Hall effect sensor that detects the magnetic field from a permanent magnet attached to the wheel’s rim. But Hall effect sensors are unsuitable for some applications, such as when there are strong magnetic fields nearby. Pavleski’s write-up demonstrates how to instead use an infrared sensor to detect the passing of the wheel’s spokes.
This infrared sensor module works by emitting infrared light from an LED and monitoring the reflection. When one of the wheel’s spokes passes in front of the sensor, the reflection becomes strong and easy to detect. An Arduino Nano board measures the time between those events and multiplies the result by the number of spokes to determine the total time for a complete revolution. Divide 60 by that number and you get the RPM. The Arduino continuously calculates that value and displays the number on a small OLED screen. Power comes from a 9V battery.
One of the great things about this design is that it doesn’t require contact with the measured object and since it is portable, so one can measure the RPM of anything spinning that has spokes.
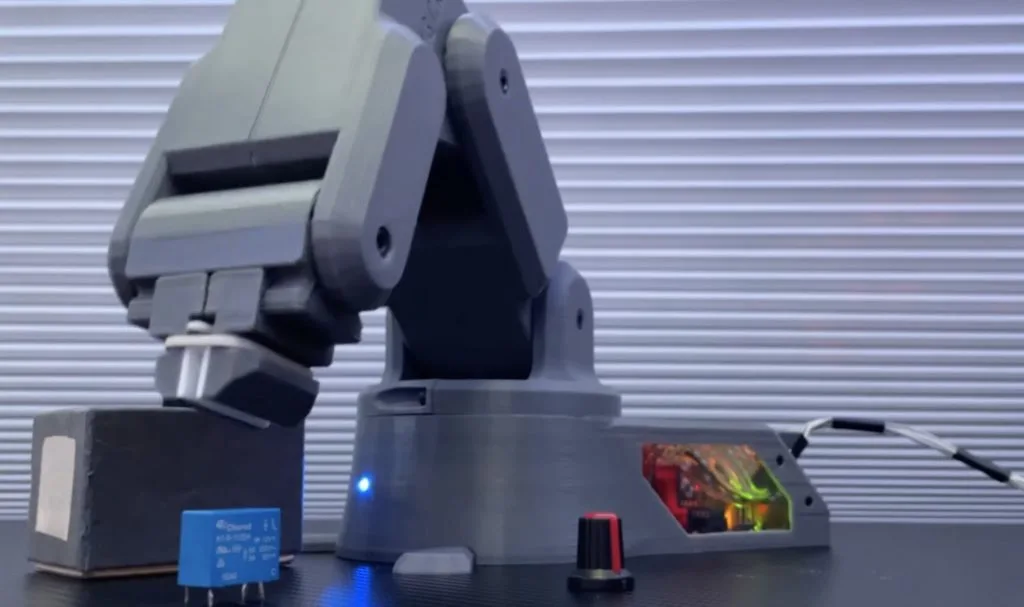
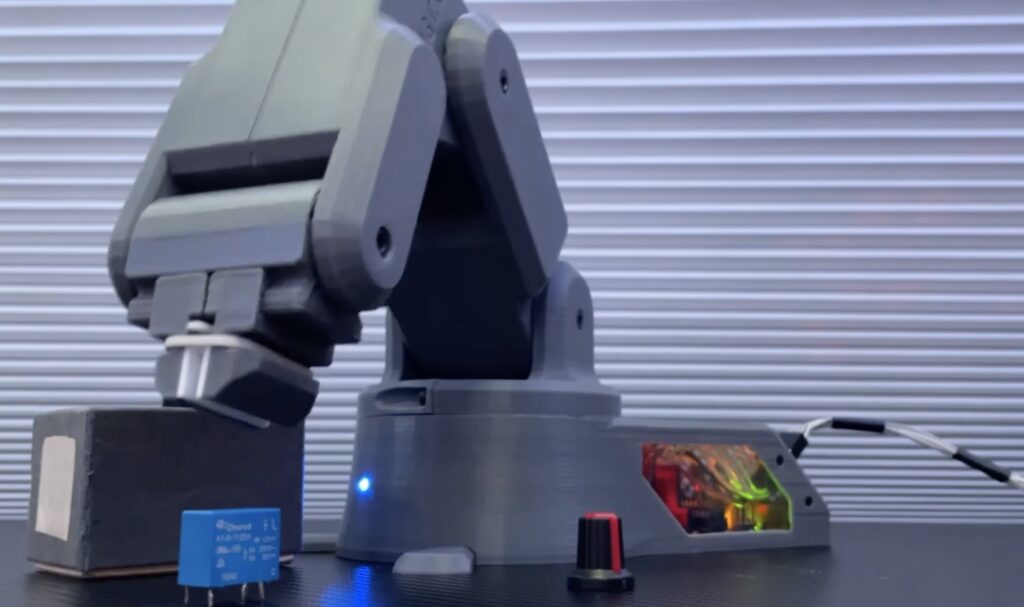
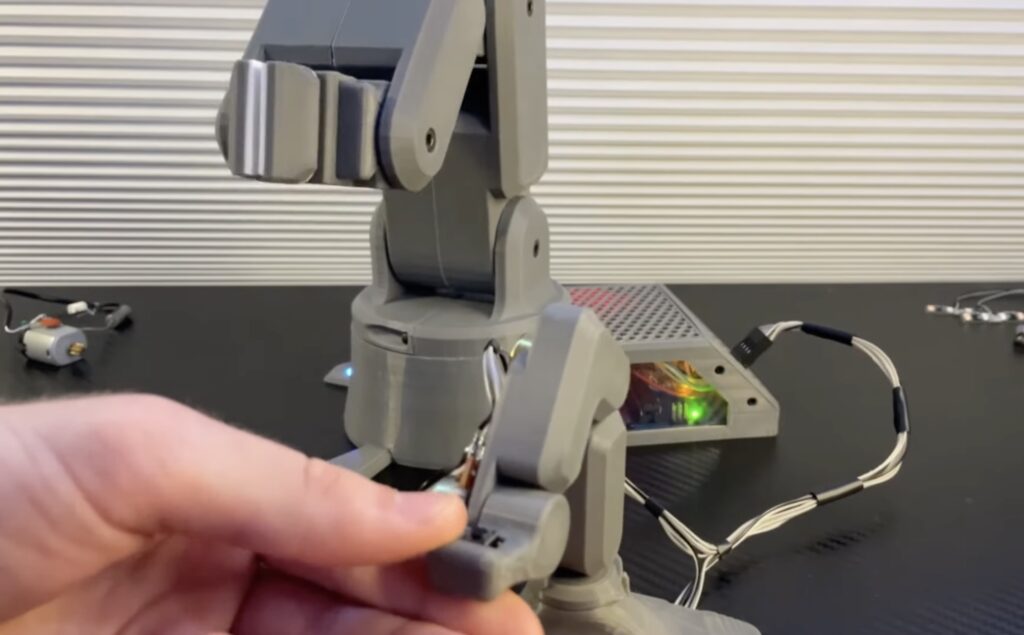
Getting started in the world of robotics can be a very challenging task, even for more experienced hobbyists, due to how difficult it can be to achieve smooth and precise motion through programming. Frustrated by the lack of accessible options, the YouTuber known as “Build Some Stuff” decided to not only design his own, but to do it using as few prefabricated parts as possible and while keeping the total cost under $60.
The premise of the arm project was to utilize a total of five servo motors for manipulating each degree of freedom, as well as an Arduino Leonardo and a PCA9685 driver for controlling them. Once the components had been selected, Build Some Stuff then moved onto the next step of creating 3D models of each of the robot arm’s joints in Fusion 360 before 3D printing them. He also made a scaled-down version of the larger arm assembly and replaced the servo motors with potentiometers, therefore allowing him to translate the model’s position into degrees for the motors.
Although simple, the code running on the Leonardo was still responsive enough to move the servos in nearly perfect synchronization compared to the model. To see more about how Build Some Stuff was able to make this robotic system from scratch and some of the problems he ran into, watch the video below!
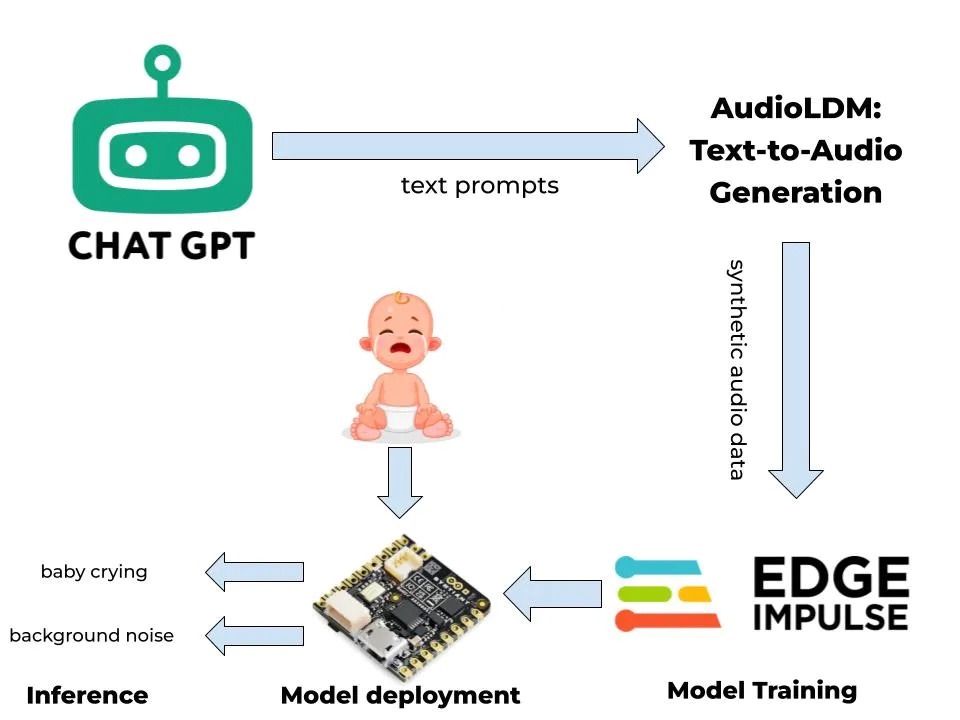
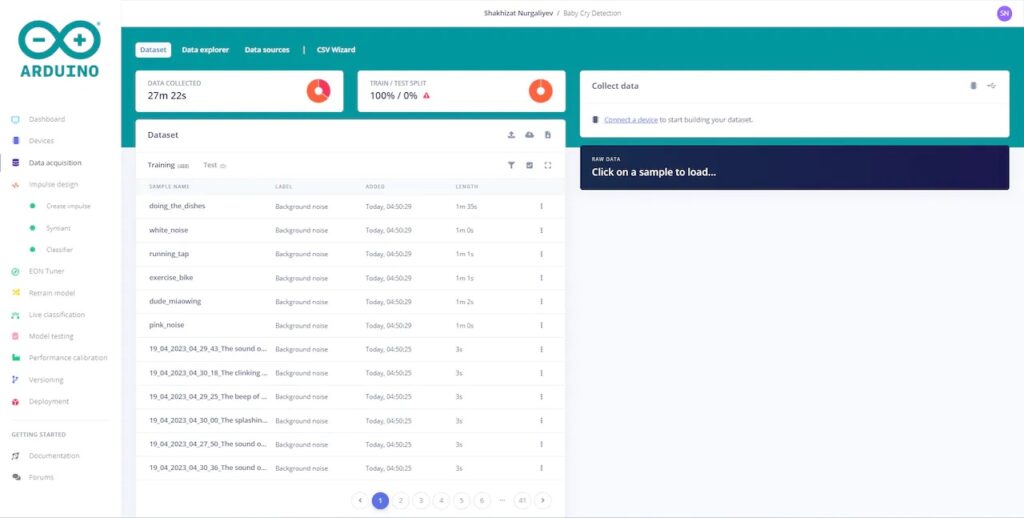
When a baby cries, it is almost always due to something that is wrong, which could include, among other things, hunger, thirst, stomach pain, or too much noise. In his project, Nurgaliyev Shakhizat demonstrated how he was able to leverage ML tools to build a cry-detection system without the need for collecting real-world data himself.
The process is as follows: ChatGPT generates a series of text prompts that all involve a crying baby in some manner. These prompts are then passed to AudioLDM which creates sounds according to the prompts. Finally, Shakhizat used the Arduino Cloud’s Machine Learning Tools integration, powered by Edge Impulse, to train a tinyML model for deployment onto an Arduino Nicla Voice board. To create the sounds themselves, Shakhizat configured a virtual Python environment with the audioldm package installed. His script takes the list of prompts, executes them within an AudioLDM CLI command, and saves the generated sound data as a WAV file.
Once this process was done, he configured a project in the Edge Impulse Studio which trains a classifier model. The result after training completed was a model that could accurately distinguish between background noise and a crying baby 90% of the time, and deploying it onto the Arduino Nicla Voice showed the effectiveness of how synthetic datasets and embedded models can be used in the real world.
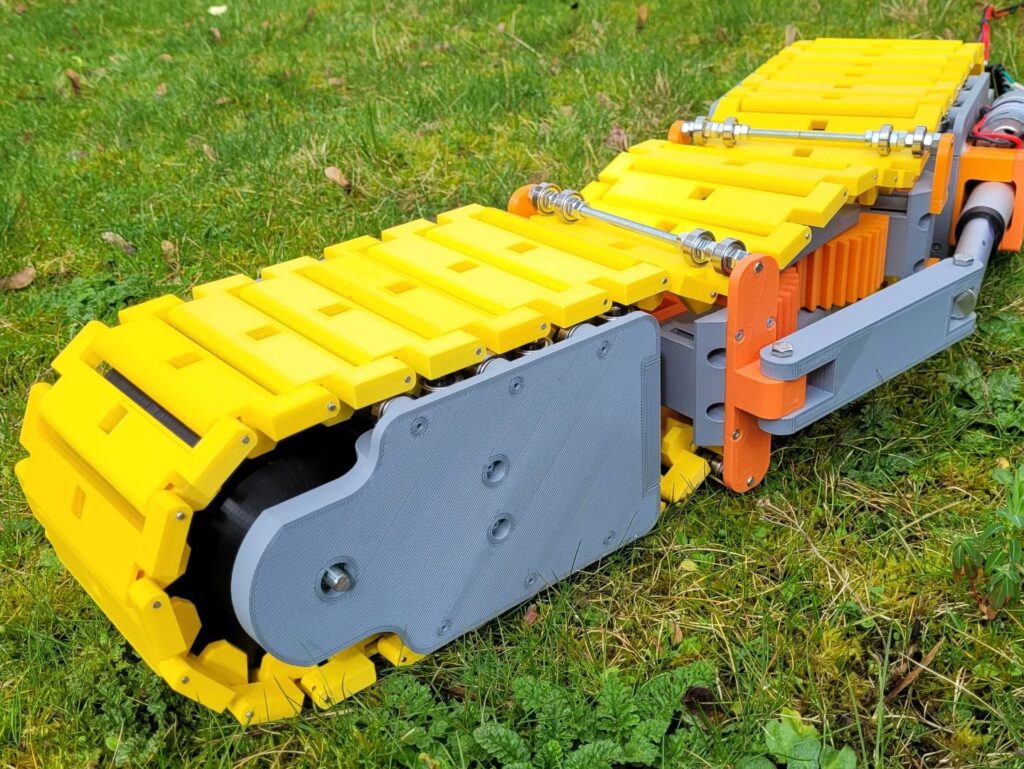
James Bruton has become something of a YouTube sensation by experimenting with unusual drive mechanisms for his robots. While he does do other things, most of his projects seem to focus on designing, building, and evaluating drive types that are far outside of the norm. His newest project is no different. It is a single-track tank vehicle that steers itself by bending its entire body.
Bruton got this idea after looking at the way conveyor belts work. Those belts, which tend to be a series of interconnected segments, are obviously flexible along their length, which is necessary for them to bend and loop back around. But they are also slightly flexible in the direction perpendicular to that, which is necessary for the conveyor belt to make a turn. Bruton figured that if he could make a tank track bend in a similar way, he could make the vehicle turn without the need for a second track.
To test this idea, Burton 3D-printed almost the entirety of the vehicle. That includes the track itself, which is made of several rigid segments that link together. There is just enough movement in the connections to allow a segment to sit at an angle relative to its neighbors. Conventional motors in front and back units spin the track, and an Arduino Mega 2560 board controls them. Between the two units is a joint that pivots horizontally. A linear actuator arm controls the angle between the front and back units, forcing the track to bend.
While the turning radius is massive, this vehicle can maneuver. It isn’t very good at clearing obstacles, but that is more due to Bruton’s design than the drive and steering system. That could be improved with additional design iterations, but this vehicle already proves that the concept works.
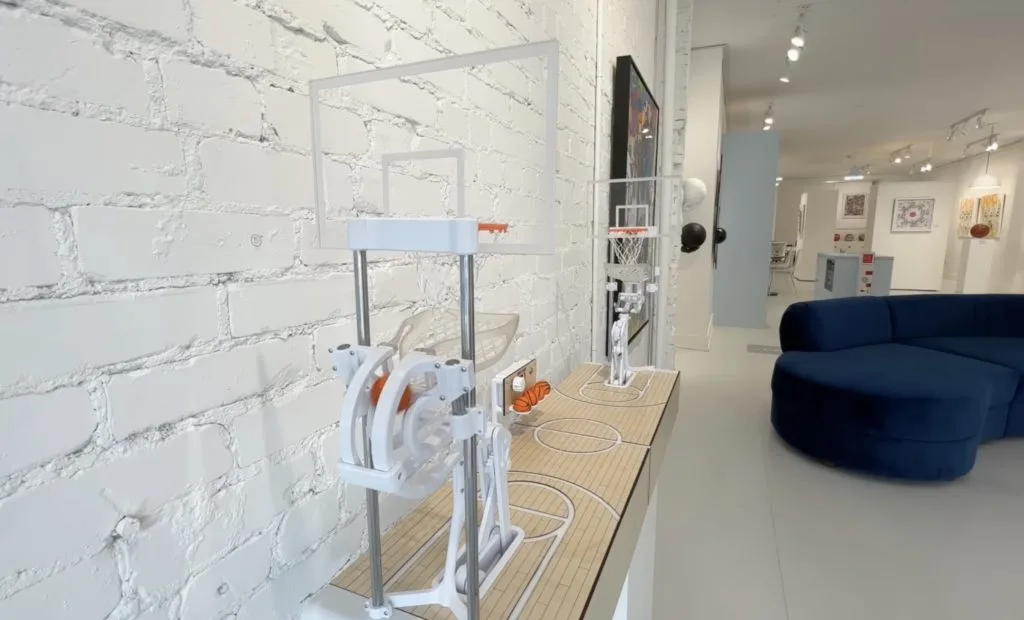
If you aren’t part of that world, you may be making the mistake of thinking that art galleries are full of boring paintings for stuffy socialites. In reality, there are all kinds of different art galleries and some of them have some pretty interesting pieces. Kinetic art is always the most exciting, as demonstrated by JBV Creative’s “Super Splash Bros” basketball sculpture built for display in a local gallery.
There weren’t any rigid constraints for this project, which let JBV Creative express his individuality. He experimented with a few different concepts and had some fun along the way, but ultimately settled on a miniature full court with two robots that throw tiny basketballs back and forth. One robot will throw the ball and sink a basket. The ball then rolls down a chute to land in the “hand” of the second robot, which proceeds to throw the ball back to the first robot’s side. That repeats endlessly, while a counter ticks up the number of sunk free-throws.
Most of this project was an exercise in mechanical design, with all of the parts either being 3D-printed or laser-cut. Beefy stepper motors actuate the robot arms and an Arduino Nano board controls those. The Arduino just needs to know when to do that, which is why each chute has a switch mounted below to detect the presence of a ball. Then it throws the ball and increases the count shown on a four-digit, seven-segment display.
We’re happy to share that version 2.1 of the Arduino IDE is out! Among the many updates and fixes, this latest release includes two main highlights:
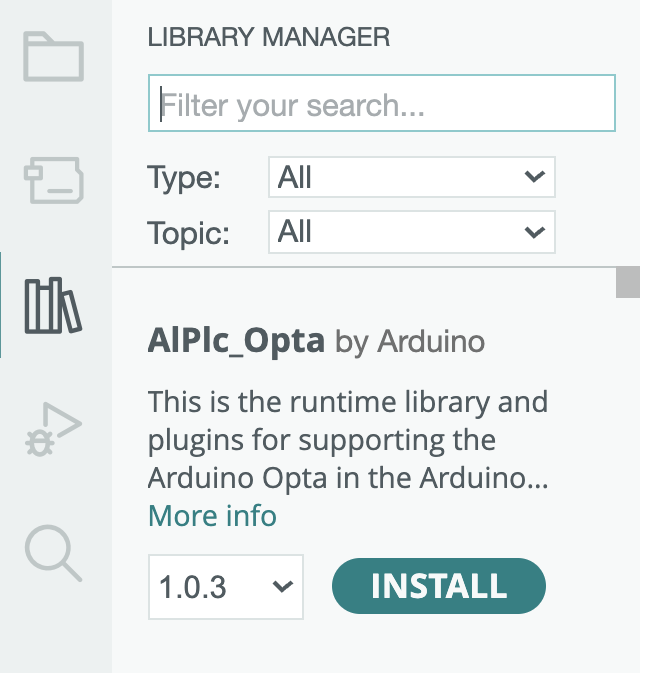
A full redesign of the Library Manager panel, which is now more usable and clear, along with an improved search engine.
A full redesign of the integration with Arduino Cloud that lets you backup your sketches via a single click and access them on multiple computers (as well as the browser).
The development of the Arduino IDE is made possible thanks to a passionate open source community, and to everyone supporting us with donations, purchases of original Arduino hardware, or Arduino Cloud subscriptions.
As a part of his new raised garden bed project, Shawn Murphy was looking for ways to improve his backyard even further with intelligent IoT systems. Apart from the existing 1800W solar panel array, he also wanted a device that could report current weather and soil conditions in real-time and even perform some watering tasks without the need for human intervention.
Initially, Murphy had researched constructing a pump that could take water from a pair of rain storing barrels and deliver it to the garden bed. However, this would have been costly to build and maintain, so he instead went with a gravity-fed setup. In this configuration, gravity would move water down-slope to a solenoid valve attached to the Arduino IoT Explorer Kit’s 24V relay pin. Once wired together, he added a soil moisture sensor for measuring the water content of the soil, along with a 12V battery pack and solar charge controller for off-grid power.
The resulting hardware was then loaded with a sketch that would continually read the moisture content of the soil, activate the solenoid valve if necessary, and even turn on a small fan if the enclosure were to get too hot. Best of all, the WiFi connectivity of the IoT Explorer Kit allowed Murphy to send the values remotely to an Arduino Cloud dashboard, complete with toggle switches for manually overriding the solenoid valve if necessary.
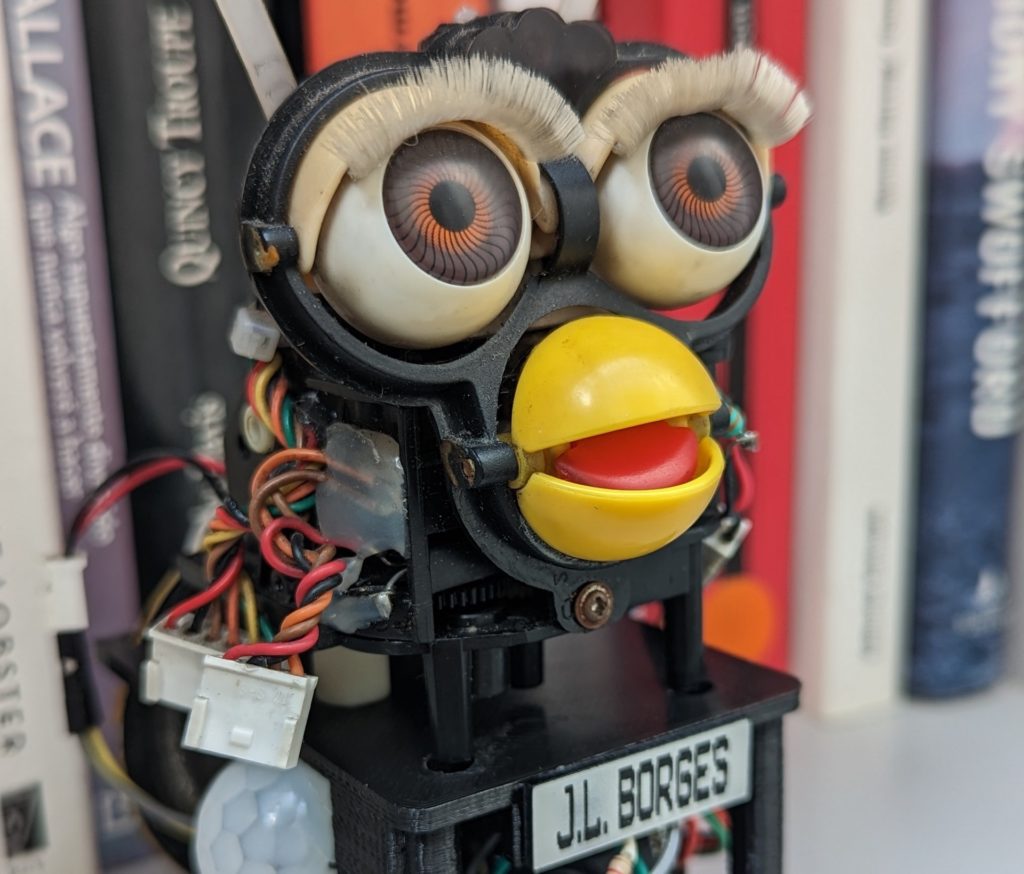
For our younger readers: the Furby is a toy released in 1998 by Tiger Electronics and that saw tremendous success in the following years. Each Furby is a little animatronic creature that resembles the Mogwai from the Gremlins films, but more colorful. When first unboxed, they speak “Furbish,” but then transition to English. While they speak, they move their ears, eyelids, and mouths. The toy has long since lost its popularity, but that didn’t stop Roni Bandini from modifying one to recite Jorge Luis Borges quotes.
While Furby toys are often described as robots, that term would be a stretch. A standard Furby only has a single DC motor to actuate all of the animatronic movement. But a clever gear mechanism controls what moves. If the motor only turns a little bit, it will just move the mouth. It can then turn further to move the ears or eyelids. Bandini discarded the original control board entirely and replaced it with his own to produce sounds, so he just needed to gain control over the DC motor.
Bandini chose to use an Arduino Nano board with an H-bridge for that job. A limit switch tells the Arduino when the motor is in the home position. Then it can rotate the motor the appropriate amount for the desired animatronic movement. Mouth movement syncs with the audio, which comes from a DFRobot DFPlayer Mini MP3 player board. Any time an audio clip is playing, the Arduino will move the Furby’s mouth. To keep it from jabbering on all the time, Bandini added a PIR (passive infrared) sensor. That tells the Arduino when someone moves nearby so it can activate a quote.
The quotes come from Jorge Luis Borges, who was an Argentinian writer of great renown. Bandini kept the Furby in its skinless state, which is a little disturbing. But at least it has deep and philosophical things to say.
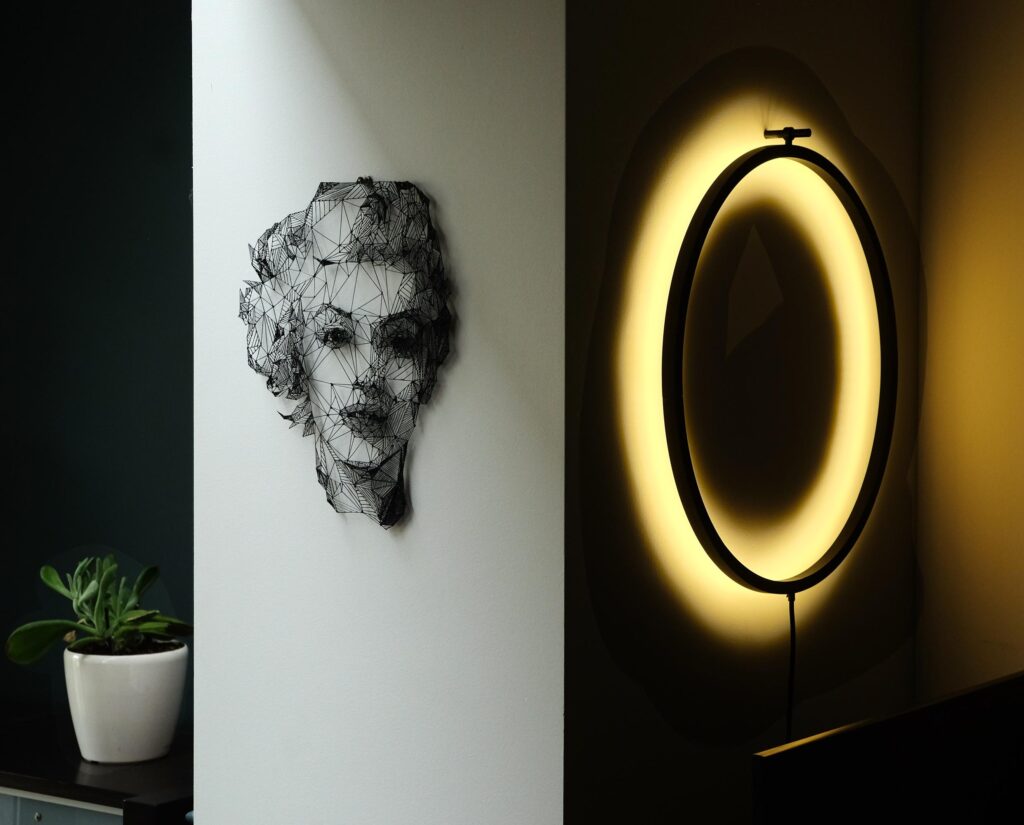
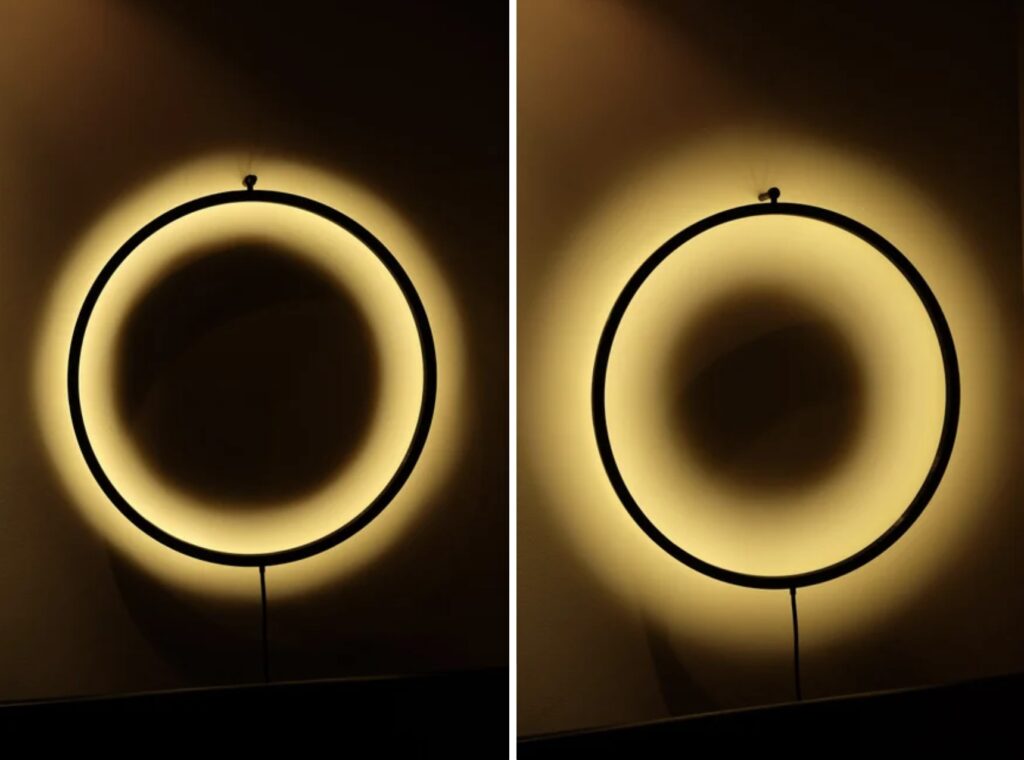
Have you ever exited a dark movie theater in the middle of the afternoon and found yourself blinded by the sudden transition to bright sunlight? Etienne Leroy faces the same problem after watching a movie on his home projector and turning on the lights. Because those lights are intense and instantly come on at full brightness, the transition can be very harsh. To increase comfort, he designed a ring-shaped lamp that lightens progressively.
ECLIPSE is a ring-shaped lamp that shines its light upon the wall onto which it is mounted. When activated, it gradually increased the brightness of the light in order to avoid a jarring transition after movie time. There are no longer any worries about hurt eyes and the lamp looks gorgeous, so it adds to the home’s decor instead of detracting from it. Best of all, ECLIPSE is easy and affordable to build if you want your own.
The lamp’s frame is printable in small sections that should fit on most consumer 3D printers. Illumination comes from a strip of “warm white” LEDs, though it would be easy to substitute another color or even RGB LEDs. An Arduino Nano controls those LEDs, increasing brightness slowly over a set period of time. It uses an infrared receiver module, so users can take advantage of the remotes they already own and have handy to turn the ECLIPSE lamp on. It will work with any infrared remote and the user only needs to decode the specific code sent by their remote when they press the desired button.
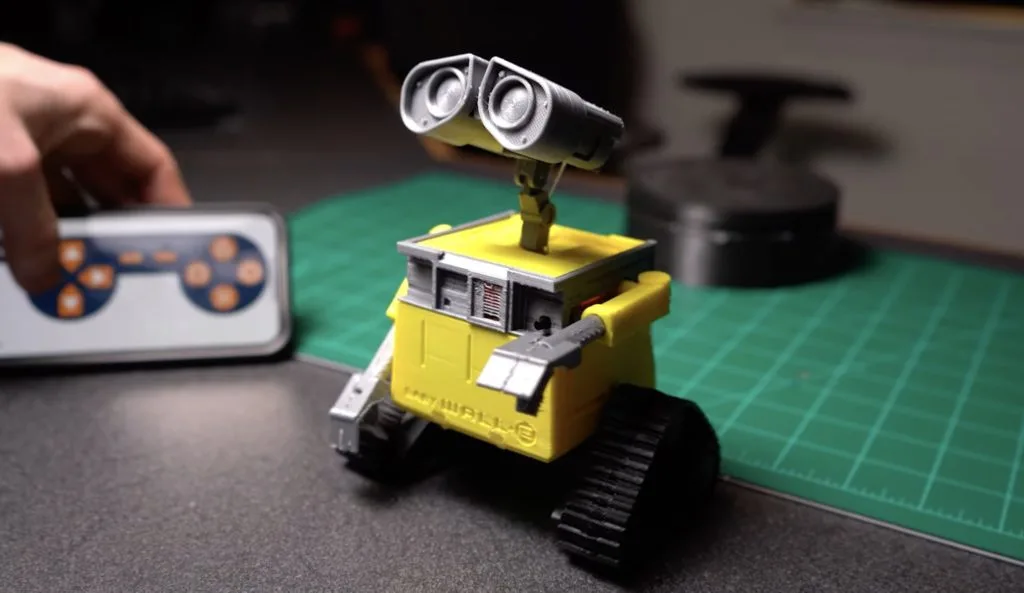
While brainstorming gift ideas, Professor Boots settled upon creating a tiny present-delivering robot that could move around on its own power. Because WALL-E’s design already has a built-in compartment and is quite memorable, it became the jumping off point for the project. The entire robot is 3D-printed from a combination of rigid PLA for the housing and flexible TPU for the tracks.
The lowest portion of the compartment houses two geared DC motors that each control a track independently. They are driven by an H-bridge chip which is, in turn, controlled by an Arduino Nano. A total of five servo motors were used to adjust the positions of the head, arms, and the front compartment. A small speaker and amplifier circuit was added so that the classic “WALL-E” sound effect could be played, and finally, an HM-10 Bluetooth® module was connected via UART for communication with a smartphone.
The mobile app, called Dabble, gives the user a virtual Bluetooth® controller and allows them to push buttons to make the robot drive, open the compartment, and even perform some predefined movement sequences, although the RC mode can be switched to autonomous via a small button at the front.
To see more about how this pint-sized WALL-E-Inspired robot was made, watch Professor Boots’ video below.
What’s the most important substance in the world? After the air we breathe, the answer is almost certainly water. We need it to live, we can’t go more than a few days without it, and it makes up about 60% of our bodies.
All this just makes it even more worrying that in many parts of the world, running out of water is a very real problem. As time goes on, the global population grows, and the effects of climate change continue, water shortages around the world will become even more of a challenge.
What can we do? One of the tools in our toolbox here is automation. Used right, it can help us manage our water supplies better and ensure as many people as possible have access to plentiful safe water. It’s even possible to employ automation in our own homes, using tools like Arduino and the Arduino Cloud and to better manage our water consumption, eliminate any wastage, and save on bills.
Why is water conservation so important?
Even though the planet is 70% water, less than 2% of that is freshwater, and even less is clean and drinkable.
One in six people globally has no access to clean water, which puts them at enormous risk for all kinds of waterborne diseases. And the problem is getting worse — the UN has predicted that water shortages will affect almost 20% of the human population by 2025.
As a result, it’s incredibly important to conserve the clean water we do have and ensure it stretches as far as possible. Here’s why:
Saving water ensures communities are prepared in the event of droughts and other water shortages. Managing our water usage and conserving an appropriate amount when times are good gives us a valuable buffer when times are hard.
Conserving water helps avoid the political unrest and even conflict that can arise when people have to compete for the same inadequate amount of water.
In developed countries, conserving water more efficiently helps protect against rising costs.
Transporting and cleaning water requires a lot of energy. By reducing our usage, we limit the environmental cost of all this work.
How can automation help save water?
The concept of using automation to save water is not new. In fact, there are many innovative projects already in place around the world, and as time goes on they look set to continue. Let’s take a look at some of the most interesting ways automation is being used to save our water.
Irrigation sensors
Irrigation — the process of artificially adding water to soil — is a critical part of modern-day farming. It enables us to keep crops watered on a consistent basis, ensuring large-scale farms that can feed entire populations.
However, despite its necessity, irrigation comes at a cost — it uses a huge amount of water. If we can find ways to manage our irrigation systems more efficiently, minimizing waste, we stand to save a lot of H2O.
Enter automated irrigation. This relies on using sensors in the soil to detect when water is needed and trigger irrigation systems only when the levels are low enough to warrant it. This ensures water is used only when needed, helping us conserve much more.
Manage water infrastructure more efficiently
Cities are incredibly complex beasts — huge networks of various different processes and systems to keep the lights on, the trains running… and the water flowing.
Ensuring everyone gets constant access to clean water is a monumental task, and often results in inefficiencies and wastage.
The St. George Water Services Department in Washington County, Utah, decided to introduce automation tools to manage their water systems more efficiently. They did this via a radio network that transmitted sensor data from across the entire district, giving them newfound visibility into their water systems and allowing them to minimize wastage and optimize the water cycle for more than 80,000 people in the city of St. George.
Home automation
Conserving water isn’t something you have to leave to governments and other big organizations. You can start using automation to optimize your water usage at home, saving money on energy bills and doing your bit for the environment.
One example is water sensors, which can detect the level of water in your tank and automatically alert you when they’re running low. They can also automatically turn off the water supply when it isn’t needed.
Another example is detecting leaks — you can install simple sensors that notify you when water is leaking, for example through damaged pipes. This can not only damage your home but also lead to large avoidable costs.
The Arduino Project Hub is filled with examples of home automation systems just like this one. Conserving water in your home is one of many incredibly useful ways to deploy automation, and can be done with only a few components and some basic knowledge.
Visit our Home Automation website to find out more about how Arduino works and how you can get started.
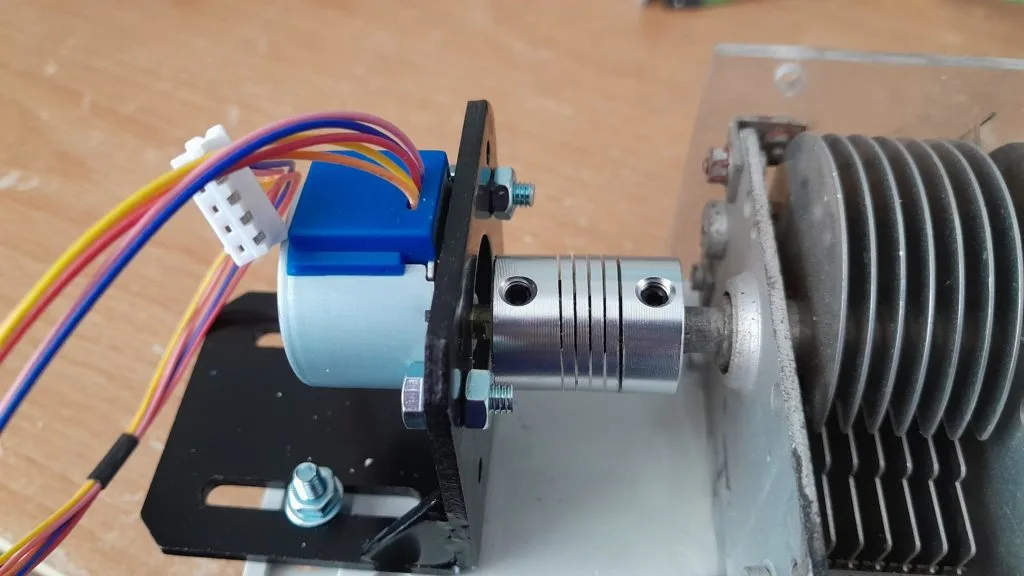
Ham radio allows for the broadcast and reception of non-commercial radio signals across vast distances with relatively inexpensive equipment. As the name implies, ham radio relies on antennas to function, and most designs can take up large amounts of space. An alternative antenna is the magnetic loop design which has a tall circle of copper tubing around the outside while each end is soldered onto a variable capacitor that is used to tune the signal.
TekMakerUK was inspired by Kevin Loughin’s YouTube video on the design and decided to make his own experimental version capable of 5W transmissions, which he could tune via an Android phone. The variable capacitor is from an old valve radio and has a central shaft that rotates to adjust the distance between the dielectric plates. In order to turn the coupling, a 5V stepper motor was added to the base along with a ULN2003 stepper motor driver. The driver was then connected to an Arduino Uno, although the board was replaced by a Nano Every for soldered connections.
In terms of usage, there is a digital encoder that increments the count either up or down depending on the direction it is rotated in, and this dictates how far the stepper should move. Calibrating the “zero” or home position is done by slowly moving the stepper on initialization until it hits a limit switch. More details about TekMakerUK’s magnetic loop antenna tuner can be found here on Instructables.
Um dir ein optimales Erlebnis zu bieten, verwenden wir Technologien wie Cookies, um Geräteinformationen zu speichern und/oder darauf zuzugreifen. Wenn du diesen Technologien zustimmst, können wir Daten wie das Surfverhalten oder eindeutige IDs auf dieser Website verarbeiten. Wenn du deine Einwillligung nicht erteilst oder zurückziehst, können bestimmte Merkmale und Funktionen beeinträchtigt werden.
Funktional
Immer aktiv
Die technische Speicherung oder der Zugang ist unbedingt erforderlich für den rechtmäßigen Zweck, die Nutzung eines bestimmten Dienstes zu ermöglichen, der vom Teilnehmer oder Nutzer ausdrücklich gewünscht wird, oder für den alleinigen Zweck, die Übertragung einer Nachricht über ein elektronisches Kommunikationsnetz durchzuführen.
Vorlieben
Die technische Speicherung oder der Zugriff ist für den rechtmäßigen Zweck der Speicherung von Präferenzen erforderlich, die nicht vom Abonnenten oder Benutzer angefordert wurden.
Statistiken
Die technische Speicherung oder der Zugriff, der ausschließlich zu statistischen Zwecken erfolgt.Die technische Speicherung oder der Zugriff, der ausschließlich zu anonymen statistischen Zwecken verwendet wird. Ohne eine Vorladung, die freiwillige Zustimmung deines Internetdienstanbieters oder zusätzliche Aufzeichnungen von Dritten können die zu diesem Zweck gespeicherten oder abgerufenen Informationen allein in der Regel nicht dazu verwendet werden, dich zu identifizieren.
Marketing
Die technische Speicherung oder der Zugriff ist erforderlich, um Nutzerprofile zu erstellen, um Werbung zu versenden oder um den Nutzer auf einer Website oder über mehrere Websites hinweg zu ähnlichen Marketingzwecken zu verfolgen.