Congratulations! You finally have a garage to call your own and you’re ready to turn it into the workshop of your dreams. But before you go on a shopping spree in Home Depot’s tools section, you may want to consider upgrading from that single dim lightbulb to more substantial lighting — otherwise, you’ll never find the screws you drop on the ground. LeMaster Tech can help with his great video on installing DIY voice-controlled smart LED lighting.
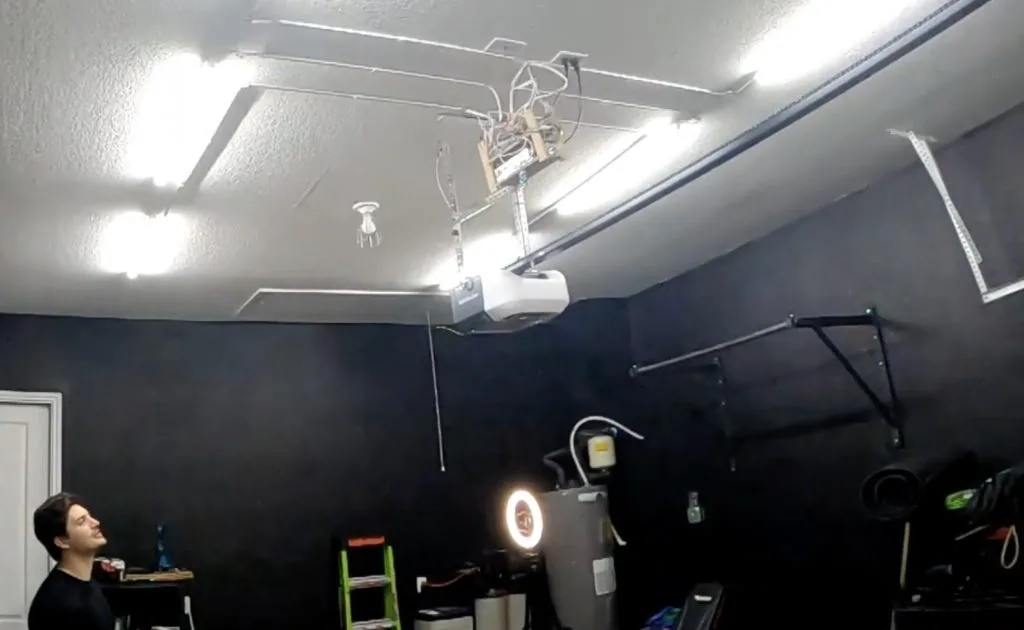
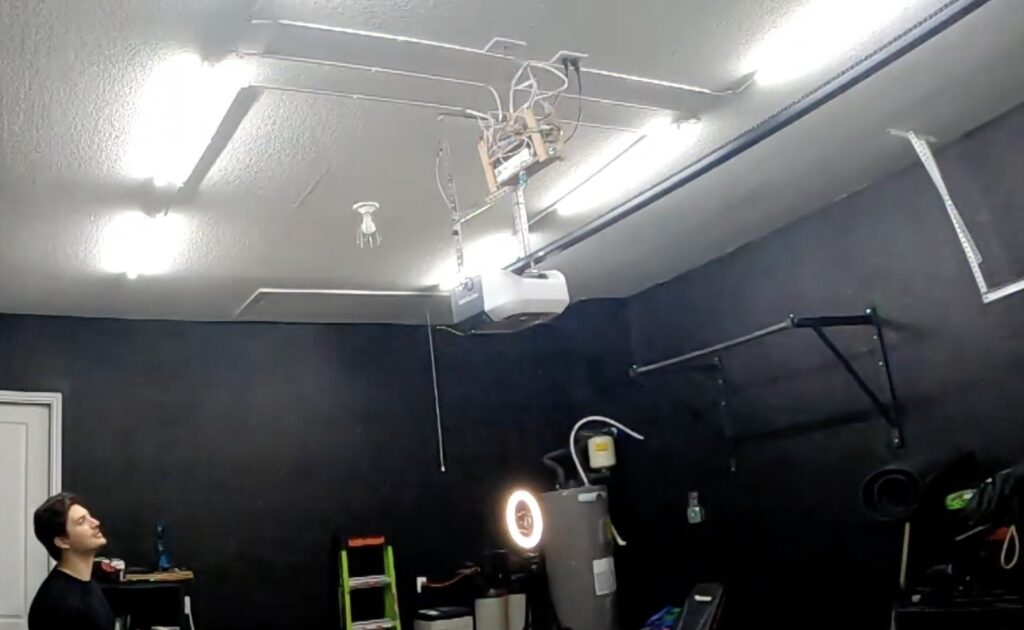
LeMaster Tech’s primary goal was simply to increase the brightness in the garage. He took the route that gives the best bang for the buck: LED tubes. Those are similar in form factor to fluorescent light tubes, but they can put out more lumens with fewer watts and they tend to last a lot longer. They also don’t need expensive and bulky ballasts. LeMaster Tech installed several of those on the ceiling of his garage, then took things to the next level.
These LED light tubes work with standard household mains AC power, so they can be wired like regular light bulbs. But instead, LeMaster Tech made them smart by wiring them through a relay board controlled by an Arduino UNO Rev3 board. That lets the Arduino safely switch each light tube on and off. LeMaster Tech gave it the ability to do that in response to voice commands by adding a DFRobot Gravity voice recognition module. That handy module works entirely offline and uses a simple AI to recognize spoken words. It has 121 built-in words and supports 17 custom words, so LeMaster Tech was able to tailor it to his needs.
Now he can switch the lights with a simple voice command and even activate pre-programmed effects, like flashing the lights.
Proper spindle speed control is necessary to get good CNC milling results. If your spindle speed is inconsistent, your speed and feed calculations will be wrong. That will lead to poor finishes and even broken end mills (and ruined parts) in extreme cases. But cheap CNC mills and routers often have insufficient spindle speed controllers. That’s why Joekutz’s Workbench built an improved spindle speed controller for his generic CNC 3040.
This DIY spindle speed controller has two major improvements: more precise adjustment and closed-loop feedback.
The original controller just had an imprecise potentiometer knob and dot markings, making it impossible to set to a specific speed. The new version lets the user set the spindle to a desired speed with a digital readout.
It also has closed-loop feedback, so it can adjust power to the motor as necessary to maintain the set speed under load. Without that, even a light load could slow down the spindle and throw off the speed/feed balance.
Joekutz’s Workbench achieved this using an Arduino UNO Rev3 board. It reads input from a rotary encoder to set the motor speed, then shows that speed on a seven-segment display. It controls the motor speed via PWM through a DIY optical isolator, a transistor, and a MOSFET. At the same time, it receives feedback on the real-world motor speed using an LED and photoresistor. That measures the reflectivity of the spinning spindle, which has a piece of aluminum foil tape in one area to increase reflectivity. That lets the Arduino detect a revolution of the motor and calculate the RPM.
The CNC mill uses an Arduino Mega 2560 with GRBL for controlling the axes’ stepper motors. The Arduino Uno spindle controller can receive g-code speed commands from that, or the user can set the speed using the rotary encoder dial.
The launch of the Arduino UNO R4 marks a huge leap forward for our community. For us, it’s also the chance to celebrate the people who bring our ecosystem to life with their bright ideas, radiant enthusiasm, and shining insight.
That is how the UNO R4 Stars blog post series began: to highlight makers who have not only created amazing projects with Arduino, but who are giving back to the community by sharing as they go and helping others make anything they wish.
We invite you to discover each profile, hoping you might find a North Star to navigate around an expanding galaxy or venture into completely new universes.
Many of us think electronics are a beautiful thing, but Anouk Wipprecht takes it to the next level. The Dutch designer creates interactive dresses that turn garments into sensorial experiences, pushing wearables into the field of robotic couture she is pioneering. Check out her YouTube or Vimeo channel to see the Spider Dress, which attacks anyone getting too close to the wearer, or the Smoke Dress, inspired by octopi’s defense mechanisms.
Wipprecht began exploring #FashionTech over 20 years ago, when computers were still big and bulky – and very difficult to hide in a dress. For her, everything changed when she discovered Arduino by attending an interaction design course held by our very own David Cuartielles and the Arduino team in Malmo, Sweden. That’s when she learned to leverage the technological platform Arduino provides to create increasingly smaller wearable systems, and most importantly, with that she became part of a diverse and eclectic community of makers. Using the same simple boards her teammates were working on projects ranging from RC cars to early drones. Meanwhile, following her passion for fashion, she was especially interested in the potential of smaller and more flexible hardware components to bring her creations to life.
Over the years she has furthered her research with every new technological advancement, up to her latest creation: the Chroma dress for Chromatic 3D, which senses other people’s proximity and lights up accordingly, mimicking the bioluminescence of fireflies with LEDs embedded in an innovative elastomer mesh fabric.
For this particular garment, Wipprecht chose the new Arduino Nano ESP32 because of its outstanding combination of small form factor – easy to integrate in the design and comfortable to wear on the body – and great power. Not to mention, the module made interconnections easier than ever and helped speed up the entire project: “The process went super rapidly from ideation to final experiment, and we were able to switch back and forth in order to optimize it.”
“The coolest thing about Arduino is it makes working with electronics really fun,” she says. The experience is so enjoyable thanks to great ease of use and flexibility – which also allows Wipprecht to use Arduino when she teaches, encouraging a whole new generation of makers to turn their ideas into reality.
“The great advantage we have today is we have a lot of accessibility to really cool tools, from powerful machines, to all the latest electronics and technology, and it doesn’t cost as much as it used to. It makes it really easy to make cool stuff.”
The copyright for Steamboat Willie famously expired at the beginning of this year. Steamboat Willie was the first appearance Mickey Mouse, so this copyright expiration is a big deal for Disney. Anyone will be able to use the character for the first time in history, as Mickey Mouse is now in the public domain. To celebrate this momentous occasion, Jaimie and Jay of the Wicked Makers YouTube channel built this terrifying FNAF-style Mickey Mouse animatronic.
A few months ago, Wicked Makers built a Five Nights at Freddy’s Springtrap animatronic and the results were amazing. For this project, they took many of those same lessons, techniques, and stylistic decisions and applied them to Mickey.
This is a full, life-saved head that can move, open and close its jaw, and direct its scary glowing gaze. The vast majority of the head’s structure is a 3D-printed shell (modeled by BeardlessProps) with a ridiculous amount of superb texturing, painting, and weathering. The ears, for example, have a coating of dark fiber that gives a felt-like appearance. The aesthetic does a fantastic job of making this look like an old and beaten animatronic from a theme park.
The movement is all actuated by hobby servo motors controlled by an Arduino UNO R4 board. Wicked Makers added a USB host shield, which let them connect a PlayStation 4 controller. The Arduino reads the stick positions and button presses from the PS4 controller and adjusts the servo motors accordingly. That allows for nice organic control when puppeteering.
This video ends with the animatronic dying. But from what we saw before that, it was very much a success. The Wicked Makers plan to repair the head and will post a video with updates, so be sure to subscribe to their channel.
We’ve just released Arduino IDE 2.3, and along with the usual list of bug-fixes and improvements, this new version marks the end of the experimental phase for the debug feature – which is now stable and fully incorporated into the IDE!
True to our belief in open standards and interoperability, the debug feature is now based on a standard framework documented in the new specifications and guidelines. As a result, maintainers of Arduino cores can now add debugging for any board and leverage the UI and debugging engine provided by the Arduino IDE.
What’s more, thanks to this new open framework, wealreadyenabled the debug feature for all the Arduino boards based on the Mbed core, which include GIGA R1 WiFi, Portenta H7, Opta, Nano BLE and Nano RP2040 Connect, while the Renesas-based boards (UNO R4, Portenta C33) will follow in the next hours.
We’ve worked on implementing debug in IDE 2 for a long time, in collaboration with the open-source community and, more recently, in close contact with Espressif to make sure that ESP32 devices would be fully supported. So keep an eye on the upcoming release of the Arduino-ESP32 core, which will support the new debug framework!
Want to be able to debug your favorite board using IDE 2.3?
Get in touch with the platform developer or, even better, help them by submitting a pull request to implement the new specifications.
We look forward to receiving your feedback on the new debugging features in the Arduino forum or, if you’re a developer and want to report a bug, directly in the GitHub repository.
Still curious about those bug-fixes? Arduino IDE 2.3 fixes security issue CVE-2023-4863 (see details in this commit).
Enjoy the new Arduino IDE, and help us make our development environment better than ever!
Exciting news! We’re gearing up for the second edition of Arduino Cloud Café, and we’re thrilled to have you join us. Tune in on Tuesday, February 13th at 5pm CET for an engaging session on environmental monitoring.
The launch of the Arduino UNO R4 marks a huge leap forward for our community. For us, it’s also the chance to celebrate the people who bring our ecosystem to life with their bright ideas, radiant enthusiasm, and shining insight.
That is how the UNO R4 Stars blog post series began: to highlight makers who have not only created amazing projects with Arduino, but who are giving back to the community by sharing as they go and helping others make anything they wish.
We invite you to discover each profile, hoping you might find a North Star to navigate around an expanding galaxy or venture into completely new universes.
Brenda Akoth Mboya, a trailblazing STEM educator and the co-founder of Jenga Labs Africa, embodies the spirit of Arduino-driven innovation in the realm of education and community empowerment. “My passion lies in inspiring African youth by using technology and leadership as tools,” she affirms – and we take pride in being the platform of choice for her vision.
Mboya’s journey with Arduino began with a revelatory moment, when she realized that technology could be both easy and fun, empowering even children under 13 to create meaningful and innovative projects of their own.
Initiating Jenga Labs Africa in 2019, Mboya embarked on a groundbreaking venture to introduce 4th Industrial Revolution technologies to the next generation of African innovators and makers. Through collaborations with West African schools, the startup has seamlessly infused STEM activities into curricula and set up makerspaces available to all students.
In addition, Mboya actively engages young minds in the technology space as part of the Arm Engage program and the Arduino user group in Kenya, organizing events that bring together electronics enthusiasts eager to dive into the vast potential of microcontrollers. A recent major achievement was the successful orchestration of a 12-hour hackathon in Kisumu, leveraging the capabilities of IoT to address critical agricultural challenges in western Kenya. The event showcased the exceptional talents of the local youth – something that Mboya holds dear: “Being a maker in 2023, especially in the African continent, means having the tools to create solutions tailored to African needs – thus moving away from being mere consumers of Western technologies, and towards becoming creators of solutions that address specific African use cases.”
Indeed, the project that most deeply resonates with her vision at the moment is the one-year Leadership and Technology Program Jenga Labs is about to launch in Kibera, one of Nairobi’s largest slums. This initiative aims to empower the community by training them on Arduino technology, enabling them to create innovative solutions for the myriad problems and challenges they face every day. Mboya sees this as a transformative way to give back, fostering a sense of leadership and innovation that can spark positive change. In Mboya’s world, Arduino is not just a tool: it’s a catalyst for African youths to shape their destinies and contribute to the advancement of their communities.
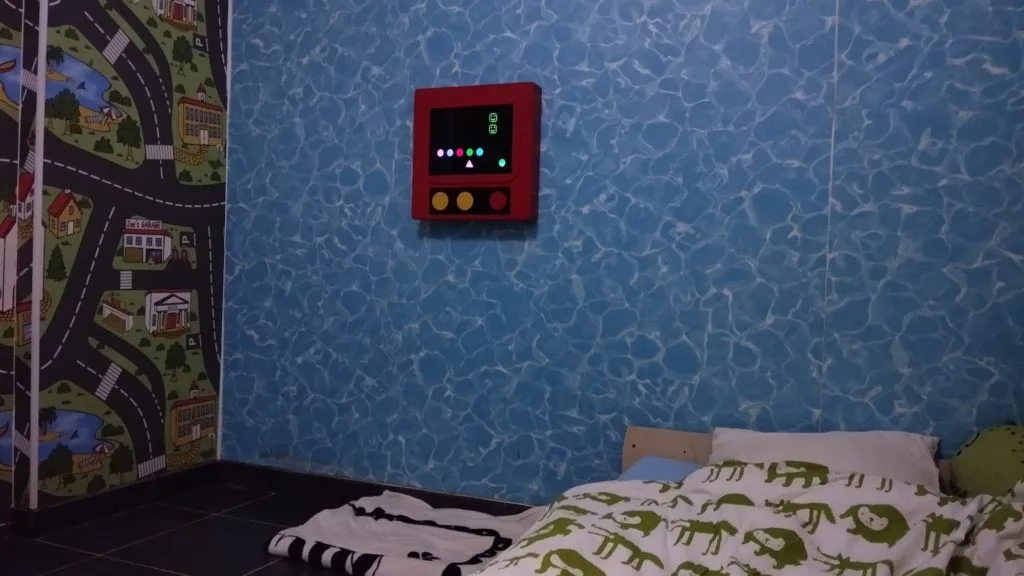
As a society, we have decided to enact some measures to make our world more accessible to those with disabilities. Wheelchair ramps, for example, are often legal requirements for businesses in many countries. But we tend to drop the ball when it comes to things aren’t necessities. For instance, entertainment options are an afterthought much of the time. That’s why Alain Mauer developed this LED gaming platform for people with special needs.
This device offers a lot of flexibility so that builders can tailor it to a specific individual’s own needs and tastes. Mauer designed it for his son, who is 17 years old and lives with non-verbal autism. Entertainment options intended for neurotypical people don’t engage the teen, but toys designed for children fail to hold his interest for long. This game, dubbed “Scott’s Arcade,” is simple to understand and interact with, while still offering a lot of replayability. It is also durable and able to withstand rough handling.
Scott’s Arcade consists of a “screen” made up of individually addressable RGB LEDs and a faceplate with shape cutouts that act as masks for the LEDs. An Arduino Nano controls the lights and responds to presses of the large buttons beneath the screen. It can trigger sound effects through a DFRobot DFPlayer Mini MP3 player as well.
Mauer programmed a few simple games for the device, such as a matching game that challenges the player to find the circle of the same color as the triangle. When they succeed, they’re rewarded with fanfare sound effects and flashing lights. Makers can also program their own games to suit the players’ abilities and interests.
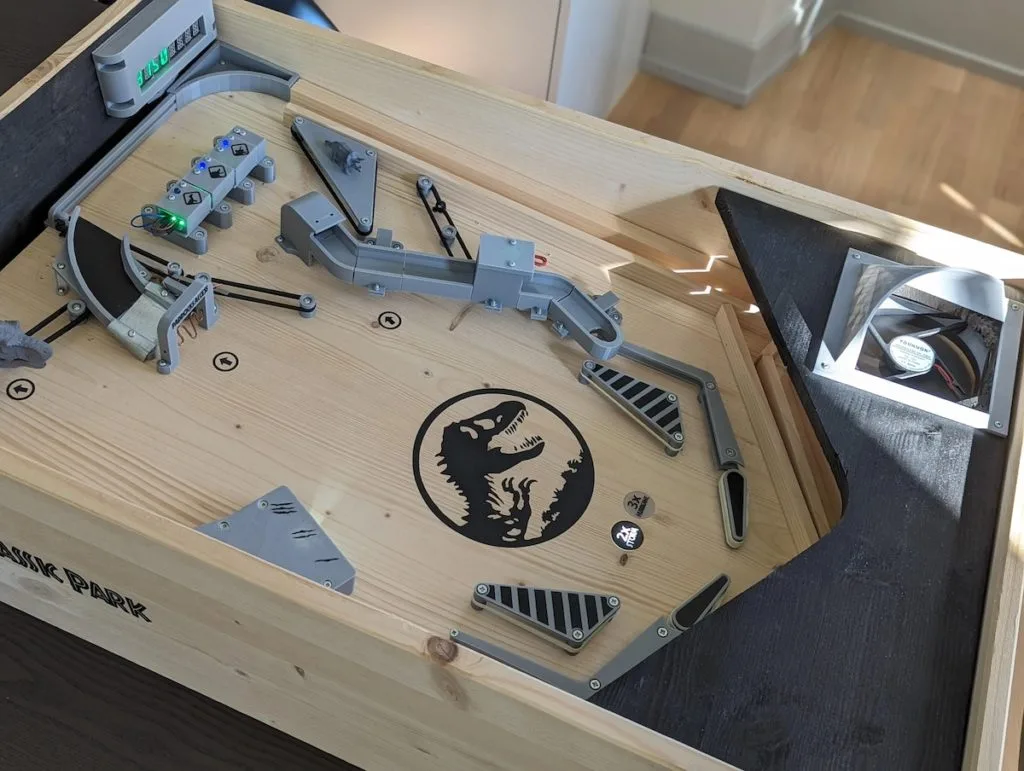
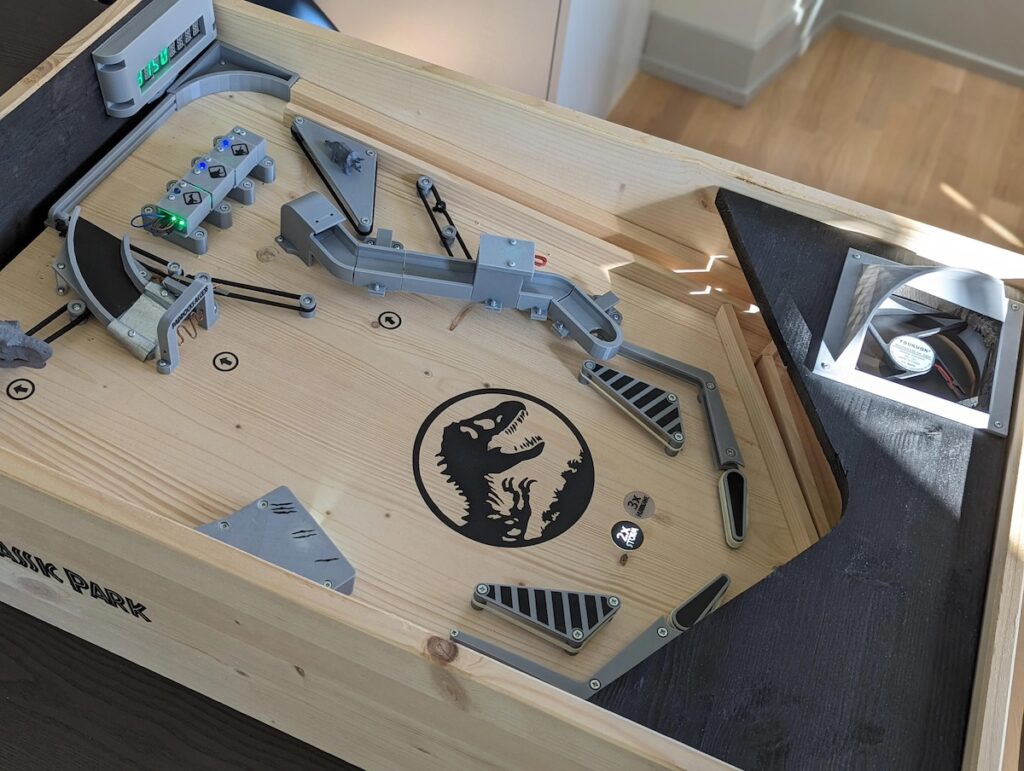
Pinball machines are prime examples of the dizzying heights achieved by engineers in the electromechanical era before digital electronics came along. But while those classic pinball machines are extremely impressive from an engineering standpoint, they required an immense amount of expertise and were therefore unapproachable to most. By utilizing modern digital components like Arduino development boards, Barjo was able to construct this amazing Jurassic Park-themed pinball machine.
From a user perspective, this looks and operates a lot like a classic pinball machine. But instead of relying on complex mechanical linkages and vast arrays of electric switches, it takes advantage of today’s microcontrollers and sensors. The table is mostly wood and Barjo 3D-printed a bunch of custom parts, such as the paddles, pathways for the ball, and enclosures for the electronic components.
Some of the parts, like the spring-loaded ball launcher, are standard off-the-shelf pinball components that are available through retailers that sell refurbishment parts. But most are custom and work using electronic circuitry. The electronic components operate under the control of an Arduino Nano and an Arduino Mega 2560. The Nano is tasked with the flippers, while the Mega handles the displays, sensors, and solenoids.
There are a variety of sensors on the table, such as infrared break beam sensors to detect the passing ball. Those can trigger solenoids to open up gates to specific pathways, like the T-Rex paddock that lets the player rack up additional points. Those points, and some status information, show up on an eight-digit seven-segment display. And, of course, there are plenty of flashing lights to create the ideal pinball experience.
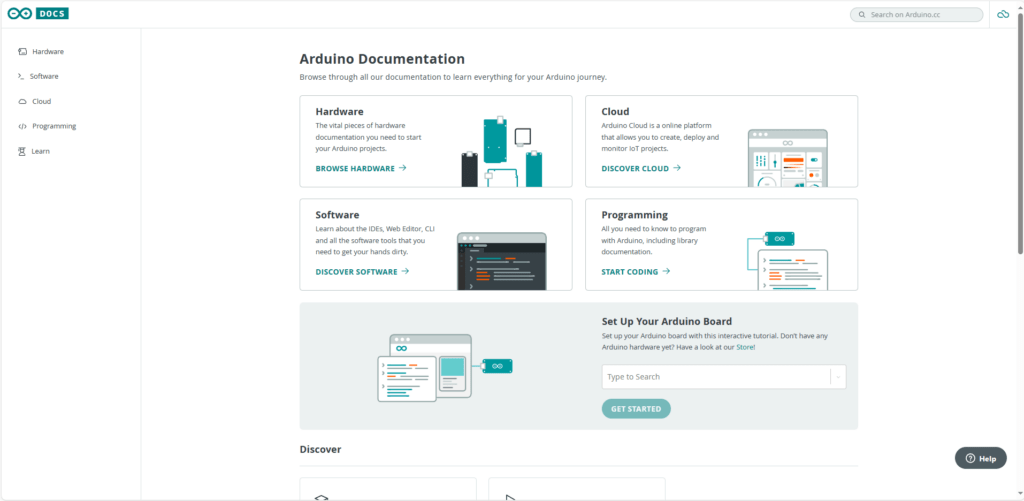
Have you checked out Arduino Docs lately? If it looks different, that’s because we can finally reveal the makeover we’ve been working on for months – in line with our constant efforts to learn, improve, and share all of it along the way!
You can always count on Arduino Docs
Arduino Docs is our public and collaborative repository of info, tech specs, and tutorials. It is a huge mass of online resources that we create, organize and maintain also thanks to our amazing community’s contributions (managed via GitHub: here’s how you can help if you are interested).
With 75+ current hardware products documented, hundreds of tutorials, and dozens of datasheets, it’s definitely the go-to resource center any time you have a new Arduino product, want to learn a new skill, or need help to figure something out! Want to host a web server on your brand new MKR WiFi 1010? Can’t wait to dive into the ultimate manual for your Opta micro PLC? Wondering how to set up a security system using ML? Need a solid starter guide for Arduino Cloud, the IDE 2, or Arduino in general? Arduino Docs has you covered, with specific and updated information to support all of this and so much more.
What’s new and improved!
Open-source through and through, Arduino Docs is a shared space that’s wonderfully alive with updates and new ideas. But it can also get messy and confusing – and that’s why we decided to revamp its design and architecture completely, to improve your experience and navigation.
Our goal was to make all the resources more accessible: easier to find, easier to consult. That’s why you can now explore a new and improved Arduino Docs:
It welcomes you with a new homepage. Don’t know where to start? Pick one of the main sections featured here: choose between hardware, software or Cloud, and see what each one has to offer.
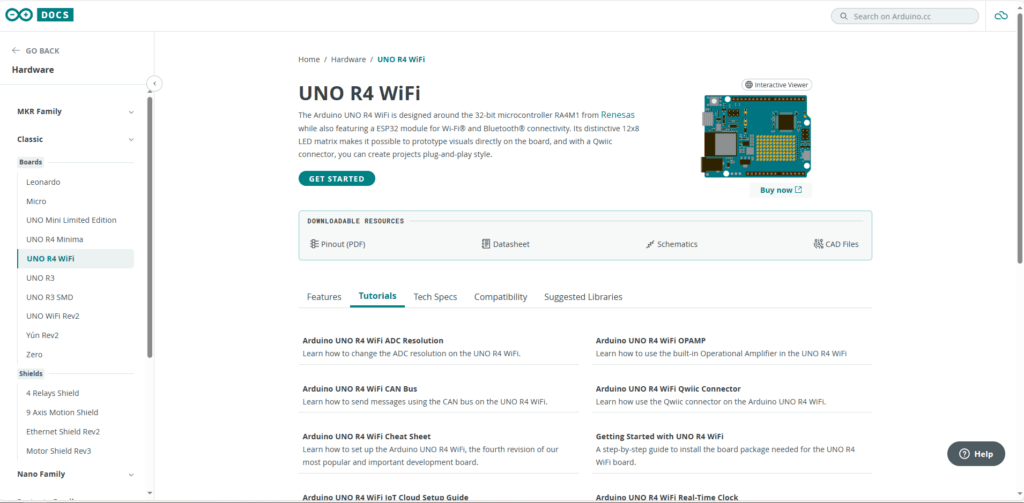
It has a sidebar so you never get lost. The side menu mirrors the main sections and drills down so you always know where you are as you browse documentation.
It streamlines finding hardware info. Datasheets and tutorials specific to each component are now presented within its dedicated page.
It helps you get started. As much as we’ve worked on making specific items more intuitive to find, we know sometimes you’re just curious about discovering more about a broader subject. That’s why we’ve included new suggestions to get started with the Arduino Cloud or MicroPython, and you’ll see a whole Learn section prominently displayed.
It looks (and works) better on mobile. A big improvement for smaller devices!
The myriad resources and open-source nature of the project remain the same. But they now live in a neater home, where it’s easier and faster for you to find everything you need to discover, learn, make, and share your knowledge about Arduino.
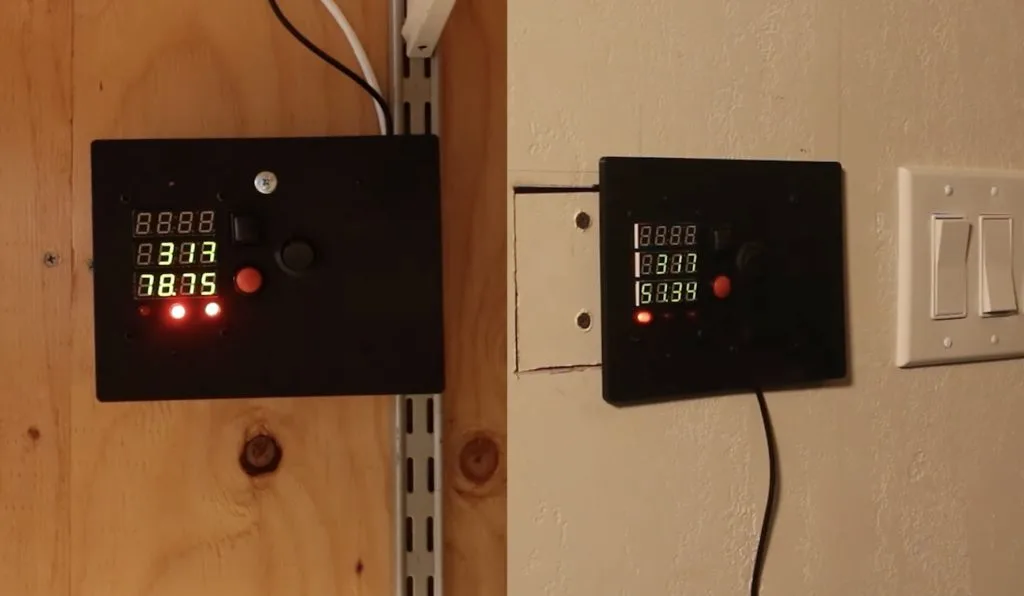
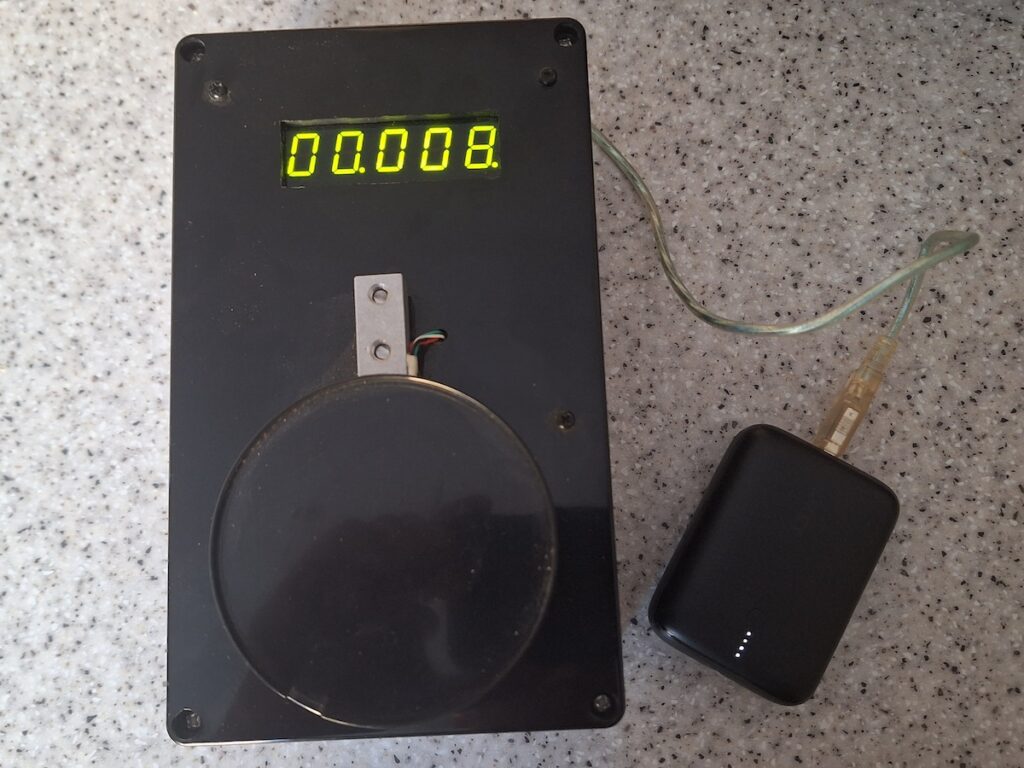
Living off the grid is a dream for many people, but it also presents unique challenges that are otherwise absent in our urban-centric lifestyles. One of the largest adjustments one has to make is the lack of readily available power, as it typically comes from renewable wind/solar or generator setups. In element14 Presents host Kaleb Clark’s case, his Honda EU-7000iS generator works in combination with some solar panels around his property, although the generator is located nearly 200 feet away and downhill, making it a very tough journey to operate in bad weather.
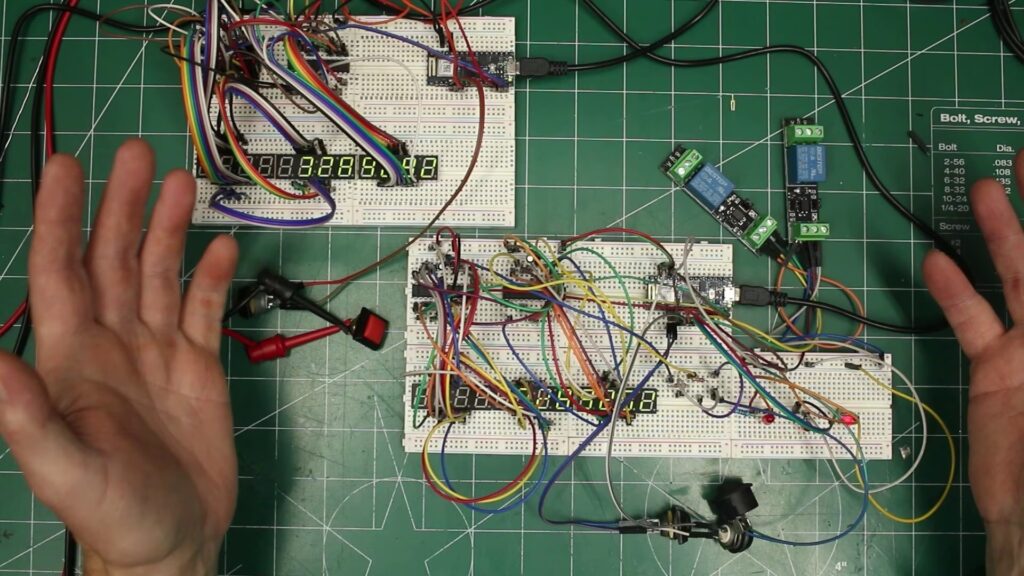
After finding a bypass cable with one pair of leads for enabling the generator and another pair for powering on the starter motor, Clark got a couple relays that could bridge their contacts together programmatically. In order to communicate the current output of the generator, solar panels, battery, and if the motor should run, a pair of Arduino Nano 33 IoT boards were chosen for both the house and generator sides of the project. They send data through Wi-Fi and MQTT to stay in consistent synchronization while either one is also connected to a few seven-segment display modules and MAX7221 LED drivers for showing the most recent data.
While inside the house, Clark is able to simply hold down a button and watch how the generator across his property roars to life and begins producing measurable power output to the display. More information about this project can be seen in Clark’s video below!
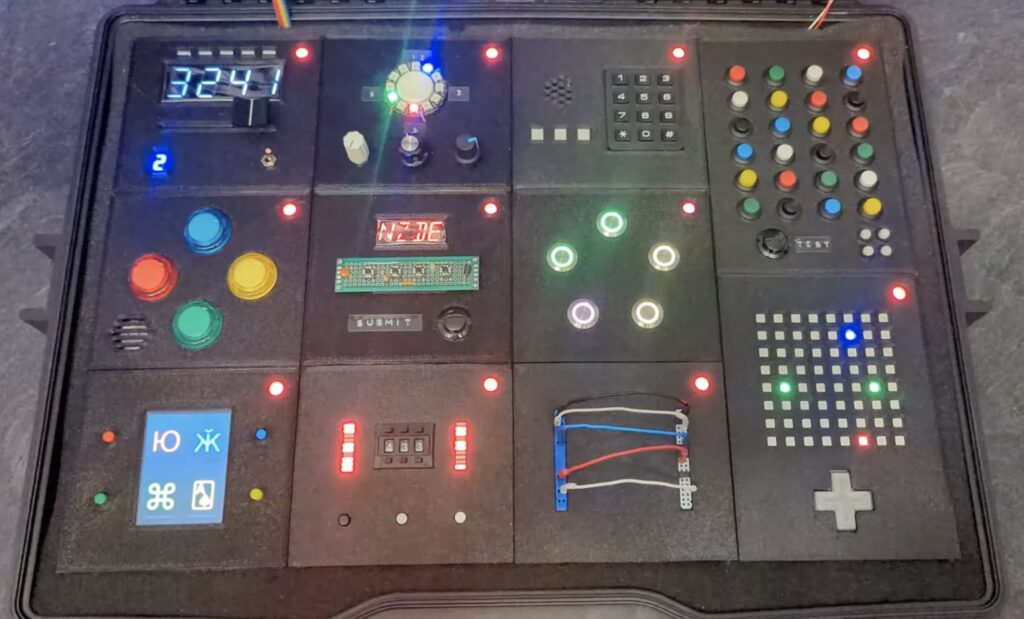
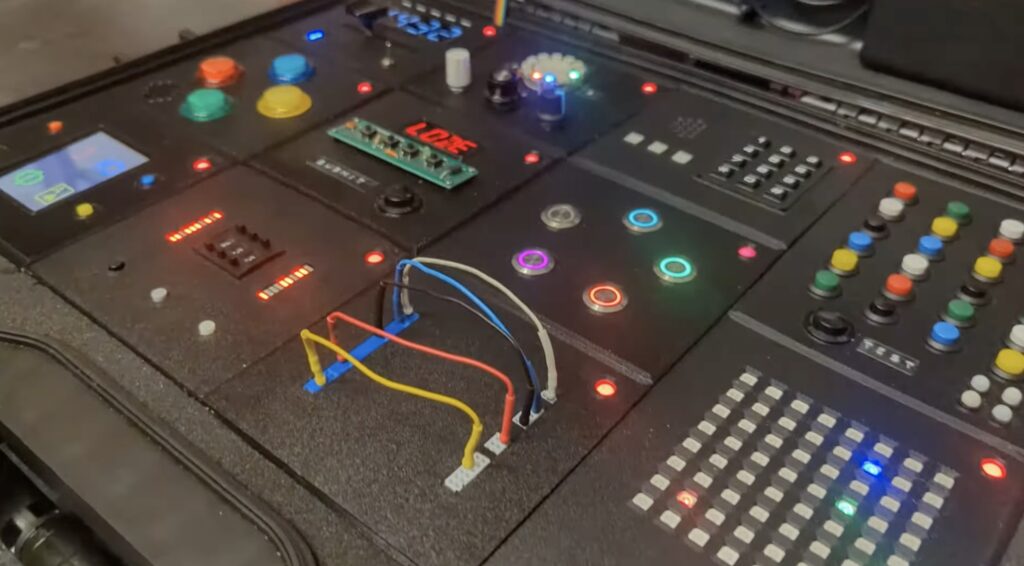
Keep Talking and Nobody Explodes is a fun party game for iOS and Android that presents players with the challenge of cooperatively defusing a virtual bomb. It is a bit like those “no, cut the blue wire!” scenes in movies, because only one player can see the bomb. The other player(s) has access to information about the bomb and good communication is necessary to guide the first player through the disarming process. Inspired by that game, Heath Paddock built this physical escape room-in-a-box for his friends that looks like a blast to play.
This self-contained escape room works almost exactly like Keep Talking and Nobody Explodes, but lets the player in charge of defusing interact with a physical “bomb.” If they wait too long or mess up the disarming process three times, the bomb explodes and the players lose.
As with Keep Talking and Nobody Explodes, this device has several modules that each act as distinct puzzles. For example, one module has an LED matrix “maze” that the defuser must guide a dot through. But they can’t see the walls of the maze, so they have to rely on instructions from the “expert” player that has access to the documentation.
One Arduino oversees the whole game, tallying failed attempts and counting down until detonation. And each module also has its own dedicated Arduino to read the inputs and set the outputs (such as LEDs and displays) for that specific puzzle.
To keep everything in sync, Paddock developed his own communication protocol. It allows any Arduino to send a message to the central Arduino by passing it along a serial chain that goes through every Arduino in the box. That chain forms a big loop, so every message will eventually reach its destination.
This project is a delight to see in action and looks like a lot of fun. It takes the proven gameplay of Keep Talking and Nobody Explodes and adds tactility to enhance the experience.
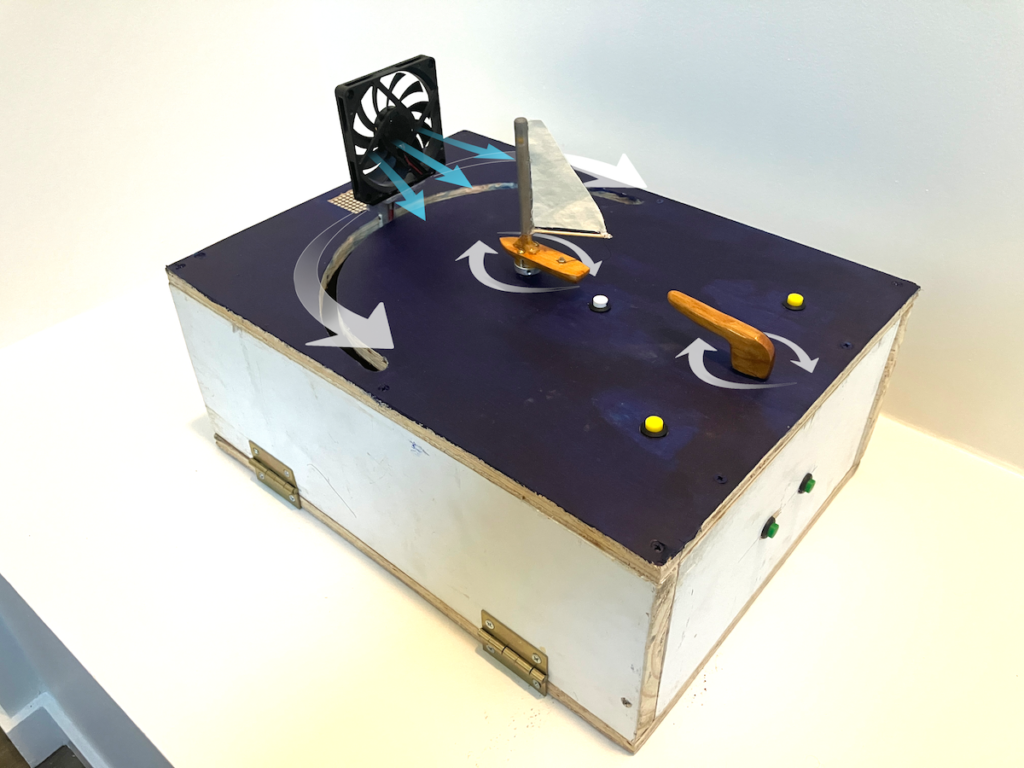
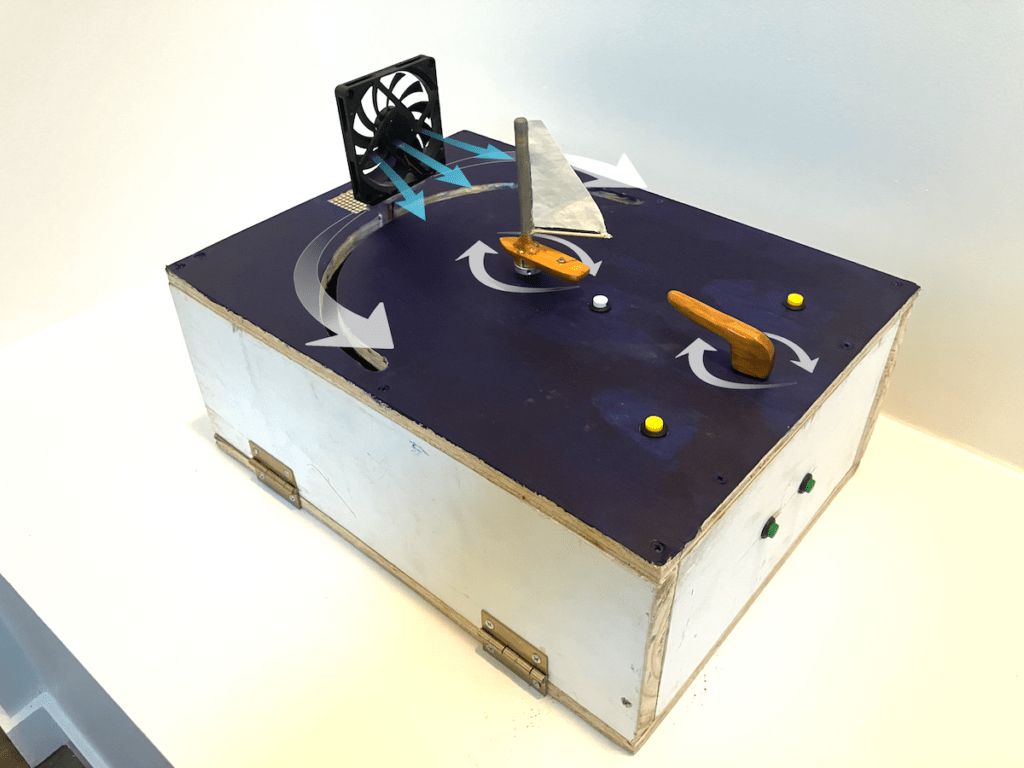
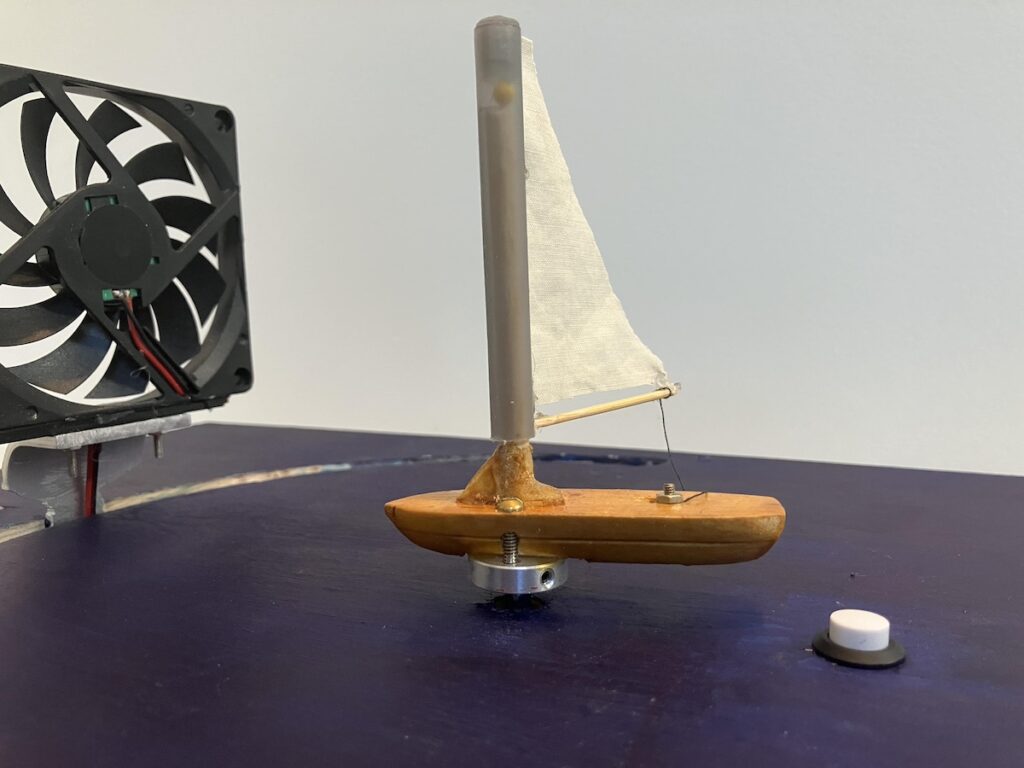
Sailing is a great way to get outdoors and explore the open waters, yet it can also pose some risks to the pilot and passengers if they are unfamiliar with how the boat handles under different wind conditions. As Kif Scheuer notes in his project write-up, traditional instruction relies on simple 2D illustrations, so he decided to take it a step further and build a highly interactive demonstrator that can affect a model sailboat in a more realistic/physical manner.
Because this device is meant to simulate sailing, Scheuer needed some sort of wind generator in the form of a 5V PC fan that was powerful enough to move the boat’s sail. It’s mounted onto an aluminum arm that is positioned on the output shaft of a NEMA17 stepper motor, thus allowing the Arduino UNO Rev3 to pivot its direction. Similarly, the boat was also hooked up to another stepper motor so that it could turn according to the fan’s updated position along its arc. The other electronics include a display for showing the current mode, a potentiometer for user interaction, and several buttons that control the mode/fan angle.
Once assembled, the user is able to switch between the various modes: manual, selective, random, and wind, with this last mode enabling the user to pivot the fan rather than the boat to observe how the sail reacts. You can read more about the sailing demonstrator on Instructables.
Three is the magic number, and extending the annual event that celebrates our community from one to three days will make for a very special edition this year. Today, we are finally announcing the dates for Arduino Days, taking place on March 21st, 22nd and 23rd, 2024. Mark your calendars, and bookmark the dedicated website for up-to-date information as we get closer to launch.
Now in its 11th year, this is the event that brings together all Arduino users and shines the spotlight on the most outstanding projects and ideas – across the world! We’ve had some great contributions in the past: remember Jeanne Harignordoquy’s World Wind Radio in 2023, or the Blue Box Project by Judit Giró Benet and Billy Chen in 2021? All sessions will be broadcast in live streaming (and later remain available on our YouTube channel) for maximum accessibility and visibility.
This year, we look forward to showcasing a huge range of applications, from industrial-grade solutions to wow-worthy prototypes, and from educational tutorials to completely original ideas that put a twist on our ecosystem. We’ll also treat our community to some exciting new product announcements, behind-the-scenes from our collaborations with industrial partners, and deep dives on current trends like Edge AI, TinyML, real-time monitoring, and so much more. Stay tuned!
The Call for Speakers
We will share the complete three-day agenda in the run-up to the event, but first… we want to give you the chance to be part of Arduino Days with your most impressive and interesting projects! Submit yours following the easy process on the dedicated website.
Should you be selected as a speaker for the 2024 edition, our team will be in touch to support you in producing the most effective video or presentation for the Arduino Days lineup – so you can be sure to make the best of your 10 minutes at the center of our stage.
We are also currently accepting submissions for organized events around the world, to take place during Arduino Days (either online or in person). If you want to be part of this incredible network of initiatives, tell us more by answering the call! All submissions will be featured on our website for a boost of visibility, and selected organizers will receive an exclusive package of communication material.
Whether you want to speak at Arduino Days or add to the celebrations with your own original event, we can’t wait to see your suggestions – and for the whole Arduino community to see YOU!
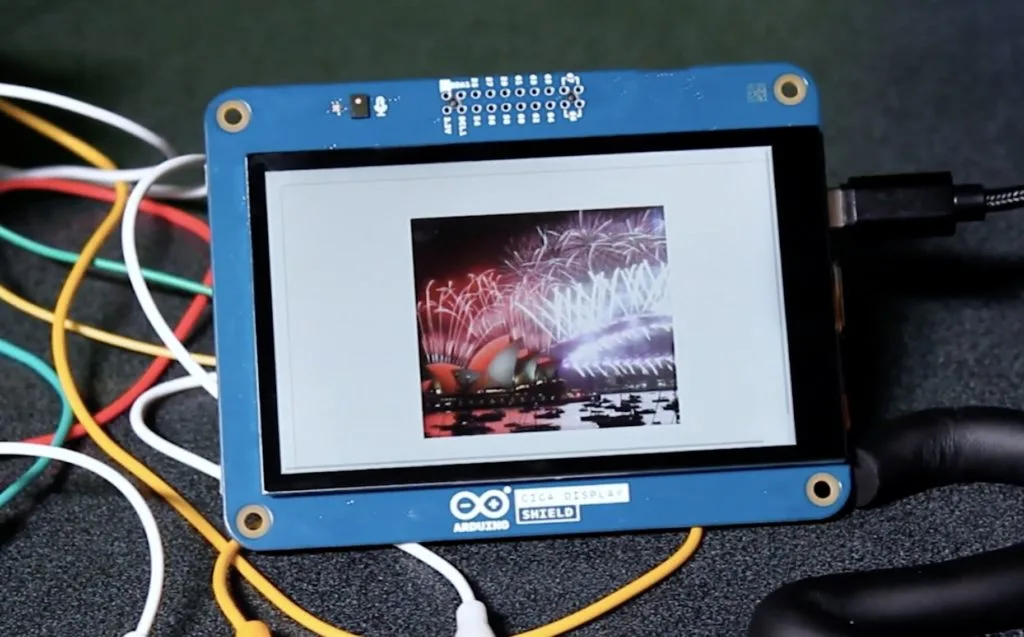
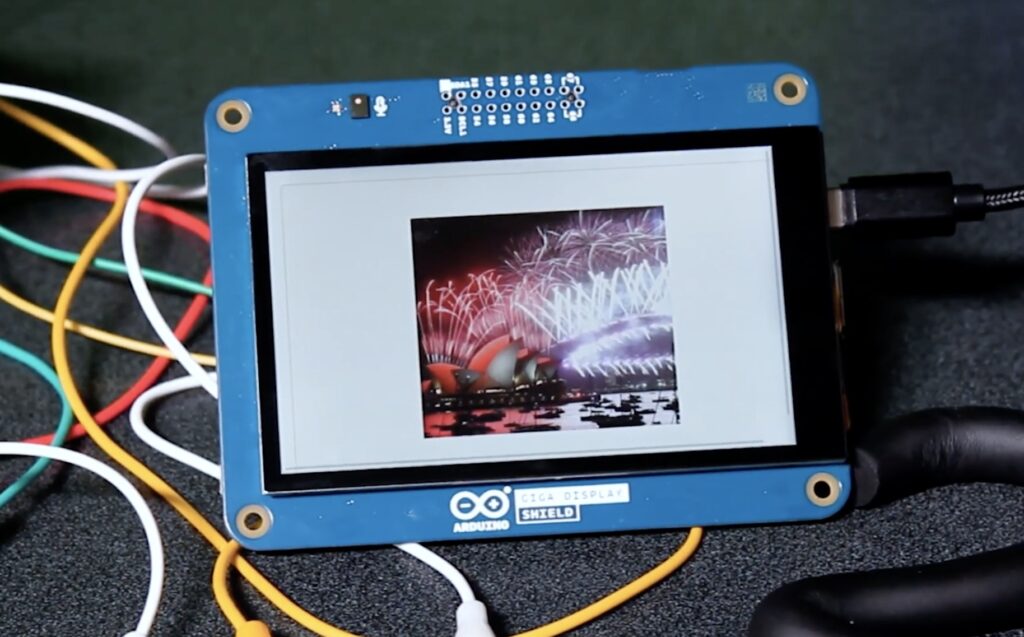
Watching back a slideshow of some of your favorite times of the past years is a great way to reflect on what’s happened and get excited for the future. The Electronic Cats crew wanted to incorporate this concept into a more simplified, interactive form which resulted in the Garrita project.
Garrita is a homemade platform that lets an Arduino GIGA R1 WiFi with GIGA Display Shield transform into a highly mobile slideshow thanks to its larger onboard memory capacity and convenient layout. This year, the Electronic Cats were able to take their image shifter concept even further with Michi: an existing project that turns any conductive object into a capacitive touch-sensing controller. Whenever one of Michi’s inputs are toggled, the board sends a signal to the GIGA R1 WiFi that causes the current slide to advance to the next one.
In order to go from a locally stored image to something on the Display Shield, users first transform their images into a more suitable format via the LVGL conversion tool. Once downloaded, the resulting files can be easily bundled into a Sketch before they become accessible in the application code. To see more about how the Electronic Cats built Garrita, you can read their write-up here on Hackster.io.
Italian artist, designer, and inventor Bruno Munari is often quoted as saying “If I listen, I forget; if I see, I remember; if I do, I understand.” We couldn’t agree more, and that is one of the reasons why we believe in the power of our Project Hub to help everyone truly learn, grow, and innovate. The tutorials our community shares are not only “recipes” you can replicate, but opportunities to go deeper and test different skills in real life. Don’t believe us? Check out this month’s top three picks!
Perplexed about the best way to safely multiplex a seven-digit LED display? Adrian Smith’s write-up offers a wonderful deep dive into electronics design best practices, suggesting shift registers as an alternative to directly connecting display segments and digit commons to microcontroller pins. The example, based on an Arduino UNO Rev3, will spur you to reflect on the interrelations between cost, complexity, and the crucial need to avoid overloads.
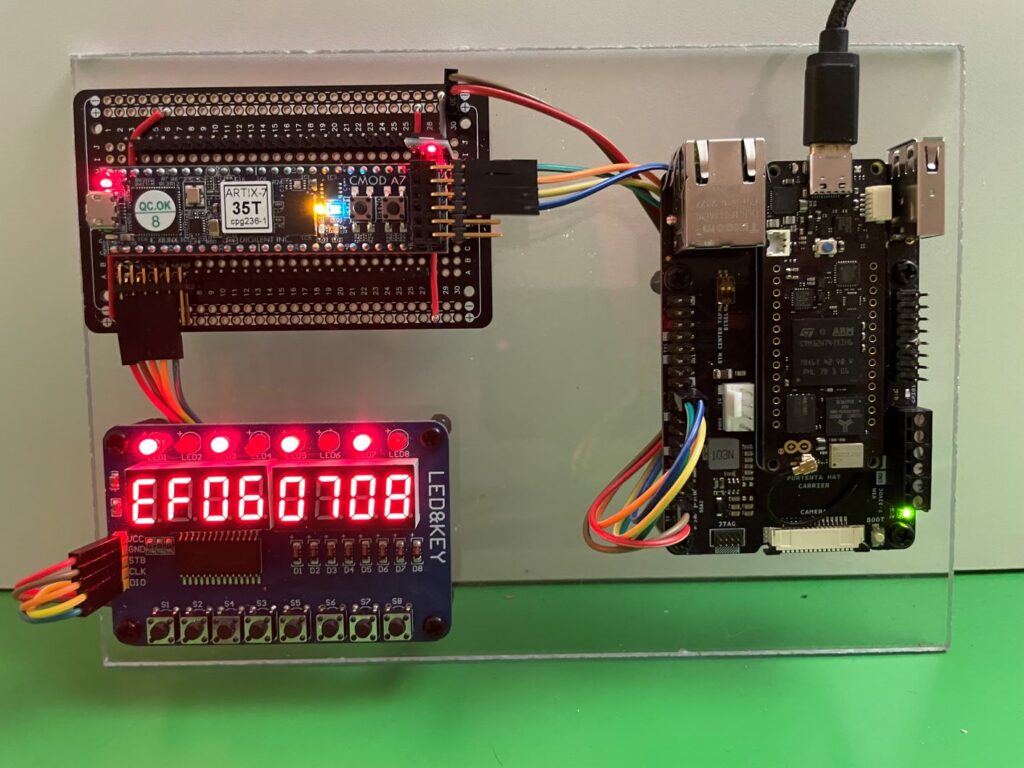
Your favorite Arduino module – Portenta H7 or H8, GIGA R1 WiFi, or Nano ESP32 will work great! – can inject a precious dose of flexibility into a field-programmable gate array (FPGA) to complete extreme tasks. Find out more about the general architecture and software drivers that can help you appropriately balance components’ performance, speed and costs: Dave Nardella’s Project Hub upload is not so much a step-by-step tutorial, but a springboard for infinite ideas!
Biking is an eco-friendly and healthy way of moving around the city! But traffic can be chaotic and safety should always be the priority: that’s why we love Luis Castillo’s idea to add direction indicators to the back of a bicycle. Activated via buttons installed directly on the handlebars, two LED arrows not only communicate clearly when you are ready to turn left or right, but also increase visibility and, of course, are a great excuse to try 3D printing, laser cutting, wiring, programming, and more!
These three Project Hub entries were selected for a $100, $300, and $500 gift card to spend on the Arduino Store, according to the terms and conditions of the Project Hub Competition we ran in 2023. Thank you all, for your contributions to open-source resources!
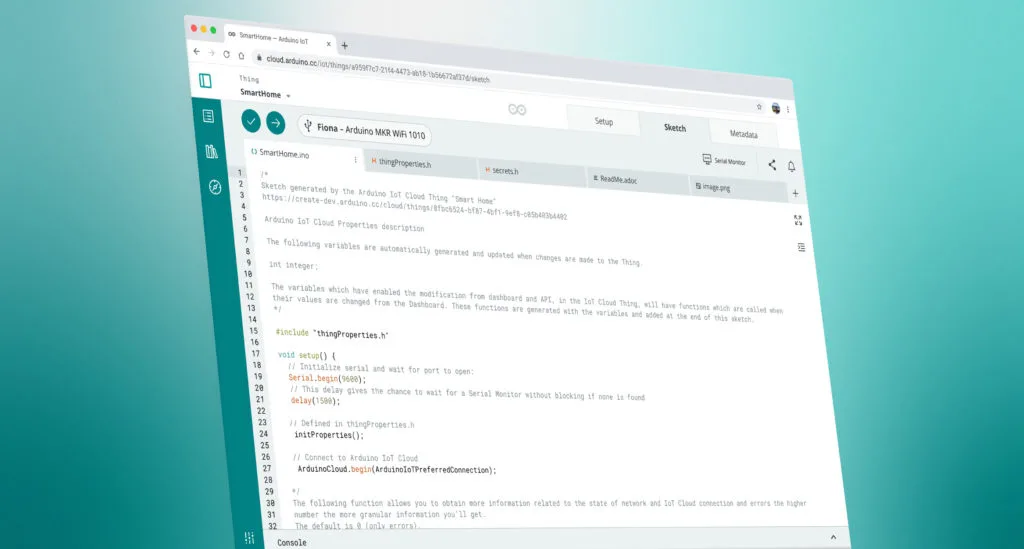
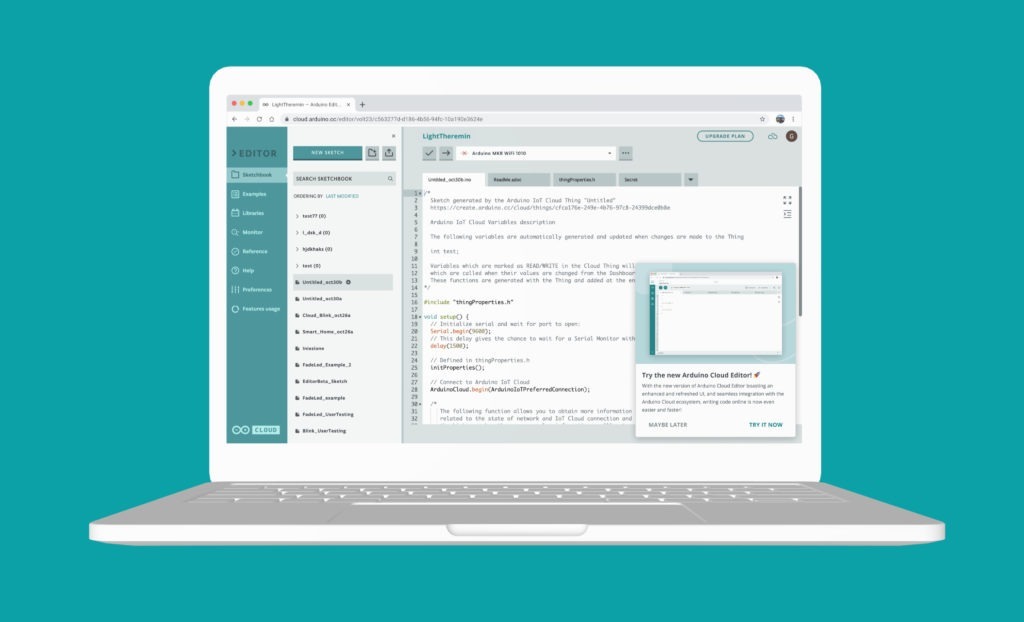
Welcome to the next chapter in our ‘Better, with You’ journey! In recent blog posts, we’ve explored the refreshed look of Arduino Cloud and introduced the latest features of the renewed Arduino IoT Remote app. Today, we’re thrilled to unveil another game-changer, the new Arduino Cloud Editor, which brings the classic Arduino IDE experience to your browser.
The new Cloud Editor
Imagine that you can start your project without having to deal with any annoying setups or maintenance headaches. Imagine that you’re free to work from wherever you want. Well, that’s the vibe of our new Cloud Editor. We’ve made the whole development experience way smoother, so you can forget about the boring techy stuff and just focus on bringing your ideas to life. Let’s dive in!
A unified and more powerful editor
Traditionally, Arduino Cloud had two separate editors: an embedded simple one and the full editor. Users have long awaited a unified editor that gets the best of each one. The new Cloud Editor achieves just that, completely revamping its implementation and setting the stage for exciting new upcoming features.
Tip: To facilitate a smooth transition, the new Cloud Editor will coexist with the current one over the next two months. During this period, you can choose to opt in for the new editor or keep the existing version. It’s your call! Scroll down to the “Try it now” section to find out how to activate the new Cloud Editor on your account.
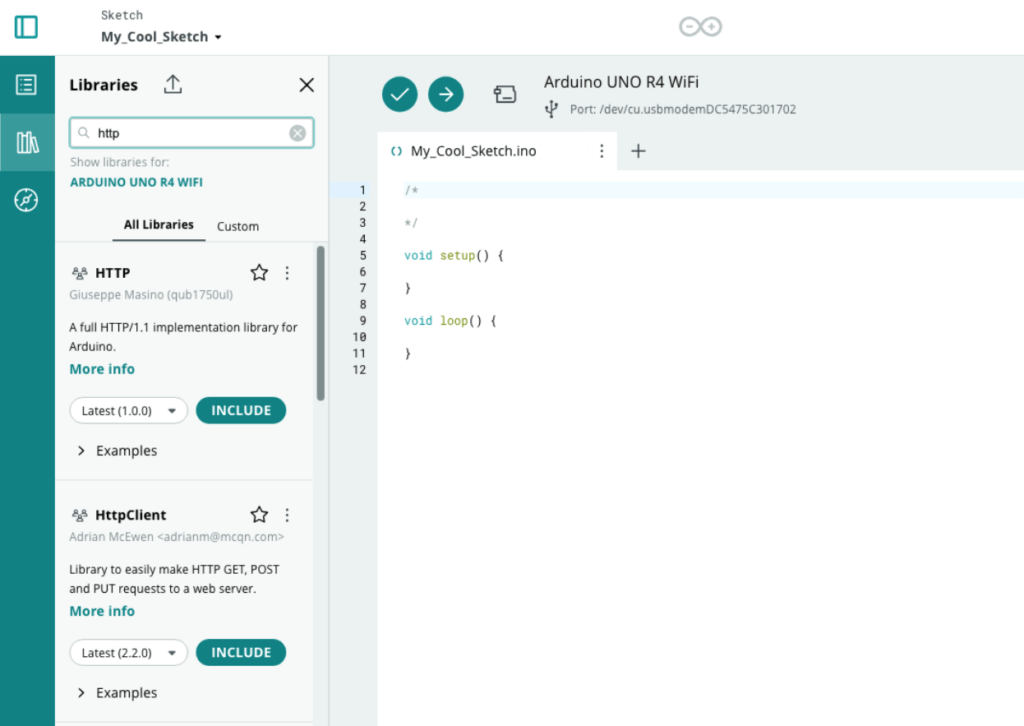
Better library and example management
The new Cloud Editor provides a library manager that helps you explore and organize libraries as well as easily use their examples.
Screenshot of the revamped library manager in the new Arduino Cloud Editor
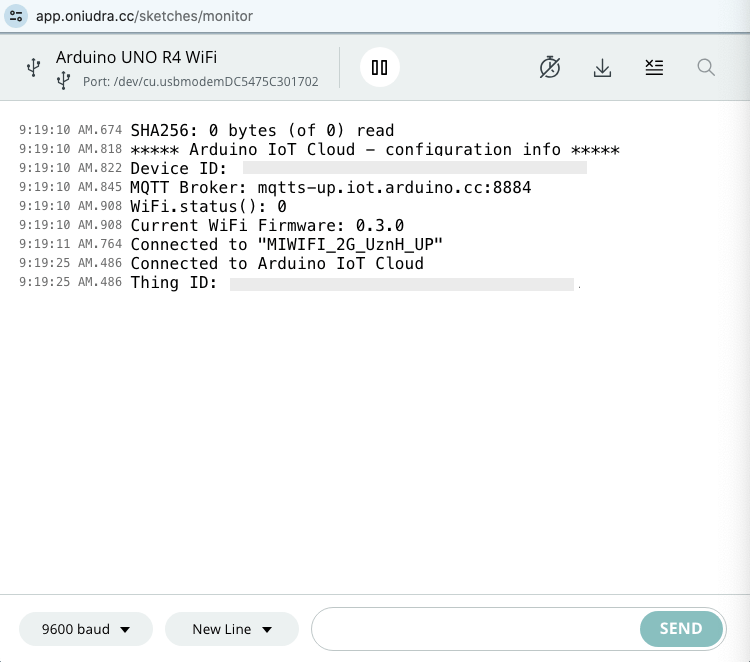
Improved serial monitor
The serial monitor has been improved with the ability to download logs and the inclusion of timestamps per line. This is a long-time requested feature by users to improve debugging.
Screenshot of the improved serial monitor with timestamps in the new Arduino Cloud Editor
Support for any Arduino IDE-compatible device
The Arduino Cloud Editor supports any device compatible with the Arduino IDE, thus extending your Arduino development experience to your browser.
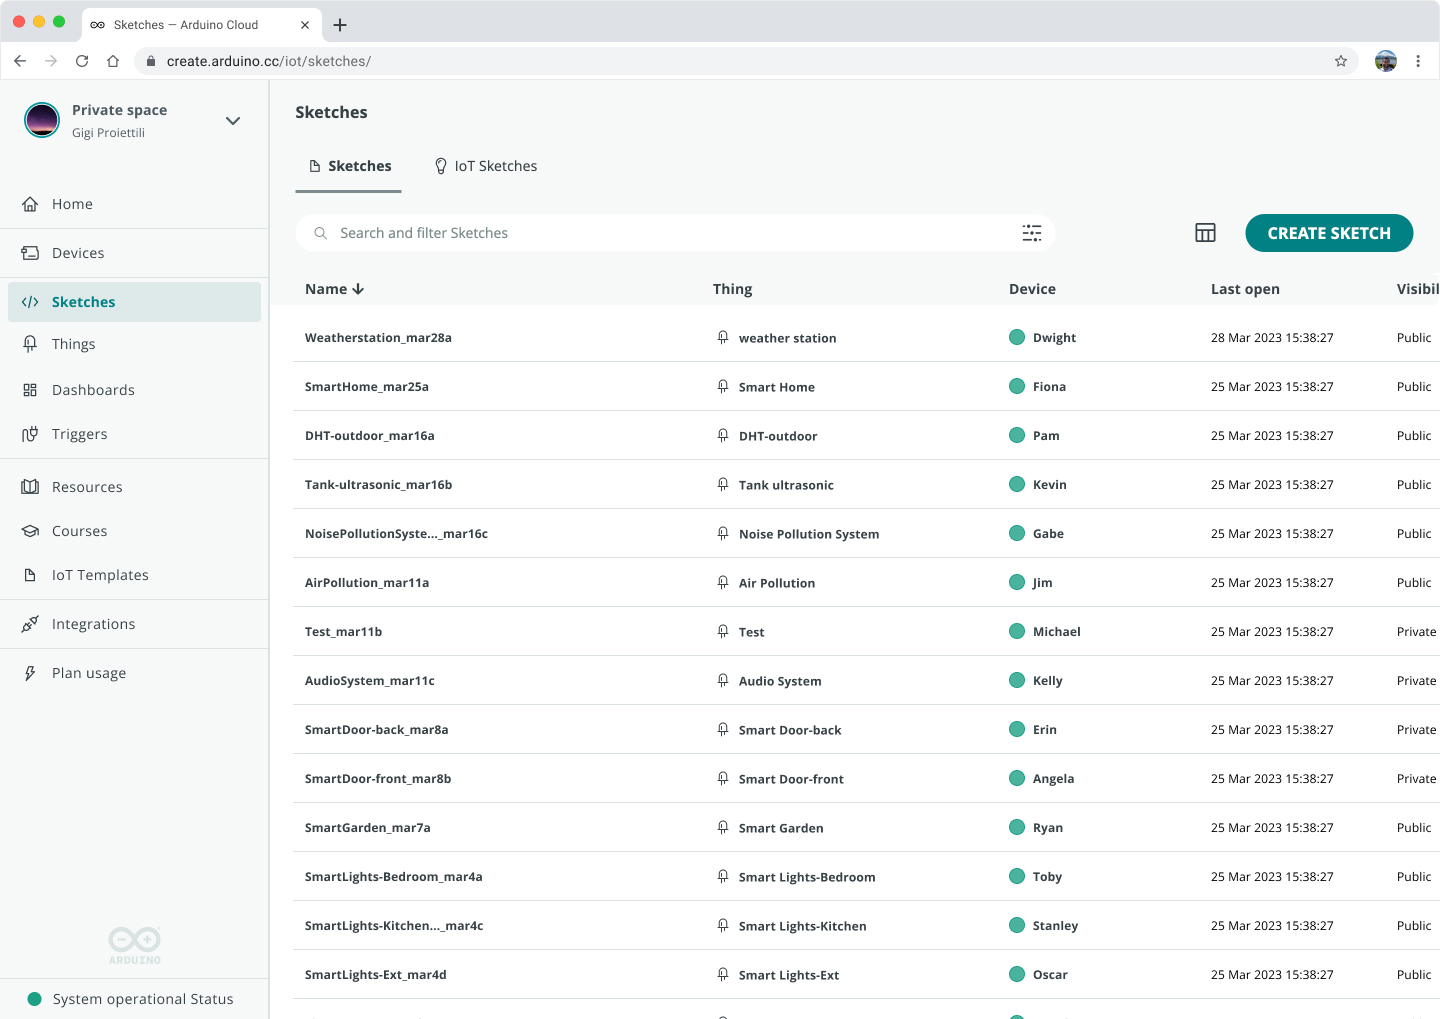
A single sketch repository
Whether you’re programming IoT sketches or traditional ones, the new Arduino Cloud provides a unified place to store and organize your sketches with a single editor for all of them.
Screenshot of the new Arduino Cloud sketchbook with the Sketches and IoT Sketches tabs
Keep your sketches organized
The sketchbook allows you to create folders so that you can keep your sketches organized in a more efficient way.
How to use the Cloud Editor
In the new Arduino Cloud, sketches are organized as “Sketches” and “IoT Sketches”, where “IoT Sketches” are the ones that have been created to connect the application with Arduino Cloud so that it can be monitored and controlled using the dashboards.
Your standalone sketch development starts from the “Sketch” section of your sketchbook. Just click on “CREATE SKETCH” or select the sketch you want to edit.
IoT Sketches are automatically created when you create an Arduino Cloud Thing. Once they are created, you can access the sketch either from the Thing or the “IoT Sketch” section of your sketchbook.
Try it now
Click on “TRY NOW” as shown in the screenshot below to start using the new Cloud Editor. If you need a bit more time before moving to the new version, you can still use the existing version until March 31st by clicking on “MAYBE LATER.”
You can now have the option to try the new Cloud Editor from the notification at the bottom right hand corner of your screen.
Please note that Chromebook support will not be available initially. Stay tuned for updates as we will announce Chromebook support as soon as it is ready.
The new editor is part of the new Arduino Cloud
If you’re just getting into the Arduino Cloud, don’t worry, we’ve got the lowdown for you right here. Arduino Cloud is the next exciting step in the Arduino journey for IoT enthusiasts. Here is a quick intro video that will give you a summary in 2 minutes.
Basically, if you’ve got an IoT project idea, you can easily turn it into a real project using this all-in-one, easy Cloud platform. It helps you create applications that can be monitored and controlled from custom dashboards accessible from your browser or your mobile phone. It not only supports Arduino and ESP-based devices, but also any device programmed using Python, MicroPython, Javascript or Node-RED. Which is why the Arduino community is talking a lot about it at the moment! Forget about dealing with complicated stuff – the Arduino Cloud lets anyone, no matter their skill level, create stuff from wherever.
Want a sneak peek? Here’s Karl giving you a tour of Arduino Cloud with the latest new UI.
Get started with the Arduino Cloud
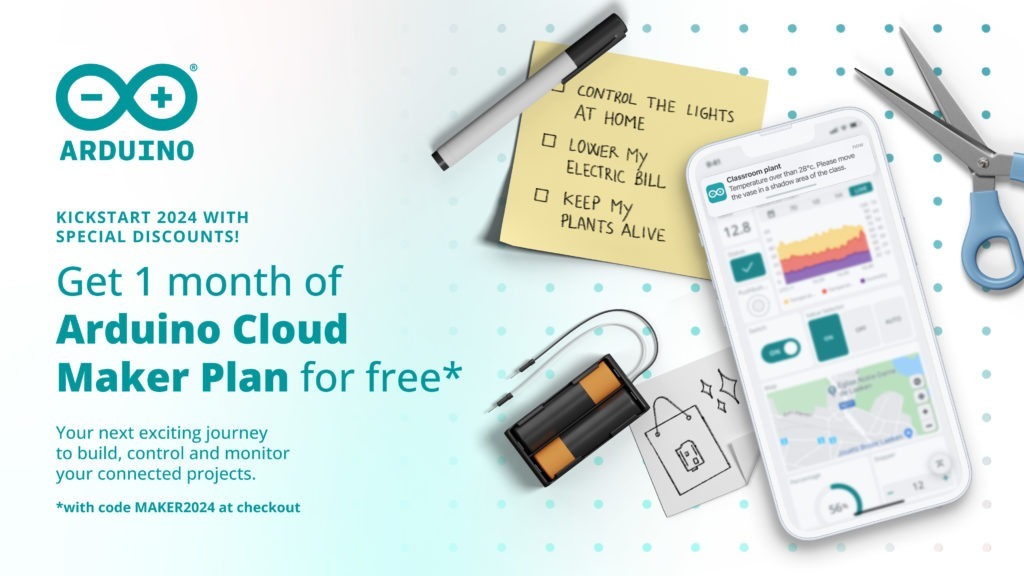
Are you ready to dive in? Learn more about the new Cloud Editor through our detailed documentation. And to sweeten the deal, don’t forget to grab your first month free on the Maker plan with the code ‘MAKER2024 at checkout. But hurry, this offer is only valid until January 31st (You can cancel anytime). Join us in unlocking the full potential of your creative projects!
Weather stations are very popular projects for people new to Arduino. They’re complex enough to help a person learn new skills, but they’re simple enough to be approachable. However, that popularity has led to something of an arms race, with many makers attempting to design the most impressive weather stations on the internet. If you want to go back to the basics to dip your toes into the water, Mirko Pavleski explains how to build a classic weather station that prioritizes the essentials.
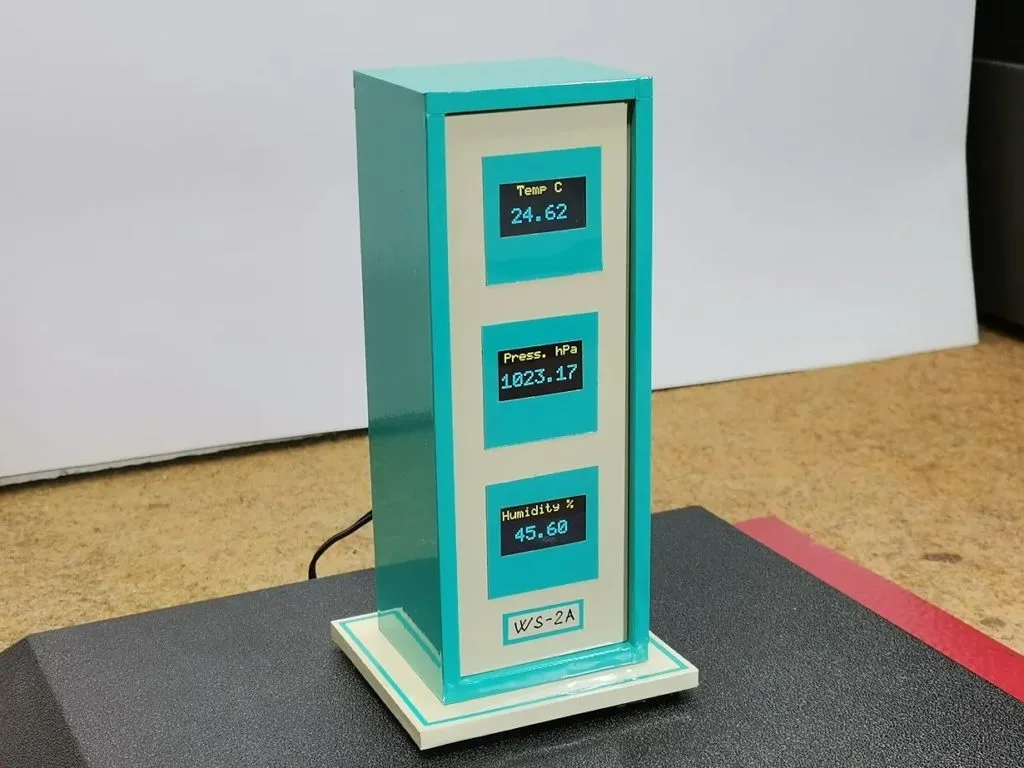
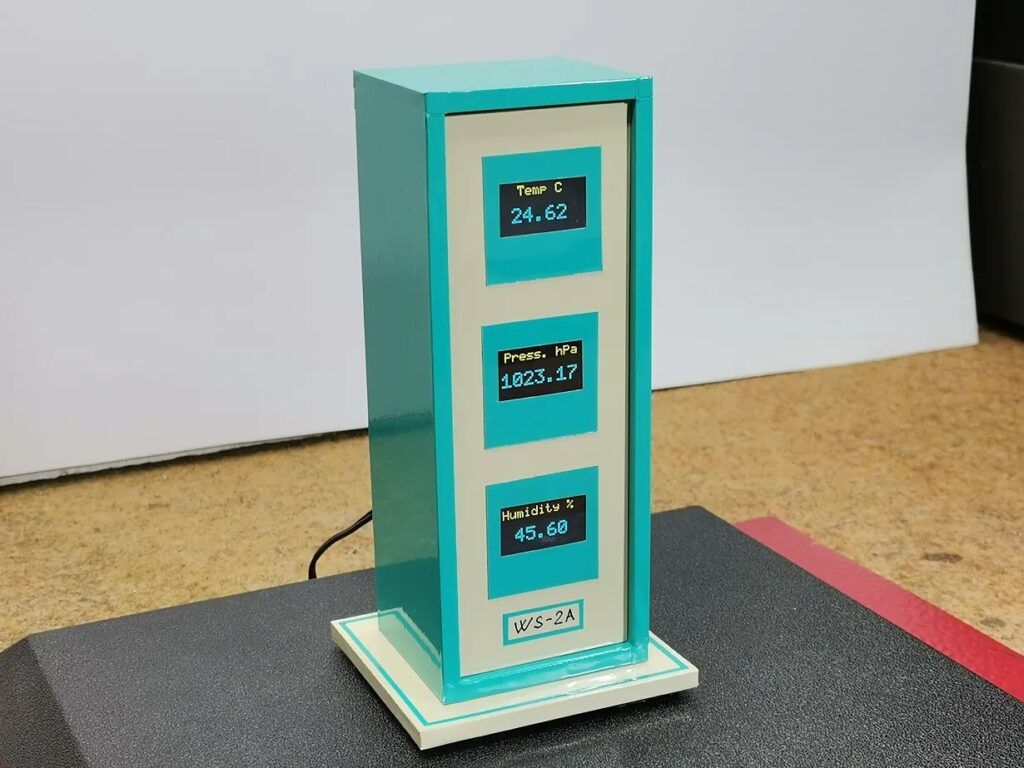
Inspired by older devices that displayed information like temperature, barometric pressure, and humidity on analog gauges, Pavleski chose a design with three screens in a vertical stack. Each screen can display whatever data the user can access through a sensor. In this case, his station utilizes the popular BME280 module that monitors the same three parameters as the vintage inspiration: temperature, pressure, and humidity.
This weather station shows each reading on a small two-tone OLED screen. Those screens have yellow pixels on the top and blue pixels on the bottom, which is handy for distinguishing the title from the data without the expense or complexity of a full-color screen.
An Arduino Nano board reads the data from the BME280 sensor and writes to the displays. But those displays and the BME280 all connect through I2C. To interface with all of them through the single pair of SCL/SDA pins, Pavleski included a TCA9548a multiplexer module.
Those components all mount in a minimalist enclosure made from foam board. And while we certainly enjoy complex weather stations, we appreciate the simplicity and approachability of this design.
Discover the future of K-12 & HE at Bett 2024 with Arduino Education
Arduino Education will be back at Bett 2024, the global stage for education innovation, from January 24th-26th at ExCel London.
Our booth (which you’ll find in Bett Hall, Stand NJ12) will be a hub of creativity and excitement, where you can immerse yourself in the world of STEAM education and discover how Arduino empowers students to become inventors, innovators, and problem-solvers.
Meet our new educational solutions
At Bett, you’ll be the first to meet the new Arduino robot and have an interactive demo of our new Programmable Logic Controller, the Arduino PLC Starter Kit. Get hands-on with both of these new kits to explore their unique features and see how they can enhance your classroom for both K-12 and higher education.
You’ll also have the opportunity to try out the Arduino Cloud for Schools and all its new features, as well as seeing our collaboration with IED Rome and Sapienza Schools, which offers secondary age teaching tools designed to improve physics learning with the Arduino Science Kit R3.
Connect with our thriving teacher community
Create connections with fellow Arduino teachers and exchange ideas, strategies, and resources that will fuel your STEAM teaching journey.
Come and meet our team
Join our team of passionate educators and STEAM enthusiasts who are eager to share their expertise and guide you through our solutions. You’ll get practical tips and strategies for incorporating Arduino into your classroom, ensuring that every student has the opportunity to experience the transformative power of STEAM education.
Will we be award winners?
Arduino Education has been recognized as a finalist in not one, but THREE categories for the Bett Awards 2024!
COMPANY OF THE YEAR: We’re incredibly proud of the work our team has done to bring us this far.
COLLABORATION WITH A SCHOOL: Our partnership with Colegio San Jose de Las Vegas in Colombia for the Medellin Challenge.
BETT INNOVATION AWARD: Our work in IoT education, specifically with the Arduino Cloud for Schools, the Explore IoT Kit, and the Greenhouse Kit, is being acknowledged as a leading force in educational innovation.
Will we win? We’ll find out at Bett!
We look forward to seeing you at stand NJ12 in the Bett Hall.
You’ve seen movies and TV shows with Geigers counters: handheld devices that click when they detect radiation — the faster the clicks, the stronger the radiation. Those clicks are actually the result of inert gas briefly made conductive by bursts of energy released by ionizing radiation particles entering the sealed Geiger–Müller tube. YouTuber The Edison Union had the clever idea to use those clicks as triggers for generative music and turned to Arduino to make it happen.
This is part of a larger project called The Cherenkov Effect, which seeks to explore Cold War-era anxieties related to nuclear power and nuclear weapons. The Cherenkov Effect does that through a combination of performance art and generative music. And what better way to generate that music than with radiation?
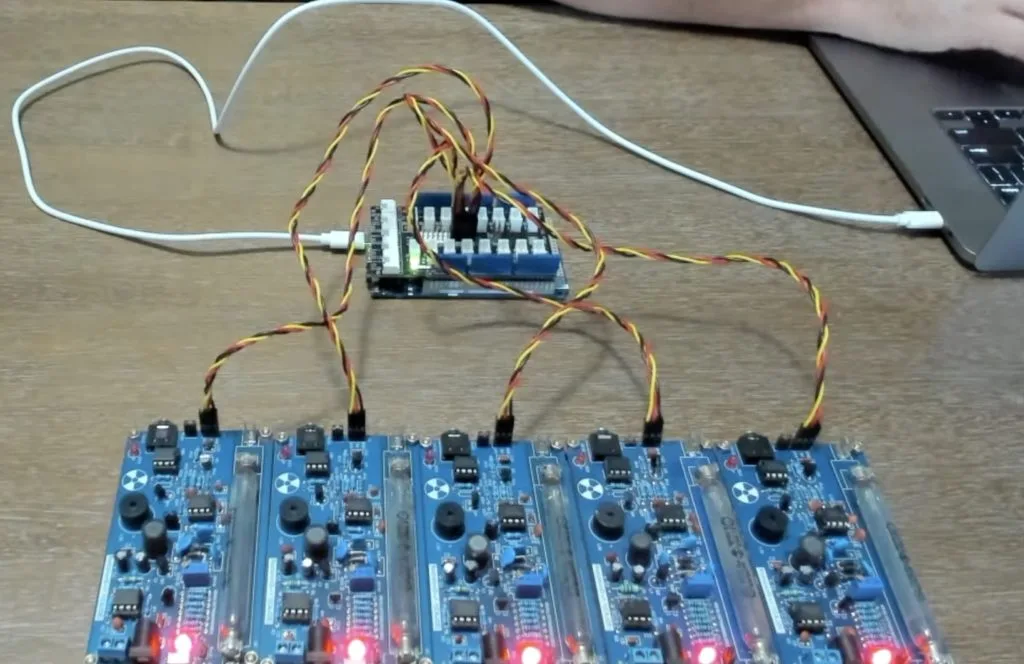
In this case, that radiation comes from Strontium-90 and Polonium-210. While those are less dangerous to handle than many other radioactive materials, they still aren’t safe and you shouldn’t replicate this project if you don’t know the proper procedures.
The Edison Union uses Ableton Live to produce the music for The Cherenkov Effect, but needed “seeds” for the generative processes that turn into audible notes. Those seeds come from five Geiger counter modules that connect to an Arduino GIGA R1 WiFi board through a Seeed Studio Grove Shield. The Arduino sketch counts radioactive pulses, then passes that data on to a Processing sketch that performs the generative music functions. The latter is where The Edison Union is able to get creative regarding the sound produced. Finally, Processing sends notes to Ableton Live to synthesize.
Now when The Edison Union moves Strontium-90 or Polonium-210 around the array of Geiger counters, the device will generate and play music based on the radiation it receives.
New year, new Open Source Report! Lots has happened in 2023 in terms of open-source development, and we’re excited to share our yearly recap of the various contributions from the Arduino team and the community. Together, we have released new, important open-source projects – both hardware and software – as well as published and maintained a staggering number of libraries, growing our shared resources at a record-breaking pace.
Apparently, we have a history of surpassing our own expectations – and 2023 was no exception. We joined the Zephyr® Project, released five new open-source hardware products, five new versions of the Arduino IDE 2.x, 13 new versions of our command line tools, 12 new official libraries, and 13 versions of the official board packages. We also worked to significantly support MicroPython – releasing a new installer tool and creating a package index.
The Arduino community has clearly shown its love for open source too. During 2023, 1,068 new libraries were added (+20% in one year!) and 101 new versions of community board packages were released. On the content side, 205 new open-source tutorials were published on our new Project Hub.
The 2023 Report also includes a ranking of the most active library authors and maintainers, who provide an incredible service to the whole community with their hard work in the name of open source.
Finally, the achievements we are proud to recap in the Arduino Open Source Report would not be possible without you. To all the people who buy original Arduino products, subscribe to Arduino Cloud, or make donations: THANK YOU for supporting us and our efforts in open-source development.
If you only care about showing content as clearly as possible at the lowest cost, then you’ll want to turn to LCD or OLED technology. But a project’s display gives you an opportunity to get creative with the aesthetic, which opens up a whole world of different display types. If you want a retro feel, then you can inspiration in DIY GUY Chris’ gorgeous LED matrix.
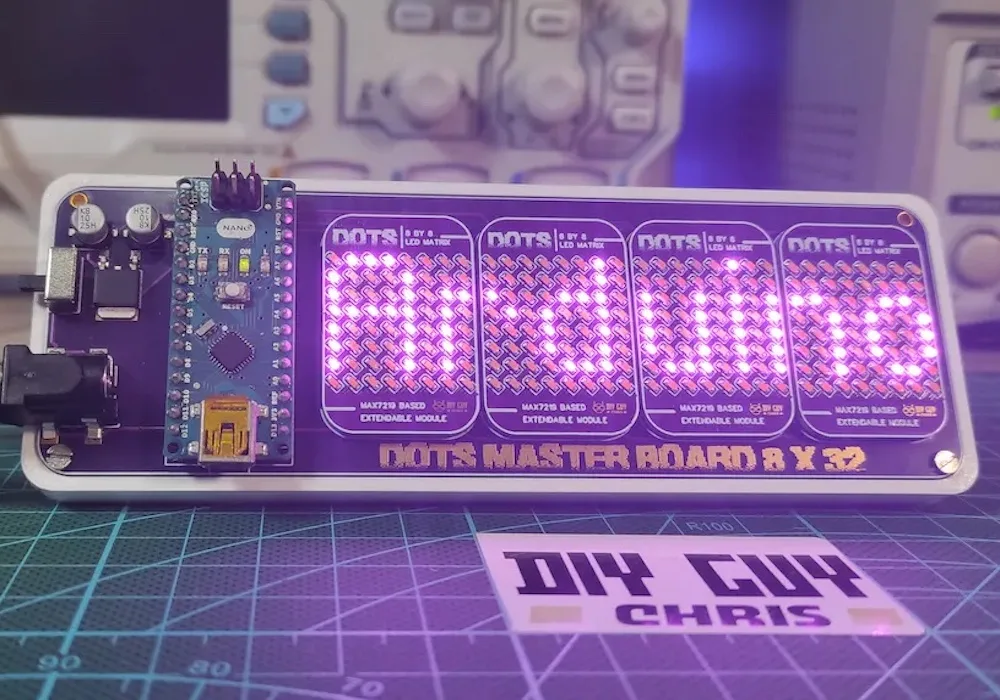
This is a dot-matrix LED display with an overall resolution of 32×8. But that description alone doesn’t do the project justice. Chris used tiny 0603 SMD LEDs, which allowed for very high “pixel” density and that results in better clarity than a typical LED matrix display. To enable future expansion, Chris set this up as a host board that accepts four LED boards — each of which contains an 8×8 matrix. A MAX7219 IC drives the LEDs on each of those boards.
The LED boards connect to the host board through nifty mezzanine connectors. The host board contains an Arduino Nano that sends control signals to the MAX7219 chips. The Arduino can supply USB power to the LEDs, but there is also a DC jack for power when USB isn’t connected. Chris’ Arduino sketch lets the user “print” alphanumeric characters to scroll across the four LED matrices.
The best part about this design (other than the great style) is that Chris can scale it up in the future with larger host boards that accept more than four LED boards.
Um dir ein optimales Erlebnis zu bieten, verwenden wir Technologien wie Cookies, um Geräteinformationen zu speichern und/oder darauf zuzugreifen. Wenn du diesen Technologien zustimmst, können wir Daten wie das Surfverhalten oder eindeutige IDs auf dieser Website verarbeiten. Wenn du deine Einwillligung nicht erteilst oder zurückziehst, können bestimmte Merkmale und Funktionen beeinträchtigt werden.
Funktional
Immer aktiv
Die technische Speicherung oder der Zugang ist unbedingt erforderlich für den rechtmäßigen Zweck, die Nutzung eines bestimmten Dienstes zu ermöglichen, der vom Teilnehmer oder Nutzer ausdrücklich gewünscht wird, oder für den alleinigen Zweck, die Übertragung einer Nachricht über ein elektronisches Kommunikationsnetz durchzuführen.
Vorlieben
Die technische Speicherung oder der Zugriff ist für den rechtmäßigen Zweck der Speicherung von Präferenzen erforderlich, die nicht vom Abonnenten oder Benutzer angefordert wurden.
Statistiken
Die technische Speicherung oder der Zugriff, der ausschließlich zu statistischen Zwecken erfolgt.Die technische Speicherung oder der Zugriff, der ausschließlich zu anonymen statistischen Zwecken verwendet wird. Ohne eine Vorladung, die freiwillige Zustimmung deines Internetdienstanbieters oder zusätzliche Aufzeichnungen von Dritten können die zu diesem Zweck gespeicherten oder abgerufenen Informationen allein in der Regel nicht dazu verwendet werden, dich zu identifizieren.
Marketing
Die technische Speicherung oder der Zugriff ist erforderlich, um Nutzerprofile zu erstellen, um Werbung zu versenden oder um den Nutzer auf einer Website oder über mehrere Websites hinweg zu ähnlichen Marketingzwecken zu verfolgen.


 core, which include