Schlagwort: arduino

  • High school student builds his dream racing wheel

    High school student builds his dream racing wheel

    Reading Time: 2 minutes

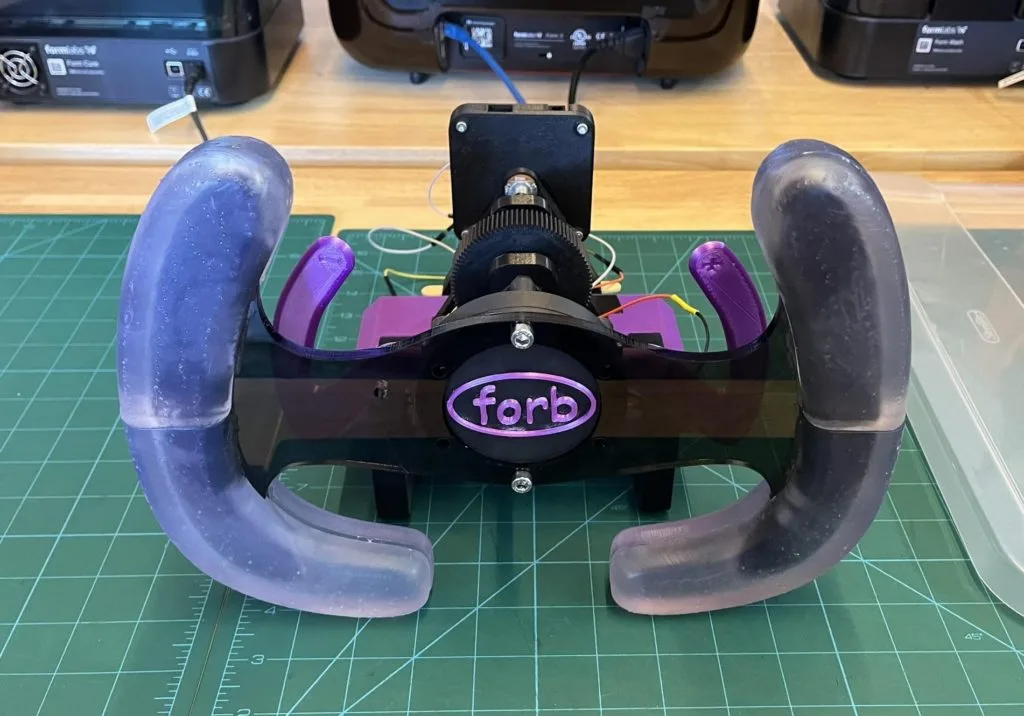
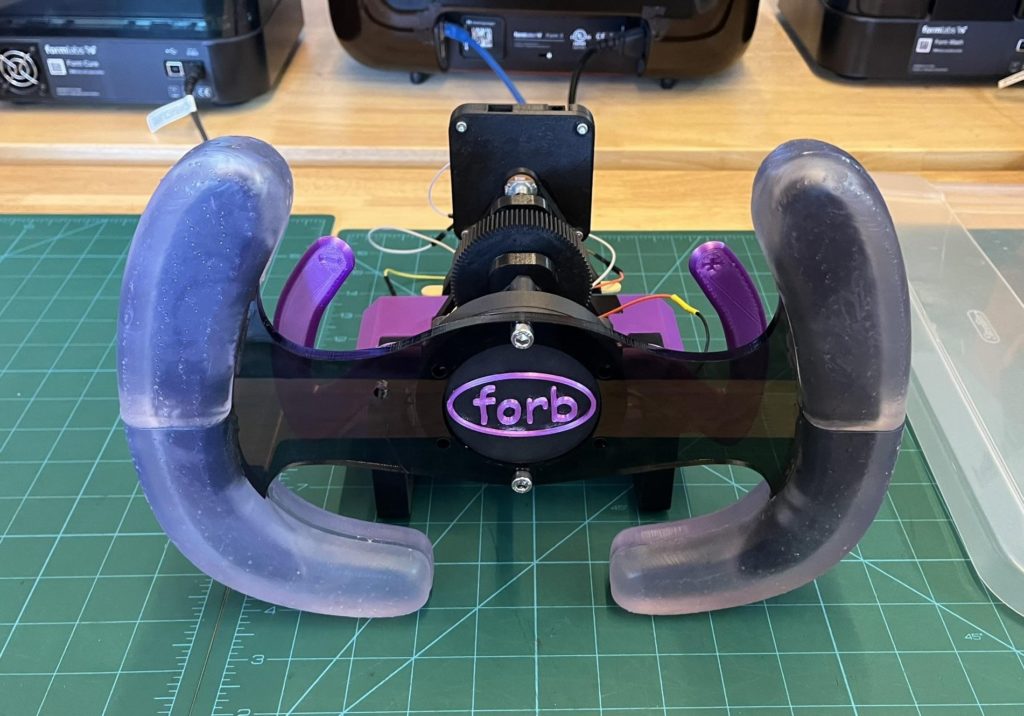
    Racing “video games” can be incredibly realistic these days, with every facet of the car’s physics and their interaction with the asphalt programmed in. Those racing sims could provide a completely immersive experience — if the player wasn’t sitting on a motionless couch using a controller that doesn’t resemble a car’s steering wheel in the slightest. To rectify that issue, high school student Pranshu Agnihotri built his dream racing wheel.

    Agnihotri tackled this project for a senior project in his Principles of Engineering class at Irvington High School. Its purpose is to provide a more realistic interface for racing games and sims. It doesn’t have any force feedback capabilities, but it will work with any PC game thanks to the Arduino that lets the user easily rebind controls. Those can even emulate keyboard and mouse inputs for games that weren’t designed for use with steering wheels.

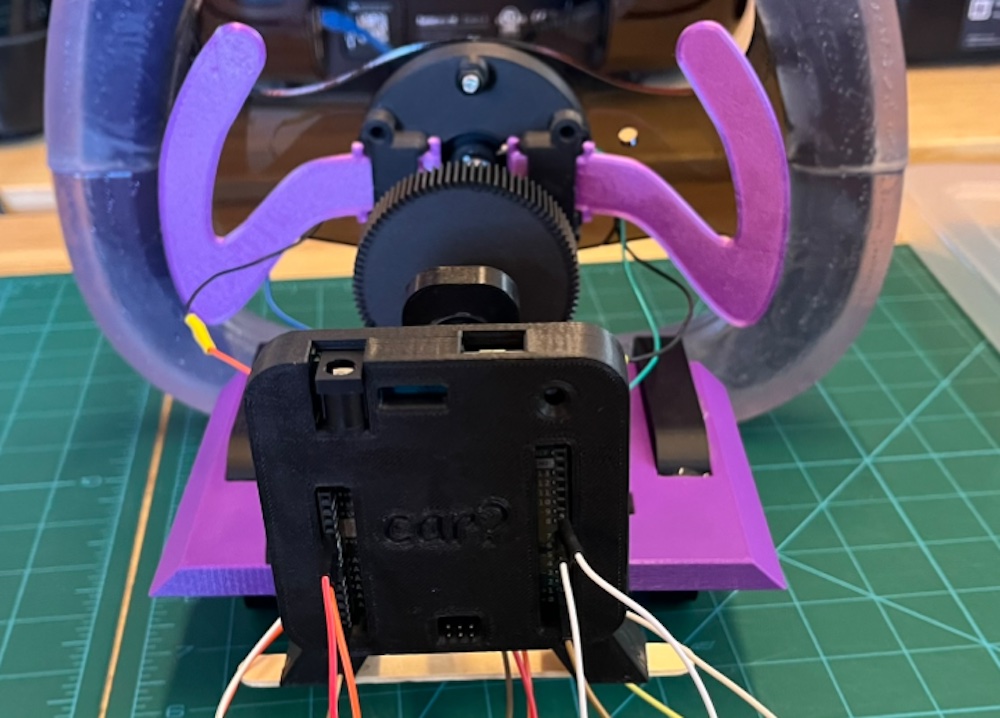
    The brain is an Arduino Leonardo, which Agnihotri chose for its Microchip ATmega32U4 microcontroller. That is configurable as a standard USB HID, so any computer will recognize its inputs without any special drivers or software. The steering wheel and electronics enclosure were 3D-printed in exactly the shape Agnihotri wanted. An M8 threaded shaft acts as the steering column. A potentiometer provides steering angle input, while limit switches detect when the player presses the paddle shifters. The Arduino reads those inputs, then sends out the corresponding gamepad, keyboard, or mouse commands via USB.

    [youtube https://www.youtube.com/watch?v=sIjAQyDc9xQ?feature=oembed&w=500&h=281]

    We have to assume that Agnihotri aced this assignment, and now he has an awesome steering wheel to race with. 

    The post High school student builds his dream racing wheel appeared first on Arduino Blog.

    Website: LINK

  • Arduino Days: Full schedule is online!

    Arduino Days: Full schedule is online!

    Reading Time: 2 minutes

    This year we have so many talks, presentations, and announcements we had to spread out over three days! Arduino Days 2024 will be held from March 21st to 23rd – giving us more time to celebrate our community with our yearly event: 100% online, free, and open to all.

    The full schedule is now available on the dedicated Arduino Days website: explore the program to find the topics that are the most inspiring or interesting to you, and turn on notifications for the three YouTube lives linked below. 

    Day #1: March 21st from 3:30 PM CET — Let’s Get to Business

    [youtube https://www.youtube.com/watch?v=x_hJ4-JPsag?feature=oembed&w=500&h=281]

    We start off with a day dedicated to innovative transformation for professionals. From Bob Martin (Wizard of Make / Senior Staff Engineer at Microchip) and Foundries.io CEO George Gray, to founder and CEO of Blues Ray Ozzie and Bosch general manager Marcellino Gemelli – you’ll hear from a variety of pros who are leveraging the open-source ecosystem to innovate their industry with flexible, reliable, out-of-the-box solutions.

    Day #2: March 22nd from 3:30 PM CET Makers in the Making

    [youtube https://www.youtube.com/watch?v=k9FsXG5thsA?feature=oembed&w=500&h=281]

    On the second day, the spotlight turns to the educators who embrace Arduino as a platform to teach STEM and engage students of all ages and skill levels. Discover how teachers can use Arduino’s Science Kit R3 to reveal the beauty of physics in Alan Bates’ talk, or find out how Alvik supports MicroPython beginners with project-based learning in Austin Gardner’s. And don’t miss new product presentations: we’re excited to introduce you to the upcoming PLC Starter Kit!

    Day #3: March 23rd from 3: 30 PM CET All About the Community

    [youtube https://www.youtube.com/watch?v=wSdFAJ3gcpM?feature=oembed&w=500&h=281]

    Last, but definitely not least, Saturday will be a huge celebration of makers’ diverse skills and passions! Join this third awesome session to hear about a variety of original projects presented by their own creators, and dive deep into topics ranging from accessibility (with inventor Danielle Boyer) to product quality testing. Don’t miss our partner talks – with STMicroelectronics, Analog Devices, and more – and keep an ear out for our latest major announcements, including one for the new product we’ve been working on with Silicon Labs.

    We hope you’ll join us to celebrate Arduino Days live on YouTube, and let us know what your favorite sessions are in the chat comments. 

    Don’t forget there will also be dozens of in-person independent events around the world: check out the Arduino Days website in a few days for the official map! 

    No matter how you decide to show your love for open source, we look forward to seeing you at Arduino Days!

    The post Arduino Days: Full schedule is online! appeared first on Arduino Blog.

    Website: LINK

  • DIY “Staccato” controller drives Tesla coils

    DIY “Staccato” controller drives Tesla coils

    Reading Time: 2 minutes

    The Tesla coil, patented by legendary inventor Nikola Tesla in 1891, is a kind of resonant transformer circuit capable of producing sparks of high-voltage alternating-current electricity. They don’t have many practical uses today beyond novelty, but they were commonly used in spark-gap radio transmitters in the early 20th century. The sparks generated by a Tesla coil would emit strong bursts of radio waves and operators could encode information through patterns of pulses, similar to a wired telegraph. But those sparks are difficult to control, which is why Mirko Pavleski designed this Arduino-based “staccato” controller for Tesla coils.

    The purpose of Pavleski’s device is to gain better control over a Tesla coil, with the goal of generating longer sparks with less power. It does so by providing very granular control over the length of each pulse, its intensity, and the interval between pulses. A Tesla coil requires a lot of voltage to create a spark, but very little current. That means that the total power needed to produce a spark is minimal and relatively safe to oversee with a microcontroller.

    In this case, Pavleski used an Arduino Nano to manage the circuit. A control panel lets the user adjust the parameters, then the Arduino does the rest. Power comes in from mains via a 12V transformer and the Arduino controls the current going from that to the Tesla coil with a standard triac, with a large capacitor providing some filtering. Almost everything else comes down to the Arduino’s programming, which ultimately determines the characteristics of the electricity supplied to the Tesla coil. Because that’s going through a triac, the Arduino can “dim” the voltage, as opposed to simply toggling it like a relay would.

    [youtube https://www.youtube.com/watch?v=JNNYee-Tons?feature=oembed&w=500&h=281]

    This will let Pavleski perform more in-depth experiments with Tesla coils.

    The post DIY “Staccato” controller drives Tesla coils appeared first on Arduino Blog.

    Website: LINK

  • Autochef-9000 can cook an entire breakfast automatically

    Autochef-9000 can cook an entire breakfast automatically

    Reading Time: 2 minutes

    Fans off Wallace and Gromit will all remember two things about the franchise: the sort of creepy — but mostly delightful — stop-motion animation and Wallace’s Rube Goldberg-esque inventions. YouTuber Gregulations was inspired by Wallace’s Autochef breakfast-cooking contraption and decided to build his own robot to prepare morning meals.

    Gregulations wanted his Autochef-9000 to churn out traditional full British breakfasts consisted of buttered toast, eggs, beans, and sausage. That was an ambitious goal, because each of those foods requires several steps to prepare. Gregulations’ solution was to, essentially, create one large machine that contains several smaller CNC machines. Each one is distinct and tailored to suit a particular food. In total — if you add up all of the different sections — this is a 12-axis CNC machine.

    The Autochef-9000’s central controller is an Arduino Mega 2560 board. But even with the power and number of pins available, that wouldn’t have been able to handle everything. So it divvies out some tasks to Arduino UNO Rev3 boards.

    As you would expect, this takes quite a lot of heat to cook everything. That’s why the Autochef-9000 contains several electric heating elements, which the Arduinos control via relays.

    Users can order food using a touchscreen menu system or a smartphone interface. Autochef-9000 will then whir to life. It will open and heat a tin of beans, grab and heat a sausage, hard boil an egg, and toast and then butter bread fed from a magazine. Finally, it will deposit all of those items onto a plate.

    There is a lot going on inside of this machine and Gregulations breezes past a lot of the technical details, but it is a joy to see in action. And unlike Wallace’s inventions, this one hasn’t caused any serious disasters (yet).

    [youtube https://www.youtube.com/watch?v=LMoHLUd81P8?feature=oembed&w=500&h=281]

    The post Autochef-9000 can cook an entire breakfast automatically appeared first on Arduino Blog.

    Website: LINK

  • This new game engine runs Manic Miner on an Arduino UNO

    This new game engine runs Manic Miner on an Arduino UNO

    Reading Time: 2 minutes

    For owners of Sinclair ZX Spectrum computers in the ‘80s, few games were more desirable than Matthew Smith’s Manic Miner. It is very much a classic and has official and unofficial ports available for just about every console and computer released since. There was even a port made for Microsoft’s Zune MP3 player. And now you can play it on an Arduino UNO thanks to Scott Porter’s custom game engine and port.

    This isn’t the first time someone has done this, as James Bowman created a Manic Miner port for Gameduino a decade ago. But Porter’s project is a little different. His port runs on a custom engine on an Arduino UNO Rev3 that produces composite video output through a custom shield. That shield also contains a speaker driver circuit, buttons for control, and a port to connect an NES controller for a more comfortable gaming experience.

    Porter’s biggest challenge was generating video, as that requires very accurate timing. For that reason, he recommends using an official UNO and not generic boards that sometimes cut corners with resonators instead of crystals. 

    The game engine is impressive, with a fixed framerate of 50fps at 256×256 and up to nine sprites on screen. One of those sprites can have pixel-perfect collision detection with all of the others, which is ideal for a game like Manic Miner. But the video is monochrome and there do seem to be some glitches evident in the demonstration video. Regardless, this is very impressive and we’re excited to see what else Porter can achieve with his engine. 

    [youtube https://www.youtube.com/watch?v=dm_dUSeIqC4?feature=oembed&w=500&h=281]
    [youtube https://www.youtube.com/watch?v=5iUYeZ2Ppnk?feature=oembed&w=500&h=281]

    The post This new game engine runs Manic Miner on an Arduino UNO appeared first on Arduino Blog.

    Website: LINK

  • This animatronic CatNap is predictably creepy

    This animatronic CatNap is predictably creepy

    Reading Time: 2 minutes

    Poppy Playtime is an interesting horror video game — or rather, an episodic series of games — that puts players into the eerie toy factory of fictional company Playtime Co., where they find that the company’s characters are alive and quite aggressive. A big part of the game’s appeal is the creepy character design, with the eponymous Poppy being just one example. But they’re all scary, as Jaimie and Jay of the Wicked Makers proved when they built this life-sized CatNap animatronic.

    The Wicked Makers aren’t strangers to this game, as they previously built an eight-foot-tall Huggy Wuggy. Their CatNap animatronic isn’t quite as tall, but it is still huge. And it is a faithful recreation of the monster seen in-game. It can move its head side-to-side, and its body sort of sways like a real, breathing creature’s would. It even breathes glowing red fog to represent the in-game sleeping gas formulated for children.

    As usual, that vast majority of the work here went into constructing the animatronic’s skeleton, body, and head. It is a masterful mishmash of PVC pipe, wire, foam, clay, and fabric. But the real magic comes from the movement, which is possible thanks to the use of an Arduino UNO Rev3. That controls the torso’s wiper motor via a relay, the servo motor that moves the head, the LEDs for the eyes and smoke, and the smoke machine.

    To simplify the animations, the Wicked Makers turned to Bottango software. That’s free and made specifically for controlling animatronics. It makes programming and uploading animations easy, so the Wicked Makers can alter CatNap’s behavior whenever they want.

    The result is just as terrifying as it is impressive.

    [youtube https://www.youtube.com/watch?v=Fh6mimCibhQ?feature=oembed&w=500&h=281]

    The post This animatronic CatNap is predictably creepy appeared first on Arduino Blog.

    Website: LINK

  • Getting more realistic camera movements in VR with an Arduino

    Getting more realistic camera movements in VR with an Arduino

    Reading Time: 2 minutes

    In virtual reality, anything is possible, yet being able to accurately model things from the real-world in a digital space remains a huge challenge due to the lack of weight/feedback that would otherwise be present in physical objects. Inspired by working with digital cameras and the inherit imperfection they bring to their videos, Bas van Seeters has developed a rig that translates the feeling of a camera into VR with only a few components.

    The project began as a salvaged Panasonic MS70 VHS camcorder thanks to its spacious interior and easily adjustable wiring. An Arduino UNO Rev3 was then connected to the camera’s start/stop recording button as well as an indicator light and a potentiometer for changing the in-game focus. The UNO is responsible for reading the inputs and writing the data to USB serial so that a Unity plugin can apply the correct effects. Van Seeters even included a two-position switch for selecting between wide and telescopic fields of view.

    With the Arduino now sending data, the last step involved creating a virtual camcorder object in Unity and making it follow the movement of a controller in 3D space, thus allowing the player to track things in-game and capture videos. More details on the project can be found in van Seeters’ write-up here and in the video below!

    [youtube https://www.youtube.com/watch?v=vt5l4E0LUpg?feature=oembed&w=500&h=281]

    The post Getting more realistic camera movements in VR with an Arduino appeared first on Arduino Blog.

    Website: LINK

  • Build yourself this simple app-controlled robot dog

    Build yourself this simple app-controlled robot dog

    Reading Time: 2 minutes

    If you have an interest in robotics, it can be really difficult to know where to start. There are so many designs and kits out there that it becomes overwhelming. But it is best to start with the basics and then expand from there after you learn the ropes. One way to do that is by building MertArduino’s adorable app-controlled robot dog.

    This is a little more complex than a typical line-following rover kit, but it is still approachable for beginners. It uses eight inexpensive MG90S hobby servo motors to walk on four legs, plus one more servo to rotate the head. The tutorial explains how to create a smartphone app for controlling the robot and there is an ultrasonic sensor hidden in the dog’s eyes to help it detect obstacles. 

    To construct this robot, you will first need to 3D print the body, legs, and head. Those parts are small enough to print on almost any model of 3D printer. You’ll then need the custom PCB, onto which all of the electronic components attach. You can order that from any PCB fabrication service. Using basic through-hole soldering techniques, you can populate that PCB with an Arduino Nano board, an HC-05 Bluetooth module (for communication with a smartphone), and various miscellaneous components like resistors and a voltage regulator. Power comes from a pair of 18650 lithium battery cells.

    After assembly, you can begin controlling the robot using the provided app. Or you can follow the instructions to make your own app with the help of MIT’s handy block-based Scratch programming tool.

    [youtube https://www.youtube.com/watch?v=NlUgbXlzpAw?feature=oembed&w=500&h=281]

    If you want to dip your toes into the world of robotics, this seems to be a fun way to do it.

    The post Build yourself this simple app-controlled robot dog appeared first on Arduino Blog.

    Website: LINK

  • A single stepper motor drives this mechanical seven-segment display clock

    A single stepper motor drives this mechanical seven-segment display clock

    Reading Time: 2 minutes

    It is amazing how much technological progress humanity has achieved over the past few centuries. But while our capability with electronics has shot ahead, it seems that we’ve almost regressed when it comes to mechanical and electromechanical design. Watches and clocks are great examples of this, as pre-digital craftsmen were capable of astonishing feats that are still impressive today. But some people are keeping those traditions alive, as evidenced by this mechanical seven-segment display clock driven by a single stepper motor.

    This clock is truly a work of art. It shows the time across six digits, each of which is a seven-segment display. But those aren’t segments lit by LEDs, they’re physical pieces of plastic. A complex series of gears flips them in and out in the appropriate sequence to display the numeric characters. That is very impressive when you consider that the segments don’t actuate in an order that correlates with the numerical value — the number 4 isn’t simply turning “on” one more segment than the number 3. But even so, the clock progresses through the numbers in order.

    That’s only possible because of the genius mechanical design of the clock. Further increasing the wonder is the fact that the clock and all of its parts were 3D-printed — no precision machining necessary. An Arduino Nano board controls the stepper motor that drives the whole series of gears. That ensures that the motor turns at a constant rate, which is required to keep accurate time.

    [youtube https://www.youtube.com/watch?v=TmxXhfyIY5g?feature=oembed&w=500&h=281]

    The post A single stepper motor drives this mechanical seven-segment display clock appeared first on Arduino Blog.

    Website: LINK

  • This kinetic light installation illuminates the Finnish snow

    This kinetic light installation illuminates the Finnish snow

    Reading Time: 2 minutes

    If you’re ever driving through rural Finland about an hour south of Jyväskylä, you might come across the Haihatus art center. That includes KITA, “the house of kinetic arts.” You’ll recognize it right away by its bold swaths of vibrant paint. And if you come by at night, you’ll see the snow illuminated in dancing colors by a kinetic art installation built by Niklas Roy and Kati Hyyppä.

    Because the building is unheated and can reach temperatures as low as -30°C (-22°F), KITA remains closed through the winter. Roy and Hyyppä approached this project with the goal of turning the building itself into a kinetic art piece for people to enjoy through the cold months. To achieve that, they lit the windows and added movement. Lights inside the building move along tracks and motors pull them with spools of twine. An Arduino Nano development board controls the motors through H-bridge drivers. Various reflectors and filters alter the lights as they move.

    To make that even more dynamic, they animated the illumination and introduced sound. A control box built into an old tool case contains another Arduino Nano that can switch the lights through relays. That Arduino also generates sounds and melodies from algorithms based on random inputs, but synced to the lights. 

    This project came with unique challenges related to the weather, as many electronic components act unpredictably at these extreme temperatures. But the installation worked well enough to unveil on New Year’s Eve 2023, when the people living in the town of Joutsa got to enjoy the dazzling inauguration.

    The post This kinetic light installation illuminates the Finnish snow appeared first on Arduino Blog.

    Website: LINK

  • Controlling 3.6kW of solar EV charging with an Arduino GIGA R1 WiFi

    Controlling 3.6kW of solar EV charging with an Arduino GIGA R1 WiFi

    Reading Time: 2 minutes

    The EV (electric vehicle) versus ICE (internal combustion engine) debate is more complicated that it may seem, but one fact is quite simple: it is much easier to generate electricity at home than it is to refine fossil fuels. This means that it is possible power a vehicle for free after the initial investment. But doing so takes quite a lot of hardware, which is why Shawn Murphy developed this charging system controlled by an Arduino GIGA R1 WiFi.

    Murphy owns a Ford Lightning electric pickup truck, which is inefficient by EV standards thanks to its weight. But even at just two miles per kWh of electricity, he estimates that he can break even on the cost of his solar charging system within four to five years. After that, the electricity to power the Ford will, essentially, be free. Any excess energy can power his home or feed back into the grid.

    Just powering the truck alone will require a lot of electricity, so Murphy acquired 10 used 360-watt solar panels. Those feed to a battery backup array, which supplies power to the Ford charging station. 

    To maximize efficiency, Murphy wants the solar panels to pivot on one axis to follow the sun. He estimates that will increase their output by 20-25% throughout the day, which is a significant amount of energy with a solar panel array this large. An Arduino GIGA R1 WiFi board controls the tilt of the panels via linear actuators. Murphy originally used “dumb” actuators, but is switching to “smart” models from Progressive Automations that include positional feedback through Hall effect sensors.

    A GIGA Display Shield gives Murphy access to an interface, which he can also access through the Arduino Cloud. In addition to controlling the linear actuators, the Arduino monitors power generation and consumption.

    This is still a work in progress as Murphy continues to make improvements, but he’s well on his way to “free” energy for his truck.

    The post Controlling 3.6kW of solar EV charging with an Arduino GIGA R1 WiFi appeared first on Arduino Blog.

    Website: LINK

  • This Arduino GIGA R1 WiFi project turns a coffee maker into a more accessible appliance

    This Arduino GIGA R1 WiFi project turns a coffee maker into a more accessible appliance

    Reading Time: 2 minutes

    While many of the things we interact with every day have become more usable by people with disabilities, the kitchen remains as one important area of our lives that still lacks many accessibility features. One of these commonplace appliances is the coffee maker and its array of small buttons or even a touchscreen that can be hard to see/touch. Orlie on Instructables has developed a set of wireless buttons and an accompanying receiver that translate simple actions into an easy, end-to-end brewing experience.

    Each button started as a custom 3D-printed shell with compartments for a AA battery holder, large arcade button, and the perfboard that also contained the ESP8266 microcontroller. In this system, the ESP8266 communicates with the Arduino GIGA R1 WiFi board via Wi-Fi and an MQTT message broker running on a host PC. This enables each button to be assigned a unique message that dictates the desired task to be performed.

    At the coffee maker, the GIGA R1 WiFi was wired into a pair of ULN2003 stepper motor driver modules that move a gantry across a set of linear rails and eventually push the corresponding buttons once the correct position has been reached. Ultimately, this allows for those with less mobility and/or dexterity to select what they want from anywhere in the house — all over Wi-Fi.

    To see how this project was built in greater detail, you can read Orlie’s write-up here on Instructables.

    The post This Arduino GIGA R1 WiFi project turns a coffee maker into a more accessible appliance appeared first on Arduino Blog.

    Website: LINK

  • Motion control interface facilitates robot operation for those with paralysis

    Motion control interface facilitates robot operation for those with paralysis

    Reading Time: 2 minutes

    Henry Evans suffered a brain-stem stroke 20 years ago that left him paralyzed with quadriplegia. He can move his head, but other than a small amount of movement in his left thumb, he can’t control the rest of his body. To help Evans live a more independent life, researchers from Carnegie Mellon University’s School of Computer Science developed a motion control interface that lets him operate a mobile robot.

    The robot is a Stretch model from Hello Robot, which can navigate a home on its mobile base, interact with objects using its arm and gripper, and provide a live view through a pair of cameras (one on its head and one on its gripper). But this telepresence robot doesn’t have any provisions for operation by a person with quadriplegia like Evans. That’s where the SCS team came in.

    They created a head-worn motion control interface consisting of an Arduino Nano board, a Bosch BNO055 IMU and an HC-05 Bluetooth module. The Arduino monitors Evans’s head movement with the IMU, then sends cursor movement commands over Bluetooth to the computer running the software that controls the Stretch robot. That lets Evans move the cursor on the screen, and then he can click a mouse button thanks to the limited movement of his left thumb.

    During a week-long testing session, Evans successfully used this system to perform many tasks around his home. He was able to use the robot to pick up tissues and bring them to his face, and even to adjust the blinds on his bedroom window. Clever “Drivers Assistance” software lets the robot operate semi-autonomously in order to complete tasks that would have been difficult for Evans to accomplish through manual control.

    While the Stretch robot is expensive at about $25,000 dollars, the HAT (Head-worn Assistive Teleoperation) control interface is affordable. This is just a prototype, but a device like this could help many people around the world living with quadriplegia and other conditions that affect motor control.  

    [youtube https://www.youtube.com/watch?v=XuQKCFJ3-V8?feature=oembed&w=500&h=281]

    The post Motion control interface facilitates robot operation for those with paralysis appeared first on Arduino Blog.

    Website: LINK

  • Opta: Enhanced cybersecurity after HWG Sababa’s testing

    Opta: Enhanced cybersecurity after HWG Sababa’s testing

    Reading Time: 2 minutes

    Connecting machines and equipment to the internet became easier than ever when we launched the Arduino Opta micro PLC, enabling real-time control, monitoring, predictive maintenance and more – in industries ranging from smart agriculture to large-scale manufacturing to building automation. 

    Supporting our well-known Arduino sketch programming experience and any of the five IEC 61131-3 PLC standard languages, the Opta was designed to be powerful yet easy to use from the start – as well as highly secure. Indeed, the Opta supports OTA firmware updates and ensures data security from the hardware to the Cloud thanks to the physical onboard secure element and X.509 Standard compliance. 

    In addition, as part of the go-to-market for this innovative hardware solution, we actively committed to verifying its security against the threats posed by cyberattacks. 

    To this end, in late 2023 we started a collaboration with global cybersecurity provider HWG Sababa: their Offensive Team engaged in a penetration test that lasted weeks, assessing Opta’s security posture and pinpointing any weaknesses. Their meticulous report allowed us to remedy any vulnerabilities before they became actual issues, and now we are proud to say the Opta is more secure than ever.

    The software patches and configuration updates we carried out are part of our ongoing commitment to providing you the most robust solutions on the market in every respect – including against ever-evolving cyber threats. The rigorous testing process and following activities our team completed only confirms Opta as an ideal candidate for any industrial automation project you have in mind. 

    To find out more about the testing process itself, check out the case study published by HWG Sababa

    The post Opta: Enhanced cybersecurity after HWG Sababa’s testing appeared first on Arduino Blog.

    Website: LINK

  • New Portenta Machine Control library boosts industrial project performance

    New Portenta Machine Control library boosts industrial project performance

    Reading Time: 2 minutes

    At Arduino, we’re committed to providing developers with tools that make the coding process smooth and efficient. That’s why we’re thrilled to announce the new Arduino_PortentaMachineControl library, an upgraded version designed to replace the deprecated Arduino_MachineControl library. It comes with a number of improvements, from a revamped structure to enhanced documentation, making it easier than ever to manage the features of the Arduino Portenta Machine Control.

    Don’t know the Arduino Portenta Machine Control? It’s a versatile industrial control unit offering soft-PLC control, diverse I/O options, and flexible network connectivity. For more information about this product, visit the dedicated page.

    What you’ll find in the new library

    • Enhanced library structure: We restructured the library to improve its organization, making it more intuitive. This ensures that you can quickly locate and utilize the functions you need for your projects. 
    • Easier-to-understand names: We standardized function and class names for better consistency and readability. This change ensures a clearer and more understandable codebase. 
    • Optimized efficiency: We eliminated unnecessary functions, decluttering the library and focusing on the essential features needed for effective machine control. 
    • Refreshed and clearer examples: You’ll find reworked examples to showcase the library’s capabilities, providing a better demonstration of the board’s features and of their usage.

    User manual and migration tutorial

    But that’s not all! Alongside the library, we’re excited to release the official user manual for the Arduino Portenta Machine Control: an essential and in-depth guide to all the board’s features, readily available to all users.

    In addition – knowing that transitioning from the old Arduino_MachineControl library might pose some challenges – we’ve prepared a detailed migration tutorial to guide you seamlessly through the process. Make the switch confidently and take advantage of the improved functionality offered by the new library!

    And if that’s not enough, we’ve also included additional technical documentation with the library, ensuring that you have all the information you need to benefit from its new and improved capabilities.

    Ready to elevate your industrial product?

    Download the Arduino_PortentaMachineControl library through the Arduino IDE library manager or directly from the GitHub repository.

    Don’t forget to explore the user manual and the migration tutorial to make the most of the new features.

    We’re excited to see how this library empowers your projects and takes your Arduino development to new heights. Happy coding!

    The post New Portenta Machine Control library boosts industrial project performance appeared first on Arduino Blog.

    Website: LINK

  • The Hardware-Oriented Microprocessor Simulator illustrates the inner workings of microcontrollers

    The Hardware-Oriented Microprocessor Simulator illustrates the inner workings of microcontrollers

    Reading Time: 2 minutes

    Do you really understand what is happening within the mysterious black packaging of a microcontroller or microprocessor? Most people don’t — we just learn how to use them. That’s because they’re wildly complex circuits combining many different subsystems that are all abstracted away from the view of the user. To help students better understand these integrated circuits (ICs), Dr. Panayotis Papazoglou designed the Hardware-Oriented Microprocessor Simulator (HOMS)

    Dr. Papazoglou is an associate professor at the National and Kapodistrian University of Athens (NKUA), so he has a stake in creating an educational tool like this one. The goal of HOMS is to provide a visual and tactile demonstration of what happens inside an eight-bit microprocessor. For example, it will show a value moving from a counter to a memory register. That’s something that is difficult to visualize when using a microprocessor, even if you’re working close to “the metal” in assembly. 

    HOMS is a modular system, so students can experiment with blocks that represent different subsystem circuits within a microprocessor. Each module has an Arduino UNO Rev3 board to control its own functions, with all of the modules working under the coordination of a central Arduino Mega 2560 controller. One module may, for instance, represent memory and will show the data “written” to it on a display. Another module may have buttons and switches to allow user input.

    There are software simulation tools that seek to illustrate computing fundamentals in a similar way, but many people learn better through physical interaction. For those people, HOMS could be very helpful.

    [youtube https://www.youtube.com/watch?v=PM6FMw1mrSM?feature=oembed&w=500&h=281]

    The post The Hardware-Oriented Microprocessor Simulator illustrates the inner workings of microcontrollers appeared first on Arduino Blog.

    Website: LINK

  • Not bigger, just better: Introducing the Nano 33 BLE Rev2

    Not bigger, just better: Introducing the Nano 33 BLE Rev2

    Reading Time: 2 minutes

    The Nano 33 BLE is one of our most popular boards, and for good reason. It’s small and 3.3-V-compatible; it comes with an embedded nine-axis IMU featuring accelerometer, gyroscope and magnetometer; it has a powerful processor; it offers a powerful Bluetooth® Low Energy module with an internal antenna that can be used to transmit data between different devices using the ArduinoBLE library; and it can be programmed with MicroPython. 

    It’s basically everything you need for projects that span from wearable to advanced robotics. 

    So, why work on making it better?

    Because we listen to our community, that’s why. And based on your requests, we’ve come up with improvements to enhance your experience with a revised iteration of the Arduino Nano 33 BLE with a newly integrated IMU to expand experimentation possibilities, and a streamlined PCB design to grant easy access to essential features.

    And here is exactly what you can find in the new Rev2, compared to its predecessor:

    • It has a combination of two IMUs (BMI270 six-axis IMU plus BMM150 three-axis IMU) instead of a single, nine-axis one.
    • While retaining the compact form factor, the new Nano 33 BLE Rev2 incorporates new pads and test points for USB, SWDIO, and SWCLK, making it easier to access these crucial points on the board.
    • We introduced a new VUSB soldering jumper on the top side, allowing you to conveniently enable the VUSB pin while using the castellated pins.
    • In addition, the Nano 33 BLE Rev2 transitions the power supply component to the MP2322 to guarantee increased performance. 

    These updates collectively contribute to a more streamlined and robust device, ready for you to test and build just about any IoT project – and more. For example, the Nano 33 BLE Rev2 is still ideal to control RGB LEDs over Bluetooth®, using an app on your phone, and supports OpenMV’s fork of MicroPython

    If you already know the Nano 33 BLE from its first revision, you can easily migrate your sketches to use them with the new and improved version: if you need help, just follow our dedicated tutorial.

    After the launch of the Nano ESP32 earlier this year, it’s the perfect addition to the “tiny footprint, mighty features” family that has proven time and time again that we can ramp up features and performance while scaling down size. Don’t believe us? Check out the classic Arduino Nano or upgrade to the Nano 33 BLE Sense Rev2 if you want to include a complete set of sensors, too. 

    For full tech specs, tutorials and inspiration on the Nano 33 BLE Rev2, head to the dedicated Arduino Docs page. Ready to get your own? The Nano 33 BLE with headers and without headers are now available on our Store.

    The post Not bigger, just better: Introducing the Nano 33 BLE Rev2 appeared first on Arduino Blog.

    Website: LINK

  • UNO R4 Stars: Meet Clatters Machines

    UNO R4 Stars: Meet Clatters Machines

    Reading Time: 2 minutes

    The launch of the Arduino UNO R4 marks a huge leap forward for our community. For us, it’s also the chance to celebrate the people who bring our ecosystem to life with their bright ideas, radiant enthusiasm, and shining insight.

    That is how the UNO R4 Stars blog post series began: to highlight makers who have not only created amazing projects with Arduino, but who are giving back to the community by sharing as they go and helping others make anything they wish.

    We invite you to discover each profile, hoping you might find a North Star to navigate around an expanding galaxy or venture into completely new universes.

    Clatters Machines creates “noisy machines for music lovers” – handmade electronic musical instruments that turn technology into sound waves. The company was co-founded by Carolina Guidi and Michelangelo Nasso, brought together by a unique passion for sound and for making what could be a mess of cables, wires, and knobs look really cool. 

    Guidi, in particular, is in charge of visual branding and product design – which makes for great eye candy on their Instagram wall! – while Nasso’s favorite part of the job is prototyping and testing the modules, fueled by his passion for hardware and software engineering.

    Arduino has always played a crucial role in the duo’s explorations, and later, in their work. Guidi discovered the brand during a university workshop: she says she was surprised to find out that putting together a few components on a breadboard could be so easy and accessible – “all you need to worry about is your own creativity.” 

    Nasso got his first taste of Arduino a bit earlier, quickly realizing how it made a lot of his ideas closer to reality than he thought, even before he acquired the engineering skills he would develop during university. 

    It is not by chance that their very first product, the Pocket Garden Listener, was “all designed, prototyped and tested with an Arduino UNO,” and that they have fond memories of the experience.

    The embodiment of how creative flair and engineering mastery can come together beautifully, Clatters Machines takes pride in inspiring “people who play and love music, with products that start right here, from an original idea:” isn’t that the essence of making?

    [youtube https://www.youtube.com/watch?v=Cnk_oSLKq8Y?feature=oembed&w=500&h=281]

    We asked Guidi and Nasso, “What’s your favorite part of the UNO R4?”

    • Its thrilling potential, which opens up to infinite new possibilities – just like the very first Arduino UNO did for the many makers who started with it! 
    • The huge leap forward it represents for anyone working in prototyping, thanks to the upgraded tech specs.
    • How it “ramps up everything that made Arduino the brand it is today.’

    Ready to play with Clatters Machines? Head to their website to get yourself a cool sound machine. 

    The post UNO R4 Stars: Meet Clatters Machines appeared first on Arduino Blog.

    Website: LINK

  • Building your own affordable SCARA plotter with Arduino

    Building your own affordable SCARA plotter with Arduino

    Reading Time: 2 minutes

    Robots come in all shapes and sizes, but one of the most popular styles for industrial applications is the SCARA (Selective Compliance Assembly Robot Arm). These have multiple degrees of freedom, each of which rotates around the vertical Z axis. But they’re otherwise constrained, which can have advantages for certain applications. For example, they tend to have relatively high payload capacities. If you’re on a budget but want to dip your toes in, tuenhidiy’s SCARA plotter is a great way to start.

    This is a follow-up to tuenhidiy’s previous SCARA design from a couple of years ago. The new version is more robust and includes a homing feature, which is important for repeatability. This is set up as a plotter and the firmware reflects that, but it would be possible to adapt the mechanical design for other purposes. 

    To keep costs down, most of the structure is PVC pipe. Stepper motors provide actuation via GT2 timing belts and pulleys. An Arduino Mega 2560 board controls those steppers through a RAMPS 1.4 board with A4988 stepper drivers. An interface module with a 2004 LCD, rotary encoder, buzzer, and button lets the user start jobs.

    In this case, those jobs are G-code files containing the movement commands to reproduce the drawings. That works because the Arduino runs Marlin firmware (popular in the 3D printing community). The use of Marlin made homing easy and it accepts g-code that users can create with most of the standard software tools. 

    [youtube https://www.youtube.com/watch?v=5AB-XvNw8qY?start=2&feature=oembed&w=500&h=281]

    The post Building your own affordable SCARA plotter with Arduino appeared first on Arduino Blog.

    Website: LINK

  • These custom Chucks are smokin’ hot kicks

    These custom Chucks are smokin’ hot kicks

    Reading Time: 2 minutes

    Once you get bored with the shoes on the shelves at Payless, you can dive into the fascinating world of custom sneakers. Converse Chuck Taylors are probably the most popular canvas for shoe customizers, as they offer plenty of room for paint and jewel bedazzling. But creative technologist Tigris Li took it to a whole other level with her Chuck 70s Smoke Shoes that blow clouds as the wearer walks.

    Each shoe has an apparatus that looks like it was cobbled together by a mad scientist trying invent their way into dunking. When the wearer puts pressure down on the sole, that apparatus will puff out a cloud of smoke. Those soles are actually custom, too. Li 3D-printed them in TPU to give the shoes a cool, angular look. They also contain the force sensors that trigger the smoke production.

    An Arduino Nano ESP32 board in each shoe monitors the force sensor in the sole. When the signal surpasses a set threshold, the Arduino activates a relay that allows power to flow through a heating coil. That coil sits in smoke machine fluid that comes from a tiny flask attached to the shoe. With power flowing, the coil burns the fluid and that expands to create the smoke.

    https://platform.twitter.com/widgets.js

    We can only assume that we’ll see Jay-Z wearing these at his next appearance at the Grammy Awards.

    The post These custom Chucks are smokin’ hot kicks appeared first on Arduino Blog.

    Website: LINK

  • The ultimate lighting system for model railroaders

    The ultimate lighting system for model railroaders

    Reading Time: 2 minutes

    Go to any model railroading convention and you’ll see that most layouts have far more work put into the terrain and buildings than into the trains themselves. The emphasis is usually on realism, so enthusiasts spend uncountable hours constructing and weathering their buildings. But lighting those buildings can be difficult, leading many people choose simple static lighting. This project by Olivier Wagener makes it relatively easy to upgrade that lighting to something much more sophisticated.

    Wagener started this project to help his father improve the lighting of a train station building for his model railroad. The result is really impressive, because every room in the building has two of its own LEDs: one a warm temperature and one a cool temperature. This also supports RGB LEDs. Using a smartphone, the user can set the brightness, color, and temperature of each room individually. They can also group those into zones for quick control. Once setup, the user has complete control over the realistic lighting and that adds a whole new dimension to model railroading.

    This is possible thanks to an Arduino MKR 1010 WiFi board that communicates with Wagener’s custom app over the local network. This can handle up to 976 single-color LEDs (warm or cool), 305 RGB LEDs, or some combination of the two. To give the Arduino full PWM (pulse-width modulation) control over that many LEDs, Wagener chose PCA9685 PWM module boards. Each one has 16 channels, so a full set of 976 single-color LEDs will require 61 boards. 305 RGB LEDs will also require 61 boards, because each of those LEDs takes up three channels.

    [youtube https://www.youtube.com/watch?v=cVVxhGMEgmw?feature=oembed&w=500&h=281]

    If you want to use Wagener’s project in your own buildings, all of the code and information is available on his Gitlab page

    The post The ultimate lighting system for model railroaders appeared first on Arduino Blog.

    Website: LINK

  • SPIN is a beautiful and imaginative AI synthesizer

    SPIN is a beautiful and imaginative AI synthesizer

    Reading Time: 2 minutes

    If you’re heard the pop music emanating from any recent reality TV show, you won’t be surprised to learn that AI is perfectly capable of generating tunes on demand. It won’t replace true artistry any time soon, but AI music fits all of the technical criteria. But typing a prompt is boring, which is why Arvind Sanjeev constructed this gorgeous and imaginative AI synthesizer called SPIN.

    SPIN is beautiful and looks like a cross between a turntable and a drum machine. Those visual cues hint at its function. The user can press buttons on the right-side pad to define musical characteristics, which then form a prompt for a language model called MusicGen. That synthesizes music according to the selected characteristics, like “happy” and “lo-fi.” The music then starts playing and the user can control its speed and direction using the record on the turntable — even scratching like a DJ if they want.

    A Raspberry Pi 4 Model B runs MusicGen, but it receives inputs through an Arduino Mega 2560 connected to the buttons. There are also dials to set song duration and BPM (beats per minute), as well as control knobs.

    The turntable is a Numark PT-01, but the vinyl is a special dummy record that only contains a time code track. The sound from that then feeds through the audio driver back to the Raspberry Pi, where it is decoded to control the playback of the synthesized music. 

    SPIN is truly stunning to look at and its functionality is quite interesting, but Sanjeev’s real motivation was to raise awareness about the ethics of AI-generated art and the original human-made art it is trained on. 

    The post SPIN is a beautiful and imaginative AI synthesizer appeared first on Arduino Blog.

    Website: LINK