Schlagwort: arduino

  • Create a custom Kerbal Space Program cockpit with Arduino

    Create a custom Kerbal Space Program cockpit with Arduino

    Reading Time: < 1 minute

    Create a custom Kerbal Space Program cockpit with Arduino

    Arduino TeamJanuary 24th, 2018

    When you play a video game, the controls are normally a compromise between what you have available (a keyboard/mouse) and the actions you’re trying to convey. This, however, wasn’t good enough for Kerbal Space Program enthusiast Hugo Peeters, who instead of accepting this limited input method, designed a new control panel with an Arduino Mega as its heart.

    Notable features of his build include dual joysticks, a throttle slider, a multi-purpose LCD display, LED bars for fuel gauges, and a beautifully laser-cut enclosure.

    Want to construct your own? Find more details on the project in Peeters’ write-up, as well as the Arduino code he used and the KSP plugin necessary to interact with his new hardware.


    Website: LINK

  • Crawl through a 1D LED dungeon with TWANG!

    Crawl through a 1D LED dungeon with TWANG!

    Reading Time: 2 minutes

    Crawl through a 1D LED dungeon with TWANG!

    Arduino TeamJanuary 24th, 2018

    While video games have grown more and more complex over the last few decades, TWANG takes things in the opposite direction as an Arduino Mega-based 1D dungeon crawler consisting of an RGB LED strip.

    The player—a dot—is controlled via an accelerometer mounted to a door spring used as a joystick. With it, the player can move forwards, backwards, and attack by “twanging” the spring to make it vibrate. The LEDs display a wide array of colors, including representations of glowing lava, water, and player disintegration when a mistake is made.

    TWANG is inspired by the Line Wobbler game from Robin Baumgarten, and beautifully implemented as shown in the video below by Barton Dring. Code for the build can be found here, and 3D print files for the housing/joystick are also available.


    Website: LINK

  • Arduino Create plans for education now available!

    Arduino Create plans for education now available!

    Reading Time: 2 minutes

    Arduino Create plans for education now available!

    Arduino TeamJanuary 24th, 2018

    Today, we’re excited to announce that Arduino Create is now available for schools with Chrome OS devices in their classrooms.

    With Arduino Create, students and teachers will be able to tinker with Arduino hardware and programming in a collaborative, always up-to-date environment. You can learn how to subscribe using this tutorial.

    Last June, we launched Arduino Create for Chrome OS; however due to limitations with Google Apps for Education (GAFE), educational institutions were unable to purchase subscriptions on the Chrome Web Store.

    The new Arduino Create subscription site allows schools to purchase and manage subscription plans for their students, starting at $0.20/student per month. All you need is a credit card and the email addresses of the students you would like to enroll. We also have a solution for students under the age of 14 who might not have full access to emails.

    The Google Admin console can be used by IT administrators to bulk install the app on a fleet of Chrome OS devices.

    Arduino Create will continue to be available for regular Chrome OS users at $0.99 per month on the Chrome Web Store. Both versions support the following boards: Uno, 101, Mega, Mega ADK, Esplora, Nano (ATmega328), Micro, Zero, MKR1000, MKR Zero, MKR Fox 1200, MKR GSM 1400, MKR WAN 1300, Pro, and Pro Mini (ATmega328).

    Visit the new Arduino Create subscription site to get started. If you have any questions or comments, write to us on this Forum page. We look forward to hearing your feedback!


    Website: LINK

  • This Arduino infinity mirror lights up to music

    This Arduino infinity mirror lights up to music

    Reading Time: < 1 minute

    This Arduino infinity mirror lights up to music

    Arduino TeamJanuary 23rd, 2018

    Infinity mirrors, which make light appear to stretch to infinity by bouncing light between two mirrors, are incredible to observe. Hacker “Evocate” decided to go the extra mile and not only illuminate the inside of his mirror arrangement, but used an Arduino Uno and a sound sensor to enable it to react to sound.

    In addition to this sound sensitivity, a Bluetooth app controls color and brightness, allowing him to customize the device on the fly.

    The mirror also has a built-in microphone which detects sound/music and reacts accordingly by generating eye-catching light strobes on the beat of the music! Simply start up the app, connect to Bluetooth and see the magic happen!

    If you’d like to build your own, full instructions along with Arduino and app code are available here. Or you can simply check it out in action below!


    Website: LINK

  • Make an interactive coffee table with Arduino and LEDs

    Make an interactive coffee table with Arduino and LEDs

    Reading Time: < 1 minute

    Make an interactive coffee table with Arduino and LEDs

    Arduino TeamJanuary 22nd, 2018

    Rather than buying a coffee table, Marija from Creativity Hero decided to build her own, adding an array of 45 programmable LEDs on top of a pine base.

    An Arduino Mega is used to take input from 45 sensors corresponding to each LED in a grid made with MDF baffles, and commands each light to change colors based on whether something is placed on that square section. The on/off colors used can be selected via a Bluetooth smartphone app, allowing you to customize the furniture to your liking.

    This unique LED coffee table can create beautiful atmosphere and will be a real focal point in my living room. I wanted to make a simple design with some interesting features that will take my room to a whole new level. It is controlled via a custom-made Android application, so I can easily change the reactive color, or the background color, and I can even adjust the brightness.

    You can find full details on the project here, as well as the tools and parts you’ll need.


    Website: LINK

  • Edgytokei is a 3D Printed Clock Inspired by Nunchucks

    Edgytokei is a 3D Printed Clock Inspired by Nunchucks

    Reading Time: 2 minutes

    This is a clock design inspired by martial arts weaponry banned from playgrounds all over the world. What could possibly go wrong? Meet the Edgytokei, made with Arduino and 3D printing.

    Don’t Miss: 3D Printed Clock: 19 Great Projects to Tell the Time

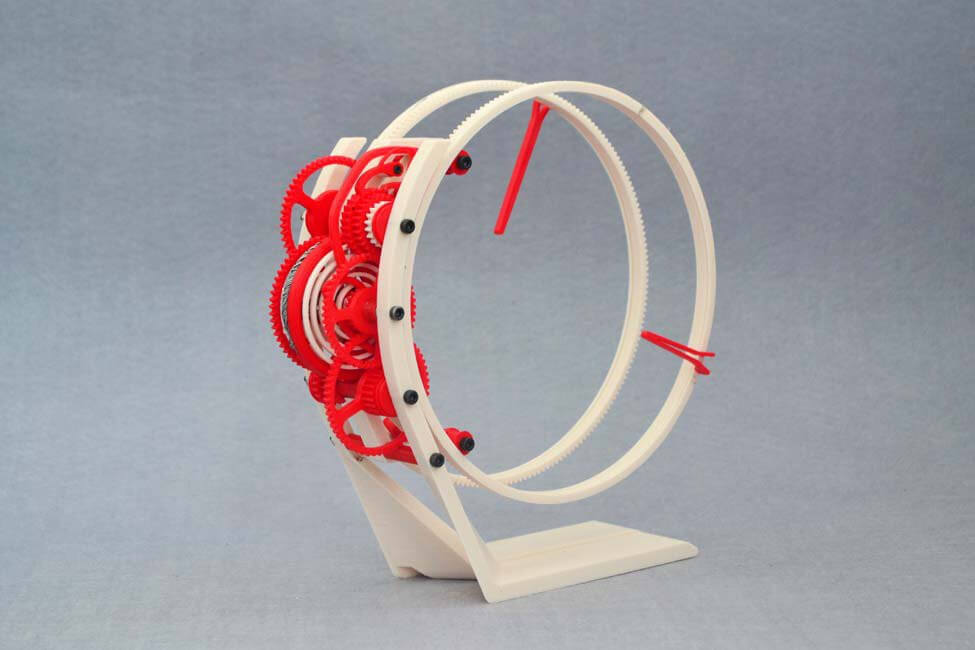
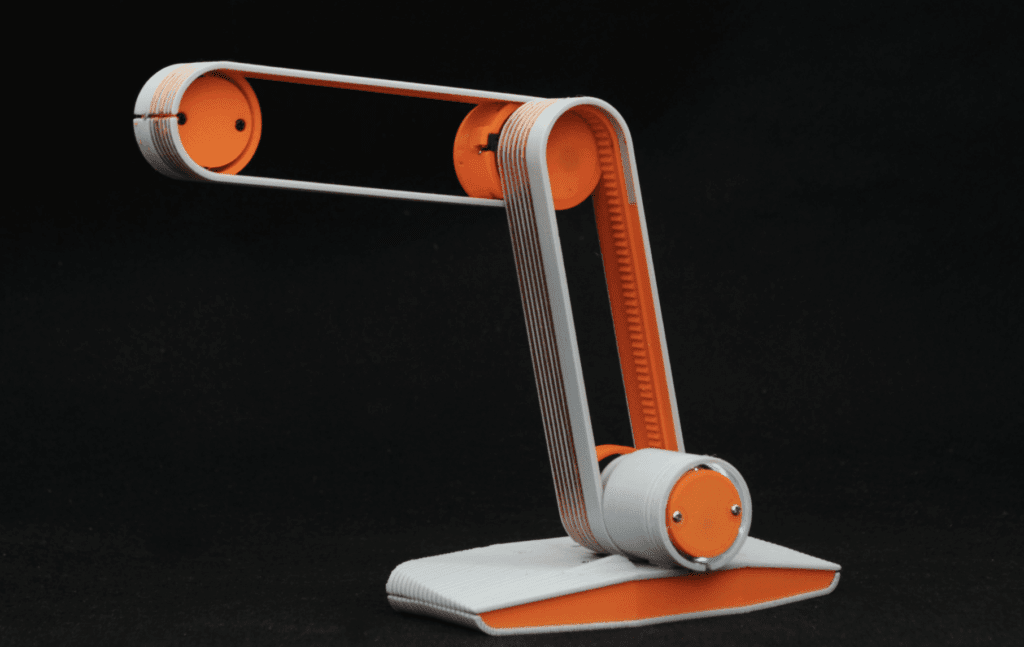
    Designer Ekaggrat Singh Kalsi created a faceless clock that is able to tell time with two hands — but it never makes a full rotation. Whoah.

    The way Edgytokei works is that an Arduino Nano powers a novel mechanical gear assembly via a pair of motors. In turn, this causes the two hands to physically switch positions between the second arm being mounted on the base and on the tip of the first arm.

    This unique and challenging representation of time changes form every fifteen minutes. As Kalsi explains on his project page:

    “The Edgytokei which literally means edge clock is inspired from the Japanese nunchucks. Just like the nunchucks the clock is just a pair of two arms displaying time by balancing themselves on the edge,” he says.

    “The clock consists of two arms and the base on which the arms are anchored. Both the arms are of equal length as the role of the arms changes with different hours of the day.”

    Check it out in action in the video below, and see if you can tell the time:

    Edgytokei is Made with Arduino and 3D Printing

    Did you manage to figure it out? If not, then allow Kalsi to elaborate further.

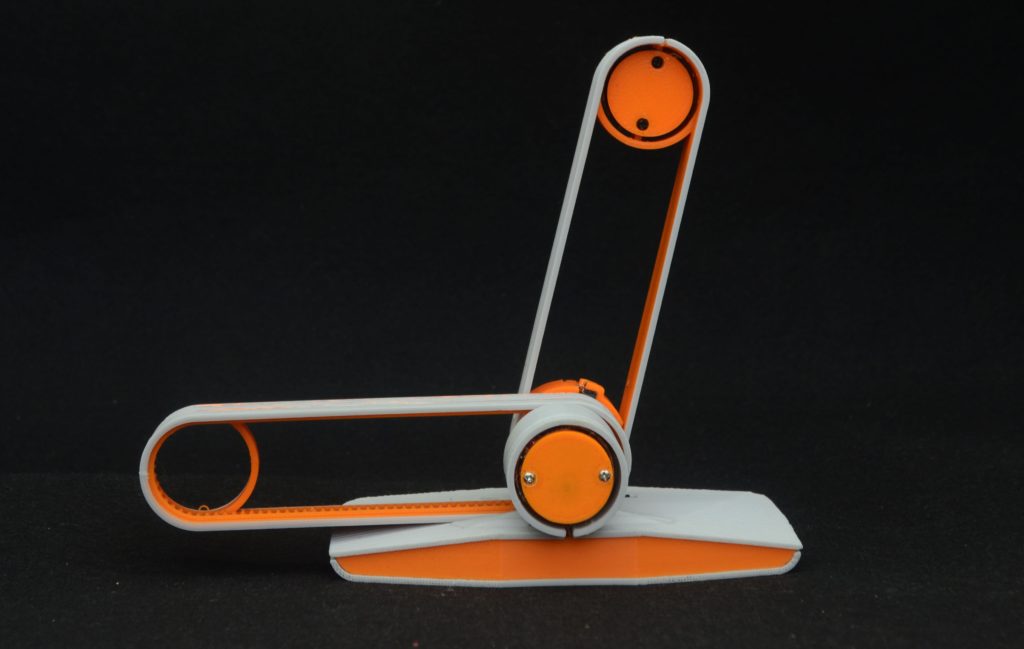
    “The fulcrum of the clock flips from the center to the left or right of the clock every quarter hour so that the clock can stand on the edge to represent the time between quarter past and quarter to hour,” he says.

    “This flipping of the arms keeps the clock dancing on the edge throughout the day. The base which contains the electronics of the clock provides a anchor for the clock and prevents the arms from falling over.”

    Because the positioning of the arms have to avoid crashing into each other, Kalsi had to roll up his sleeves when it came to programming the clock. All the unique positions of all the hours had to be elaborated. And naturally, the entirety of the housing and arms are 3D printed on a custom dual color Corey machine.

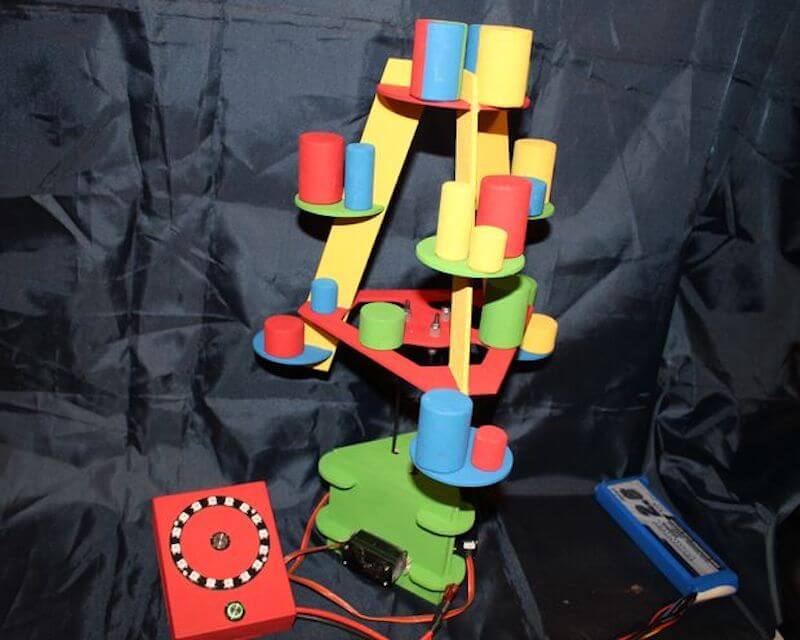
    As it happens, this isn’t Kalsi’s first rodeo with 3D printed clockmaking. Last year he shared Torlo on Thingiverse, a project which is only marginally more conventional. You can still still the arms of a clock to tell the time, but it functions by rotating discs with fixed arms.


    edgytokei

    Website: LINK

  • Light up the elements with this periodic table display

    Light up the elements with this periodic table display

    Reading Time: < 1 minute

    Light up the elements with this periodic table display

    Arduino TeamJanuary 16th, 2018

    If you took chemistry at any point in your life, you were exposed to the periodic table, which organizes different atomic structures by their atomic number. It’s an amazing chart, demonstrating just how much “stuff” our world is made up of!

    To show off the element collection he shares with his girlfriend, elemental hacker “Maclsk” built a light-up periodic table display with square cubes where each sample could be stored.

    What makes this really amazing is that the display uses WS2812B LEDs to light each cube individually. This allows it to produce fun color effects and even categorize the collection by different aspects, like element group, discovery year, or their state at certain temperatures.

    Modes are selected via a Bluetooth phone app. Be sure to see it in action in the video below!


    Website: LINK

  • RFID-controlled dry cleaner machine displays glowing leaves

    RFID-controlled dry cleaner machine displays glowing leaves

    Reading Time: < 1 minute

    RFID-controlled dry cleaner machine displays glowing leaves

    Arduino TeamJanuary 16th, 2018

    While you may not give dry cleaning conveyors much thought, Andrew Quitmeyer and Madeline Schwartzman’s “Replantment” exhibition at the Pratt Manhattan Gallery uses them in an entirely new way, along with glowing silicone molds of leaves from all over the world.

    The machine detects when an RFID tag attached to a laundry ticket is nearby, then moves over a lighting arrangement to display the multitude of glowing leaves.

    An Arduino and a SparkFun Simultaneous RFID Reader are used for control, with relays taking the place of a foot switch to start and stop the conveyor motors.

    You can check it out in action below, or if you are in the New York area, you can see the artwork in person until February 17th.


    Website: LINK

  • Robotic playing card dealer made with cardboard

    Robotic playing card dealer made with cardboard

    Reading Time: < 1 minute

    Robotic playing card dealer made with cardboard

    Arduino TeamJanuary 16th, 2018

    Ruben, aka “Ruubz0r,” a mechanical engineering student, was tasked with building a smart object. As he enjoys card games, he decided to make a playing card distributor.

    The resulting device uses a single servo to slide cards off of a deck, along with a stepper motor and ultrasonic sensor to aim it at the human recipient. An Arduino Uno provides the brains of the operation.

    The system is made out of wood and cardboard, and while it may not be ready for casino use, it’s a great example of what can be done with readily available materials. Check it out in action in the video seen here!


    Website: LINK

  • Automatically open doors with Arduino!

    Automatically open doors with Arduino!

    Reading Time: < 1 minute

    Automatically open doors with Arduino!

    Arduino TeamJanuary 12th, 2018

    Tired of doing the mundane task of opening your door? This hack from Sieuwe Elferink takes care of that for you, using an Arduino Uno for control.

    When someone comes within 50 cm of an ultrasonic sensor attached to the door, the Arduino uses an H-bridge relay to power a windshield wiper motor, which opens and closes it via a linkage setup. Another sensor is implemented on the opposite side of the door, allowing hands-free travel both ways!

    Want to build your own? You can find instructions here, while code is available on GitHub.


    Website: LINK

  • Create an Arduino Mega-powered, cable-cutting machine

    Create an Arduino Mega-powered, cable-cutting machine

    Reading Time: < 1 minute

    Create an Arduino Mega-powered, cable-cutting machine

    Arduino TeamJanuary 12th, 2018

    What do you do when faced with measuring and cutting a bunch of cables? If you’re Edward Carlson, you “simply” build a machine to do it for you!

    While it may not save time on this run, at least on the next occasion that he needs a few cables cut, he can just program his device to snip everything to size!

    His setup uses an Arduino Mega with an LCD/button shield to tell the machine how long to snip each wire, then employs a stepper motor to move the cable between two rollers to the correct length. When in position, a high-torque servo actuates a (normally) manual pair of clippers to cut it to size.

    Be sure to check out the project explanation in the video seen here, or skip to around 5:30 to see it in action!


    Website: LINK

  • The Edgytokei is a nunchucks-inspired edge clock

    The Edgytokei is a nunchucks-inspired edge clock

    Reading Time: 2 minutes

    The Edgytokei is a nunchucks-inspired edge clock

    Arduino TeamJanuary 11th, 2018

    Just when you thought you’d seen every possible hacked clock design, creator Ekaggrat Singh Kalsi has come up with something new: a faceless clock that is able to tell time with two hands that never make a full rotation.

    Instead, an Arduino Nano powers a novel mechanical gear assembly via a pair of motors, which causes the two hands to physically switch positions between the second arm being mounted on the base and on the tip of the first arm. This strange representation of time changes form every fifteen minutes.

    The Edgytokei which literally means edge clock is inspired from the Japanese nunchucks. Just like the nunchucks the clock is just a pair of two arms displaying time by balancing themselves on the edge. The clock consists of two arms and the base on which the arms are anchored. Both the arms are of equal length as the role of the arms changes with different hours of the day.

    The fulcrum of the clock flips from the center to the left or right of the clock every quarter hour so that the clock can stand on the edge to represent the time between quarter past and quarter to hour. This flipping of the arms keeps the clock dancing on the edge throughout the day. The base which contains the electronics of the clock provides a anchor for the clock and prevents the arms from falling over.

    If that sounds unique, then wait until you see it in action below. More details on the build can be found via this Hackaday write-up.


    Website: LINK

  • Recreating the Apollo Guidance Computer Display and Keyboard with Arduino

    Recreating the Apollo Guidance Computer Display and Keyboard with Arduino

    Reading Time: < 1 minute

    Recreating the Apollo Guidance Computer Display and Keyboard with Arduino

    Arduino TeamJanuary 11th, 2018

    Nearly 50 years ago, mankind made the giant leap of being able to travel to the moon. To celebrate, ST-Geotronics has come of with a replica of the Apollo Guidance Computer Display/Keyboard, or AGC DSKY as it’s abbreviated.

    The display was prototyped on a huge breadboard assembly, along with an Arduino Mega, then finished using a custom PCB and Arduino Nano.

    3D-printed parts are used to form the housing, in addition to a variety of electronics. These include an actual GPS unit, along with a custom three-segment LED assemblies to display “+” and “-” as needed.

    Be sure to check it out in the video seen here, showing off its interface, as well as an MP3 unit that plays back a 1962 JFK speech about going to the moon.


    Website: LINK

  • Build a block balancing game with Arduino and servos

    Build a block balancing game with Arduino and servos

    Reading Time: 2 minutes

    Build a block balancing game with Arduino and servos

    Arduino TeamJanuary 8th, 2018

    If you’re tired of classic tower building games like Jenga or stacking cards and would like a new challenge, “mr_fid” has come up with a game where you balance blocks on a tree assembly. The nicely crafted device then moves around to throw the blocks off using three servos and push rods.

    Everything is controlled by an Arduino Nano that randomly selects the intensity of the movement and which color of block to be stacked, displayed on a circular arrangement of programmable LEDs.

    Once a block has been added, a button in the middle of the LEDs is pushed and tree movement starts, potentially destabilizing the player’s work.

    Nice Arduino project. Featuring an Arduino Nano controlling 3 servos to move the tree. Firstly the “Roll” button is pressed to give you a colour and amplitude once the correct bit has been placed on the tree the “Shake” button is pressed and the tree moves around. Any bits which fall off are given to the person whos go it was! the idea of the game is to get rid of all your bits first. If when you press the “Roll” button you don’t have the correct colour OR the strength is to high then if you wish you can miss your go.

    You can check the game out in the first video below, or see the second video for information on how to avoid jittery servos in this type of setup.


    Website: LINK

  • Add colorful effects to your 1980s boombox with Arduino and LEDs

    Add colorful effects to your 1980s boombox with Arduino and LEDs

    Reading Time: < 1 minute

    Add colorful effects to your 1980s boombox with Arduino and LEDs

    Arduino TeamJanuary 5th, 2018

    While ’80s-style boomboxes have their own unique character, per hacker “Dancorp’s” excellent mod, it’s clear that they could be improved dramatically with programmable LEDs.

    This build uses a capacitive filtering arrangement to feed line out signals from the boombox into an Arduino Uno, which then controls three LED strips.

    Two of these strips are arranged around the speaker cones, emitting beautiful LED effects to go along with the music playing, while the third can be used to light up the built-in VU meters.

    A schematic along with Arduino code are available on Dancorp’s write-up. It looks like a fairly accessible project, especially given the extra space available in electronics from that era.


    Website: LINK

  • Rick and Morty fans will love this butter robot

    Rick and Morty fans will love this butter robot

    Reading Time: < 1 minute

    Rick and Morty fans will love this butter robot

    Arduino TeamJanuary 4th, 2018

    Up until the present day, if you need butter, you simply ask another human to “pass the butter,” leading to minor inconvenience and awkwardness. Engineering students in Brussels have come up with a novel solution: a robot that brings the butter to you!

    The robot, inspired by Rick and Morty’s Butter Bot, is powered by an Arduino Uno and summoned to hungry humans via an infrared remote control.

    When the signal detected by onboard IR sensors, the robot moves over using continuous-rotation modded servos, then flips its cap-like lid to reveal the butter inside.

    Want a Butbot of your own? You can find the build process and code in the student team’s write-up here.


    Website: LINK

  • Build a six-wheeled RC vehicle for any terrain

    Build a six-wheeled RC vehicle for any terrain

    Reading Time: 2 minutes

    Build a six-wheeled RC vehicle for any terrain

    Arduino TeamJanuary 4th, 2018

    In order to create the ultimate off-road RC rig, “asrebro” designed his own six-wheeled vehicle, operated with the help of Arduino.

    To give it decent range and reliability, the hacker turned to a stock transmitter and receiver, but routed the PWM signals onboard to a Mega. The Arduino uses a pair of H-bridge boards to drive all six motors/wheels for tank-like movement.

    Since an Arduino is used, this opens up a wide range of manual and automatic control options, and could even be used to power robotic accessories like a gripper or gimbal with a camera.

    I decided to build a bigger robot that will easily overcome various obstacles on its way and will be able to move with a load of at least a dozen kilos. I also assumed that the robot should be able to cope in difficult terrain such as sand, snow and rubble. To make it possible, I built a 6-wheel [aluminum and duralumin] chassis equipped with 6 motors of sufficient high power and suitable motor driver and power supply. I also wanted my robot to be controlled from a long distance (at least 200 meters) so I used a good quality 2.4GHz transmitter and receiver.

    You can see it in action below, traversing through a forest near Warsaw, Poland.


    Website: LINK

  • RoboGlove assists users with gripping objects

    RoboGlove assists users with gripping objects

    Reading Time: 2 minutes

    RoboGlove assists users with gripping objects

    Arduino TeamJanuary 3rd, 2018

    The RoboGlove project is a robotic glove by students at the Université Libre de Bruxelles that is designed to assist the wearer when continuously gripping objects.

    This is accomplished by a series of three servos that transmit force through cables for the index finger, middle finger, and thumb. Control is via an Arduino Uno, which takes input from pressure sensors in the three finger fixtures, helping the wearer keep gripping when force is initially exerted to close a fist.

    The glove has a wire connection that links the fingers to some servo motors: a wire is attached to the extremity of the finger and to the servo, so when the servo turns, the wire is pulled and the finger is flexed. In this way, by controlling the grip done by the user through some pressure sensors in the extremity of the fingers, we are able to actuate the motors in a controlled way and help the gripping by bending the finger proportionally to the rotation of the motors and so to the rolling up of the wires. In this way we should be able either to allow weak people to grip objects or help even people in physiological conditions to grip objects and to keep it without any effort.

    While still a prototype, it’s an interesting device that could be developed further into a very helpful augmentation. You can see it in action below!


    Website: LINK

  • Playing chiptunes on an old reed organ with Arduino

    Playing chiptunes on an old reed organ with Arduino

    Reading Time: < 1 minute

    Playing chiptunes on an old reed organ with Arduino

    Arduino TeamJanuary 3rd, 2018

    After finding an organ left outside to rot, hacker “tinkartank” decided to use it for his own purposes, adding push buttons under each key as inputs to an Arduino Mega.

    He also reused the control rods with potentiometers as a secondary input method, and added a tiny OLED to display the system’s menu. With this unique interface setup, the Mega drives a MOS6581 SID chip—originally used to produce sound on the Commodore 64—for music generation, and can interface with Eurorack modules as needed.

    Want to see more? Be sure check out the SID organ in action below, and read the entire project write-up here.


    Website: LINK

  • Control lights and sounds with the Arduino-powered LED Eclipse

    Control lights and sounds with the Arduino-powered LED Eclipse

    Reading Time: < 1 minute

    Control lights and sounds with the Arduino-powered LED Eclipse

    Arduino TeamJanuary 2nd, 2018

    If you need a MIDI device that can be programmed as your own unique light and sound controller, then Jon Bumstead’s LED Eclipse may be just what you’re looking for.

    The circular device, roughly the diameter of a large plate, is constructed out of 30 layers of MDF, and boasts 10 capacitive sensors made with copper strips, as well as 10 corresponding programmable LEDs.

    An Arduino Uno powers the assembly, which can be seen being played like a multi-player electronic piano towards the end of the video below. It can also be used as a Simon-style game, and even a light display—though you could program it for any other application you desire!


    Website: LINK

  • Designing an Arduino-powered Braille generator

    Designing an Arduino-powered Braille generator

    Reading Time: < 1 minute

    Designing an Arduino-powered Braille generator

    Arduino TeamJanuary 2nd, 2018

    Did you know that embossing machines needed to generate Braille characters can cost thousands of dollars? After finding this out, hacker Carlos Campos decided to design and build his own using 3D-printed parts, along with an Arduino Mega and a RAMPS board for control.

    Instead of punching each dot, the device pushes a pin out onto the paper, then rolls the dot onto it from the other side, leading to a much quieter operation than normal machines.

    Check out the clips below to see the pin actuator by itself and the embosser in action. More details and videos can also be found on Facebook. The project is still in the experimental stages, so collaborators are invited to help turn it into an even more useful implement.


    Website: LINK

  • Ultrasonically levitate particles and liquid

    Ultrasonically levitate particles and liquid

    Reading Time: 2 minutes

    Ultrasonically levitate particles and liquid

    Arduino TeamDecember 29th, 2017

    If you thought the power of levitation was only available to magicians (and perhaps magnets) then check out this amazing project from Asier Marzo. It uses an Arduino Mega to control an 8×8 array of ultrasonic transducers, which when carefully coordinated using a simulation program, not only can suspend a particle but cause it to move around the grid of transducers.

    You can find a summary of this kind of device’s capabilities in Marzo’s write-up, including haptic feedback, use as a directional speaker, and even levitating liquids in a standing wave setup.

    We present Ultraino, a modular, inexpensive, and open platform that provides hardware, software and example applications specifically aimed at controlling the transmission of narrowband airborne ultrasound. The software can be used to define array geometries, simulate the acoustic field in real time and control the connected driver boards. The driver board design is based on an Arduino Mega and can control 64 channels with a square wave of up to 17 Vpp and ?/5 phase resolution. Multiple boards can be chained together to increase the number of channels. 40 kHz arrays with flat and spherical geometries are demonstrated for parametric audio generation, acoustic levitation and haptic feedback.

    You can also skip to 8:30 in the video below to see it manipulating a particle, or to 9:30 where several individual drops of alcohol and food coloring are able to float in mid-air.


    Website: LINK