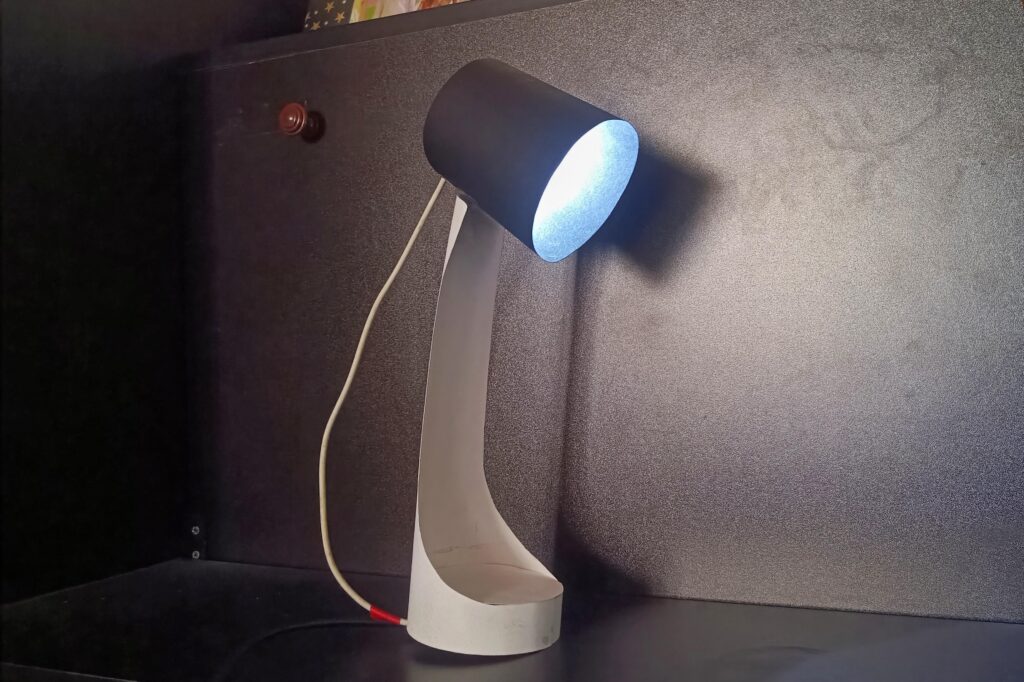
When you hear about all of the amazing things being accomplished with artificial intelligence today, you probably assume that they require a massive amount of processing power. And while that is often true, there are machine learning models that can run on the edge — including on low-power hardware like microcontrollers. To prove that, Shovan Mondal built this AI-enhanced desk lamp.
Mondal’s goal with this project was to demonstrate that AI (specifically machine learning) can be easy to implement on affordable and efficient hardware, such as an Arduino UNO Rev3 board. Here, the ML model adjusts the brightness of the lamp’s LED proportionally to the ambient light in the area as detected by an LDR (light-dependent resistor). The lamp body is heavy cardstock paper.
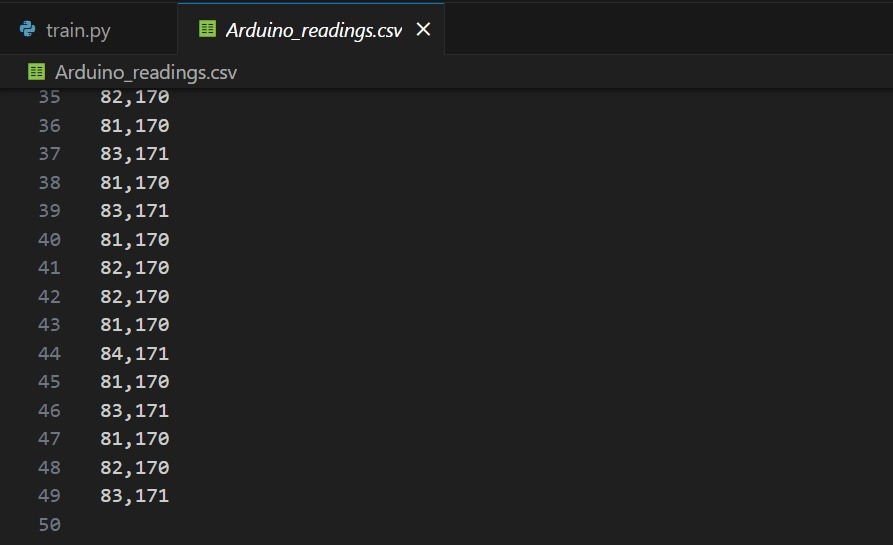
It would be possible to program this behavior explicitly with set thresholds or a manually created formula. But a trained ML model can do the same job without explicit instructions. The training process is simply subjecting the lamp to different lighting conditions and manually adjusting the brightness to suit them. That produces a series of data pairs consisting of the LDR and LED brightness values.
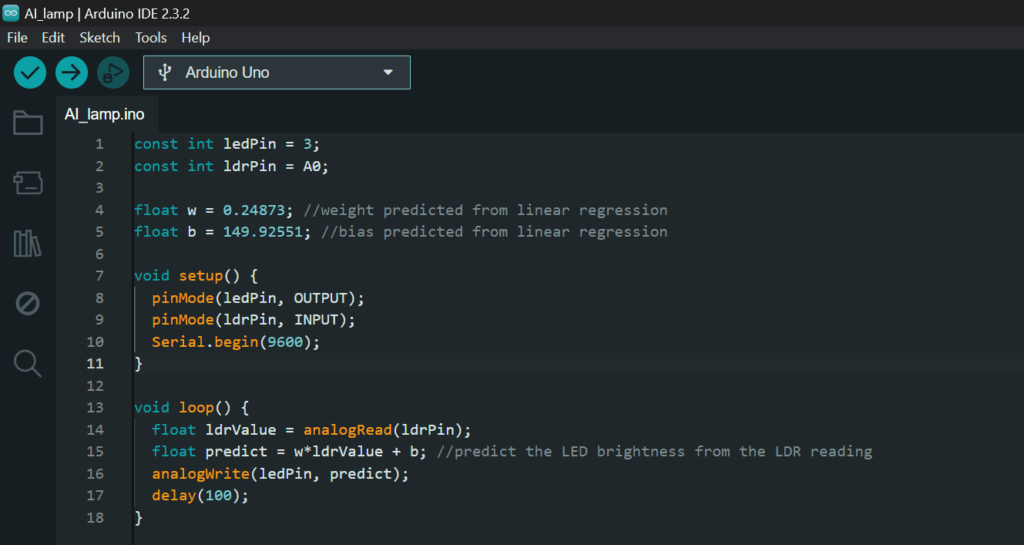
In CSV format, that data can be used to train a linear regression model provided with scikit-learn. That then produces a formula and values that will reproduce the data seen in the training set. The output can then set the LED brightness.
In this case, that formula is very simple, because it only has to account for two variables with a direct relationship. But much more complex relationships are possible, as are ML models that perform tasks more challenging than linear regression.
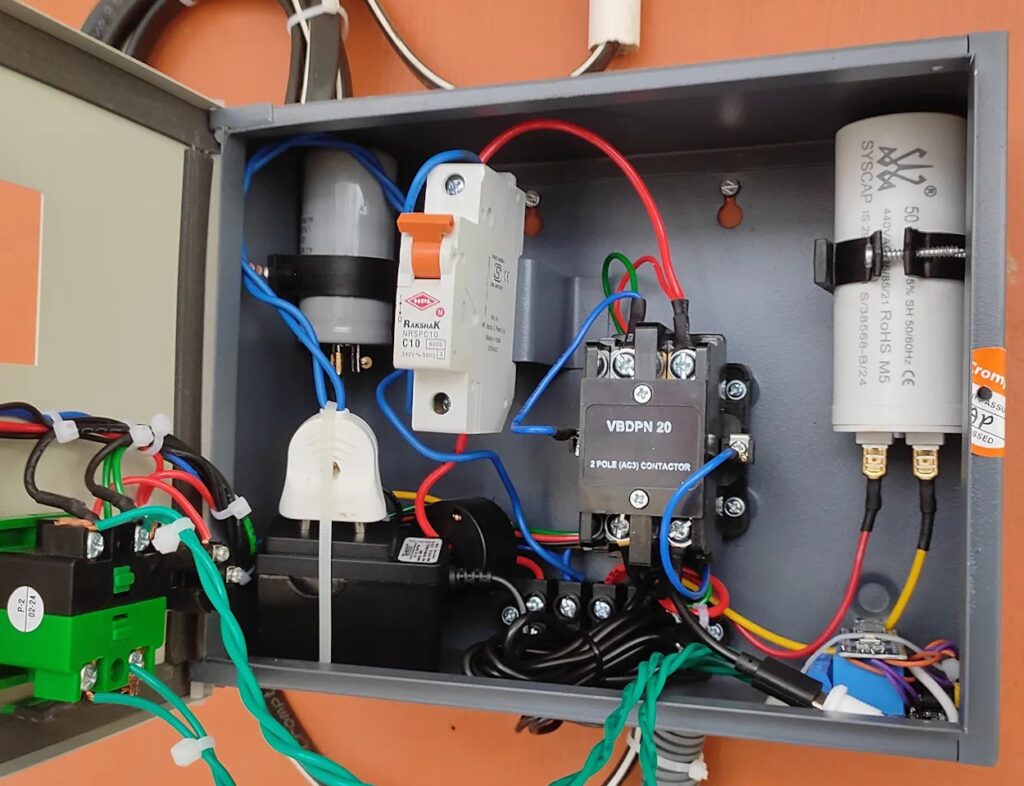
It might surprise our urban-dwelling readers, but wells are still very common in rural areas where it is difficult or prohibitively expensive to run utilities. The CDC reports that more than 15 million households rely on groundwater and wells — and that’s just in the United States. But few people haul up old wooden buckets of water, which is electric pumps come in. Vishal Roy developed a DIY controller perfect for submersible groundwater pumps.
Roy previously had a centrifugal pump to pull up groundwater and fill a holding tank, but that pump was failing. Because it needed replacement anyway, Roy decided to go ahead and switch to a submersible pump that would likely be more reliable. But the submersible pump he purchased came with a manual control panel, which would introduce a new chore. That motivated Roy to build this Arduino-based controller that automatically runs the submersible pump to fill the holding tank whenever the level drops below a set point.
The holding tank has a conventional water level sensor system consisting of three exposed wires acting as capacitive sensors at different heights. This sensor design isn’t precise, but it is inexpensive and reliable, and precision isn’t important for this task, anyway.
The pump itself has a large electric motor that requires a startup sequence that first charges up a starting capacitor. Roy was able to replicate that using the Arduino Nano, which connects the two starting circuits using a Seeed Studio relay module. When the Arduino detects the water below a threshold in the holding tank, it toggles the relays to start the pump motor. Once enough water fills the tank to reach the highest sensor, the Arduino turns the motor back off.
Now Roy has a reliable way to automatically keep the holding tank full of water.
Asset tracking has become increasingly crucial across various industries and applications. Whether you’re a logistics company monitoring your fleet, a conservation organization tracking wildlife, or an individual passionate about outdoor adventures, the ability to track and visualize the movement of assets in real-time can be invaluable.
Today, we are excited to announce the release of the new Advanced Map widget in the Arduino Cloud, a powerful tool that allows you to track the movement and location of your IoT devices over time.
What is the Advanced Map in Arduino Cloud?
Advanced Map is a widget, currently available for Maker and Maker Plus plans in the Arduino Cloud, designed to provide users with an enhanced mapping experience. Unlike the existing Map widget, which displays the current location of devices, the Advanced Map widget takes tracking capabilities a step further by visualizing the historical positions of your devices over time.
This powerful widget not only allows you to monitor the real-time positions of your devices but also shows their movement patterns and historical data. With this invaluable information at your fingertips, you can gain deeper insights and make more informed decisions about your assets.
Advanced Map: Use cases and applications
The Advanced Map widget opens up a world of possibilities for various industries and applications.
Asset tracking for logistics and supply chain management: Monitor the movement of goods and inventory in real-time, optimizing delivery routes and ensuring timely arrivals.
Fleet management for transportation companies: Track your vehicles, monitor driver behavior, and optimize fleet utilization for increased efficiency and cost savings.
Drone tracking: Keep a watchful eye on your drone operations, ensuring compliance with regulations and enhancing safety.
Wildlife tracking for conservation projects: Gain valuable insights into the movement patterns and behaviors of wildlife, contributing to effective conservation efforts.
Personal projects and hobbies: Whether you’re an adventurer tracking your outdoor explorations or a hobbyist monitoring your projects, the Advanced Map widget offers endless opportunities for creativity.
Track a mobile phone
You can track a mobile phone with the IoT Remote app installed and the “Phone as Device” feature enabled. This opens up a new set of applications, from child or elder people care, to outdoor activities tracking.
The benefits of the Advanced Map
The Advanced Map widget comes with a range of features and benefits:
Track your assets’ real-time position: Stay up-to-date with the exact locations of your devices in real-time, enabling you to take immediate action when necessary.
Visualize historical position data: Gain a comprehensive understanding of your assets’ movement patterns by visualizing their historical positions on the map during a selected period of time. This feature empowers you to analyze trends, identify inefficiencies, and optimize your operations.
Follow in real-time the creation of the track You can visualize in real time not only the position of the device, but also the track that is being created.
In summary, with the Advanced Map widget, you can monitor your assets more effectively, reducing the risk of loss or misplacement and ensuring optimal utilization. The data provided provides you with valuable insights, enabling data-driven decision-making and informed strategic planning.
Why choose Arduino Cloud — in 5 points
The Arduino Cloud is more than just a platform for IoT asset tracking in a map; it’s a comprehensive IoT solution for connected projects of all sizes and complexities:
1. Build your IoT project quickly: With its intuitive and user-friendly interface, the Arduino Cloud makes IoT accessible to users of all skill levels, from beginners to experts. 2. Develop from anywhere: The Arduino Cloud features an online development environment that mimics the Arduino IDE experience and helps you create from anywhere. 3. Visualize your sensor data easily: The Arduino Cloud becomes your own control center allowing you to talk to your devices and monitor them from anywhere with beautiful customizable dashboards. 4. Learn, play, scale: Whether you’re working on a small personal project or a large-scale enterprise solution, the Arduino Cloud can adapt to your needs, providing the flexibility and scalability required for growth. 5. Get all the support and resources you need for your project: Join a vibrant community of IoT enthusiasts, professionals, and experts, and benefit from the large catalog of resources and tutorials, and the community support to enhance your skills and projects.
Get started with the Advanced Map widget
Advanced Map in the Arduino Cloud is a game-changer for asset tracking, unlocking new possibilities and empowering users to take their projects to the next level. With its real-time tracking capabilities, historical data visualization, and a suite of powerful features, this new widget opens up exciting opportunities for various industries and applications.
Upgrade to Arduino Cloud Maker plan today and get 20% off with code CLOUD20MAY (offer is valid until June 15th, for users who aren’t currently on any paid plan), and create a new breed of IoT applications with advanced asset tracking capabilities.
Need more time? Get started for free and join the growing community of IoT enthusiasts and professionals who trust Arduino Cloud to bring their ideas to life.
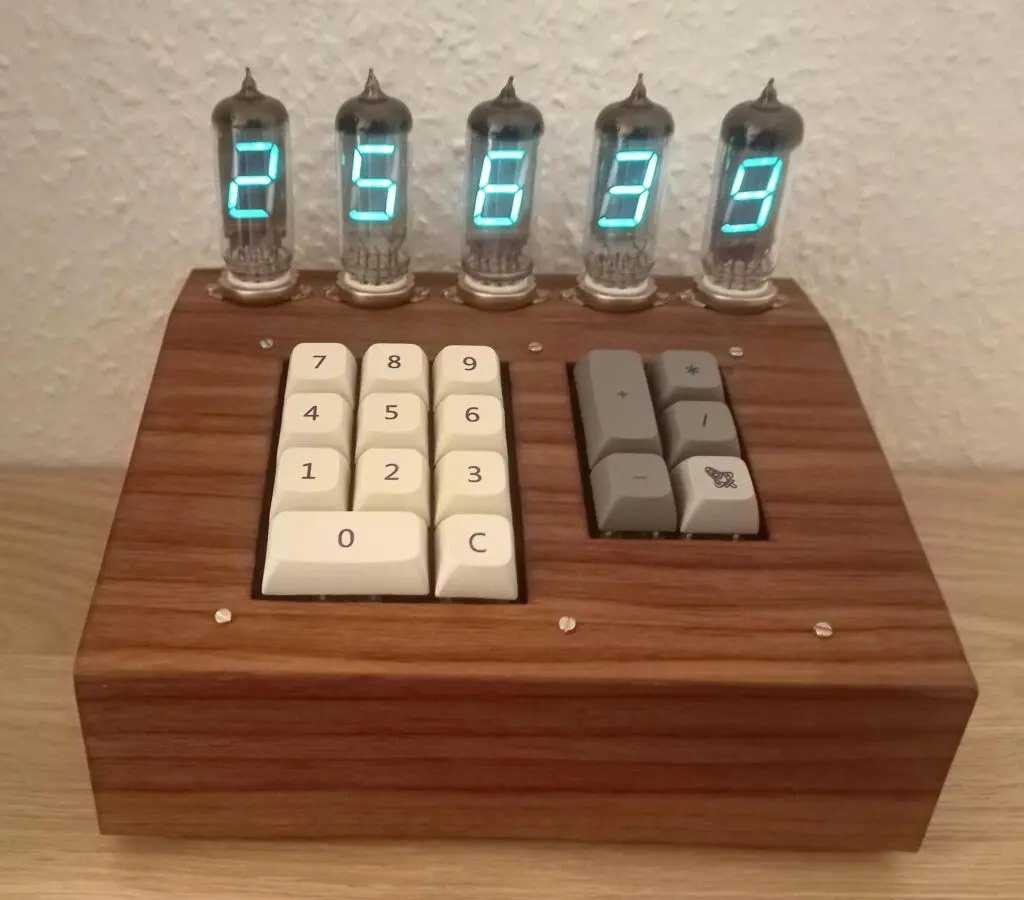
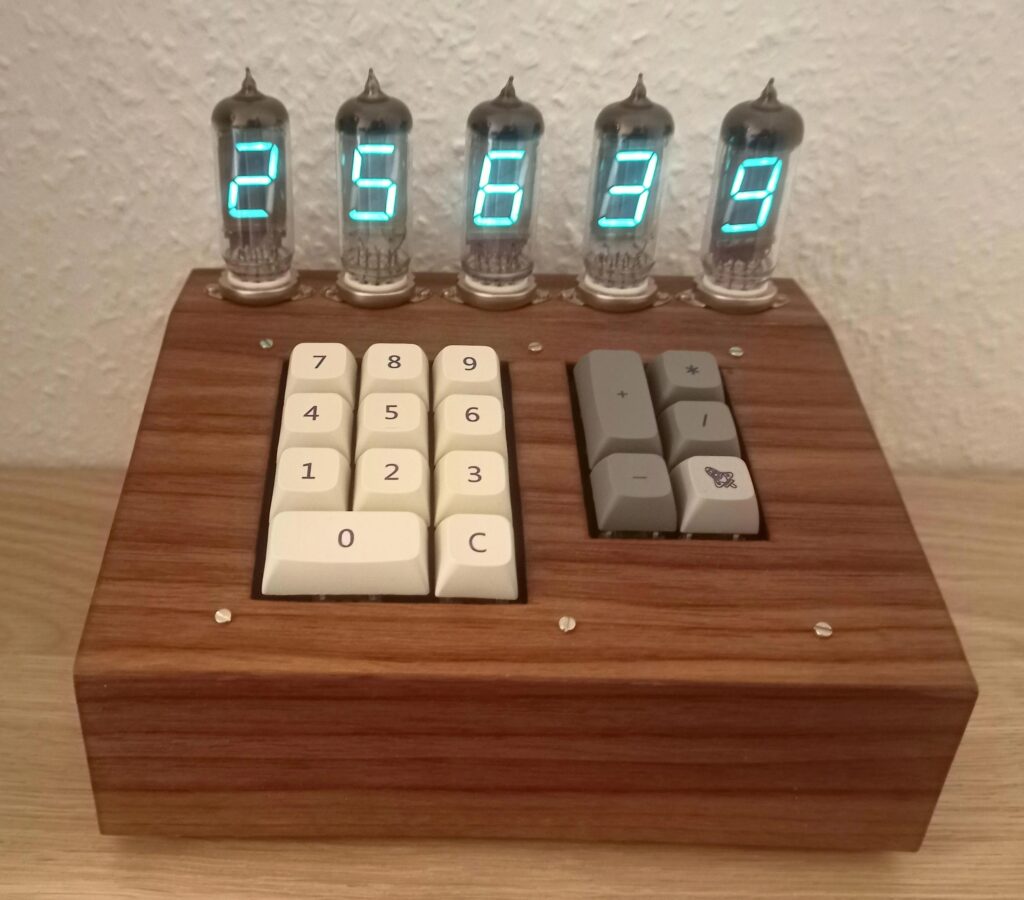
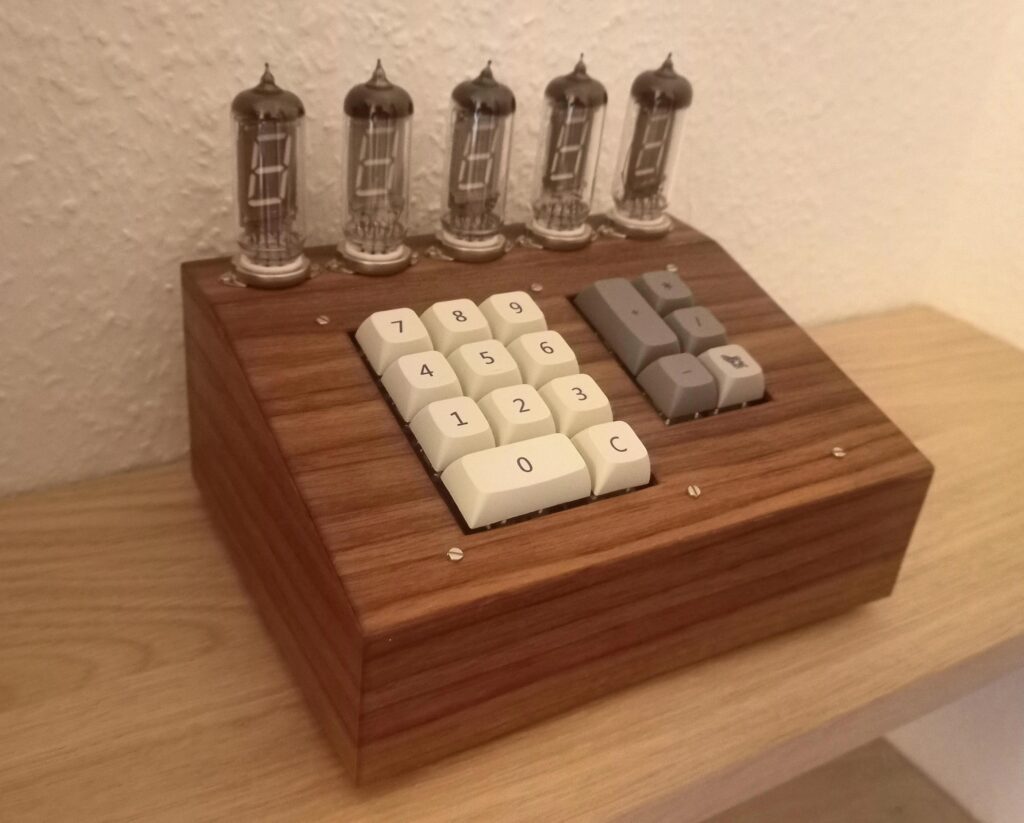
Nixie tubes have been the go-to option for makers looking for retro display aesthetics for many years, because their distinct orange glow carries a lot of vintage appeal. But VFD (vacuum fluorescent display) tubes have been gaining in popularity recently and have different — though similar — appeal. Oskar took advantage of IV-12 VFD tubes to build this beautiful custom calculator.
VFDs work like a cross between Nixie tubes and CRTs (cathode-ray tube). These IV-12 VFD tubes have seven segments that glow in a teal/cyan blue color (thanks to phosphor) and work at lower (and safer) voltages than Nixie tubes. They are bright and readable, which is why VFD technology was popular for automotive dashboards for decades. In this case, Oskar used five of these IV-12 VFD tubes for a custom calculator.
Aside from those very distinct VFD tubes, this calculator also has a lovely wood enclosure and a nice-looking set of key caps for the mechanical Cherry MX Brown key switches. The enclosure is laser-cut plywood with a walnut veneer. Oskar mounted the switches on a 3D-printed base plate.
An Arduino Nano board reads the keypad input, performs the calculations, and displays the results on the VFD tubes. A custom PCB simplifies the wiring, including for multiplexing to the VFD tubes, power connections from a lithium battery charger module, and altering voltage through boost and buck converters.
This looks fantastic, but there is a caveat: it can’t display a decimal point. Some VFD tubes include a segment for that purpose, but the IV-12 model does not. Even so, the calculator is usable for people who can deduce where the decimal point should go.
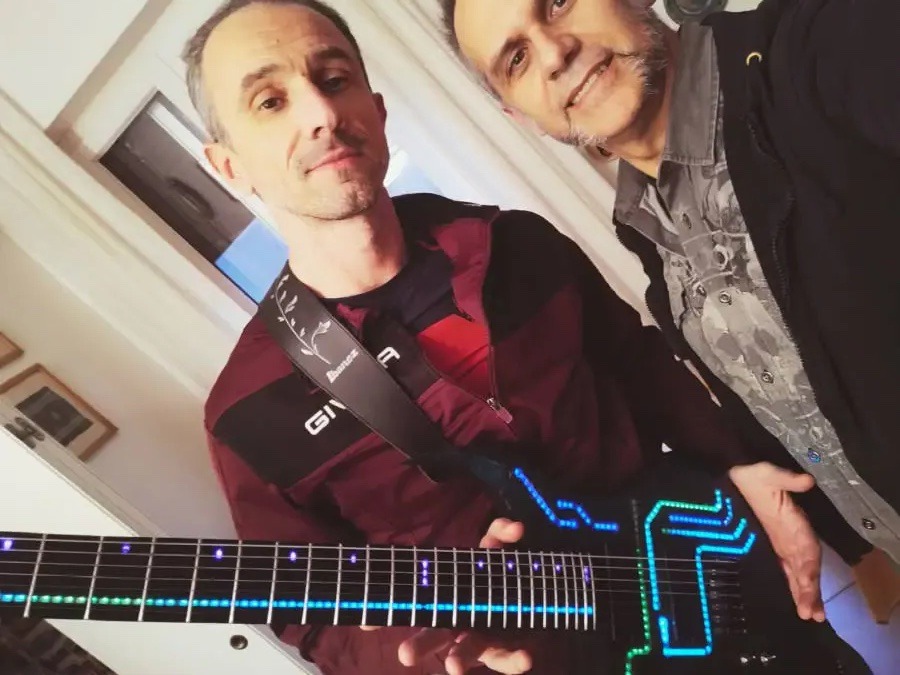
You don’t go to watch a band play live for the audio quality — most venues are atrocious in that regard. No, you go to enjoy the show as a whole and that includes the visuals. The more a band can do to make the performance look exciting, the more you’re going to enjoy it. To that end, Luigi Morelli helped luthier (and fellow Italian) Gianluca of Nadar Guitars build this one-of-kind LED-lit electric guitar.
This guitar’s body looks like a left-handed B.C. Rich Warlock merged into a teardrop. It is a very unique design made all the more special by the LED lighting. Several strips of LEDs on the body resemble the traces of a circuit board, while additional LEDs run the length of the fretboard. There are eight different effects/animation programs and it is possible to switch between them using an infrared remote — a well thought-out feature, because a tech can control that along with the stage lights.
These are WS2812B individually addressable RGB LEDs that operate under the control of two Arduino Nano boards. One controls the lights on the neck (which only follow a single program) and the other controls the lights on the body. Power comes from a 5000mAh lithium battery.
In his writeup, Morelli mentions that the LED circuit produced a hum around 1kHz. We assume that the guitar’s pickups would amplify that, but Morelli says that they were able to solve the problem — they’re just keeping the solution “a little industrial secret.” Hum or not, the guitar looks fantastic.
When playing golf, few things are as important as using the correct form when swinging, since even small deviations can be the difference between a hole-in-one and additional strokes. To improve his game, Concept Bytes has designed a small clip-on device called the “Club Master.” With it, he can get a live display of various data points which help track power, distance, and acceleration.
Collecting and processing all of this data is an Arduino Nano RP2040 Connect due to its fast microcontroller, BLE connectivity, and onboard six-axis IMU, which meant an external accelerometer was not required. Before placing everything into a small, 3D-printed enclosure, Concept Bytes added power to his device with a single LiPo battery cell attached to a step-up voltage converter.
The Club Master’s Arduino sketch continuously reads the latest acceleration data from the board’s IMU before performing a series of calculations to derive metrics including swing speed, the number of strokes, and distance traveled. All of the results are then sent to the Arduino Cloud and shown in a mobile-friendly IoT Remote app dashboard for quick access outdoors on the range.
More details about the Club Master can be found in the TikTok video below, and if you’re curious about how edge ML can improve your putting, check out the Golf Ace project here.
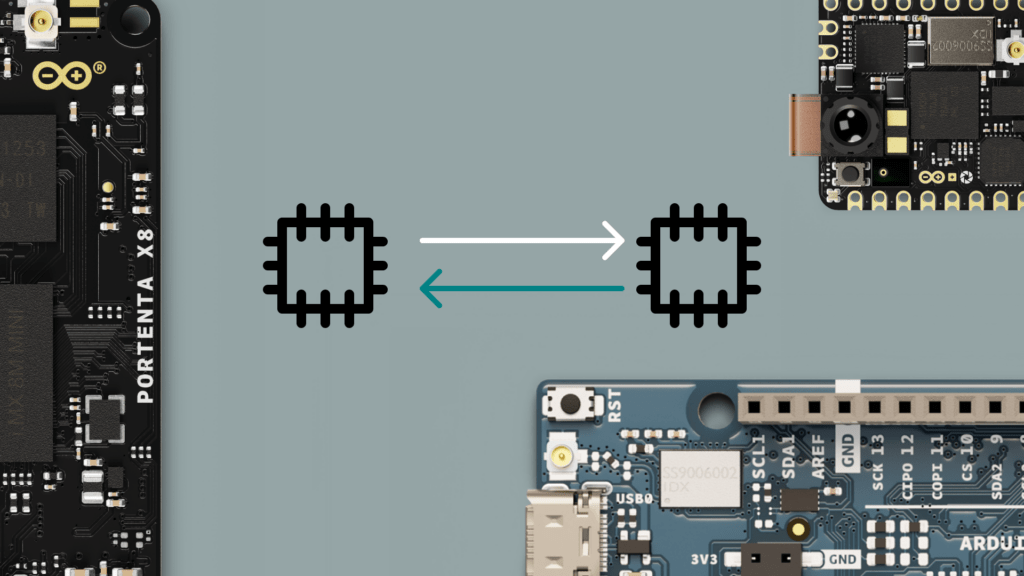
We’re excited to announce a powerful new feature that we have been working on in collaboration with the MicroPython team!
Starting with the upcoming release (v1.23), MicroPython will offer support for Asymmetric Multiprocessing (AMP) on multi-core microcontrollers, based on the industry standard OpenAMP framework (see the MicroPython openamp module documentation for more information).
This enables Arduino users to run both an Arduino sketch and a MicroPython program simultaneously on multi-core modules and to communicate between the two. Supported boards include the Arduino GIGA R1 WiFi, Portenta H7 and Nicla Vision.
The communication between Arduino and MicroPython is facilitated by using Remote Procedure Calls (RPC). This allows us to benefit from the simplicity of using MicroPython while unlocking access to all of Arduino’s rich libraries from MicroPython.
If you ever found yourself wanting to use MicroPython for a project, but were stuck on this one library that is only available for the Arduino language… your problem is now solved!
MicroPython AMP support provides the following key features:
Minimal and user-friendly API
Compatibility with Arduino’s RPC library
Remote processor lifecycle management, such as loading firmware and booting the secondary core
Support for synchronous and asynchronous remote procedure calls
You spoke, we listened. The feature has been on the community’s wishlist for a while, so we couldn’t be any more proud to bring you this new advancement! We’re excited to see what kind of creative applications it will unlock for our community. Leave a comment in the section below or share your endeavors on the Project Hub!
Held in Hawaii this year, the Association of Computing Machinery (ACM) hosted its annual conference on Human Factors in Computing Systems (CHI) that focuses on the latest developments in human-computer interaction. Students from universities all across the world attended the event and showcased how their devices and control systems could revolutionize how we interact with technology in both the real-world and virtual environments. These 12 projects presented at CHI 2024 feature Arduino at their core and demonstrate how versatile the hardware can be.
First on the list is MouseRing from students at Tsinghua University in Beijing that aims to give users the ability to precisely control mouse cursors with only one or two inertial measurement units (IMUs). Worn as a ring on the index finger, data collected from the MouseRing via an Arduino UNO Rev3 was used to both train a classification neural network and model the finger’s kinematics for fine-grained mouse cursor manipulation.
Because objects in virtual reality are only as heavy as the controller, simulating weight has always presented a challenge, which is why five students from the University of Regensburg in Germany devised their MobileGravity concept. With it, the user can place a tracked object onto a base station where an Arduino Micro then quickly pumps in/extracts water from the object to change its weight.
Another virtual reality device, the AirPush, is a fingertip-worn haptic actuator which gives wearers force feedback in up to eight directions and at five different levels of intensity. Through its system of an Arduino UNO, air compressor, and dual DC motors, this apparatus from students at the Southern University of Science and Technology in Shenzhen can accurately apply pressure around the finger in specific areas for use in games or training.
A Robotic Metamaterial, as described by students at Carnegie Mellon University, is a structure built from repeating cells that, on their own, cannot accomplish much, but when combined in specific configurations are able to carry out very complex tasks. Some of the Arduino Mega 2560-powered cells are able to actuate, sense angles, or enable capacitive touch interactions, thus letting a lattice of cells become a capable robot.
Instead of using pneumatics to bend materials, this team of students from Zhejiang and Tongji universities in China has designed a modular, flexible material using magnets which they call MagPixel. An Arduino UNO powers one such digital clock application leveraging MagPixel by energizing electromagnets within a ring to move the hour “hand” around the clock face.
Proprioception, or the ability to inherently sense where limbs are in 3D space, is vital to how we navigate the world, but VR spaces can limit this ability. The ArmDeformation project from a group of Southern University of Science and Technology students in Shenzhen rests on the wearer’s forearm and then moves the skin below to simulate an external force thanks to an Arduino Mega and several DC motors.
Grasping and moving objects is already quite the task in VR, but sketching a picture takes it to a whole other level of difficulty. Three students from the University of Virginia, therefore, have developed a shape-changing device that attempts to match the forms present in a 3D world for the purpose of sketching. After attaching a piece of paper to the surface, the VRScroll will bend into the correct shape using its two Arduino Uno WiFi Rev 2 boards and six motors.
As an alternative to plastic-based fibers for use in smart textile prototyping/production, four University of Colorado-Boulder students built an open-source machine that is capable of spinning gelatine-based fibers in a compact footprint. Leveraging an Arduino Mega, the machine can spin biofibers through its heated syringe with GCODE input, thus creating a strong thread which potentially integrates wearable sensors.
The art of communication relies on many forms of signals- not just speaking, and harnessing the user’s breathing pattern to better communicate is ExBreath from students at Tsinghua University in Beijing. An Arduino Nano continuously monitors the breathing patterns from a wearer via a bend sensor and translates them into signals for a micro air pump. In doing so, small, externally-worn air sacs are inflated to reflect the sensed breathing pattern.
This smart material, called ConeAct by its creators at Carnegie Mellon University, is a modular system consisting of small cones joined together with four shape memory actuators (SMA) that either flex or become rigid at certain temperatures. An Arduino Nano coordinates the actions of each cone, and when one needs to bend, the onboard ATtiny1616 will activate its MOSFETs to begin heating the corresponding SMA wires.
Targeted to those with blindness or low vision, the Tangible Stats project from a group of students at Stanford University allows them to more easily visualize statistical data by interacting with physical objects. The Arduino Mega-driven platform senses the number of stackable tokens placed into a column and provides quick feedback. Additionally, it can tilt the row of tokens to represent a sloping line.
Everyone needs access to fresh, clean air, but quickly seeing the indoor air quality of somewhere like an office meeting room/lobby is difficult. ActuAir, constructed by students at Newcastle University, is a wall-sized soft robotics display powered by a several Arduino UNO R4 WiFis that can each adjust the shape and color of a wall-mounted pouch to indicate the current CO2, temperature, or humidity levels — all of which is adjustable from an external web application.
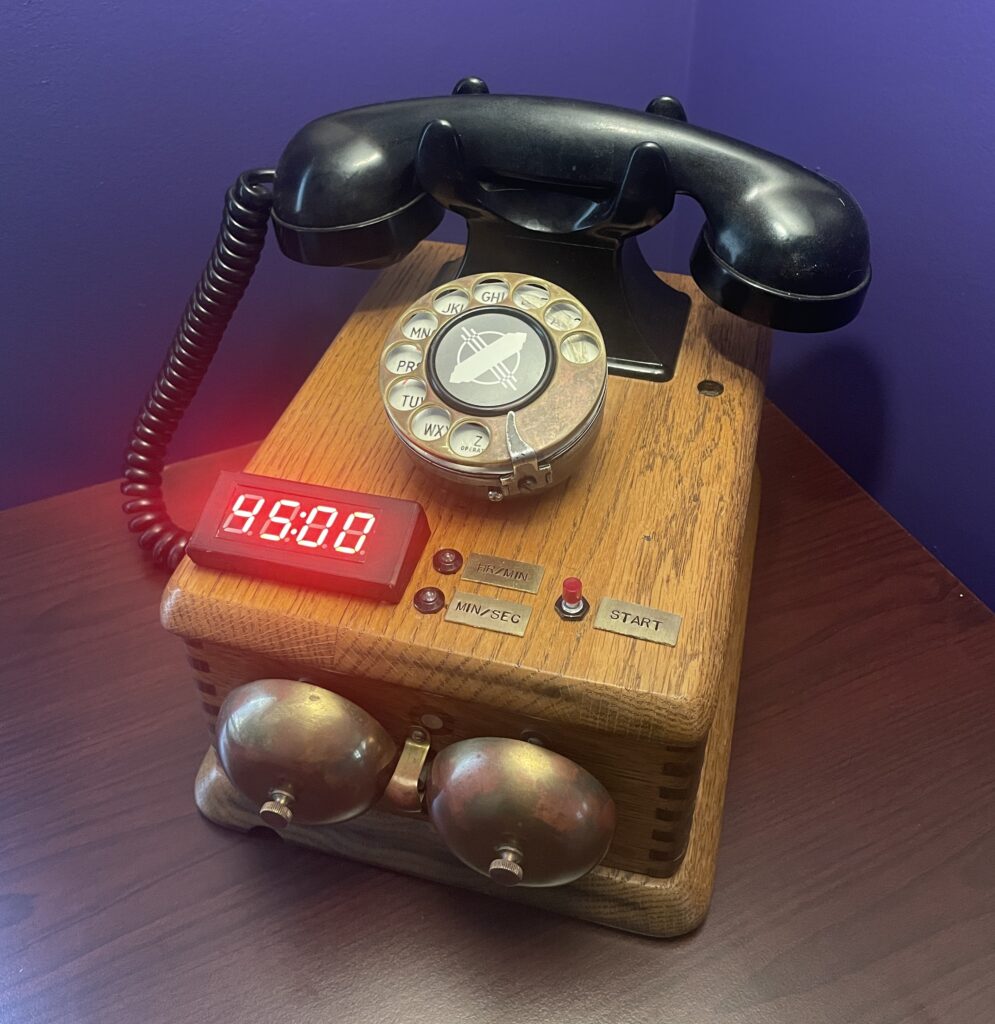
It seems like everything that happens in a kitchen requires exact timing. Whisk the batter for three minutes, knead the dough for 15 minutes, bake for 30 minutes, and so on. A timer is a necessity for cooking and baking, but there is no reason you need to use your phone or a boring egg timer from the dollar store. You can follow Scott-28’s lead and convert an antique rotary phone into a stylish kitchen timer.
This looks like a very old rotary phone, but it is actually a versatile kitchen timer that counts down from as little as one second or as much as 99 hours and 99 minutes. Users enter the time by spinning the rotary dial, which is good fun. Then, when the countdown ends, the old school ringer bells start chiming. A four-digit seven-segment display is a bit anachronistic, but makes the timer more usable by showing the countdown. Lifting and then dropping the handset turns off the timer.
This all happens under the control of an Arduino UNO Rev3 board, which reads the pulses from the rotary dial and the singular input button. It also sets the seven-segment display and the LED indicators.
The only tricky part was sounding the ringer, which requires AC power to function. To provide that from a DC power supply, Scott-28 used a LS057020 Black Magic Sine Wave Generator. That works like a power inverter, turning 5VDC into 70VAC (at 20Hz) to drive the ringer.
The Monaco Grand Prix is just days away and will likely be one of the most exciting races of the season. While most fans can’t participate directly — except as spectators — they can celebrate their passion through DIY projects. That’s why we’ve scoured the community to find the best of those builds for every skill level. Check out the list below!
Formula 1 races get underway with a light sequence that is unique in motorsports. That sequence starts with the lights illuminating one after another, telling the drivers to prepare. Then, after a random delay, the lights turn off and drivers can launch. This tests driver reaction, rather than memorized timing.
Project Hub user BirdGuy’s project replicates those start lights using just an Arduino UNO Rev3, some LEDs and resistors, a momentary push button, and a breadboard. It is perfect for beginners, thanks to the simple wiring and sketch.
Logitech’s G Driving Force Shifter is a popular six-speed racing simulator peripheral. Modern Formula 1 cars use electronic sequential shifters, but this accessory would be perfect for vintage F1 cars in racing sims.
However, there is a problem: this shifter only works with a Logitech wheel. Dave Madison’s Arduino Leonardo-based adapter lets digital racers connect the shifter directly to a PC. It breaks out the DB9 connector and reads the inputs, then provides USB output. No soldering or breadboard necessary!
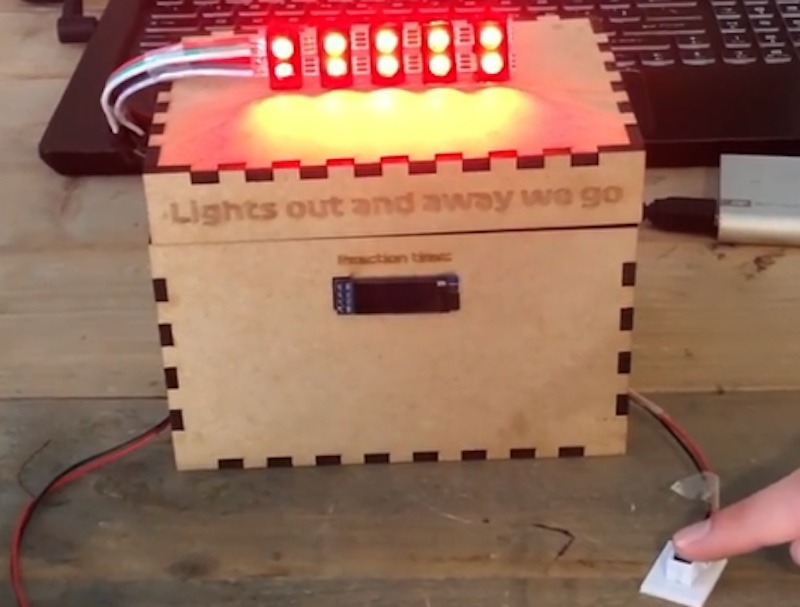
The previous start lights project is a great demonstration, but Stephan Holding’s reaction timer puts user skill to the test. The concept is very similar, but with a second button that represents an accelerator pedal and an OLED screen that shows the user’s reaction time.
This project is a bit more complex, with that OLED screen, WS2812B individually addressable RGB LEDs, a piezo buzzer, and a laser-cut MDF enclosure. But it is still suitable for beginners who want to train their reaction time.
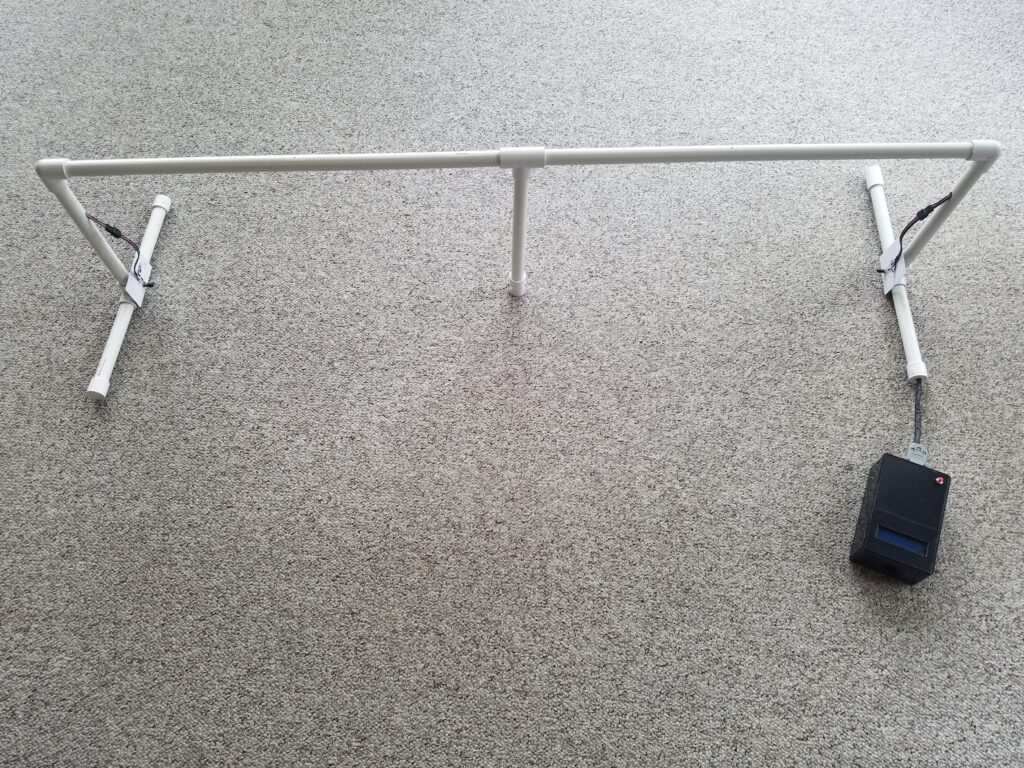
Formula 1 is a wildly expensive sport, but dedicated enthusiasts can participate in amateur racing leagues to get their wheel-to-wheel fix. Those enthusiasts will want some way to measure lap times or speeds during practice and Project Hub user nfarrier’s DIY race photogate can help.
This was designed for small-scale model cars, but the same hardware will work for full-size cars. Each PVC pipe gate has a homemade break-beam sensor and an Arduino UNO Rev3 monitors those. Enabling multiple lanes is as simple as adding more break-beam sensors. The Arduino times the interval between gate sensor triggers and sends the results to a basic Android app through an HC-05 Bluetooth for logging.
Sequential transmissions, which weigh less and shift faster, took over F1 about 30 years ago. Most have “flappy paddle” electronic shifters integrated into the steering wheel, but many people prefer the feeling of reaching over to a shifter lever. Those people should enjoy Carlos Almeida’s sequential gear shift controller for sim racing.
This project required 3D CAD modeling skills and a well-tuned 3D printer, so it is a step up in difficulty. It utilizes an Arduino MKR1000 WiFi board, because that is what Almeida had on hand. But it should work with several other models. There is even a seven-segment display that indicates the current gear.
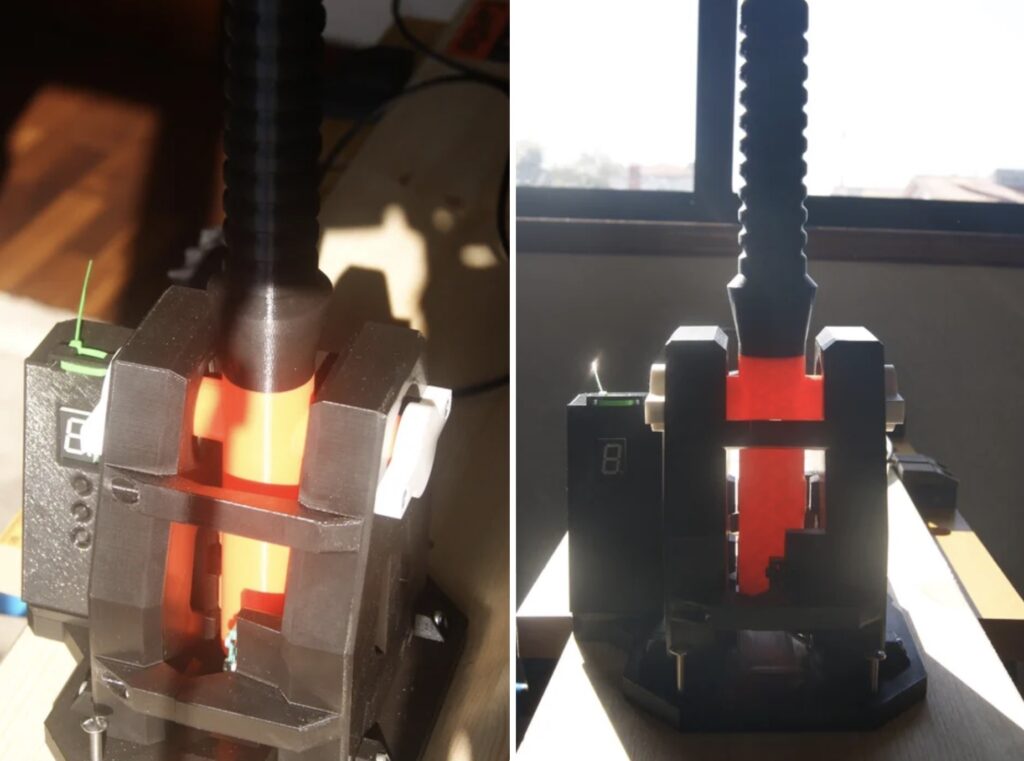
Current Formula 1 regulations mandate the use of 1.6L V6 hybrid engines, but the V12 era was the most quintessential F1 experience for many fans. And the number of pistons on a V12 engine just happens to match the number of hours on a clock. That gave Will Reeve the inspiration to construct this V12 engine clock.
Reeve styled this 3D-printed clock after a simplified V12 engine. As each hour passes, internal servomotors lift pistons to indicate the time. A seven-segment display on the front of the engine block shows the minutes. An Arduino Mega 2560 controls that process and LEDs provide accent lighting.
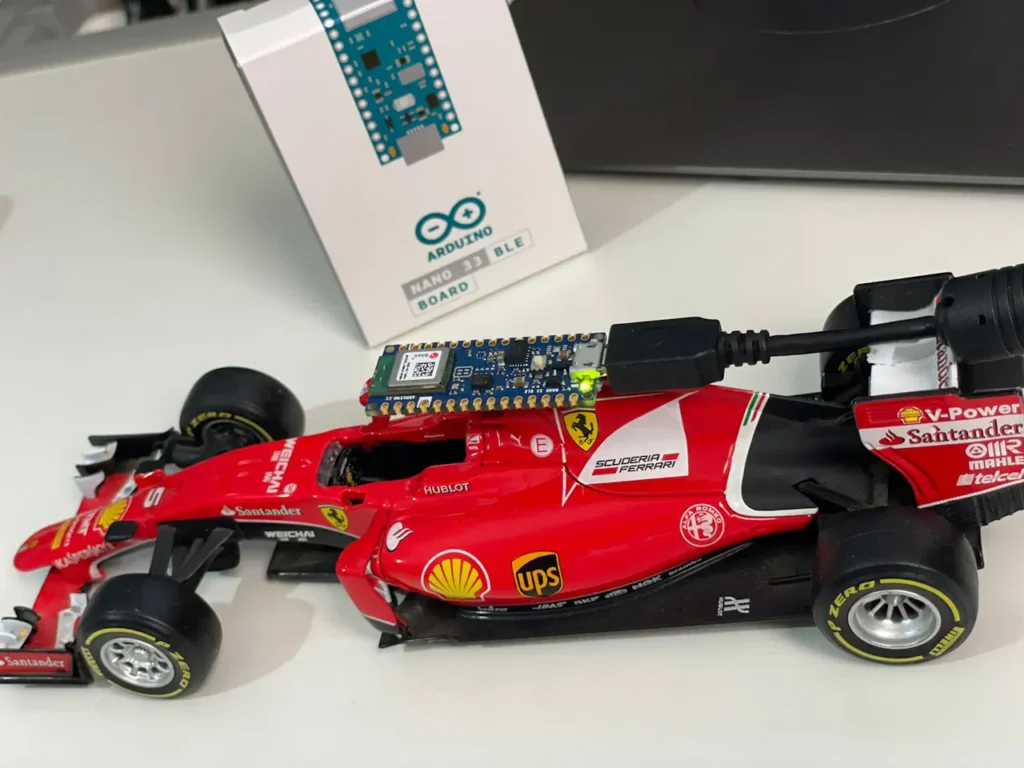
Cutting-edge machine learning models are capable of amazing feats and often reach conclusions that we humans cannot. Leonardo Gonçalves theorized that a machine learning model could predict the winner of a Formula 1 race and this project tests that idea.
Gonçalves didn’t have access to actual F1 cars, so this project is only a demonstration of the concept using unpowered scale models. The idea is that a machine learning model trained on data from F1 cars can predict the winner of an ongoing race based on the new real-time data.
Here, that data comes from an Arduino Nano 33 BLE Sense attached to the model car, which has all kinds of onboard sensors for collecting data, including an IMU (inertial measurement unit). That data went to a Neuton tinyML model for training and new data goes to the trained model for predictions. The results are fun to see, even if the test was dramatically simplified compared to a real race.
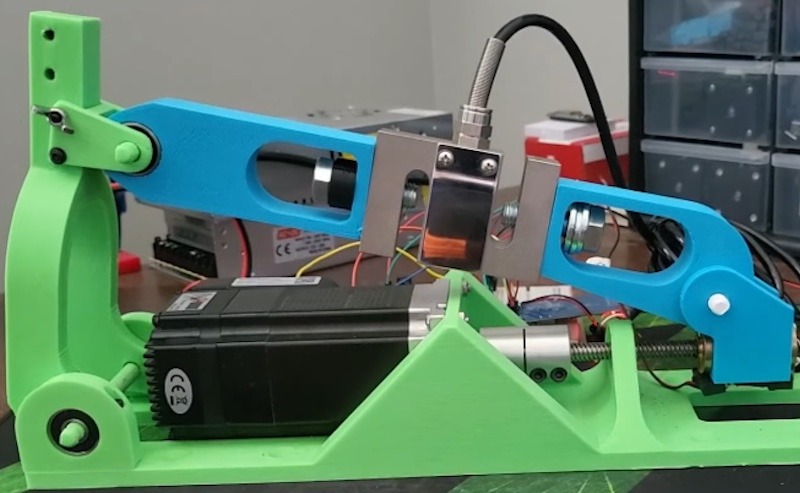
The racing sim hardware we’ve already discussed only approximates the experience of driving a real car. But this active racing simulator pedal is much more robust and provides force feedback resistance. While drive-by-wire throttle systems are making it a thing of the past, mechanical throttle linkages impart noticeable feedback through the pedal. This DIY pedal replicates very high-end Simucube hardware, providing that feedback at a fraction of the cost.
The two killer features are a load cell to measure pressure on the pedal and a large servo with a leadscrew to generate feedback. An Arduino controls the servo and reads the signal from the load cell’s amplifier. With the help of software running on a connected PC, this closed-loop system can accurately replicate the feel of an accelerator pedal in the real world.
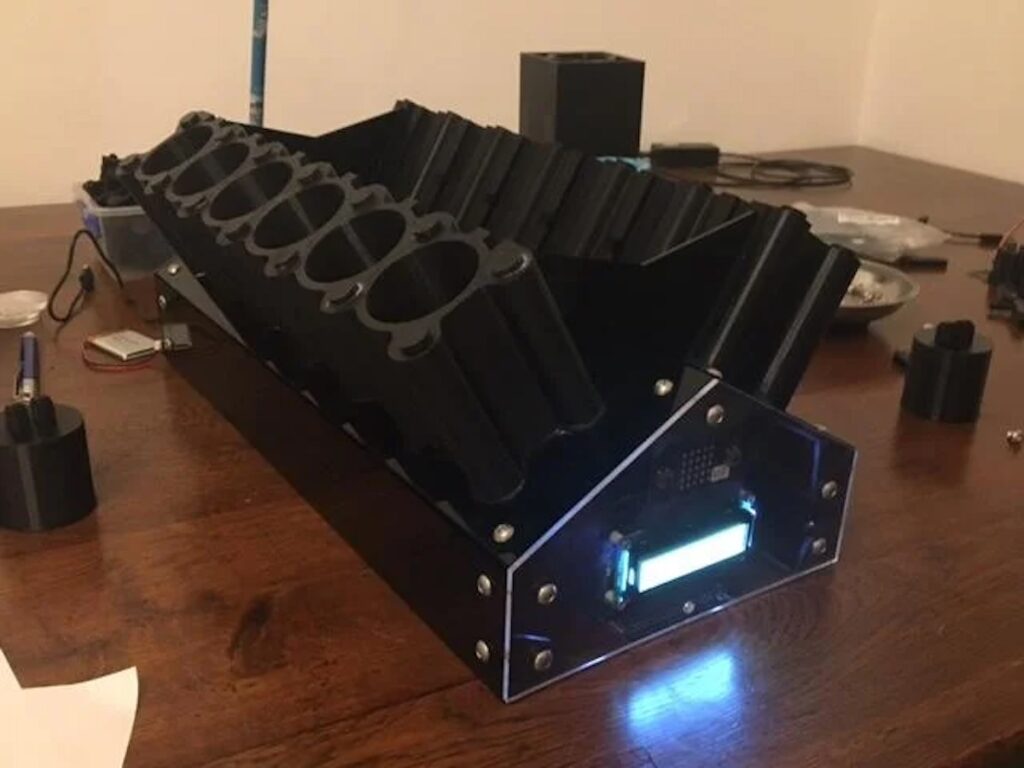
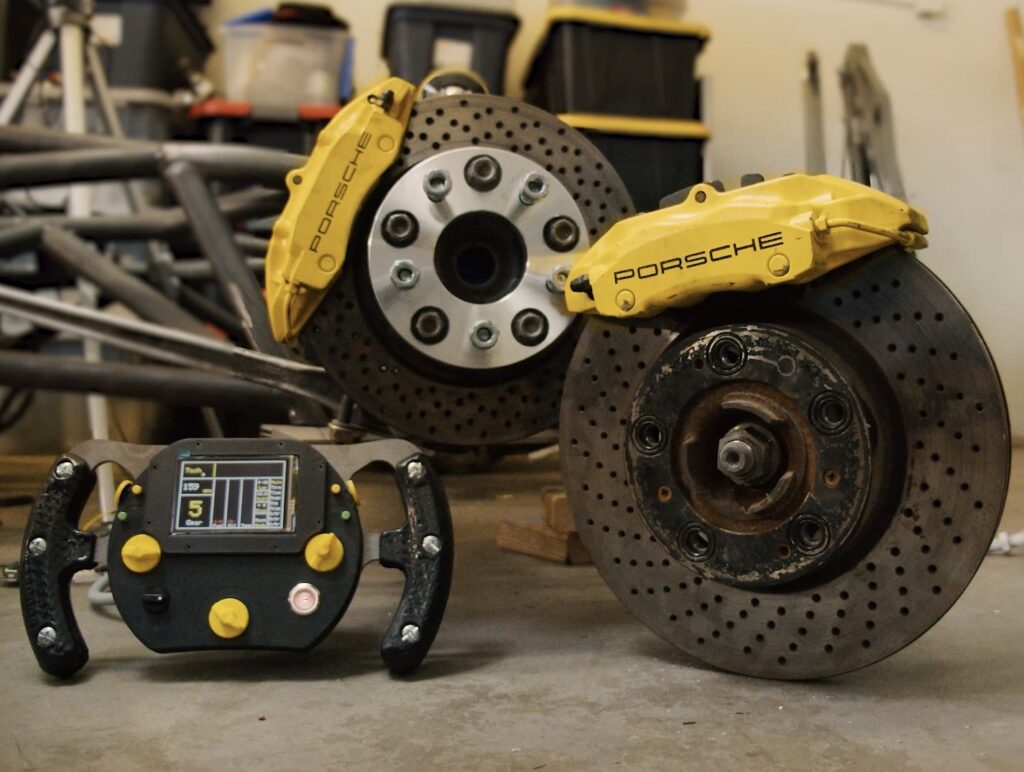
Wesley Kagan is on an incredible quest to build his own F1 car, complete with a Mercedes V12 engine. There is a massive amount of custom work that Kagan has put into this project, but one of the highlights is the steering wheel. It looks and operates a lot like what you would see on an F1 car today, but is 100% bespoke.
This requires three Arduino development boards. The first, an Arduino Mega 2560, collects data from the car’s sensors. The other two, Arduino Micro boards, read the steering wheel buttons and switches, and display content on the 3.5” LCD screen. That shows information like the current gear and speed, just like today’s F1 drivers see on their steering wheels.
If you have an F1-themed project or get inspired to create one after watching the Monaco Grand Prix this weekend, be sure to upload it to the Project Hub!
One of the great things about making is that it really is for everyone — every budget, every skill level, and every age group.
Children are one of the groups that can benefit the most from Arduino. Getting exposed to making and home automation from an early age can be enormously beneficial for kids and their families, and can spark a lifelong love for technology.
In this article, we’ll look at why Arduino is so great for kids, and some of the ways parents, older relatives, and teachers can use Arduino’s products to entertain, educate, and inspire young learners.
Why is Arduino so great for kids?
It teaches valuable STEM skills: STEM has always been a lucrative field, and as we enter an increasingly tech-driven world this trend looks likely to continue. Arduino projects can help kids gain hands-on experience and build a solid foundation of STEM skills from an early age.
It can begin a lifelong love for engineering. Making projects from a young age can be the start of a wonderful journey, giving kids a passion that can follow them through life and lead to many great experiences.
It’s a community: The Arduino community extends across the entire world, with regular meetups and events where like-minded makers can get together. For kids, this can be a great way to make friends and be part of a wider group.
It helps build wider skills: On top of pure STEM, using Arduino can also help kids grow in other areas, by encouraging skills like problem-solving and teamwork.
It’s fun: What more needs to be said? Tinkering with Arduino projects is a ton of fun, and that’s a huge benefit in itself.
5 ways to use Arduino with kids
Now let’s take a look at some specific ways we can use Arduino with young learners, illustrated with a few real-life examples of projects.
1. Learn through projects
Arduino can be the perfect gateway into making and engineering as hobbies, by giving kids accessible and fun projects to learn fundamental skills and gain practical experience.
Take a look at this project, for example — which teaches kids the fundamentals of AI and machine learning via a fun game. Since these skills are exploding in importance, getting a solid headstart here is a valuable opportunity.
2. Projects for groups
One of the best things about Arduino for kids is the teamwork aspect, and the ability to work together toward a shared goal. This not only brings a new dimension of fun to the activity but also helps foster social skills and make friends.
Take a look at this automated gardening project from EDUcentrum. In this tutorial, kids build a smart watering system for a connected plant, which they will then monitor over time. Then, they’ll discuss the project with their peers and do a presentation.
3. Projects for kids with kids with autism
STEM really should be accessible to everyone, and in fact, children with autism can benefit enormously from Arduino projects.
Arduino For Autism is a group dedicated to helping mentor kids with autism, showing them how to work with microcontrollers. It’s designed to give kids with autism an introduction to the world of making and STEM in general, helping lay the foundations for skills like coding, engineering, and game development.
Arduino can also be a useful tool for parents of children with autism. Phillip Mallon is a great example — on his website he shares the projects he’s built to help his son Jason, who has severe autism. Examples include a simpler timer for time management and an easy-to-use MP3 player.
4. Projects to help parents
Parenting is a tough task, but Arduino can help in this area, too.
For example, check out this baby formula tracker. The monitor is designed to help randallph and his wife keep track of their daughter’s feeding times and make sure she is eating the right amounts at the right intervals.
5. Learning mixed with fun
Learning doesn’t have to be a chore — and there’s no better proof of that than this project, a device that launches NERF darts to show how angles affect the trajectory of ballistics.
It was built by Arduino user buildfams and won Arduino Project of the Month in March 2023. Buildfams and his son worked together to build the project — a valuable learning experience in itself — and ended up with a fun gadget and a great way to learn key physics concepts.
Tools and products
On top of project ideas, Arduino also has several tools and products specifically designed to help beginners and kids make a start with their own projects. Let’s take a closer look.
Get started with making
If you or your kids are brand new to making, Arduino’s Student Kit is made for you. It’s built to help learners get started with making projects, covering basic skills like coding and building electronic circuits. It’s made for complete beginners — making it perfect for kids — and includes 11 activities designed to guide the learner through key concepts and important skills.
Learn key scientific skills
If learning basic scientific skills and concepts is your goal, look no further than the Science Kit R3 by Arduino. Designed to teach key scientific skills, bringing abstract theories to life through practical, interactive projects.
Learn the basics of STEM
Arduino’s Starter Kit is the perfect introduction to STEM and can be used at home or in the classroom. The kit teaches fundamental skills like coding and electronics through engaging, fun projects. It covers a ton of important basic concepts, from sensors and actuators to digital logic, while also encouraging learners to think critically and work together to solve problems.
Alvik
Arduino enthusiasts have yet another product to play with! Alvik is designed for students and teachers to explore the world of robotics, introducing this fascinating field to young learners with a unique approach. Why not grab yours today?!
Learn more about Arduino and how you can use it with young learners (and older ones too!).
If the COVID pandemic showed us anything, it is that our public spaces are overflowing with opportunity for germ transmission. In 2019, most people didn’t think twice about touching a gas pump handle or an ATM touchscreen, but it quickly became apparent that such contact presents a genuine risk. We have technology to detect interaction without physical touch, but what about providing the user with feedback? That’s where synthetic jets can come in with non-contact haptic feedback.
Put a flat cover with a hole in the middle over a speaker driver and you’ve just built a synthetic jet, or “synjet.” As the cone moves, it alters the available volume within the enclosed chamber and when that decreases, the synjet forces air out through the hole. Cone size, driver power, frequency, and hole diameter all influence the characteristics of the air. Except for cone size and material, every parameter is adjustable — the hole diameter can even change using an aperture mechanism like a camera lens. By adjusting the parameters, a synjet can create everything from a steady light stream of air to strong pulses.
Here, a team from Carnegie Mellon University’s Future Interfaces Group paired synjets with an Arduino Nano board to construct a non-contact haptic feedback system. The Arduino controls servo motors that adjust the nozzle port, influencing the air flow characteristics. A single servo can open or close an aperture iris, while two servos can move a secondary aperture to alter port size and position.
The researchers demonstrated this concept across a wide variety of applications, with synjets of many different sizes. Synjet size can vary just as much as speaker driver size, so the possibilities are almost endless. As the team shows, this has a lot of potential — especially for situations where physical contact is undesirable.
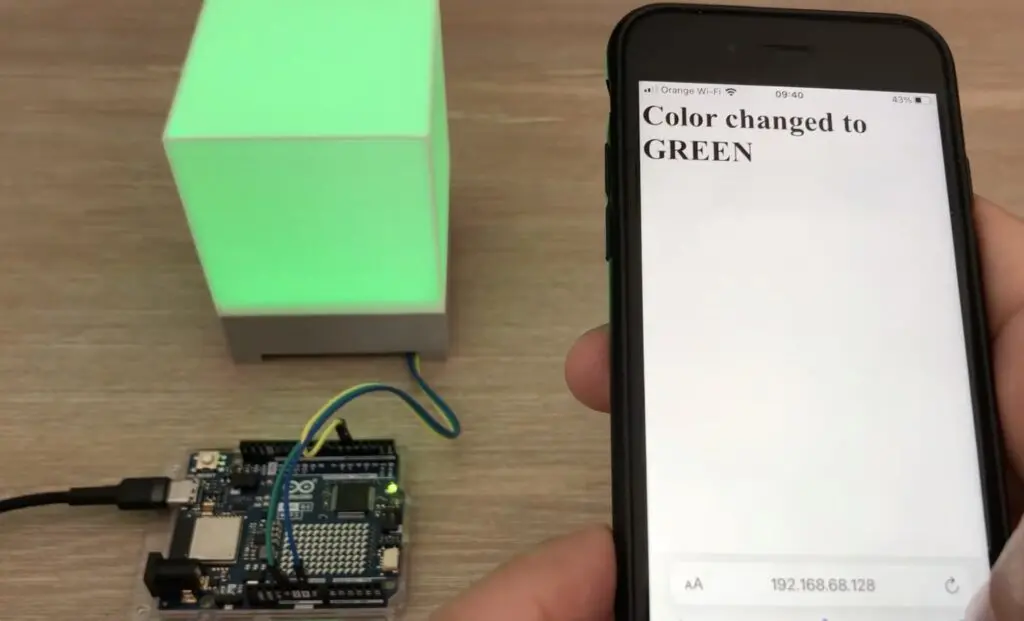
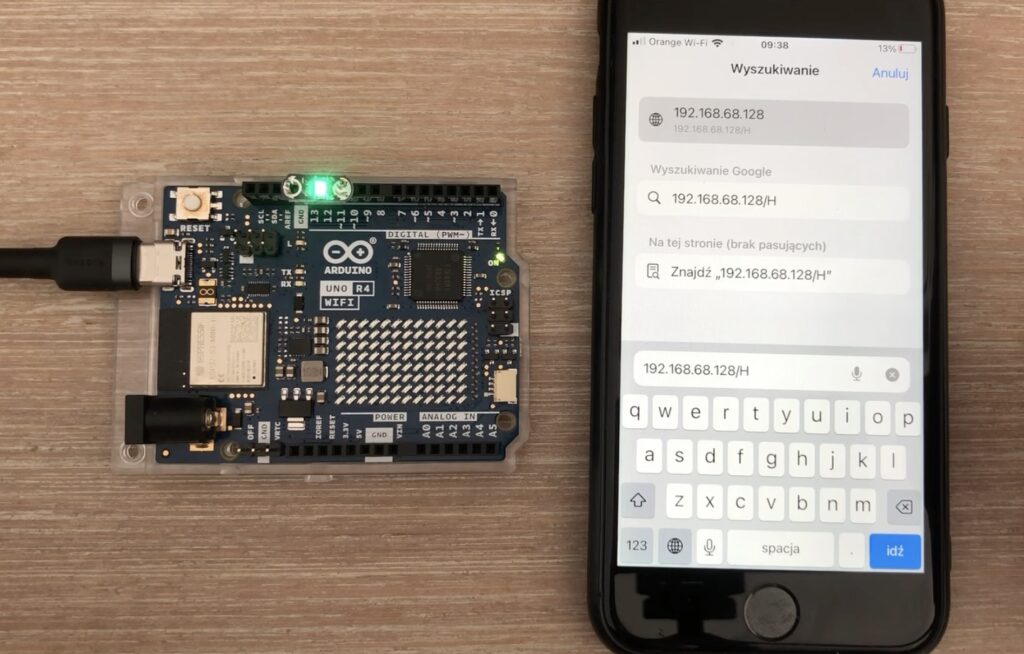
It can be tough to get started with building an Internet of Things (IoT) project from the ground-up, as getting connected, serving a webpage, and managing other devices can all be a challenge to a beginner. This is why the YouTuber known as “Mario’s Ideas” made an end-to-end tutorial that details everything one might need to build a smart RGB lamp.
Because the Arduino UNO R4 WiFi contains an ESP32-S3 chip for its Wi-Fi radio and Renesas RA4M1 microcontroller, it was the perfect candidate. Mario’s sketch begins with a call to initialize the Wi-Fi module before attempting to connect to his local access point. Once finished, it enters a loop that continuously checks if a client has connected to the web server, and if one has, reads the requested path while also seeing if the string contains “/H” to denote an “ON” command to set the LED.
Toggling an LED is useful, but Mario wanted to take things a step further by building a tangible — in this case a lamp. His 3D-printed enclosure features a recessed base and translucent cube for diffusing the light emitted by a grid of NeoPixels. Controlling the color was just as easy since any browser could still send a request path containing a color and get back the lamp’s updated status.
To see more about this IoT lamp project, you can watch Mario’s video below!
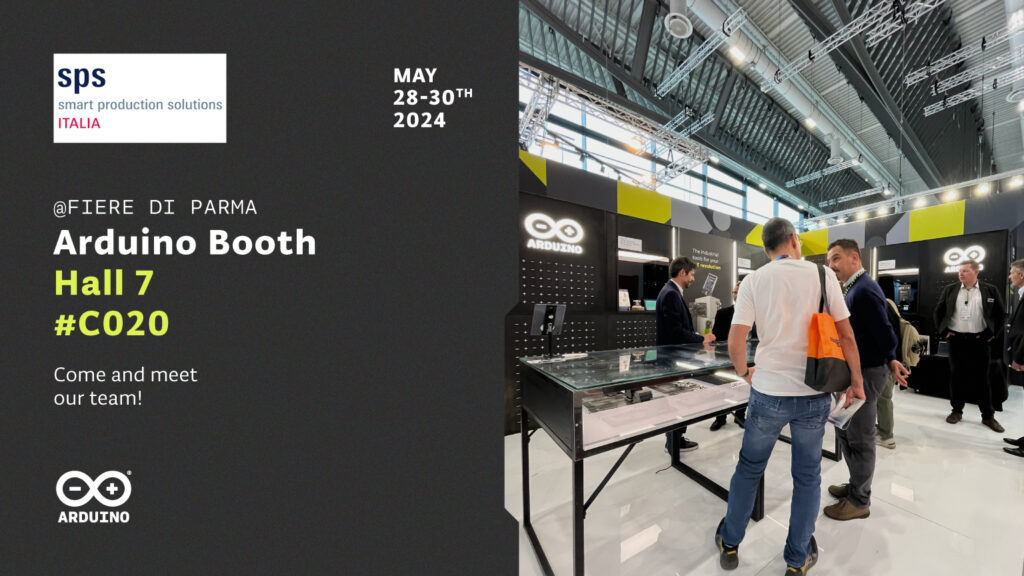
Save the date on May 28th-30th, Arduino will be back at SPS Italia in Parma, showcasing how our open-source solutions are revolutionizing the industrial sector with high performance and accessibility.
At Arduino’s booth #C020, hall 7, we’ll be presenting the latest additions to our ecosystem, designed to help companies of all sizes embrace digital transformation and the Industrial IoT. Here’s a sneak peek at what’s in store:
Opta: the “Swiss Army knife” of industrial automation
Opta is our versatile micro PLC: reliable, secure, and open-source, it avoids vendor lock-in and is the ideal choice for both newcomers and seasoned professionals. Opta can be programmed with standard IEC 61131-3 languages or within Arduino’s environment, offering unmatched flexibility.
“With Opta, we aim to support companies looking for increased visibility into their processes through IoT retrofitting, breaking down barriers to industrial automation, and those that produce machinery, seeking a ready-to-use controller for IoT and edge AI. Opta offers high performance, secure connectivity, and unprecedented programming flexibility at an affordable price,” says Arduino’s CEO Fabio Violante.
Opta Expansion Modules to boost your projects
New expansion modules allow you to enhance Opta’s capabilities: the Arduino Pro Opta Ext D1608E, Arduino Pro Opta Ext D1608S, and Arduino Pro Opta Ext A0602 provide additional programmable inputs, relay outputs, and analog I/O options for diverse data acquisition and control needs.
Live demos for a hands-on experience
Explore live demonstrations of Opta and other key products from our Portenta and Nicla families. Discover how these solutions can be applied to industrial automation, remote monitoring, predictive maintenance, and more!
A strategic partnership with Melchioni Electronics
We’re excited to collaborate with Melchioni Electronics, enhancing our reach and support for Arduino’s innovative solutions. “We strongly support this partnership with the strength of our sales network – from major events like SPS in Parma and SIDO Lyon to e-commerce – because Arduino Pro is the perfect bridge between prototyping and large-scale production. It meets the needs of all customers looking for energy-efficient, low-power solutions integrating a connected ecosystem,” comments Michele Busnelli, Head of Product at Melchioni.
Join us at SPS Italia 2024 to see how Arduino is driving innovation and efficiency in the industrial sector. Get in touch with our experts and visit our booth in hall 7, #C020!
Fine motor skills correlate strongly with cognition and the accurate assessment of an individual’s motor skills can be critical in diagnosing and treating a variety of conditions. But objective evaluation has been a challenge, as suitable sensors weren’t available. To help medical professionals better test fine motor skills, a team of researchers from Japan’s Shibaura Institute of Technology developed a new EIT-based tactile sensor system.
EIT (electrical impedance tomography) is traditionally used for non-invasive medical imaging of human body parts, but here it is used to image the internal structure of the sensor body in order to classify fine finger movements. When a subject pinches the sensor, for example, they deform the structure and that alters the voltage between the sensor’s 16 electrodes. Each finger movement or grip creates an identifiable pattern of voltages, enabling classification and therefore assessment.
This only works if the system can collect precise voltage readings from the electrodes, so the researchers turned to an Arduino UNO R4 Minima board for the task. The electrodes connect to the Arduino’s 14-bit ADC (analog-to-digital converter) through multiplexer chips, so the system can quickly scan through all 16 electrodes. It would be easy to expand that number in the future to produce more detailed images. After collecting the data, the team was able to utilize conventional EIT image reconstruction techniques for classification and even classify the voltage readings directly.
With the latter technique, the researchers reported 94.1% classification accuracy in testing of 12 subjects performing six unique motions. More details on the work can be found in the team’s paper here.
Image credit: R. Asahi, S. Yoshimoto and H. Sato, “Development of Pinching Motion Classification Method Using EIT-Based Tactile Sensor,” in IEEE Access, vol. 12, pp. 62089-62098, 2024, doi: 10.1109/ACCESS.2024.3395271
Enhance your IoT projects with our special offer! Get 20% off a yearly subscription to the Arduino Cloud Maker Plan using code CLOUD20MAY. Valid until the end of May, this deal saves you $14.38, reducing the price from $71.88 to $57.50.
Benefits of the Maker Plan:
Unlimited dashboards: Visualize sensor data in real time.
Device management: Control up to 25 devices from anywhere.
Over-the-air updates: Keep your devices up-to-date.
Real-time notifications: Get instant alerts via email or app.
Extensive resources: Access a vast library of IoT projects and tutorials.
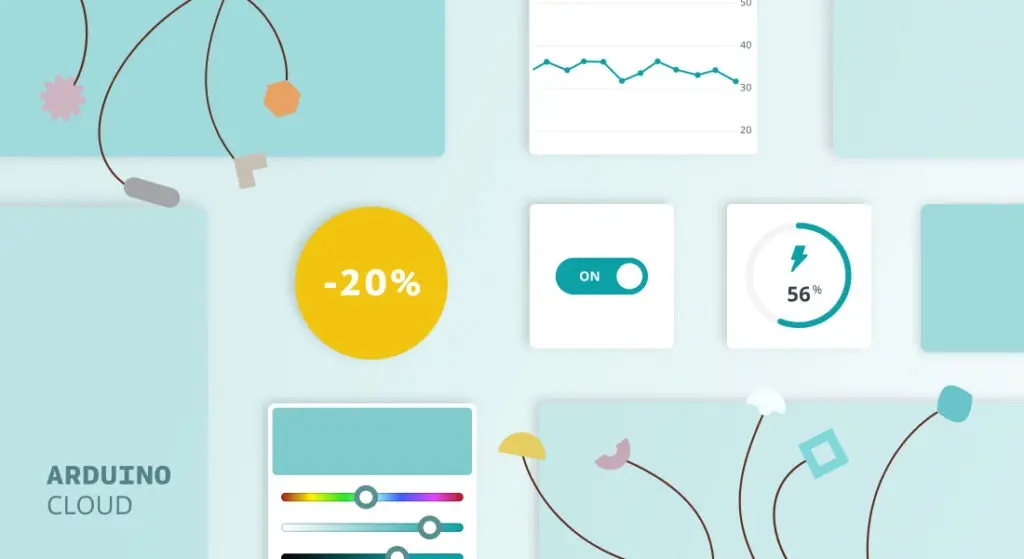
What is Arduino Cloud?
Arduino Cloud is the next exciting journey to bring your creations to life in a snap. It’s an all-in-one IoT solution that empowers makers to create from anywhere, control their devices with stunning dashboards, and share their projects with anyone.
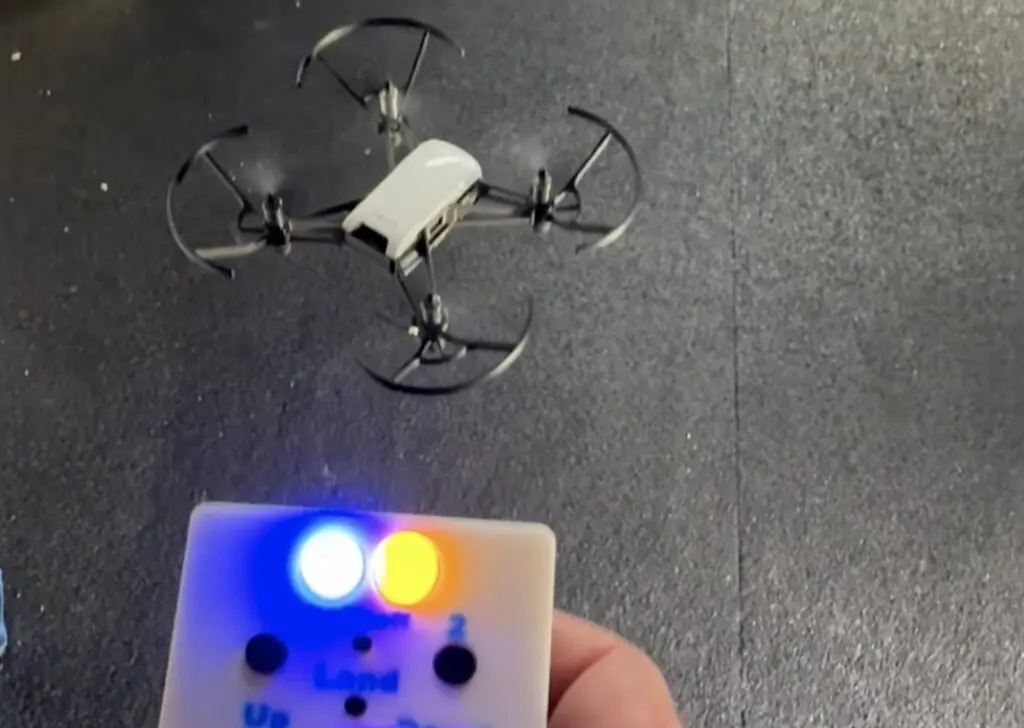
Maker culture has always been a major part of magic performance. Some tricks are well-rehearsed slight of hand, but many of them rely on clever engineering to sell an illusion. And modern technology offers a great deal of interesting possibilities. That is the idea behind Peter Boie’s Engineering Wonder “STEM infused magic show.” That show includes a drone and Boie needed a way to reliably control it, so he created this purpose-built remote.
This remote works with the Tello drone, which is an interesting piece of hardware all on its own. It is an affordable quadcopter that we would normally categorize as a toy, except that it contains high-quality DJI components (and, presumably, flight control firmware) and versatile control schemes. Users can start flying right away by piloting the drone with a smartphone app, but the drone can also respond to simple commands sent over Wi-Fi by any device. For example, you can connect to the drone’s Wi-Fi network from your PC and run a custom Scratch program to send flight commands.
Boie needed a way to do that while performing during his magic show. He needed to send flight commands without drawing attention from the audience and that had to be very reliable. His solution was to build a custom remote based on the Arduino UNO R4 WiFi board.
Boie designed his own shield that contains several buttons to trigger specific flight commands, such as “go up 50” or “do a barrel roll.” That also has two big, bright LEDs. Those provide a very clear indication of the Wi-Fi connection status, so Boie doesn’t risk an onstage blunder if the connection fails for some reason.
When it detects a button press, the Arduino sends the corresponding Tello command over WiFi as a UDP (User Datagram Protocol) packet. Each button triggers a single function and Boie can find the buttons by touch on the custom 3D-printed enclosure, letting him focus on his magic performance.
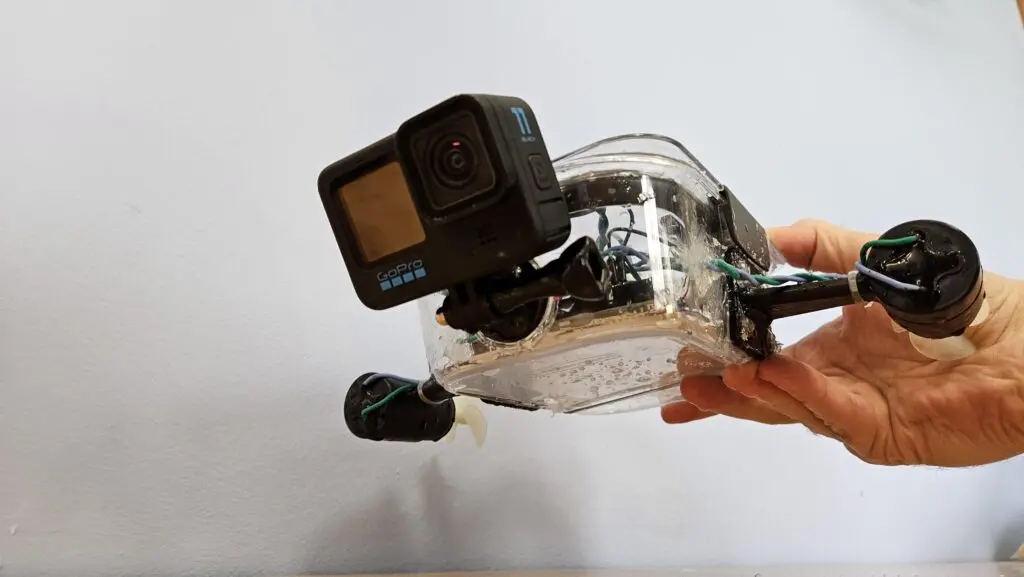
ROVs (remotely operated vehicles) let us explore bodies of water and it is hard not to be excited by the possibilities. But traditional ROVs cost a lot of money and often require serious expertise to operate and maintain. Luckily there are affordable alternatives, such as this DIY underwater rover designed by Science Buddies’ Ben Finio.
Finio created this ROV specifically for educational purposes and so it accommodates a relatively small classroom budget. For about $100-150, a school science club can build this device and start exploring the depths.
In order to keep the costs down, Finio used as many everyday parts as possible. The hull, for example, is a food storage container and the weights to bring the vehicle close to neutral buoyancy are steel bar stock. This design doesn’t include a ballasts or thrusters to alter depth (it can only steer left or right), so users will have to experiment with the weights to reach the desired depth.
This ROV has two thrusters for propulsion and steering. Those are electric DC motors controlled by an Arduino UNO Rev3 board through H-bridge drivers. Power comes from an onboard lithium battery and users pilot the craft with a remote control connected via a tether. That remote has two joysticks, each with one axis tied to one motor’s power.
Finio suggests attaching a GoPro (or any other action camera) to the vessel to record the underwater action.
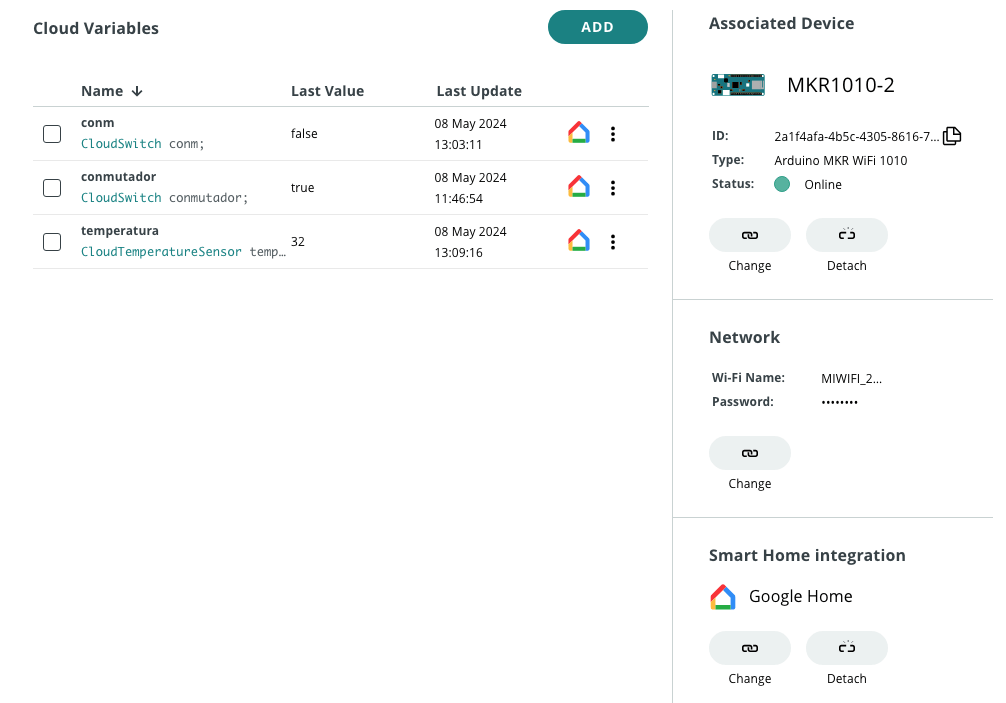
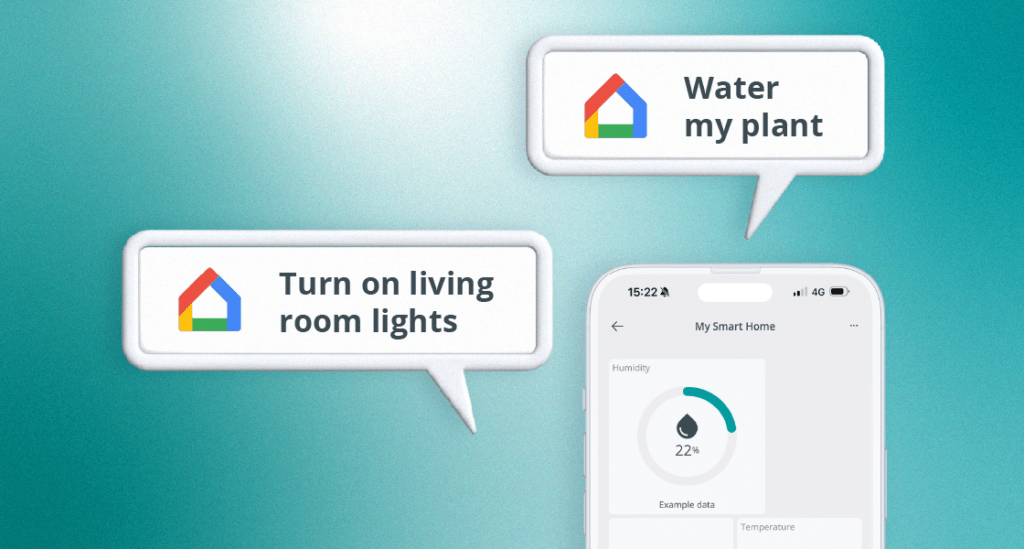
We’re excited to announce that the Arduino Cloud now supports Google Home! This means you can now interact with your devices, simply through your Google Home Assistant: use voice commands, the Google Home app, or create new routines integrating Arduino solutions.
This new integration expands our ecosystem of compatible applications, which already includes Alexa. The process is similar, making it easy for you to connect your devices in the most natural way: just by talking!
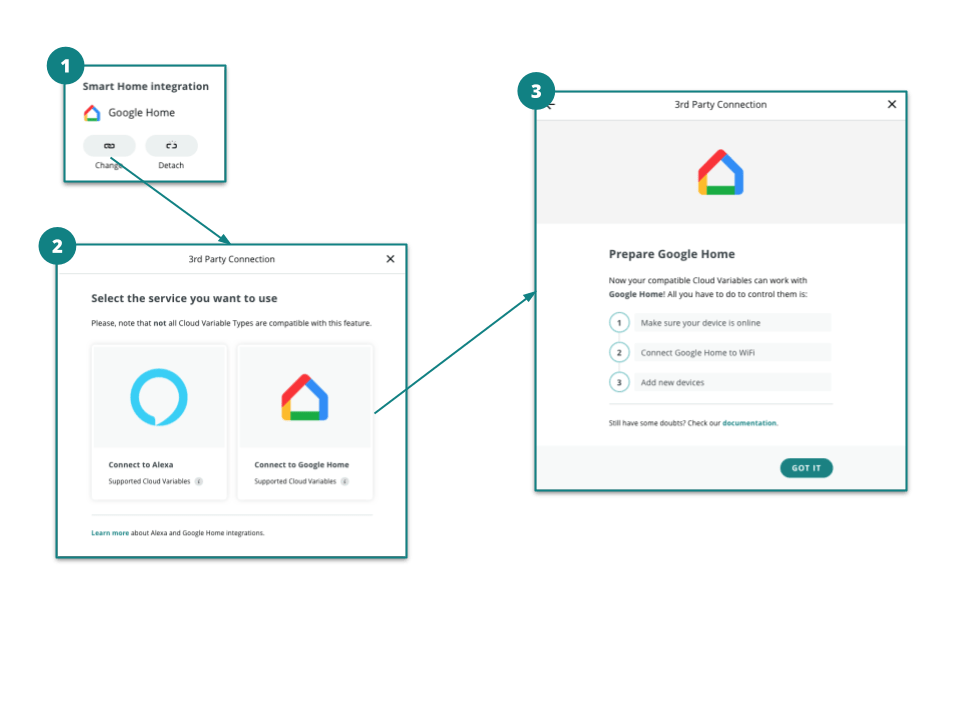
How to use Google Home with Arduino Cloud
1. Program your device
The first step is to create, configure and program your device in a way that it can be connected to Google Home. The process is very straightforward:
1. Create and set up a new Thing, configuring the network and associating a physical device. 2. Define your variables making sure that you choose from the Smart Home compatible ones. For example, if you have connected an LED strip to your board, add a “Colored light” variable.
3. Create the sketch of your application and program your device. 4. Configure your Smart Home Integration and set “Connect to Google Home.”
Your device is now ready to be detected! Every variable will be detected as a new device in Google Home.
2. Detect your device with Google Home
The next step is to enable Google Home to detect and configure your device. For that, follow the instructions below:
1. Wait until the board is connected to your network. 2. Open your Google Home app, go to the Devices tab and click on “Add Device.” 3. Select “Works with Google Home.” 4. Select the “Arduino” action from the list, and follow the instructions to link your Arduino account if requested.
Next, you will be prompted to add your devices (there will be one device per variable). Simply select each device to associate it to a room.
Congratulations! Your device is ready to use with Google Home.
Use your Google Home-compatible speaker or mobile phone
With the Google Home integration, you can now interact with any device connected to the Arduino Cloud using your Google Home-compatible speakers or the Google Home app. You can also include them in your Routines in Google Home Automations to help automate your tasks. Bear in mind that Arduino Cloud is compatible not only with devices based on Arduino or ESP hardware, but also with those programmed using Python, JavaScript or Node-RED.
What projects can you set up with Google Home and Arduino Cloud?
Currently, the supported Google Home sensors are temperature and motion detection, and the supported actionable accessories are light, dimmable light, colored light, smart plug and smart switch. So, with the Arduino Google Home Action, you can turn on the lights in the living room, check the temperature in the bedroom, start the coffee machine, water your plants, find out if your dog is sleeping in the doghouse, and much more.
The only limit is your imagination. Just try saying…
“Hey Google, turn on the lights in my bedroom.”
“Hey Google, what’s the temperature in the living room?”
“Hey Google, turn on the coffee machine.”
What is Arduino Cloud?
Arduino Cloud is an all-in-one IoT solution that empowers makers to create, monitor and control their devices from anywhere with stunning dashboards and share their projects with anyone.
The Google Home integration with the Arduino Cloud is free to use. Make sure you have an Arduino Cloud account and explore our documentation if you want to learn more.
And that’s it. It’s ready to use and it is free. You can explore the premium features for enhanced functionality.
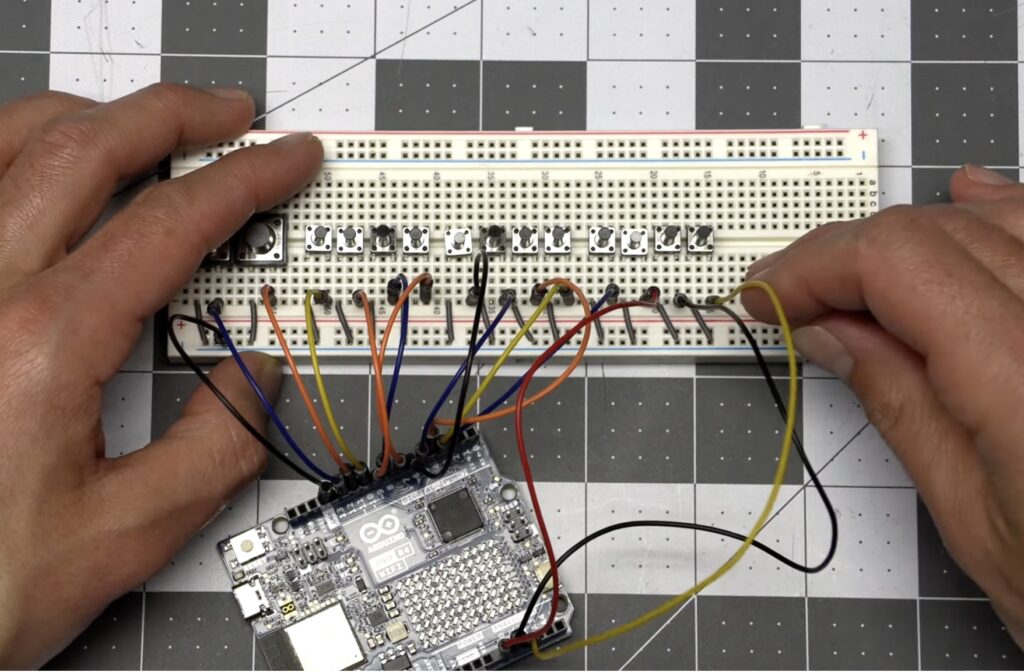
For the visually impaired community, most of their interactions on mobile phones are confined to text-to-speech (TTS) interfaces that read portions of the screen aloud. Dynamic braille displays also exist as a tactile means of communication, but their prices can get close to $15,000, putting them out of reach for most people. This is why Instructables user bmajorspin wanted to create an inexpensive, portable alternative that could work with other mobile devices.
Unlike other braille displays that use moving pins, this design leverages a set of six static pins housed within a 3D-printed enclosure that can vibrate independently. After connecting six haptic motors to an Arduino Nano 33 BLE through MOSFET drivers, bmajorspin mounted the entire circuit onto a small piece of perfboard and then soldered a micro USB cable for power. Lastly, a spring and 3D-printed cap were placed over each braille dot to isolate the vibrations and prevent the haptic signals from becoming muddled together.
The Nano 33 BLE is able to display braille characters thanks to it acting as a Bluetooth® Low Energy server that exposes a custom braille reader service. Through it, bmajorspin’s custom Android app can send encoded dot patterns to the device for it to then decode and present with the haptic motors.
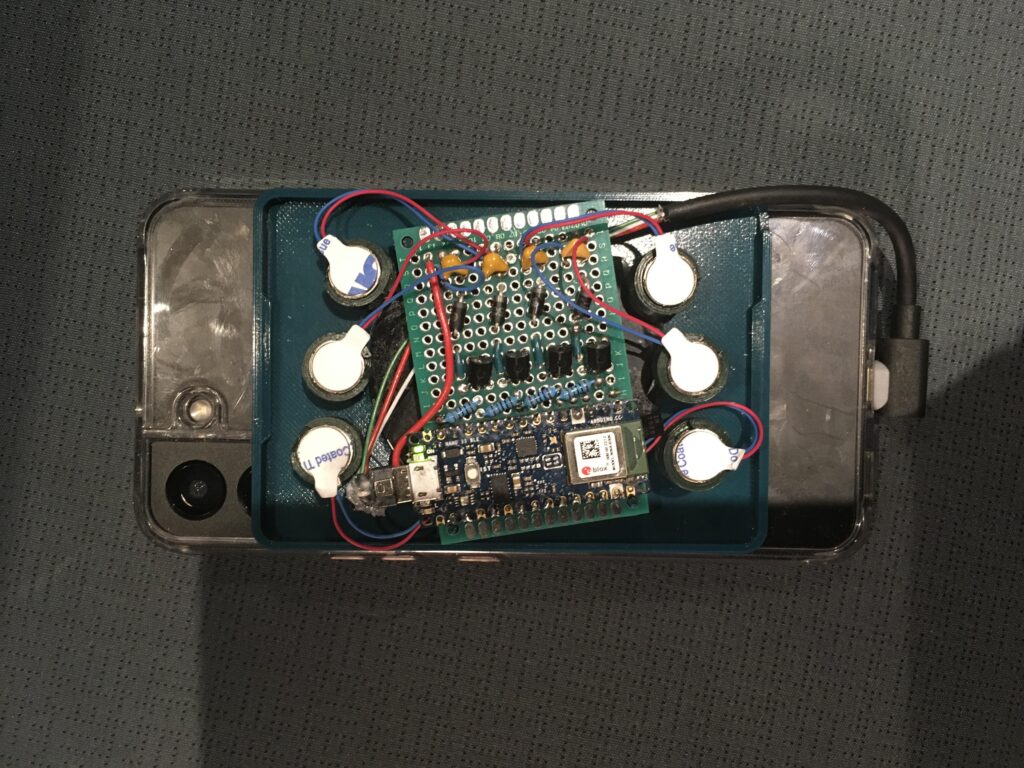
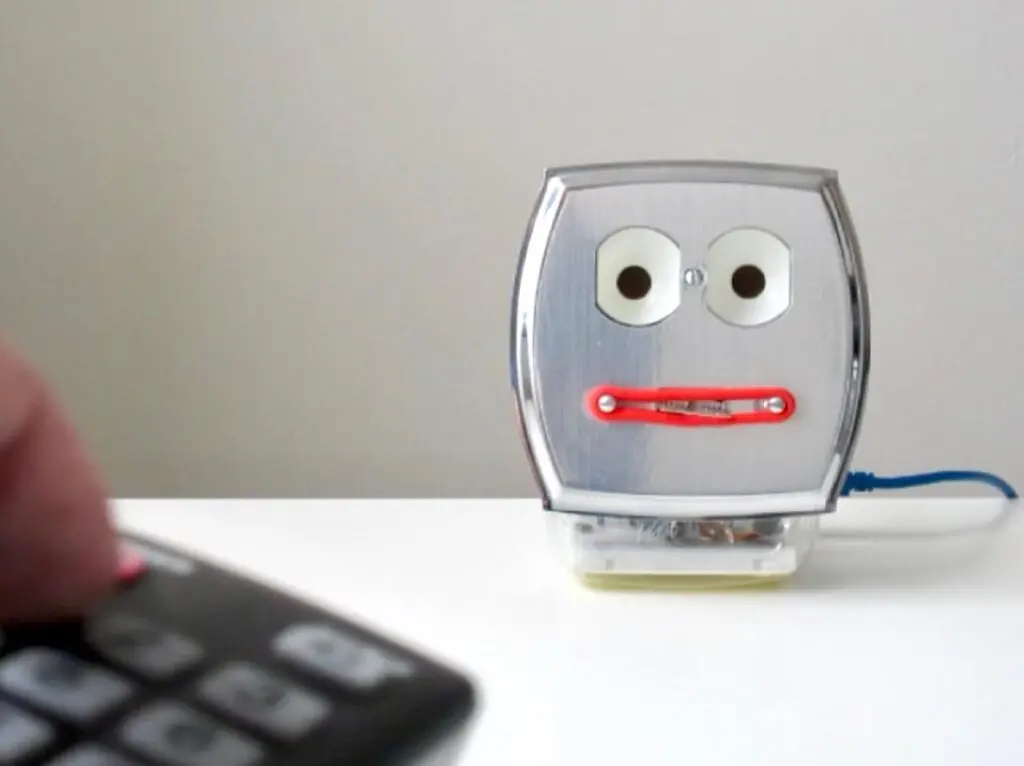
Interactive robots always bring an element of intrigue, and even more so when they feature unusual parts and techniques to perform their actions. Mr. Wallplate, affectionately named by Tony K on Instructables, is one such robot that is contained within an electrical wall plate and uses a servo motor connected to an Arduino UNO Rev3 for mouth movement.
The circuit for Mr. Wallplate is not very complex, as a single Arduino handles all of the processing. Users are able to control the robot with an IR remote thanks to a corresponding receiver that passes along the encoded signals to the Uno for parsing. After a valid code has been found, the Talkie library in the sketch accepts speech synthesis commands before converting them into waveforms for outputting to an amplifier. One of the more challenging aspects was getting the speech to align with the mouth moving, and Tony’s solution was to simply move the servo a predetermined amount based on the word.
After ensuring the electronics worked as intended, Tony fabricated the bot from a clear plastic bottle, a metallic toggle/duplex switch plate for the face, two halves of a ping pong ball for the eyes, and a ponytail holder for the lips. As seen in the demo video below, Tony’s creation is certainly captivating while it talks.
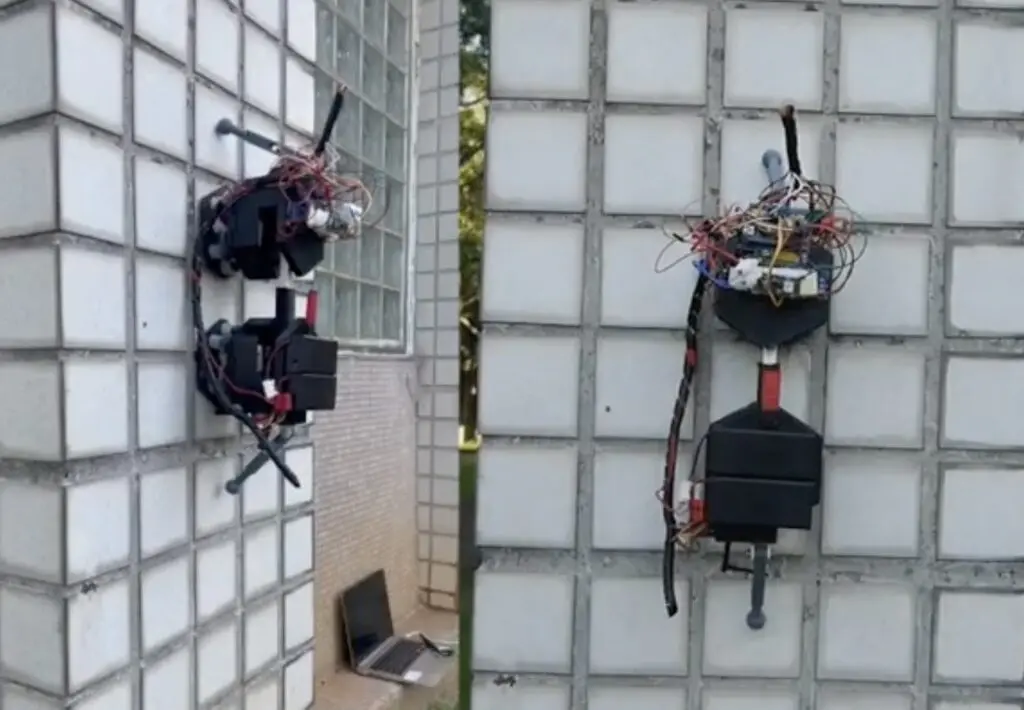
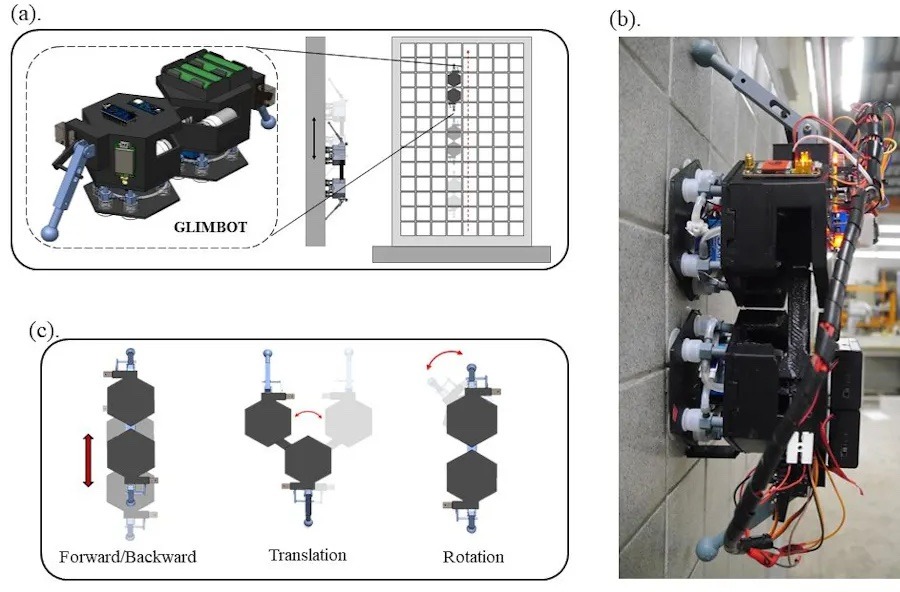
A great deal of building maintenance expenses are the result of simple inaccessibility. Cleaning the windows are your house is a trivial chore, but cleaning the windows on a skyscraper is serious undertaking that needs specialized equipment and training. To make exterior wall tile inspection efficient and affordable, the GLEWBOT team turned to nature for inspiration.
GLEWBOT climbs up walls like a gecko and taps on tiles like a woodpecker to evaluate wall integrity. Like cleaning the windows on a skyscraper, the traditional inspection method requires specialized tools and skills. GLEWBOT can perform the same functions autonomously, dramatically reducing costs.
This robot has a two-part design that lets it scale walls in a manner similar to a climber using ascenders. One part grips, while the other releases. When the bottom part grips, the top part can extend to move up the wall. When the top part grips, the bottom part can retract to repeat the process. The robot grips the tile using suction cup feet connected to micro vacuum pumps and a linear actuator performs the extension/retraction. Each end has a motor that lets it rotate relative to the linear actuator, so the robot can turn.
The system is equipped with two Arduino boards. An Arduino Nano serves as central command and handles general functions, while an Arduino Nano 33 BLE Sense acts as an acoustic recognition module and controls the inspection tool. That tool is a hollow drum hammer that taps each tile and listens for the resulting echo. An audio classification model trained for this task will detect a questionable tile based on the sound it makes, so engineers can investigate further.
Um dir ein optimales Erlebnis zu bieten, verwenden wir Technologien wie Cookies, um Geräteinformationen zu speichern und/oder darauf zuzugreifen. Wenn du diesen Technologien zustimmst, können wir Daten wie das Surfverhalten oder eindeutige IDs auf dieser Website verarbeiten. Wenn du deine Einwillligung nicht erteilst oder zurückziehst, können bestimmte Merkmale und Funktionen beeinträchtigt werden.
Funktional
Immer aktiv
Die technische Speicherung oder der Zugang ist unbedingt erforderlich für den rechtmäßigen Zweck, die Nutzung eines bestimmten Dienstes zu ermöglichen, der vom Teilnehmer oder Nutzer ausdrücklich gewünscht wird, oder für den alleinigen Zweck, die Übertragung einer Nachricht über ein elektronisches Kommunikationsnetz durchzuführen.
Vorlieben
Die technische Speicherung oder der Zugriff ist für den rechtmäßigen Zweck der Speicherung von Präferenzen erforderlich, die nicht vom Abonnenten oder Benutzer angefordert wurden.
Statistiken
Die technische Speicherung oder der Zugriff, der ausschließlich zu statistischen Zwecken erfolgt.Die technische Speicherung oder der Zugriff, der ausschließlich zu anonymen statistischen Zwecken verwendet wird. Ohne eine Vorladung, die freiwillige Zustimmung deines Internetdienstanbieters oder zusätzliche Aufzeichnungen von Dritten können die zu diesem Zweck gespeicherten oder abgerufenen Informationen allein in der Regel nicht dazu verwendet werden, dich zu identifizieren.
Marketing
Die technische Speicherung oder der Zugriff ist erforderlich, um Nutzerprofile zu erstellen, um Werbung zu versenden oder um den Nutzer auf einer Website oder über mehrere Websites hinweg zu ähnlichen Marketingzwecken zu verfolgen.


 ! This means you can now interact with your devices, simply through your Google Home Assistant: use voice commands, the Google Home app, or create new routines integrating Arduino solutions.