Schlagwort: Arduino Pro

  • Prototype faster and smarter in 2025: Meet the Arduino Pro Portenta Proto Kit

    Prototype faster and smarter in 2025: Meet the Arduino Pro Portenta Proto Kit

    Reading Time: 3 minutes

    Launching today at CES 2025, the Arduino Pro Portenta Proto Kit is here to revolutionize how professionals approach prototyping. Designed to empower engineers, designers, and innovators from all walks of life, this kit provides everything you need to turn your ideas into functional prototypes quickly, efficiently, and without conventional limitations.

    Available in two variants – Portenta Proto Kit ME (Motion Environment) and VE (Vision Environment, available later this month) – the kit equips you with advanced tools to tackle any challenge, from environmental sensing to machine vision to vibration detection, accelerating the prototyping phase from weeks to days and days to hours. Whether you’re developing predictive maintenance systems or high-speed test rigs, the flexible and comprehensive Portenta Proto Kit has you covered.

    What’s inside the Portenta Proto Kit?

    At the heart of the kit is the powerful Portenta H7, paired with the versatile Portenta Mid Carrier. These components support advanced processing and edge machine learning, ensuring your prototypes are as future-ready as they are functional. 

    The kit also includes the full set of our innovative Modulino nodes for rapid sensing and actuation, 4G GNSS Module Global for connectivity, and an Arduino Cloud for Business Voucher for your first three months of seamless cloud integration – so you can store, display, and analyze data remotely. 

    Depending on your chosen configuration, you’ll also find everything you need for motion, vision, and environmental sensing in one kit:

    You’ll easily integrate all of these hardware tools with the new Proto Shield included, and leverage the Arduino IDE on the software side to develop quick, scalable, IoT-enabled prototypes.

    Go from concept to reality in a wide range of applications

    The Arduino Pro Portenta Proto Kit is suitable for many industries and countless applications: the kit’s modular design means you can tailor your prototypes to meet specific requirements, ensuring your projects are always on track. What’s more, you’ll often be able to transition from prototyping to production with no redesigns required.

    Here are some ideas you could explore:

    • Predictive maintenance: reduce downtime and monitor machinery health, using advanced Nicla sensors and cloud-based predictive algorithms.
    • Environmental monitoring: precisely track air quality, noise, and other parameters for real-time decision-making.
    • Machine vision: implement object recognition, motion detection, and people counting using Nicla Vision.
    • Logistics tracking: monitor goods in transit with environmental data and cloud-enabled location tracking.
    • Intruder detection: use motion and face recognition for security monitoring, with cloud-based real-time alerts.
    • EV charging station: create a prototype for efficient, remotely managed charging with data analytics.
    • High-speed test rigs: build scalable test benches for automated sensor calibration, load testing, and real-time data analysis.

    As always, we are curious to find out what the Arduino professional community will come up with next! 

    Learn and innovate with the ACE-220 course

    Ready to hit the ground running? Enroll in ACE-220: Portenta Proto Kit Certification Course on Arduino Academy. This 8-hour professional program is designed to provide embedded engineers, hardware designers, and firmware developers with hands-on modules that cover everything from hardware and software setup to cloud integration. By dedicating a few hours to the ACE-220 course, you’ll gain the expertise to leverage the kit’s capabilities fully, saving significant time and effort in your prototyping process and accelerating your path to innovation.

    Get started on your greatest idea now!

    Whether you’re building the next big thing in automation, smart cities, or IoT, the Arduino Pro Portenta Proto Kit offers the tools to make it happen. Explore the full kit online and take the first step toward redefining what’s possible in prototyping.

    The post Prototype faster and smarter in 2025: Meet the Arduino Pro Portenta Proto Kit appeared first on Arduino Blog.

    Website: LINK

  • You have 3 ways to meet Massimo Banzi in the UK!

    You have 3 ways to meet Massimo Banzi in the UK!

    Reading Time: 3 minutes

    Massimo Banzi and the Arduino Pro team will be crossing the Channel soon for a short tour of Southern England, touching base with long-time partners and meeting many new Arduino fans! 

    On July 11th at 4PM BST, Massimo has been invited to give a Tech Talk at Arm’s headquarters in Cambridge, as part of the company’s ongoing series where “leading experts cover topics across the industry, including artificial intelligence, automotive, consumer technology, infrastructure, and IoT.” Register now to attend the talk remotely, anywhere in the world.

    Fancy a pint and a fireside chat? Come and meet us in London at the Cittie of Yorke, July 12th at 6PM in Holborn. You can learn about Arduino’s latest products and future vision, straight from the co-founder himself. The event is free and no registration is required, but admission will be regulated depending on the venue’s capacity – get there early to save your seat!

    Finally, on July 13th we are excited to announce Arduino Pro will debut with a booth at Hardware Pioneers Max. Come visit us at the Business Design Center in London, booth #48, to chat with our experts. Not sure where to begin? Our demos make great conversation starters! At the show, look for these:

    • An industrial-grade computer built with a Portenta X8 and Max Carrier. The X8’s hybrid combination of microprocessor and microcontroller yields unprecedented flexibility to simultaneously run Linux apps and perform real-time tasks. Pair that with the Max Carrier and an 8″ screen and you have a secure and powerful computer to deploy advanced AI algorithms and ML on the edge. The Portenta X8 can also act as a multi-protocol gateway: data from onsite sensors and controllers (e.g. temperature, operation time, warning codes) are collected and processed thanks to the module’s supported industrial protocols, then sent to the Cloud or ERP system via Wi-Fi, LoRa®, NB/IoT or LTE Cat.M1.
    • A vibration-based condition monitoring system to detect anomalies with Nicla Sense ME. Developed in collaboration with SensiML, this solution makes great use of Nicla’s self-learning AI smart sensor – with integrated accelerometer and gyroscope – to measure vibrations generated by a computer fan. With the intelligence of a trained ML model, the system monitors the fan’s conditions and can determine whether it is on or off, if there are any shocks, and even if the airflow is simply sub-optimal.
    • A solution to monitor vineyard pests, thanks to Nicla Vision and MKR WAN 1310. Smart farming leverages machine vision and valuable data on pest behavior, seasonality, and population size to optimize manual interventions against the dangerous Popillia japonica. Insects are attracted by pheromones inside the trap, where a low-power sensing solution leverages an ML model trained, tested and deployed with Edge Impulse to recognize and count insects, sending real-time data via LoRa® connectivity to the Cloud for remote monitoring.

    And don’t miss Massimo’s talk, “Everything you think you know about Arduino is WRONG” at 4PM (see the event agenda). It’s your chance to find out how the brand that made tech accessible for the first generation of makers is now evolving to support a new generation of innovators.

    We can’t wait to see you there!

    The post You have 3 ways to meet Massimo Banzi in the UK! appeared first on Arduino Blog.

    Website: LINK

  • Vineyard pest monitoring with Arduino Pro

    Vineyard pest monitoring with Arduino Pro

    Reading Time: 7 minutes

    The challenge

    Pest monitoring is essential for the proper management of any vineyard as it allows for the early detection and management of any potential pest infestations. By regularly monitoring the vineyard, growers can identify pests at early stages and take action to prevent further damage. Monitoring can also provide valuable data on pest behaviour, seasonality, and population size. This information can be used to adjust management strategies and protect the quality of grapes harvested from the vineyard.

    One of the most effective ways to monitor pests is with pheromone traps. Pheromone traps use synthetic hormone-like compounds to attract specific insects and correctly estimate their overall presence based on their number, preventing major damage and disease to the plants. Using pheromone traps can help protect vines from serious infestations, reduce pesticide use, and ensure a healthy crop. Additionally, these traps can be used to track the activity of a particular species over time which is useful for predicting when pest populations are likely to peak or decline. By knowing when insect pressure is high or low, winemakers can better plan for treatments and cultivate their land accordingly. 

    The value of conservation and pest control initiatives is immeasurable as the effects of climate change, biodiversity loss, and species invasions become more evident. Traps are widely used for population detection, tracking progress on projects, determining management solutions; in addition to assessing treatment performance.

    Popillia japonica

    Vineyard Pest Monitoring is the practice of monitoring and controlling vineyard pests, such as Popillia japonica. Popillia japonica is a species of scarab beetle native to Japan that feeds on grapevine leaves and can cause significant damage in vineyards. Traditional pest management techniques involve manual monitoring with traps or pheromone traps. These methods are labor-intensive and may not provide accurate and timely monitoring or pest control.

    Our solution

    We propose a solution for estimating Popillia japonica populations in vineyards using pheromone traps and Computer Vision.  

    This system utilizes LoRa® technology to enable remote monitoring of Popillia japonica in vineyards. Arduino Pro allows farmers to monitor Popillia japonica activity with pheromone traps and collect the data remotely. This makes it easier for farmers to detect infestations early and take action, leading to improved efficiency and higher yields. The IoT technology also helps reduce labor costs associated with manual monitoring.

    By using Computer Vision in combination with LoRa® technology, real-time data of pest activity can be collected. This information allows growers to better understand the dynamics of Vineyard pests such as Popillia japonica, helping them to make more informed decisions and reduce their environmental impact. With the right monitoring tools, vineyards can now be better prepared to face the increased risk of Japanese beetle outbreaks posed by climate change.  With IoT devices, there is no longer any excuse not to employ pest monitoring in vineyards. The use of IoT-based pest monitoring is not only cost-effective, but also helps to reduce the environmental impact of pesticide applications. This makes it an important tool for vineyard managers looking to protect their crops in an ever-changing environment. The future of vineyard management lies in the hands of innovative technologies like this one, enabling farmers to ensure their crops are healthy and safe.  By taking advantage of the latest technologies, vineyard managers can make sure their crops are protected from infestations and ensure a successful harvest season year after year.

    To address the challenge we will devise a pest monitoring system based on sensor nodes that monitor areas in the vineyard and send the collected data to a LoRa® gateway that can either display it locally or push it toward a cloud solution where further computation can be done. Either at the gateway level or in the cloud, alerts can be set based on certain thresholds considered relevant. 

    Bug counting

    For monitoring the number of Popillia Japonica in each section of the vineyard we have chosen the Arduino Nicla Vision which is ideal for this project because of its advanced image processing capabilities. It combines a powerful Dual ARM® Cortex® M7/M4 IC processor with a 2MP color camera that supports TinyML in a compact format. The full datasheet is available here. For training the object detection model, we have chosen the Edge Impulse platform where we can easily train and deploy a model that will allow us to detect the number of bugs in the view of the camera. After the deployment, no further need of internet connectivity is needed for the camera and only the number of bugs will be relayed to the Arduino MKR WAN 1310 through UART.

    Connectivity

    The Arduino MKR WAN 1310 is a powerful and versatile IoT development board based on the ARM Cortex®-M0+ 32-bit processor, perfect for building connected projects. It supports the LoRa® communication protocol, making it suitable for long-range applications such as vineyard pest monitoring. Moreover, it also supports the UART, I2C, and SPI communication protocols so it can easily be interfaced with other devices. Additionally, the MKR WAN 1310 features an integrated LiPo battery charger to keep your project running 24/7. With its compact size and low energy consumption, this board can be used in a wide range of projects where connectivity is required without sacrificing power efficiency.

    Thanks to its radio connectivity via LoRa® radio transceivers, the data can be sent directly to the nearest LoRa® gateway which forwards it to the Arduino IoT Cloud. The gateway, Arduino Pro WisGate Edge Pro powered by RAKwireless™ ensures secure and reliable connectivity for a wide range of professional applications and is suitable for medium-sized to wide area coverage in industrial environments and remote regions. Its high transmission power and 2x fiberglass antennas with 5dBi gain provide extensive coverage in open environments, making it the perfect fit for IoT commercial outdoor deployment – required for example for parking sensors, remote fleet management, livestock tracking and geofencing, and soil monitoring solutions that maximize crops’ yield.

    Solving it with Arduino Pro

    Now let’s explore how we could put all of this together and what we would need for deployment both in terms of hardware and software stack. The Arduino Pro ecosystem is the latest generation of Arduino solutions bringing users the simplicity of integration and scalable, secure, professionally supported services.

    Hardware requirements

    Software requirements

    The Nicla Vision has been programmed in MicroPython since the Edge Impulse model was created/tested using the OpenMV IDE and thus we have also sent the number of detected bugs to the Arduino MKR WAN 1310 via UART.

    The Arduino MKR WAN 1310 has been programmed in C/C++ using the Arduino IDE and the Arduino IoT Cloud and registered on the The Things Stack (TTS) platform. The Arduino MKR WAN 1310 acts as an end device programmed to receive the number of detected Popilia Japonica bugs from the Nicla Vision through UART and forward it to the Arduino IoT Cloud through the nearest LoRa® gateway connected to the TTS service.

    Here is a screenshot from a dashboard created directly in the Arduino IoT Cloud showcasing data received from the sensor nodes:

    Here is an overview of the software stack and how a minimum deployment with one of each hardware module communicates to fulfill the proposed solution:

    Conclusion

    By combining Computer Vision with LoRa® technology, farmers can create a reliable vineyard pest monitoring system that is capable of estimating the population of Popillia japonica quickly and accurately. With this IoT-based op-solution, farmers can monitor Popillia japonica activity in their vineyard and take action before Popillia japonica causes significant damage. This helps protect the vineyard from Popillia japonica infestations and ensures higher yields for the farmer.  With Vineyard Pest Monitoring with Arduino Pro, farmers no longer need to rely on labor-intensive manual methods for Popillia japonica monitoring. Instead, they can use IoT technology to create an efficient and cost-effective pest monitoring system that provides accurate data about Popillia japonica activity in their vineyards. 

    In summary, pheromone traps are an important tool for protecting vineyards from pests and ensuring a healthy harvest season and great wines. Salute! 

    The post Vineyard pest monitoring with Arduino Pro appeared first on Arduino Blog.

    Website: LINK

  • Portenta C33: The high-performance, low-price oxymoron

    Portenta C33: The high-performance, low-price oxymoron

    Reading Time: 2 minutes

    While democratizing professional solutions may seem like an oxymoron, that’s exactly what Arduino Pro is out to achieve. Our business-oriented unit stands at industrial clients’ side with a growing ecosystem of high-performance, reliable, secure products that aim to provide the right solution for every need big and small companies may have, in any field and at any stage of their growth. 

    Case in point: the Portenta C33. The module – which we are introducing at Embedded World 2023 – leverages the R&D carried out for previous Portenta modules, optimizing every aspect and streamlining features to offer a cost-effective option to users starting out with Industrial IoT or automation, or those who have more specific, targeted needs than the H7 or X8 cater to.

    Is the Portenta C33 right for you? Check out its main tech specs:

    • Arm® Cortex®-M33 microcontroller by Renesas
    • MicroPython and other high-level programming languages are supported
    • Onboard Wi-Fi® and Bluetooth® Low Energy connectivity
    • Secure element for industrial-grade security at the hardware level
    • Secure OTA firmware updates (connecting to Arduino IoT Cloud or third-party services)
    • Compatible with Portenta, MKR, and Nicla components
    • Castellated pins
    • Wide variety of peripheral interfaces, including CAN, SAI, SPI, and I2C

    What’s more, the Portenta C33 is born into an extensive ecosystem that comes not only with a variety of components that easily combine, but also with ready-to-use software libraries and Arduino sketches shared and perfected by our incredible community. 

    If that sounds like everything you need to prototype and develop your next project – or perhaps your first project – for industrial or building automation, you can find more details on the Arduino Pro website and join the waiting list

    If you are attending Embedded World in Nuremberg, Germany from March 14th to 16th, come visit Arduino Pro inside the tinyML Pavilion at booth 2-238. We will be presenting the Portenta C33 at the show and our experts will be happy to introduce you to our newest product.

    The post Portenta C33: The high-performance, low-price oxymoron appeared first on Arduino Blog.

    Website: LINK

  • Ready for SPS – with a new product unveil!

    Ready for SPS – with a new product unveil!

    Reading Time: 2 minutes

    Are we going to see you in Nuremberg? SPS – smart production solutions, the smart and digital automation fair, is the perfect opportunity to get to know Arduino Pro’s growing catalog of industrial-grade hardware and software solutions. Meet the experts at Booth 5-129 to ask us anything and check out live demos showing our components in action: from best-sellers to recent releases, we look forward to presenting all the features and benefits you can leverage to become the innovator in your industry and scale up your projects with us.

    Our ecosystem is designed to accelerate innovation by dramatically lowering the access barriers and avoiding any gap along the way from prototype to series. We grow it with flexibility and modularity in mind, so professional users can reduce complexity and time to market, while increasing ROI with secure IoT and AI applications that their own internal teams can develop and implement from beginning to end, avoiding vendor lock-in.” – Adriano Chinello, Arduino Pro Business Unit Leader

    Need an extra nudge to join us? We’ll be unveiling an entirely new product in line with the fair’s “Bringing Automation to Life” theme, dedicated to all the developers focused on industrial applications that are already part of our community… and the many more we hope to inspire!

    To be the first to hear more about Arduino Pro’s new launch during the event, view our exhibitor page and visit us at SPS in Nuremberg, Booth 5-129 at NürnbergMesse, from November 8th to 10th.

    Categories:ArduinoEvents

    Website: LINK

  • DIY jet engine powered by a Portenta H7

    DIY jet engine powered by a Portenta H7

    Reading Time: 2 minutes

    Arduino TeamJanuary 19th, 2022

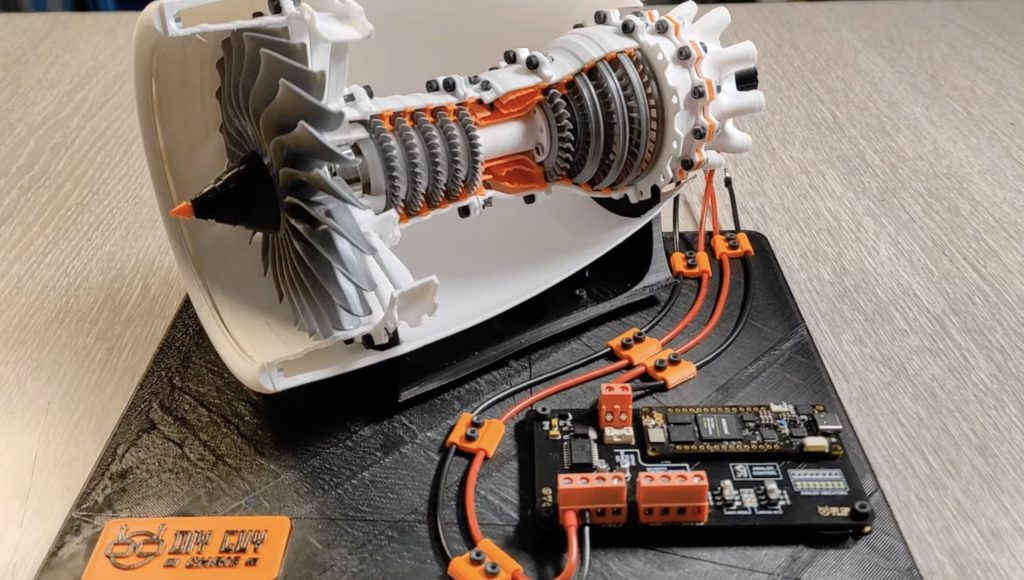
    Projects don’t get much more ambitious than DIY GUY Chris’ Arduino-powered jet engine. We’ve been following the work he’s done building a custom carrier board for the Portanta H7, and now we get to see it in action.

    Portenta Jet Engine

    To be honest, just building a working DIY jet engine model is incredible enough. But the model Chris has created is so much more than that.

    The 3D-printed model has a breakaway section that lets us see the engine in action. A superb educational tool that covers everything from design and control to operation. And it looks like so much fun to make and play with, too.

    His latest project puts the custom built Portenta H7 “Throne” board to use. This is a breakout, or carrier board, that he developed to explore ways to use the Portenta H7’s high density connectors. In this application it’s driving a high powered a DC motor that runs his jet engine model.

    It’s an elaborate build, with a lot of printed, moving parts. In many respects the application that the H7 is used for is pretty simple, at least on the surface. But what’s great about Chris’ latest project is that it’s an excellent example of how the Arduino board could be implemented in industrial applications.

    His excellent (and very professional) breakout board — the Throne — is a further demonstration of this, showing how adaptable devices like the H7 are in combination with custom solutions. So it’s worth taking a look at Chris’ other videos about the Throne’s development, as well as his mightily impressive DIY jet engine.

    Categories:H7

    Website: LINK

  • Creating an online robot fighting game using Arduino MKR1000 WiFi

    Creating an online robot fighting game using Arduino MKR1000 WiFi

    Reading Time: 7 minutes

    This is a guest post from Surrogate, a team of developers building games that people play in real-life over the internet.

    We introduced this concept last year, and have launched three games so far. Our final game of 2019 was SumoBots Battle Royale — where players from anywhere in the world can fight real robots in a battle royale-style arena. The aim of the project was to have the game run semi-autonomously, meaning that the bots could self-reset in between the games, and the arena could run by itself with no human interaction. This was our most complex project to date, and we wanted to share some parts of the build process in more detail, specifically, how we’ve built these robots and hooked them online for people to control remotely.

    Robot selection

    We’ve started our process by choosing which robots we’d want to use for the game. There were a couple of requirements for the robots when making the evaluation:

    • Are able to withstand 24/7 collision
    • Easily modifiable and fixable
    • Can rotate on the same spot
    • Must have enough space to fit the electronics

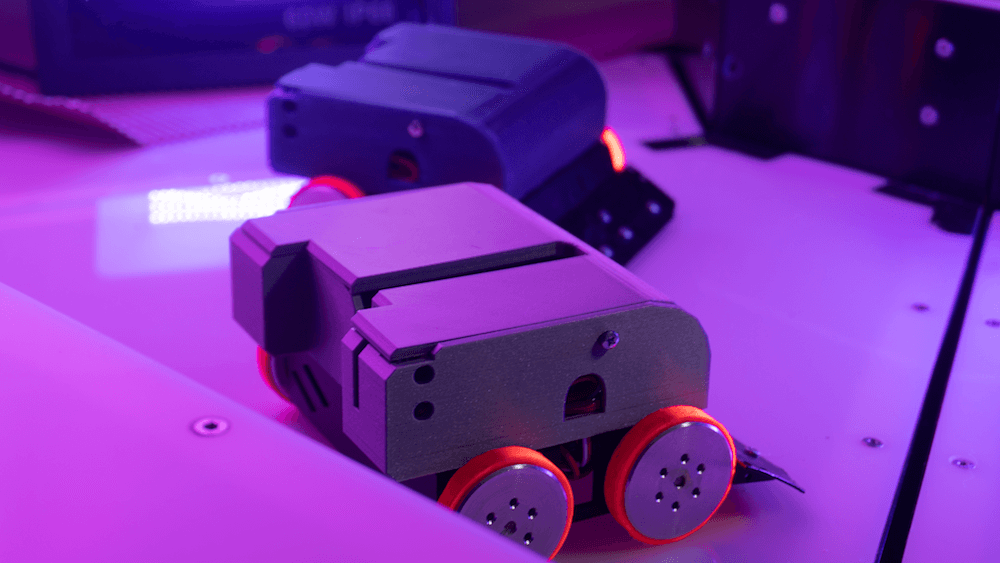
    After looking at a lot of different consumer robots, maker projects, and competitive fighting bots, we’ve decided to use the JSUMO BB1 robots for this game. We liked the fact that these bots have a metal casing which makes them very durable, all parts are easily replaceable and can be bought separately, and it has 4 independent motors (motor shields included), one for each wheel, which allows it to rotate on the same spot.

    We were pretty skeptical of being able to fit all the electronics into the original casing, but we decided to go with this robot anyways, as it had the best overall characteristics. As this robot is easily modifiable, we can always 3D print an extra casing to fit all the parts.

    What is the board?

    Now that we’ve decided on the robot, it was the time to define what electronics should we use in this build. As usual, it all starts with the requirements. Here’s what we need for the game to run smoothly:

    • The robot should be able to recover from any position
    • Can stay online while charging
    • Supports WiFi network connection and offers reliable connectivity
    • Easily programmable and supports OTA updates
    • Can control four motors simultaneously

    Based on these requirements we had the following electronics layout in mind:

    We had to find a board that is energy efficient, can send commands to motors, supports parallel charging and has a small footprint on the robot size. With so many requirements, finding the perfect board can be a challenge.

    Arduino to the rescue

    Fortunately, Arduino was there to help us out. They offer a rich selection of boards to fit every possible robotics project out there and have very detailed documentation for each of the boards. 

    More importantly, Arduino is known for its high quality, something that is crucial for semi-autonomous types of applications. Coming from an embedded software background and having to work with all sorts of hardware, we often see that some features or board functionalities are not fully finished which can lead to all sorts of unpleasant situations.

    After looking at the Arduino’s collection of boards we quickly found a perfect candidate for our project, the Arduino MKR1000 WiFi. This board fits all of our main requirements for the motor controls, is easily programmable via Arduino IDE, and due to its low power design is extremely power efficient, allowing us to have a lower capacity battery. Additionally, it has a separate WiFi chip onboard, which solely focuses on providing a reliable WiFi connection, something that is very important in our use case.

    Now that we’ve decided on the “brain” of our robot, it was time to choose the rest of the components.

    Robust hardware means working software

    Something to keep in mind is that when working with hardware, you should always try to avoid any possible risks. This means that you should always over-do your minimal hardware requirements where possible. The reason is — if your hardware doesn’t work as intended, your whole software stack becomes unusable too. Always chose reliable hardware components for mission-critical applications.

    Some of our electric components might look a bit overkill, but due to the nature of our projects, they are a critical requirement.

    Avoiding the battery explosions

    As there is a lot of robot collision involved in the game, we decided to go with a high safety standard battery solution. After evaluating multiple options on the market, we decided to go with the RRC2040 from RRC (Germany). It has a capacity of 2950 mAh that allows us to run the robots for up to five hours on a single charge. It has an internal circuitry for power management, protection features and it supports SMBUS communications (almost like I2C), and is certified for all of the consumer electronics battery standards. For charging, we used RRC’s charging solution designed specifically for this battery and that offers the possibility to feed power to the application while the battery is being charged.

    Note: the Arduino MKR1000 has a pretty neat charging solution on the board itself. You can connect the battery to the board directly as the main power source, and you charge it directly through the MKR1000’s micro USB port. We really wanted to use it to save space and have a more robust design, but due to the large capacity of our battery, we couldn’t use it at full potential. In our future projects with smaller scale robots, we definitely plan to use the board’s internal charging system, as it works perfectly for 700-1800 mAh power packs.

    Bot recovery

    For the bot to be able to recover from falling on its head, we’ve implemented a flipping servo. We didn’t want to have any risk of not enough torque, so we went with DS3218, which is capable of lifting up to 20KG of weight. Here’s how it works:

    Hooking everything together

    Now that we’ve decided on all of the crucial elements of this setup, it was time to connect all the elements together. As the first step, we figured what would be the best step way to locate all the pieces within the bot. We then 3D-printed a casing to protect the electronics. With all of the preliminary steps completed, we’ve wired all of the components together and mounted them inside of the casing. Here’s how it looks:

    It was really convenient for us that all the pins on the board could be connected just by plugging them in, this avoids a lot of time spent on soldering the cables for 12 robots and more importantly, allowed us to cut out the risk of bad soldering that usually can’t be easily identified.

    Arduino = Quick code

    Arduino MKR1000 offered us the connectivity we needed for the project. Each sumo robot hosts their own UDP server using MKR1000 WiFi libraries to receive their control commands for a central control PC and broadcasting their battery charge status. The user commands are translated to three different PWM signals using Arduino Servo library for the flipping, left and right side motor controllers. The board used has support for hardware PWM output which was useful for us.  Overall we managed to keep the whole Arduino code in a few hundred lines of code due to the availability of Servo and Wifi libraries.

    The out of the box ArduinoOTA support for updating the code over the WiFi came in handy during the development phase, but also anytime we update the firmware for multiple robots at the same time. No need to open the covers and attach a USB cable! We created a simple Bash script using the OTA update tool bundled in Arduino IDE to send firmware updates to every robot at the same time.  

    To summarize

    It’s pretty amazing that we live in the age where you can use a mass market, small form factor board like the Arduino MKR1000 and have so much functionality. We’ve had a great experience developing our SumoBots Battle Royale game using the board. It made the whole process very smooth and streamlined, the documentation was right on point, and we never had to hit a bottleneck where the hardware wouldn’t work as expected.

    More importantly, the boards have proven to be very robust throughout the time. These SumoBots have been used for more than 3,000 games already, and we haven’t seen a single failure from the MKR1000. For a game where you literally slam the robots in to each other at a high speed, that’s pretty impressive to say the least.

    We look forward to working with Arduino on our future games, and we can’t wait to see what they will be announcing in 2020!

    Website: LINK

  • Arduino goes PRO at CES 2020

    Arduino goes PRO at CES 2020

    Reading Time: 2 minutes

    Arduino goes PRO at CES 2020

    Arduino TeamJanuary 7th, 2020

    We’re kicking off this year’s CES with some big news.

    Millions of users and thousands of companies across the world already use Arduino as an innovation platform, which is why we have drawn on this experience to enable enterprises to quickly and securely connect remote sensors to business logic within one simple IoT application development platform: a new solution for professionals in traditional sectors aspiring for digital transformation through IoT. 

    Combining a low-code application development platform with modular hardware makes tangible results possible in just one day. This means companies can build, measure, and iterate without expensive consultants or lengthy integration projects.

    Built on Arm Pelion technology, the latest generation of Arduino solutions brings users simplicity of integration and a scalable, secure, professionally supported service. 

    “By combining the power and flexibility of our production ready IoT hardware with our secure, scalable and easy to integrate cloud services, we are putting in the hands of our customers something really disruptive,” commented Arduino CEO Fabio Violante. “Among the millions of Arduino customers, we’ve even seen numerous businesses transform from traditional ‘one off’ selling to subscription-based service models, creating new IoT-based revenue streams with Arduino as the enabler. The availability of a huge community of developers with Arduino skills is also an important plus and gives them the confidence to invest in our technology”.  

    But that’s not all. At CES 2020, we are also excited to announce the powerful new Arduino Portenta family. Designed for demanding industrial applications, AI edge processing and robotics, it features a new standard for open high-density interconnect to support advanced peripherals. The first member of the family is the Arduino Portenta H7 module – a dual-core Arm Cortex-M7 and Cortex-M4 operating at 480MHz and 240MHz, respectively, with industrial temperature-range (-40 to 85°C) components. The Portenta H7 is capable of running Arduino code, Python and JavaScript, making it accessible to an even broader audience of developers.

    The new Arduino Portenta H7 is now available for pre-order on the Arduino online store, with an estimated delivery date of late February 2020.

    Website: LINK