Schlagwort: Arduino Clock
-

This spinning spiral clock is hypnotizing
Reading Time: 2 minutesSometimes makers come across products that they’d love to buy, but which are too expensive to justify. When that happens, the natural inclination of the maker is to build a DIY version. Such projects often end up costing way more — in both time and literal currency — than the product would…
-

No need for buttons with this Arduino Cloud alarm clock
Reading Time: 2 minutesWhen Arduino first hit the maker scene, the world of embedded electronics was largely unconnected and offline. But as the IoT, home automation, and smart technology advanced, Arduino kept up. Today, there are a variety of Arduino development boards that offer built-in networking capability and you can use the Arduino Cloud to…
-

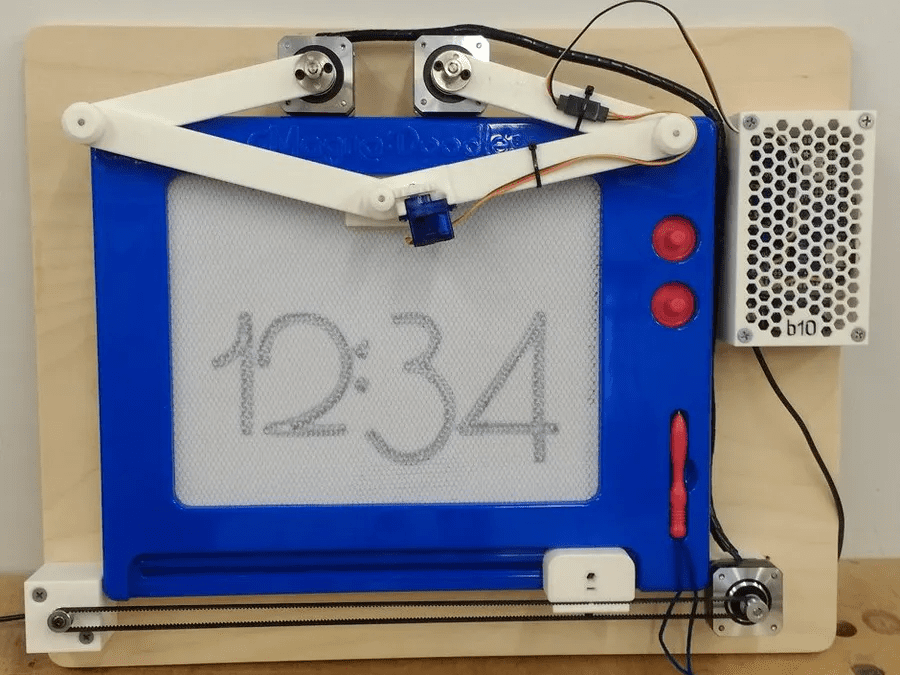
Sketch the current time with this Magna Doodle clock
Reading Time: 2 minutesArduino Team — May 31st, 2022 The Magna Doodle is a classic children’s toy that works by embedding a layer of iron shavings just below the surface of a canvas and then using a magnetic pen to pull them up, thus showing whatever lines might have been drawn. Steve Turner had the…
-

A DIY digital clock with a twist
Reading Time: 2 minutesArduino Team — December 27th, 2021 The digital clock has existed in its current form for decades at this point, so it’s quite exciting to see when a new take on the classic design comes along. The Time Twister 5, created by Hans Andersson, is a fully 3D-printed electromechanical clock that twists certain blocks…
-

Holo Clock is a novel 3D-printed clock that tells time using a pair of rings
Reading Time: 2 minutesArduino Team — August 10th, 2021 Simply looking at a traditional analog clock sitting on a wall somewhere got pretty boring for one Instructables user who goes by saulemmetquinn, which is partially why they wanted to create a novel design instead. Their device uses almost entirely 3D-printed components that come together to…
-

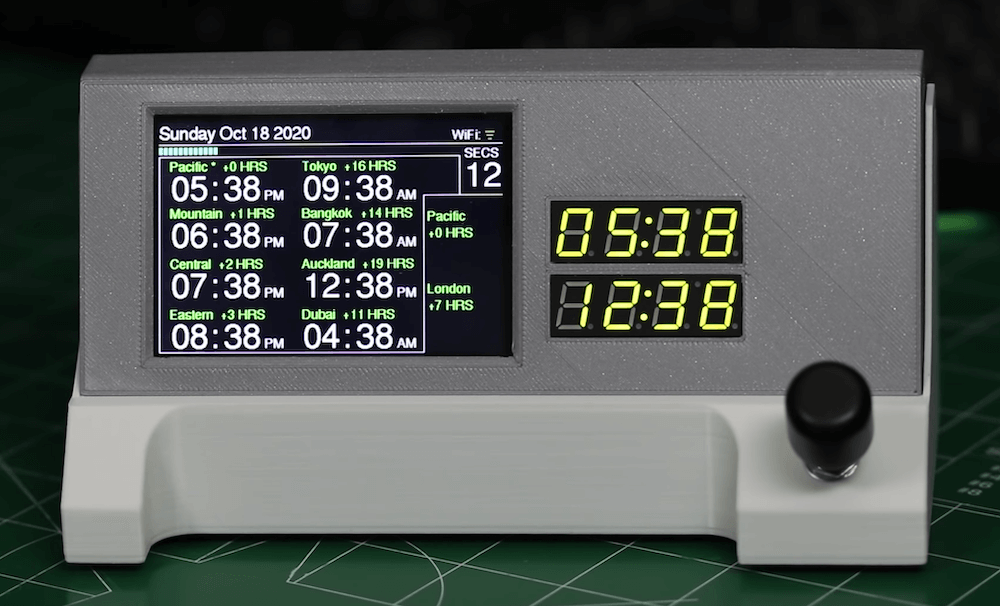
Know what time it is anywhere in the world with this Nano 33 IoT-based NTP clock
Reading Time: < 1 minuteKnow what time it is anywhere in the world with this Nano 33 IoT-based NTP clock Arduino Team — December 14th, 2020 Kaleb Clark, like many of us, works with others from all around the globe. While he could view any number of websites or commercial options to see what time…
-
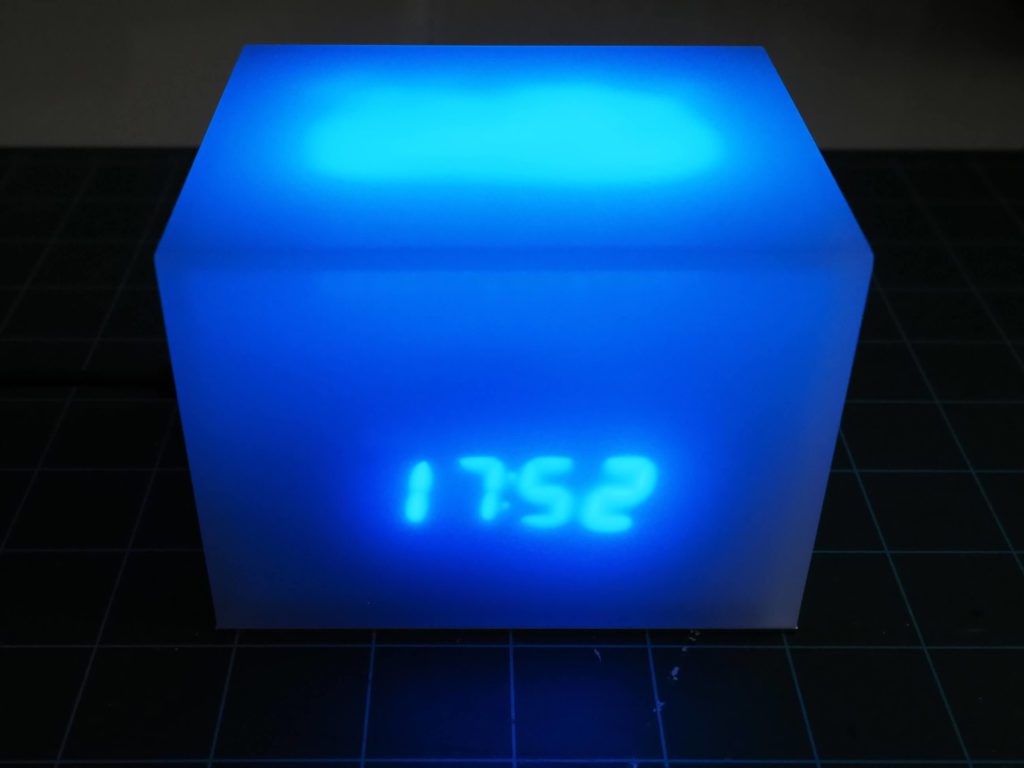
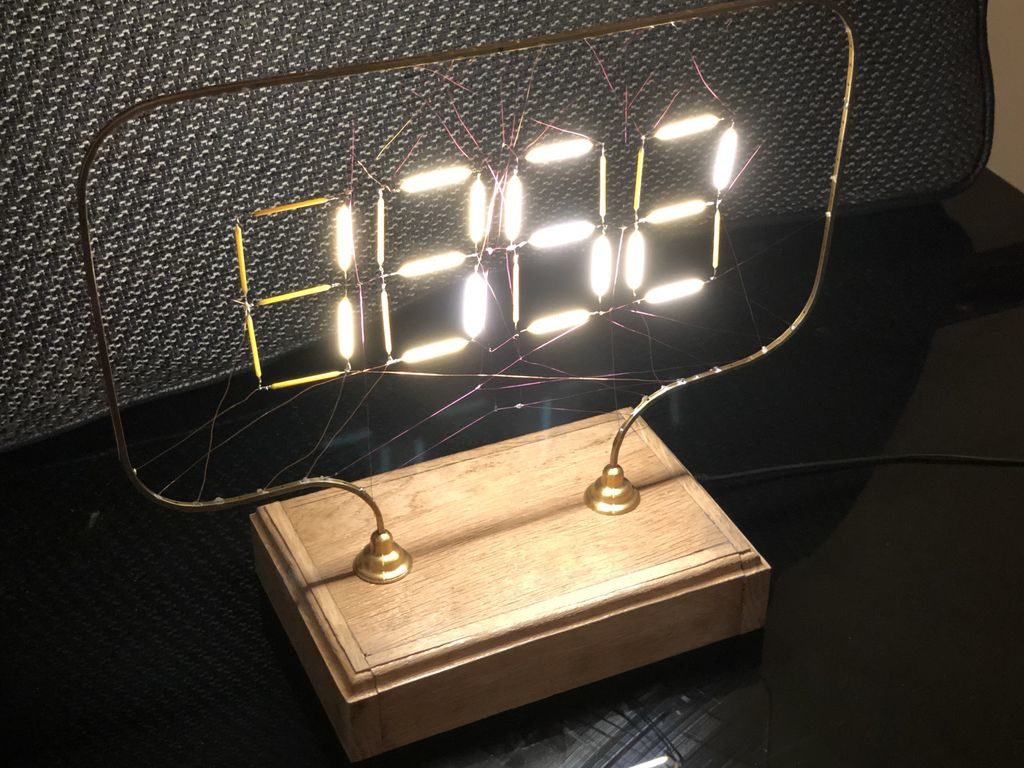
Old becomes new again with this glowing clock
Reading Time: 2 minutesOld becomes new again with this glowing clock Arduino Team — July 3rd, 2020 Whether for work or play, and now for various video/voice socials that have been set up, “chebe” spends most of the day at their desk — so much so that, in some instances they lose track of time.…
-

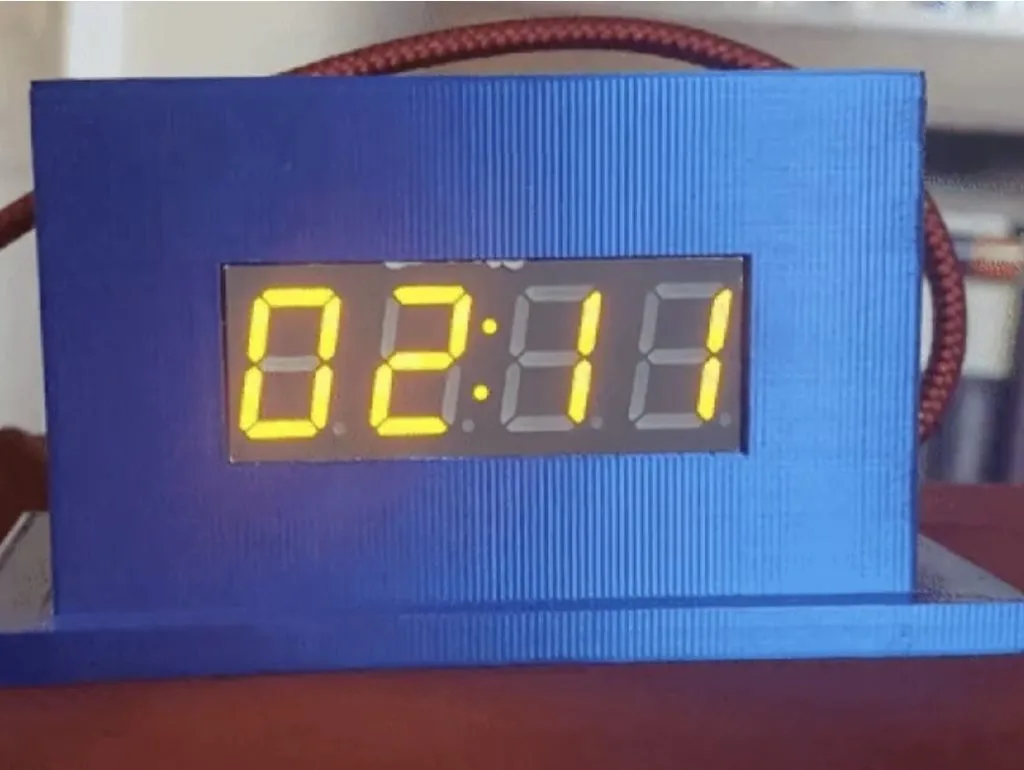
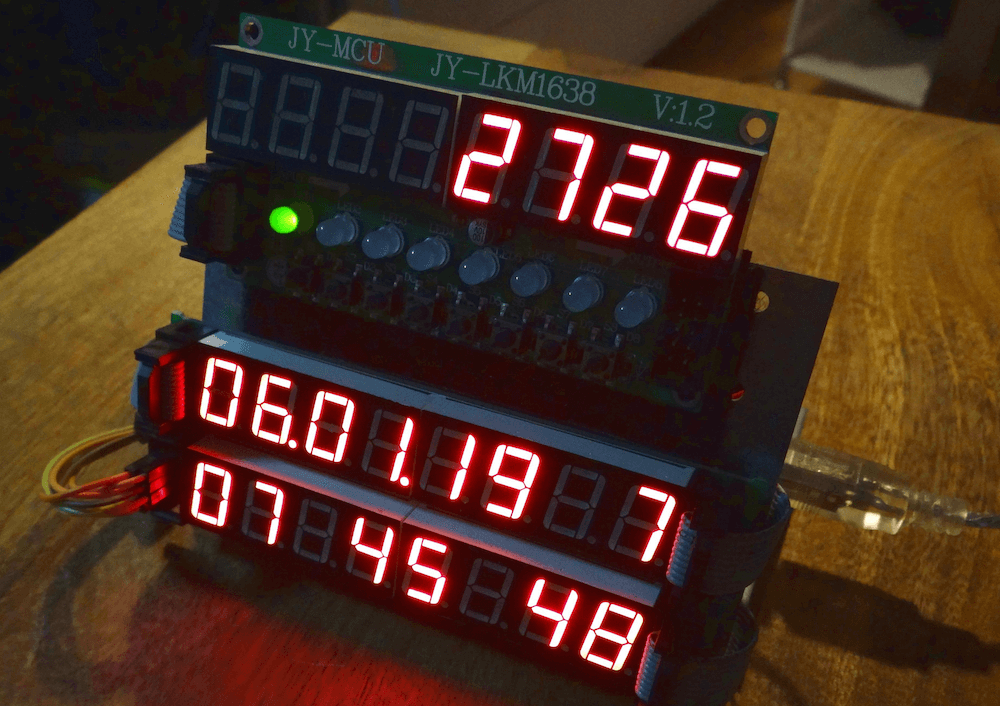
Intuitive Arduino clock has seven alarms and three LED displays
Reading Time: 2 minutesIntuitive Arduino clock has seven alarms and three LED displays Arduino Team — June 19th, 2019 Alarm clocks of old—and certainly many of those today—require several button pushes to set things up properly. Maker Michael Wessel, however, decided to implement his own take on a more intuitive clock, creating a device that…
-

Tell time with a servo-driven skull clock!
Reading Time: 2 minutesTell time with a servo-driven skull clock! Arduino Team — January 10th, 2019 While model skulls are generally relegated to Halloween, or biology class, this maker decided to construct a very unique clock out of one. The “hands” of the terrifying timepiece are represented by two eyes—right for hours, left for minutes—that…
-
A time-telling web powered by Arduino
Reading Time: < 1 minuteA time-telling web powered by Arduino Arduino Team — August 2nd, 2018 Flament bulbs, commonly known as Edison bulbs, contain a variety of interesting LED lights. So interesting, in fact, that maker Andy Pugh decided to take these individual components up and turn them into a 7-segment display clock. While making…
-

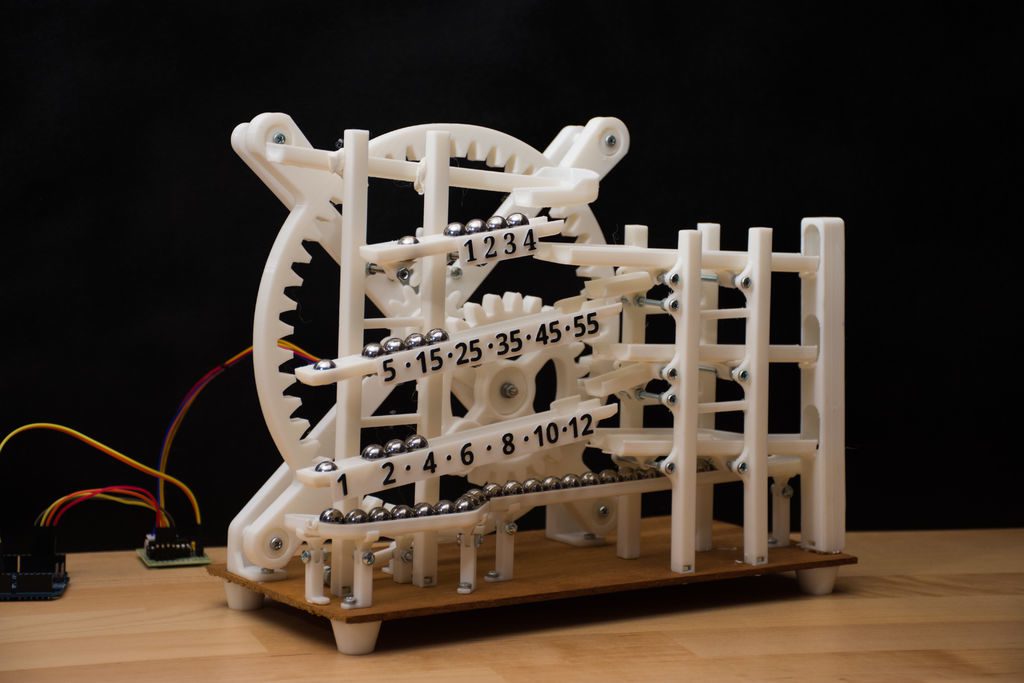
Ingenious marble clock runs on Arduino
Reading Time: 2 minutesIngenious marble clock runs on Arduino Arduino Team — August 1st, 2018 Arduino boards and custom clock builds seem to be a great match, as illustrated by Görkem Bozkurt’s recent project. His 3D-printed marble clock uses a stepper-driven gear mechanism to lift 11mm steel spheres to the device’s top chute. The spheres…
-
Earth Clock brilliantly tracks the sun’s light
Reading Time: 2 minutesEarth Clock brilliantly tracks the sun’s light Arduino Team — June 25th, 2018 While we understand that the Earth rotates to produce day and night, and tilts on its axis to vary the day’s length, how is the planet positioned in relation to the sun right now? Unless you’re well-attuned to our…
-

Wake up to an Arduino-based overhead alarm clock
Reading Time: 2 minutesWake up to an Arduino-based overhead alarm clock Arduino Team — May 29th, 2018 Tired of wondering what time it is at night, only to have to roll over to look at your alarm clock? If you’d like to avoid this nighttime inconvenience, then Kurt Andros has a great solution with his…
-

This Pong clock displays the time and temperature in score-like fashion
Reading Time: < 1 minuteThis Pong clock displays the time and temperature in score-like fashion Arduino Team — March 19th, 2018 If you need to get creative with something useful, clocks are always great objects to hack together. One idea, in particular, is this Pong Clock from Brett Oliver. Oliver’s Arduino-powered device is based off of a similar…