Kategorie: News
-

Free Play Days – Jujutsu Kaisen Cursed Clash, NHL 25, Dying Light and For the King
Reading Time: 3 minutesThere’s something for everyone to love this weekend with Free Play Days! Jujutsu Kaisen Cursed Clash, NHL 25, Dying Light and For the King are available this weekend for Xbox Game Pass Ultimate, Standard and Core members to play from Thursday, February 13 at 12:01am Pacific until Sunday, February 16 at 11:59…
-
Play Avowed Starting Today with the Premium Edition
Reading Time: 2 minutesDie Premiumausgabe enthält: – das Basisspiel – Bis zu 5 Tage früherer Zugang – Zwei Premium-Skin-Pakete – Zugang zum digitalen Artbook und zum Original-Soundtrack Willkommen im Land der Lebenden, einer mysteriösen Insel voller Abenteuer und Gefahr. Avowed findet in der fiktionalen Welt von Eora statt, die erstmals in der „Pillars of Eternity“-Spielserie…
-
Atomfall: Diving Deeper Into Its Unique Mechanics
Reading Time: 6 minutesWith Atomfall coming to Xbox and Game Pass in just over a month (arriving on March 27), today we released the latest trailer for the game. Featuring brand new gameplay, the trailer highlights the main features that you will experience when you enter the quarantine zone. I thought now would be a…
-

Teaching about AI in K–12 education: Thoughts from the USA
Reading Time: 5 minutesAs artificial intelligence continues to shape our world, understanding how to teach about AI has never been more important. Our new research seminar series brings together educators and researchers to explore approaches to AI and data science education. In the first seminar, we welcomed Shuchi Grover, Director of AI and Education Research…
-

The Apple TV app is now available on Google Play for Android mobile devices.The Apple TV app is now available on Google Play for Android mobile devices.Managing Director
Reading Time: < 1 minuteSince its launch in 2021, the Apple TV app for Google TV has given people the ability to stream award-winning original shows, like “Severance,” “Slow Horses,” “The Morning Show” and “Ted Lasso,” as well as films like “Wolfs” and “The Instigators.” Starting today, the Apple TV app is available on the…
-
How Features in Symphonia were Designed with Speed Runners in Mind
Reading Time: 6 minutesSummary Symphonia was released for Xbox Series X|S on December 5, 2024. Custom level design, precision platforming and special features great for speedruns. Deep dive into speedrunning with player perspectives and tips. From its inception, Symphonia was envisioned as a game that rewarded control and timing mastery. Initially designed as a game…
-
Perk up A Deep Dive into Overwatch 2’s New Perks System
Reading Time: 6 minutesSummary Perks are exciting new abilities for Overwatch 2heroes, offering wild gameplay twists and creative strategies. Lead gameplay designer for Overwatch, Alec Dawson, explains how Perks work. Overwatch 2 Season 15 launches February 18. Hey everyone! Alec here, ready to spill the tea on one of the most exciting new mechanics coming…
-

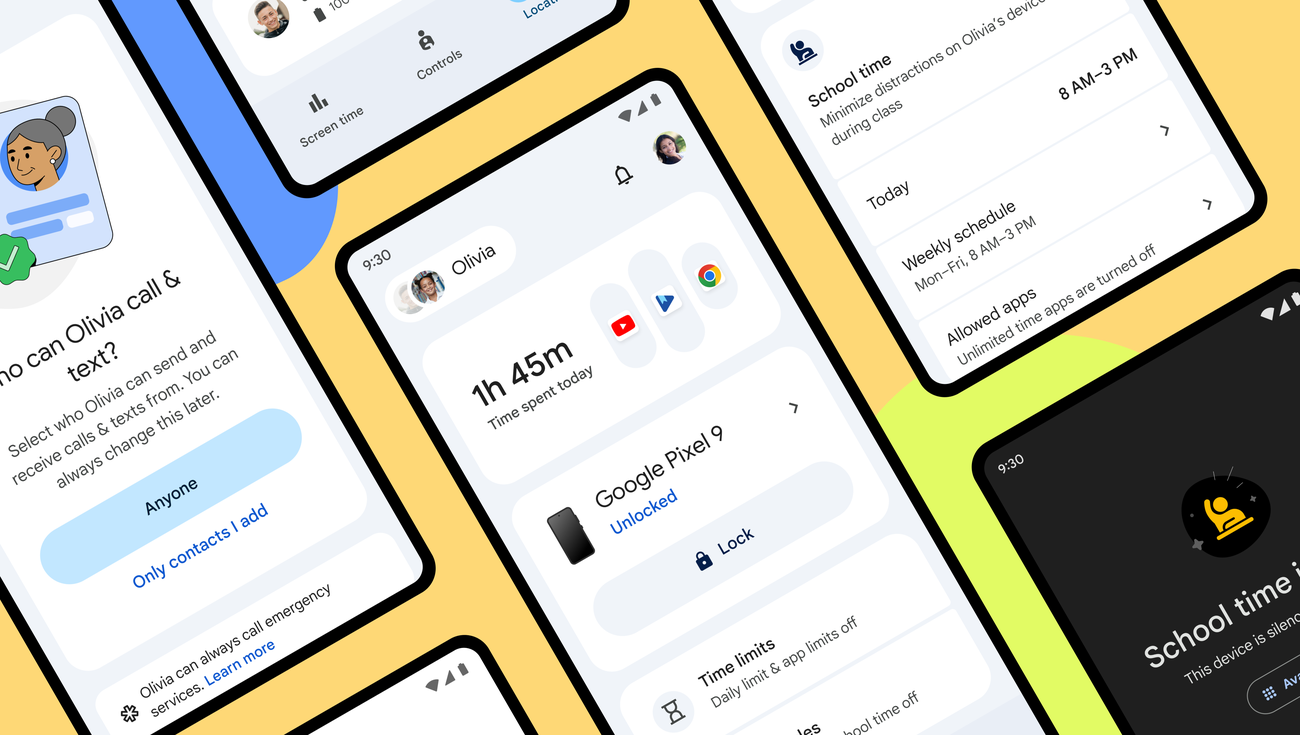
Google Family Link brings new supervision tools for parentsGoogle Family Link brings new supervision tools for parentsProduct Manager
Reading Time: < 1 minuteGoogle Family Link is introducing new features that help families foster healthy digital habits.Google Family Link is introducing new features that help families foster healthy digital habits.Website: LINK
-
How Monster Energy Supercross 25 Was Rebuilt From the Ground Up with You in Mind
Reading Time: 5 minutesSummary Learn how Milestone has rebuilt the Monster Energy Supercross franchise in the last two years by leveraging key contributions from the community. Simulation is the word, with a new physics system that allows full air control and a true riding experience in the dirt. And for the first time, the current…
-
Elden Ring Nightreign: Answering 20 Burning Questions
Reading Time: 3 minutesFromSoftware bosses? Now we’re talking! Exactly. At the end of every day, you’ll battle a boss that will reward you with loot that will (presumably) make it easier to survive. At the end of the third night, you’ll face off against a Nightlord. Beat that boss to earn semi-permanent character boosts (more…
-
#AvowedExperience in Hamburg – das Land der Lebenden übernimmt das XPERION
Reading Time: 2 minutesDie Welt von Avowed ruft nach Dir… und sie ist nur ein paar Rolltreppen entfernt! Triff Deine Lieblingscreator im XPERION in Hamburg beim Meet & Greet, mach Fotos mit Cosplayer*innen im Avowed-Stil, gewinne tolle Preise und vor allem: Spiel das neue RPG-Meisterwerk von Obsidian vor Ort auf Xbox Series X, PC oder…
-

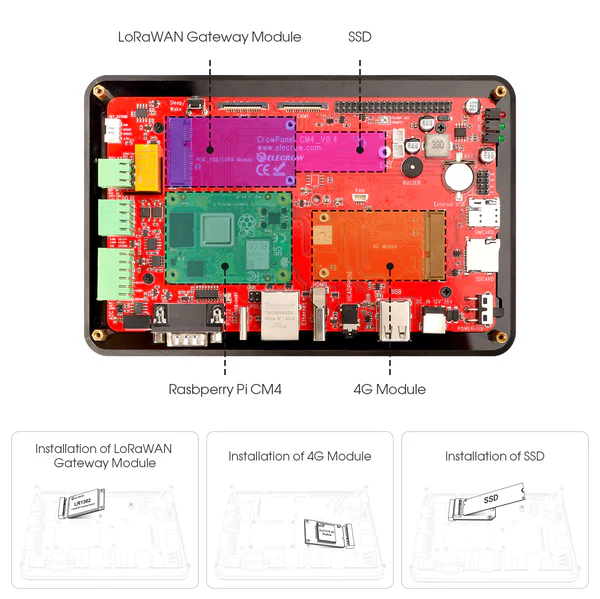
Pi Terminal review
Reading Time: 2 minutesIt also has the equally important connectivity requirements of modern industrial automation. From your classic terminal pins, serial connector, Ethernet, etc., there’s also access to the built-in Wi-Fi and Bluetooth of CM4, along with a GPS antenna add-on, and you can expand it with LoRa or LTE for more radio connections. Ready…
-
Survival, Love, and Legacy: Why Undying Is a Zombie Game Unlike Any Other
Reading Time: 4 minutesSummary Undying is available today. Help Anling and Cody survive the zombie apocalypse. A unique blend of heartfelt narrative, survival, and RPG gameplay. A Journey of Love and Survival Comes to Xbox Hello, Xbox players! I’m David Brevik, President and Executive Producer at Skystone Games. As someone who has spent decades creating…
-
Sid Meier’s Civilization VII on Xbox Reignites That ‘Just One More Turn’ Feeling
Reading Time: 6 minutesExpand the strategic horizons of your empire and enjoy more options for your reign with Sid Meier’s Civilization® VII Founders Edition! This digital-only edition is only available until February 28, 2025—get it now before it’s history. Purchasing Sid Meier’s Civilization VII Founders Edition entitles digital versions of the game on both Xbox…
-
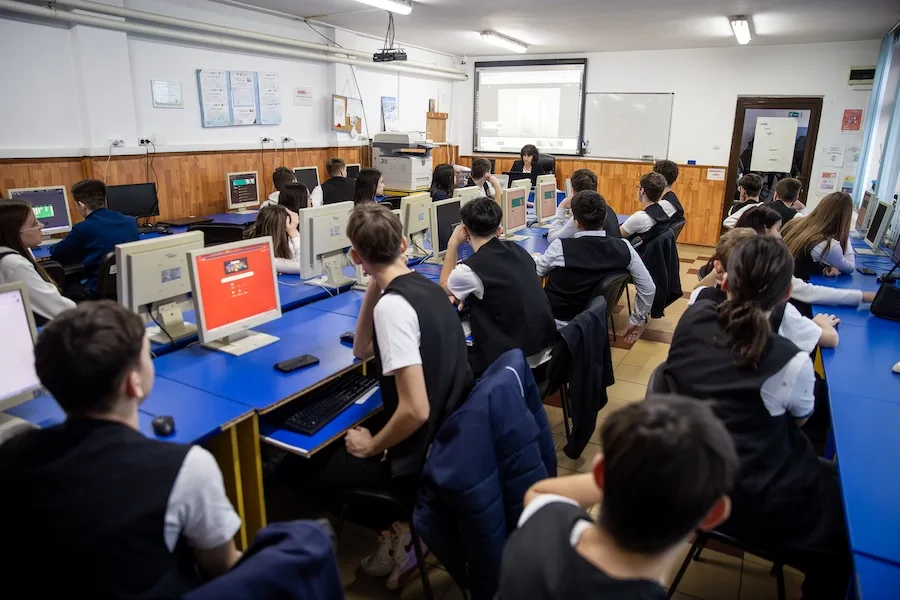
Safer Internet Day: ein tiefer Einblick in das Thema KI mit Minecraft Education
Reading Time: 3 minutesKI erhält weltweit immer mehr Einzug auf der Arbeit, zuhause und in der Schule. Laut der jüngsten Microsoft Global Online Safety Survey hat die Zahl der aktiven Nutzer*innen generativer KI überall auf der Welt zugenommen. Unsere Ergebnisse zeigen, dass im letzten Jahr 51 Prozent der Menschen generative KI nutzten oder zumindest damit…
-
Celebrating Safer Internet Day by Digging Deeper into AI with Minecraft Education
Reading Time: 3 minutesPeople are using AI more and more at home, at work, in school, and everywhere in between. According to the most recent Microsoft Global Online Safety Survey, there has been a global increase in active generative AI users. Our findings showed that in 2024, 51% of people are users or experimenters of…
-
South of Midnight angespielt: ein wunderschönes, schonungsloses Märchen
Reading Time: 7 minutesAuf den ersten Blick könnte South of Midnight als klassisches Action-Adventure beschrieben werden – eine Heldin, die aus ihrem gewöhnlichen Leben gerissen wird und sich auf eine bemerkenswerte Reise begibt − mit magischen Waffen und Fähigkeiten. Doch wenn Du nur wenige Minuten mit dem Spiel verbringst, verflüchtigt sich dieses Gefühl sofort. Eine…
-
South of Midnight Hands-on: A Gorgeous, Pull-No-Punches Fairytale
Reading Time: 9 minutesAt first blush, South of Midnight could be described as a classic action-adventure: a heroine thrust from ordinary life into a remarkable journey; magical weapons and abilities; ability skill trees. But spend just a few minutes with it, and that feeling simply floats away. We’ve never seen a gaming world quite like…
-

Wired for success: Inspiring the next generation of women in science
Reading Time: 3 minutesDid you know that it’s International Day of Women and Girls in Science on February 11th, 2025? To celebrate this global event, we’re shining a light on the efforts to make STEM more accessible, inclusive, and inspiring for future generations. Let’s dive in! Mind the gap: gender representation in STEM Science and…
-

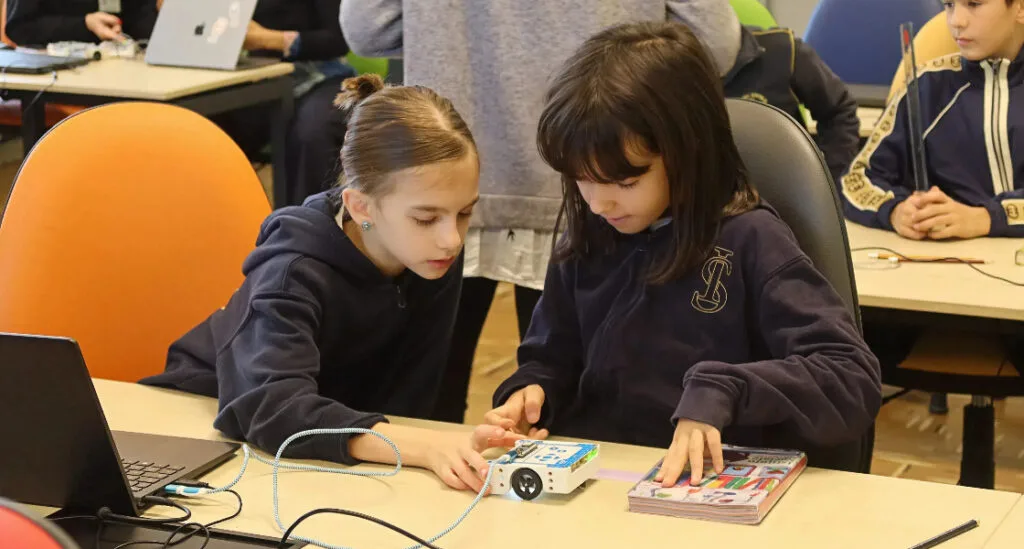
Teaching AI safety: Lessons from Romanian educators
Reading Time: 6 minutesThis blog post has been written by our Experience AI partners in Romania, Asociatia Techsoup, who piloted our new AI safety resources with Romanian teachers at the end of 2024. Last year, we had the opportunity to pedagogically test the new three resources on AI safety and see first-hand the transformative effect…
-

Gustavo Reynaga: Inspiring the next generation of makers with MicroPython
Reading Time: 3 minutesIf you’re a fan of open-source technology, Gustavo Salvador Reynaga Aguilar is a name to know. An experienced educator with a passion for technology, Gustavo has spent nearly three decades teaching and inspiring students at CECATI 132 in Mexico. He’s worked with platforms like Arduino, Raspberry Pi, and BeagleBone, and is renowned…
-
WOPR
Reading Time: 2 minutesWhat’s inside? • Raspberry Pi 4 • Raspberry Pi Touch Display 2 • 5 V / 30 A power supply • 615 Adafruit NeoPixels • Bluetooth speaker A script runs on boot, which twinkles the NeoPixels in the traditional 1980s supercomputer colours: yellow and red. Another script can be run to play…