Fractals are shapes that contain complex detail however closely you look at them, or however far you zoom in. Often, they are self-similar: if you zoom in on the small-scale detail, you find it resembles the overall shape. Some of the most familiar forms that have fractal features are ones found in nature, like fern leaves and frost patterns, and we bet we’re not the only ones who call Romanesco “fractal cauliflowers”.
They are also beautiful. Fractal art can be created algorithmically by software, with the results usually represented as still digital images or animations. It all kicked off in the mid-1980s, so it’s the kind of thing that’s likely to be right up our street.
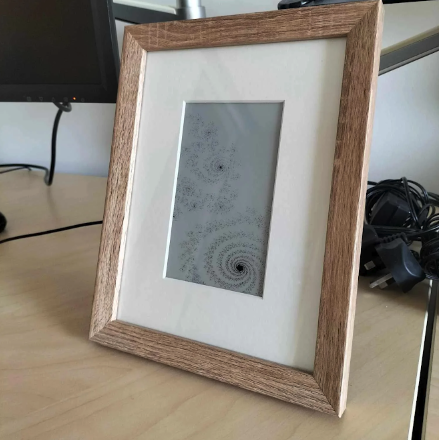
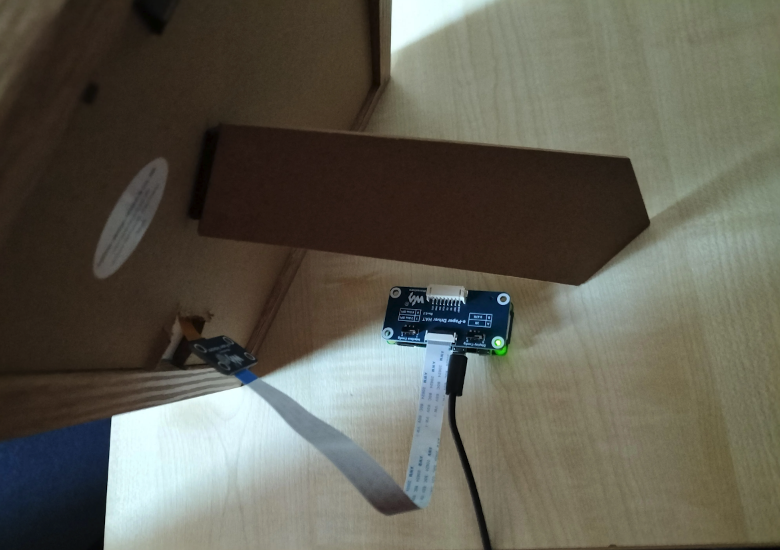
The maker kept the assembly pretty simple, cutting a small hole in the picture frame’s back mount panel to slip the display HAT’s ribbon cable through, with the project’s Raspberry Pi left free-floating behind it. The e-ink display itself fits snugly inside the frame, with a card mount providing a little breathing space between the display and the glass.
Software setup
Getting the software going looks to be as elegantly easy as the hardware. All the code you need is on GitHub, including a step-by-step guide in the README. It generates part of a Mandelbrot set with dimensions to suit the e-paper screen, then renders it for display.
Fellow maker Rob Weber has added extra code to the GitHub repository from the Omni-EPD project. The additional code allows for more electronic display types to be used.
We’re not going to get into what the Mandelbrot set is, but Jimi Sol in this here video seems to do a great job of explaining.
“I bought the panel from the Waveshare Amazon store,” says Karl. “For the 7.5 in Waveshare panel, I’d recommend getting an 18×24 cm frame [like this one].” Karl also ordered a custom frame from Best4Frames: “I ordered mine around 15×9.7 cm, which is one of the smallest cutouts they can make.”
“The picture mount is good for aesthetics,” explains Karl alongside offering “extra protection.” A small slit on the side of the back panel of the frame allows access to the ribbon cable. “I attached it to the header which comes with the Waveshare panel, and which goes directly on [Raspberry] Pi Zero.
“Those of you who are more gifted in building might be able to come up with an enclosure, but in my build Raspberry Pi is free‑floating,” says Karl.
Italian artist, designer, and inventor Bruno Munari is often quoted as saying “If I listen, I forget; if I see, I remember; if I do, I understand.” We couldn’t agree more, and that is one of the reasons why we believe in the power of our Project Hub to help everyone truly learn, grow, and innovate. The tutorials our community shares are not only “recipes” you can replicate, but opportunities to go deeper and test different skills in real life. Don’t believe us? Check out this month’s top three picks!
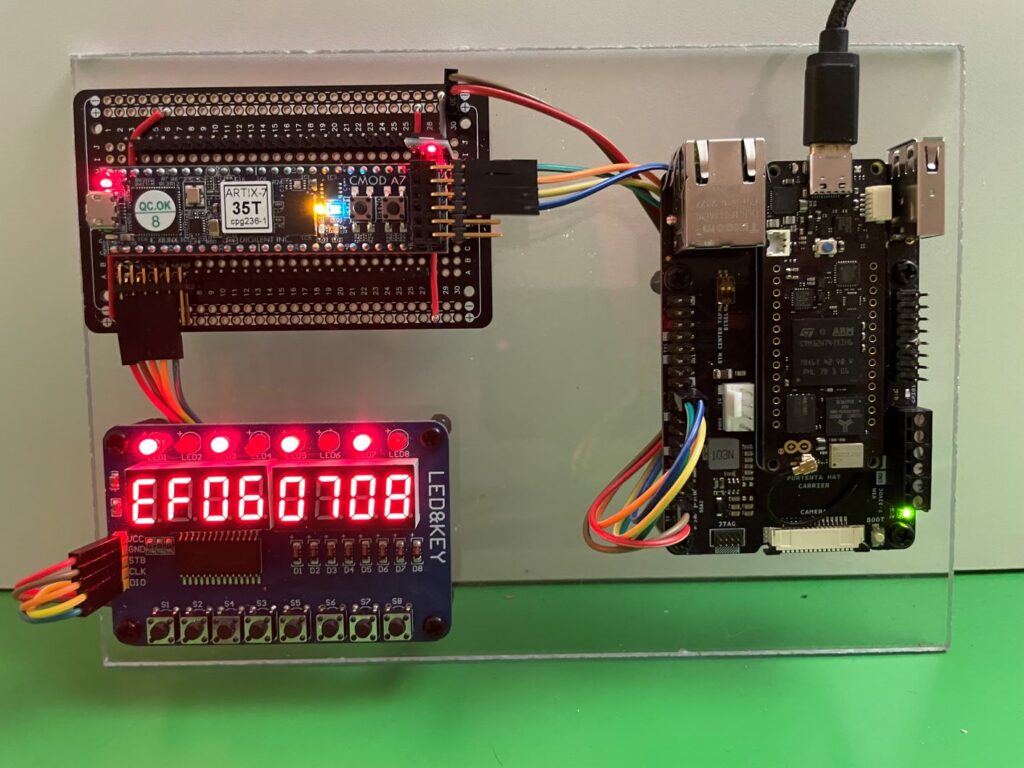
Perplexed about the best way to safely multiplex a seven-digit LED display? Adrian Smith’s write-up offers a wonderful deep dive into electronics design best practices, suggesting shift registers as an alternative to directly connecting display segments and digit commons to microcontroller pins. The example, based on an Arduino UNO Rev3, will spur you to reflect on the interrelations between cost, complexity, and the crucial need to avoid overloads.
Your favorite Arduino module – Portenta H7 or H8, GIGA R1 WiFi, or Nano ESP32 will work great! – can inject a precious dose of flexibility into a field-programmable gate array (FPGA) to complete extreme tasks. Find out more about the general architecture and software drivers that can help you appropriately balance components’ performance, speed and costs: Dave Nardella’s Project Hub upload is not so much a step-by-step tutorial, but a springboard for infinite ideas!
Biking is an eco-friendly and healthy way of moving around the city! But traffic can be chaotic and safety should always be the priority: that’s why we love Luis Castillo’s idea to add direction indicators to the back of a bicycle. Activated via buttons installed directly on the handlebars, two LED arrows not only communicate clearly when you are ready to turn left or right, but also increase visibility and, of course, are a great excuse to try 3D printing, laser cutting, wiring, programming, and more!
These three Project Hub entries were selected for a $100, $300, and $500 gift card to spend on the Arduino Store, according to the terms and conditions of the Project Hub Competition we ran in 2023. Thank you all, for your contributions to open-source resources!
“Computational thinking is really about thinking, and sometimes about computing.” – Aman Yadav, Michigan State University
Computational thinking is a vital skill if you want to use a computer to solve problems that matter to you. That’s why we consider computational thinking (CT) carefully when creating learning resources here at the Raspberry Pi Foundation. However, educators are increasingly realising that CT skills don’t just apply to writing computer programs, and that CT is a fundamental approach to problem-solving that can be extended into other subject areas. To discuss how CT can be integrated beyond the computing classroom and help introduce the fundamentals of computing to primary school learners, we invited Dr Aman Yadav from Michigan State University to deliver the penultimate presentation in our seminar series on computing education for primary-aged children.
In his presentation, Aman gave a concise tour of CT practices for teachers, and shared his findings from recent projects around how teachers perceive and integrate CT into their lessons.
Research in context
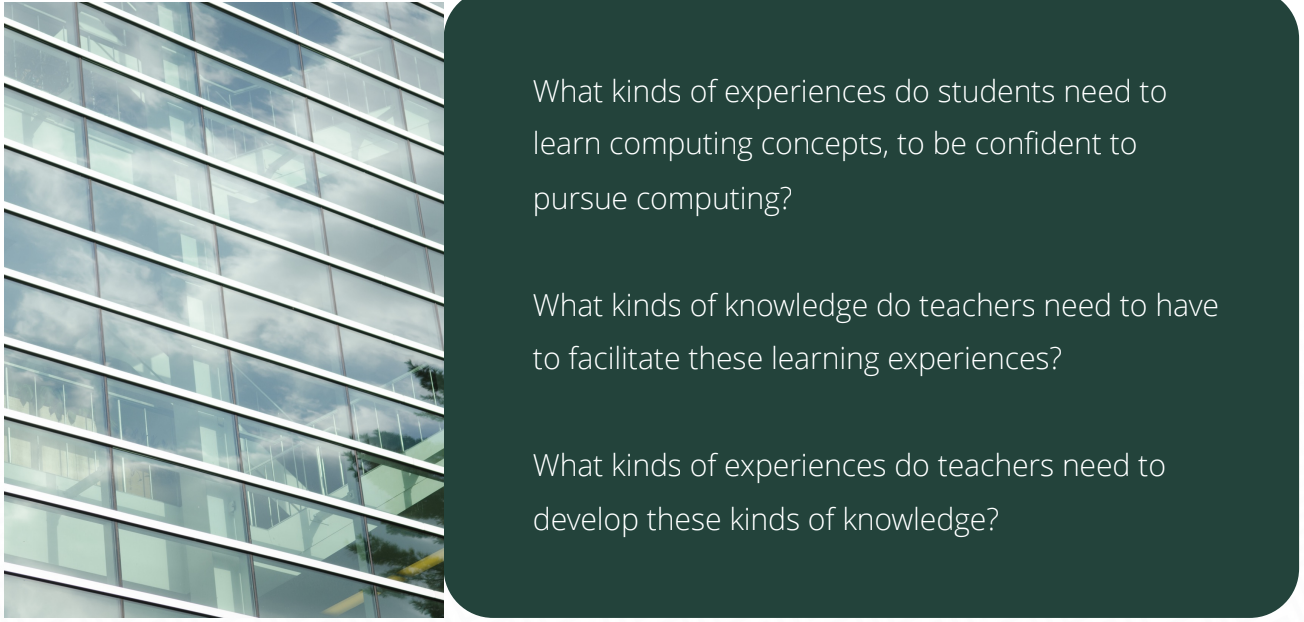
Aman began his talk by placing his team’s work within the wider context of computing education in the US. The computing education landscape Aman described is dominated by the National Science Foundation’s ambitious goal, set in 2008, to train 10,000 computer science teachers. This objective has led to various initiatives designed to support computer science education at the K–12 level. However, despite some progress, only 57% of US high schools offer foundational computer science courses, only 5.8% of students enrol in these courses, and just 31% of the enrolled students are female. As a result, Aman and his team have worked in close partnership with teachers to address questions that explore ways to more meaningfully integrate CT ideas and practices into formal education, such as:
What kinds of experiences do students need to learn computing concepts, to be confident to pursue computing?
What kinds of knowledge do teachers need to have to facilitate these learning experiences?
What kinds of experiences do teachers need to develop these kinds of knowledge?
The CT4EDU project
At the primary education level, the CT4EDU project posed the question “What does computational thinking actually look like in elementary classrooms, especially in the context of maths and science classes?” This project involved collaboration with teachers, curriculum designers, and coaches to help them conceptualise and implement CT in their core instruction.
During professional development workshops using both plugged and unplugged tasks, the researchers supported educators to connect their day-to-day teaching practice to four foundational CT constructs:
Debugging
Abstraction
Decomposition
Patterns
An emerging aspect of the research team’s work has been the important relationship between vocabulary, belonging, and identity-building, with implications for equity. Actively incorporating CT vocabulary in lesson planning and classroom implementation helps students familiarise themselves with CT ideas: “If young people are using the language, they see themselves belonging in computing spaces”.
A main finding from the study is that teachers used CT ideas to explicitly engage students in metacognitive thinking processes, and to help them be aware of their thinking as they solve problems. Rather than teachers using CT solely to introduce their students to computing, they used CT as a way to support their students in whatever they were learning. This constituted a fundamental shift in the research team’s thinking and future work, which is detailed further in a conceptual article.
The Smithsonian Science for Computational Thinking project
The work conducted for the CT4EDU project guided the approach taken in the Smithsonian Science for Computational Thinking project. This project entailed the development of a curriculum for grades 3 and 5 that integrates CT into science lessons.
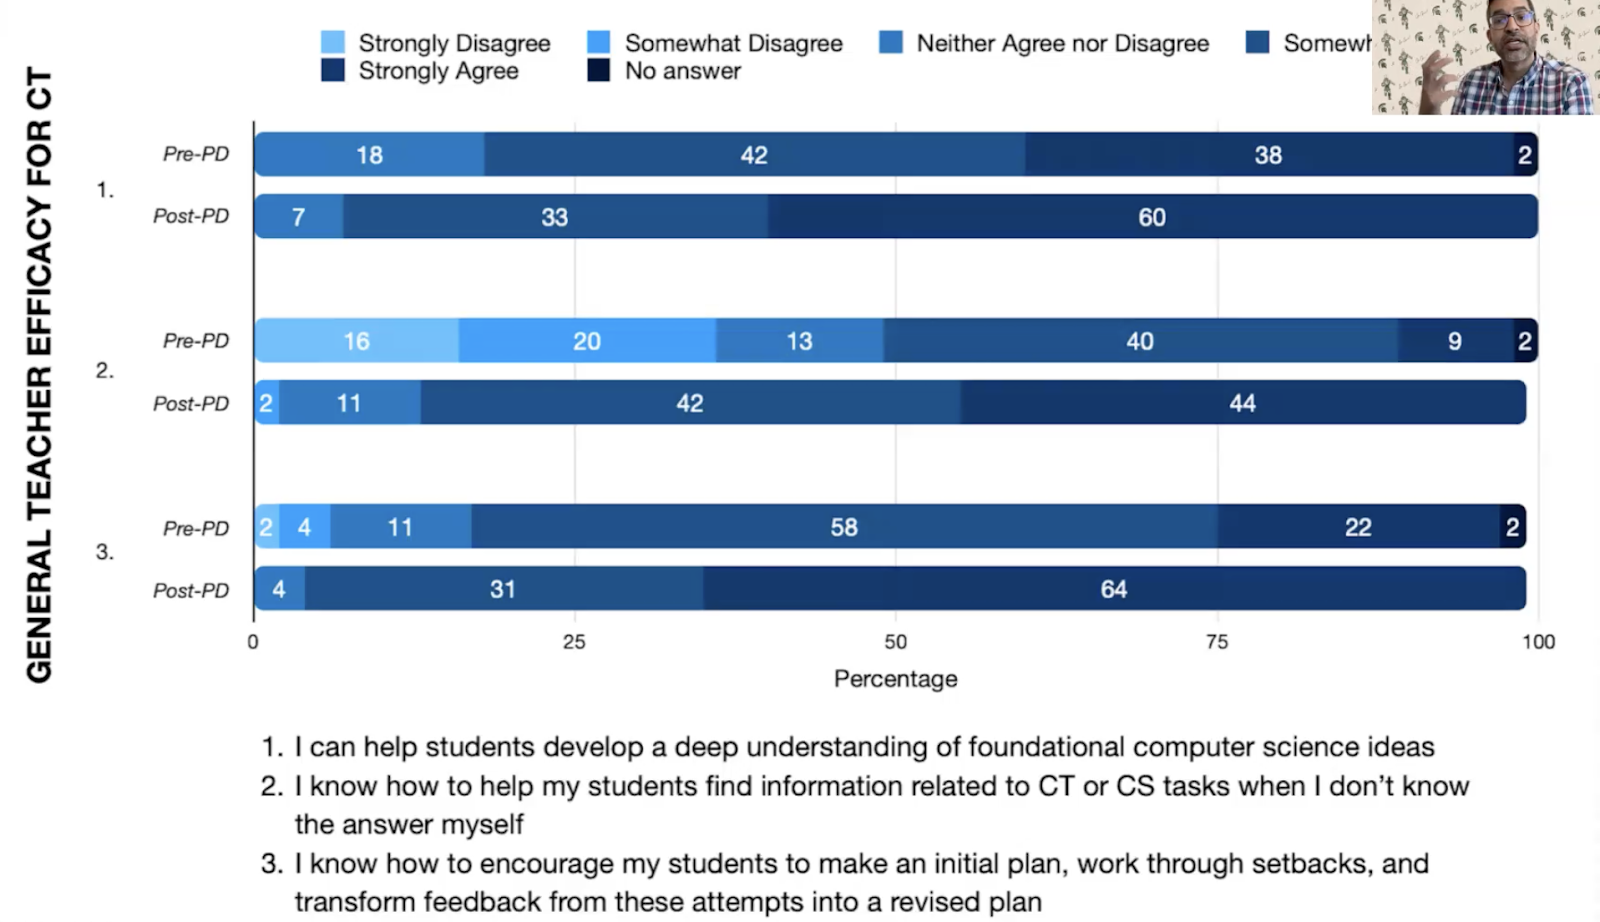
Part of the project included surveying teachers about the value they place on CT, both before and after participating in professional development workshops focused on CT. The researchers found that even before the workshops, teachers make connections between CT and the rest of the curriculum. After the workshops, an overwhelming majority agreed that CT has value (see image below). From this survey, it seems that CT ties things together for teachers in ways not possible or not achieved with other methods they’ve tried previously.
Despite teachers valuing the CT approach, asking them to integrate coding into their practices from the start remains a big ask (see image below). Many teachers lack knowledge or experience of coding, and they may not be curriculum designers, which means that we need to develop resources that allow teachers to integrate CT and coding in natural ways. Aman proposes that this requires a longitudinal approach, working with teachers over several years, using plugged and unplugged activities, and working closely with schools’ STEAM or specialist technology teachers where applicable to facilitate more computationally rich learning experiences in classrooms.
Integrated computational thinking
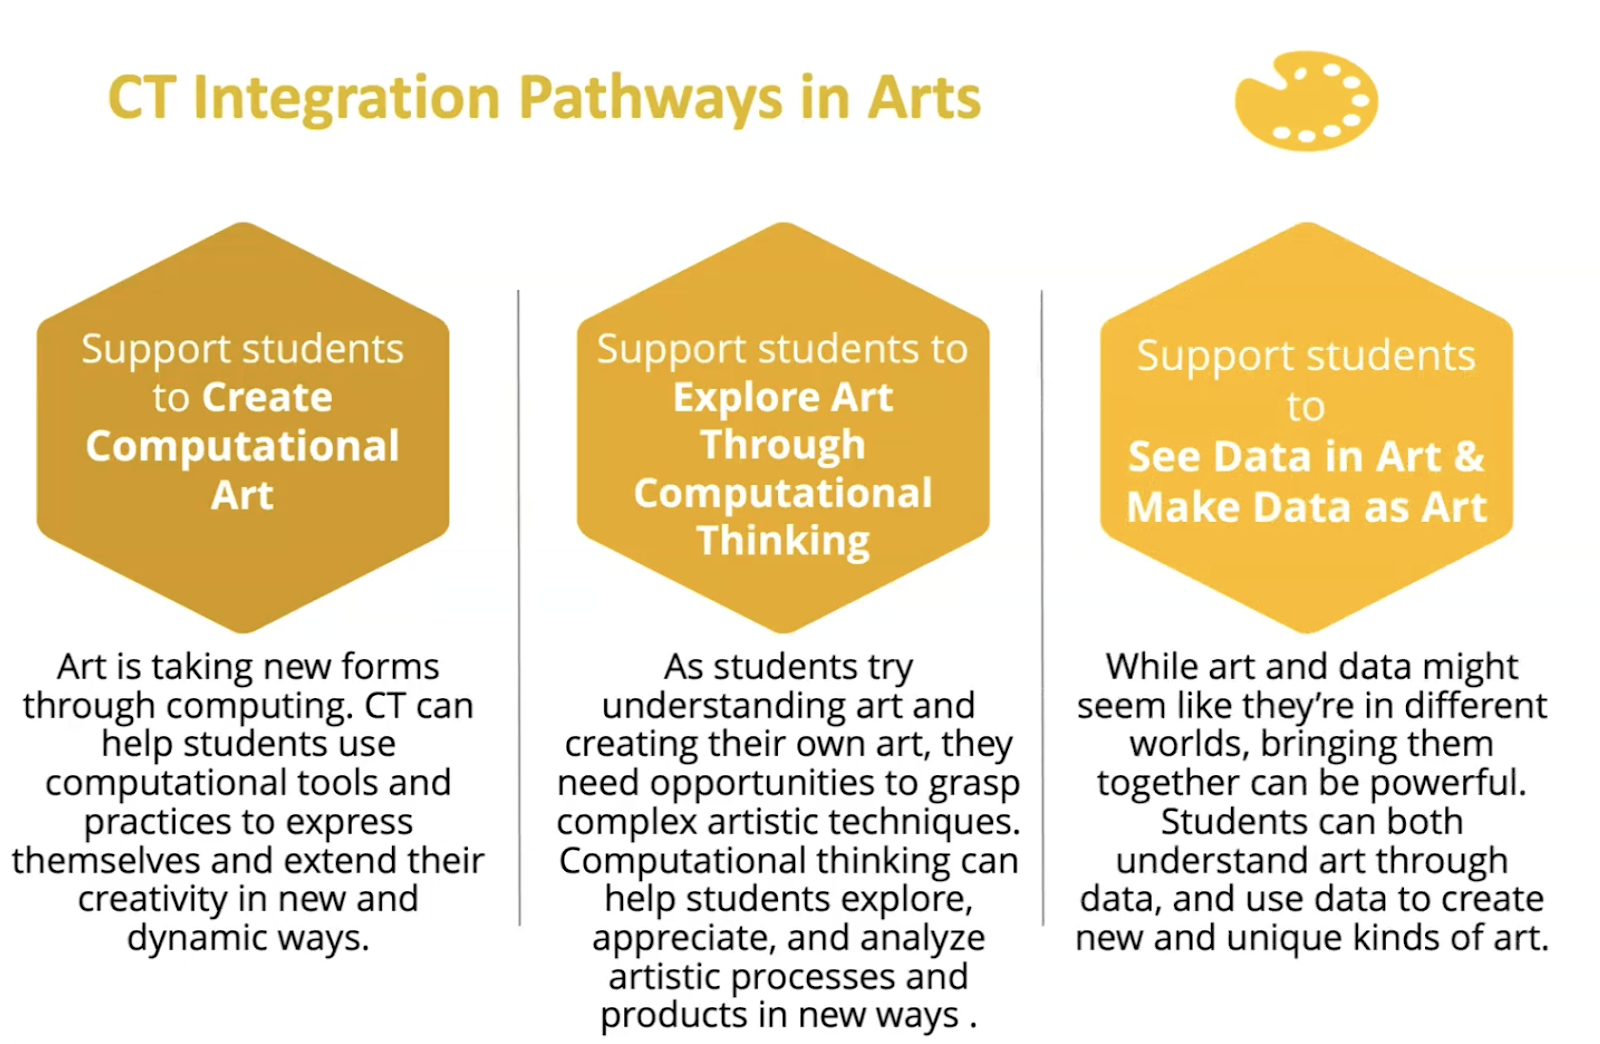
Aman’s team is also engaged in a research project to integrate CT at middle school level for students aged 11 to 14. This project focuses on the question “What does CT look like in the context of social studies, English language, and art classrooms?”
For this project, the team conducted three Delphi studies, and consequently created learning pathways for each subject, which teachers can use to bring CT into their classrooms. The pathways specify practices and sub-practices to engage students with CT, and are available on the project website. The image below exemplifies the CT integration pathways developed for the arts subject, where the relationship between art and data is explored from both directions: by using CT and data to understand and create art, and using art and artistic principles to represent and communicate data.
Computational thinking in the primary classroom
Aman’s work highlights the broad value of CT in education. However, to meaningfully integrate CT into the classroom, Aman suggests that we have to take a longitudinal view of the time and methods required to build teachers’ understanding and confidence with the fundamentals of CT, in a way that is aligned with their values and objectives. Aman argues that CT is really about thinking, and sometimes about computing, to support disciplinary learning in primary classrooms. Therefore, rather than focusing on integrating coding into the classroom, he proposes that we should instead talk about using CT practices as the building blocks that provide the foundation for incorporating computationally rich experiences in the classroom.
Our 2024 seminar series is on the theme of teaching programming, with or without AI. In this series, we explore the latest research on how teachers can best support school-age learners to develop their programming skills.
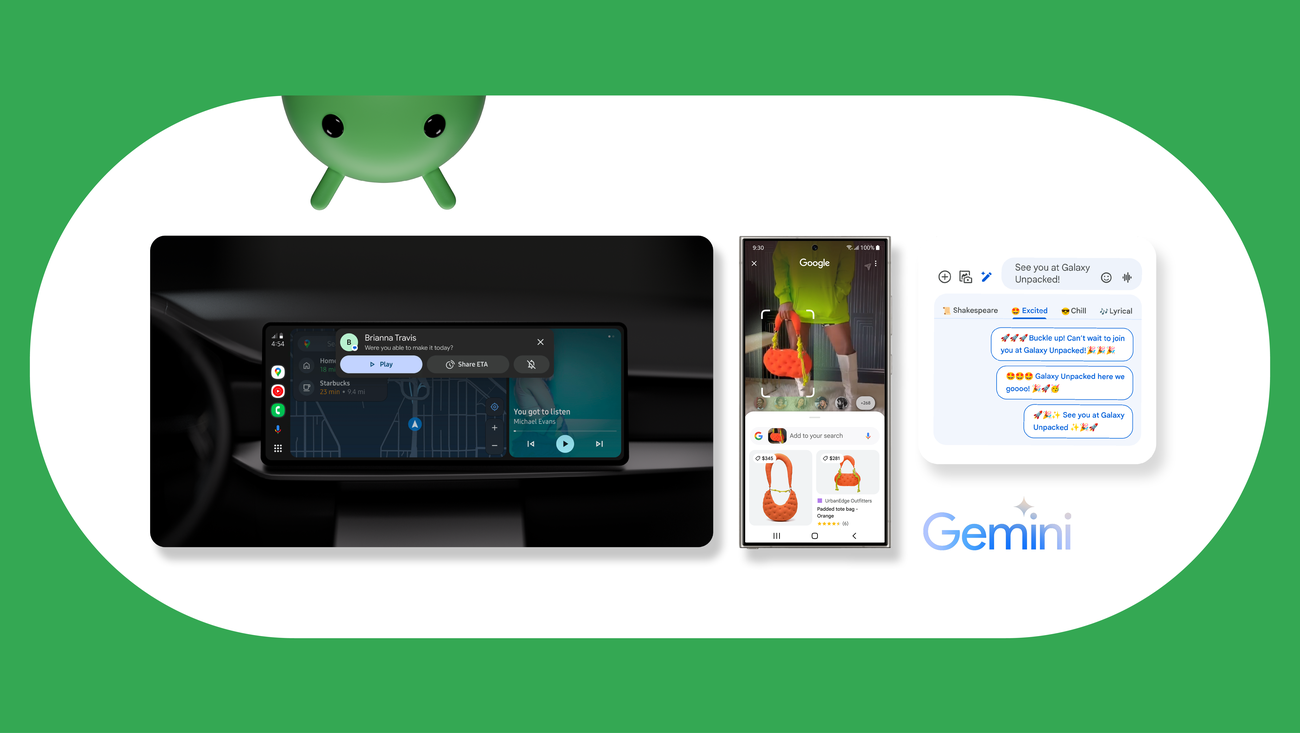
With a new partnership between Google Cloud and Samsung, Galaxy S24 users will be able to access our most capable AI model, Gemini, through apps and services built by Samsung.
With Gemini Pro, our best model for scaling across a wide range of tasks, you can interact with familiar Samsung apps in more helpful ways than ever before. On the new Galaxy S24 series, Samsung’s Notes, Voice Recorder and Keyboard apps will use Gemini Pro to deliver better summarization features. For example, you can record a lecture using Voice Recorder and quickly get a summary of the most important parts of the lesson. And with Imagen 2, Google’s advanced text-to-image diffusion technology, you will be able to access helpful photo editing capabilities using Generative Edit within the Galaxy S24 Gallery app.
Galaxy S24 series will also come built-in with Gemini Nano, the most efficient model for on-device tasks, to enable a new feature in Google Messages and ensure your data doesn’t leave your smartphone. Additionally, Samsung will be one of the first partners to test Gemini Ultra, our largest model for highly complex tasks, before it is available broadly to developers and enterprise customers later this year.
We look forward to working with Samsung to bring Gemini into even more product experiences for Galaxy users around the world. Learn more about Google Cloud and Samsung’s partnership here.
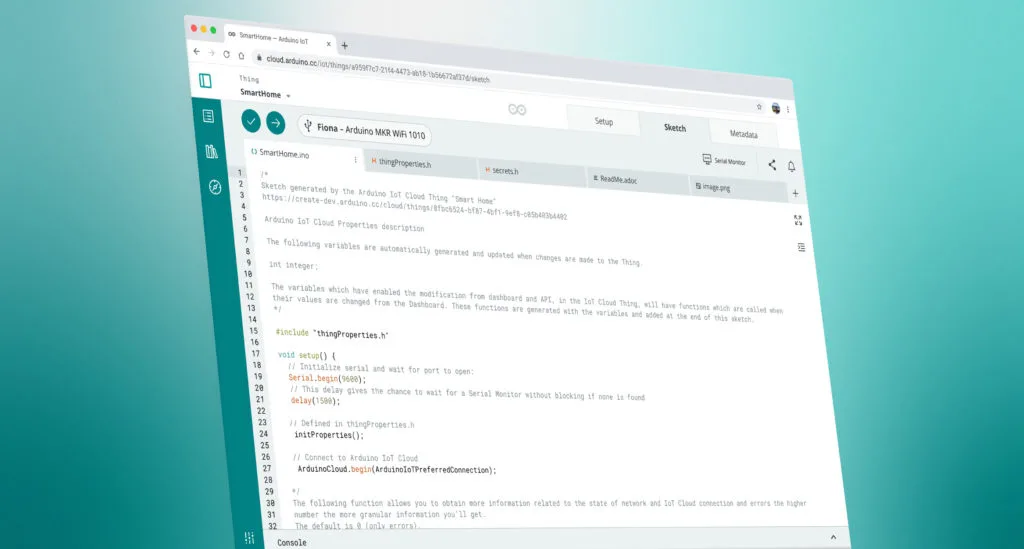
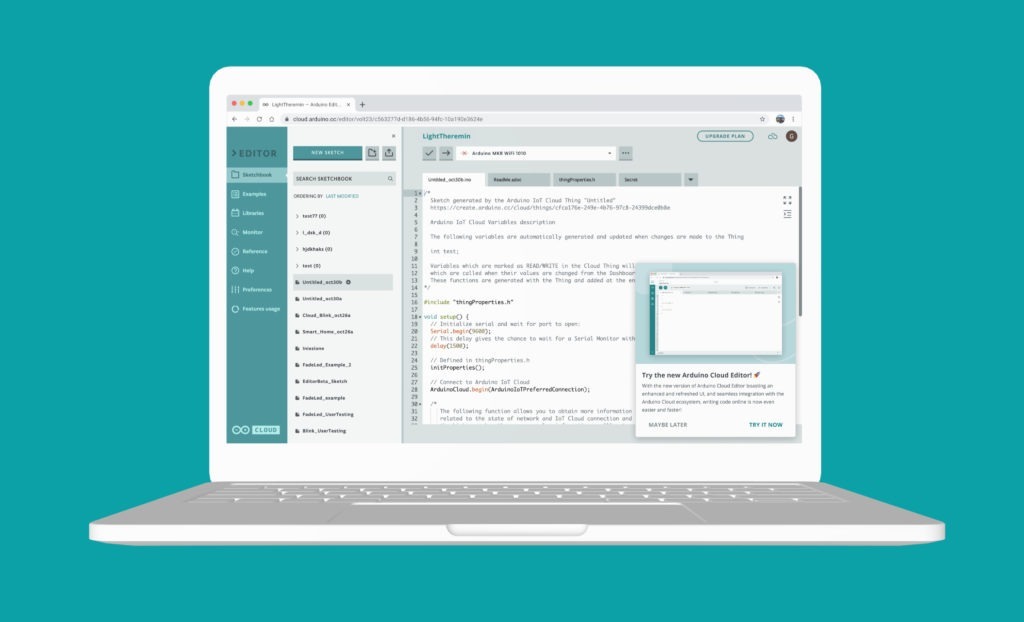
Welcome to the next chapter in our ‘Better, with You’ journey! In recent blog posts, we’ve explored the refreshed look of Arduino Cloud and introduced the latest features of the renewed Arduino IoT Remote app. Today, we’re thrilled to unveil another game-changer, the new Arduino Cloud Editor, which brings the classic Arduino IDE experience to your browser.
The new Cloud Editor
Imagine that you can start your project without having to deal with any annoying setups or maintenance headaches. Imagine that you’re free to work from wherever you want. Well, that’s the vibe of our new Cloud Editor. We’ve made the whole development experience way smoother, so you can forget about the boring techy stuff and just focus on bringing your ideas to life. Let’s dive in!
A unified and more powerful editor
Traditionally, Arduino Cloud had two separate editors: an embedded simple one and the full editor. Users have long awaited a unified editor that gets the best of each one. The new Cloud Editor achieves just that, completely revamping its implementation and setting the stage for exciting new upcoming features.
Tip: To facilitate a smooth transition, the new Cloud Editor will coexist with the current one over the next two months. During this period, you can choose to opt in for the new editor or keep the existing version. It’s your call! Scroll down to the “Try it now” section to find out how to activate the new Cloud Editor on your account.
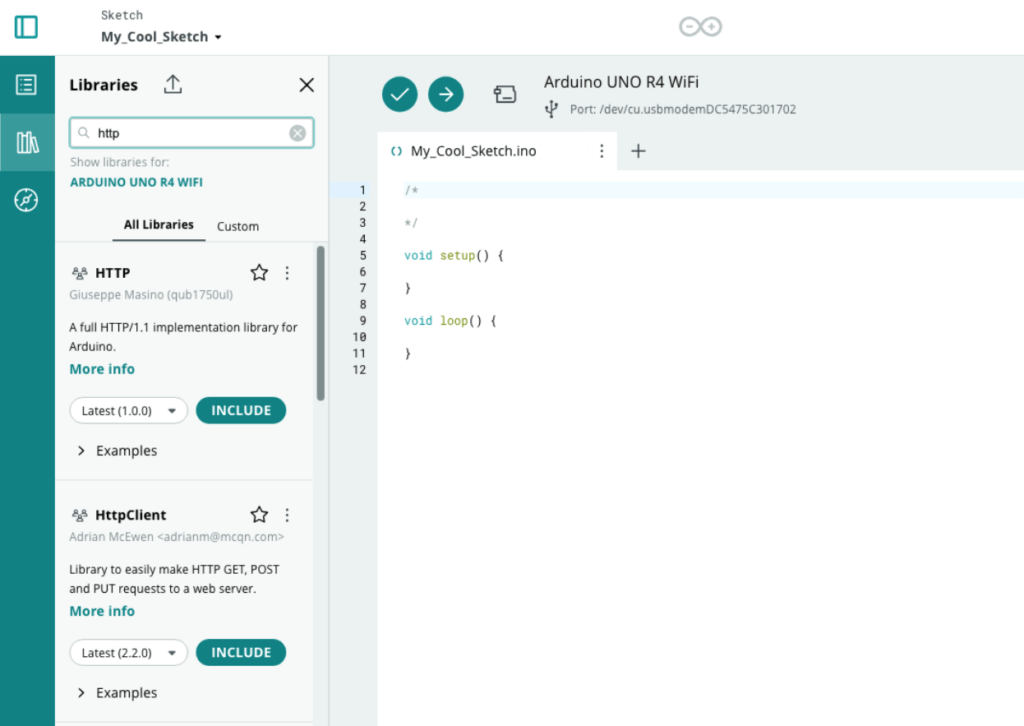
Better library and example management
The new Cloud Editor provides a library manager that helps you explore and organize libraries as well as easily use their examples.
Screenshot of the revamped library manager in the new Arduino Cloud Editor
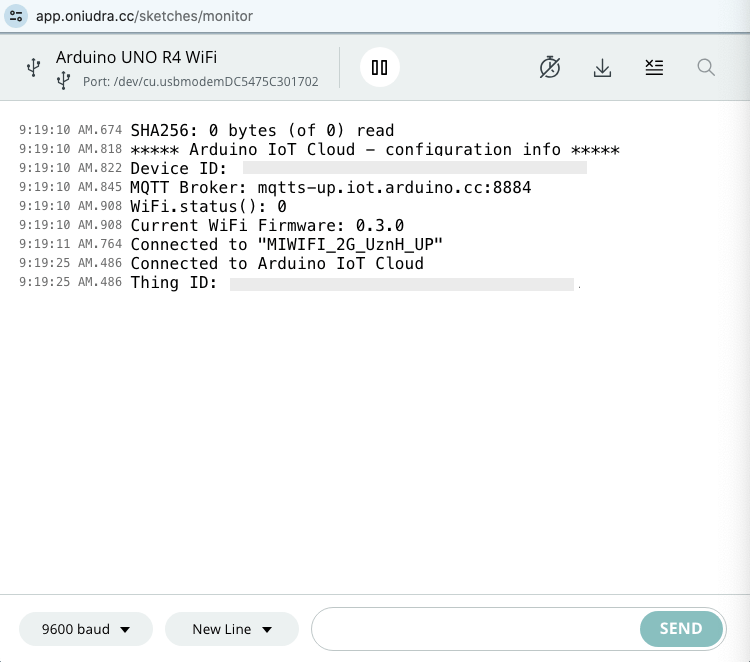
Improved serial monitor
The serial monitor has been improved with the ability to download logs and the inclusion of timestamps per line. This is a long-time requested feature by users to improve debugging.
Screenshot of the improved serial monitor with timestamps in the new Arduino Cloud Editor
Support for any Arduino IDE-compatible device
The Arduino Cloud Editor supports any device compatible with the Arduino IDE, thus extending your Arduino development experience to your browser.
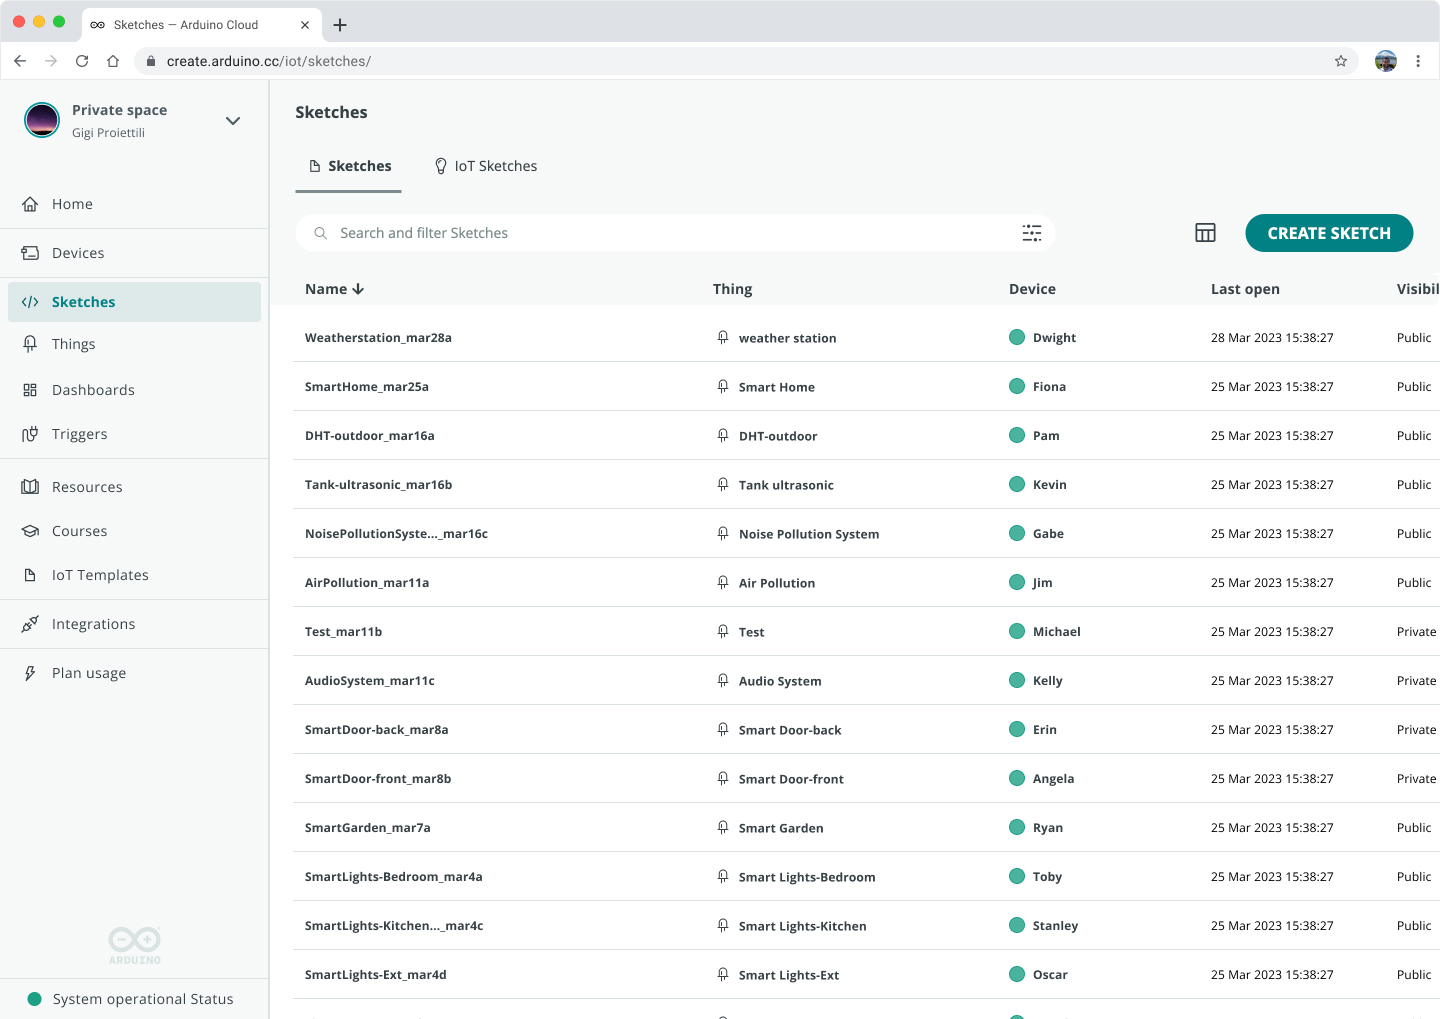
A single sketch repository
Whether you’re programming IoT sketches or traditional ones, the new Arduino Cloud provides a unified place to store and organize your sketches with a single editor for all of them.
Screenshot of the new Arduino Cloud sketchbook with the Sketches and IoT Sketches tabs
Keep your sketches organized
The sketchbook allows you to create folders so that you can keep your sketches organized in a more efficient way.
How to use the Cloud Editor
In the new Arduino Cloud, sketches are organized as “Sketches” and “IoT Sketches”, where “IoT Sketches” are the ones that have been created to connect the application with Arduino Cloud so that it can be monitored and controlled using the dashboards.
Your standalone sketch development starts from the “Sketch” section of your sketchbook. Just click on “CREATE SKETCH” or select the sketch you want to edit.
IoT Sketches are automatically created when you create an Arduino Cloud Thing. Once they are created, you can access the sketch either from the Thing or the “IoT Sketch” section of your sketchbook.
Try it now
Click on “TRY NOW” as shown in the screenshot below to start using the new Cloud Editor. If you need a bit more time before moving to the new version, you can still use the existing version until March 31st by clicking on “MAYBE LATER.”
You can now have the option to try the new Cloud Editor from the notification at the bottom right hand corner of your screen.
Please note that Chromebook support will not be available initially. Stay tuned for updates as we will announce Chromebook support as soon as it is ready.
The new editor is part of the new Arduino Cloud
If you’re just getting into the Arduino Cloud, don’t worry, we’ve got the lowdown for you right here. Arduino Cloud is the next exciting step in the Arduino journey for IoT enthusiasts. Here is a quick intro video that will give you a summary in 2 minutes.
Basically, if you’ve got an IoT project idea, you can easily turn it into a real project using this all-in-one, easy Cloud platform. It helps you create applications that can be monitored and controlled from custom dashboards accessible from your browser or your mobile phone. It not only supports Arduino and ESP-based devices, but also any device programmed using Python, MicroPython, Javascript or Node-RED. Which is why the Arduino community is talking a lot about it at the moment! Forget about dealing with complicated stuff – the Arduino Cloud lets anyone, no matter their skill level, create stuff from wherever.
Want a sneak peek? Here’s Karl giving you a tour of Arduino Cloud with the latest new UI.
Get started with the Arduino Cloud
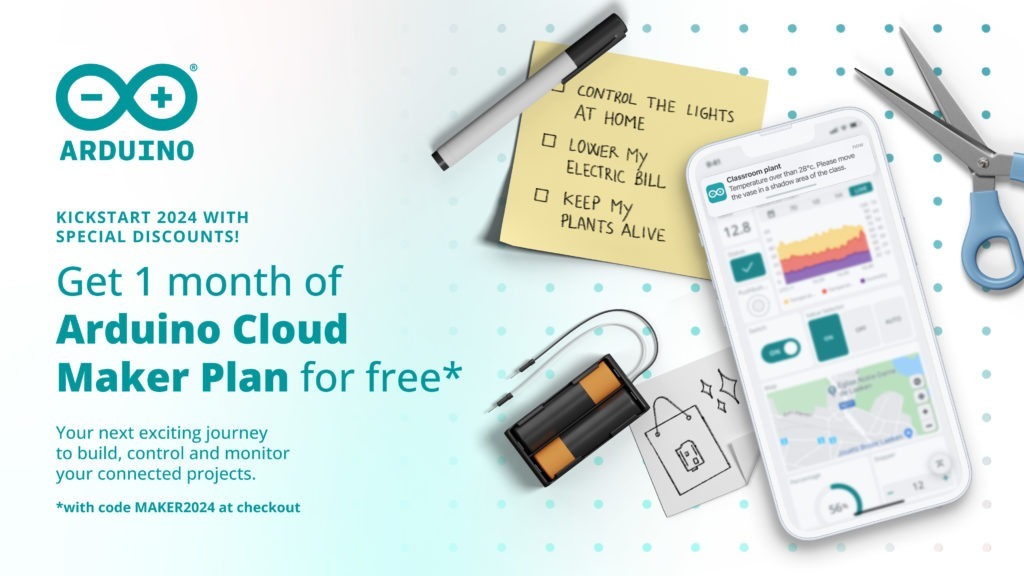
Are you ready to dive in? Learn more about the new Cloud Editor through our detailed documentation. And to sweeten the deal, don’t forget to grab your first month free on the Maker plan with the code ‘MAKER2024 at checkout. But hurry, this offer is only valid until January 31st (You can cancel anytime). Join us in unlocking the full potential of your creative projects!
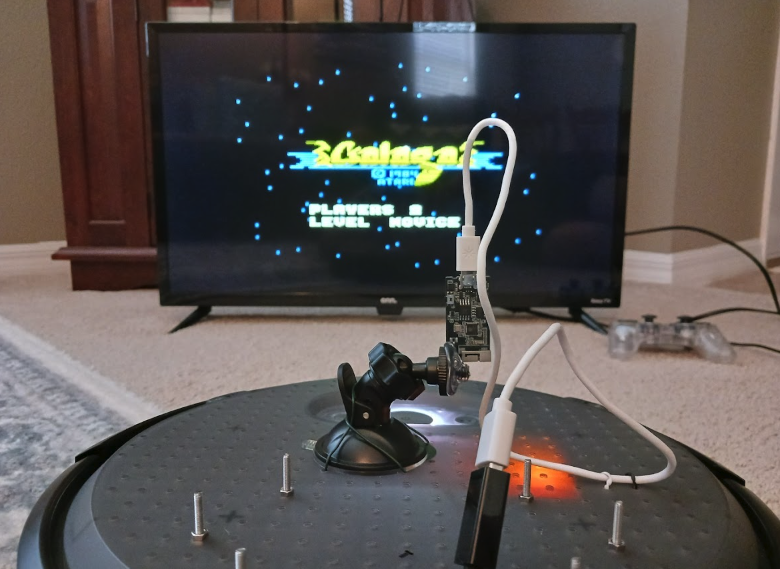
It’s like a Rube Goldberg machine from Looney Tunes or Wallace and Gromit, and we think it also crosses the boundary into modern art too. Nick says he hates to throw away electronics, and likes to repurpose them if he can’t fix them, which has resulted in this interesting fix.
What a fix
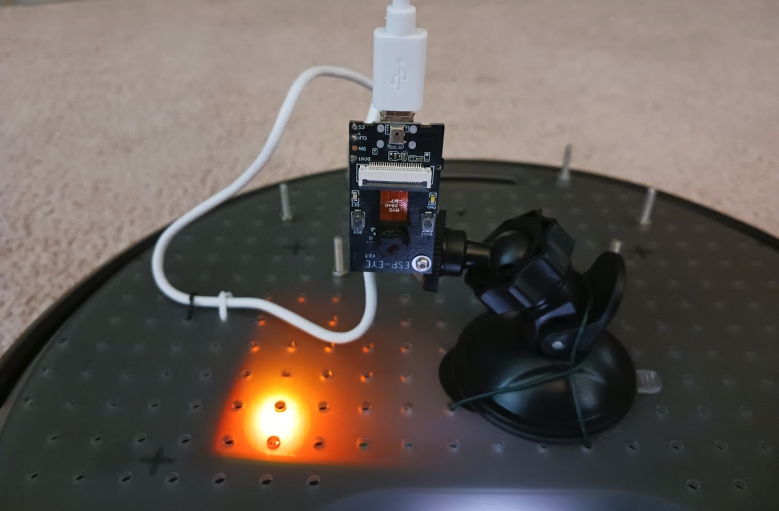
“After gutting the arcade cabinet, I installed a new 320×240 LCD display of the same size as the original,” Nick reveals. “The display, along with the joystick and buttons, are wired to a Raspberry Pi 4 computer that fits inside the casing. Raspberry Pi runs fbcp-ili9341 to use the LCD as its main display. It also runs a custom Python script which handles input from the joystick and buttons.
“The arcade operates in two modes – ‘drive’ and ‘game’, which are toggled by the ‘Start’ button. In drive mode, the script sends HTTP requests to a laptop that issues ROS 2 commands over Wi-Fi that control the movements of the robot. In game mode, HTTP requests are sent to an Arduino Nano 33 IoT attached to a Raspberry Pi 3, running RetroPie and emulating Galaga, that acts as a keyboard emulator. This allows remote key-strokes to be sent to control the action in the game.”
The robot has an Espressif ESP-EYE camera board connected to ESP32 MJPEG streaming server which allows for sub-second video streaming delays – very impressive and also fairly necessary for the experience to feel as organic as possible.
Remote control
With all this tech, was Nick able to fix his Galaga machine? Yes, as he explains.
“It works surprisingly well in some respects. The game is clearly visible on the display screen, and the lag is only about 200 milliseconds, which is acceptable for most retro games — nothing happens much faster than that in games of that era,” Nick says. “As for the robot, the controls are smooth and it is easy to get around without bumping into obstacles.”
We look forward to the explosion of arcade cabinet repair kits with streaming robot cameras at their core.
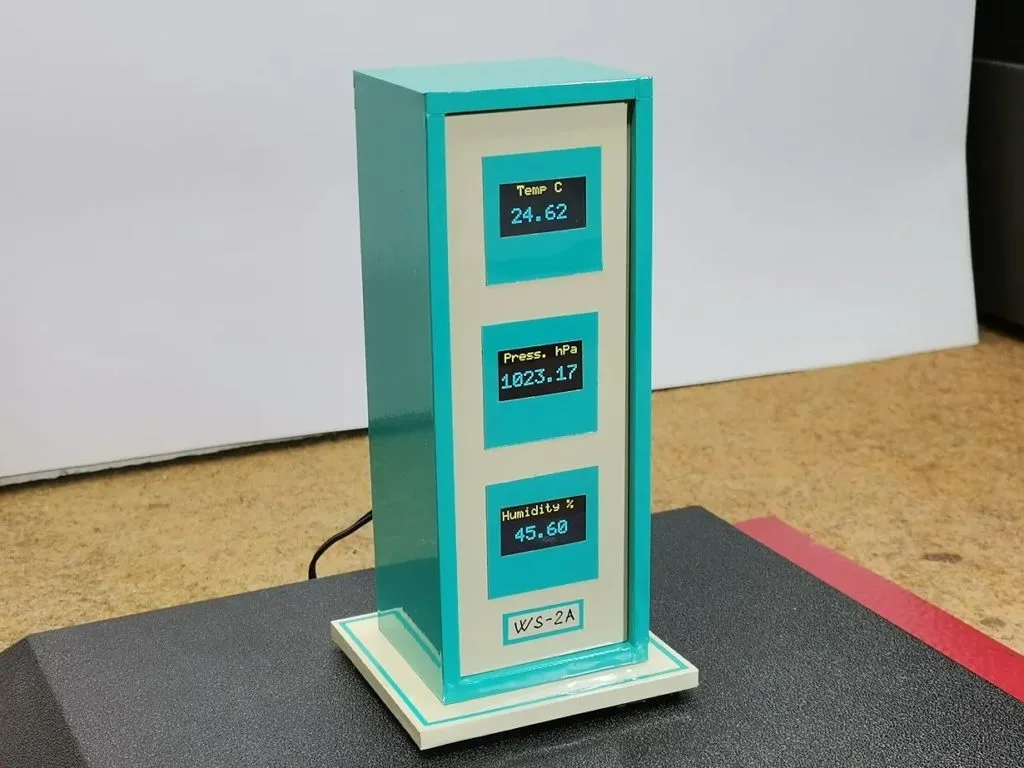
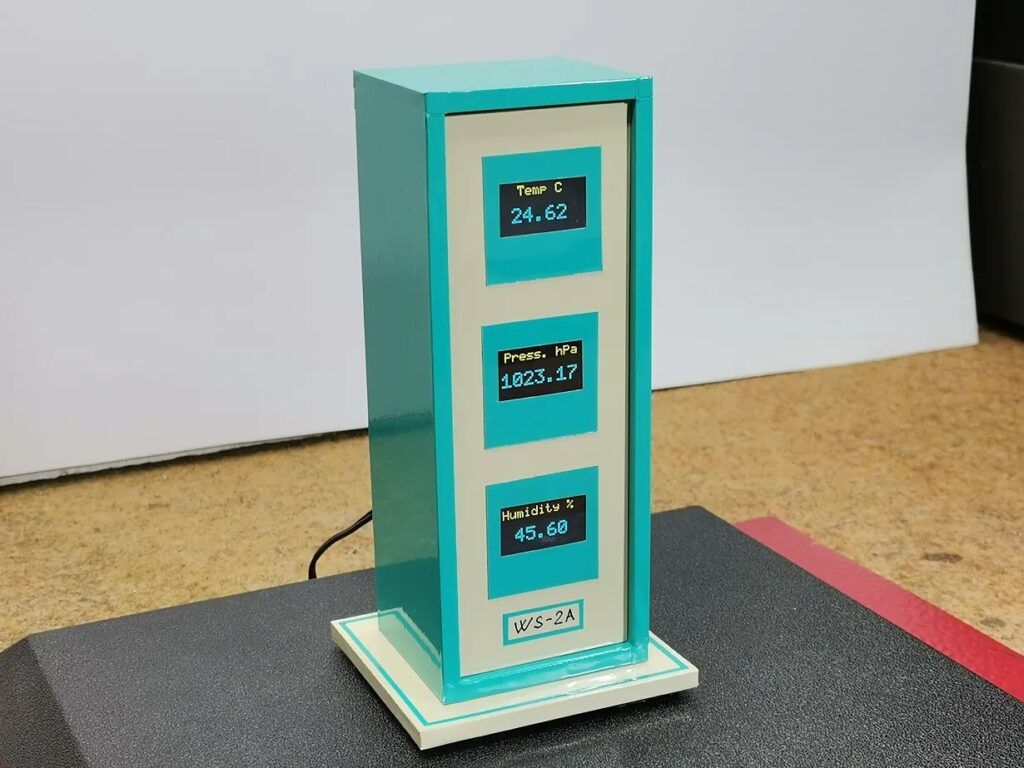
Weather stations are very popular projects for people new to Arduino. They’re complex enough to help a person learn new skills, but they’re simple enough to be approachable. However, that popularity has led to something of an arms race, with many makers attempting to design the most impressive weather stations on the internet. If you want to go back to the basics to dip your toes into the water, Mirko Pavleski explains how to build a classic weather station that prioritizes the essentials.
Inspired by older devices that displayed information like temperature, barometric pressure, and humidity on analog gauges, Pavleski chose a design with three screens in a vertical stack. Each screen can display whatever data the user can access through a sensor. In this case, his station utilizes the popular BME280 module that monitors the same three parameters as the vintage inspiration: temperature, pressure, and humidity.
This weather station shows each reading on a small two-tone OLED screen. Those screens have yellow pixels on the top and blue pixels on the bottom, which is handy for distinguishing the title from the data without the expense or complexity of a full-color screen.
An Arduino Nano board reads the data from the BME280 sensor and writes to the displays. But those displays and the BME280 all connect through I2C. To interface with all of them through the single pair of SCL/SDA pins, Pavleski included a TCA9548a multiplexer module.
Those components all mount in a minimalist enclosure made from foam board. And while we certainly enjoy complex weather stations, we appreciate the simplicity and approachability of this design.
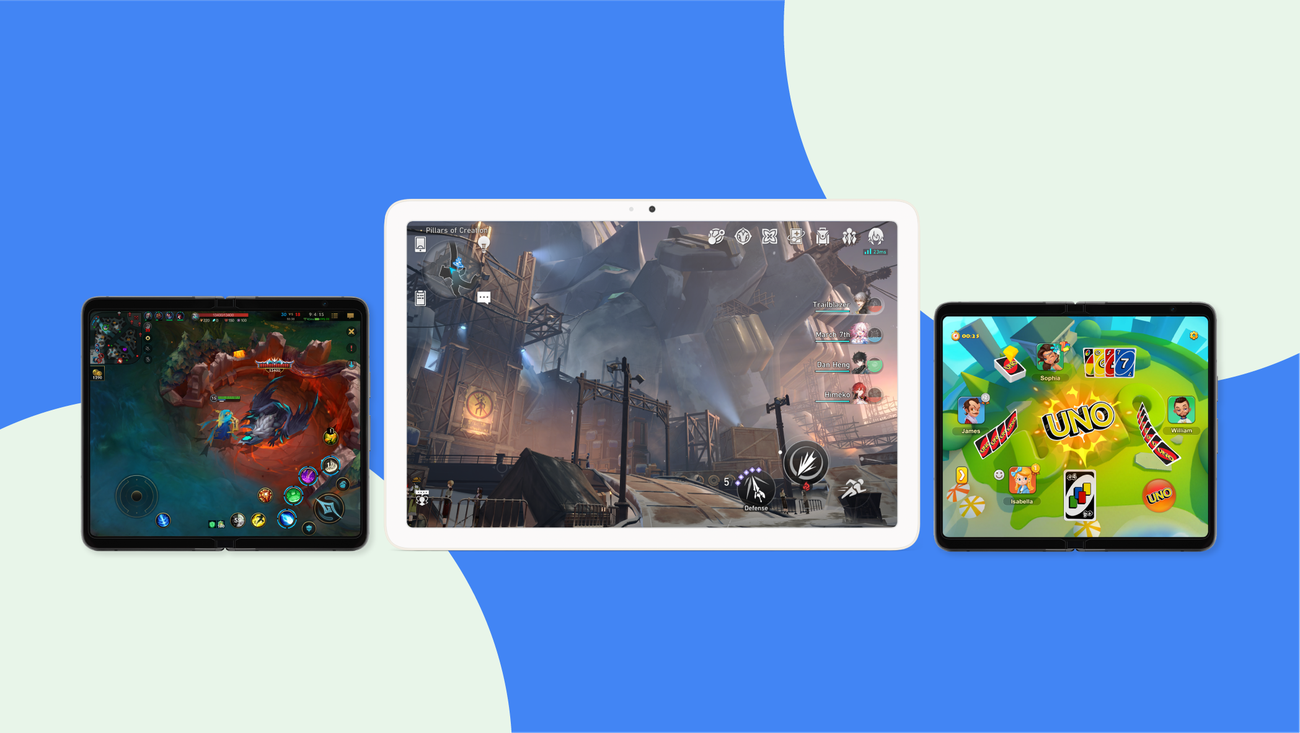
Over the past few years, Android has been redesigning its software experience for larger screens, like tablets and foldable phones. This includes working with developers to make sure apps — whether they’re for productivity, creativity or gaming — look great and make the most of the larger screen space.
Personally, I’m a huge fan of the expansive, cinematic experience that foldable phones and tablets deliver. My favorite mobile games are able to come to life on a whole new stage, where every vibrant detail and sweeping landscape can truly shine. From heart-pounding action games to intricate puzzles, every genre feels amplified on these immersive displays.
To see for yourself, here are five games that are great to play on Android’s larger screens.
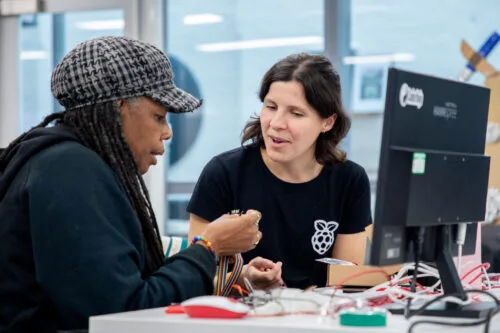
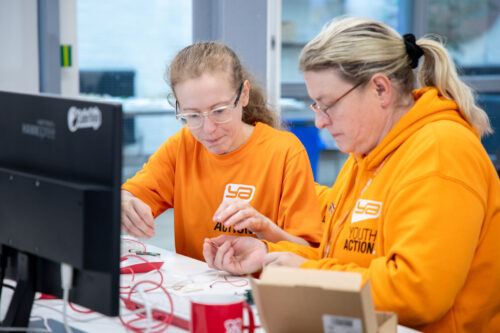
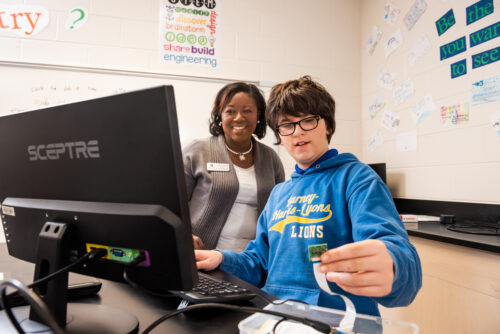
At the heart of our work as a charity is the aim to democratise access to digital skills and technologies. Since 2020, we have partnered with over 100 youth and community organisations in the UK to develop programmes that increase opportunities for young people experiencing educational disadvantage to engage and create with digital technology in underserved communities.
Youth organisations attempting to start a coding club can face a range of practical and logistical challenges, from a lack of space, to funding restrictions, and staff shortages. However, the three issues that we hear about most often are a lack of access to hardware, lack of technical expertise among staff, and low confidence to deliver activities on an ongoing basis.
In 2023, we worked to help youth organisations overcome these barriers by designing and delivering a new hybrid training programme, supported by Amazon Future Engineer. With the programme, we aimed to help youth leaders and educators successfully incorporate coding and digital making activities as part of their provision to young people.
“Really useful, I have never used Scratch so going [through] the project made it clear to understand and how I would facilitate this for the children[.]” – Heather Coulthard, Doncaster Children’s University
Participating organisations
We invited 14 organisations from across the UK to participate in the training, based on:
The range of frontline services they already provide to young people in underresourced areas (everything from employability skills workshops to literacy classes, food banks, and knife crime awareness schemes)
Previous participation in Raspberry Pi Foundation programmes
Their commitment to upskill their staff and volunteers and to run sessions with young people on a regular basis following the training
Attendees included a number of previous Learn at Home partners, including Breadline London, Manchester Youth Zone, and Youth Action. They all told us that the additional support they had received from the Foundation and organisations such as The Bloomfield Trust during the coronavirus pandemic had directly inspired them to participate in the training and begin their own coding clubs.
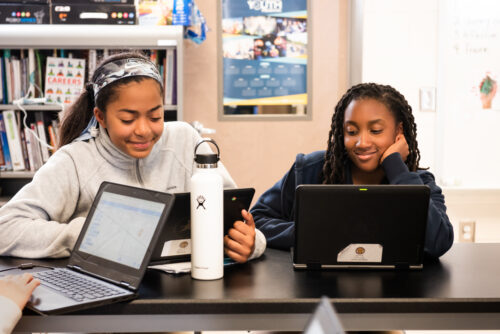
Online sessions to increase skills and confidence
We started with four online training sessions where we introduced the youth leaders to digital making concepts, programming languages, and recommended activities to run with their young people. This included everything from making their own block-based Scratch games, to running Python programs on our Code Editor and trying out physical computing via our new micro:bit project path.
Alongside digital skills and interactive codealongs, the training also focused on how to be an effective CoderDojo mentor, including classroom management best practice, an explanation of the thinking behind our 3…2…1…Make! project paths, and an overview of culturally relevant pedagogy.
This last part explored how youth leaders can adapt and tailor digital making resources designed for a wide, general audience for their specific groups of young people to aid their understanding, boost their learning outcomes, and increase their sense of belonging within a coding club environment — a common blocker for organisations trying to appeal to marginalised youth.
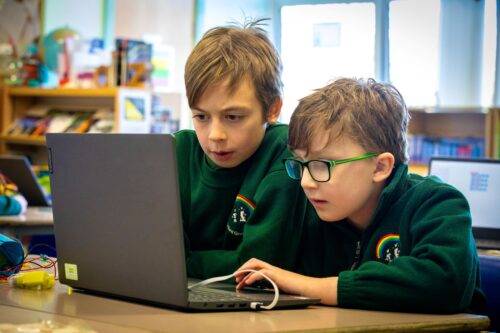
In-person training to excite and inspire
The training culminated in a day-long, in-person session at our head office in Cambridge, so that youth leaders and educators from each organisation could get hands-on experience. They experimented with physical computing components such as the Raspberry Pi Pico, trained their own artificial intelligence (AI) models using our Experience AI resources, and learned more about how their young people can get involved with Coolest Projects and Astro Pi Mission Zero.
The in-person session also gave everyone the chance to get excited about running digital making activities at their centres: the youth leaders got to ask our team questions, and had the invaluable opportunity to meet each other, share their stories, swap advice, and discuss the challenges they face with their peers.
“Having the in-person immensely improved my skills and knowledge. The instructors were all brilliant and very passionate.” – Awale Elmi, RISE Projects
Continuing support
Finally, thanks to the generous support from Amazon Future Engineer, we were able to equip each participating organisation with Raspberry Pi 400 kits so that the youth leaders can practise and share the skills and knowledge they gained on the course at their centres and the organisations can offer computing activities in-house.
Over the next 12 months, we will continue to work with each of these youth and community organisations, supporting them to establish their coding clubs, and helping to ensure that young people in their communities get a fair and equal opportunity to engage and create with technology, no matter their background or challenges they are facing.
“It was really great. The online courses are excellent and being in-person to get answers to questions really helped. The tinkering was really useful and having people on hand to answer questions [was] massively useful.” – Liam Garnett, Leeds Libraries
For more information about how we can support youth and community organisations in the UK to start their own coding clubs, please send us a message with the subject ‘Partnerships’.
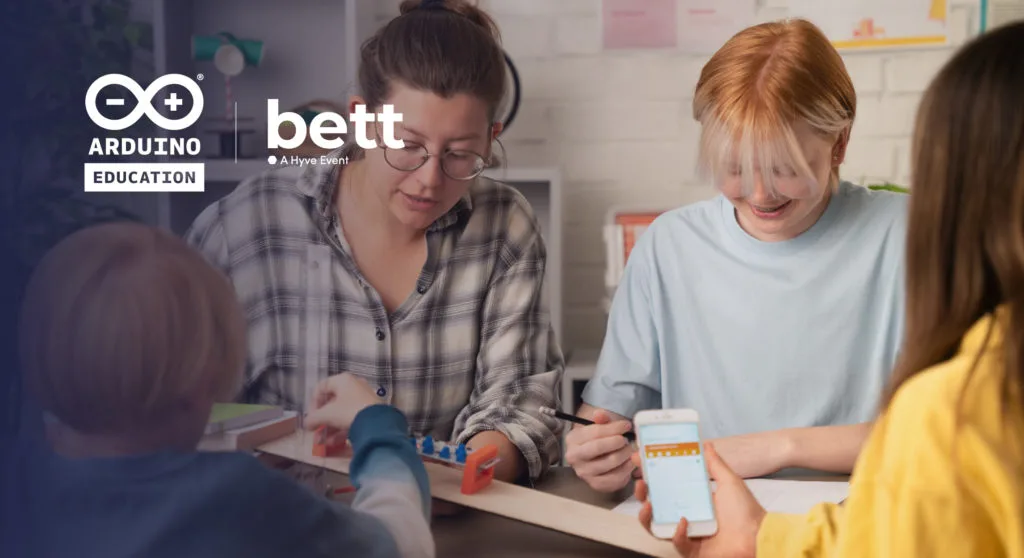
Discover the future of K-12 & HE at Bett 2024 with Arduino Education
Arduino Education will be back at Bett 2024, the global stage for education innovation, from January 24th-26th at ExCel London.
Our booth (which you’ll find in Bett Hall, Stand NJ12) will be a hub of creativity and excitement, where you can immerse yourself in the world of STEAM education and discover how Arduino empowers students to become inventors, innovators, and problem-solvers.
Meet our new educational solutions
At Bett, you’ll be the first to meet the new Arduino robot and have an interactive demo of our new Programmable Logic Controller, the Arduino PLC Starter Kit. Get hands-on with both of these new kits to explore their unique features and see how they can enhance your classroom for both K-12 and higher education.
You’ll also have the opportunity to try out the Arduino Cloud for Schools and all its new features, as well as seeing our collaboration with IED Rome and Sapienza Schools, which offers secondary age teaching tools designed to improve physics learning with the Arduino Science Kit R3.
Connect with our thriving teacher community
Create connections with fellow Arduino teachers and exchange ideas, strategies, and resources that will fuel your STEAM teaching journey.
Come and meet our team
Join our team of passionate educators and STEAM enthusiasts who are eager to share their expertise and guide you through our solutions. You’ll get practical tips and strategies for incorporating Arduino into your classroom, ensuring that every student has the opportunity to experience the transformative power of STEAM education.
Will we be award winners?
Arduino Education has been recognized as a finalist in not one, but THREE categories for the Bett Awards 2024!
COMPANY OF THE YEAR: We’re incredibly proud of the work our team has done to bring us this far.
COLLABORATION WITH A SCHOOL: Our partnership with Colegio San Jose de Las Vegas in Colombia for the Medellin Challenge.
BETT INNOVATION AWARD: Our work in IoT education, specifically with the Arduino Cloud for Schools, the Explore IoT Kit, and the Greenhouse Kit, is being acknowledged as a leading force in educational innovation.
Will we win? We’ll find out at Bett!
We look forward to seeing you at stand NJ12 in the Bett Hall.
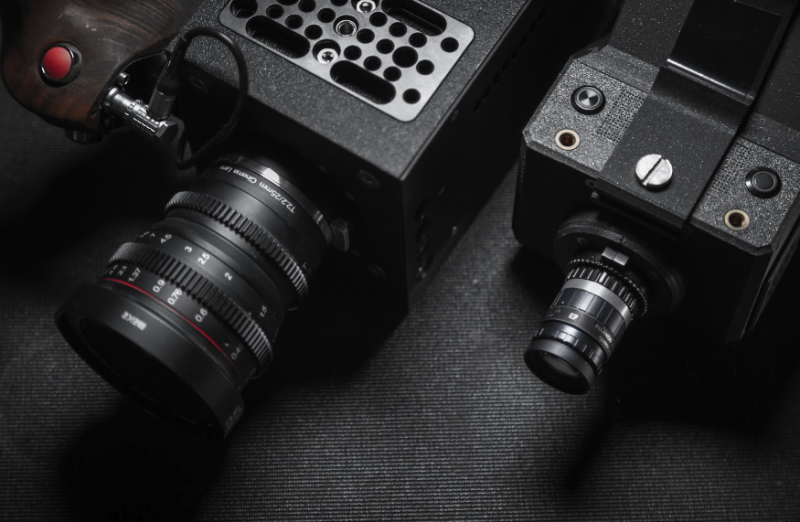
Csaba says that CinePI was always intended to push the possibilities of Raspberry Pi as a video camera with features found in cinema cameras, but in an open-source device so developers could integrate it into their own designs. CinePI V2 can record 2K RAW Cinema DNG video at frame rates up to 50 fps with 12-bit colour depth that far surpasses the 8-bit or 10-bit usual video fare. Csaba showcased its abilities, using CinePI V2 to film more than half of his Timekeeper short film this summer.
Having completed CinePI V2 in early 2023, it wasn’t long before Csaba began work on developing this latest version, with a Compute Module. He has been inspired all along by the cameras made by Blackmagic Design. “They were one of the very first manufacturers to offer RAW video capabilities at affordable prices; democratising tools used for filmmaking.” This means cameras cost a couple of thousand dollars rather than many thousands. If, as Csaba intends, you were to build your own CinePI camera, it would cost far less again, and can largely be built with off-the-shelf components and sensors from the likes of Adafruit. He estimates CinePI V2 costs $250–$300 while CinePI XL in the same or similar configuration would be closer to $400–$600. “A steeper cost, but still very affordable in comparison to the types of camera it would aim to compete with on the market.”
Whereas CinePI V2 was a compact form factor handheld camera, the XL model is noticeably larger. That’s because it features a specially developed sensor, OneInchEye, designed by Will Whang. This larger sensor enables greater image quality and higher frame rates than the Raspberry Pi HQ Camera and also necessitated a switch to Compute Module because it required a MIPI CSI-2 link with four data lanes. Csaba decided to embrace the possibilities this offered in terms of additional sensors and design a camera that mimicked the feature set and capabilities of real professional cinema cameras. Advantages included a larger battery, bigger display, more mounting points for accessories, and a larger physical lens mount.
Community spirit
This summer Csaba saw membership of his Discord server grow from 300 to 1000 members, “It’s been amazing to see the ways people have been using CinePI, modifying and customising it for their unique needs. Exactly what I was hoping for when I started the project.” With the launch of Raspberry Pi 5, Csaba expects to see even more interest. “Perhaps in the future, with the efforts of talented individuals from the community or established companies already in this space, we can see the production of larger sensor modules that will work on the Raspberry Pi platform,” he suggested to CineD.
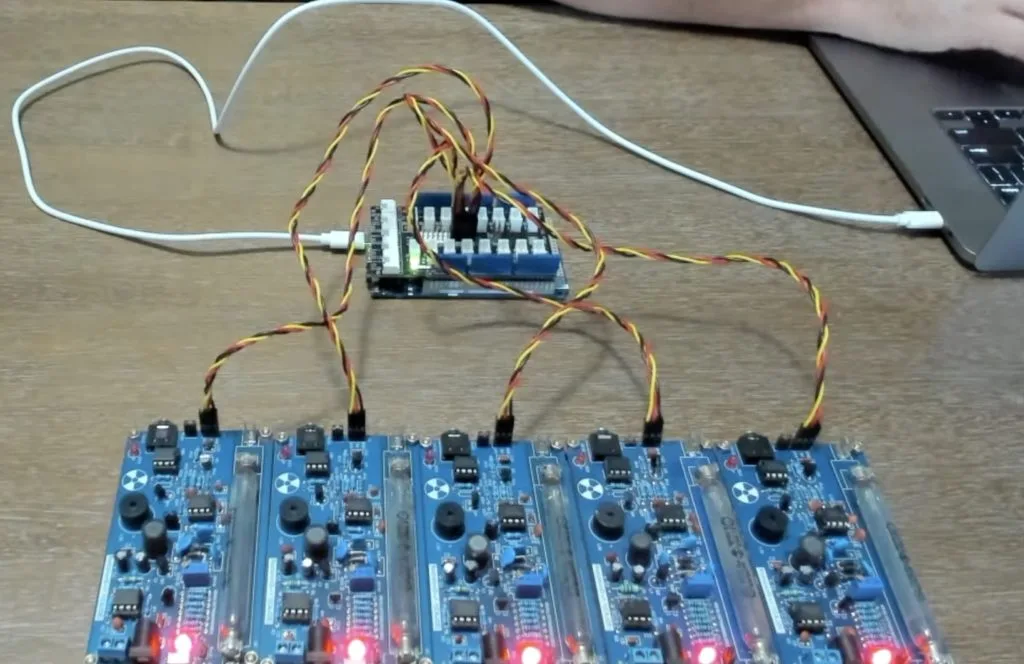
You’ve seen movies and TV shows with Geigers counters: handheld devices that click when they detect radiation — the faster the clicks, the stronger the radiation. Those clicks are actually the result of inert gas briefly made conductive by bursts of energy released by ionizing radiation particles entering the sealed Geiger–Müller tube. YouTuber The Edison Union had the clever idea to use those clicks as triggers for generative music and turned to Arduino to make it happen.
This is part of a larger project called The Cherenkov Effect, which seeks to explore Cold War-era anxieties related to nuclear power and nuclear weapons. The Cherenkov Effect does that through a combination of performance art and generative music. And what better way to generate that music than with radiation?
In this case, that radiation comes from Strontium-90 and Polonium-210. While those are less dangerous to handle than many other radioactive materials, they still aren’t safe and you shouldn’t replicate this project if you don’t know the proper procedures.
The Edison Union uses Ableton Live to produce the music for The Cherenkov Effect, but needed “seeds” for the generative processes that turn into audible notes. Those seeds come from five Geiger counter modules that connect to an Arduino GIGA R1 WiFi board through a Seeed Studio Grove Shield. The Arduino sketch counts radioactive pulses, then passes that data on to a Processing sketch that performs the generative music functions. The latter is where The Edison Union is able to get creative regarding the sound produced. Finally, Processing sends notes to Ableton Live to synthesize.
Now when The Edison Union moves Strontium-90 or Polonium-210 around the array of Geiger counters, the device will generate and play music based on the radiation it receives.
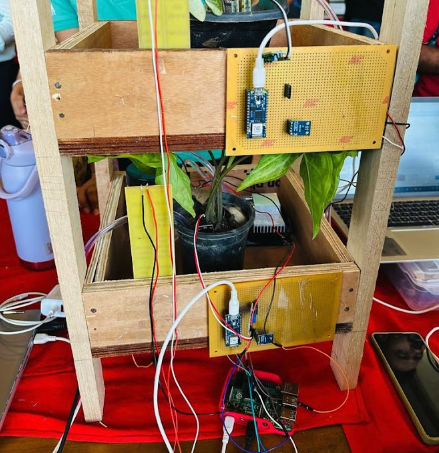
“The inspiration came from the need to address the challenges in traditional farming and leverage technology for efficient crop management,” Tanay explains. “It’s a forward-thinking approach to agriculture and my project was born out of a passion for sustainable agriculture. The aim was to explore innovative solutions, driven by a desire to contribute to a greener future.”
Making sense
Although Tanay has not had first-hand experience of vertical farming, he says he has read lots about it. “It’s a fascinating concept,” he adds. His research meant he had a good idea of what was needed to create his own system. “Raspberry Pi was chosen for its versatility, affordability, and the vast community support it offers,” Tanay says. “It’s a robust choice for managing and controlling various components in a system like this.”
These components include ambient light, soil moisture, and water level depth detection sensors. “The project was planned by first identifying the key requirements, such as real-time monitoring, efficient water supply, secure communication, and a user-friendly interface,” Tanay continues. “Components were selected based on their compatibility and functionality within the system.”
The sensors gather data about the plants. This data is then processed by a peripheral control unit (in this case an Arduino Nano 33 IoT) and sent to the central unit (Raspberry Pi 4) via Bluetooth Low Energy (BLE) communication. “The central unit makes decisions on actions such as activating actuators to adjust environmental parameters,” Tanay says. “This continuous loop ensures optimal conditions for crop growth.”
Friendly farming
A thermoelectric Peltier refrigeration cooling system kit has also been used. “A humidity-to-water conversion, with the help of the Peltier module device working on the principle of condensation, ensures a continuous supply of water,” Tanay explains. It ensures plants are kept alive and are able to thrive but there’s also a user-friendly GUI for remote manual control.
“The software was crafted with modularity and user-friendliness in mind,” says Tanay, who used the IoT platform ThingSpeak. “ThingSpeak is useful for visualising data from sensors in real-time which provides valuable insights to farmers,” he continues. “A user-friendly interface makes it accessible to those without extensive technical knowledge and providing a fault tolerance to the system.”
Tanay hopes the project will show that vertical farming doesn’t have to be expensive. “The project’s cost-effectiveness is a standout feature,” he says. It’s also scalable. “The project is aimed at small and large-scale farmers,” Tanay adds. “The modularity and scalability design principles suggest it’s adaptable to various farm sizes, making it accessible to a broad audience.”
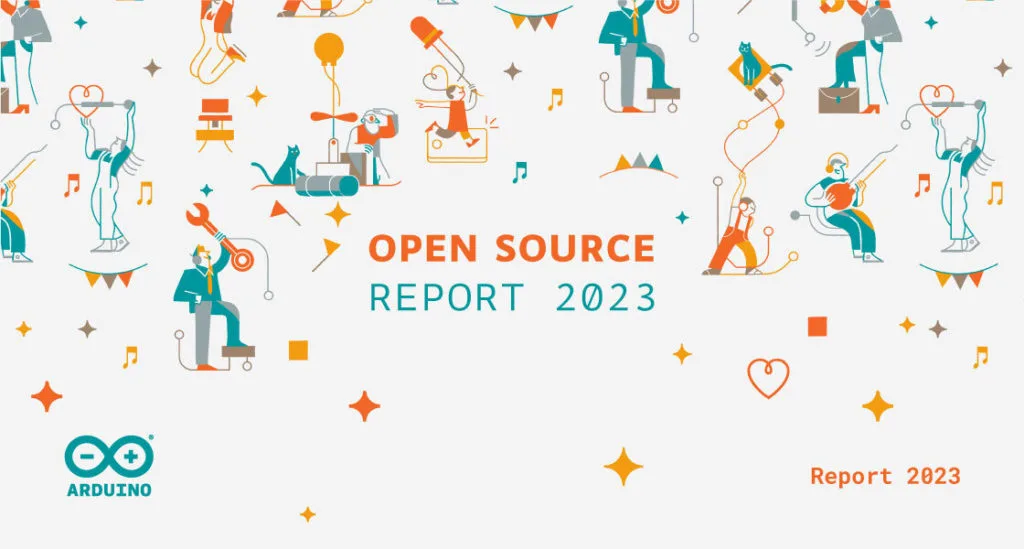
New year, new Open Source Report! Lots has happened in 2023 in terms of open-source development, and we’re excited to share our yearly recap of the various contributions from the Arduino team and the community. Together, we have released new, important open-source projects – both hardware and software – as well as published and maintained a staggering number of libraries, growing our shared resources at a record-breaking pace.
Apparently, we have a history of surpassing our own expectations – and 2023 was no exception. We joined the Zephyr® Project, released five new open-source hardware products, five new versions of the Arduino IDE 2.x, 13 new versions of our command line tools, 12 new official libraries, and 13 versions of the official board packages. We also worked to significantly support MicroPython – releasing a new installer tool and creating a package index.
The Arduino community has clearly shown its love for open source too. During 2023, 1,068 new libraries were added (+20% in one year!) and 101 new versions of community board packages were released. On the content side, 205 new open-source tutorials were published on our new Project Hub.
The 2023 Report also includes a ranking of the most active library authors and maintainers, who provide an incredible service to the whole community with their hard work in the name of open source.
Finally, the achievements we are proud to recap in the Arduino Open Source Report would not be possible without you. To all the people who buy original Arduino products, subscribe to Arduino Cloud, or make donations: THANK YOU for supporting us and our efforts in open-source development.
In the rapidly evolving digital landscape, students are increasingly interacting with AI-powered applications when listening to music, writing assignments, and shopping online. As educators, it’s our responsibility to equip them with the skills to critically evaluate these technologies.
A key aspect of this is understanding ‘explainability’ in AI and machine learning (ML) systems. The explainability of a model is how easy it is to ‘explain’ how a particular output was generated. Imagine having a job application rejected by an AI model, or facial recognition technology failing to recognise you — you would want to know why.
Establishing standards for explainability is crucial. Otherwise we risk creating a world where decisions impacting our lives are made by opaque systems we don’t understand. Learning about explainability is key for students to develop digital literacy, enabling them to navigate the digital world with informed awareness and critical thinking.
Why AI explainability is important
AI models can have a significant impact on people’s lives in various ways. For instance, if a model determines a child’s exam results, parents and teachers would want to understand the reasoning behind it.
Artists might want to know if their creative works have been used to train a model and could be at risk of plagiarism. Likewise, coders will want to know if their code is being generated and used by others without their knowledge or consent. If you came across an AI-generated artwork that features a face resembling yours, it’s natural to want to understand how a photo of you was incorporated into the training data.
Explainability is about accountability, transparency, and fairness, which are vital lessons for children as they grow up in an increasingly digital world.
There will also be instances where a model seems to be working for some people but is inaccurate for a certain demographic of users. This happened with Twitter’s (now X’s) face detection model in photos; the model didn’t work as well for people with darker skin tones, who found that it could not detect their faces as effectively as their lighter-skinned friends and family. Explainability allows us not only to understand but also to challenge the outputs of a model if they are found to be unfair.
In essence, explainability is about accountability, transparency, and fairness, which are vital lessons for children as they grow up in an increasingly digital world.
Routes to AI explainability
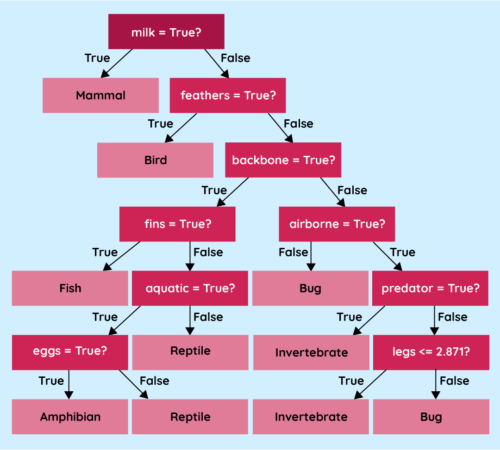
Some models, like decision trees, regression curves, and clustering, have an in-built level of explainability. There is a visual way to represent these models, so we can pretty accurately follow the logic implemented by the model to arrive at a particular output.
By teaching students about AI explainability, we are not only educating them about the workings of these technologies, but also teaching them to expect transparency as they grow to be future consumers or even developers of AI technology.
A decision tree works like a flowchart, and you can follow the conditions used to arrive at a prediction. Regression curves can be shown on a graph to understand why a particular piece of data was treated the way it was, although this wouldn’t give us insight into exactly why the curve was placed at that point. Clustering is a way of collecting similar pieces of data together to create groups (or clusters) with which we can interrogate the model to determine which characteristics were used to create the groupings.
A decision tree that classifies animals based on their characteristics; you can follow these models like a flowchart
However, the more powerful the model, the less explainable it tends to be. Neural networks, for instance, are notoriously hard to understand — even for their developers. The networks used to generate images or text can contain millions of nodes spread across thousands of layers. Trying to work out what any individual node or layer is doing to the data is extremely difficult.
Regardless of the complexity, it is still vital that developers find a way of providing essential information to anyone looking to use their models in an application or to a consumer who might be negatively impacted by the use of their model.
Model cards for AI models
One suggested strategy to add transparency to these models is using model cards. When you buy an item of food in a supermarket, you can look at the packaging and find all sorts of nutritional information, such as the ingredients, macronutrients, allergens they may contain, and recommended serving sizes. This information is there to help inform consumers about the choices they are making.
Model cards attempt to do the same thing for ML models, providing essential information to developers and users of a model so they can make informed choices about whether or not they want to use it.
Model cards include details such as the developer of the model, the training data used, the accuracy across diverse groups of people, and any limitations the developers uncovered in testing.
Model cards should be accessible to as many people as possible.
A real-world example of a model card is Google’s Face Detection model card. This details the model’s purpose, architecture, performance across various demographics, and any known limitations of their model. This information helps developers who might want to use the model to assess whether it is fit for their purpose.
Transparency and accountability in AI
As the world settles into the new reality of having the amazing power of AI models at our disposal for almost any task, we must teach young people about the importance of transparency and responsibility.
As a society, we need to have hard discussions about where and when we are comfortable implementing models and the consequences they might have for different groups of people. By teaching students about explainability, we are not only educating them about the workings of these technologies, but also teaching them to expect transparency as they grow to be future consumers or even developers of AI technology.
Most importantly, model cards should be accessible to as many people as possible — taking this information and presenting it in a clear and understandable way. Model cards are a great way for you to show your students what information is important for people to know about an AI model and why they might want to know it. Model cards can help students understand the importance of transparency and accountability in AI.
The project began with disconnecting the fan wires from the GPIO on Raspberry Pi 5 and unscrewing the standoffs. The Ethernet and USB 3.0 cables inside the RasPad are quite short, so they were a little more stretched than is ideal in order to reach the ports on Raspberry Pi 5. The slightly different layout of Raspberry Pi 5 also meant they had to cross over each other.
Once it was all connected, everything worked as normal in the Chromium browser. And the touchscreen was “nice and responsive” under the control of the super-speedy Raspberry Pi 5. RasPad 3 is a touchscreen device, but there are plenty of ports for you to plug in wireless keyboard and mouse dongles, which Lee did to test out accessing his YouTube channel. We were pleased to see that everything loaded nice and quickly, and of course, our Raspberry Pi 5 handled full-screen, high-resolution video with ease.
We’re officially crowning Lee as the creator of the first-ever Raspberry Pi 5-powered tablet. A special prize goes to the creators of RasPad 3, SunFounder, of course.
Retrofit dreams with Raspberry Pi 5
We cannot wait to see what weird and wonderful objects our newest board ends up inside. Eben is particularly keen to see someone using a 1950s TV as a display for Raspberry Pi 5, since, as he and James keep telling everyone, it can output an ancient TV standard [Editor’s note: please be careful working with old CRT TVs as they can be extremely dangerous]. Of course, an old Pye would be the dream for this, both for our nearly-shared name and for our shared Cambridge heritage. We spent a happy interlude on eBay, and someone dug up this informative and also daunting page about restoring old 405-line TV receivers, before sighing wistfully, closing about a dozen tabs, and going back to what we were all supposed to be doing. So, if you are pals with a retro TV enthusiast who’d relish the challenge, make sure you tip them the wink.
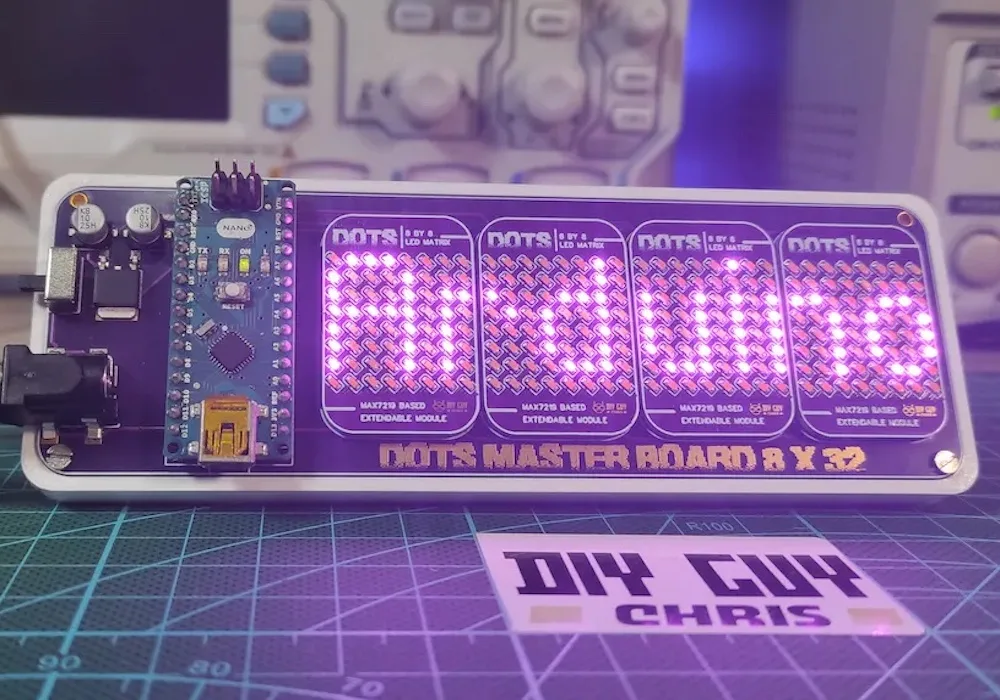
If you only care about showing content as clearly as possible at the lowest cost, then you’ll want to turn to LCD or OLED technology. But a project’s display gives you an opportunity to get creative with the aesthetic, which opens up a whole world of different display types. If you want a retro feel, then you can inspiration in DIY GUY Chris’ gorgeous LED matrix.
This is a dot-matrix LED display with an overall resolution of 32×8. But that description alone doesn’t do the project justice. Chris used tiny 0603 SMD LEDs, which allowed for very high “pixel” density and that results in better clarity than a typical LED matrix display. To enable future expansion, Chris set this up as a host board that accepts four LED boards — each of which contains an 8×8 matrix. A MAX7219 IC drives the LEDs on each of those boards.
The LED boards connect to the host board through nifty mezzanine connectors. The host board contains an Arduino Nano that sends control signals to the MAX7219 chips. The Arduino can supply USB power to the LEDs, but there is also a DC jack for power when USB isn’t connected. Chris’ Arduino sketch lets the user “print” alphanumeric characters to scroll across the four LED matrices.
The best part about this design (other than the great style) is that Chris can scale it up in the future with larger host boards that accept more than four LED boards.
Watch out for The Bot’s cameo on Sphere today — it’s taller than the Statue of Liberty! You might even spot The Bot all around Las Vegas — look for it adorning the billboards or hitching a ride on the monorail. You can even get a closer look at Sphere in our AR experience mentioned above.
We’ve also tucked 10 unique collectable pins around the Android space for you to find and pop on your backpack or wherever you’d like. Each pin represents a bit of Android’s personality and the future of AI, creativity, discovery and more. Collect them all before you leave!
We hope you enjoy the event as much as we’ve enjoyed creating it for you. Let us know what you think on social and use the hashtags #CES2024 and #Android.
Want to learn more about what we announced? Check out our full roundup in this post.
Stay connected, informed and entertained with more apps
Whether you’re looking to check the weather forecast at your destination, or parked waiting for your kids at school pickup, there’s new apps to help you stay informed and entertained in cars with Google built-in.
Today, Chrome browser is starting to roll out to select Polestar and Volvo cars in beta, and will be available in more cars later this year, so you can do a little shopping or access your saved bookmarks to keep you busy while parked.
And if you need to keep the kids entertained (or hey, maybe keep yourself entertained!), you can watch shows from PBS KIDS and Crunchyroll, which are both now available in select cars with Google built-in.
Finally, by popular demand, The Weather Channel app is now available for cars with Google built-in, giving you peace of mind on the road. Now you can stay up-to-date on changing weather conditions with hourly forecasts, follow-me, alerting and “Trip View” radar right from your dashboard.
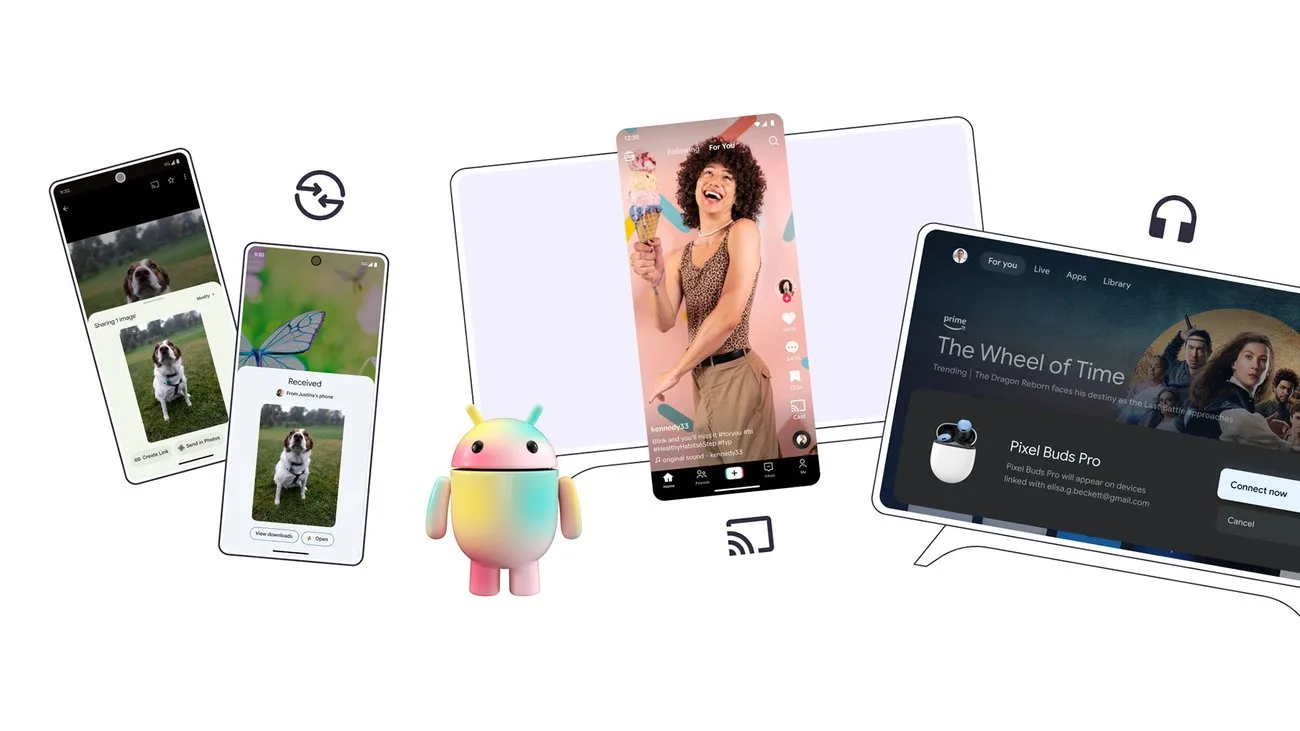
Android is all about giving you the ability to choose the devices that work best for you and making sure they connect seamlessly together, regardless of what brand they are.
Today at CES, we’re announcing updates to help you get more done across your phone, laptop, Bluetooth accessories, TV, smart home and car. Take a look at these updates and how they build on improvements we made to our ecosystem at last year’s CES.
A new way to share files
Sharing pictures, files and text between devices should be simple, fast and convenient. In 2020, we introduced Nearby Share to make it easy to share files across devices. Samsung also has its own capability called Quick Share, which is loved by their users.
Collaborating with Samsung, we’re bringing the best of our sharing solutions together into a singular cross-Android solution under the Quick Share name. We’ve integrated the experiences and created the best default, built-in option for peer-to-peer content sharing across all types of devices in the Android and Chromebook ecosystems. And to make sharing even more seamless between devices, we’re working with leading PC manufacturers like LG to expand Quick Share to Windows PCs as a pre-installed app.
This means with a simple tap of the new Quick Share icon, you can see a list of available devices close by. You remain in control of your privacy, and can choose in your phone’s settings who can discover your device and send files, whether it’s everyone, only your contacts or just your own devices. Quick Share will start rolling out to current Nearby Share enabled devices next month.
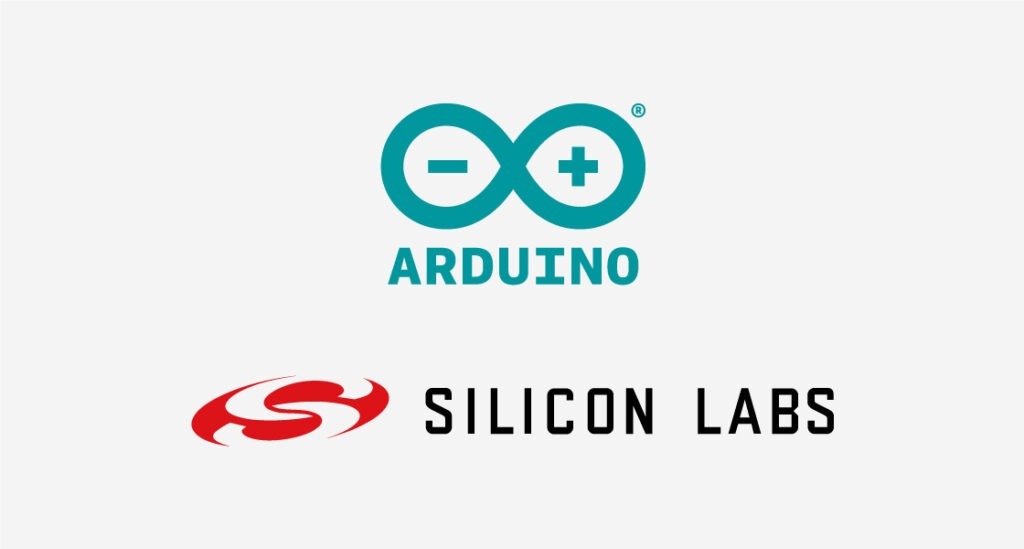
The world of IoT just got more exciting: Arduino and SiLabs unveil plans for Matter protocol integration.
In a groundbreaking development for IoT enthusiasts and professionals alike, Arduino and Silicon Labs (SiLabs) have announced a collaboration that promises to revolutionize access to the Matter protocol. This initiative is set to unfold in two major phases, ushering in a new era of connectivity and innovation.
Phase one: The dawn of a new era in IoT development begins at CES 2024
At CES 2024, Arduino and SiLabs have revealed the first phase of their ambitious project. This phase marks the release of an extremely user-friendly Arduino library tailored for the Matter protocol, alongside the Arduino core for SiLabs microcontrollers. This integration into the Arduino IDE is a significant leap forward, making advanced IoT development more accessible than ever.
“Our partnership with Arduino brings simplicity and ease of use to wireless development for Silicon Labs developers as well as Arduino’s 40M users to take their project from concept to production,” said Rob Shane, VP of Global Mass Markets for Silicon Labs. “By integrating Matter with Arduino’s ecosystem, we’re opening a universe of possibilities for developers.”
This announcement is not just about new tools; it’s a statement of intent to make IoT technology more accessible to a wider range of users, from hobbyists to professionals.
Get started now: Use existing Matter boards
In anticipation of the second phase, the Arduino community can begin experimenting with Matter protocol through existing boards. Our friends at SparkFun have provided an excellent platform for this purpose, allowing users to get a head start in exploring the potential of Matter with Arduino.
“We are thrilled with the continued adoption of Matter to support IoT applications. The Matter implementation in Arduino has been a massive undertaking and it will make Matter even more accessible for engineers, creators, and innovators across the globe. This is another major step forward in interoperability and improving our daily interactions with the devices we have come to reply upon.” – Glenn Samala, CEO at SparkFun
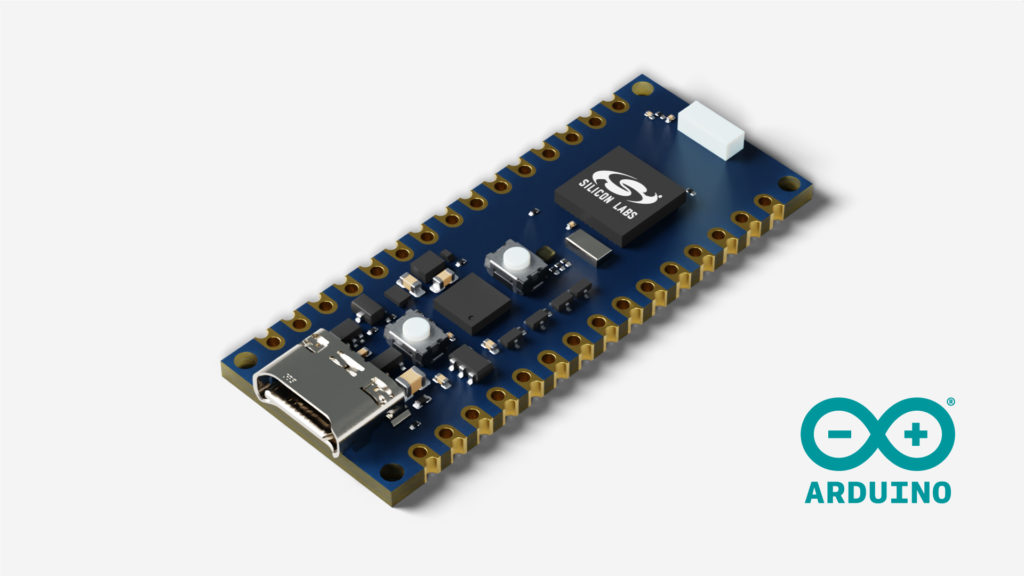
Phase two: The launch of a revolutionary board ads to Arduino Day celebrations
The second phase is set to culminate on Arduino Day, in March 2024, with the release of an innovative addition to the über-popular Nano family, with a board based on the SiLabs MGM240SD22VNA. This board is expected to be a game-changer in the field of IoT, offering unparalleled ease of use and capabilities.
The collaboration between Arduino and SiLabs, leading up to these releases, represents a major stride in making advanced IoT technologies more accessible. The combination of Arduino’s user-friendly interface with the robust capabilities of SiLabs’ technology and the universality of the Matter protocol is a recipe for innovation.
For educators, students, hobbyists, and professionals, this means an unprecedented opportunity to dive into IoT projects with greater ease and more powerful tools. The implications for smart home applications, industrial IoT, and educational projects are immense.
Looking ahead
Here is a sneak peek of the new board being developed – stay tuned for the launch in March 2024!
As we eagerly await these releases, the excitement within the Arduino community is palpable. This collaboration is not just about new products; it’s about empowering a whole generation of creators and innovators, breaking down barriers, and opening up new horizons in the world of IoT.
Stay tuned for more updates as we approach these landmark dates, and get ready to embark on a journey of discovery and innovation with Arduino and SiLabs.
Are you in Las Vegas? Come meet the Arduino team at CES 2024 – Venetian Tower — Suite 29-228.
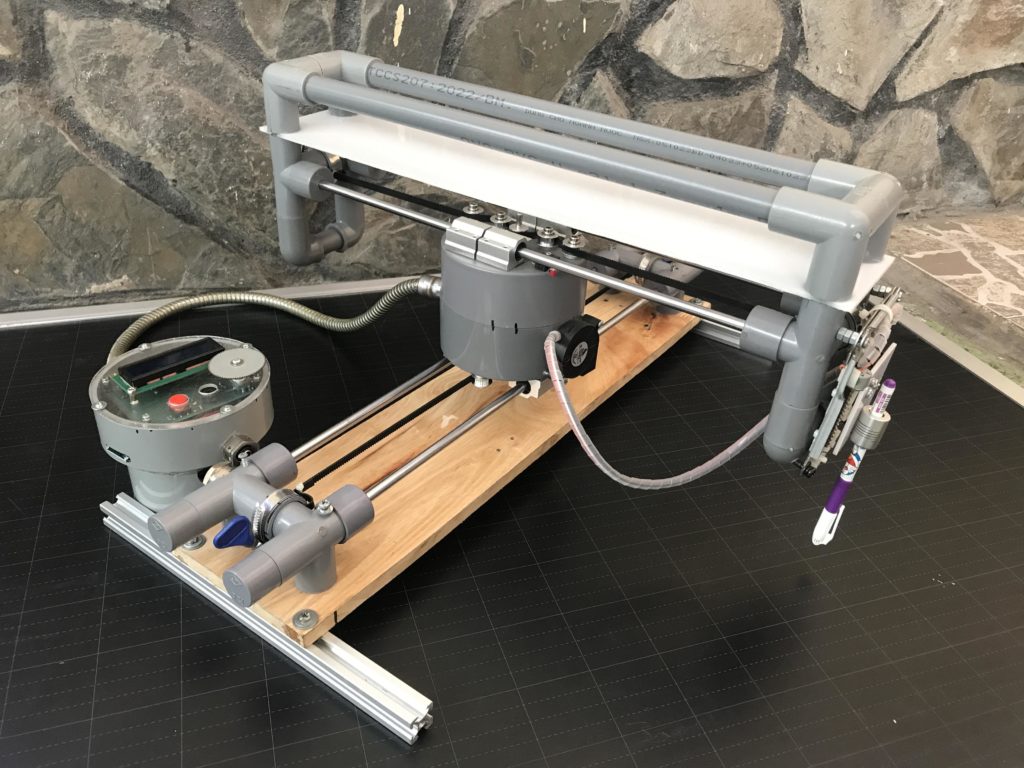
Design paradigms are the norm in every industry and automated machine tools aren’t any different. Most 3D printers, for example, function in a similar way: each axis rides on rails, with belts pulled by fixed motors. Pen plotters tend to utilize similar kinematics. But sometimes we see builds that ignore established paradigms, like this DIY fixed-belt CNC pen plotter.
Unlike most pen plotters, this machine moves along fixed belts. This layout treats the belts almost like rigid bodies, similar to a rack-and-pinion gear set. Because the belts remain fixed in place, the motors must move. The result is a unique form factor. In this case, creator tuenhidiy made heavy use of PVC pipe for the machine’s structure and enclosures. The materials are very inexpensive, but this machine’s axes ride on hardened steel rods and so it is still capable of drawing very well.
To keep costs down without sacrificing capability, tuenhidiy chose to use an Arduino UNO Rev3 board for control. That reads GRBL G-code files through a microSD card module and controls the stepper motors through a CNC shield with A4988 stepper drivers. There is also a simple Arduino Nano-based controller interface made with a 16×2 character LCD, button, and rotary encoder.
Um dir ein optimales Erlebnis zu bieten, verwenden wir Technologien wie Cookies, um Geräteinformationen zu speichern und/oder darauf zuzugreifen. Wenn du diesen Technologien zustimmst, können wir Daten wie das Surfverhalten oder eindeutige IDs auf dieser Website verarbeiten. Wenn du deine Einwillligung nicht erteilst oder zurückziehst, können bestimmte Merkmale und Funktionen beeinträchtigt werden.
Funktional
Immer aktiv
Die technische Speicherung oder der Zugang ist unbedingt erforderlich für den rechtmäßigen Zweck, die Nutzung eines bestimmten Dienstes zu ermöglichen, der vom Teilnehmer oder Nutzer ausdrücklich gewünscht wird, oder für den alleinigen Zweck, die Übertragung einer Nachricht über ein elektronisches Kommunikationsnetz durchzuführen.
Vorlieben
Die technische Speicherung oder der Zugriff ist für den rechtmäßigen Zweck der Speicherung von Präferenzen erforderlich, die nicht vom Abonnenten oder Benutzer angefordert wurden.
Statistiken
Die technische Speicherung oder der Zugriff, der ausschließlich zu statistischen Zwecken erfolgt.Die technische Speicherung oder der Zugriff, der ausschließlich zu anonymen statistischen Zwecken verwendet wird. Ohne eine Vorladung, die freiwillige Zustimmung deines Internetdienstanbieters oder zusätzliche Aufzeichnungen von Dritten können die zu diesem Zweck gespeicherten oder abgerufenen Informationen allein in der Regel nicht dazu verwendet werden, dich zu identifizieren.
Marketing
Die technische Speicherung oder der Zugriff ist erforderlich, um Nutzerprofile zu erstellen, um Werbung zu versenden oder um den Nutzer auf einer Website oder über mehrere Websites hinweg zu ähnlichen Marketingzwecken zu verfolgen.