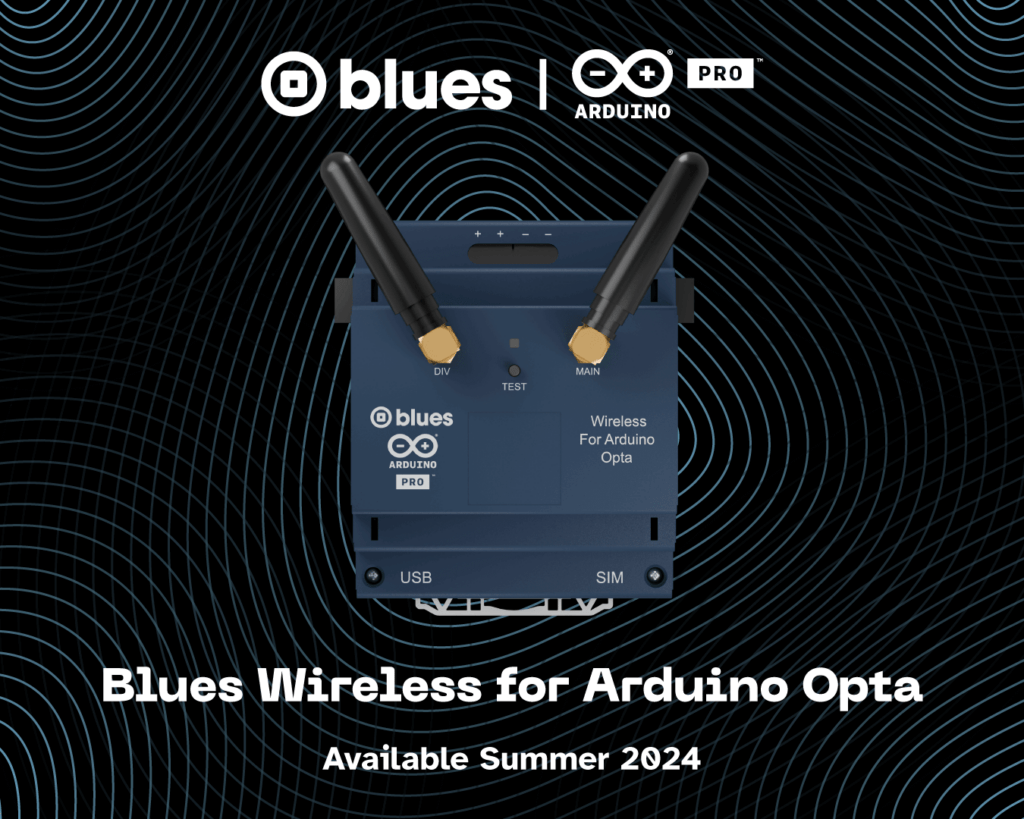
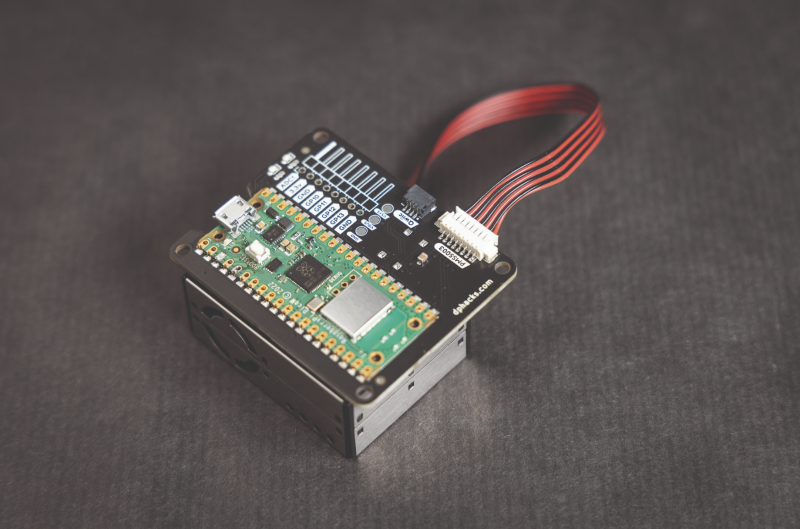
Blues Wireless and Arduino have joined forces to create the game-changing Blues Wireless for Arduino Opta, unveiled this week at the Automate Show in Chicago. The expansion module is an affordable solution to enhance connectivity options for Arduino Opta micro PLCs, and marks a significant milestone in PLC technology and in making technology more easily accessible to all.
“The IIoT is on the cusp of a revolution in democratized connectivity and computing not unlike the PC era of a generation ago,” said Brandon Satrom, Senior Vice President of Product & Experience at Blues. “Products like Lotus Notes, Microsoft Access, and FrontPage sparked a revolution, offering teams and organizations a red tape-free path to connect with one another. With the Opta and Blues’ Wireless Expansion, Blues and Arduino are fueling a similar revolution, empowering OT teams with a direct path to cloud-connected PLC systems.”
The expansion module adds cellular or LoRa® connectivity to any Arduino Opta micro PLC, in addition to existing Ethernet, RS485, or Wi-Fi®/Bluetooth® capabilities (depending on the specific variant). It is easy to connect via the Opta’s standard AUX expansion port in a daisy-chain setup with other modules, and allows users to quickly and securely communicate with the Cloud.
“The market is seeking effective, manageable embedded solutions for routine industrial challenges, as exemplified by the Arduino Opta micro PLC,” said Marcello Majonchi, Chief Product Officer at Arduino. “With Opta, Arduino empowers engineers to swiftly create professional-grade solutions that integrate seamlessly with existing systems and connect to their chosen cloud platforms. The partnership with Blues Wireless expands these connectivity possibilities into the cellular realm, enabling comprehensive remote monitoring and control with just a few clicks. If you think about a remote plant, a solar farm, a water well pump, an industrial vehicle or a large machine, like an air compressor, that you want to monitor and control, these are the scenarios we are targeting.”
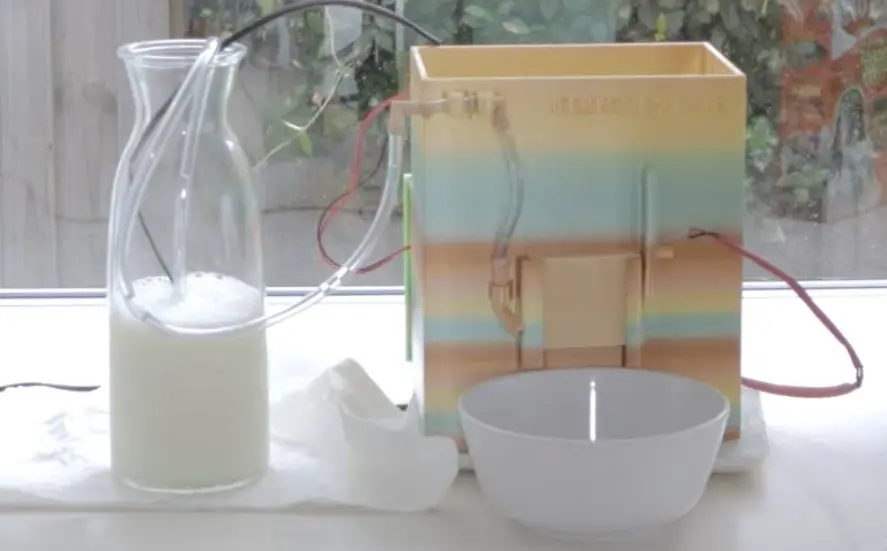
Breakfast cereal is controversial. Milk or cereal first? Best cereal to milk ratio? Favorite cereal? Most attractive mascot? The opportunities for debate never end. But we can all agree that consistency is key when it comes to the milk:cereal ratio — nobody changes that up from day to day. To ensure that every pour is perfect, Engineering Dads built this cereal and milk dispensing machine.
This machine pours dry breakfast cereal from a hopper and pumps milk from a jug, so the hungry user only needs to place the bowl and lift the hopper door. That is nice and automatic, but the more important feature is the ratio adjustment. The user can turn a dial to tweak the amount of milk dispensed with each serving, while controlling the cereal quantity by lifting the hopper chute door to a specific height. A movable sensor detects that door and triggers the milk pump when the door reaches that desired height.
Engineering Dads designed an Arduino UNO Rev3-based circuit to control that functionality. It reads the voltage from the potentiometer to determine the amount of time to power the milk-dispensing pump and it starts that process when it detects a change from the photoresistor. The hopper door moves in front of the photoresistor, blocking the light to kick everything off.
The hopper and electronics enclosure were 3D-printed, which brings up an important point about food safety. 3D-printed parts are generally not food-safe (even if the filament material is), because bacteria can collect in the layer lines and sanitization isn’t easy. But Engineering Dads coated the prints in a layer of epoxy to create a smoother surface and that may help — though they’re not making any guarantees.
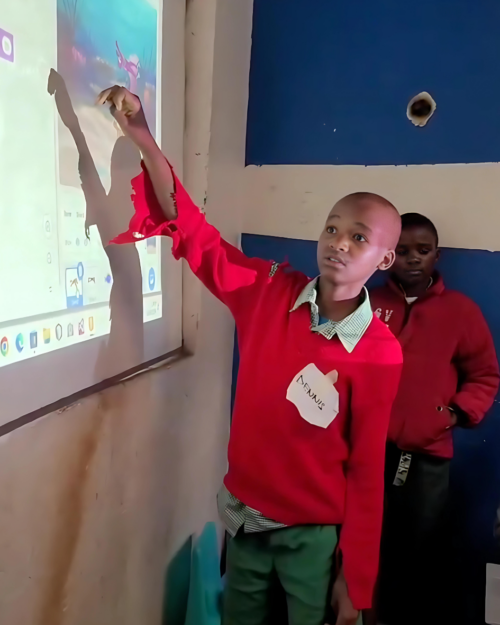
Through Code Club and CoderDojo we support the world’s largest network of free informal computing clubs for young people.
Code Club is a global network of after-school coding clubs for learners aged 9 to 13, where educators and other volunteers help young people learn about coding and digital making
CoderDojo is a worldwide network of free, open, and community-based programming clubs for young people aged 7 to 17, where they get the opportunity to learn how to create fantastic new things with technology
The clubs network reaches young people in 126 countries across the globe, and we estimate that the 4,557 Code Clubs and 771 CoderDojos are attended by more than 200,000 young people globally.
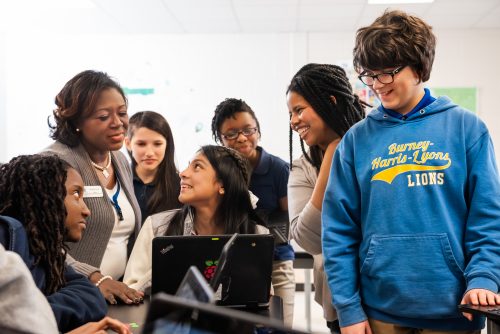
All these clubs are run by incredible volunteers and educators who help young people to learn computing and coding. Every year, we ask the volunteers to tell us about their experiences in our annual clubs survey. Below we share some highlights from this year’s survey results.
About the survey
We want to know more about volunteers in the network, how they run their clubs, and what impact the club sessions have for young people. Understanding this better helps us to improve the support we give to volunteers and young people around the world. This year we received over 300 responses, which has given us valuable insights and feedback.
What are the clubs like?
Improving gender balance in computing is part of our work to ensure equitable learning opportunities for all young people. Girls’ participation in the CodeDojo community has risen from 30% to 35% between 2023 and 2024, while 40% of Code Club attendees are girls.
Clubs are using a wide variety of technologies and tools to support young people with their coding. According to the survey, the most popular coding tool was Scratch, which nearly all of the volunteers said they used in their club. Over 60% of volunteers reported using micro:bits, and over 50% mentioned Python.
What impact is the clubs network having?
We asked volunteers to tell us what changes they had seen in young people as a result of being part of a club. Volunteers fed back to us about the positive community created by clubs where young people felt safe and included. This was evidenced by the way young people felt able to share their ideas and support other young people:
“The more experienced members are both capable and competent to demonstrate their skills to less experienced children. For example, they recently ran a full-day session for the whole school to complete the Astro Pi Mission Zero project.” – Code Club volunteer
Volunteers reported increases in young people’s skills and confidence in digital making and engaging with technology (see graph below). They also agreed that young people developed other skills, with nearly 90% noting improvements in problem solving, personal confidence, and creative thinking.
How are we supporting volunteers?
These positive outcomes are the result of the hard work and dedication of the club volunteers. Based on the survey, we estimate that at the time of the survey, there were over 6000 Code Club leaders and almost 3000 CoderDojo champions around the world. Many of the volunteers are motivated to volunteer by a love of teaching and a desire to pass on their skills.
These volunteers are part of a global network, and 80% of volunteers said that belonging to this global community of clubs was motivating for them. Volunteers particularly valued the access to resources and information being part of a global community offered, as well as opportunities to share ideas and problem solve.
The majority of Code Clubs are mostly or always using our digital making pathways and projects as part of their clubs. Volunteers value the projects’ step-by-step structure and how easy they are to follow.
We plan to do more to ensure that clubs around the world find these projects and pathways accessible and useful for their sessions with young people.
What’s next
The survey has helped us to identify a number of areas where we can support club volunteers even better. Volunteers identified help getting equipment and funding as the main things they needed support with, as well as recruitment of volunteers and young people. We are looking at the best ways we can lend a hand to the clubs network in these areas.
We take impact seriously and are always looking to understand how we can improve and increase the impact we have on the lives of children and young people. To find out more about our approach to impact, you can read about our recently updated theory of change, which supports how we evaluate what we do.
This has caused me a little bit of a quandary though. My desk in the office is my home away from home and I want to make it feel comfy and welcoming when I visit. However, I’m not there that often, so I can’t bring in stuff I need at home, where I do most of my work.
Sparse
Currently I’ve brought in an original Raspberry Pi Zero from the cover of an issue 40, still in its blister pack, a 3D POP camera, some jingle bells I found, and a little ceramic hedgehog with a fake succulent plant growing out of it. It’s also got some prizes there for future competitions but they’ll come and go so that’s a bit different. The benefit of bringing stuff in also means I won’t have it filling up my home any more, but don’t tell the boss that.
I’ve been thinking about having little Raspberry Pi and/or Pico-powered devices to keep there – I have threatened to make a mini set of two drums and a cymbal so I can make a rimshot machine to punctuate my steady stream of bad jokes – and as we have a fancy new maker lab here with lots of toys – er, I mean serious tools – I feel I should make use of that while I’m visiting. Send me suggestions for simple little machines to the usual places!
Something to call your own
This is clearly a fairly unique and low-level problem, but I wanted to bring it up because it is important to be able to have a space to work/indulge in hobbies at while being comfortable. I have the luxury of being able to personalise my working space at home as well as my hobby space, which is full of boom arms holding cameras, lights and microphones though. I may have chosen the wrong hobby.
It’s taken me a while to get to this stage, so don’t get frustrated if it takes a while for you to get a space you can feel comfy in. Just like learning any skill, it can take practice as well as some trial and error. Also, money.
I now need to figure out the work policy on how many hedgehog plushes I can keep on my desk.
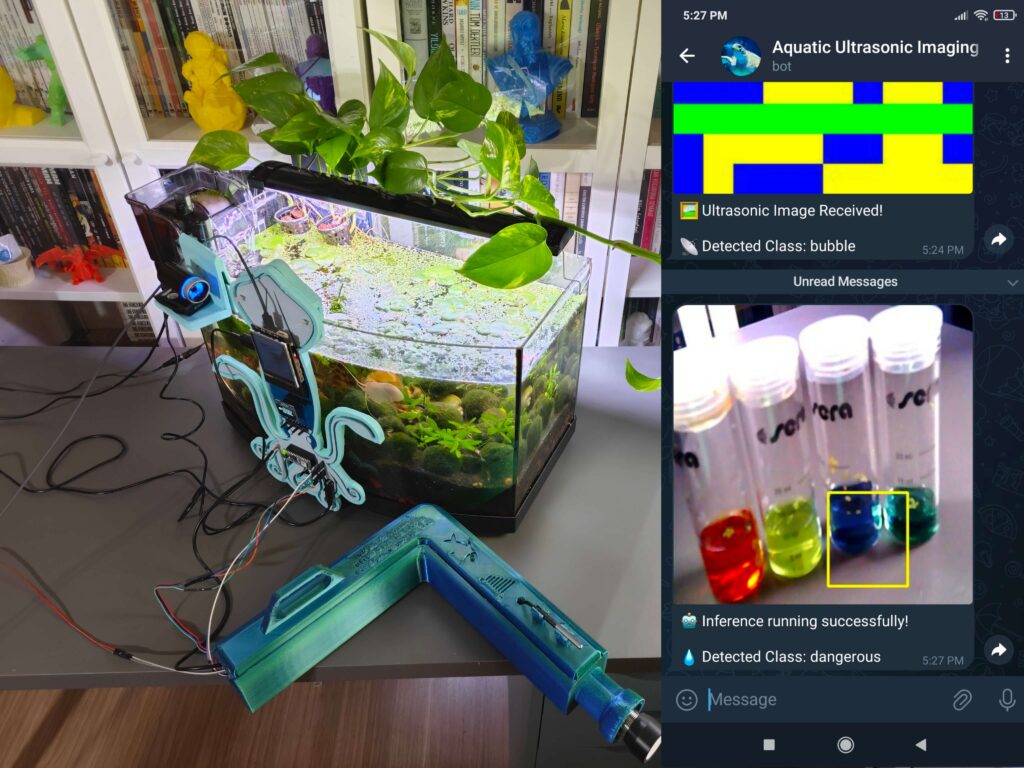
Below the surface of any body of water, harmful amounts of toxic gases and contaminates can accumulate, which leads to a loss in fish and plant populations if not fixed quickly. But because most water testing, especially in aquariums, is done primarily on the surface, vital information gets missed. Kutluhan Aktar’s automated testing system aims to address these concerns through its harnessing of both ultrasonic sensors and computer vision data being fed into two AI models.
Everything started with an Arduino Nano ESP32 board connected to a 75KHz ultrasonic sensor and DS18B20 temperature sensor. Aktar then took many readings of his aquarium utilizing the sensor to produce several 20×20-point maps, which were uploaded to the Edge Impulse Studio and used to create a classification model. Once trained, the model was deployed to the Nano ESP32 so that it could inform the user if there were any toxin-containing bubbles present in the tank.
The other half of the monitoring system consists of a DFRobot UNIHIKER single-board computer running a RetinaNet model that detects and classifies chemical tests as either sterile, dangerous, or polluted. The results from it and the Nano ESP32 are combined, presented on a large screen, and sent to users via a Telegram bot.
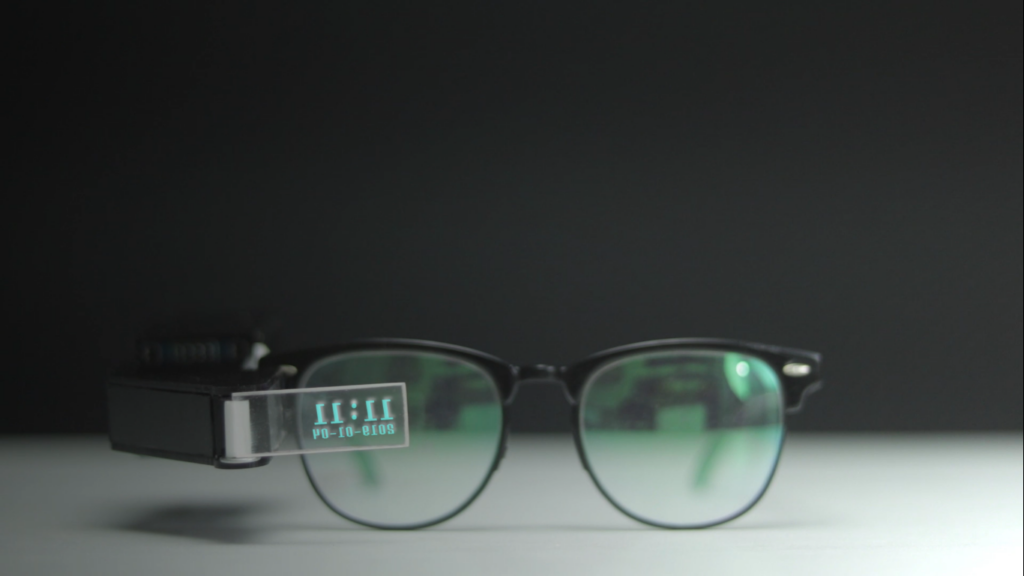
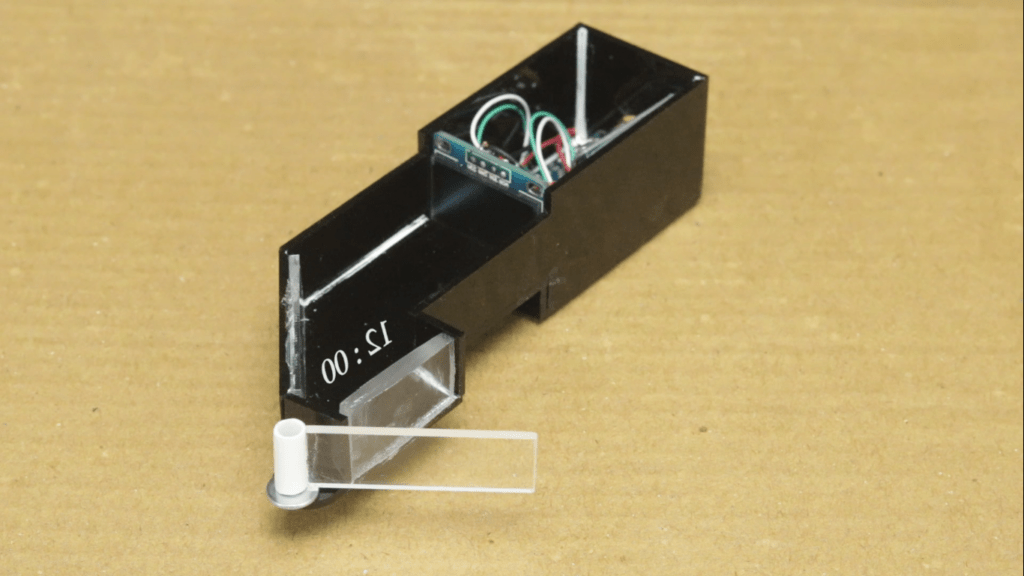
When Google Glass launched in 2013, the public opinion seemed to be “interesting technology, but the world isn’t ready yet.” Now that more than a decade has passed, the world may finally be ready — especially with the omission of controversial features like video recording. If that appeals to you, then Akashv44 has a great tutorial that will walk you through building your own affordable Arduino-based smart glasses.
The biggest challenge for a project like this is the geometry of the heads-up display optics. Our eyes cannot focus on a screen that is too close. The screen has to be at least a few inches away to comfortably read. But those few inches don’t need to be in a straight line, so this device uses a mirror, a lens, and a piece of glass to project screen content in front of the user’s eye. The total distance along that path is enough for the user to focus on the content without eye strain.
That content comes from a small monochrome OLED screen chosen for its high contrast. The dark pixels of the screen are essentially invisible, while the lit pixels are easy to see. The content on that screen comes from an Arduino Nano board. It receives power from a 300mAh lithium battery (this design doesn’t contain a charging circuit) and an HC-05 Bluetooth module lets the Arduino communicate with external devices.
In theory, the Arduino can display any alphanumeric digits that it receives via Bluetooth. So, the content shown will depend on the user and there are many possibilities. It could, for example, reveal incoming text messages or information about whatever song is playing.
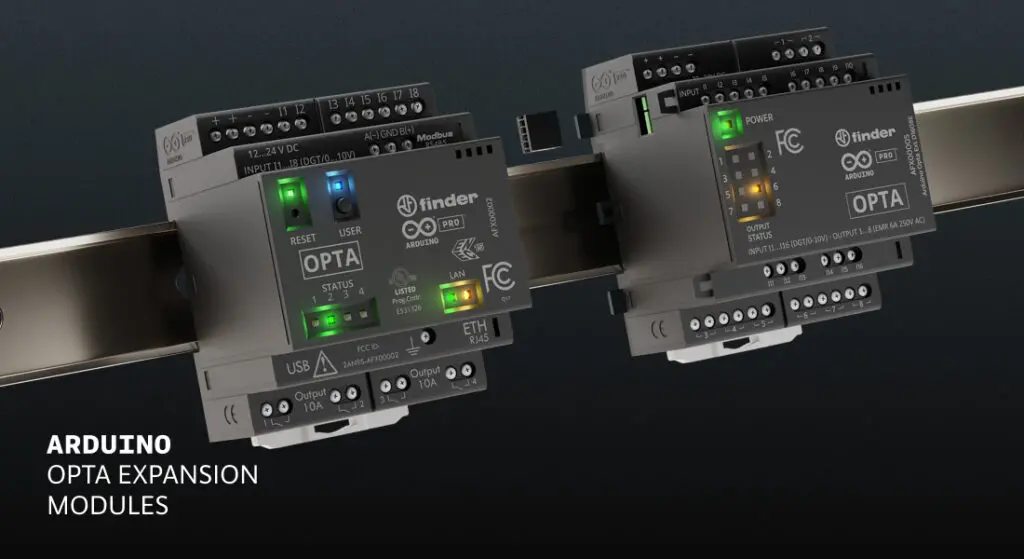
Last year, we launched the Arduino Pro Opta: it was an instant success with our community, and allowed us to reach PLC engineers with a new solution specifically designed for their needs.
To further expand Opta’s capabilities, today the Arduino ecosystem welcomes various expansions that allow you to add new I/Os in the simplest and fastest way possible.
Meet the Opta Digital Expansions
The digital expansions, Arduino Pro Opta Ext D1608E and Arduino Pro Opta Ext D1608S, are ideal to multiply the number of real-time control points in the manufacturing sector and in any building automation project. The new, ready-to-use I/Os are seamlessly adopted by the Opta controller, giving you a native-like management experience. Each expansion offers 16 programmable inputs and eight relay outputs (electromechanical or solid state), and up to five expansions can be mixed to obtain the best fit for each project.
Stay tuned for the Opta Analog Expansion!
We are also finalizing an analog option: the Arduino Pro Opta Ext A0602 (coming soon) will allow you to diversify your data acquisition capabilities, and expand your devices’ actuation possibilities with great flexibility and process efficiency. Configuring new inputs/outputs to acquire 0-10 V and 0/4-20 mA signals and temperature values through PT100 will help you take Opta’s monitoring and control capabilities to a new level.
The Opta is our industrial-grade micro PLC, developed in partnership with Finder to provide engineers with a durable, reliable, secure and high-performance hardware, while still maintaining our signature flexibility and ease of deployment in production.
All three variants of Opta are based on a powerful STM32H747XI Dual ArmARM® Cortex® microcontroller and can be programmed using C++ in Arduino sketches, but also offer the flexibility of incorporating any or all of the 5 traditional IEC 61131-3 PLC automation control languages.
To find out more, check out the three variants in our Store:
• Opta Lite: with Ethernet onboard and USB-C® programming ports (SKU: AFX00003)
• Opta RS485: which also adds RS485 half duplex connectivity interface (SKU: AFX00001)
• Opta WiFi: the most versatile option, featuring also Wi-Fi®/Bluetooth® Low Energy connectivity (SKU: AFX00002)
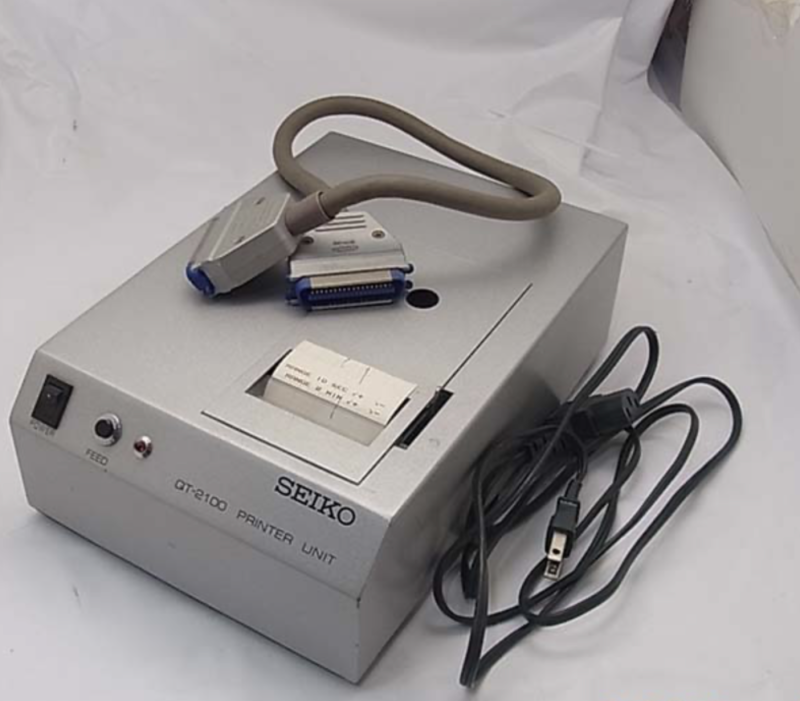
“I was working at Heathrow Airport developing controls software for a baggage handling line in 1999 when we decided it would be useful to attach a dot matrix printer to keep track of errors and how the code was treating each piece of luggage passing through the system,” he explains.
“The choices for a dot matrix printer with a Centronics connector were very limited and still cost more than £500. From using a Sinclair QL at home I also knew the problems of finding a suitable printer which understood plain text and realised this was going to pose an increasing issue for home-computer users and industry.”
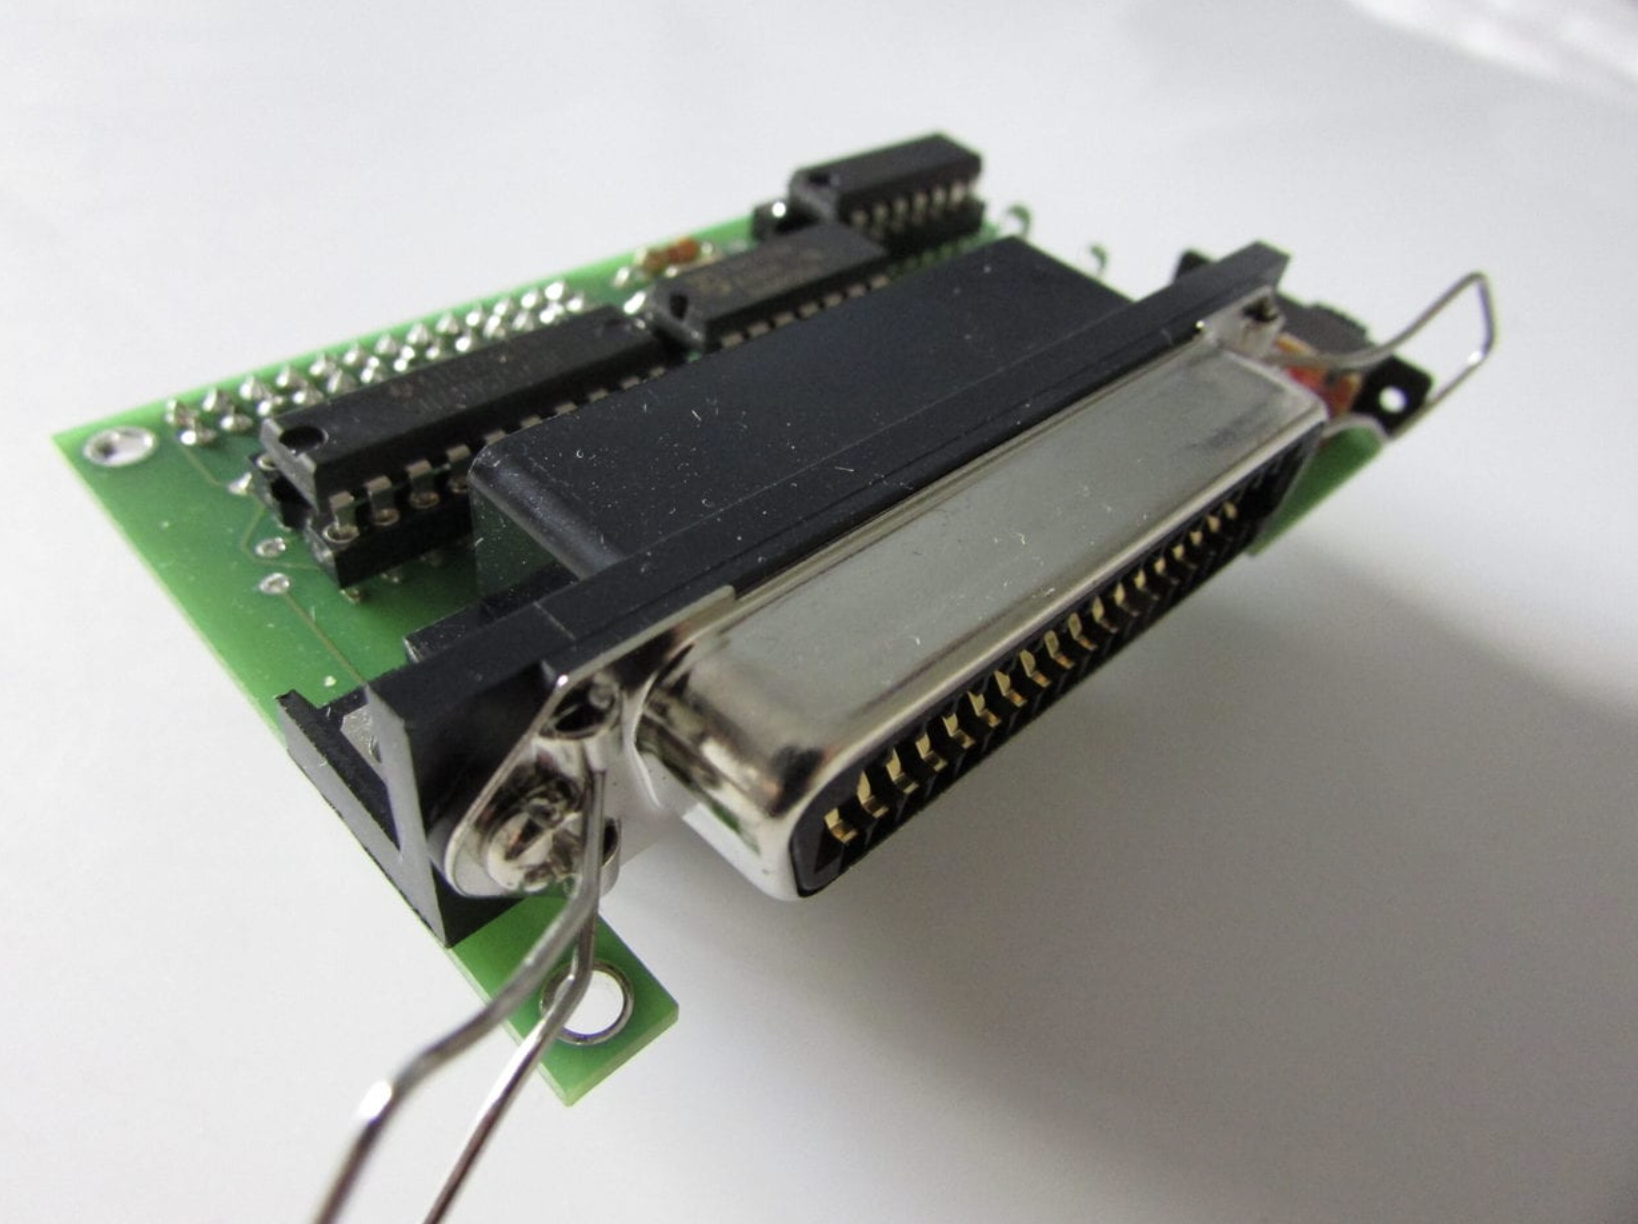
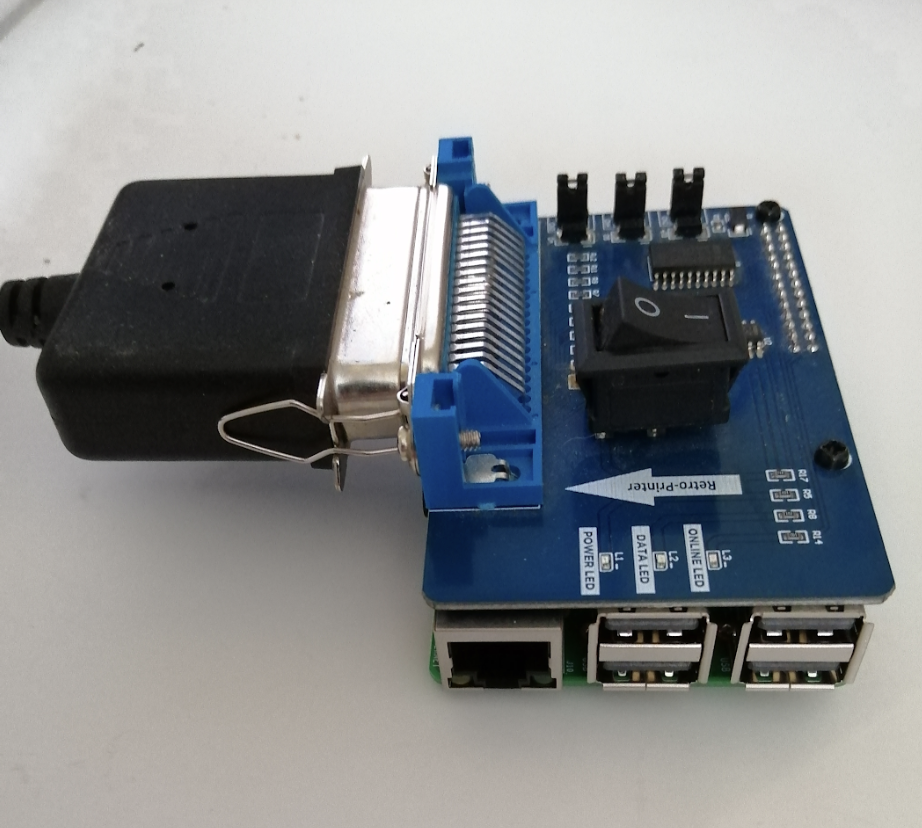
Having talked with two fellow electrical engineers, he tried in vain to work out a low-cost solution. “It was only with the release of the earliest Raspberry Pi that I realised an affordable printer emulator could be developed,” he says. This prompted him to begin work on the Retro-Printer project – a HAT designed to plug into a Raspberry Pi computer that allows data captured from the Centronics (or parallel) port on a retro machine to be sent to a modern printer.
Bit by bit
Most personal computers released from the 1970s to the 2000s had Centronics ports for connecting the machines to printers and other devices. Data would be sent eight bits at a time in parallel to each other at 150 kilobytes/sec. Rich figured he could develop working hardware that acted as an interface between the port of any one of those computers and the Raspberry Pi. Software would then convert the captured data into a PDF, ready for printing.
“The Retro-Printer HAT is simply an interface to convert the incoming data signals from the Centronics output to the GPIO pins on a Raspberry Pi computer,” Rich says. “The hardware incorporates some hard-wired signals so that the busy signal is asserted as soon as any data is received from the Centronics port, and we found that we needed to add jumpers to allow 5v to be enabled on three different pins of the Centronics port as this was expected by some computers. We also initially added an offline switch as a nod to the fact that many old printers had one but we’ve since changed the software to support different functions on that switch such as swapping page sizes or printer types.”
The software is written in C and it makes use of a single capture process that runs constantly. “It watches for incoming data, spooling it to a temporary file and sending the acknowledge and ready signals as we process each byte,” Rich continues. “That process also has to deal with 7-bit or 8-bit data, the position of an offline switch and different timing mechanisms.”
There are two background processes: “One handles the three LEDs on the HAT which can be controlled externally by the user if they wish and the other is the all-important printer emulator.” Since there have been so many different printer types over the years, testing has been a major challenge. “We’ve had to work alongside users to identify and address issues particularly around equipment which does not fully implement the Centronics protocol or where there is little or no information about programming.”
Ink-spiring
Such is the lack of information about some original printers, Rich has sometimes had to rely on old faded printouts or photos on the internet. “We’ve been able to reverse engineer the printouts mainly using a Sinclair QL emulator in the first instance to understand what the data means,” he says. As a result of all of this, different printer emulators have been developed for each printer type.
“They all include standard classes for reading the captured bytes from the temporary file and graphics routines and creating the PDFs,” Rich explains. “The printer emulator is responsible for interrupting each captured byte and determining whether it is data for processing, text or a printer command – for example, an ESCape code sequence.
“We then create a PNG of the printed page in memory using those printer commands to set the position on the page and draw any text or graphics. Once the capture process indicates that it thinks the end of the print job has been reached, or we have filled a page of data, the PNG is converted to a PDF for printing or storage.”
Given the amount of work involved, it’s surprising to hear that the project was created rather quickly. “Thanks to a contact in Germany who had previously developed hardware for the Sinclair ZX81, the initial hardware and basic Epson printer emulator only took six months to develop,” Rich says. “Getting the product readyfor manufacture by a well-known Raspberry Pi supplier took a further 12 months, although thanks to a production issue picked up after the initial batch of boards were received and sold, it took another six months before we had a v4 Retro-Printer.”
Not that the work is complete. Development is still ongoing as Rich meets new challenges and old printer technologies. “We have found a niche among retro computer users and industry alike, with uses from the humble ZX Spectrum and Commodore 64 through to various commercial flight simulator and industrial production lines,” he says. “In some cases, we have extended the useful life of multi-million pound equipment which would have needed complete replacement for the sake of a working printer.”
Founded in 1975 and headquartered in Madison Heights, Michigan, Galco is a leading e-commerce distributor that specializes in providing a wide range of industrial and commercial electrical and electronic products, focusing on maintenance, repair, and operations (MRO).
Known for strong expertise in sourcing hard-to-find, high-quality products and guaranteeing exceptional customer service – including cross-referencing, free in-house technical support, same-day shipping on in-stock products and repair services both on-site and send-in – they are able to provide customized control panel solutions and engineered systems to clients across the United States.
Having noticed growing demand for integrated solutions in industrial automation over the past few years, they are joining the System Integrators Partnership Program by Arduino Pro at Platinum level to offer clients access to a wider range of innovative products and services. “The partnership with Arduino comes with a unique product technology mix, able to enhance the automation and control product offering for our customers. Not to mention greater potential to expand our footprint into the higher education vertical market,” comments Bob Marshall, Vice President of Engineering and Services at Galco.
Find out more about the partnership – and stay ahead of the curve on the latest developments and breakthroughs in the field of industrial electronics and automation – by following Galco’s online podcast series, Tech Talks: each episode includes in-depth insights into the world of industrial electronics and automation through engaging discussions with industry experts and insiders, who offer valuable knowledge and real-world experiences to shed light on technological innovations driving the industry forward.
Strategic Partnerships Advisor to Arduino Paul Kaeley notes, “With its mission to ‘enable the world today for a better tomorrow’, Galco aligns with Arduino’s core values at the deepest level. We are thrilled to support the company and excited to see the results of this synergy develop.”
The System Integrators Partnership Program by Arduino Pro is an exclusive initiative designed for professionals seeking to implement Arduino technologies in their projects. This program opens up a world of opportunities based on the robust Arduino ecosystem, allowing partners to unlock their full potential in collaboration with us.
The service we now know as rpilocator started off as cm4locator, with André coding it during a couple of days off. Initially it was private, and within a couple of days it had helped him locate – and buy – a Raspberry Pi Zero 2 W. Surprised at how easy it was, he decided to make a public version.
“I registered the domain on January 26 and spent a couple of hours a day after work adding more listings to be tracked,” André says. “On January 29 I pushed the website to a cloud service. Rpilocator was officially live but no one knew about it. I waited a day to make sure everything was working and I sent an email to Lee from leepspvideo and Jeff Geerling.”
From there, word spread, and rpilocator became the best way to find a Raspberry Pi.
What is your history with making?
I grew up in a household where both my parents were very handy at making things. My dad is an engineer who loves tinkering with everything. I remember one of the first projects we worked on together was a crystal radio receiver – the classic kid introduction to making project.
I grew up in Brazil and access to maker kits wasn’t as widely available as in the US or the UK. This was in the ’80s and the ’90s. There were some STEM magazines available in English and that was one of the reasons why I wanted to learn English.
My mom started sewing when she was young and she’s an experienced seamstress. Seeing a flat sheet of fabric turn into a 3D object was so inspiring to me. I’ve played with and created things with textiles my whole life.
What projects have you made with Raspberry Pi?
I’ve used Raspberry Pi in quite a few projects over the years ranging from a network of sensors to home automation and camera applications.
Last year, there were many large wildfires in Canada. A lot of the smoke drifted into where we live. The air quality outside was unhealthy for long periods of time. My daughter hadn’t turned one yet and I wanted to make sure the air quality inside our home was healthy for her. I created a PCB that hosts a Pico W and makes it easy to plug an air quality sensor and I2C devices to the Pico W. It runs an open-source CircuitPython firmware that calculates the Air Quality Index inside our home and sends sensor information through MQTT.
What is your dream project?
I find the intersection between science and art so intriguing. My pie-in-the-sky project would be something that combines scientific knowledge and artistic expression. I don’t know exactly what it would be. Maybe something that would spark kids’ interest in learning more about science and art.
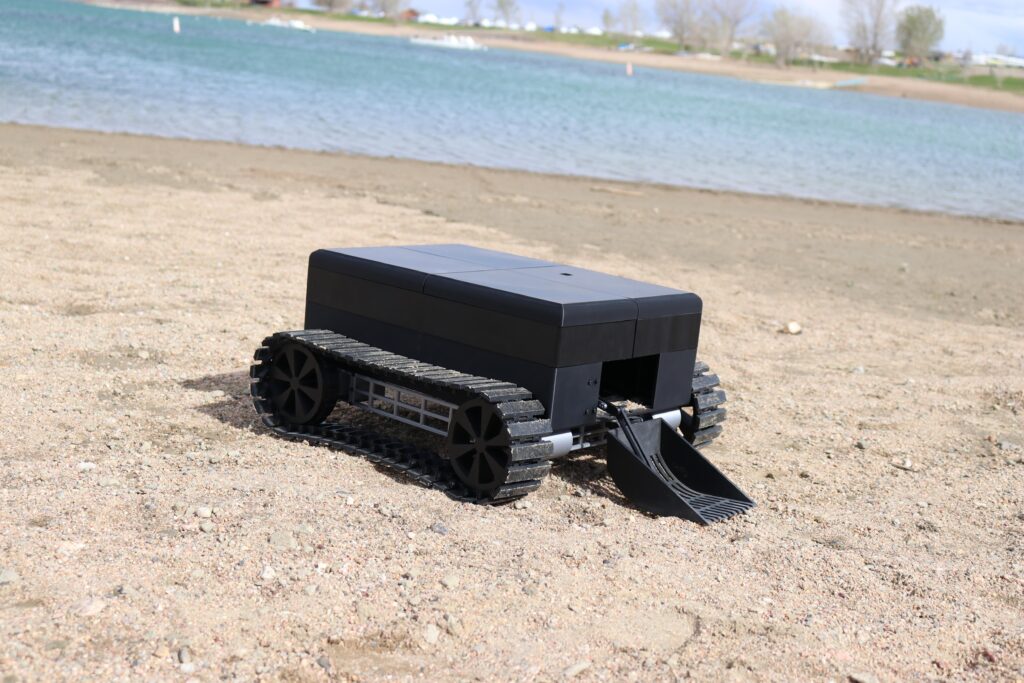
Without anyone caring for them, beaches quickly become trash-covered swaths of disappointment. That care is necessary to maintain the beautiful sandy havens that we all want to enjoy, but it requires a lot of labor. A capstone team of students from the University of Colorado Boulder’s Creative Technology & Design program recognized that fact and they create the Seaside Sweeper beach-cleaning robot to lighten the load.
Seaside Sweeper is like a Roomba for beaches. Either autonomously or through manual control, it can patrol a beach for up to 15 hours on a battery charge and scoop up any trash it comes across. This costs less than $450 to build, which is an important consideration when most beaches are public property and have limited maintenance budgets.
There are two Arduino boards used in this project: an Arduino Mega 2560 in the Seaside Sweeper itself and an Arduino UNO Rev3 in the remote. They communicate with each other through nRF24L01+ radio transceivers. The Mega 2560 is able to track its own position using a Neo-6M GPS module and an Adafruit LIS3MDL compass module. Together, those enable the autonomous navigation functionality — though it isn’t clear how Seaside Sweeper detects trash. The Mega 2560 also controls the four drive motors and the scoop mechanism’s servo motor.
The robot’s body and almost all of its mechanical parts were 3D-printed to keep costs down. That even includes the tracks. The electronic components can be connected via breadboards, so no custom PCBs are required.
When we think about air quality and pollution, it’s easy to conjure up images of smog-filled cities and power plants churning clouds of poison into the atmosphere.
And while all this is still important, and has massive consequences for our health, it’s all too easy to overlook the air pollution that takes place within our homes.
Indoor air quality is incredibly important for our health and quality of life, and taking steps to improve the air quality in our homes — while also saving energy — is one of the best things we can do. It’s also surprisingly easy and can be achieved even with DIY devices that aren’t difficult to put together.
In this article, we’ll look at the ways we can improve air quality at home, along with a few Arduino examples.
Why does air quality matter?
Air pollution is a massive health problem. In fact, unclean air can lead to issues like strokes, heart disease, lung cancer, and a whole laundry list of terrible respiratory diseases.
Many of these risks come from living in a part of the world with polluted air, which unfortunately isn’t something most of us can do much about. However, the air in our homes — which we do have some control over — is also a risk factor.
In 2020, the World Health Organization found that household air pollution was responsible for around 3.2 million deaths per year – including over 237,000 children under the age of 5.
Enhancing home environment
So what are the concrete steps we can take to improve the air quality in our homes and keep our family members safe? The good news is, there’s a lot we can do:
Ventilate our homes properly, using age-old methods like windows and doors and more modern approaches like ventilation systems.
Use monitors that measure the concentration of harmful substances like carbon monoxide and issue warnings when they reach dangerous levels.
Minimize emissions from things like waste by keeping the home clean.
Manage devices like HVAC units carefully — if not properly maintained these can be harmful to your indoor environment.
Avoid burning objects or using powerful toxic chemicals near the home.
3 ways you can improve air quality with Arduino
With automation and tools like Arduino, it’s more than possible to improve the air quality in your home and build a safer and healthier environment for your loved ones to share. Let’s take a look at a few examples.
Detecting HVAC failures early
Heating, ventilation, and air conditioning systems make life much more comfortable, but more than that, in many parts of the world they’re essential for safe living conditions.
This is because HVAC systems don’t just regulate indoor temperature, they also provide a steady supply of fresh, clean air. This is crucial if you live in an area with poor air quality, or have household members with respiratory problems.
When HVACs stop working, problems arise. That’s why Yunior González and Danelis Guillan set out to fix the issue, developing a prototype device that uses machine learning to predict HVAC issues before they arise so you can avoid downtime entirely.
The project uses an Arduino Nicla Sense ME and Edge Impulse’s machine learning tools to create an algorithm that detects anomalous readings and issues warnings to the user when things don’t look right.
Another monitoring solution
In a similar vein to the first project, the medical center network Sangostino developed its own monitoring system using an Arduino Nano RP2040 Connect, aimed at tracking the performance of their HVAC units across 35 locations in Italy.
They fed the AI extensive amounts of data to help it quickly identify any concerning signs, allowing their teams to keep on top of their HVAC performance and avoid any malfunctions or downtime in an environment where air quality is literally a matter of life and death.
Air quality and education
If you’re interested in teaching young learners about the value of air quality, while simultaneously introducing them to some core STEM concepts, Arduino has you covered.
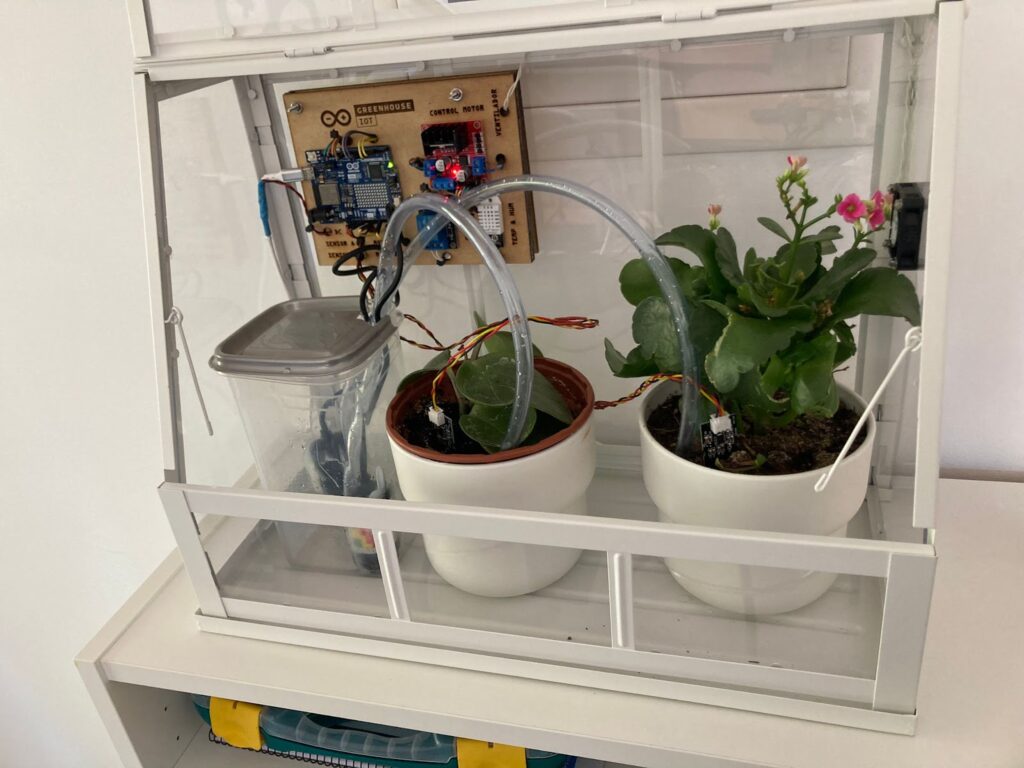
The Arduino Greenhouse Kit and the Arduino Explore IoT Kit include experiments involving air quality, allowing users to build their own sensors and tracking tools to measure a range of data points like humidity, moisture, and the presence of particles like CO2. These projects both work using the Arduino MKR IoT Carrier Rev2, which has a VOC sensor.
Share your projects
Have you created a project to monitor or improve the air quality inside your home? If so, share it on our Project Hub!
Whether you’re passionate about conservation or simply curious about the possibilities, now is your chance to join the community and make a difference.
Don’t miss out — embrace innovation while honoring our planet.
It’s been nearly two years since the launch of the Raspberry Pi Computing Education Research Centre. Today, the Centre’s Director Dr Sue Sentance shares an update about the Centre’s work.
The Raspberry Pi Computing Education Research Centre (RPCERC) is unique for two reasons: we are a joint initiative between the University of Cambridge and the Raspberry Pi Foundation, with a team that spans both; and we focus exclusively on the teaching and learning of computing to young people, from their early years to the end of formal education.
As the name implies, our work is focused on research into computing education and all our research projects align to one of the following themes:
AI education
Broadening participation in computing
Computing around the world
Pedagogy and the teaching of computing
Physical computing
Programming education
These themes encompass substantial research questions, so it’s clear we have a lot to do! We have only been established for a few years, but we’ve made a good start and are grateful to those who have funded additional projects that we are working on.
In our work, we endeavour to maintain two key principles that are hugely important to us: sharing our work widely and working collaboratively. We strive to engage in the highest quality rigorous research, and to publish in academic venues. However, we make sure these are available openly for those outside academia. We also favour research that is participatory and collaborative, so we work closely with teachers and other stakeholders.
Within our six themes we are running a number of projects, and I’ll outline a few of these here.
Exploring physical computing in primary schools
Physical computing is more engaging than simply learning programming and computing skills on screen because children can build interactive and tangible artefacts that exist in the real world. But does this kind of engagement have any lasting impact? Do positive experiences with technology lead to more confidence and creativity later on? These are just some of the questions we aim to answer.
We are delighted to be starting a new longitudinal project investigating the experience of young people who have engaged with the BBC micro:bit and other physical computing devices. We aim to develop insights into changes in attitudes, agency, and creativity at key points as students progress from primary through to secondary education in the UK.
To do this, we will be following a cohort of children over the course of five years — as they transition from primary school to secondary school — to give us deeper insights into the longer-term impact of working with physical computing than has been possible previously with shorter projects. This longer-term project has been made possible through a generous donation from the Micro:bit Educational Foundation, the BBC, and Nominet.
We are conducting a range of projects in the general area of artificial intelligence (AI), looking both at how to teach and learn AI, and how to learn programming with the help of AI. In our work, we often use the SEAME framework to simplify and categorise aspects of the teaching and learning of AI. However, for many teachers, it’s the use of AI that has generated the most interest for them, both for general productivity and for innovative ways of teaching and learning.
In one of our AI-related projects, we have been working with a group of computing teachers and the Faculty of Education to develop guidance for schools on how generative AI can be useful in the context of computing teaching. Computing teachers are at the forefront of this potential revolution for school education, so we’ve enjoyed the opportunity to set up this researcher–teacher working group to investigate these issues. We hope to be publishing our guidance in June — again watch this space!
Culturally responsive computing teaching
We’ve carried out a few different projects in the last few years around culturally responsive computing teaching in schools, which to our knowledge are unique for the UK setting. Much of the work on culturally responsive teaching and culturally relevant pedagogy (which stem from different theoretical bases) has been conducted in the USA, and we believe we are the only research team in the UK working on the implications of culturally relevant pedagogy research for computing teaching here.
In one of our studies, we worked with a group of teachers in secondary and primary schools to explore ways in which they could develop and reflect on the meaning of culturally responsive computing teaching in their context. We’ve published on this work, and also produced a technical report describing the whole project.
In another project, we worked with primary teachers to explore how existing resources could be adapted to be appropriate for their specific context and children. These projects have been funded by Cognizant and Google.
‘Core’ projects
As well as research that is externally funded, it’s important that we work on more long-term projects that build on our research expertise and where we feel we can make a contribution to the wider community.
We have four projects that I would put into this category:
Teacher research projects This year, we’ve been running a project called Teaching Inquiry in Computing Education, which supports teachers to carry out their own research in the classroom.
Computing around the world Following on from our survey of UK and Ireland computing teachers and earlier work on surveying teachers in Africa and globally, we are developing a broader picture of how computing education in school is growing around the world. Watch this space for more details.
PRIMM We devised the Predict–Run–Investigate–Modify–Make lesson structure for programming a few years ago and continue to research in this area.
LCT semantic wave theory Together with universities in London and Australia, we are exploring ways in which computing education can draw on legitimation code theory (LCT).
We are currently looking for a research associate to lead on one or more of these core projects, so if you’re interested, get in touch.
Developing new computing education researchers
One of our most important goals is to support new researchers in computing education, and this involves recruiting and training PhD students. During 2022–2023, we welcomed our very first PhD students, Laurie Gale and Salomey Afua Addo, and we will be saying hello to two more in October 2024. PhD students are an integral part of RPCERC, and make a great contribution across the team, as well as focusing on their own particular area of interest in depth. Laurie and Salomey have also been out and about visiting local schools too.
Laurie GaleSalomey Afua Addo
Laurie’s PhD study focuses on debugging, a key element of programming education. He is looking at lower secondary school students’ attitudes to debugging, their debugging behaviour, and how to teach debugging. If you’d like to take part in Laurie’s research, you can contact us at rpcerc-enquiries@cst.cam.ac.uk.
Salomey’s work is in the area of AI education in K–12 and spans the UK and Ghana. Her first study considered the motivation of teachers in the UK to teach AI and she has spent some weeks in Ghana conducting a case study on the way in which Ghana implemented AI into the curriculum in 2020.
Thanks!
We are very grateful to the Raspberry Pi Foundation for providing a donation which established the RPCERC and has given us financial security for the next few years. We’d also like to express our thanks for other donations and project funding we’ve received from Google, Google DeepMind, the Micro:bit Educational Foundation, BBC, and Nominet. If you would like to work with us, please drop us a line at rpcerc-enquiries@cst.cam.ac.uk.
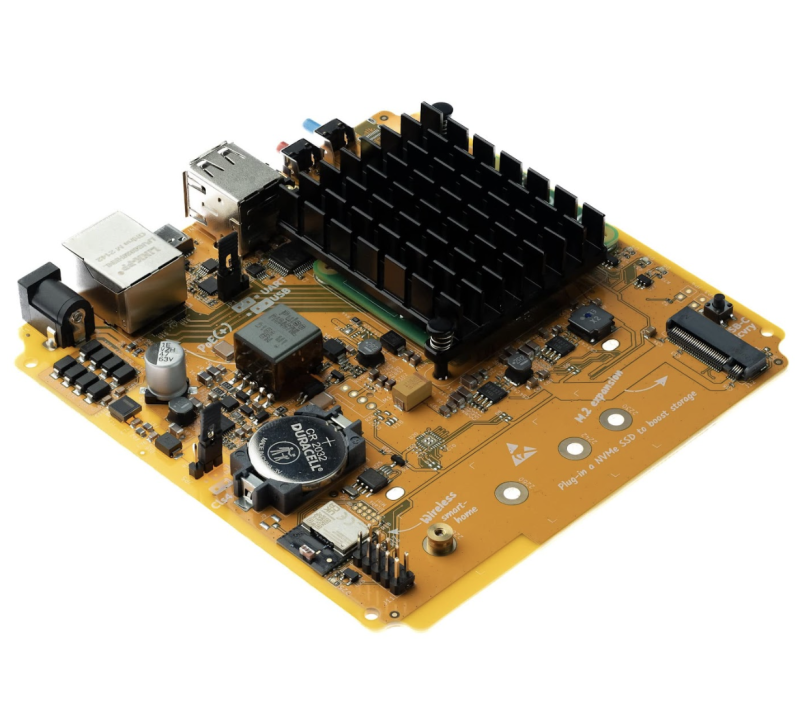
Setting up the device is very simple, although depends slightly on the version you get. The kit that comes with a Compute Module 4 already installed is basically ready to go, just requiring you to get it set up for your network and IoT add-ons.
If you’re adding the Compute Module, you just need to take the case off using the hand-tightened screws (no screwdrivers involved) and firmly click CM4 in. You can also add an M.2 SSD at this stage too if you want the extra storage. After that, it’s just installing the OS via a USB stick (set up with Raspberry Pi Imager), and then doing the usual network setup. The longest part of setting up this way is just letting all the software install – in about 30 minutes we were all ready to go.
Automated automation
During the last stages of set up, Home Assistant will let you know what devices it has found on your network. It has access to a huge range of services and standards as you’d expect, and puts any found devices on your dashboard for you to configure further. This is accessible via a smartphone app or your browser, and there’s an astonishing level of customisability in the software. From the use of general active triggers for actions (including voice control) to different passive ‘scenes’ that will, for example, automatically lower the lights when watching TV.
As this is positioned as a big hub on your network, you can also add plenty of other software services to it – such as Plex, Sonos, TOR, and a whole variety of extensions that you can easily add from the browser. The SSD slot will come in handy if you use the media server applications.
It’s a fantastic piece of kit that we found very easy to use without sacrificing any of the nitty-gritty home automation tools you’d want to use to truly customise your home – to the point that it’s inspired us to expand the amount of automated devices in our home.
Verdict
10/10
Extremely easy to set up and use, it’s a very compact and practical box that really helps power your home.
Specs
Dimensions: 123mm x 123mm x 36mm
Power: 12v/2A barrel DC jack, PoE+ IEEE 802.3at-2009 Class 3 or 4
Extra features: M.2 SSD slot, stereo audio DAC with 3.5mm jack output, enhanced wireless (Silicon Labs MGM210P Mighty Gecko Module), RTC
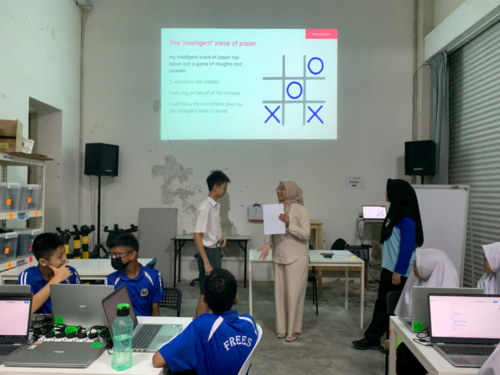
Today’s blog is from Aimy Lee, Chief Operating Officer at Penang Science Cluster, part of our global partner network for Experience AI.
Artificial intelligence (AI) is transforming the world at an incredible pace, and at Penang Science Cluster, we are determined to be at the forefront of this fast-changing landscape.
The Malaysian government is actively promoting AI literacy among citizens, demonstrating a commitment to the nation’s technological advancement. This dedication is further demonstrated by the Ministry of Education’s recent announcement to introduce AI basics into the primary school curriculum, starting in 2027.
Why we chose Experience AI
At Penang Science Cluster, we firmly believe that AI is already an essential part of everybody’s future, especially for young people, for whom technologies such as search engines, AI chatbots, image generation, and facial recognition are already deeply ingrained in their daily experiences. It is vital that we equip young people with the knowledge to understand, harness, and even create AI solutions, rather than view AI with trepidation.
With this in mind, we’re excited to be one of the first of many organisations to join the Experience AI global partner network. Experience AI is a free educational programme offering cutting-edge resources on artificial intelligence and machine learning for teachers and students. Developed in collaboration between the Raspberry Pi Foundation and Google DeepMind, as a global partner we hope the programme will bring AI literacy to thousands of students across Malaysia.
Our goal is to demystify AI and highlight its potential for positive change. The Experience AI programme resonated with our mission to provide accessible and engaging resources tailored for our beneficiaries, making it a natural fit for our efforts.
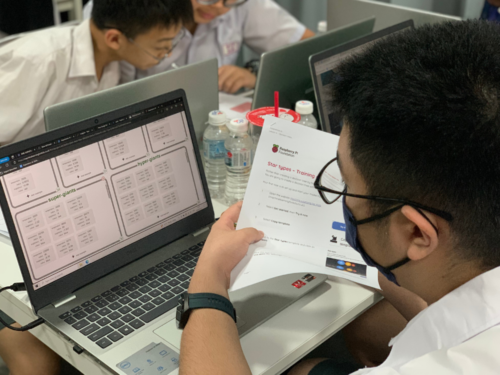
Experience AI pilot: Results and student voices
At the start of this year, we ran an Experience AI pilot with 56 students to discover how the programme resonated with young people. The positive feedback we received was incredibly encouraging! Students expressed excitement and a genuine shift in their understanding of AI.
Their comments, such as discovering the fun of learning about AI and seeing how AI can lead to diverse career paths, validated the effectiveness of the programme’s approach.
One student’s changed perspective — from fearing AI to recognising its potential — underscores the importance of addressing misconceptions. Providing accessible AI education empowers students to develop a balanced and informed outlook.
“I learnt new things and it changed my mindset that AI is not going to take over the world.” – Student who took part in the Experience AI pilot
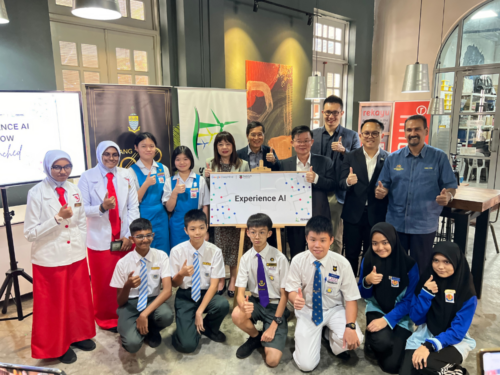
Launching Experience AI in Malaysia
The successful pilot paved the way for our official Experience AI launch in early April. Students who participated in the pilot were proud to be a part of the launch event, sharing their AI knowledge and experience with esteemed guests, including the Chief Minister of Penang, the Deputy Finance Minister of Malaysia, and the Director of the Penang State Education Department. The presence of these leaders highlights the growing recognition of the significance of AI education.
Experience AI launch event in Malaysia
Building a vibrant AI education community
Following the launch, our immediate focus has shifted to empowering teachers. With the help of the Raspberry Pi Foundation, we’ll conduct teacher workshops to equip them with the knowledge and tools to bring Experience AI into their classrooms. Collaborating with education departments in Penang, Kedah, Perlis, Perak, and Selangor will be vital in teacher recruitment and building a vibrant AI education community.
Inspiring the next generation of AI creators
Experience AI marks an exciting start to integrating AI education within Malaysia, for both students and teachers. Our hope is to inspire a generation of young people empowered to shape the future of AI — not merely as consumers of the technology, but as active creators and innovators.
We envision a future where AI education is as fundamental as mathematics education, providing students with the tools they need to thrive in an AI-driven world. The journey of AI exploration in Malaysia has only just begun, and we’re thrilled to play a part in shaping its trajectory.
If you’re interested in partnering with us to bring Experience AI to students and teachers in your country, you can register your interest here.
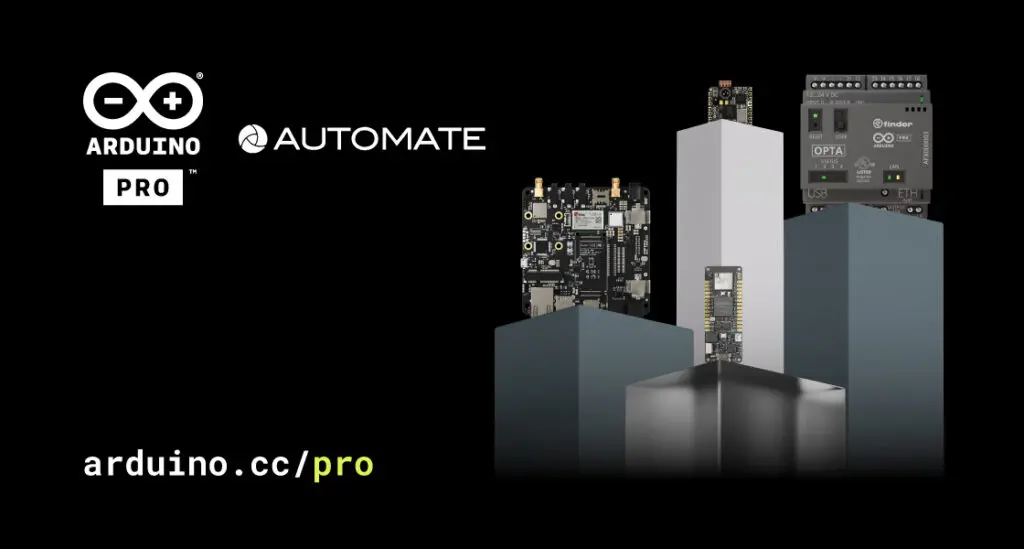
We’re ready to bring our unconventional take on automation to one of North America’s leading industry events: come meet us at Automate Show in Chicago, taking place May 6th-9th, to find out more about open-source hardware and software solutions unlocking new opportunities to empower engineers and educators alike.
1. Get a closer look at the Arduino Opta: with its small form factor, low power consumption, and built-in connectivity options, our groundbreaking micro PLC is “the Swiss Army knife” of industrial automation. Zero vendor lock-in, tons of programming flexibility: choose among the key IEC 61131-3 languages or the Arduino environment, or even combine the two approaches to further boost capabilities.
2. Discover the brand newArduino PLC Starter Kit, based on the Opta WiFi and Arduino PLC IDE: a training solution that plugs right into the future of industrial automation, designed to introduce students in vocational institutes and tech-oriented academies to IEC 61131-3 standard programming languages and Modbus communication.
3. Be the first to know about the Opta’s I/O Expansion Modules: Arduino ProOpta Ext D1608E and Arduino Pro Opta Ext D1608S multiply real-time control points with 16 programmable inputs and 8 digital (electromechanical or solid-state) relay outputs; Arduino Pro Opta Ext A0602 instead allows users to configure new analog I/O to interact with 0-10 V and 0/4-20 mA signals, and get temperature values through PT100, diversifying data acquisition capabilities and expanding actuation possibilities.
4. Learn more about ACE-100: a comprehensive training program designed to equip participants with the skills and knowledge needed for industrial and building automation using the Arduino Opta. Gain hands-on experience and practical insights into PLC programming, and earn your Arduino Certified Engineer credential!
5. Live demos featuring products from our ecosystem, from a manufacturing command and control platform developed with AWS Monitron and the Opta WiFi to a vibration-based anomaly detection solution powered by the Nicla Sense ME to… you’ll have to visit to discover how many different challenges can be solved with open-source!
Keep an eye out for Arduino even beyond the booth! Weintek USA (#5463) will showcase a joint Opta demo, part of a strategic partnership aimed at enhancing STEM HMI+PLC training programs across the United States.
So, whether you work in automation or are simply curious about the technology trends shaping your industry today, Automate Show is the fair for you!
Register to attend here, and visit the Arduino team at booth #2853 at McCormick Place in Chicago, from May 6th to 9th. Want to schedule some one-on-one time with our experts? Click here to schedule.
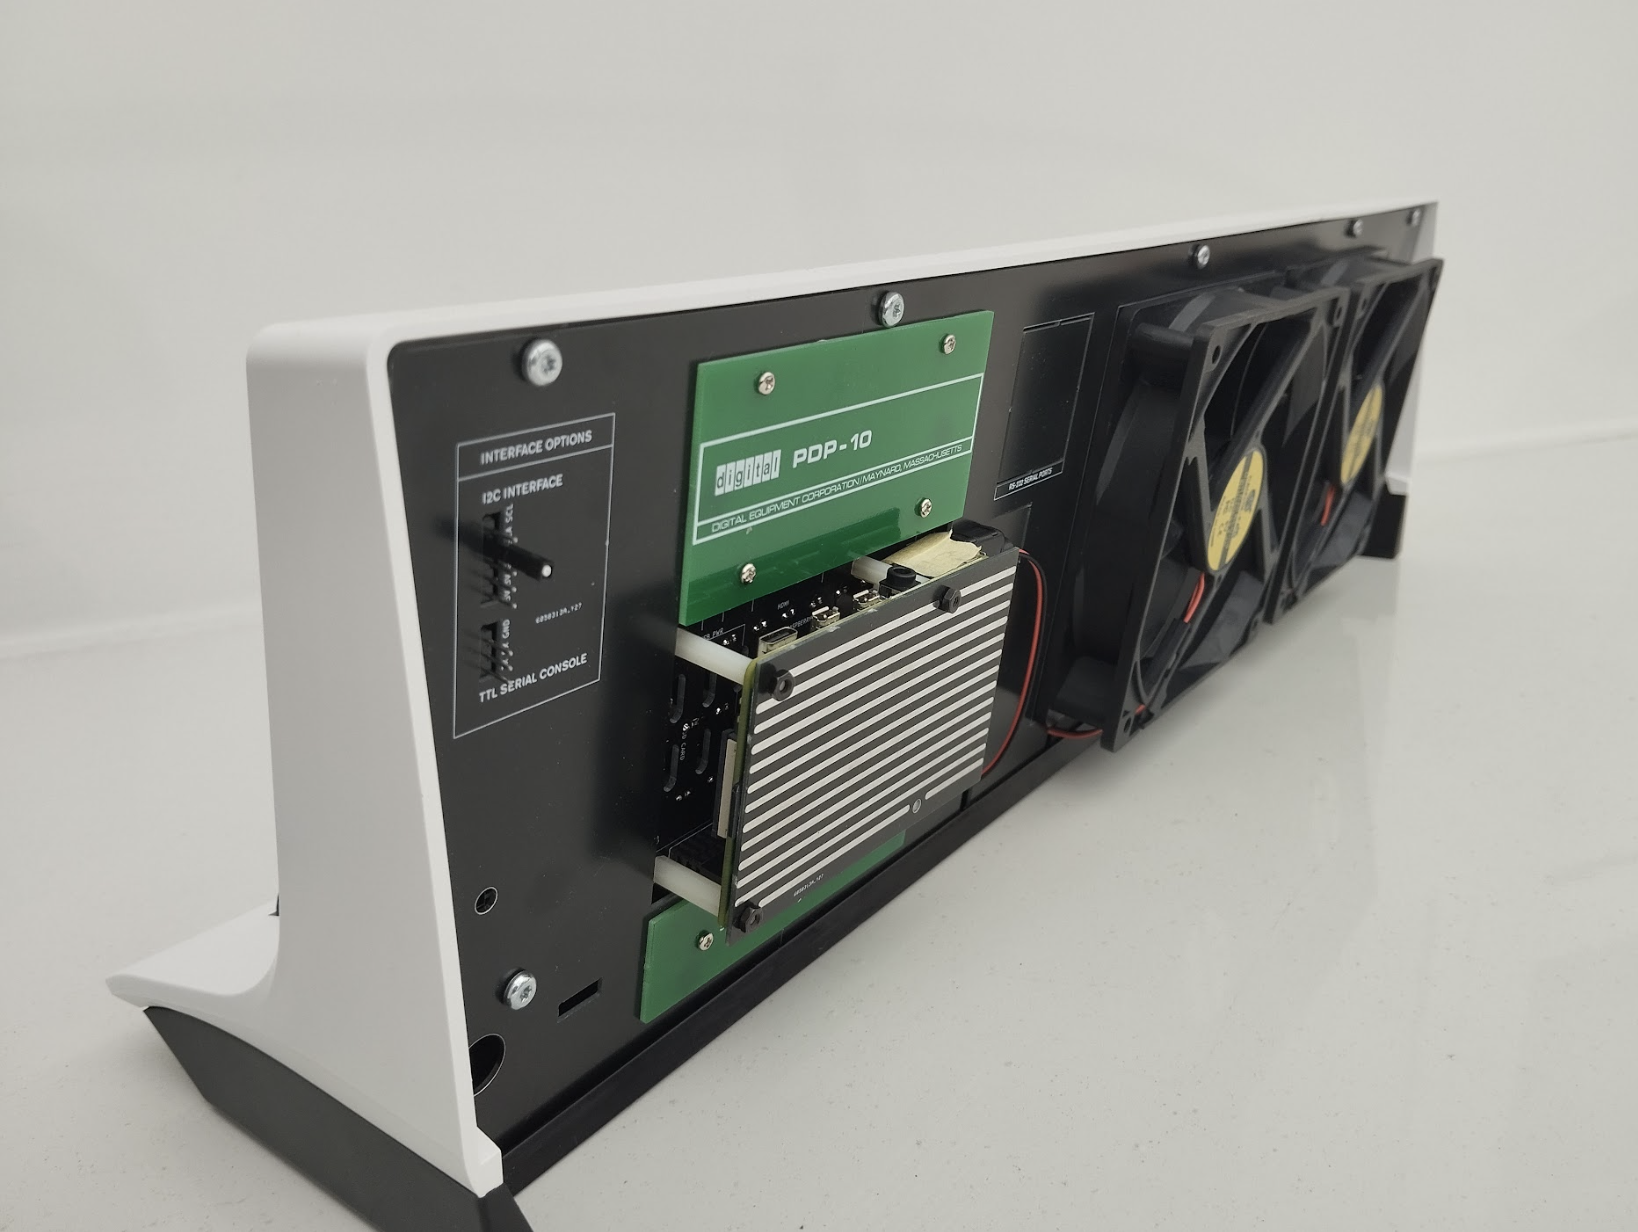
Mainframes were actually quite boring machines to work with. You created punch-cards, fed them in, waited, then a response was printed out. DEC’s PDP-10 was the first to be truly interactive. It was DEC’s decision in 1968 to provide a unit to MIT that really sealed its place in history. For the first time, a mainframe became a multi-use computer. Students and staff attached graphics terminals and other displays and started hacking the system. One of the main outcomes from this period was the first computer game, Spacewar! PDP-10s were the first computers to connect via ARPANET, which later became the internet.
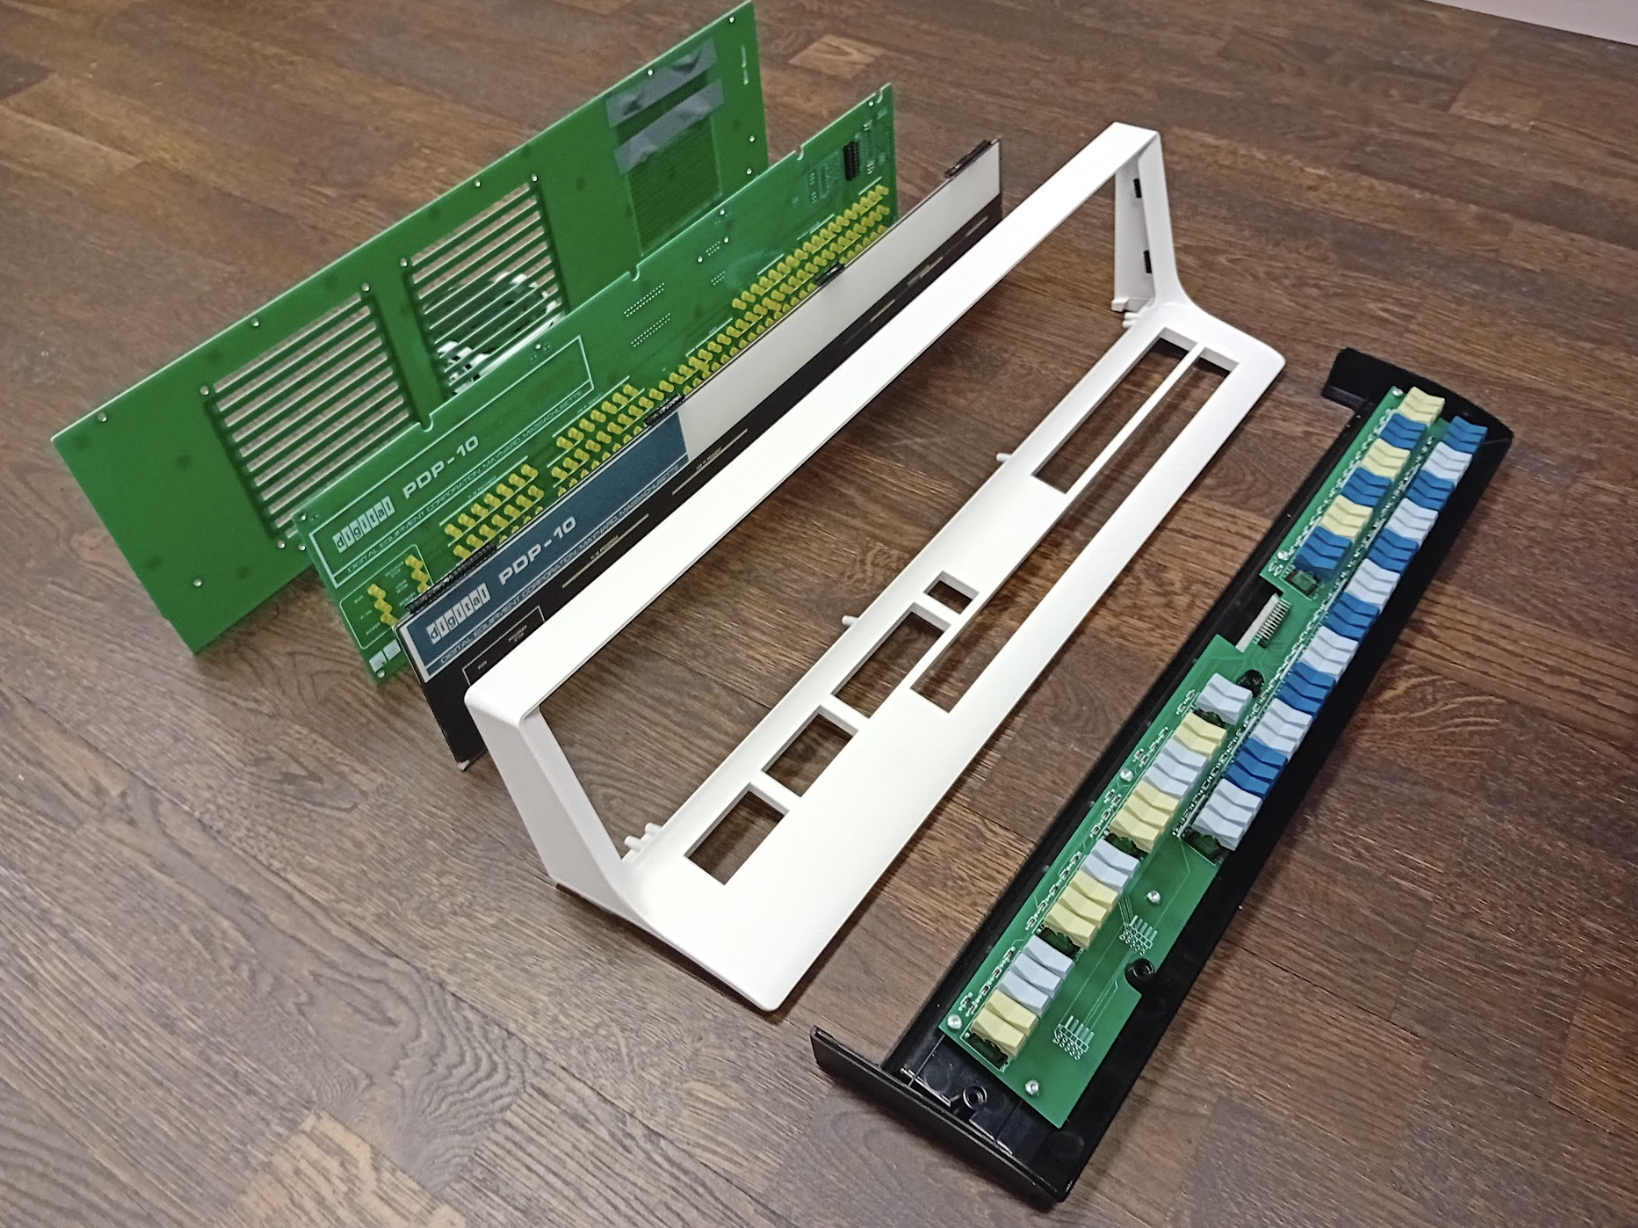
Pieces of the puzzle
Oscar’s new project had two distinct parts: The emulator and the hardware. In truth, the hardware is a simple lightboard with some control circuitry. It’s the attention to detail that makes it special. However the software was a bigger problem. Oscar wanted to recreate the MIT experience, and that meant emulating their custom operating system, the Incompatible Timesharing System (ITS). Fortunately, a group was already working hard on emulating ITS, despite MIT having switched everything off in the 1990s. When Oscar met Lars Brinkhoff, the principal driver of the project, the PiDP-10 was born.
Now emulation was taken care of, attention turned to the hardware. Part of the magic of the PDP-10 is its beautiful panel, complete with rows of lights and toggle switches. Oscar was determined to create an accurate replica and found it a satisfying and fun process: “Producing that pretty front panel, with its artwork and transparent windows for the LEDs behind it. That is artisanal work that I really enjoy. Endless tinkering, and then tweaking a big printer to print out the front panels with the exactly correct colours, that sort of thing.”
The injected-moulded case, over 50 cm in width, would be more challenging though. “The problem with injection mould making is – you make a 3D model, you give it to a mould maker, and if you’re lucky he makes a mould to your specifications. Any mistake you made in your 3D model is your problem, there is no going back to fix things.” Luckily, Oscar found a friendly manufacturer who understood the importance of the project and helped him with the process. The result took two years to get right.
The PCB was designed in Kicad, connecting matrices of LEDs and switches to the GPIO of a Raspberry Pi 5, which would be hidden away inside the case. The next challenge was to interface everything together. “Part of the fun is getting the simulator working right. Making sure that it blinks the right LEDs at the right time, that the complex front panel switches for the debugger built into the system really work as they did on the old machine.” explained Oscar. But how to confirm this? Since the mid-eighties there have been no operational PDP-10s. In 2018 Paul Allen, co-founder of Microsoft, who had a strong affinity with the mainframe, tasked the Living Computer Museum in Seattle with restoring an example. Shortly before the pandemic, Oscar was able to see the machine working and fine-tune the emulation to match. Sadly Allen died a few weeks before the restoration was complete.
It was obvious to Oscar that the recreated PDP-10 would be based on Raspberry Pi. A primary factor was cost, as he could see no way he could assemble all the I/O ports and connectors necessary for less than the cost of Raspberry Pi 5, which had everything he needed. Even though the Raspberry Pi does not run a true real-time operating system, it is fast enough to be able to scan the switches and refresh the LEDs two hundred times a second, which is more than enough for accurate emulation.
Two hearts
Oscar also wanted the result to be ‘dual-hearted’. Emulating a PDP-10 and controlling the front panel is a breeze for Raspberry Pi 5, so there’s plenty of processing power available to run other things such as a media server. It’s certainly more aesthetically pleasing than a small black box.
Is Oscar happy with the result? “Yes! In the end, I think the primary motivator for such a project is that you want to have this thing for yourself, blinking away in your living room, and it becomes almost an obsession to Get It Right. And I think we did.” He acknowledges that this has been a project with a lot of contributors such as the ITS Reconstruction Project and many ex-Digital employees, many of which attended the project’s launch at MIT in April.
Best of all, if you’re happy with through-hole soldering, you can have your own PiDP-10! Oscar has put the kit into production and you can order it from his site and build your very own 1960s mainframe. This project has taken seven years, but Oscar is not done yet. Next on the list is the PDP-1 from the 1950s which would complete the ‘evolutionary tree’ of interactive computers. We can’t wait.
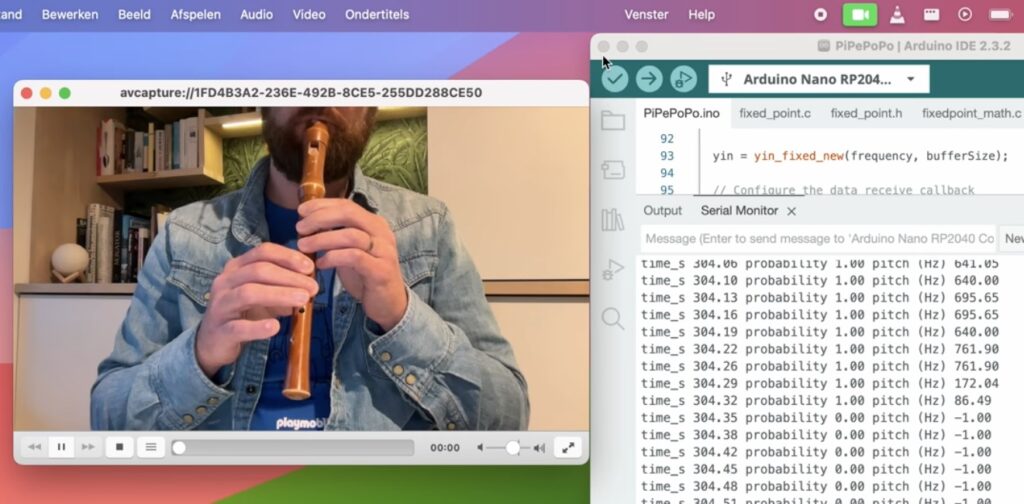
The computer mouse has existed in its current form since the late 1970s. But as musician and software engineer Joren Six points out, it can become boring after a while. His novel reinvention of the mouse eschews moving a physical interface in favor of sound, with different frequencies causing the cursor to move in a predictable manner.
For this project, Six went with an Arduino Nano RP2040 Connect because it not only supports USB HID functionality, but is also fast enough to determine frequencies based on the input from the board’s onboard PDM microphone. The program running on the Nano RP2040 Connect works by initializing the microphone and a YIN-based library, which finds the fundamental frequency from an array of samples. From here, the Nano RP2040 continuously reads new samples from the microphone and passes them to the algorithm before getting back the result and a confidence value.
The Nano RP2040 Connect takes each result frequency and maps it to either a horizontal or vertical motion the cursor can execute, and a frequency around 900Hz causes the mouse to send a click event to the host computer. Realizing that not everyone has access to the same hardware, Six also wrote a Chrome extension that replicates this functionality via the browser’s Microphone API.
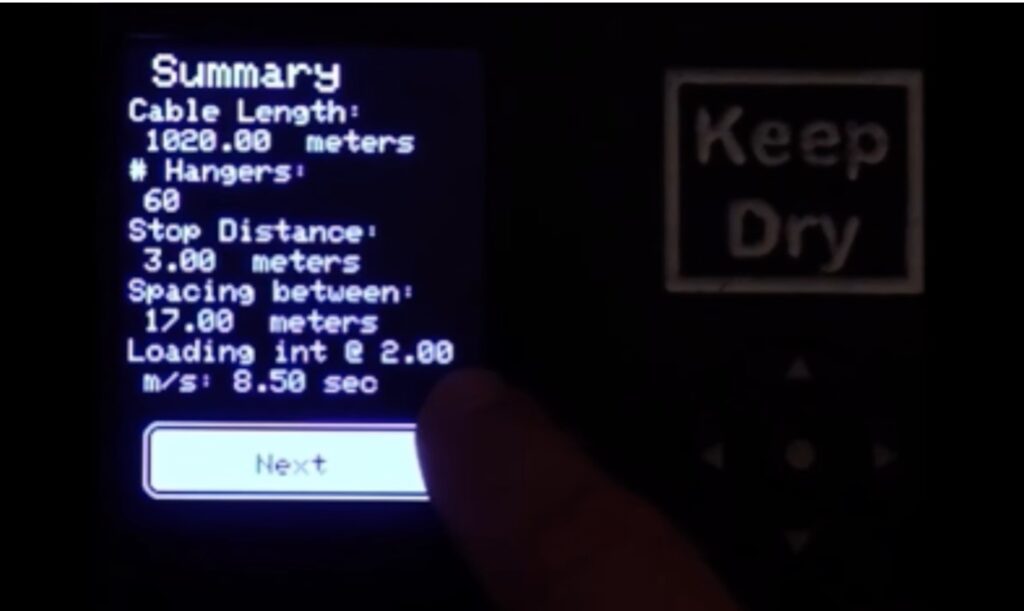
Most ski lifts are pretty simple systems: they use big ol’ motors to pull cables with chairs or hangers attached. More advanced detachable designs let the chairs come off the cable temporarily while in the terminal, so skiers can hop on at a leisurely pace. But basic fixed-grip chairlifts don’t have that capability and skiers have to jump on while the chairs move at full speed. To help ski lift operators space those chairs properly, Marc Antaya designed the Ski Lift Spacer 2000.
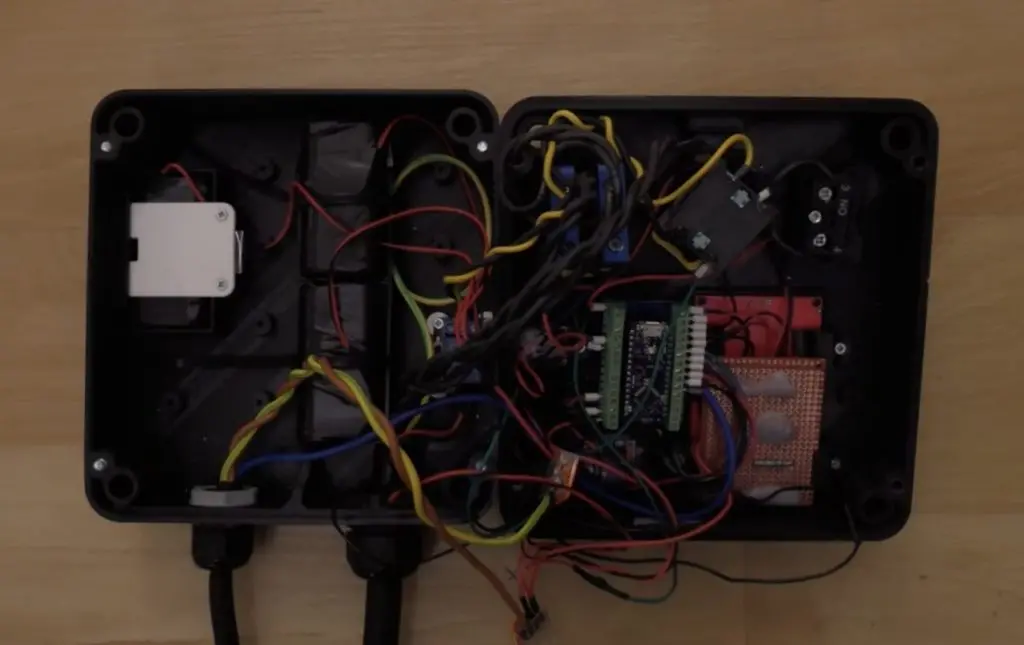
Antaya was working as a liftie at a local ski area and noticed that it was difficult to attach chairs to the ski lift cable at consistent intervals that facilitate smooth operation. So he built the Ski Lift Spacer 2000, which measures the cable speed and distance traveled, calculates the spacing, and stops the lift at the right times to hang the chairs. It is wired in series with the lift’s existing controls, so it can’t override their safety measures. It simply provides a remote start/stop function, which it can perform when desired for attaching chairs.
The device consists of an Arduino Nano Every board, lithium batteries, relays, an LCD screen, and a control interface. That interface is important, because it lets lifties calculate the chair positions in several different ways based on the data they have available. For example, they can start with a certain number of chairs and the cable length. In that case, the device will calculate the spacing between chairs. Or they can enter the cable length and desired spacing, in which case the device will calculate the total number of chairs required.
To do its job, the device needs to know exactly how much the cable moves. To achieve that, Antaya built a wheel turned by the cable. It has magnets, which the Arduino can use for rotational encoding thanks to Hall effect sensors. This is all configurable in the device menu system, where the liftie can set the wheel circumference/diameter and number of magnets.
Antaya has already tested an earlier version of the Ski Lift Space 2000 at his local ski area. After updating it as shown in the video, it is ready for a second round of testing.
We are thrilled to announce the newest addition to Arduino’s System Integrators Partnership Program: Interactive Engineering Corp. (IEC), based in Ohio, is a best-in-class solution provider in engineering and manufacturing, bringing to the table a unique blend of expertise and aligning seamlessly with Arduino’s core values of industrial innovation. Indeed, their philosophy combines technical excellence in design with flexible manufacturing, to deliver solutions quickly and efficiently both in the United States and on a global scale.
One of IEC’s standout features – as a full-service electronics manufacturer with over 20 years of experience – is their comprehensive range of services. From PCBAs to wire harnesses, sheet metal, assemblies, and LCD displays, they offer everything needed to bring a product to market. Their ability to manufacture in large quantities ensures scalability and reliability for clients across various industries.
As a Gold-level partner, IEC is poised to open up new avenues for accelerated product development in key verticals, leveraging the Arduino Pro range and accessing custom support services driven by our dedication to unlocking new possibilities.
“Joining the System Integrators Partnership Program is an important milestone for us. Until now, most of our partnerships have been in the embedded and board level space, but with Arduino at our side we are ready to grow more into the machine automation field,” commented IEC’s Director of Engineering, Jeremy Nocchi.
Furthermore, the collaborative partnership is based on a shared vision that recognizes the importance of ease-of-use for customers and accessibility, with a strong focus on retrofitting legacy solutions as a way to sustainably embrace innovation. With that in mind, Strategic Partnerships Advisor to Arduino Paul Kaeley spoke for the company: “We extend a warm welcome to IEC and look forward to a fruitful partnership that drives innovation, fosters collaboration, and unlocks endless possibilities for our customers and the industry as a whole”.
The System Integrators Partnership Program by Arduino Pro is an exclusive initiative designed for professionals seeking to implement Arduino technologies in their projects. This program opens up a world of opportunities based on the robust Arduino ecosystem, allowing partners to unlock their full potential in collaboration with us.
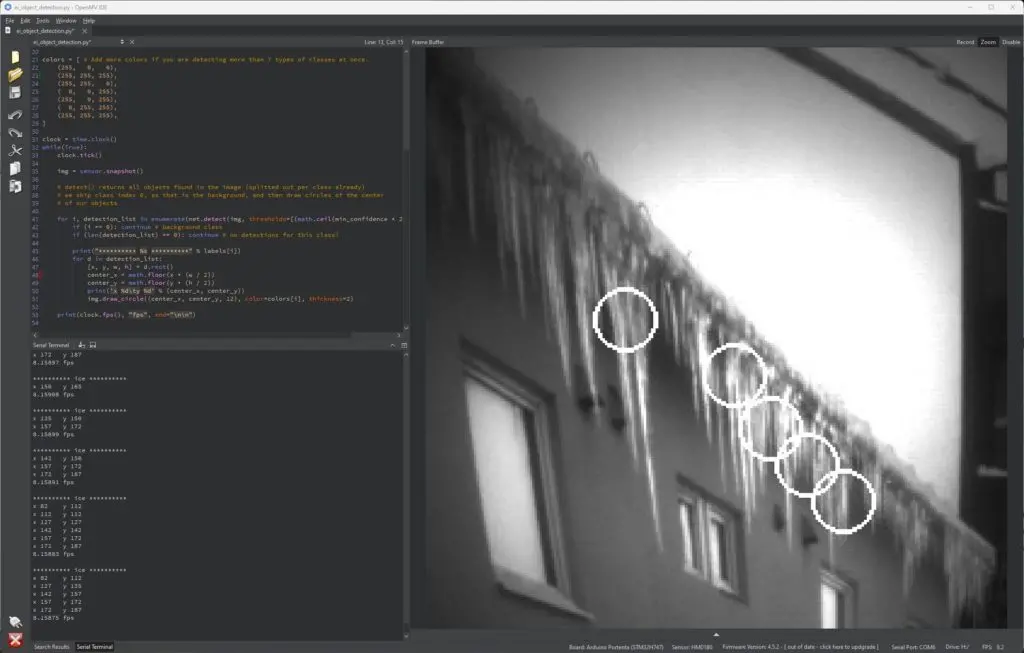
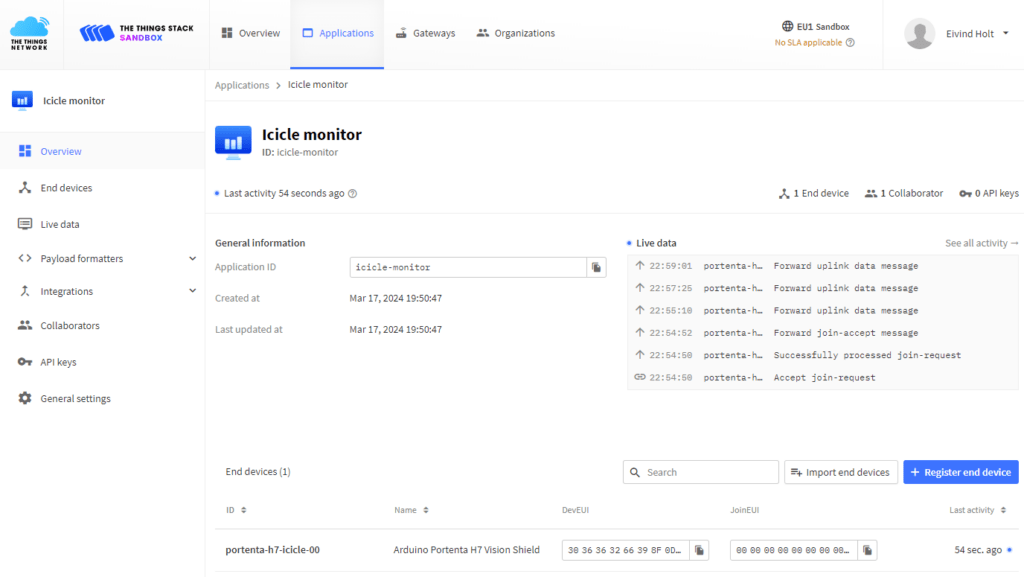
In areas that experience plenty of cold weather, icicles and ice dams can present a very real danger to the people and property nearby. In response, Eivind Holt has developed a computer vision-based system that relies on an Arduino Portenta H7, a Portenta Vision Shield, and a slew of AI tools/models to recognize this ice buildup. Best of all, the board’s low power consumption and LoRaWAN connectivity means it can be deployed almost anywhere outdoors.
Before a model can be created, it needs copious amounts of training, data which normally comes from manually-annotated, real images. But recent advancements have allowed for synthetic datasets to be used instead, such as with NVIDIA’s Omniverse Replicator. It was in here that Holt programmatically added a virtual house and randomized icicle models, as well as configured Omniverse to move the camera around a raytraced scene in order to snap virtual pictures and annotate them with the correct label.
Once the realistic, synthetic data had been created, Holt exported everything to Edge Impulse and trained an object detection model for the Portenta H7, although it was also tested in NVIDIA’s Isaac Sim environment via the Edge Impulse extension prior to deployment. Alert generation was achieved by connecting the LoRaWAN radio to The Things Stack and sending a small, binary payload every ten seconds if any icicles were detected.
In the rapidly evolving landscape of industrial technology, three interesting trends are intertwining to streamline processes, improve efficiency, and reduce downtime. They are retrofitting, remote control/monitoring, and power metering – and together, they make for a great strategy to upgrade and improve existing machinery, reaping all the benefits of connected things and data analysis without the huge investment of completely new equipment.
Retrofitting industrial machinery Retrofitting industrial machinery involves updating existing equipment with modern technology to enhance functionality and performance. It allows businesses to extend the lifespan of their machinery while adapting to evolving industry standards and requirements.
Remote monitoring and control Remote monitoring and control enable businesses to oversee their operations from anywhere in the world. This capability not only improves operational efficiency but also facilitates proactive decision-making and troubleshooting, ultimately reducing costs and downtime.
Power metering Power metering entails tracking and analyzing energy consumption. By monitoring power usage, businesses can identify areas for optimization, reduce waste, and lower energy costs, contributing to sustainability efforts and improving their own bottom line at the same time.
Our latest demo showcases the seamless integration of these three crucial aspects into a single solution, using Arduino technology.
The demo in detail
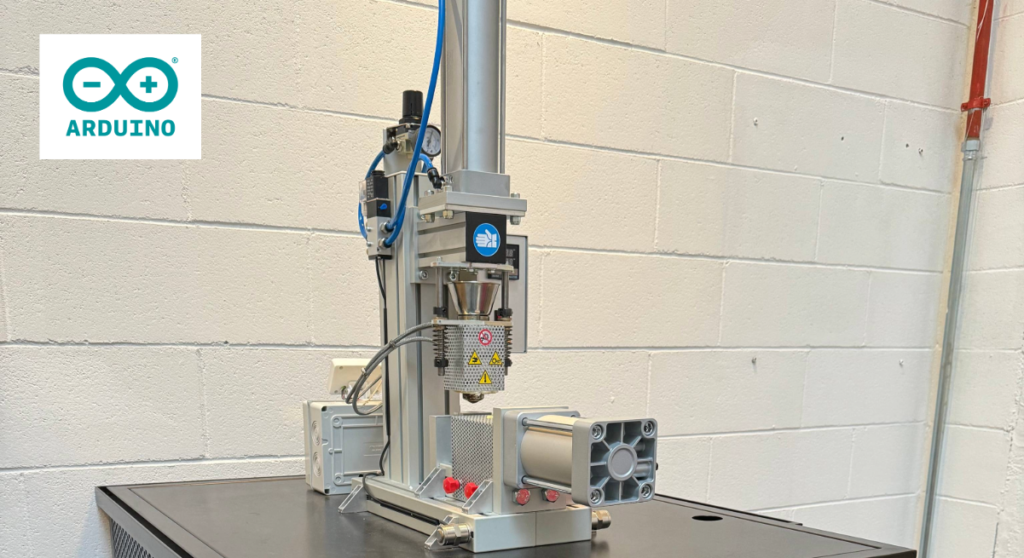
We focused on retrofitting an injection molding machine – a common piece of industrial equipment – with advanced automation capabilities. By replacing the original controller with the Arduino Opta WiFi micro PLC, we transformed the machine into a connected device.
Now, integrating with the Arduino Cloud, users can monitor and control the injection molding machine remotely via intuitive dashboards. This connectivity allows for real-time oversight of production cycles, performance metrics, and equipment status from anywhere with an Internet connection.
Additionally, the Arduino Opta WiFi is equipped with RS485 communication capabilities, enabling seamless integration with an external power meter – in our case, a Finder model. This provides valuable insights into energy consumption, production output, material usage, and equipment health.
The collected data is then analyzed through dedicated dashboards, offering information about operational efficiency and potential issues. By leveraging this data, businesses can proactively schedule maintenance and repairs, minimizing downtime and optimizing production processes.
Retrofitting for a connected future
Many businesses today can retrofit existing machinery to embrace the benefits of connectivity and automation. Our demo provides a practical example of how common industrial equipment can become smarter, more efficient, and easier to manage. From remote monitoring and control to power metering and predictive maintenance, retrofitting offers a sustainable way to modernize industrial infrastructure.
Unlocking potential across industries
Moreover, the versatility of Arduino’s open-source ecosystem ensures that this solution can be adapted and applied to a wide range of existing machines and equipment, enhancing their operation effectively – whether in manufacturing, logistics, or any other industry relying on machinery.
To learn more about how you can leverage Arduino technology to upgrade your infrastructure and achieve tangible results, contact us today. Let us help you unlock the full potential of your industrial assets with practical, cost-effective solutions.
Um dir ein optimales Erlebnis zu bieten, verwenden wir Technologien wie Cookies, um Geräteinformationen zu speichern und/oder darauf zuzugreifen. Wenn du diesen Technologien zustimmst, können wir Daten wie das Surfverhalten oder eindeutige IDs auf dieser Website verarbeiten. Wenn du deine Einwillligung nicht erteilst oder zurückziehst, können bestimmte Merkmale und Funktionen beeinträchtigt werden.
Funktional
Immer aktiv
Die technische Speicherung oder der Zugang ist unbedingt erforderlich für den rechtmäßigen Zweck, die Nutzung eines bestimmten Dienstes zu ermöglichen, der vom Teilnehmer oder Nutzer ausdrücklich gewünscht wird, oder für den alleinigen Zweck, die Übertragung einer Nachricht über ein elektronisches Kommunikationsnetz durchzuführen.
Vorlieben
Die technische Speicherung oder der Zugriff ist für den rechtmäßigen Zweck der Speicherung von Präferenzen erforderlich, die nicht vom Abonnenten oder Benutzer angefordert wurden.
Statistiken
Die technische Speicherung oder der Zugriff, der ausschließlich zu statistischen Zwecken erfolgt.Die technische Speicherung oder der Zugriff, der ausschließlich zu anonymen statistischen Zwecken verwendet wird. Ohne eine Vorladung, die freiwillige Zustimmung deines Internetdienstanbieters oder zusätzliche Aufzeichnungen von Dritten können die zu diesem Zweck gespeicherten oder abgerufenen Informationen allein in der Regel nicht dazu verwendet werden, dich zu identifizieren.
Marketing
Die technische Speicherung oder der Zugriff ist erforderlich, um Nutzerprofile zu erstellen, um Werbung zu versenden oder um den Nutzer auf einer Website oder über mehrere Websites hinweg zu ähnlichen Marketingzwecken zu verfolgen.