Kategorie: Mobile

  • A vote of thanks to our Trustees

    A vote of thanks to our Trustees

    Reading Time: 5 minutes

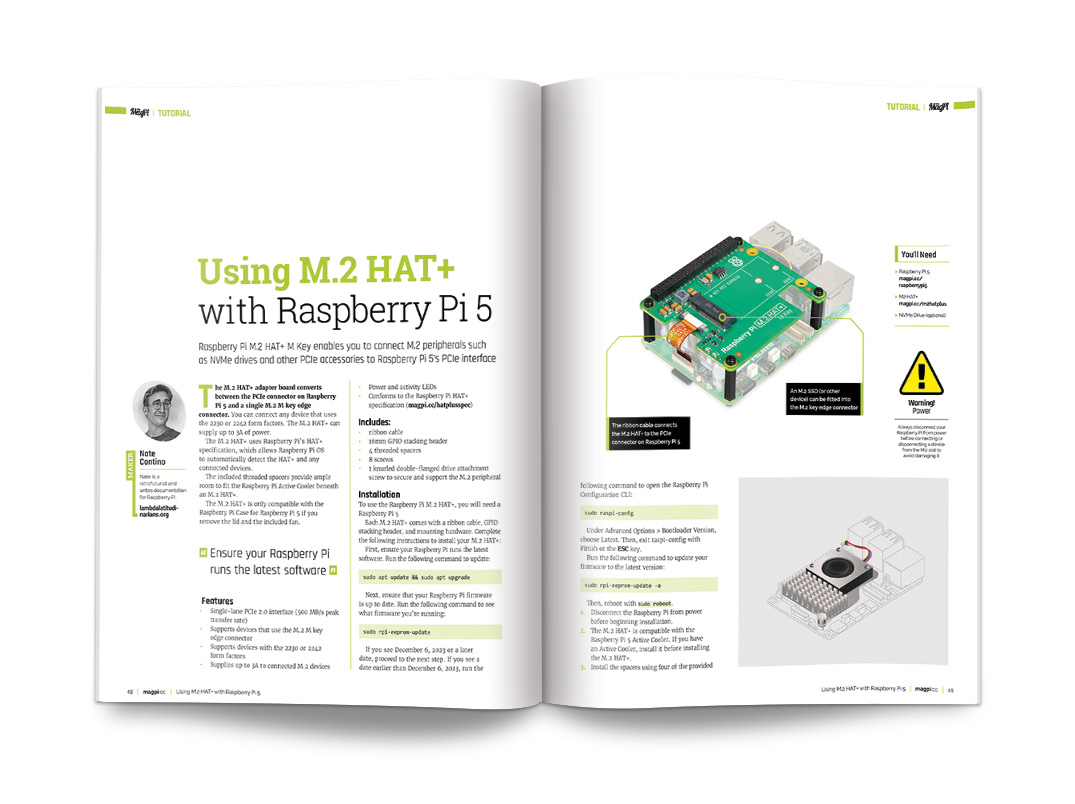
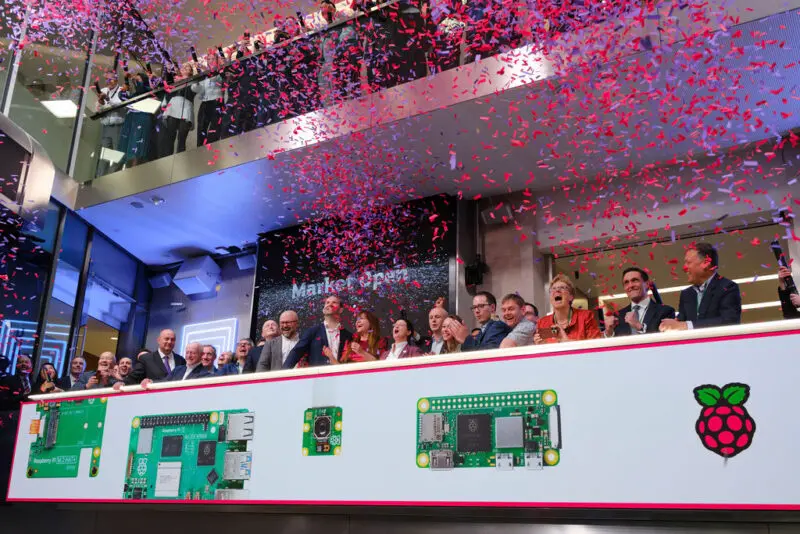
    Tuesday 11 June 2024 will be remembered as one of the most important days in the history of Raspberry Pi.

    Confetti rains at the introduction of Raspberry Pi Holdings PLC to the London Stock Exchange.
    At the London Stock Exchange on 11 June 2024.

    The successful introduction of the Raspberry Pi Foundation’s commercial subsidiary on the London Stock Exchange is a genuinely remarkable achievement. I want to put on record my huge congratulations and thanks to Eben Upton, Martin Hellawell, and the whole team at Raspberry Pi Holdings plc for everything they have done to make this possible. 

    The purpose of the IPO was to secure the next stage of growth and impact for both the Foundation and the company. We have huge ambitions and the IPO has provided both organisations with the capital we need to pursue those ambitions at pace and scale. Our Chief Executive Philip Colligan has already explained what it means for the Raspberry Pi Foundation and our mission to empower young people all over the world. 

    In this post, I wanted to take a moment to acknowledge the significant contribution that others have made over the years, particularly all of the Trustees who have been so generous with their time, energy, and expertise. 

    Founding Trustees

    The Raspberry Pi Foundation was established in 2008 by six founding Trustees: Alan Mycroft, David Braben, Eben Upton, Jack Lang, Pete Lomas, and Rob Mullins. All of them deserve credit and thanks for setting us off on this incredible journey. 

    Alan, Eben, Jack, and Rob were all involved with the Computer Lab at the University of Cambridge. They were dealing with a decline in applications to study the computer science undergraduate course, which was a symptom of the much wider challenge that far too many young people weren’t getting access to opportunities to learn computer science, or getting hands-on with programming and electronics. 

    David Braben brought an industry perspective, drawing on the challenges he was experiencing with recruiting engineers and programmers at the world-leading games company that he had founded, Frontier Developments.

    At the Sony factory in Pencoed, Wales, that produces Raspberry Pi computers.

    For Pete Lomas, he was paying forward the support and inspiration that he received from a college technician who gave him the opportunity and encouragement to experiment with programming a DEC PDP-8. That experience ultimately led Pete to establish Norcott Technologies, an electronics design and manufacturing business that he still runs today.

    The founding Trustees’ original idea was to create a low-cost programmable computer — available for the price of a textbook — that would remove price as a barrier to owning a computer and inspire young people to take their first steps with computing. It took four years for the first Raspberry Pi computer to be launched, an achievement for which Eben and Pete were rightly honoured, along with other members of the team, as recipients of the prestigious MacRobert Prize for engineering.

    Combining social impact and commercial success 

    What none of our founding Trustees could have predicted was the enormous commercial success of Raspberry Pi computers. In realising their vision of a low-cost programmable computer for education, the team created a new category of single-board computers that found a home with enthusiasts and industry, enabling the team to evolve — through hard work and creativity — into a business that is now entering a new phase as a listed company.

    They also delivered on the original mission, with computer science at the University of Cambridge now being one of the most oversubscribed undergraduate courses in the country and many applicants citing Raspberry Pi computers as part of their introduction to programming. 

    The commercial success of Raspberry Pi has enabled the Foundation to expand its educational programmes to the point where it is now established as one of the world’s leading nonprofits focused on democratising access to computing education, and is benefiting the lives of tens of millions of young people already. 

    It takes a village 

    While no-one really knows the origin of the proverb ‘It takes a village to raise a child’, we can all recognise the truth in that simple statement. It applies just as much for endeavours like Raspberry Pi.

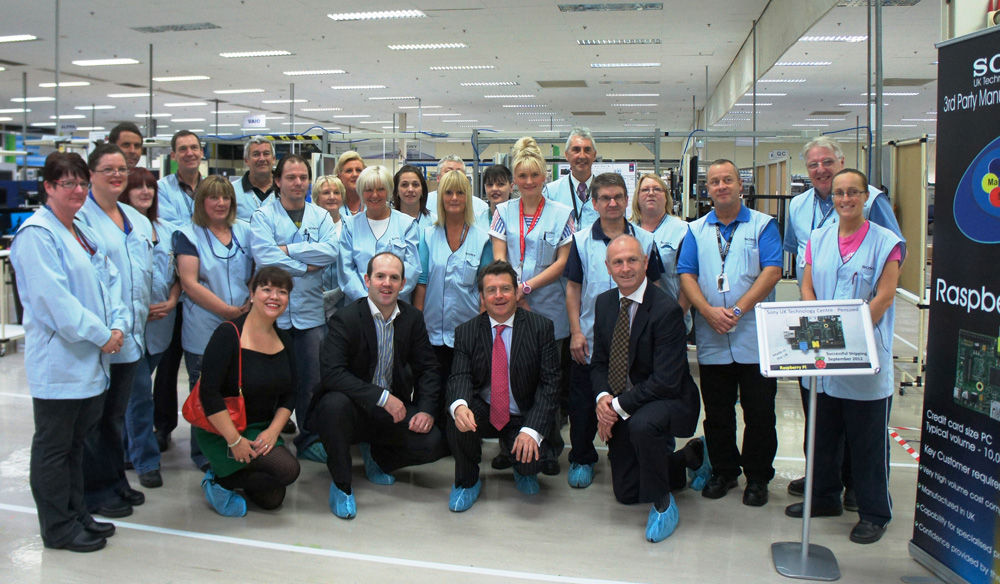
    Over the years, Raspberry Pi has been a genuine team game. Employees in the Foundation and our commercial subsidiary, advisers, partner organisations and supporters, volunteers and community members have all played a crucial role in the success of both the company and the Foundation.

    Pete Lomas and Philip Colligan laugh on stage.
    At a Raspberry Pi birthday celebration.

    Over the years there have been 21 Trustees of the Foundation, bringing an incredible range of skills and experience that has elevated our ambitions and supported the teams in both the Foundation and the company. 

    All of our Trustees have provided their time and expertise for free, never receiving any financial benefit for their contribution as Trustees. 

    Serving as a Trustee of a charity is a serious business, with significant responsibility and accountability. While many charities have commercial operations, there is no doubt that the scale and complexity of Raspberry Pi’s commercial business has placed significant additional responsibilities on all of our Trustees. 

    I especially want to pay tribute to my predecessors as chair of the Board of Trustees: Jack Lang, one of our founding Trustees, who sadly passed away this year; and David Cleevely, who continues to support our work as a Member of the Foundation. Both Jack and David played a particularly important part in the success of Raspberry Pi. 

    Welcoming our new Trustees

    As we enter this new phase for the Foundation’s relationship with Raspberry Pi Holdings Ltd, we are delighted to welcome three new Trustees to the Board:

    • Andrew Sliwinski is a VP at Lego Education, formerly co-director of Scratch @ MIT, ex-Mozilla, and founder of DIY.org. Andrew is a technologist and maker with a deep understanding of education systems globally.
    • Laura Turkington leads global partnerships and programmes at EY, and was previously at Vodafone Foundation. Laura has extensive global experience (including Ireland and India), including supporting large-scale initiatives on digital skills, computing education, and AI literacy.
    • Stephen Greene is the founder and CEO of Rockcorps and the former chair of the National Citizen Service. Stephen brings huge experience of building global volunteer movements, social enterprise, marketing (especially to young people), government relations, and education of disadvantaged youth.

    Website: LINK

  • The Dicemaster 2000

    The Dicemaster 2000

    Reading Time: 4 minutes

    From the start, Chris had an idea of what he wanted from the device. “I knew what I wanted to achieve – for my friend to press buttons, for virtual dice to be rolled and the result to be announced,” he says. “From there it was just about figuring out which components to use and how to lay them out efficiently. This needed to be hand-held, so a compact design was a must.”

    To that end, Chris modelled the device on a gamepad. “I tried to imagine a controller, like an Xbox controller,” he says. “I sought to work out how it would look, feel and where the thumbs would rest. I wanted to make something that was comfortable and felt familiar and I also needed it to operate without being plugged in so I chose a Raspberry Pi Pico and used an 18650 battery shield to power it along with the other components.”

    The different modes make life even easier. A die pool can be saved and loaded to a microSD card which is inserted in the top of the device.

    Roll with it

    Selecting the Raspberry Pi Pico meant the dice roller could be compact and use minimal power. “It’s instantly on and it was able to handle the different components I needed, such as a microSD card reader, an audio amp with speaker and a litany of buttons,” Chris says.

    Those buttons would be 3D printed with Braille so that his friend would be able to read their various functions and control the device effectively and independently. “Adding Braille wasn’t very difficult,” Chris says. “I designed flat button caps then added the Braille numbers to them in Blender, the free open-source 3D computer graphics software.”

    Board games often make use of non-traditional dice – in other words, they’re not always familiar cubes with six marked faces. The standard polyhedral dice set also includes those with four, eight, ten, 12 and 20 sides (the entire set being referred to as d4, d6, d8, d10, d12 and d20). “I needed to have a button for each one,” Chris says. He also added two extras: Reset and Roll.

    The case took some time to perfect, but it’s been designed to be comfortable to hold while giving easy finger access to the buttons

    Writing the project in CircuitPython, he created a device that would allow his friend to press one of the numbered buttons to add it to the die pool. When the dice are ready to be rolled, it’d be a case of pressing Roll and listening to the result when it’s announced. “In addition, there are some long press modes,” Chris adds. “If you hold the d4 button for a few seconds, you will enter quiet mode which plays chimes rather than speaking out every die entered and describing what it’s doing. It still announces the results of the roll, but it can cut down on time and I added it in case the normal mode was too distracting to other players at the table.”

    Holding down d6 saves the current die pool. “This is useful if you’re playing something like Dungeons & Dragons and constantly need to roll that big 8d6 fireball [that’s eight d6 dice being rolled at once],” Chris continues. “Long-pressing d8 will load the saved die pool from the microSD card, and that means the saved pool will persist across uses.” Long-pressing the d10 enters percentage mode which, rather than rolling dice, will simply give a percentage between one and 100.

    Play the game

    Coding all of this was a challenge. “Interfacing with the audio amp was tricky and I wish the device was a bit easier to understand in terms of audio quality, but this may have been due to everything being built on a prototype board,” Chris laments. He also found it difficult to perfect the controller shape. “The housing was 3D printed in a single colour and the top was painted red. I had a good friend of mine help with the ergonomics of it. There was also a lot of soldering,” he adds.

    The device makes use of a Raspberry Pi Pico board connected to a protoboard which is wired to the buttons and a PAM8302 2.5 Class D single channel amp

    Even so, it’s been worth the time and effort. Chris’ friend loves using the device and he finds it allows him to fully participate in games. It’s also comfortable to hold, easy to use and very effective. What’s more, you can replicate it because Chris has made the code open source and he has also shared the 3D files on Printables. In that sense, it’s capable of helping many other people with a visual impairment.

    Chris is certainly happy overall even though he would have done some things differently. “If there is one part of this project I wish I had done, it would have been to design a custom PCB using something like KiCad – if only I’d had issue 138 of The MagPi when I started! It probably would have helped a lot with audio issues and made for a cleaner build overall. It’s definitely on my list of things to learn for future projects.”

  • A desktop-sized DIY vending machine for your room

    A desktop-sized DIY vending machine for your room

    Reading Time: 2 minutes

    Have you ever wanted your very own vending machine? If so, you likely found that they’re expensive and too bulky to fit in most homes. But now you can experience vending bliss thanks to this miniature vending machine designed by m22pj, which you can craft yourself using an Arduino and other materials lying around the house.

    This project is fun, because it gives makers the opportunity to experiment with vending machine features without a big budget. That even includes more modern payment options, like one might see on a college campus with vending machine that charge to student identification cards. This design lets DIYers work with those features to learn about RFID, security, and more. And, of course, this is a chance to get hands-on experience with vending mechanisms, too.

    The best part is that you can build this with some cardboard and off-the-shelf electronic components. The enclosure and almost all of the mechanical parts are cardboard. The electronics include an Arduino Mega 2560 board, a keypad, an RFID reader module, LEDs, and servo motors. The servos must be full-rotation models, so they can drive the vending mechanisms.

    As designed, this vending machine can serve up to four different treats. But it would be possible to expand that to include many more. The Arduino has plenty of pins available to control additional servo motors, so the sky is the limit. 

    The post A desktop-sized DIY vending machine for your room appeared first on Arduino Blog.

    Website: LINK

  • Hello World #24 out now: Impact of tech

    Hello World #24 out now: Impact of tech

    Reading Time: 3 minutes

    Do you remember a time before social media? Mobile phones? Email? We are surrounded by digital technology, and new applications impact our lives whether we engage with them or not. Issue 24 of Hello World, out today for free, gives you ideas for how to help your learners think openly and critically about technology.

    Teaching about the impact of technology 

    For learners to become informed, empowered citizens, they need to understand the impact technology has on them as individuals, and on society as a whole. In our brand-new issue of Hello World, educators share insights from their work in and around classrooms that will help you engage your learners in learning about and discussing the impact of tech.

    For example:

    • Jasmeen Kanwal and the team at Data Education in Schools share their resources for how young people can start to learn the skills they need to change the world with data
    • Julie York writes about how incorporating AI education into any classroom can help students prepare for future careers
    • Ben Hall discusses whether technology is divisive or inclusive, and how you can encourage students to think critically about it
    Two learners in a computing classroom.

    This issue also includes stories on how educators use technology to create a positive impact for learners:

    • Yolanda Payne tells you how she’s using teaching experiences from the COVID-19 pandemic to bring better remote learning to communities in Georgia, USA, and in the US Virgin Islands
    • Mitchel Resnik and Natalie Rusk from Lifelong Kindergarten group at MIT Media Lab introduce their new free mobile app, OctoStudio, and how it helps learners and educators in underresourced areas get creative with code

    And there is lots more for you to discover in issue 24.

    The issue also covers how you can make time to teach about the impact of technology in an already packed curriculum. Sway Grantham, Senior Learning Manager at the Raspberry Pi Foundation, says in her article:

    “As adults, it is easy for us to see the impact technology has had on society and on our lives. Yet when I tell pupils that, within my lifetime, it wasn’t always illegal to hold your mobile phone to your ear and have a call while driving, they are horrified. They are living in the now and don’t yet have the perspective to allow them to see the change that has happened. However, knowing the impact of technology allows us to learn from previous mistakes, to make decisions around ethical behaviour (such as using a phone while driving), and to critically engage in real-world issues.

    As teachers, allocating some time to this topic throughout the year can seem challenging, but with a few small changes, the impact might be more than you can imagine.”

    Share your thoughts & subscribe to Hello World

    With so many aspects of life impacted by technology, computing educators play a crucial role in supporting young people to become informed, empowered citizens. We hope you enjoy this issue of Hello World and find it useful in your teaching.

    Website: LINK

  • Enjoy a perpetual solar eclipse with this machine

    Enjoy a perpetual solar eclipse with this machine

    Reading Time: 2 minutes

    Total solar eclipses are rare — at least from the perspective of any specific point on the planet. A total eclipse will occur somewhere on Earth once every 18 months or so, but that is more likely to track across the middle of the Pacific Ocean than wherever you happen to be. That made Bernd Kraus feel like he was missing out, so he used an Arduino to build this machine that produces a personal solar eclipse every day.

    This is a kind of robot that can move a cutout of the moon to any point on the 2D plane of Kraus’s window. Like the sun and actual moon, the size relationship is important and the cutout is the precise diameter necessary to block the sun. And also like the real deal, the position of the viewer is important. Luckily, Kraus tends to sit in the exact same location whenever he is in that room and the sun’s path (or, rather, Earth’s rotation and orbit) is predictable. A bit of fancy math is all it takes to determine where to place the cutout to project a shadow over the area where Kraus’s face should be.

    The hardware of the robot consists of two stepper motors, a solar panel with charger, an 18650 lithium battery, an HM-10 module, and an Arduino Nano board to control everything. The solar panel attaches to the back side of the moon cutout so it gets good exposure. It sends power up through the wires from which it hangs. The Arduino receives position data from Kraus’s smartphone via Bluetooth, calculates the point where the cutout should be, and then moves the cutout to that point using the two stepper motors. 

    [youtube https://www.youtube.com/watch?v=WCM7DSpBpg0?feature=oembed&w=500&h=281]

    Now Kraus gets to enjoy an eclipse at all times. And as a bonus, he doesn’t have sun shining in his eyes while he’s trying to watch TV. 

    The post Enjoy a perpetual solar eclipse with this machine appeared first on Arduino Blog.

    Website: LINK

  • Coolest Projects 2024: 7197 young tech creators showcase their projects online

    Coolest Projects 2024: 7197 young tech creators showcase their projects online

    Reading Time: 5 minutes

    Our Coolest Projects 2024 online showcase has come to a close, with 7197 young people from 43 countries sharing the incredible things they have made with code. A huge congratulations to everyone who took part!

    Young people raising their hands in the air.

    Coolest Projects is our annual global celebration of young digital creators and the cool things they make with technology. This year’s showcase featured 4678 amazing projects, from a doughnut clicker game created in Scratch to an app that tracks sunscreen usage and areas with high UV levels for users. 

    This week, we celebrated each and every young creator and their incredible tech projects in a special livestream:

    [youtube https://www.youtube.com/watch?v=1ln4S0jYaok?feature=oembed&w=500&h=281]

    Every year, we invite some very special VIP judges to choose their favourite projects to highlight. Meet our 2024 judges and find out about the projects they picked.

    Azra Ismail’s favourite projects

    Azra is the co-founder of MakerGhat, an education nonprofit based in India that aims to nurture underserved youth to become the next generation of entrepreneurs and leaders. MakerGhat has reached around a million youth to date through hands-on making programmes. She is also an Assistant Professor at Emory University, where she directs the CARE Lab (Collective Action & Research for Equity). Azra was named in the Forbes 30 under 30 Asia list, and has previously worked with Google, the Wadhwani Institute for AI, and United Nations Global Pulse. She has a PhD in Human-Centered Computing and Bachelor’s in Computer Engineering from Georgia Tech. 

    See Azra’s favourite projects:

    Judges’ favourite projects in the Scratch category.

    Greg Foot’s favourite projects

    Greg is an award-winning Science Presenter and Producer who has written and hosted a bunch of stuff on TV, YouTube, radio, and stage over the past 20 years. Greg has a BBC Radio 4 show called Sliced Bread that investigates whether wonder products like face creams and air fryers are indeed ‘the best thing since sliced bread’, or marketing hype. Greg regularly pops up on TV — he’s a regular on the BBC’s Morning Live and was the in-house science guy on Blue Peter and Sunday Brunch for many years. He’s also hosted multiple TV series, made live shows for families on YouTube (Let’s Go Live), and toured science theatre shows around the UK.

    Take a look at Greg’s favourite projects:

    Judges’ favourite projects in the Web category.

    Natalie Lao’s favourite projects

    Natalie is the Executive Director of the App Inventor Foundation, a global nonprofit that has empowered over 20 million inventors of all ages to create over 100 million apps to improve their lives and uplift their communities. She received her PhD in ML and AI education from MIT’s Computer Science and Artificial Intelligence Lab, and currently serves as Expert on Mission at UNESCO to develop the UN’s AI Competency Framework for K-12 Students. 

    See which projects Natalie chose as her favourites:

    Judges’ favourite projects in the Games category.

    Selin Ornek’s favourite projects

    Selin is a 17-year-old multi-award winner and changemaker who has been passionate about using tech for good since an early age. She taught herself to code at age 8 and started building robots at 10, and participated in Coolest Projects for many years. She has built seven robots to date, including the social good robot iC4U, a robot guide dog for visually impaired people, and BB4All, an anti-bullying school aid robot. She has also built a stray dog wellbeing app, JAVA, and an AI model for breast cancer diagnosis. Her aim is to inspire young people, especially girls, to see the fun and importance of using tech for good.

    Selin’s favourite projects are:

    Judges’ favourite projects in the Mobile category.

    Broadcom Coding with Commitment® award

    We partnered with Broadcom Foundation to give a special award to young creators using coding and computing to solve real-world problems that matter to their communities. Broadcom Coding with Commitment® is a special recognition for a Coolest Projects creator aged 11–14 who has used computing as an essential problem-solving tool to help those around them.

    Naitik, Shravasti and Nikita present their 'Drainage alert system' project.

    This year’s Broadcom Coding with Commitment® recipients are Naitik, Shravasti, and Nikita from India in recognition of their project Drainage alert system. Their thoughtful project uses a water flow sensor connected to a Raspberry Pi computer to detect when waste enters the drainage system and causes blockages and send an alert to the local council.

    Get inspired and keep creating!

    Now you’ve seen the judges’ favourite projects, it’s time to pick your own! Take a look at the Coolest Projects 2024 online showcase gallery to see all the amazing projects from young people all over the world, and get inspired to make your own.

    Judges’ favourite projects in the Hardware category.

    Participants will shortly receive their own unique certificates and the personalised feedback on their projects from our team of judges, to celebrate their achievements.

    Judges’ favourite projects in the Advanced category.

    Support from our Coolest Projects sponsors means we can make the online showcase and celebration livestream an inspiring experience for the young people taking part. We want to say a big thank you to all of them: Amazon Future Engineer, Broadcom Foundation, GoTo, Kingston Technology, Meta, and Qube Research & Technologies.

    Website: LINK

  • Build a robot explorer in The MagPi magazine issue #143

    Build a robot explorer in The MagPi magazine issue #143

    Reading Time: 3 minutes

    Use Raspberry Pi robotic kits, sensors, and components to make a science-smart rover!

    Robot Explorers

    Turn Raspberry Pi into a rugged robot, equipped with wheels or legs, and you can explore the surface of a planet (or your backyard) and use sensors to analyse your environment. This month, we’ve got a guide to the best robotic parts, equipment, and sensors to use.

    This 3D-printed controller has buttons in Braille to help visually impaired board gamers get involved

    Dicemaster 2000

    We love this game controller for visually impaired people. The buttons are 3D printed with Braille enabling the maker’s friend to take part in a gaming group. Dicemaster showcases maker skills with Raspberry Pi’s electronics to produce a fun, but seriously useful, controller.

    This wonderful project lights up letters to tell the time

    Colour Word Clock

    Gurgle Apps has been making fun electronics projects for years now. The three siblings Amelie, Caleb and Zivya are back again with a kit that you can build yourself – the Colour Word Clock. It uses LEDs to light up letters in a 3D-printed case that spells out the time.

    Part mirror, part information screen, and a lot of retro gaming!

    Retro Gaming Magic Mirror

    David Edwards wanted to make a Magic Mirror, and he also wanted an arcade machine but didn’t have the space (or permission) to build one. The solution was this fabulous build that combines both concepts into one device. A 65-inch display turned into a magic mirror that plays as many different systems as possible. 

    We set up Raspberry Pi's new M.2 HAT+

    Using M.2 HAT+ with Raspberry Pi

    The new M.2 HAT+ enables you to add super-fast SSD storage cards to Raspberry Pi, alongside other devices like the AI accelerator in the AI Kit. This month Nate shows us how to attach M.2 HAT+ to Raspberry Pi and set it up to expend Raspberry Pi 5 using the PCI-express compatible connector.

    We celebrate the makers who've made something big with Raspberry pi

    Raspberry Pi Success Stories

    Raspberry Pi has been used as the bedrock for many homespun projects that turned into successful business ideas. It makes us so happy to see Raspberry Pi help people build a successful company from scratch, and some big-name companies have used Raspberry Pi to breathe life into their product range. Our Success Stories feature showcases some of the best business ideas around.

    Learn electronics with the CrowPi Compact

    Learn electronics with CrowPi Compact

    The CrowPi is a smart electronics kit that now serves up components to Raspberry Pi 5. Experimenting with electronics is an excellent, fun, and rewarding hobby and this kit will help you get started.

  • Why is STEAM education important for kids? 6 activity tips

    Why is STEAM education important for kids? 6 activity tips

    Reading Time: 4 minutes

    School’s out for summer – at least for most of us. While the majority of children (and teachers!) will probably be breathing a huge sigh of relief, parents face a new challenge: how to keep kids engaged during the long break. Of course, downtime is important, but there are also loads of fun ways to keep those brains fired up and prevent the summer slide.

    As we explain in this article, incorporating STEAM education (Science, Technology, Engineering, Arts, and Mathematics) into your child’s summer routine is a great place to start. Read on for our top tips for success, along with some interesting summer STEAM activities to try at home.

    The benefits of STEAM education 

    As most parents will know, STEAM education has numerous benefits for children of all ages. In addition to stimulating their natural curiosity and creativity, it helps to build critical thinking and problem-solving skills. STEAM activities also allow kids to understand how scientific theory applies to real-world applications and scenarios. This makes the learning experience more relevant and enjoyable. Who knows, it might even spark a lifelong passion for STEAM or open their eyes to potential future careers. 

    With so much to offer, it’s no wonder STEAM education has become an integral part of the curriculum. But that doesn’t mean you have to keep it to the classroom.You can bring STEAM learning to life at home too. And with the extended summer break now upon us, there’s never been a better time to give it a go! 

    Exploring STEAM at home: advice for parents

    Whether you’re a parent/carer to an enthusiastic elementary-aged youngster or a fiercely independent middle schooler, here are six practical tips for you:

    1. Prioritize interactive activities

    Hands-on projects are always popular with kids, regardless of age. To make STEAM education as interesting as possible, choose interactive projects that encourage children to get stuck in. Classic summer STEAM activities like making bath bombs, a volcano or a lava lamp are all great examples – just be prepared for things to get messy!

    2. Let children take the lead

    Where possible, give children the freedom to explore STEAM activities independently. This is an excellent way to build their self-confidence and problem-solving skills, which will serve them in the future. While younger children may need support, you can still encourage open-ended play. Their creativity and ingenuity might just surprise you.

    3. Try a new activity together

    Although independent exploration is important, collaborating on a STEAM project with your child can be equally beneficial. As well as being an ideal bonding opportunity, tackling something new together also shows children how it’s possible to work through challenges and new situations. This popular egg drop challenge might be a good option if you really want to test your problem-solving abilities and don’t mind the inevitable clean-up afterwards!

    4. Opt for something tangible

    In today’s digital world, pick an activity that lets kids play with a physical object. The Arduino Alvik robot is perfect for starting a coding journey with your kids. It provides hands-on experience as they build their own robot – whether it’s an automated mug delivery car, an autonomous patrol vehicle, or even a customized moon rover.

    5. Make the connection to the real world

    You only have to glance around your home to see STEAM in practice. Why not encourage your teenager to explore this further with our Oplà IoT Kit? The kit comes with eight IoT projects that demonstrate how to make everyday appliances smart. Older children can easily control them with a mobile app. Plus, they have access to all the advanced features of Arduino Cloud to easily control their projects in a single platform.

    6. Connect activities to your child’s interests

    Another way to stimulate an interest in STEAM is to relate it to something your child already enjoys, such as coding, baking, sports, gaming, music etc. Find hands-on activities that demonstrate how their passion relates to key STEAM concepts. For example, this Bluetooth-controlled LEGO® toy car project is ideal for introducing LEGO®-loving kids to the basics of electronics. Meanwhile, music fans might want to try making and playing their own keyboard with the Arduino Starter Kit

    Experimenting with STEAM education at home helps to keep children’s minds active and engaged over the long summer break. Just remember that the goal is for them to have fun, play and explore – anything else is a bonus. So be patient, flexible, and supportive, and celebrate the process of discovery and learning together. 

    Keep reading for more ideas on how to use Arduino with kids or explore our hands-on educational kits here

    The post Why is STEAM education important for kids? 6 activity tips appeared first on Arduino Blog.

    Website: LINK

  • Win one of five Raspberry Pi AI kits

    Win one of five Raspberry Pi AI kits

    Reading Time: < 1 minute

    Subscribe

  • Controlling a drum machine with the Arduino Opta

    Controlling a drum machine with the Arduino Opta

    Reading Time: 2 minutes

    Makers have long asked the question “why bother with an expensive PLC when I can just use an Arduino?” The answer comes down to the priorities and needs of industrial clients. In a factory automation setting, the client will prioritize durability, reliability, and serviceability over the one-time purchase price of the device itself. But to prove that Arduino’s professional turnkey solutions are just as easy to use as their developer-focused educational counterparts, Jeremy Cook leveraged an Arduino Opta micro PLC to build a drum machine.

    This isn’t any old drum machine that plays sound samples or synthesized notes, but rather a robotic drum machine that makes noise by banging on stuff like a true percussion instrument. Cook could have built this with any Arduino board and a few relays, but instead chose to implement the Opta and new Opta Digital Expansion. That is robust enough for serious commercial and industrial applications, but is still simple to program with the familiar Arduino IDE. Programmers can also use conventional PLC languages if they prefer.

    In this case, Cook made noise with relays and solenoids. The Opta has four built-in relays and Cook’s sketch flips one of them to make a sound analogous to a hi-hat. Cook added an Arduino Pro Opta Ext D1608S module with its solid-state relays for the other two “drums.” One of those fires a solenoid that taps a small hand drum (the kick drum sound), while the other controls a solenoid that hits a power supply enclosure (the snare sound).

    Together, those three sounds can cover the basics of a drum track. Cook’s sketch is a drum sequencer program that stores each sound sequence as array, looping through them until turned off. 

    [youtube https://www.youtube.com/watch?v=Ok2tLkR7pcM?feature=oembed&w=500&h=281]

    An Opta may be overkill for a project like this one, but this does a great job of demonstrating the ease at which an Arduino user can transition to professional PLC work. 

    The post Controlling a drum machine with the Arduino Opta appeared first on Arduino Blog.

    Website: LINK

  • The Arduino-controlled Spin Meister helps spin up the perfect pizza

    The Arduino-controlled Spin Meister helps spin up the perfect pizza

    Reading Time: 2 minutes

    Dedicated pizza ovens are all the rage right now, as they provide a better-distributed and higher heat that many find more preferable than a conventional kitchen oven. But even a nice gas-powered pizza oven like the Ooni Koda 12 will have some hot spots and cold spots. To get an even bake every time, Yvo de Haas designed the Spin Meister rotation controller for the Ooni Koda 12 pizza oven.

    The Spin Meister is a DIY device that controls the rotation of a pizza stone in the oven. The Ooni Koda 12 doesn’t come with any hardware to spin the pizza, so it is susceptible to uneven cooking. With the Spin Meister, the user can set a specific rotation speed and time to ensure that the pizza moves constantly and cooks consistently. 

    An Arduino Nano R3 board controls a stepper motor through a TMC2100 drive. That stepper motor’s shaft goes through the bottom of the oven to the pizza stone, which sits on a Lazy Susan-style turntable bearing. To avoid heat damage, the Arduino and other electronic components sit in a 3D-printed enclosure that the user can place a couple of feet away from the oven. 

    The controls consist of two buttons and two linear potentiometer sliders — one set for spin, the other for time. The status and time information shows up on a bright 12-digit vacuum fluorescent display (VFD). Power comes from a USB battery back, so users can cook anywhere. Finally, a DFRobot DFPlayer Mini MP3 player gives the Spin Meister the ability to play sound effects, like button press tones and a timer alarm. 

    [youtube https://www.youtube.com/watch?v=tqMtIWjaeWg?feature=oembed&w=500&h=281]

    The Koda 12 already has very good reviews, but we think that the Spin Meister would make it even better.

    The post The Arduino-controlled Spin Meister helps spin up the perfect pizza appeared first on Arduino Blog.

    Website: LINK

  • Create anytime, anywhere with OctoStudio

    Create anytime, anywhere with OctoStudio

    Reading Time: 5 minutes

    Today our friends Mitch Resnick and Natalie Rusk from MIT’s Lifelong Kindergarten group tell you about OctoStudio, their free mobile app for children to create with code. Find their companion article for teachers in the upcoming issue of Hello World magazine, out for free on Monday 1 July.

    When people see our new OctoStudio coding app, they often say that it reminds them of Scratch, the world’s most popular coding platform for kids. That’s not surprising, since the group of us developing OctoStudio were also involved in creating Scratch, with its distinctive building-block approach to programming. But there’s an important difference.

    A young person connects coding blocks in their OctoStudio phone app.
    A young person connects coding blocks to animate their OctoStudio project. Credit: MIT Media Lab

    The difference is that we designed OctoStudio specifically for mobile phones and tablets, based on requests from educators in communities where children and families don’t have access to laptops and desktop computers, but do have access to mobile devices. 

    [youtube https://www.youtube.com/watch?v=7olsvxyhlPM?feature=oembed&w=500&h=281]

    OctoStudio takes advantage of special features of mobile phones and tablets, such as built-in sensors, so young people can create projects that respond to shaking or tilting, or even ‘beam’ signals between devices. And because of the small size of mobile devices, children and families can create projects anytime anywhere, and integrate digital coding with physical making.

    OctoStudio makes it easy for beginners to start creating. Children can choose a character from a diverse collection of emojis, draw their own in the OctoStudio paint editor, or take and edit a photo. With just a couple coding blocks, they can make their characters move, jump, speak, or glow — and respond to shaking, tilting, or tapping on the phone or tablet:

    A short OctoStudio blocks script.
    A short OctoStudio blocks script.

    Since our Lifelong Kindergarten group at the MIT Media Lab launched OctoStudio as a free app in October 2023, we’ve been delighted by the creativity and diversity of projects that children around the world have created with OctoStudio. As examples, we’d like to share with you three different projects from three different continents.

    Getting active with OctoStudio 

    When Xavier, a 10-year-old in Rwanda, started using OctoStudio, he was intrigued with the ‘When I shake’ block. He realized that he could create a step tracker project, by sensing how the phone shook each time he took a step. 

    From the emoji library in OctoStudio, Xavier selected a rabbit, and he programmed it to grow a little bit each time he took a step. The more steps, the bigger the rabbit. To test the project, Xavier ran around in a circle. When he looked at the rabbit again, he saw how big it had grown and exclaimed: “Now it’s mega huge!” After finishing his project, Xavier made and posted a video tutorial to show others how to make their own step tracker using only 5 coding blocks.

    [youtube https://www.youtube.com/watch?v=ifWbb-4JJnM?feature=oembed&w=500&h=281]

    Making creatures come to life on screen

    One popular way to get started with OctoStudio is to make a favorite animal out of craft materials, take a photo of it, then bring your creation to life on the screen with OctoStudio coding blocks. As part of the Brazilian Creative Learning Network, educators Renato Barboza and Simone Lederman offer creative learning workshops in which children design creatures using a combination of natural materials and modeling clay. In these ‘fantastical creatures’ workshops, facilitators ask questions to encourage participants to design not only the creatures, but also develop ideas about how their creatures interact within their environment.

    A girl holds up a winged creature she has grafted.

    For example, two sisters created imaginary creatures, one with long sticks for arms, the other with big eyes and wings made from leaves. The sisters then took photos and made their creatures come to life in OctoStudio, making them jump, glow, and fly. They recorded sounds and explained more about their creatures, including where they live and what they like to eat.

    A child uses the OctoStudio app on a mobile phone.

    Beaming between devices

    OctoStudio also opens up the possibility of projects involving multiple mobile devices, using the new ‘beam’ block to send signals between the devices (via Bluetooth). For example, children can make a character in a story or game look like it’s jumping from one device to another by sending a beam signal when the character reaches the edge of the screen.

    Thawin, an elementary school student in Thailand, decided to use the ‘beam’ block to create a project about caring for the environment. He embedded one tablet in a cardboard cutout of a watering can, and programmed it to beam a signal each time he shook it as if he were sprinkling water. Then, he added a tree emoji to another tablet, and programmed the tree to grow each time it received a beam signal. He proudly shared his project with his classmates: each time someone shook the watering can, the tree grew.

    [youtube https://www.youtube.com/watch?v=HQX7LqVWA14?feature=oembed&w=500&h=281]

    Get started with OctoStudio

    To get started with OctoStudio, you can download it for free from app stores for Android and iOS phones and tablets. The app is translated into more than 25 languages, and comes with sample projects and mini-tutorials. 

    Here are some resources for learning and exploring more:

    You can share your OctoStudio stories, photos, and videos on social media using @octostudioapp or #octostudio. We can’t wait to hear about your and your children’s experiences!

    Website: LINK

  • Easily add Python-controlled GPIO pins to any computer

    Easily add Python-controlled GPIO pins to any computer

    Reading Time: 2 minutes

    Let’s say that, hypothetically, you wanted to use your computer to blink an LED or read the state of a button. Could you? Almost certainly not — at least not without additional hardware. Most modern computers don’t provide any interface for direct interaction with low-level components. That’s why Nick Bild developed a device called USBgpio that lets users easily add Python-controlled GPIO pins to any computer.

    USBgpio connects to any modern PC via USB. It has a row of exposed GPIO pins and users can control their states programmatically using Python. If you noticed that this sounds a lot like connecting an Arduino board to a computer, then you’re most of the way to understanding the concept. That’s because the enclosure does, indeed, contain a Nano 33 IoT. The header pins on the top of the USBgpio device connect directly to their counterparts on the Arduino.

    This provides utility (beyond the Arduino alone) because of the sketch that accepts serial commands sent by Python code. By using the USBgpio library, a user can set the state of any of the GPIO pins with a simple command. Of course, it is also possible to read the value of a pin.

    Instead of flashing a new sketch to the Arduino every time they want to do something, a user can run a Python script directly on their computer. Or they can send commands in real-time using a Python interpreter. This provides an interesting interaction style that may appeal more to some users than traditional workflows.

    [youtube https://www.youtube.com/watch?v=I5nCYR48eAI?feature=oembed&w=500&h=281]

    The post Easily add Python-controlled GPIO pins to any computer appeared first on Arduino Blog.

    Website: LINK

  • #WeArePlay celebrates app and game founders from Australia#WeArePlay celebrates app and game founders from AustraliaBrand Marketing Manager

    #WeArePlay celebrates app and game founders from Australia#WeArePlay celebrates app and game founders from AustraliaBrand Marketing Manager

    Reading Time: < 1 minute

    Sweaty Chair Studio, Sydney

    After graduating in computer science, Brian embarked on a career as a 3D animator. Following a stint in Silicon Valley, he returned to Sydney and founded his own gaming company, SweatyChair, merging his technical skills with the passion for art. During a gaming developer competition, Brian — alongside his wife and three other participants — built a challenging monster and bullet dodging game called No Humanity within 48 hours, winning first place. He successfully improved and launched the title a week later, getting over 9 million downloads so far. Taking part in Google Play’s Indie Games Accelerator program in 2022 helped Brian to grow the studio even further. Apart from assisting fellow creatives in the industry, he also champions a more active gaming experience, where players can create and enjoy their own elements.

    Discover more #WeArePlay stories from Australia, stories from across the globe and share your favorites.

  • Can this tiny lawn mower robot cut it in the real world?

    Can this tiny lawn mower robot cut it in the real world?

    Reading Time: 2 minutes

    We’re finally starting to see robotic lawn mowers gain a little bit of traction as prices come down and consumer trust goes up. They work a bit like Roomba vacuums and pathfinding sophistication varies from one model to the next. But even the most basic models are still a lot more expensive than their secondhand gasoline powered cousins. So, Nikodem Bartnik decided to cut costs by making his DIY lawn mower robot very small.

    To keep this prototype simple and affordable, Bartnik decided not to bother with any kind of mapping, pathfinding, object avoidance, or perimeter detection capabilities. It has no autonomous navigation features and instead the user must control the robot themselves. But sitting on a chair in the shade is still a lot better than pushing around a heavy lawn mower. Though the robot is only about the size of a dinner plate, so mowing an entire lawn will take a while.

    Bartnik constructed the robot out of a sheet of plywood and 3D-printed parts. It has two driven wheels and each is turned by a small geared DC motor. The third wheel on the front is a caster that spins freely. An Arduino UNO Rev3 board controls both of those, as well as the brushless DC motor that spins the blades. Those blades swivel where they attach to the central hub, so centrifugal force causes them to swing outwards. Finally, the Arduino can communicate with the user’s smartphone through an HC-05 module for remote operation.

    This won’t rival your dad’s zero-turn mower when it comes to power, but that wasn’t Bartnik’s intention. Instead, he sees it as a machine for giving the lawn a light trim every day or two before it can get too long. It’s slow, but that won’t be an issue if Bartnik implements autonomous navigation in the future.  

    [youtube https://www.youtube.com/watch?v=oJbYpmUHdLs?feature=oembed&w=500&h=281]

    The post Can this tiny lawn mower robot cut it in the real world? appeared first on Arduino Blog.

    Website: LINK

  • Axiom is Arduino’s newest Gold Integration Partner!

    Axiom is Arduino’s newest Gold Integration Partner!

    Reading Time: 2 minutes

    Digital manufacturing consultancy and solutions provider, Axiom Manufacturing Systems, based in the United States, has recently joined our System Integrators Partnership Program. As Gold-level partners, Axiom will supercharge their mission – to empower manufacturers to rapidly transform their operations through the practical adoption of digital technologies – with Arduino’s versatility, developing custom solutions for clients of all sizes.

    The partnership is born out of a solid foundation of shared goals and values, which seem to naturally intertwine educational inspiration and industrial needs.

    “Being selected as a key partner by Arduino is significant for several reasons,” commented Axiom Managing Partner Ryan Cahalane. “We look forward to serving Arduino’s broad, established user base. Many of those who started with Arduino in education and DIY projects have moved into manufacturing and industrial solutions, creating a ready-made community and support network. Moreover, the Arduino platform integrates seamlessly with other high-quality, cost-effective partners – from specialized sensor manufacturers to cloud service providers – expanding our capabilities and enabling us to bring transformation to a wider audience, especially in the small and midsize markets. Arduino’s focus on education and knowledge sharing aligns perfectly with Axiom’s mission to accelerate the practical adoption of digital technologies in manufacturing and help customers become self-sufficient.

    John Dyck, CEO of the Clean Energy Smart Manufacturing Innovation Institute, shared his positive outlook: “Axiom is a longtime advocate and CESMII member, and we are thrilled to see this new partnership tackle some of the big barriers to democratizing smart manufacturing: cost, complexity, and not knowing where to invest first. People all over the world use Arduino to learn technology, prototype ideas without fear of failure, and bring great solutions to life. Combining that with Axiom’s focus on education, smart manufacturing roadmapping, and helping customers help themselves is exactly what many people need to get started.”

    “Axiom has the expertise and proactive approach to bring any manufacturing business into the digital age,” said Arduino’s Strategic Partnerships Advisor, Paul Kaeley. “More than just a partner, they are ‘smart manufacturing sherpas’ for companies across various fields. We are proud to support them and excited to see their success.”


    The System Integrators Partnership Program by Arduino Pro is an exclusive initiative designed for professionals seeking to implement Arduino technologies in their projects. This program opens up a world of opportunities based on the robust Arduino ecosystem, allowing partners to unlock their full potential in collaboration with us.

    The post Axiom is Arduino’s newest Gold Integration Partner! appeared first on Arduino Blog.

    Website: LINK

  • This portable Starmap could be your guide to the cosmos

    This portable Starmap could be your guide to the cosmos

    Reading Time: 2 minutes

    Estimates vary, but there are generally a few thousand stars bright enough to see in the sky on a clear, moonless, cloudless night away from city lights. You might be able to identify a couple of them, along with a handful of constellations. But what about the rest? If they intrigue you, you might want to build this Starmap designed by Shabaz over on element14.

    Star charts aren’t anything new and astronomers (both amateur and professional) use them all the time. But we like the portable nature of Shabaz’s Starmap, which would be easy to carry along on a camping trip to a dark sky area. It doesn’t require any internet connectivity to work, so it is perfect for use in rural settings. And the round LCD display is pretty darn attractive.

    That screen is a 1.28” GC9A01 round TFT LCD with a resolution of 240×240, intended for use in smartwatches. It receives its graphics from an Arduino UNO R4 Minima, modified for 3.3V logic levels to suit the display. Shabaz also added a flash memory chip large enough to contain the star chart data.

    The stars visible in the night sky at any given time depend on where you are on the planet, so this uses a GPS receiver module to find the user’s coordinates. Its Arduino sketch then determines the positions of the visible stars and draws them to the display. 

    Shabaz doesn’t provide one, but a simple 3D-printed enclosure would make StarMap ready for the road. Power can come from a USB battery bank for off-grid use. 

    [youtube https://www.youtube.com/watch?v=GIHXshW9cDw?feature=oembed&w=500&h=281]

    The post This portable Starmap could be your guide to the cosmos appeared first on Arduino Blog.

    Website: LINK

  • Self-leveling workbench can travel without trouble

    Self-leveling workbench can travel without trouble

    Reading Time: 2 minutes

    An actually level workbench is critical for many different jobs, such as pouring resin or calibrating sensors. But it is difficult enough to level a stationary workbench and that becomes a nightmare for a workbench that needs to roll around a shop on casters, as shop floors definitely aren’t level. That’s why Firth Fabrications crafted this self-leveling workbench to eliminate such headaches.

    Firth Fabrications made this workbench because he needed a level rolling platform for his projects, but his garage floor is too far from level to rely on. Instead of manually leveling the workbench every time he moves it, he built this workbench than can level itself. 

    It does this with four heavy duty linear actuators — one at each corner of the table constructed of CNC-cut OSB (oriented strand board). Those extend or retract as necessary to tilt the top (relative to the base) to achieve level. It would have been possible to implement that leveling capability with just three linear actuators, but this is more robust and stable.

    An Arduino Nano board uses an MPU6050’s gyroscope to monitor pitch and roll. In automatic leveling mode, it makes adjustments until both register as level. There are also two other modes: lift and manual. Lift raises and lowers the entire top, like a standing desk. Manual lets Firth Fabrications tilt the table in any way he wishes using a joystick. Power comes from an old 18V/4Ah Ryobi power tool battery, so the workbench is untethered. 

    [youtube https://www.youtube.com/watch?v=Iy2L9dH4VH4?feature=oembed&w=500&h=281]

    While flatness is still a concern, FirthFabrications can now rest easy knowing his workbench is reasonably level. 

    The post Self-leveling workbench can travel without trouble appeared first on Arduino Blog.

    Website: LINK

  • Project Hub’s new featured pages are your gateway to inspiration!

    Project Hub’s new featured pages are your gateway to inspiration!

    Reading Time: 2 minutes

    Arduino’s Project Hub is more than just a platform; it’s a vibrant community where members share their ideas and achievements, contributing to our knowledge base and inspiring everyone to make, learn, and try something new.

    With close to 5,400 projects, including tutorials, examples, and resources for all skill levels, Project Hub is the perfect place to spark your next idea!

    Just like our community, the portal constantly improves. That’s why, starting today, you’ll find a brand new release of the Project Hub online. Our team has been working behind the scenes to bring you:

    New look and feel: a sleeker interface makes it easier than ever to discover the most exciting projects handpicked by our experts. Whether you’re interested in a specific board, theme, or creator, our new featured section allows you to dive right in.

    • Dedicated sections for projects tailored to both professional and educational settings too! Arduino users are branching out into a huge array of industries and applications, making us proud of how much and how many different goals can be accomplished with our open-source ecosystem of hardware, software and cloud products. Check out the new “pro” and “for school” tabs!

    Easier navigation and search function to sift through the vast repository. Some days it’s great to just browse and see what you stumble upon. Other times you know exactly what you are looking for and want to get to it quickly! In any case, the new Project Hub has you covered.

    We invite you to explore the new Project Hub and share your thoughts in the comments below. Better yet, join hundreds of makers and creators by submitting your next great idea for publication! See you on the Project Hub.

    The post Project Hub’s new featured pages are your gateway to inspiration! appeared first on Arduino Blog.

    Website: LINK

  • Introducing a computing curriculum in Odisha

    Introducing a computing curriculum in Odisha

    Reading Time: 5 minutes

    We are working with two partner organisations in Odisha, India, to develop and roll out the IT & Coding Curriculum (Kaushali), a computing curriculum for government high schools. Last year we launched the first part of the curriculum and rolled out teacher training. Read on to find out what we have learned from this work.

    A group of teachers is standing outside a school building.

    Supporting government schools in Odisha to teach computing

    Previously we shared an insight into how we established Code Clubs in Odisha to bring computing education to young people. Now we are partnering with two Indian civil society organisations to develop high school curriculum resources for computing and support teachers to deliver this content.

    With our two partners, we trained 311 master teachers during July and August 2023. The master teachers, most often mathematics or science teachers, were in turn tasked with training teachers from around 8000 government schools. The aim of the training was to enable the 8000 teachers to deliver the curriculum to grades 9 and 10 in the June 2023 – April 2024 academic year.

    A master teacher is delivering a training session to a group of teachers.

    At the Foundation, we have been responsible for providing ongoing support to 1898 teachers from 10 districts throughout the academic year, including through webinars and other online and in-person support.

    To evaluate the impact our work in Odisha is having, we gathered data using a mixed-methods approach that included gathering feedback from teachers via surveys and interviews, visiting schools, capturing reflections from our trainers, and reviewing a sample of students’ projects.

    Positive impact on teachers and students

    In our teacher survey, respondents were generally positive about the curriculum resources:

    • 87% of the 385 respondents agreed that the curriculum resources were both high quality and useful for their teaching
    • 91% agreed that they felt more confident to teach students IT & Coding as a result of the curriculum resources

    Teachers also tended to agree that the initial training had helped improve their understanding and confidence, and they appreciated our ongoing support webinars.

    “The curriculum resources are very useful for students.” – Teacher in Odisha

    “The webinar is very useful to acquire practical knowledge regarding the specific topics.”  – Teacher in Odisha

    Teachers who responded to our survey observed a positive impact on students:

    • 93% agreed their students’ digital literacy skills had improved
    • 90% agreed that their students’ coding knowledge had improved

    Students’ skills were also demonstrated by the Scratch projects we reviewed. And students from Odisha shared 314 projects in Coolest Projects — our online technology showcase for young people — including the project ‘We’ll build a new Odisha’ and an apple catching game.

    A master teacher is delivering a training session to a group of teachers.

    Feedback and observations about teacher training

    On school visits, our team observed that the teachers adopted and implemented the practical elements of the initial training quite well. However, survey responses and interviews showed that often teachers were not yet using all the elements of the curriculum as intended.

    In their feedback, many teachers expressed a need for further regular training and support, and some reported additional challenges, such as other demands on their time and access to equipment.

    A master teacher is delivering a training session to a group of teachers.

    When we observed training sessions master teachers delivered to teachers, we saw that, in some cases, information was lost within the training cascade (from our trainers, to master teachers, to teachers), including details about the intended pedagogical approach. It can be difficult to introduce experienced teachers to new pedagogical methods within a short training session, and teachers’ lack of computing knowledge also presents a challenge.

    We will use all this data to shape how we support teachers going forward. Some teachers didn’t share feedback, and so in our further evaluation work, we will focus on making sure we hear a broad and representative range of teachers’ views and experiences.

    What’s new this year?

    In the current academic year, we are rolling out more advanced curriculum content for grade 10 students, including AI literacy resources developed at the Foundation. We’re currently training master teachers on this content, and they will pass on their knowledge to other teachers in the coming months. Based on teachers’ feedback, the grade 10 curriculum and the training also include a recap of some key points from the grade 9 curriculum.

    Two master teachers are delivering a presentation to teachers.

    A State Resource Group (SRG) has also been set up, consisting of 30 teachers who will support us with planning and providing ongoing support to master teachers and other teachers in Odisha. We have already trained the SRG members on the new curriculum content to enable them to best support teachers across the state. In addition to this, our local team in Odisha plans to conduct more visits and reach out directly to teachers more often. 

    Our plans for the future

    The long-term vision for our work in India is to enable any school in India to teach students about computing and creating with digital technologies. A critical part of achieving this vision is the development of a comprehensive computing curriculum for grade 6 to 12, specifically tailored for government schools in India. Thanks to our work in Odisha, we are in a better position to understand the unique challenges and limitations of government schools. We’re designing our curriculum to address these challenges and ensure that every Indian student has the opportunity to thrive in the 21st century. If you would like to know more about our work and impact in India, please reach out to us via india@raspberrypi.org.

    We take evaluation of our work seriously and are always looking to understand how we can improve and increase the impact we have on the lives of young people. To find out more about our approach to impact, you can read about our recently updated theory of change, which supports how we evaluate what we do.

    Website: LINK

  • This smart spice box makes cooking a breeze

    This smart spice box makes cooking a breeze

    Reading Time: 2 minutes

    Many people shy away from cooking because they’re overwhelmed by all of the different steps and ingredients. Recipes are useful, but they aren’t very intuitive to those who are more comfortable with visual thinking. To help these people enjoy the cooking experience, Purdue University students Riddhi Gupta and Aarav Garg created a smart spice box.

    This is a hexagonal spice storage box divided up into six individual compartments. Four buttons on the front of the spice box let the cook select a pre-programmed recipe. The edges of the corresponding compartments will then light up in green, indicating that they’re necessary for the recipe. For example, a tikka masala chicken marinade recipe might illuminate turmeric, cumin, chili powder, and garam masala. 

    An Arduino UNO Rev3 board makes this possible. It monitors the buttons to determine which recipe was chosen, then triggers the appropriate RGB LED strips to guide the user as they prepare the meal.

    These components fit inside a 3D-printed hexagonal enclosure that Gupta and Garg designed in Autodesk Fusion 360. In theory, the Arduino sketch can support up to 999 different recipes. The user must enter each recipe’s spice combination within that sketch. After that, they just tap the buttons to enter the recipe’s identification number and the proper spice containers will light up. 

    [youtube https://www.youtube.com/watch?v=tijRumN3yWg?feature=oembed&w=500&h=281]

    The post This smart spice box makes cooking a breeze appeared first on Arduino Blog.

    Website: LINK

  • DIY ECU controls Honda Insight’s Kubota diesel engine

    DIY ECU controls Honda Insight’s Kubota diesel engine

    Reading Time: 2 minutes

    The Honda Insight was the first hybrid car released in North America and Honda put serious effort into making it as efficient as was practical at the time. That meant aerodynamic streamlining, which is why the first-generation Insight had very distinct covers over the rear wheels. It even had special tires with very low rolling resistance. Those factors made the Honda Insight the perfect platform for Robot Cantina’s Kubota diesel engine swap with a homemade Arduino ECU.

    Engine swaps are common in the car enthusiast community, but this is an unusual one. Instead of trying to make the Honda Insight more powerful, Robot Cantina went in the opposite direction. Their project replaces the original engine with a 700cc Kubota diesel engine. That’s the kind of power plant you would typically find in industrial machines and vehicles. For reference, that engine has less displacement than any motorcycle currently offered by Harley-Davidson. 

    To help this Kubota diesel engine run efficiently and cleanly in the Honda Insight, Robot Cantina needed to construct a custom engine control unit (ECU). They used an Arduino UNO Rev3 for the job. It physically adjusts the boost valve and fuel rack limiter using stepper motors through stepper driver modules. It also monitors the throttle position sensor (TPS) to determine how much the driver is pushing the accelerator. For testing and refinement, an LCD screen shows the current positions and potentiometer knobs let the driver manually set the values.

    But while the driver can set boost and rack manually, the goal is to develop a formula to automatically adjust those two values in response to the TPS value. Like a production vehicle’s ECU, this will let the engine run at maximum efficiency without direct driver involvement. It will also reduce visible smog, which is an important factor for a diesel Honda Insight that the driver doesn’t want to drawing attention.

    [youtube https://www.youtube.com/watch?v=K6IjDCqbzIQ?feature=oembed&w=500&h=281]

    The post DIY ECU controls Honda Insight’s Kubota diesel engine appeared first on Arduino Blog.

    Website: LINK