Kategorie: Mobile

  • Enhance your IoT dashboards with Arduino Cloud’s new Image widget

    Enhance your IoT dashboards with Arduino Cloud’s new Image widget

    Reading Time: 4 minutes

    At Arduino, we’re constantly working to improve your IoT management experience. Today, we’re excited to announce a new feature for Arduino Cloud that will allow you to enhance your IoT dashboards: the Image widget.

    The new Image widget

    The Image widget is a simple yet powerful addition to your Arduino Cloud toolkit. 

    With this new widget, you can either upload a static image in formats like GIF, JPG, or WEBP, with a size limit of 5MB or specify a URL where the image is located.

    You can choose between two display options: 

    • Fill the widget frame (cropping may occur).
    • Fit the image within the frame (no cropping).

    You can customize the widget frame by showing or hiding it, and select a white or gray background. Best of all, no Thing variable is needed!

    5 tips to enhance your IoT dashboards in Arduino Cloud

    The Image Widget isn’t just about aesthetics; it brings several practical advantages to your Arduino Cloud experience. Here’s how this simple addition can make your IoT dashboards look better:

    1. Create a banner for your dashboard: Add a personalized header to your dashboard with your company or project logo.

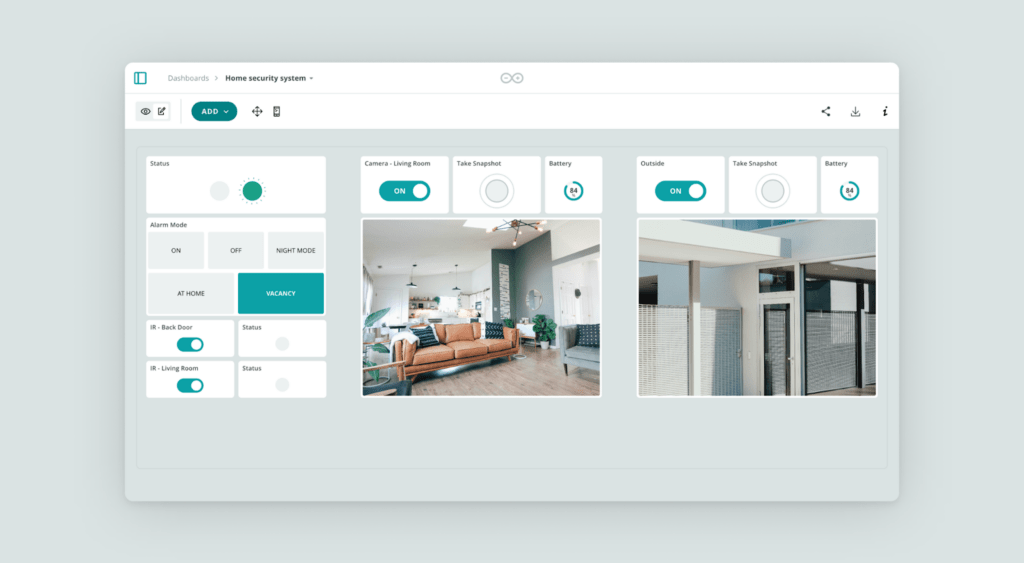
    2. Identify sections of your dashboard with descriptive pictures: Use icons or images to visually categorize different parts of your dashboard, making it more intuitive to navigate.

    3. Separate sections with an image acting as a separator: Improve the visual organization of your dashboard by using images as dividers between different sections.

    4. Make your dashboards look prettier: Enhance the overall aesthetic appeal of your dashboards with carefully chosen images that complement your data visualizations.

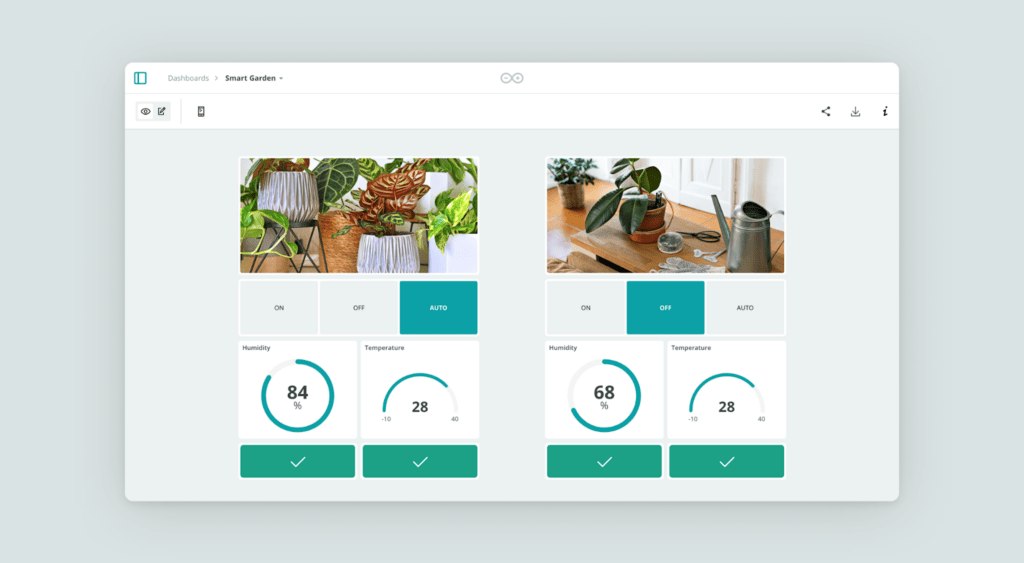
    5. Show camera snapshots: You can upload a picture taken from a camera at regular intervals or specific events, upload it to a fixed URL on a web server and display the picture in the dashboard.

    How to use the Image widget

    Adding the Image widget to your Arduino Cloud dashboard is a fairly straightforward process:

    1. Open your Arduino Cloud dashboard.
    2. Click on the “Add Widget” button.
    3. Select “Image Widget” from the list of available widgets.
    4. Upload your desired image (mind the 5MB size limit and file format) or indicate the image URL.
    5. Choose your display option: Fill widget or Fit image.
    6. Fine tune the final appearance: Decide whether to show or hide the widget frame and select your preferred background color (white or gray).
    7. Position and resize the widget on your dashboard as needed.

    Wait, what is Arduino Cloud?

    New to Arduino Cloud? Arduino Cloud is an all-in-one IoT solution that empowers makers, IoT enthusiasts, and businesses to create, monitor, and control their IoT devices from anywhere in the world. With its intuitive interface, stunning customizable dashboards, and sharing capabilities, Arduino Cloud makes it easy to bring your IoT projects to life and collaborate with others.

    [youtube https://www.youtube.com/watch?v=27S-XI_zHQc?feature=oembed&w=500&h=281]

    Key features of the Arduino Cloud include:

    • Zero-touch online development environment
    • Real-time device monitoring and control
    • Customizable dashboards with a variety of widgets, including our new Image widget
    • Over-the-air updates for connected devices
    • Secure data and sketch storage and management
    • Easy sharing and collaboration tools for team projects

    Get started with the new Image widget

    The new Image widget is just one of the many ways we’re working to improve your experience with Arduino Cloud. By allowing you to personalize and organize your dashboards more effectively, you can make your IoT projects not just functional, but also visually appealing and intuitive. Check our documentation to learn more.

    Ready to try out the new Image widget? Log in to your Arduino Cloud account today and start enhancing your dashboards for free. If you’re new to Arduino Cloud, there’s never been a better time to start. Sign up now and discover how Arduino Cloud can streamline your IoT development process.

    The post Enhance your IoT dashboards with Arduino Cloud’s new Image widget appeared first on Arduino Blog.

    Website: LINK

  • Bridging the gap from Scratch to Python: Introducing ‘Paint with Python’

    Bridging the gap from Scratch to Python: Introducing ‘Paint with Python’

    Reading Time: 3 minutes

    We have developed an innovative activity to support young people as they transition from visual programming languages like Scratch to text-based programming languages like Python.

    An illustration of a web browser window with colourful tags and labels around it.

    This activity introduces a unique interface that empowers learners to easily interact with Python while they create a customised painting app.

    “The kids liked the self-paced learning, it allowed them to work at their own rate. They liked using RGB tables to find their specific colours.” – Code Club mentor

    Why learn to code Python?

    We’ve long been championing Python as an ideal tool for young people who want to start text-based programming. Python has simple syntax and needs very few lines of code to get started, and there is a vibrant community of supportive programmers surrounding it.

    However, we know that starting with Python can be challenging for young people who have never done any text-based coding. They can face obstacles such as software installation issues, getting used to a new syntax, and the need for appropriate typing skills.

    How ‘Paint with Python’ helps learners get started

    ‘Paint with Python’ is an online educational activity that addresses many of these challenges and helps young people learn to code Python for the first time. It’s entirely web-based, requiring no software installation beyond a web browser. Instructions are displayed in a side panel, allowing learners to read and code without needing to switch tabs.

    To help young people with creating their painting app, much of the initial code is pre-written behind the scenes, which enables learners to focus on experimenting with Python and observing the outcomes. They engage with the code by clicking on suggested options or, in some cases, by typing small snippets of Python. For example, they can select colours from a range of options or, as they grow more confident, type RGB values to create custom colours.

    The activity is fully responsive for mobile and tablet devices and provides a final view of the full program on the last page, together with suggested routes to continue learning text-based programming.

    An accessible introduction to text-based programming

    We believe this activity offers an accessible way for young learners to begin their journey with text-based programming and learning to code Python. The code they write is straightforward and the activity is designed to minimise errors. When mistakes do occur, the interface provides clear, constructive feedback, guiding learners to make corrections.

    Try out ‘Paint with Python’ at rpf.io/paint-with-python. We’d love to hear your feedback! Please send any thoughts you have to uxresearch@raspberrypi.org. 

    This activity was developed with support from the Cisco Foundation. Through our funding partnership with them, we’ve been able to provide thousands of young people with the inspiration and opportunity to progress their coding skills anywhere, and on any device.

    Website: LINK

  • Win! One of 20 Raspberry Pi Pico 2

    Win! One of 20 Raspberry Pi Pico 2

    Reading Time: < 1 minute

    Subscribe

  • 7 ways to keep up with the Paralympic Games Paris 2024 on Google and YouTube7 ways to keep up with the Paralympic Games Paris 2024 on Google and YouTube

    7 ways to keep up with the Paralympic Games Paris 2024 on Google and YouTube7 ways to keep up with the Paralympic Games Paris 2024 on Google and YouTube

    Reading Time: < 1 minute

    Some of the world’s greatest athletes are headed to Paris for the Paralympic Games. And with features across Search, Maps, YouTube and more, you can experience the action wherever you are.

    1. Stay up-to-date on what’s happening with Search

    Celebrate the Paralympic Games through daily Paralympic Doodles and features which help you stay up-to-date on your favorite athletes, sports and countries. Find schedules in your local timezone along with the latest detailed results, medal counts, news, and video highlights — all in one place.

    When one of your favorite teams or athletes wins a medal, just search for them and you will be able to send a virtual bouquet of flowers to celebrate their achievements.

  • Storing ephemeral micropoetry on RFID cards for bite-sized readings

    Storing ephemeral micropoetry on RFID cards for bite-sized readings

    Reading Time: 2 minutes

    Most people don’t consume poetry in the same way that they do novels. Instead of reading a book of poetry from cover-to-cover over the course of a few sessions, the majority of people seem to prefer enjoying poetry in occasional little chunks. And unlike the epic poems of Greek antiquity, those tend to be short and sweet. Leaning into those tendencies, Roni Bandini built this RFID device to read micropoetry.

    “Micropoetry,” in this context, is a style of short poem consisting of three lines. Each of those lines can contain up to 16 characters. That is roughly similar in overall length to a haiku, but doesn’t have any rules regarding syllables. In fact, some haikus couldn’t fit in this micropoem structure, as the lines would contain too many characters.

    If these rules seem awfully specific, that’s because they aren’t arbitrary. Bandini created them so that the poems can fit within the limited storage of MIFARE Classic 1k RFID chips. MIFARE didn’t design those to store any significant amount of data, but rather for saving critical attributes like IDs. These rules ensure that MIFARE Classic 1k RFID tags can contain micropoems. Bandini even created a handy utility to write the poem’s lines into a card’s memory.

    With that structure defined, Bandini built a device to let users read the stored poetry. When someone is in the mood for some poetry, they can simply place a micropoem RFID card on the device. An Arduino UNO R4 WiFi board will then scan the RFID chip using an MFRC522 module, read the stored data, and display the poem’s lines on a 1.3” 128×64 OLED screen. 

    As an added dramatic bonus, one datum in the RFID chip’s memory is a counter. On each read, the device increments that counter. When it reaches three, the device deletes the poem from the chip’s memory forever. 

    [youtube https://www.youtube.com/watch?v=C4U-hpYl5XQ?feature=oembed&w=500&h=281]

    The post Storing ephemeral micropoetry on RFID cards for bite-sized readings appeared first on Arduino Blog.

    Website: LINK

  • Adding real-time local voice controls to a SMARS Quad Mod robot with an Arduino RP2040 Connect

    Adding real-time local voice controls to a SMARS Quad Mod robot with an Arduino RP2040 Connect

    Reading Time: 2 minutes

    Robotics kits like the Screwless/Screwed Modular Assemblable Robotic System (SMARS) are great tools for learning more about how electronics, mechanics, and software can combine to perform useful tasks in the physical world. And in his latest project, Edge Impulse’s senior embedded software engineer Dmitry Maslov shows how he was able to take this platform and give it both speech recognition and Wi-Fi control capabilities using an Arduino Nano RP2040 Connect.

    Constructed from an array of 3D-printed parts and eight servo motors, the SMARS Quad Mod robot is a small, blocky quadruped that uses two LiPo battery cells, a step-down converter, and an IO expansion board to move based on simple directional commands such as “forward” and “left,” among others. Normally, these would come from an IR remote or a preprogrammed sequence, but by leveraging AI at the edge, it can respond in real-time to audible commands. And to achieve this, Maslov imported a dataset containing many samples of people saying directions along with background noise before training a keyword spotting model on it.

    Once exported as a C++ library, the model was embedded into the robot’s sketch. Thanks to the RP2040’s dual-core architecture, the first core continuously reads new data from the microphone, performs inferencing, and sends the result to the second core when available. Then when the value is received, the other core maps the direction to a sequence of leg movements.

    For more information about this project, you can check out Maslov’s tutorial on Hackster.io and see its dataset/model here in the Edge Impulse Studio

    [youtube https://www.youtube.com/watch?v=jt3Bl0be6fE?feature=oembed&w=500&h=281]

    The post Adding real-time local voice controls to a SMARS Quad Mod robot with an Arduino RP2040 Connect appeared first on Arduino Blog.

    Website: LINK

  • Find the best Google services with Google Essentials on Windows PCsFind the best Google services with Google Essentials on Windows PCsDirector of Strategic Partnerships

    Find the best Google services with Google Essentials on Windows PCsFind the best Google services with Google Essentials on Windows PCsDirector of Strategic Partnerships

    Reading Time: 2 minutes

    Over the last two years, we’ve been working to bring Google Play Games to more Windows PC gamers around the world.

    Today, we’re introducing Google Essentials, a new app that makes it easier for you to discover and install many of our best Google services — including Google Play Games — when setting up a new PC. Google Essentials will be first available on all HP Windows consumer and gaming brands: Spectre, Envy, Pavilion, OMEN, Victus and HP Brand and soon to be featured on all OmniBook brands. You can open Google Essentials right from the start menu and easily switch between your phone and laptop.

    For example, from Google Essentials or HP’s OMEN Gaming Hub, you’ll be able to access thousands of mobile and native PC games from Google Play Games, such as Clash of Clans and CookieRun: Tower of Adventures. Signing in to your Play Games account allows you to sync your in-game progress and reward benefits for certain titles, so you can pick things back up whether you’re on an Android device or PC.

    You can also access Google Photos and Google Messages from Google Essentials, making it easier to enjoy your photo albums and respond to texts from friends and family. For those times when you need to get tasks done, Google Essentials includes shortcuts to our popular productivity tools — like Google Docs, Drive, and Calendar. Plus, eligible Google One subscribers can get access to a 2-month trial of Google One 100GB for their cloud storage needs, on us.

    As always, we want to make sure you’re in control of your experience. You can uninstall any Google service — or Google Essentials altogether — at any time. We’ll expand Google Essentials to more laptops and desktops in the coming months, so stay tuned for more updates.

  • More than a store: How we’re evolving Google PlayMore than a store: How we’re evolving Google PlayVice President and General Manager

    More than a store: How we’re evolving Google PlayMore than a store: How we’re evolving Google PlayVice President and General Manager

    Reading Time: < 1 minute

    More rewards

    With over 220 million members, Google Play Points is already one of the world’s largest rewards programs. We recently leveled up our offering with new perks and early access to top titles. Now, we’re doing even more to celebrate our members with new rewards and exclusive experiences.

    This week, we’re launching Super Weekly Prizes, giving Diamond, Platinum and Gold members a chance to win exciting prizes like Pixel devices, Razer gaming products and merchandise. Starting in the U.S., Great Britain, Japan, Korea and Taiwan, check out the Play Points perks tab each week to review and claim Super Weekly Prizes.

  • Amassing a mobile Minion militia

    Amassing a mobile Minion militia

    Reading Time: 2 minutes

    Channeling his inner Gru, YouTuber Electo built a robotic minion army to terrorize and amuse the public in local shopping malls.

    Building one minion robot is, in theory, pretty straightforward. That is especially true when, like these, that robot isn’t actually bipedal and instead rolls around on little wheels attached to the feet. But creating 10 robots is more of a challenge. Assuming a limited budget, the robots would have to be relatively inexpensive. So, how could Electo give them the ability to run around causing mayhem?

    Electo’s solution was to make one smart minion, called King Bob, to lead all of the other minions of lesser intelligence. The basic design consists of an Arduino that controls the two drive motors and that can communicate with other Arduino boards via radio transceiver modules. Those components fit inside a 3D-printed shell and this basic minion is pretty affordable to construct.

    But King Bob has more advanced hardware and special abilities. He can receive explicit movement commands from Electo’s radio transmitter controller, but also has some intelligence thanks to a single-board computer and a camera. That lets it run a computer vision application to detect and follow specific things that it sees. In this case, that is a banana.

    King Bob could follow explicit commands or a banana, but what about the other minions? Electo gave them the ability to follow their leader by simply mimicking its movements. Any movement that King Bob makes is also transmitted over radio to the other minions, so they can make the same movements. This is intentionally clumsy (because minions), but lets the group move together in an entertaining way as they traverse shopping malls and movie theaters.

    [youtube https://www.youtube.com/watch?v=sf7dvccCYY0?feature=oembed&w=500&h=281]

    The post Amassing a mobile Minion militia appeared first on Arduino Blog.

    Website: LINK

  • This beautiful table creates art in the sand

    This beautiful table creates art in the sand

    Reading Time: 2 minutes

    Kinetic sand art tables are pretty hot right now, because they look really cool. They’re like zen gardens that rake themselves in intricate patterns. But most of the builds we’ve seen use a conventional cartesian CNC layout or polar layout. This table by Newsons Electronics takes a different approach inspired by spirograph drawing machines.

    A spirograph is drawing template mechanism made up of at least two gears (and often several). By placing a pen in the hole, the user can draw a line that traces the path created by the gear movement. That path varies based on the gear parameters and can be extremely intricate. The geometric beauty is appealing and this table produces those patterns in sand.

    Like other kinetic art tables, this draws in the sand by using a magnet to pull a ball bearing through the sand. In this case, that magnet attaches to a motor-driven spirograph mechanism underneath the table. One motor rotates the mechanism, while another motor actuates a rack-and-pinion that affects the path and ultimately the drawn pattern.

    Those are both stepper motors and an Arduino UNO Rev3 board controls them through a stepper shield. The Arduino also controls the LED accent lighting, with potentiometer knobs to adjust brightness and the speed of animated transitions.

    [youtube https://www.youtube.com/watch?v=bWOSr_GDN-E?feature=oembed&w=500&h=281]

    Newsons Electronics designed the table’s structure and frame to be made from stacked sheets of plywood cut out with a laser for precision, but it would be possible to make the parts with a CNC router or even a scroll saw. The result is a gorgeous piece of kinetic art.

    The post This beautiful table creates art in the sand appeared first on Arduino Blog.

    Website: LINK

  • 10 amazing big builds

    10 amazing big builds

    Reading Time: 3 minutes

    Raftberry

    Floating dock

    It can be nice to pootle around a lake, especially with some delicious food and company. This Raspberry Pi-powered raft uses arcade controls to move around on the water.

    Teslonda

    Custom electric car

    Taking a 1981 Honda Accord and souping it up is one thing, then there’s making it an electric hot rod. All powered by Raspberry Pi, of course.

    Arcade machine

    Retro cool

    In Retro Gaming with Raspberry Pi, we show you how to make your own nifty arcade cabinet powered by Raspberry Pi, and with your own custom vinyls too!

    Doodleborg

    Big rover

    PiBorg’s biggest robot is a rover they made themselves. It’s powerful enough to pull a caravan, which is why it has a tow ball on it. It was built to show just how powerful PiBorg tech is.

    Odyssey Lights

    Illuminating Blackpool

    One of the biggest Raspberry Pi builds around, these 11-metre-high interactive towers are full of lights, lasers, speakers and other special effects which were made possible with Raspberry Pi.

    Interactive TTRPG table

    Digital D&D

    Built for in-person Dungeons & Dragons using popular remote virtual table software, the only thing it’s missing is an ornate carved fascia.

    SailBot

    Robotic boat

    Tired of winning robotic sailing regattas, a group of university students created an autonomous sailboat that could cross the Atlantic ocean all by itself.

    Magic Mirror

    Rite of passage

    A classic project that just about every Raspberry Pi fan has attempted at least once, the software for it is very powerful and easy to use too.

    Pinball machine

    Steel ball run

    The folks at Team Pinball design and build their own pinball machines, and decided that Raspberry Pi was the perfect computer to run these throwback games.

    Open weed locator

    Raspberry Pi farming

    This big robot travels fields and uses Raspberry Pi with computer vision software to scan for, and pull up, unwanted weeds and other plants.

  • Get ready for Moonhack 2024: Projects on climate change

    Get ready for Moonhack 2024: Projects on climate change

    Reading Time: 3 minutes

    Moonhack is a free, international coding challenge for young people run online every year by Code Club Australia, powered by our partner the Telstra Foundation. The yearly challenge is open to young people worldwide, and in 2023, over 44,500 young people registered to take part.

    A Moonhack 2024 logo.

    Moonhack 2024 runs from 14 to 31 October. This year’s theme is taken from World Space Week 2024: climate change. As always, the projects cater for everyone from brand-new beginners to more experienced coders. And young people have a chance to win a prize for their submitted project!

    We caught up with Kaye North, Community and Engagement Manager at Code Club Australia, to find out more.

    What to expect from Moonhack in 2024

    For this year’s projects, Kaye told us that she collaborated with farmers, scientists, and young people from across Australia to cover diverse topics related to climate change and space. The projects will help participants learn about topics from how people who work in agriculture use climate data to increase crop yields and practise sustainable farming, to the impact of rising global temperatures on sea life populations.

    An illustration depicting various elements related to the environment and sustainability.

    Kaye also hopes to help young people understand the role of satellite data related to climate change, such as the data NASA collects and shares via satellite. Satellite data on rising sea levels, called out in United Nations Sustainable Development Goal 13, forms the basis of one of the Moonhack projects this year.

    Moonhack participants will be able to code with Scratch, micro:bit, or Python. They can also take on a project brief where they may choose their favourite programming language and even include physical computing if they wish.

    A computing classroom filled with learners.

    All six projects will be available from 1 September when registration opens, and projects can be submitted until 30 November.

    Inspiring young people to create a better future

    Climate change is an issue that affects everyone, and for many young people it’s a source of concern. Kaye’s aim this year is to show small changes young people can make to contribute to a big, global impact.

    “Moonhack’s question this year is ‘Can we create calls to action through our coding to influence others to make better choices, or even inform them of things that they didn’t know that they can share with others?’” – Kaye North, Code Club Australia

    Moonhack support for volunteers, teachers and parents

    This year’s Moonhack includes new resources to help educators and mentors who are supporting young people to take part:

    Get your young coders involved: Key info

    • Registration for Moonhack 2024 opens on 1 September
    • The challenge runs from 14 to 31 October, and projects can be submitted until 30 November
    • Participation is free and open to any young coder worldwide, whether they are part of a Code Club or not
    • Everyone from beginners to advanced coders can participate
    • The six projects for Moonhack 2024 will be available in around 30 languages

    To find out more, visit the Moonhack website and sign up to the Moonhack newsletter.

    Code Club Australia is powered by the Telstra Foundation as part of a strategic partnership with us at the Raspberry Pi Foundation.

    Website: LINK

  • An Arduino-powered robotic ukulele that plays itself

    An Arduino-powered robotic ukulele that plays itself

    Reading Time: 2 minutes

    The ukulele has a bit of a reputation for being quaint, but it is a legitimate instrument like any other and that means it takes a lot of practice to play competently. Zeroshot is too busy building cool stuff to bother with all of that, so he put his skills to use constructing this robotic ukulele that plays itself.

    Like a guitarist, a ukulelist can play a note by strumming multiple strings at once or by picking individual strings. More exotic techniques are also possible, but uncommon and outside the scope of this project. The key to Zeroshot’s design is the mechanism that can both pick and strum. It does so by using two actuators: a servo motor to lift and drop the pick, and a stepper to slide the pick back and forth perpendicular to the strings.

    An Arduino UNO Rev3 board controls those motors through a HiLetgo L293D motor shield, with a TMC2208 driver module for the stepper. The Arduino can lower the pick and strum it across all of the strings, or it can move to a specific string and pluck just that one. 

    But it would be limited to only a handful of songs if it could only play open strings, so Zeroshot also needed to add hardware to hold the strings down on the fretboard. He chose solenoids for that job, held in a 3D-printed mount. With power coming from the motor shield, the Arduino can extend the solenoids to play any required notes.

    Zeroshot designed the mount to accommodate up to 16 solenoids, for the first four frets across the four strings. When including open strings, that would give the robot up to 20 notes to work with. But a lot of songs only require a handful of solenoids, as Zeroshot demonstrated by performing Celine Dion’s “My Heart Will Go On.”

    [youtube https://www.youtube.com/watch?v=2MbfsqCwU2Q?feature=oembed&w=500&h=281]

    The post An Arduino-powered robotic ukulele that plays itself appeared first on Arduino Blog.

    Website: LINK

  • Celebrating the community: Isabel

    Celebrating the community: Isabel

    Reading Time: 5 minutes

    One of our favourite things is sharing the stories of amazing young people, volunteers, and educators who are using their passion for technology to create positive change in the world around them.

    Recently, we had the pleasure of speaking with Isabel, a computer science teacher at Barton Peveril Sixth Form College in Eastleigh, England. She told us her fascinating journey from industry to education, along with how she is helping to make the tech space inviting to all.

    From industry to the classroom: Isabel’s journey to encourage diversity in tech

    Isabel’s path to working in the tech sector started with her early exposure to engineering thanks to her father’s career in telecoms.

    “I find this is true for a lot of female engineers my age: you will find that their dad or their uncle was an engineer. I remember that when I made the decision to study engineering, my teachers asked me if I was sure that it was something I wanted to do.”

    Isabel pursued a degree in engineering because she loved the technical aspects, and during her studies she found a passion for programming. She went to work as a software engineer in Hampshire, contributing to the development of 3G mobile phone technology.

    Despite enjoying her career in tech, Isabel felt a strong pull towards teaching due to her long-standing involvement with youth groups and a desire to give back to the community.

    “While I was at university in London, I took part in a scheme where we could go into local primary schools and help with their science teaching. At the time, I just thought this was my way of giving back, I hadn’t really thought of it as a career. But actually, after a while, I thought ‘I’m enjoying this programming, but I really liked helping the young kids as well’.”

    The transition wasn’t easy, as Computer Science was not widely taught in schools at the time, but Isabel persevered, teaching IT and Media to her classes as well.

    Once Isabel settled into her teaching role, she began thinking about how she could tackle a problem she noticed in the STEM field.

    Championing diversity in tech

    Having experienced first-hand what it was like to be the only woman in STEM spaces, Isabel’s commitment to diversity in technology is at the core of her teaching philosophy. She works hard to create an inclusive environment and a diversity of opportunities in her classroom, making sure girls feel encouraged to pursue careers in tech through exploring various enrichment activities.

    Two educators at a desk using their computers.

    Isabel focuses on enrichment activities that bridge the gap between academic learning and real-world application. She runs various projects and competitions, ensuring a balanced representation of girls in these initiatives, and gives her students the opportunity to participate in programs like the Industrial Cadets, Student Robotics, and Coolest Projects

    Isabel told us that she feels these opportunities provide essential soft skills that are crucial for success in any career.

    “The A level environment is so academic; it is heavily focused on working on your own on very abstract topics. Having worked in industry and knowing the need to collaborate, I found that really hard. So I’ve always made sure to do lots of projects with my students where we actually work with real engineers, do real-world projects. I believe strongly in teaching soft skills like team working, project management, and time management.”

    Harnessing trusted resources

    A key resource in Isabel’s teaching toolkit is the Ada Computer Science platform. She values its reliability and the timely updates to the topics, which are crucial in a rapidly evolving subject like Computer Science.

    She said she encourages both her students and fellow teachers, especially those who have retrained in Computer Science, to use the platform as a resource. 

    “Ada Computer Science is amazing. We know we can rely on saying to the students ‘look on Ada, the information will be correct’ because I trust the people creating the resources. And we even found ourselves as teachers double-checking things on there. We struggle to get Computer science teachers, so actually only two of us are Computer Science teachers, and the other three are Maths teachers we have trained up. To be able to say ‘if you are not sure about something, look on Ada’ is a really nice thing to have.”

    A large group of educators at a workshop.

    The ongoing challenge and hope for the future

    Despite her efforts, Isabel acknowledges that progress in getting more girls to pursue tech careers is slow. Many girls still view tech as an uninviting space and feel like they don’t belong when they find themselves as one of a few girls — if not the only one — in a class. But Isabel remains hopeful that continuous exposure and positive experiences can change these perceptions.

    “I talk to students who are often the only girl in the class and they find that really hard. So, if at GCSE they are the only girl in the class, they won’t do [the subject] at A level. So, if we leave it until A level, it is almost too late. Because of this, I try as much as I can to get as many girls as possible onto my engineering enrichment projects to show them as many opportunities in engineering as possible early on.”

    Her work with organisations like the UK Electronics Skills Foundation reflects her commitment to raising awareness about careers in electronics and engineering. Through her outreach and enrichment projects, Isabel educates younger students about the opportunities in these fields, hoping to inspire more girls to consider them as viable career paths.

    Looking ahead

    As new technology continues to be built, Isabel recognises the challenges in keeping up with rapid changes, especially with fields like artificial intelligence (AI). She stays updated through continuous learning and collaborating with her peers, and encourages her students to be adaptable and open to new developments. “The world of AI is both exciting and daunting,” she admits. “We need to prepare our students for a future that we can hardly predict.”

    Isabel’s dedication to teaching, her advocacy for diversity, and her efforts to provide real-world learning opportunities make her an inspiring educator. Her commitment was recognised by the Era Foundation in 2023: Isabel was named as one of their David Clark Prize recipients. The award recognises those who “have gone above and beyond the curriculum to inspire students and showcase real-world engineering in the classroom”.

    A woman receives a certificate of recognition.

    Isabel not only imparts technical knowledge — she inspires her students to believe in their potential, encouraging a new generation of diverse tech professionals. 

    If Isabel’s story has inspired you to encourage the next generation of young tech creators, check out the free teaching and training resources we provide to support your journey.

    If you are working in Computer Science teaching for learners age 14 and up, take a look at how Ada Computer Science will support you. 

    Website: LINK

  • LR1302 LoRaWAN HAT + Gateway Module review

    LR1302 LoRaWAN HAT + Gateway Module review

    Reading Time: 2 minutes

    Construction is simple – simply slot the Gateway Module into the HAT’s mini PCIe connector, and slot the HAT on top of your Raspberry Pi. There are external antennas to add as well, including a fancy GPS module in case you need to know its location.

    From source

    The software is a little more involved though. The docs help guide you in the setup, which includes compiling the software from source and connecting everything up to thethings.network so you can control it all remotely. It’s a bit of a lengthy process, however it’s definitely streamlined once you get past the initial compiling phase. This is not for folks wanting to try out their first IoT set up though, with LoRaWAN products definitely having a more professional user in mind, and the docs don’t help you beyond getting the gateway working.

    The Gateway Module makes the magic happen

    That said, if you know your LoRaWAN stuff, you’re all ready to start connecting devices. The range on the gateway is very good, and we didn’t have any problems with devices around our home not reaching it. We even put some sensors outside and they worked a treat. The GPS worked well too, something you’d need if you’re deploying gateways out on a farm or throughout a wider area. You could probably jury rig it to work as a GPS tracker or Geocacher if you’d like to as well, however there are better ways to do that.

    Prosumer uses

    This is definitely a very powerful piece of kit, and very reasonably priced at that, although you will need to supply your own Raspberry Pi for it as well. If you’re feeling the strain in your home automation network and fancy upgrading to the next level, it’s definitely a great way to try out and experiment with LoRaWAN too, and Elecrow also has Node Boards you can use with it if you need to upgrade that part too.

    Verdict

    8/10

    A great piece of kit designed for folks with serious remote automation needs that fits snugly atop a Raspberry Pi.

    Specs

    Chipset: Semtech SX1302 with an RTC battery

    Sensitivity: -125dBm @125K/SF7, -139dBm @125K/SF12

    Channels: 8 channels with bandwidth of 125/250/500 kHz

  • Video magnifier

    Video magnifier

    Reading Time: 3 minutes

    “[It’s a] technical version of a magnifying glass to help people with low vision,” Markus tells us. “It’s basically a camera that can be connected to any HDMI screen, with a simple interface to scale and modify images. There are lots of professional devices out there, and a few DIY takes on the category as well. My goal was to make it simple, portable and affordable. There’s also experimental support for reading out text.”

    Markus came up with the idea when his grandmother was prescribed one of these professional devices after suffering from macular degeneration.

    “Even though she generally shunned away from most technology beyond a telephone or TV, this improved her life a lot and she enjoyed reading and writing again, be it letters, books or the newspaper,” Markus says. “However, it’s a bulky device that was placed in the living room, so when she needed it for cooking recipes she had to frequently go back and forth between the kitchen and the living room.”

    According to him, a DIY solution is at least a tenth of the price of professional versions.

    The magnifier is useful for both reading and writing

    Rapid prototyping

    While a tablet or laptop would have done the job, the constant updates and unlock codes felt like a barrier. Raspberry Pi with a Camera Module and a screen seemed like the best solution to Markus.

    “The software was relatively easy,” Markus explains. “But I experimented a lot with the form factor. I started out with a wooden setup as I wanted to make it look nice and non-technical, but my latest version is 3D-printed and I’m quite proud of its simple and portable design.”

    There are three main functions for the magnifier: a button cycles through different magnification levels, while another can change colour modes. This includes inverting the colours or tinting it yellow or blue.

    “There’s also an experimental readout feature,” says Markus. “[It takes] a picture and then uses Tesseract OCR to get the text which is later read out via the pico TTS library, all on-device without the need for an internet connection.”

    Testing out the concept using a wooden board and a bottle of soda

    Book smarts

    “This has been an interesting project where I’ve learned a lot over the years,” Markus mentions. Everytime he revisits it he thinks about little tweaks he can make but is happy that the code is up on his GitHub so others can modify it to their needs.

    Unfortunately Markus’ grandmother had a stroke before getting to test it, and is now unable to use it. However, other folks have been able to give feedback, much of it positive. He’s gone on to use Raspberry Pi and Camera Modules for other projects, such as a portable photo booth for weddings – sounds like something we need to cover in a future issue.

  • This UNO R4 WiFi-controlled device streamlines a restaurant’s online order system

    This UNO R4 WiFi-controlled device streamlines a restaurant’s online order system

    Reading Time: 2 minutes

    Most successful restaurants operating today have to take advantage of online ordering, as a huge chunk of customers have switched to takeout and delivery. But point-of-sale (POS) systems don’t always integrate well into a kitchen’s workflow and that can lead to missed orders — one of the worst things a restaurant can do. To help streamline a POS for a friend’s fried chicken takeout restaurant, Redditor UncleBobbyTO developed this affordable notification bot.

    UncleBobbyTO’s friend uses a Square system in her restaurant, which has an online interface and sends an email for each new order. But the kitchen staff is busy and they sometimes fail to notice the emails. This device solves that problem. It can sit in the kitchen or by the expo window and connects to the Square API, checking for new orders every three minutes. When the device detects a new order, it lights up green and displays basic information about that transaction. Staff can then look up the order and press a button on the device to clear the notification.

    That’s all possible because the device contains an Arduino UNO R4 WiFi board, which has built-in Wi-Fi capabilities that lets it connect to the internet and the Square API. It resides inside of a sturdy 3D-printed enclosure that also contains an RGB LED strip and a 16×2 character LCD screen. 

    Now UncleBobbyTO’s friend can run her restaurant without worrying that staff might miss an order. 

    The post This UNO R4 WiFi-controlled device streamlines a restaurant’s online order system appeared first on Arduino Blog.

    Website: LINK

  • Made by Google 2024Made by Google 2024

    Made by Google 2024Made by Google 2024

    Reading Time: < 1 minute

    Today, at our ninth Made by Google event, we shared how we’re bringing the best of Google AI to more people and more phones with updates across Gemini, Android and the Pixel portfolio.

    We believe that AI can make day-to-day life more productive, open up new ways to learn, and create ways for people to express themselves. This is especially true when AI is built into the devices that people carry around with them everywhere. We’re innovating with AI at every layer of the tech stack — from our research and models that make new features and capabilities possible, to Android OS that brings the apps and services to billions of people to use every day, to our premium hardware built with a custom silicon chip.

    Here’s everything we announced across Gemini and Android — plus, how we’re bringing these new capabilities to our latest Pixel devices, including the new Pixel 9 phones, Pixel 9 Pro Fold, Pixel Watch 3 and Pixel Buds Pro 2.

    Find out where each product will be available and sign up for product updates on the Google Store.

    Website: LINK

  • Android is reimagining your phone with GeminiAndroid is reimagining your phone with GeminiPresident, Android Ecosystem

    Android is reimagining your phone with GeminiAndroid is reimagining your phone with GeminiPresident, Android Ecosystem

    Reading Time: 2 minutes

    No matter the task, it’s critical that your personal information is protected and private. With your permission, Gemini can help you connect your relevant personal data with all the valuable knowledge that Google has organized and made accessible to provide just the right help you need. For example, Gemini can help create a daily workout routine based on your personal trainer’s email, or use your resume in Google Drive to write a work bio. Only Gemini can do all of this with a secure, all-in-one approach that doesn’t require hand-off to a third-party AI provider you may not know or trust.

    And because Android is the first mobile operating system with a large, on-device multimodal AI model — called Gemini Nano — your data never leaves your phone for some of the most sensitive use cases. With Gemini Nano on Pixel 9, you can use Call Notes to summarize audio from a phone call or Pixel Screenshots to save and organize your images.

    So whether your data is being processed in the cloud or on device, it lives within Google’s secure end-to-end architecture, keeping your information safe and private.

    Built for Android’s scale

    Gemini is the most widely available AI assistant — supported in 45 languages, in more than 200 countries and territories, and we’re continuing to add more.

    It’s available on hundreds of phone models from dozens of device makers, and has been tailored for the many form factors of Android — from phones to foldables. On Samsung’s Galaxy Z Fold6, you can bring Gemini into a multi-window, split-screen experience for multitasking. And on the motorola razr+, you can bring up Gemini directly from the external display to quickly summarize your recent emails without ever having to open your phone. Beyond the latest flagship devices, Gemini is already supported on existing devices, which means your Android phone keeps getting better over time.

    Website: LINK

  • 4 new AI-powered Pixel and Android accessibility updates4 new AI-powered Pixel and Android accessibility updatesSenior Director, Product Management, Pixel

    4 new AI-powered Pixel and Android accessibility updates4 new AI-powered Pixel and Android accessibility updatesSenior Director, Product Management, Pixel

    Reading Time: < 1 minute

    Working with the disability community to advance accessibility innovation is a core part of our mission to build for everyone. Here’s a look at our latest accessibility features that use AI — from Pixel Camera updates to more widely available captions.

    Get more suggestions to capture the perfect shot

    Guided Frame, built with and for people with blindness or low vision, lets you take great photos and selfies with your Pixel Camera. Guided Frame will give spoken guidance to help you not only get your face in the frame, but also position the camera angle just right. Prompts will tell you to tilt your face up or down, or pan left to right before the camera auto-captures the photo. It will also announce that “lighting is low,” so you’ll know to move your phone to find a better shot. The latest update to Guided Frame also delivers improved object recognition, intelligent face filtering in group photos, and better focus on subjects even in complex scenes.

    Previously, Guided Frame was only accessible through TalkBack, Android’s screen reader. Now you can also turn the feature on right from the camera settings, making it even easier for those who don’t use screen readers.

    Website: LINK

  • Laptop dock CrowView Note now on Kickstarter

    Laptop dock CrowView Note now on Kickstarter

    Reading Time: < 1 minute

    While we’ve not had enough time to assess it for review yet, we’ve had a chance to play with one for a bit with a Raspberry Pi 5 and we’re very intrigued by it. CrowView has speakers, a webcam, a microphone, and an in-built battery so all you need to do is provide a Raspberry Pi to get it functioning like a true laptop. It’s very light too as it doesn’t have as much internal hardware as a real laptop.

    The screen is quite nice to boot

    There’s no extra software you need to add for that extra hardware either – the closest SD card we could find had been a fresh install and we were able to use the mouse and keyboard straight away to set it up.

    At the time of writing this, the project just launched and already hit its funding goal, so that’s a good sign a lot of other folks are interested in it as well.

    Look out for a full review in a future issue of The MagPi.

  • Reimagining the chicken coop with predator detection, Wi-Fi control, and more

    Reimagining the chicken coop with predator detection, Wi-Fi control, and more

    Reading Time: 2 minutes

    The traditional backyard chicken coop is a very simple structure that typically consists of a nesting area, an egg-retrieval panel, and a way to provide food and water as needed. Realizing that some aspects of raising chickens are too labor-intensive, the Coders Cafe crew decided to automate most of the daily care process by bringing some IoT smarts to the traditional hen house.

    Controlled and actuated by an Arduino UNO R4 WiFi and a stepper motor, respectively, the front door of the coop relies on a rack-and-pinion mechanism to quickly open or close at the scheduled times. After the chickens have entered the coop to rest or lay eggs, they can be fed using a pair of fully-automatic dispensers. Each one is a hopper with a screw at the bottom which pulls in the food with the help of gravity and gently distributes it onto the ground. And similar to the door, feeding chickens can be scheduled in advance through the team’s custom app and the UNO R4’s integrated Wi-Fi chipset.

    The last and most advanced feature is the AI predator detection system. Thanks to a DFRobot HuskeyLens vision module and its built-in training process, images of predatory animals can be captured and leveraged to train the HuskyLens for when to generate an alert. Once an animal has been detected, it tells the UNO R4 over I2C, which in turn, sends an SMS message via Twilio.

    More details about the project can be found in Coders Cafe’s Instructables writeup.

    The post Reimagining the chicken coop with predator detection, Wi-Fi control, and more appeared first on Arduino Blog.

    Website: LINK