The primary appeal of microcontrollers is their versatility. They are, essentially, the embedded equivalent of computers — general purpose devices that can perform a wide range of functions. And to get the most out of a microcontroller, you’ll also want connectivity suitable for your application. That’s why we released the Arduino Nano Matter and YouTuber Mr Innovative has shared a great video illustrating how easy it is to build an energy meter using this new development board.
The Nano Matter is based on the powerful Silicon Labs MGM240S, which has an Arm Cortex-M33 processor and support for a number of wireless connectivity options, including 802.15.4 (Zigbee and Thread), Bluetooth® Low Energy 5.3, Bluetooth® Mesh, and Matter. That makes the Nano Matter perfect for smart home and other Internet of Things applications. To demonstrate that, Mr Innovative created an energy meter that would be useful to many people around the world.
This unit monitors the power flowing to any device or appliance connected to mains AC power. It displays information about that power consumption on a small OLED screen, and also sends the data over Bluetooth to a connected smartphone for logging. The Nano Matter can’t monitor mains AC voltage directly, so Mr Innovative used a ZMCT103C current transformer for the job. The Arduino receives its power from a 9V battery and the components fit inside a 3D-printed enclosure. A printed sticker label gives that a nice, smooth top finish.
Developing energy-efficient IoT and wearable devices is complex and time-consuming, yet it is essential for creating high-quality products that stand out in today’s market. A key part in this process is optimizing power consumption without sacrificing performance or functionality. Fortunately, Arduino Pro modules help address this challenge by offering powerful chips and efficient regulators, enabling developers to fine-tune power settings and maximize efficiency for their specific needs.
To further support these efforts, we’re excited to introduce a powerful new power management library designed specifically for Arduino Pro modules. The currently supported models are Arduino Portenta H7, Portenta C33, and Nicla Vision. With this library, you can easily monitor battery usage and health, fine-tune charging parameters, toggle components to reduce power consumption, and even enable sleep and standby modes on supported devices. In fact, when in deep sleep mode, some boards consume under 100 microamperes, enabling months or even years of continuous runtime on a single charge.
Ready to optimize your IoT and wearable devices? Keep reading to learn how our new power management library for Arduino Pro modules can help you extend battery life and boost efficiency. Discover the tools to take control of your device’s power usage and try it for yourself!
Watt’s in store: key features you’ll love
Here are some of the standout features that will help you maximize efficiency and extend battery life:
Battery monitoring: Keep track of vital battery metrics, including voltage, current, percentage, and temperature, in real-time.
Battery health tracking: Monitor battery health with detailed insights into temperature, and reported capacity.
Charging control: Take charge of your device’s battery management by monitoring and adjusting charging parameters.
Sleep and Standby modes: Save significant power by putting Portenta C33 or Portenta H7 into low-power Sleep and Standby modes. Support for Nicla Vision will be added in an upcoming update.
Power rail control: Fine-tune power usage by toggling and setting voltages on various power rails of the board.
Juice it up: monitor battery health like a pro
Managing your device’s battery health has never been easier. With the dedicated battery management class, you gain real-time insights into your battery’s usage and health, empowering you to optimize energy efficiency and prolong battery life. This powerful tool lets you track essential metrics such as current and average voltage, battery percentage, current draw, temperature, and even provides estimates for time-to-full and time-to-empty, allowing you to predict charging and discharging times with accuracy. By keeping a close eye on these parameters, you can make informed decisions to maximize your device’s performance and longevity.
Monitoring battery health is crucial for ensuring the long-term reliability and efficiency of your devices. Poor battery health can lead to reduced performance, shorter runtimes, and even unexpected shutdowns, which can negatively impact user experience. By proactively tracking battery metrics, you can identify potential issues before they become critical, extend the lifespan of your batteries, and maintain optimal energy usage – whether your device is in constant use or running intermittently over long periods. Staying on top of battery health means fewer disruptions, lower maintenance costs, and more sustainable, high-performing products.
Charging your LiPo battery effectively is key to maintaining long-term health and maximizing runtime. The power management library gives you control over your battery’s charging process by monitoring each stage and allowing you to adjust crucial parameters to suit your specific needs. With this tool, you can confidently charge your devices, knowing you’re getting the most out of your batteries without risking damage or reduced lifespan.
The three stages of charging
LiPo batteries charge in three stages, each critical for ensuring the battery is properly and safely charged:
Pre-Charge: The first phase begins by charging the battery at a low current, gradually increasing until it reaches the appropriate charging level. This gentle start ensures that the battery is brought up to full charge safely.
Constant Current: In this stage, the battery charges at a consistent current until it reaches the designated “fully charged” voltage – typically 4.2 V for most LiPo batteries. This is where the bulk of the charging occurs.
Constant Voltage: Once the battery hits its target voltage, it transitions to constant voltage mode, where the current is gradually reduced. This final stage ensures that the battery is topped off and ready to go without overcharging.
Understanding these stages helps you manage your battery more effectively and ensures optimal charging every time.
Why monitoring matters
The library allows you to check what stage of charging your battery is in at any time. Knowing whether your battery is pre-charging, fast-charging, or maintaining its full charge can help you monitor its health and ensure it is not being overstressed. The ability to monitor charging status also alerts you to potential issues like overvoltage, overheating, or timer faults, so you can intervene and protect your system before any damage occurs.
By giving you control over parameters such as charge voltage, charge current, and end-of-charge current, the library ensures that your battery is charged in the safest and most efficient manner possible. Whether you’re tweaking the current limit for a more gentle charge or adjusting the voltage for a custom battery, these settings help you get the best performance while extending battery life.
With this level of control, you’ll be able to keep your batteries healthy, your devices powered, and your projects running smoothly.
Powering down, saving up: discover power-saving modes for longer life
With modern IoT devices, power efficiency is critical, especially when running on battery for extended periods. That’s where sleep modes come in. The Renesas and ST chips supported by this library feature two essential low-power states – Sleep and Standby – each optimized to help you manage power consumption without sacrificing functionality.
Whether you’re developing an energy-conscious wearable or a long-lasting sensor network, these modes help you strike the perfect balance between performance and efficiency.
Sleep mode: ready when you are
In Sleep mode, your module significantly reduces its power consumption to about half of its normal usage. The best part? When it wakes up, it resumes execution right where it left off. This makes Sleep mode ideal for applications that need to remain responsive while conserving energy. Wake-up triggers can vary depending on your specific board, allowing you to customize how and when your device springs back to life.
Standby mode: for maximum power saving
Standby mode takes energy conservation to the next level, dropping power consumption to as low as 50 uA to 300 uA when peripherals are turned off. This mode is perfect for long-term, battery-dependent applications where energy use is a major concern. Unlike Sleep mode, Standby resets the board upon waking, triggering the setup() function again. This full reset is well-suited for scenarios where occasional wake-ups are acceptable, such as data logging or remote monitoring.
Fine-tuning your sleep strategy
Both the Portenta H7 andPortenta C33 offer flexible wake-up options. You can use a real-time clock alarm for scheduled wake-ups or external stimuli such as sensor input to trigger activity. On the Portenta C33, multiple pins can be configured as wake-up sources, allowing you to seamlessly integrate peripherals like motion sensors or buttons to bring your board out of sleep.
For even more control, toggle your peripherals on and off as needed, ensuring that features like the ADC, RGB LED, Secure Element, Wi-Fi®, and Bluetooth® are only active when required. This granular level of power management means you can tailor your device’s behavior to its environment, making sure energy isn’t wasted.
In both sleep modes, managing your wake-up sources, peripherals, and configurations can significantly extend your device’s battery life, making it a key factor in creating sustainable, long-lasting IoT solutions.
Mbed and Portenta H7: automated efficiency
On Mbed-enabled STM32-based boards like the Portenta H7 and Nicla Vision, sleep management is automatic. The system enters a sleep-like state during idle periods, but you can enhance this by manually managing sleep locks – peripherals or processes that might prevent the module from sleeping. Unlocking these will ensure your board sleeps whenever possible, maximizing efficiency without compromising essential tasks. Check out this example from the underlying Arduino_LowPowerPortentaH7 library for more information about sleep locks.
Power consumption comparison
To give you a clear idea of how power consumption varies across different Arduino Portenta modules, here is a breakdown of current usage with and without power optimizations. This table highlights how effectively sleep modes and peripheral management can reduce power draw, helping you extend battery life in your projects.
Note: Sleep measurements are not available on the Portenta H7 modules because they go to sleep automatically when idling.
Note: These measurements have been taken using a Nordic Power Profiler Kit II through the JST power connector of the Portenta boards. The numbers might be higher when powering through the VIN or 5V pin because it involves more power regulators that are not as efficient as the PF1550’s integrated regulators.
Conclusion
Efficient power management is key to unlocking the full potential of your Arduino Pro projects! With advanced tools like customizable sleep modes, detailed battery monitoring, and flexible peripheral control, you can significantly extend battery life and optimize energy usage across your devices. Whether you’re working with the Portenta H7, Portenta C33, or Nicla Vision, these features allow you to create smarter, more sustainable IoT and wearable solutions that stand the test of time.
Now it’s your turn to put these powerful features to work: elevate your designs, reduce energy consumption, and build products that last longer and perform better. And don’t forget to share your results on Project Hub or the Arduino Forum!
Today we’re unveiling a fresh look and feel for Code Club, along with a new ambition to inspire 10 million more young people to get creative with technology over the next decade.
Code Club is a network of free coding clubs where young people learn how to create with technology. Founded in the UK in 2012, it has grown to be a global movement that has already inspired more than 2 million young people to learn how to build their own apps, games, animations, websites, and so much more.
We know that Code Club works. Independent evaluations have demonstrated that attending a Code Club helps young people develop their programming skills as well as wider life skills like confidence, resilience, and skills in problem-solving and communication. This impact is a result of the positive learning environment created by the teachers and volunteers that run Code Clubs, with young people enjoying the activities and developing skills independently and collaboratively — including young people who sometimes struggle in a formal classroom setting.
Just as important, we know that Code Clubs inspire young people from all backgrounds, including girls and young people from communities that are underrepresented in the technology sector.
What’s changing and why
While we are incredibly proud of the impact that Code Club has already achieved, we want to see many more young people benefiting, and that led us to set the ambitious goal to reach 10 million more young people over the next decade.
To help us figure out how to reach that ambition, we spent a lot of time this year listening to the community as well as engaging with parents, teachers, and young people who aren’t yet involved in Code Club. All of the changes we’ve made have been informed by those conversations and are designed to make it easier for educators and volunteers all over the world to set up and run Code Clubs.
The biggest change is that we are making Code Club a more flexible model that can be adapted to reflect your local context and culture to ensure that it is as meaningful as possible for the young people in your community.
That means you can host a Code Club in a school or a community venue, like a library or makerspace; you can choose the age range and rhythm of meetings that make sense for your setting; and you can tailor the activities that you offer to the interests and skills of the young people you are serving. In order for the movement to be as inclusive as possible, you don’t even need to be called ‘Code Club’ to be an ‘Official Raspberry Pi Foundation Code Club’ and benefit from all the support we offer.
To support this change, we have developed a Code Club Charter that we ask all club leaders and mentors to sign up to. This sets out the principles that are shared by all Code Clubs, along with the commitments that the Raspberry Pi Foundation is making about our support to you.
We have launched a new website that makes it easier for you to find the information you need to set up and run your Code Club, along with an updated and simplified club leader guide. In a few weeks time, we are launching a new online course with guidance on how to run a successful club, and we will be adding to our programme of online community calls, webinars, and training to support a growing community of club leaders and mentors.
One of the most important parts of our support for Code Clubs is the projects that help young people learn how to bring their ideas to life using a wide range of hardware and software. As they are created by experienced educators, based on research, rigorously tested, and translated into dozens of languages, you can have confidence that these projects lead to meaningful and lasting learning outcomes for the young people attending your club. Code Club projects enable young people to learn independently, meaning that mentors don’t need technical skills.
What this means for CoderDojos
Alongside Code Club, the Foundation supports CoderDojo, a network of coding clubs that started life in Cork, Ireland in 2011 and merged with the Raspberry Pi Foundation in 2017.
In order to reduce duplication and make it easier for anyone to set up and run a coding club, we have decided to bring together the resources and support for all club leaders and mentors under one website, which is the new Code Club website.
There is no need for existing CoderDojos to change their name or anything about the way they operate. All registered CoderDojos will be able to manage their club in exactly the same way through the new website, and to access all of the support and resources that we offer to all coding clubs. New clubs will be able to register as CoderDojos.
The ethos, experiences, and lessons from the CoderDojo community have been a vital part of the development of the new Code Club. We have worked hard to make sure that all existing CoderDojos feel that their values are reflected in the Charter, and that the guidance and resources we offer address their circumstances.
CoderDojos will very much remain part of this community, and the Raspberry Pi Foundation will continue to celebrate and learn from the amazing work of CoderDojos all over the world.
Code Club in the age of artificial intelligence
With AI already transforming so many parts of our lives, it’s not surprising that some people are starting to ask whether young people even need to learn to code anymore.
We’ve got a lot to say on this subject — so watch this space — but the short version is that learning how to create with technology has never been more important. The way that humans give instructions to computers is changing, and Code Club provides a way for young people to experiment with new technologies like AI in a safe environment. Over the next couple of weeks, we’ll be launching new Code Club projects that support young people to learn about AI technologies, including generative AI, and we’ll be providing support for club leaders and mentors on the topic too.
Thank you and get involved
I want to end by saying a huge thank you to everyone who has been part of the Code Club journey so far, and particularly to everyone who has worked so hard on this project over the past year — far too many people to name here, but you know who you are. I also want to thank all of the parents, teachers, mentors, and partners who have provided the feedback and ideas that have shaped these changes.
Code Club and CoderDojo were both founded in the early 2010s by individuals who wanted to give more young people the opportunity to be digital creators, not just consumers. From that first Dojo in Cork, Ireland, and the first Code Clubs in London, UK, we’ve built a global movement that has empowered millions of young people to engage confidently with a world that is being transformed by digital technologies.
It’s never been a better time to get involved with Code Club, so please take a look and get in touch if you need any help or support to get started.
For now-college student Joel Grayson, making something that combined his interests in mechanics, electronics, and programming while being simultaneously useful to those around him was a longtime goal. His recent Venderoo project is exactly that, as the creatively named vending machine was designed and built from the ground-up to dispense snacks in his former high school to fellow classmates.
Constructing Venderoo started with a sketch that featured the dimensions, vending mechanism, and the electronics panel on the left. Then through a combination of a CNC router and a jigsaw, Grayson meticulously cut out each plywood panel and assembled them together along with clear acrylic sheets so students could observe the machine in-action. On the electronics side, an Arduino Mega 2560 is responsible for handling selections on the keypad, displaying commands/feedback to users via the character LCD, accepting money, and rotating the motors when it’s time to dispense.
When a student first approaches Venderoo, they are greeted by a message instructing them to select their snack of choice, after which the price will appear and ask for a combination of $1 or $5 bills, depending on the price. Once the balance has met the threshold, Venderoo will find the location of the snack and spin the appropriate motor thanks to powerful MOSFET drivers.
To see more about how Grayson’s Venderoo vending machine works, watch the video below!
New updates are coming to all Google TV devices starting today — including the new Google TV Streamer, available on September 24. From new ways to find what to watch to new ways to control your smart home, here’s a look at everything we’re launching.
Control your smart home with Google TV
With the new home panel on Google TV, you can control all of your compatible smart home devices — including lights, thermostats and cameras — without leaving the couch. The new doorbell notifications also allow you to see who’s at the front door without pausing what you’re watching. And, if you can’t find the remote, you can control your devices using your voice and the Google Assistant.
Since they became publicly available at the end of 2022, generative AI tools have been hotly discussed by educators: what role should these tools for generating human-seeming text, images, and other media play in teaching and learning?
Two years later, the one thing most people agree on is that, like it or not, generative AI is here to stay. And as a computing educator, you probably have your learners and colleagues looking to you for guidance about this technology. We’re sharing how educators like you are approaching generative AI in issue 25 of Hello World, out today for free.
Generative AI and teaching
Since our ‘Teaching and AI’ issue a year ago, educators have been making strides grappling with generative AI’s place in their classroom, and with the potential risks to young people. In this issue, you’ll hear from a wide range of educators who are approaching this technology in different ways.
For example:
Laura Ventura from Gwinnett County Public Schools (GCPS) in Georgia, USA shares how the GCPS team has integrated AI throughout their K–12 curriculum
Mark Calleja from our team guides you through using the OCEAN prompt process to reliably get the results you want from an LLM
Kip Glazer, principal at Mountain View High School in California, USA shares a framework for AI implementation aimed at school leaders
Stefan Seegerer, a researcher and educator in Germany, discusses why unplugged activities help us focus on what’s really important in teaching about AI
This issue also includes practical solutions to problems that are unique to computer science educators:
Graham Hastings in the UK shares his solution to tricky crocodile clips when working with micro:bits
Riyad Dhuny shares his case study of home-hosting a learning management system with his students in Mauritius
And there is lots more for you to discover in issue 25.
Whether or not you use generative AI as part of your teaching practice, it’s important for you to be aware of AI technologies and how your young people may be interacting with it. In his article “A problem-first approach to the development of AI systems”, Ben Garside from our team affirms that:
“A big part of our job as educators is to help young people navigate the changing world and prepare them for their futures, and education has an essential role to play in helping people understand AI technologies so that they can avoid the dangers.
Our approach at the Raspberry Pi Foundation is not to focus purely on the threats and dangers, but to teach young people to be critical users of technologies and not passive consumers. […]
Our call to action to educators, carers, and parents is to have conversations with your young people about generative AI. Get to know their opinions on it and how they view its role in their lives, and help them to become critical thinkers when interacting with technology.”
Share your thoughts & subscribe to Hello World
Computing teachers are being asked again to teach something that they didn’t study. With generative AI as with all things computing, we want to support your teaching and share your successes. We hope you enjoy this issue of Hello World, and please get in touch with your article ideas or what you would like to see in the magazine.
We’d like to thank Oracle for supporting this issue.
Manufacturers put a lot of effort into their packaging (there is an entire engineering discipline just for that) and some of it can be quite beautiful. But it usually still ends up in the landfill or, at best, in a recycling center. However, if you’re the type of person who can see the beauty in wine bottles, mason jars, and tin cans, then you can build the Bottle Plotter to transform trash into treasure.
This machine, developed by VGaman, is a CNC pen plotter with one linear axis swapped out for a rotary axis. That means that instead of plotting on a traditional XY plane, it plots around a cylinder. The “pen” can be anything that fits in the holder and the possibilities are almost endless. Paint markers seem especially well-suited to this kind of work, but there are certainly other options that may produce interesting results on some materials.
The Bottle Plotter is relatively affordable to build, as most of the parts are 3D-printable. The exceptions are fasteners, bearings, rods, and the electronic components. Those electronics include an Arduino UNO Rev3 board, a CNC shield, and stepper motors. VGaman’s design does include a Z axis (to move the pen closer to and further from the workpiece surface), so the machine requires three stepper motors.
The Arduino runs GRBL firmware and can accept any compatible G-code. The easiest way to generate that G-code is with a plugin for Inkscape, which will let users create artwork and then plot that all within one piece of software. Swap pens between toolpaths to make cool multicolor designs!
Signing up for Tindie is pretty trivial. You need a basic account to be able to buy from Tindie, and every account has all the options to start selling. Your need to give your store a name, then set up a verified PayPal account, and then you are ready to list your first product. A couple of things to note about Tindie is that you must have an image of your actual product on the product page, you can’t have a render of a product that you will make if you get an order. Neither can you list a product that you plan to make, so you can’t use Tindie to act as a pre-order system.
Listing a product is pretty straightforward: you fill in some details about the product, then supply links to any documentation and any source files you are sharing. Brilliantly, Tindie is also set up to promote open-source hardware projects well, so there are dialogue options to add OSHWA certification numbers, see Figure 1. You can add multiple images and also links to videos which automatically embed in the bottom of the project page. Save your product listing as a draft, and you can preview the page and check your work; it’s very similar to creating a blog post. When you are ready to launch the product you submit the product for approval and the Tindie team will take a look before setting it live on the site.
When someone orders your product you get a notification in your store menu and an email to your registered email address. You have two weeks from the time of order to ship the item and mark it as such. If you don’t ship it in that time then Tindie will refund the buyer and cancel the order. On Tindie you can add shipping options for different regions and services and then assign them to different products. This makes for a very flexible system. For example, many of my products can ship within the UK as a large letter weighing under 100 grams so can set up that postal option and then assign it to numerous products as in Figure 2.
Each shipping option has an “additional item cost,” so you can add an extra charge for additional packaging. You can use this functionality to push a postage option into a different service, so for example if someone buys one item they pay for a 100g large letter, but the additional item costs mean that if they buy three items which would weigh over 100g then the additional item cost has raised the postage price so that it covers the 250g large letter option. It takes a little thinking about, and trial and error, but it becomes pretty straightforward after a few sales. I tend to use tracked services so that items are insured and that delivery to the person is somewhat guaranteed; this perhaps loses me some sales as my shipping rates are higher, but keeps the stress levels lower! The majority of my sales are to the UK or the US but occasionally I will get a notification that someone has requested a shipping option for a product to a new region. This doesn’t guarantee a sale, but you can research shipping options to the destination and set up an option in response and the potential customer will be notified.
Yet another consideration around postage, which may be a little less obvious, is packaging and the storage of packaging. Often this can be tricky and you may well need to allocate more space than you need to store your product packaging. Many of the products I sell are small electronics, and as such the actual kit is packed into small anti-static packaging which can be shipped in a very small padded envelope. Some of the larger products require a bigger envelope, and sometimes products require a range of padded mailer envelopes to accommodate the range of options.
As an example I can send a basic PCB and header kit of the StoRPer robot PCB in a size 000 small padded mailer, but if I need to add 3D-printed motor mounts and a laser cut ‘deck’ as add-on options then I often need to jump to a larger envelope. If I packed the items in the smaller mailer it becomes too wide for the ‘large letter’ service, see Figure 3. It also makes sense to bulk buy your shipping packaging, and for my range of products this means the shipping packaging takes up at least as much storage space as the actual stock items, as in Figure 4.
StoRPer: Genesis Within the stock subject there are a couple of things worth considering. The first is how much stock are you capable of making and storing. I live in a pretty small and packed old Welsh mining cottage and I have physical limitations on how much space I can give to stock. When I first started and just had some of the early products like my rocketry screw switches and centre of pressure and gravity stickers, everything could fit in a shoe box. As I added products and product options this has grown somewhat. Stock storage and also stock value have affected how products and designs are sold. An example of mine is the Laser Cut Fin Jig Short Kit. The Fin Jig product is a tool that once assembled allows rocket builders to position fins onto rocket body tubes incredibly accurately. Getting fins on straight and vertical and well aligned is a key concept in getting a rocket to perform well. The jig has numerous laser cut parts and also quite a bit of metalwork in the form of longish 90° angle aluminium sections and 5mm threaded rod sections plus lots of nuts and bolts. A full kit with all the metalwork included would be heavy and costly to post, and would require me to stock and warehouse lots of long metal sections. The threaded rods and angle sections are the type of thing that can be found in most parts of the world but perhaps not everyone has access to a laser cutter. The solution therefore was the ‘short kit’ in Figure 5, which just offers the laser-cut MDF parts from which you can build the whole tool. I am sure this approach has lost me some customers, but it means that I can at least do something with the design and it has become a reasonably well sold item. I can keep around a year’s worth of stock in a shoe box and the postage is pretty affordable.
Aside from developing an item to the point you feel confident it is a quality product, documentation is a key bit of work that you need to do. Documentation has a couple of roles in a maker business. First and foremost it needs to explain the product and give the technical information that a customer might need. It also though is crucial in terms of making a sale. If there are parts of a product that seem unclear and unexplained and the potential customer can’t find an answer quickly then it is much less likely they will purchase the product. The level of documentation a product needs is hugely variable. For example I haven’t felt the need to document things like my centre of pressure and centre of gravity stickers, but the recently launched HEXA model rocket kit has a 14-page PDF about the assembly of the kit and usage, as in Figure 6.
One thing I have noticed is that you need to repeatedly make content about items that you sell to keep bringing them to the attention of potential customers. I am not particularly good at this, as I tend to really immerse myself in creating projects and products and then move on to the next idea. The people who excel at building business in this sector are those who can create content that regularly shows new features or applications of products. Wonderfully, sometimes people talk about their build of your product online, and this can serve to generate interest in your designs. This is one reason why considering open-source approaches may help, as others may be more inclined to use your project and share it.
In the Night market
While this article has predominantly looked at Tindie and online sales, you can of course find places and events where you can sell directly to customers. If your products are less specific than mine and appeal to a general population then, of course, craft fairs and markets are a great potential source of sales. I recently applied for and was allocated space at EMF Camp’s excellent solar-punk themed night market in the Null Sector area of the festival. Even at a festival full of hacker types it’s unlikely I would do that well selling niche high-power rocketry parts, so I opted to just take StoRPer, my modular, open-source, Raspberry Pi Pico-powered robot platform. Getting into the theme, I even modified a vintage travel case to contain stock, be branded and lit: it’s in Figure 7.
I felt it was important to have a few examples of the robot built up, and you have to be prepared to talk a lot about your product and the design choices you have made. You also need to work out how you can receive money from sales – a small amount of customers will carry and use cash, but it’s far more common for people to use contactless payment. There are a few contactless reader options available for small businesses and it’s worth looking around them all. You may even find that you can manage contactless payments using a smartphone. I opted for a common solution from Sumup, where I bought a Sumup Air card reader for £40 as a one-off expense.
Sumup, and other similar services, set you up with an account and charge a small transaction fee. Contactless payments are first transferred into the Sumup account and you can then transfer the money out to whatever bank account you prefer. The card reader device connects to the Sumup application on my phone via Bluetooth, and you can quickly set up a charge/transaction in-app. This works excellently. As a side note, if you have less than perfect data coverage or Wi-Fi at an event it isn’t totally critical, so long as the contactless transaction has completed it will be logged in the application and everything will pass through when connectivity is re-established. Similarly, this means that, perhaps with the help of a USB powerbank, you can be totally off-grid!
I hope this article has inspired you to have a go at selling some of your creations. It can be challenging but also rewarding, sometimes financially, but often it’s the fact that people enjoy using your designs and product that really motivates you to make and sell more. It’s also a great way to connect and communicate with like-minded makers who are interested in similar projects to yourself.
Team Ikaro is a vibrant group of high school students from the Pacinotti Archimede Institute in Rome, sharing a strong passion for electronics and turning heads in the world of robotics! Specializing in Soccer Lightweight games (where robot-soccer players compete to score goals on a miniature field), they clinched the first place at the Romecup 2024 and won Italy’s national Robocup in Verbania earlier this year – earning the right to compete in the world championships in Eindhoven, where they placed third in the SuperTeam competition.
The brains behind the bots
Utilizing the versatile Arduino Nano RP2040 Connect, the team has crafted highly efficient robots that feature ultrasound sensors, PCB boards, a camera, four motors, a solenoid kicker and omni-directional wheels, all meticulously assembled in the school’s FabLab.
Mentored by professor Paolo Torda, Team Ikaro exemplifies the spirit of innovation and teamwork bringing together three talented students: Francesco D’Angelo, the team leader, focuses on system design and mechanics; Flavio Crocicchia, the software developer, ensures the robots’ brains are as sharp as possible; Lorenzo Addario specializes in camera software, making sure the robots can “see” and react swiftly on the field. Their combined efforts have led to a seamless integration of hardware and software, and established a foundation of passion and ambition for future success in their careers.
Future goals
After their first taste of global competition, Team Ikaro is determined to continue refining their robots, leveraging every bit of knowledge and experience they gain – whether in the classroom, lab, or live challenges. At Arduino, we are proud to sponsor such brilliant young minds and look forward to seeing what they will accomplish next!
To empower every educator to confidently bring AI into their classroom, we’ve created a new online training course called ‘Understanding AI for educators’ in collaboration with Google DeepMind. By taking this course, you will gain a practical understanding of the crossover between AI tools and education. The course includes a conceptual look at what AI is, how AI systems are built, different approaches to problem-solving with AI, and how to use current AI tools effectively and ethically.
In this post, I will share our approach to designing the course and some of the key considerations behind it — all of which you can apply today to teach your learners about AI systems.
Design decisions: Nurturing knowledge and confidence
We know educators have different levels of confidence with AI tools — we designed this course to help create a level playing field. Our goal is to uplift every educator, regardless of their prior experience, to a point where they feel comfortable discussing AI in the classroom.
AI literacy is key to understanding the implications and opportunities of AI in education. The course provides educators with a solid conceptual foundation, enabling them to ask the right questions and form their own perspectives.
As with all our AI learning materials that are part of Experience AI, we’ve used specific design principles for the course:
Choosing language carefully: We never anthropomorphise AI systems, replacing phrases like “The model understands” with “The model analyses”. We do this to make it clear that AI is just a computer system, not a sentient being with thoughts or feelings.
Accurate terminology: We avoid using AI as a singular noun, opting instead for the more accurate ‘AI tool’ when talking about applications or ‘AI system’ when talking about underlying component parts.
Ethics: The social and ethical impacts of AI are not an afterthought but highlighted throughout the learning materials.
Three main takeaways
The course offers three main takeaways any educator can apply to their teaching about AI systems.
1. Communicating effectively about AI systems
Deciding the level of detail to use when talking about AI systems can be difficult — especially if you’re not very confident about the topic. The SEAME framework offers a solution by breaking down AI into 4 levels: social and ethical, application, model, and engine. Educators can focus on the level most relevant to their lessons and also use the framework as a useful structure for classroom discussions.
You might discuss the impact a particular AI system is having on society, without the need to explain to your learners how the model itself has been trained or tested. Equally, you might focus on a specific machine learning model to look at where the data used to create it came from and consider the effect the data source has on the output.
2. Problem-solving approaches: Predictive vs. generative AI
AI applications can be broadly separated into two categories: predictive and generative. These two types of AI model represent two vastly different approaches to problem-solving.
People create predictive AI models to make predictions about the future. For example, you might create a model to make weather forecasts based on previously recorded weather data, or to recommend new movies to you based on your previous viewing history. In developing predictive AI models, the problem is defined first — then a specific dataset is assembled to help solve it. Therefore, each predictive AI model usually is only useful for a small number of applications.
Rick Payne and team / Better Images of AI / Ai is… Banner / CC-BY 4.0
Generative AI models are used to generate media (such as text, code, images, or audio). The possible applications of these models are much more varied because people can use media in many different kinds of ways. You might say that the outputs of generative AI models could be used to solve — or at least to partially solve — any number of problems, without these problems needing to be defined before the model is created.
3. Using generative AI tools: The OCEAN process
Generative AI systems rely on user prompts to generate outputs. The OCEAN process, outlined in the course, offers a simple yet powerful framework for prompting AI tools like Gemini, Stable Diffusion or ChatGPT.
Yasmine Boudiaf & LOTI / Better Images of AI / Data Processing / CC-BY 4.0
The first three steps of the process help you write better prompts that will result in an output that is as close as possible to what you are looking for, while the last two steps outline how to improve the output:
Objective: Clearly state what you want the model to generate
Context: Provide necessary background information
Examples: Offer specific examples to fine-tune the model’s output
Assess: Evaluate the output
Negotiate: Refine the prompt to correct any errors in the output
The final step in using any generative AI tool should be to closely review or edit the output yourself. These tools will very quickly get you started but you’ll always have to rely on your own human effort to ensure the quality of your work.
Helping educators to be critical users
We believe the knowledge and skills our ‘Understanding AI for educators’ course teaches will help any educator determine the right AI tools and concepts to bring into their classroom, regardless of their specialisation. Here’s what one course participant had to say:
“From my inexperienced viewpoint, I kind of viewed AI as a cheat code. I believed that AI in the classroom could possibly be a real detriment to students and eliminate critical thinking skills.
After learning more about AI [on the course] and getting some hands-on experience with it, my viewpoint has certainly taken a 180-degree turn. AI definitely belongs in schools and in the workplace. It will take time to properly integrate it and know how to ethically use it. Our role as educators is to stay ahead of this trend as opposed to denying AI’s benefits and falling behind.” – ‘Understanding AI for educators’ course participant
All our Experience AI resources — including this online course and the teaching materials — are designed to foster a generation of AI-literate educators who can confidently and ethically guide their students in navigating the world of AI.
You can sign up to the course for free here:
A version of this article also appears in Hello World issue 25, which will be published on Monday 23 September and will focus on all things generative AI and education.
With roots in Africa, the kalimba is a type of hand piano featuring an array of keys that are each tuned for a specific note, and upon plucking or striking one, a pleasant, xylophone-like sound can be heard. Taking inspiration from his mini kalimba, Axel from the YouTube channel AxelMadeIt sought to automate how its keys are struck and produce classical melodies with precision.
The design process started out with Axel determining the best mechanism for interacting with the small keys, and after hitting/plucking them using a range of objects, he settled on plucking individual keys with a small plastic actuator. Two servo motors were utilized to perform the action, with one motor sliding a gantry left-and-right, and the other moving a small plastic pick across the keys. Axel’s design underwent several iterations to get the sound correct since material thickness, the lack of a resonant backing, and a loud servo motor all contributed to reduced quality initially.
After perfecting the physical layout, Axel assembled the electronic components into a custom 3D-printed case, which includes spaces for the Arduino Nano, battery, charging circuit, and pushbuttons. The first two buttons cause the kalimba to play preprogrammed melodies, while the last one plays random notes with a random amount of delay in between.
As discussions of how artificial intelligence (AI) will impact teaching, learning, and assessment proliferate, I was thrilled to be able to add one of my own research projects to the mix. As a research scientist at the Raspberry Pi Foundation, I’ve been working on a pilot research study in collaboration with Jane Waite to explore the topic of program error messages (PEMs).
PEMs can be a significant barrier to learning for novice coders, as they are often confusing and difficult to understand. This can hinder troubleshooting and progress in coding, and lead to frustration.
Recently, various teams have been exploring how generative AI, specifically large language models (LLMs), can be used to help learners understand PEMs. My research in this area specifically explores secondary teachers’ views of the explanations of PEMs generated by a LLM, as an aid for learning and teaching programming, and I presented some of my results in our ongoing seminar series.
Understanding program error messages is hard at the start
I started the seminar by setting the scene and describing the current background of research on novices’ difficulty in using PEMs to fix their code, and the efforts made to date to improve these. The three main points I made were that:
PEMs are often difficult to decipher, especially by novices, and there’s a whole research area dedicated to identifying ways to improve them.
Recent studies have employed LLMs as a way of enhancing PEMs. However, the evidence on what makes an ‘effective’ PEM for learning is limited, variable, and contradictory.
There is limited research in the context of K–12 programming education, as well as research conducted in collaboration with teachers to better understand the practical and pedagogical implications of integrating LLMs into the classroom more generally.
My pilot study aims to fill this gap directly, by reporting K–12 teachers’ views of the potential use of LLM-generated explanations of PEMs in the classroom, and how their views fit into the wider theoretical paradigm of feedback literacy.
What did the teachers say?
To conduct the study, I interviewed eight expert secondary computing educators. The interviews were semi-structured activity-based interviews, where the educators got to experiment with a prototype version of the Foundation’s publicly available Code Editor. This version of the Code Editor was adapted to generate LLM explanations when the question mark next to the standard error message is clicked (see Figure 1 for an example of a LLM-generated explanation). The Code Editor version called the OpenAI GPT-3.5 interface to generate explanations based on the following prompt: “You are a teacher talking to a 12-year-old child. Explain the error {error} in the following Python code: {code}”.
Figure 1: The Foundation’s Code Editor with LLM feedback prototype.
Fifteen themes were derived from the educators’ responses and these were split into five groups (Figure 2). Overall, the educators’ views of the LLM feedback were that, for the most part, a sensible explanation of the error messages was produced. However, all educators experienced at least one example of invalid content (LLM “hallucination”). Also, despite not being explicitly requested in the LLM prompt, a possible code solution was always included in the explanation.
Figure 2: Themes and groups derived from teachers’ responses.
Matching the themes to PEM guidelines
Next, I investigated how the teachers’ views correlated to the research conducted to date on enhanced PEMs. I used the guidelines proposed by Brett Becker and colleagues, which consolidate a lot of the research done in this area into ten design guidelines. The guidelines offer best practices on how to enhance PEMs based on cognitive science and educational theory empirical research. For example, they outline that enhanced PEMs should provide scaffolding for the user, increase readability, reduce cognitive load, use a positive tone, and provide context to the error.
Out of the 15 themes identified in my study, 10 of these correlated closely to the guidelines. However, the 10 themes that correlated well were, for the most part, the themes related to the content of the explanations, presentation, and validity (Figure 3). On the other hand, the themes concerning the teaching and learning process did not fit as well to the guidelines.
Figure 3: Correlation between teachers’ responses and enhanced PEM design guidelines.
Does feedback literacy theory fit better?
However, when I looked at feedback literacy theory, I was able to correlate all fifteen themes — the theory fits.
Feedback literacy theory positions the feedback process (which includes explanations) as a social interaction, and accounts for the actors involved in the interaction — the student and the teacher — as well as the relationships between the student, the teacher, and the feedback. We can explain feedback literacy theory using three constructs: feedback types, student feedback literacy, and teacher feedback literacy (Figure 4).
Figure 4: Feedback literacy at the intersection between feedback types, student feedback literacy, and teacher feedback literacy.
From the feedback literacy perspective, feedback can be grouped into four types: telling, guiding, developing understanding, and opening up new perspectives. The feedback type depends on the role of the student and teacher when engaging with the feedback (Figure 5).
From the student perspective, the competencies and dispositions students need in order to use feedback effectively can be stated as: appreciating the feedback processes, making judgements, taking action, and managing affect. Finally, from a teacher perspective, teachers apply their feedback literacy skills across three dimensions: design, relational, and pragmatic.
In short, according to feedback literacy theory, effective feedback processes entail well-designed feedback with a clear pedagogical purpose, as well as the competencies students and teachers need in order to make sense of the feedback and use it effectively.
This theory therefore provided a promising lens for analysing the educators’ perspectives in my study. When the educators’ views were correlated to feedback literacy theory, I found that:
Educators prefer the LLM explanations to fulfil a guiding and developing understanding role, rather than telling. For example, educators prefer to either remove or delay the code solution from the explanation, and they like the explanations to include keywords based on concepts they are teaching in the classroom to guide and develop students’ understanding rather than tell.
Related to students’ feedback literacy, educators talked about the ways in which the LLM explanations help or hinder students to make judgements and action the feedback in the explanations. For example, they talked about how detailed, jargon-free explanations can help students make judgments about the feedback, but invalid explanations can hinder this process. Therefore, teachers talked about the need for ways to manage such invalid instances. However, for the most part, the educators didn’t talk about eradicating them altogether. They talked about ways of flagging them, using them as counter-examples, and having visibility of them to be able to address them with students.
Finally, from a teacher feedback literacy perspective, educators discussed the need for professional development to manage feedback processes inclusive of LLM feedback (design) and address issues resulting from reduced opportunities to interact with students (relational and pragmatic). For example, if using LLM explanations results in a reduction in the time teachers spend helping students debug syntax errors from a pragmatic time-saving perspective, then what does that mean for the relationship they have with their students?
Conclusion from the study
By correlating educators’ views to feedback literacy theory as well as enhanced PEM guidelines, we can take a broader perspective on how LLMs might not only shape the content of the explanations, but the whole social interaction around giving and receiving feedback. Investigating ways of supporting students and teachers to practise their feedback literacy skills matters just as much, if not more, than focusing on the content of PEM explanations.
This study was a first-step exploration of eight educators’ views on the potential impact of using LLM explanations of PEMs in the classroom. Exactly what the findings of this study mean for classroom practice remains to be investigated, and we also need to examine students’ views on the feedback and its impact on their journey of learning to program.
If you want to hear more, you can watch my seminar:
If any of these ideas resonated with you as an educator, student, or researcher, do reach out — we’d love to hear from you. You can contact me directly at veronica.cucuiat@raspberrypi.org or drop us a line in the comments below.
Join our next seminar
The focus of our ongoing seminar series is on teaching programming with or without AI. Check out the schedule of our upcoming seminars.
To take part in the next seminar, click the button below to sign up, and we will send you information about how to join. We hope to see you there.
If you want to make PCBs at home and you don’t happen to own a CNC mill, then you’ll probably need to turn to chemical etching. Use one of several different techniques to mask the blank PCB’s copper that you want to keep, then toss the whole thing into a bath to dissolve away the unmasked copper. Unfortunately, the last step can be slow, which is why Chris Borge built this PCB agitator.
Alton Brown’s philosophy on “unitaskers” is wise when it comes to the kitchen, but things are different in the workshop. Sometimes a tool or machine is so useful that it is worth keeping around—even if it only does one job. That’s the case here, because Borge’s machine only does one thing: tilts back and forth. If a container with a PCB in an etchant bath is sitting on top of the machine, that action will slosh the chemicals around and the agitation will dramatically speed up the process.
On a mechanical level, this is extremely simple. It only requires a handful of 3D-printed parts, some fasteners, and a couple of bearings. The bearings provide a rotational interface between the stationary base (weighed down with poured concrete) and the pivoting platform. The electronics are even simpler and consist of an Arduino Nano board and a small hobby servo motor. The Arduino just tells the servo motor to move back and forth endlessly, tilting the platform and providing constant agitation.
The Poetry Camera began life as an ‘AI classifier’ and was partly inspired by Kelin’s friend Susi Fu’s Artist and Machine performances examining how artists and computers can learn from each other. “Susie would draw sketches of the person standing in front of her, while a machine – using Raspberry Pi – printed out AI-drawn sketches of the same subject.”
An MIT computer science graduate turned digital product designer, Kelin took charge of the Raspberry Pi prototyping, learning how to solder, plus some basic electronics, while designing her first PCB (a HAT for Raspberry Pi). The initial cardboard design took only a few days to complete.
Industrial designer Ryan, meanwhile, has worked as a toy designer and in a creative technologist-type design role at Google where he learned “Javascript and a bit of Python,” and was introduced to Raspberry Pi for prototyping, which he’d “definitely recommend” for anyone who wants to build hardware prototypes that need a logic layer.
He was “ecstatic to create something from scratch, and prototype it on his home 3D printer”. Having started out as pen and paper sketches, Poetry Camera’s form was created and iterated on in Rhino.
Power play
As “the brain of the whole device,” Raspberry Pi Zero 2 W connects to a Camera Module 3 and a thermal printer via UART. It calls on remote AI models via an API for pointers on poem writing. The idea was that they’d get faster responses this way, but this approach necessitates connecting to Wi-Fi hotspots, which could be challenging depending on where they took Poetry Camera out and about. “In ideal conditions, it works like a well-oiled machine but Wi-Fi networks can be very spotty, especially at crowded events where there’s a lot of signal interference”. Six AA batteries keep everything powered (the thermal printer can drain batteries fast) with a buck converter to step down the voltage for Raspberry Pi. Kelin and Ryan chose Raspberry Pi for its wireless connectivity and the volume of tutorials on how to interface with cameras and thermal printers, starting with Raspberry Pi 3B+ before switching to Zero 2 W “since it hits a sweet spot in terms of small size and fast processing power”. They made use of Adafruit’s Python Thermal Printer library and found ChatGPT “very well versed” – pun hopefully intended – for creating code. “We were able to ask a question in our own naive way and get a custom tailored response that often works right out of the box, instantly.”
The pair are constantly tweaking and updating Poetry Camera. It’s already on version 4, and its creators have been delighted by how well it’s been received. “In the future, we’re looking forward to letting people customise their cameras’ outputs – by updating the poem prompts, or adding images, or using their own servers.”
If you were unlucky enough to visit a big box retail store or goofy uncle’s home around the turn of the century, you would have undoubtedly come across a Big Mouth Billy Bass. That’s an animatronic fish that wiggles on a plaque while older, very licensable hit songs play. But while ol’ Billy was wildly popular at the time and spawned a whole new market segment, he wasn’t very sophisticated. Tony–K decided to address those cognitive shortcomings by giving Billy Bass an ‘arti-fish-al intelligence’ upgrade.
Internally, the original Big Mouth Billy Bass is quite simple. It has a single electric motor that drives the animatronic movement through a plastic mechanism, with a cheap sound chip that has Al Green’s “Take Me to the River” burned in. Tony–K’s modification gives the user fully control over everything, so they can program whatever behavior they like and use any audio. Using a standard infrared remote control, the user can activate those programmed sequences. If desired, Billy can be switched back to his normal routines.
Tony–K achieved that using two Arduino UNO Rev3 boards. One handles motor control, while the other plays audio. Tony–K chose to do that so he could use a motor driver shield with one Arduino and an SD card shield with the other. This takes advantage of the TMRpcm library, which makes it possible to play PCM and WAV files without a dedicated audio DAC (digital-to-analog converter). The audio quality won’t be stellar, but it is good enough for this purpose.
What to play all comes down to the builder’s ability to think up fish-related puns. If you can find a way to incorporate a Jimmy Buffett song, you’ll be golden!
In today’s busy world, getting students or engineers to work together is key to tackling complex IoT projects. Traditional code sharing and editing methods, like using offline IDEs or swapping files manually, often slow down projects and lead to mistakes. This can be a hassle and take up a lot of time, often getting in the way of students or developers learning together. To address these challenges, Arduino Cloud introduces Collaborative Coding — a new feature available in the Cloud Editor, the online alternative to the traditional Arduino IDE, that enables real-time, collaborative coding.
So, what is Collaborative Coding?
In Arduino Cloud, Collaborative Coding allows multiple users to work on the same code at the same time. For example, industrial automation professionals can enhance project efficiency, reduce errors, and accelerate development cycles while streamlining the collaborative experience and enhancing the overall efficiency of group projects. But not only enterprises, also teachers can work closer with their students by sharing and reviewing code, or finding ways to teach how the code works.
Advantages of code collaborations:
It streamlines the coding process.
It foster innovation through teamwork.
It ensures projects are on track and boosts continuity.
Is Collaborative Coding available for users with a Shared Space?
Yes, Collaborative Coding can only be accessed if you have a Shared Space created for your organization or school.
A Shared Space in Arduino Cloud is a collaborative environment designed for organizations or educational institutions. It allows team members or students to work together on projects while sharing many resources such as dashboards, things, sketches,…. There is no limit to the number of members who can join a Shared Space.
If you are on a paid Arduino Cloud plan and you have created a Shared Space, Collaborative Coding will already be enabled for you. Just open a sketch file from your organization space and start editing.
If you haven’t created a Shared Space for your organization yet, you can purchase an Arduino Cloud School or Business plan on this page.
How does Collaborative Coding work ?
Let’s say that you’re in the middle of editing a sketch, when another user tries to access it. They will be notified right away that the sketch is being edited by someone else. How? With a message displayed in the lower hand corner of Arduino Cloud Editor (see screenshot below). Once you complete your changes or you have verified and uploaded the sketch, the other user will be able to edit the code.
4 ways to make the best out of Collaborative Coding
1. Boost IoT team project development
Facilitate collaboration among team members located in different parts of the world, ensuring that everyone is on the same page. Conduct code reviews in real time, improving code quality and knowledge sharing.
2. Engage in pair programming
Pair programming is the practice of pairing up students to work on programming activities. This is the most common approach used by teachers to foster collaboration in the classroom.
Collaborative coding helps students to be more actively involved in projects, making the learning process interactive and engaging. They can leverage each other’s knowledge and skills, resulting in more effective problem-solving and innovation. The development cycle accelerates as well, allowing for quicker iterations and refinements.
3. Deliver interactive workshops and training
Use the collaborative editor for training new hires and students who are learning to code allowing them to follow along and participate in real-time. Conduct hands-on workshops where participants can actively engage with the code, enhancing their learning experience.
4. Enhance client collaborations
Collaborate with clients on specific projects, enabling them to see progress and provide feedback in real-time. Quickly prototype and demonstrate solutions to clients, incorporating their feedback instantly.
Collaborative Coding in action
Explore how our new Collaborative Coding feature can revolutionize your workflow. Access short clips on our documentation site, customized for your specific needs:
This isn’t news: In both educational and professional realms, working with multiple users in real-time is key to success. The new Collaborative Coding feature in Arduino Cloud bridges the gap. It offers learning, helps debugging and improves communication.
By integrating this tool into your workflow, whether you’re a student working on group projects or a developer in the industrial automation sector, you will get a better development experience
Ready to revolutionize the way you collaborate on code? Check out this tutorial on how to Collaborate using the Cloud Editor.
Don’t have a Shared Space?
Visit our plans now and upgrade to a Pro or School plan depending on your profile and needs. If you’re a student or an educator, you can also sign-up for a free trial now and start collaborating within Arduino Cloud Editor.
For any information, our team is here to support you. Get in touch!
“I’ve enjoyed actually learning about what AI is and how it works, because before I thought it was just a scary computer that thinks like a human,” a student learning with Experience AI at King Edward’s School, Bath, UK, told us.
This is the essence of what we aim to do with our Experience AI lessons, which demystify artificial intelligence (AI) and machine learning (ML). Through Experience AI, teachers worldwide are empowered to confidently deliver engaging lessons with a suite of resources that inspire and educate 11- to 14-year-olds about AI and the role it could play in their lives.
“I learned new things and it changed my mindset that AI is going to take over the world.” – Student, Malaysia
Experience AI students in Malaysia
Developed by us with Google DeepMind, our first set of Experience AI lesson resources was aimed at a UK audience and launched in April 2023. Next we released tailored versions of the resources for 5 other countries, working in close partnership with organisations in Malaysia, Kenya, Canada, Romania, and India. Thanks to new funding from Google.org, we’re now expanding Experience AI for 16 more countries and creating new resources on AI safety, with the aim of providing leading-edge AI education for more than 2 million young people across Europe, the Middle East, and Africa.
In this blog post, you’ll hear directly from students and teachers about the impact the Experience AI lessons have had so far.
Case study: Experience AI in Malaysia
Penang Science Cluster in Malaysia is among the first organisations we’ve partnered with for Experience AI. Speaking to Malaysian students learning with Experience AI, we found that the lessons were often very different from what they had expected.
Launch of Experience AI in Malaysia
“I actually thought it was going to be about boring lectures and not much about AI but more on coding, but we actually got to do a lot of hands-on activities, which are pretty fun. I thought AI was just about robots, but after joining this, I found it could be made into chatbots or could be made into personal helpers.” – Student, Malaysia
“Actually, I thought AI was mostly related to robots, so I was expecting to learn more about robots when I came to this programme. It widened my perception on AI.” – Student, Malaysia.
The Malaysian government actively promotes AI literacy among its citizens, and working with local education authorities, Penang Science Cluster is using Experience AI to train teachers and equip thousands of young people in the state of Penang with the understanding and skills to use AI effectively.
“We envision a future where AI education is as fundamental as mathematics education, providing students with the tools they need to thrive in an AI-driven world”, says Aimy Lee, Chief Operating Officer at Penang Science Cluster. “The journey of AI exploration in Malaysia has only just begun, and we’re thrilled to play a part in shaping its trajectory.”
Giving non-specialist teachers the confidence to introduce AI to students
“Our Key Stage 3 Computing students now feel immensely more knowledgeable about the importance and place that AI has in their wider lives. These lessons and activities are engaging and accessible to students and educators alike, whatever their specialism may be.” – Dave Cross, North Liverpool Academy, UK
“The feedback we’ve received from both teachers and learners has been overwhelmingly positive. They consistently rave about how accessible, fun, and hands-on these resources are. What’s more, the materials are so comprehensive that even non-specialists can deliver them with confidence.” – Storm Rae, The National Museum of Computing, UK
Experience AI teacher training in Kenya
“[The lessons] go above and beyond to ensure that students not only grasp the material but also develop a genuine interest and enthusiasm for the subject.” – Teacher, Changamwe Junior School, Mombasa, Kenya
Sparking debates on bias and the limitations of AI
When learners gain an understanding of how AI works, it gives them the confidence to discuss areas where the technology doesn’t work well or its output is incorrect. These classroom debates deepen and consolidate their knowledge, and help them to use AI more critically.
“Students enjoyed the practical aspects of the lessons, like categorising apples and tomatoes. They found it intriguing how AI could sometimes misidentify objects, sparking discussions on its limitations. They also expressed concerns about AI bias, which these lessons helped raise awareness about. I didn’t always have all the answers, but it was clear they were curious about AI’s implications for their future.” – Tracey Mayhead, Arthur Mellows Village College, Peterborough, UK
Experience AI students in UK
“The lessons that we trialled took some of the ‘magic’ out of AI and started to give the students an understanding that AI is only as good as the data that is used to build it.” – Jacky Green, Waldegrave School, UK
“I have enjoyed learning about how AI is actually programmed, rather than just hearing about how impactful and great it could be.” – Student, King Edward’s School, Bath, UK
“It has changed my outlook on AI because now I’ve realised how much AI actually needs human intelligence to be able to do anything.” – Student, Arthur Mellows Village College, Peterborough, UK
“I didn’t really know what I wanted to do before this but now knowing more about AI, I probably would consider a future career in AI as I find it really interesting and I really liked learning about it.” – Student, Arthur Mellows Village College, Peterborough, UK
If you’d like to get involved with Experience AI as an educator and use our free lesson resources with your class, you can start by visiting experience-ai.org.
Caffeine lovers take their coffee very seriously and that is most apparent when you dive into the world of espresso machines. To satisfy enthusiasts, an espresso machine needs to provide precise control over temperature, pressure, and flow to enable the perfect pull. But if you’re the type of true aficionado that isn’t satisfied with any consumer off-the-shelf option, then you’ll be interested in the diyPresso One machine.
The diyPresso One kit costs €1,250.00 (about $1,390) and it isn’t meant to be a budget option. But it is more affordable than many of the high-end machines on the market. And, more importantly, its DIY and hackable nature means that you can tweak it and tinker with it until you have it exactly the way you like it. If you can’t make your perfect cup of espresso with the diyPresso One, then your perfect cup simply doesn’t exist.
That all starts with the open-source controller and software, which monitor the machine’s various sensors and oversee the brewing process. That controller is built around an Arduino MKR WiFi 1010 board, programmed with the Arduino IDE. The choice to use Arduino was critical, because it lets users easily modify the machine’s behavior through simple sketch changes.
The rest of the parts are of equally high quality. The enclosure is stainless steel formed into a beautiful minimalist design, with side windows so everyone can see the stunning copper boiler that was custom-made for the diyPresso One. And the machine takes advantage of E61 brewing group components, so users can swap them based on preferences or requirements.
Have you ever discovered a cool piece of tech buried in your drawer and thought, “This could make for an awesome project”? That’s exactly what happened to Roni Bandini, maker, writer, electronics artist – and Arduino Alvik Star!
Bandini began coding at 10 years old, and has always found automatons and robots fascinating. About Alvik, he has said, “I really like this little robot—the elegance of its concept and design. As soon as I encountered it, I dove into several projects aimed at expanding its default capabilities.”
One of those projects in particular caught our attention, and we are excited to share it with you.
Getting the building blocks ready
After stumbling upon a tiny Seeed Studio XIAO ESP32S3 with an OV2640 camera sensor, Bandini saw its potential right away. It was the perfect tool to upgrade Arduino’s Alvik robot with computer vision. His mission? To teach Alvik to evade law enforcement officials – or at least a LEGO® police figure!
Since both the Alvik main board and the XIAO cam board use ESP32, Bandini used ESPNow – a fast communication protocol – to connect the camera with the robot. He then 3D-printed two support bars and attached them with a pair of M3 screws.
Learning to react fast!
But before the epic police chase could begin, Alvik needed some training. Bandini took pictures of the LEGO® police figure and a ball and uploaded them to Edge Impulse. He then exported the trained model as an Arduino library using the EON compiler, before importing the zip file into the Arduino IDE.
Once everything was set up and the MicroPython script created, Alvik was ready to roll. As it moved forward, the robot took pictures and processed them through a machine learning (ML) model. If it detected the police figure, Alvik would turn around and flash a red light. In other words, it was time to make a quick getaway!
For more details on this exciting project, including a link to a YouTube demo, visit Bandini’s blog post here.
Making it useful
However, the action doesn’t stop there. Although Alvik can drive autonomously, Bandini has also adapted a remote control from the 1980s to give himself even more control. How? By writing C++ routines that translate the remote’s coordinates into commands. These commands are then sent via ESPNow to the MAC address of the ESP32 in Alvik, where they trigger functions to move the robot.
Inspired by an old-school advertisement for the Omnibot 2000 robot, Bandini has even taught Alvik to bring him a glass of whiskey! While we don’t recommend this for anyone under the legal drinking age, there’s no reason why you can’t substitute it for your favorite refreshments!
A microSD slot extender enables easy access, while an adapter board extends Raspberry Pi 5’s USB-C power port and converts its micro-HDMI outputs to full-size HDMI ones. It also houses a button battery for the real-time clock.
An IO expander board extends the GPIO pins, powers the two RGB fans, and connects the mini OLED. Then there’s an NVMe board to add an SSD (not supplied), and a power converter connected to a metal button that permits easy shutdown.
Power and control
Upon first power up, the fans spin continually. For full control of these and the RGB LEDs, you need to install the Pironman 5 software. This then creates a handy web dashboard for detailed system monitoring and the option to switch between several fan modes. Key stats are also shown on the mini OLED.
Cooling performance is impressive: in a five-minute stress test of all four cores, the CPU temperature maxed out at just above 60°C. Wi-Fi signal strength and quality does suffer a little due to the metal parts of the case, but it’s fine when kept reasonably close to the router.
Verdict
9/10
Quality components and detailed documentation make for a robust, beautiful cooling case with excellent performance.
Features
Tower cooler with PWM fan, 2 × RGB fans with dust filters, 0.96-inch OLED, NVMe M.2 SSD board, 2 × full-size HDMI ports, power button, RTC battery.
Registration is now open for the European Astro Pi Challenge 2024/25! The Astro Pi Challenge, an ESA Education project run in collaboration with us here at the Raspberry Pi Foundation, offers young people the incredible opportunity to write computer programs that will run in space.
Young people can take part in two exciting missions for beginners and more experienced coders, and send their code to run on special Raspberry Pi computers, called Astro Pis, on board the International Space Station (ISS).
Meet the new Astro Pi ambassador, Sławosz Uznański
Sławosz UznańskiSławosz Uznański at the European Space Agency
We are delighted that new ESA project astronaut Sławosz Uznański will be the ambassador for this year’s Astro Pi Challenge. Sławosz, born in Poland in 1984, has a background in space systems engineering and has conducted research in radiation effects. He recently served as the Engineer in Charge of CERN’s largest accelerator, the Large Hadron Collider.
Mission Zero: Send your pixel art into space
In Mission Zero, young people create beautiful pixel art to display on the Astro Pis’ LED screens. This mission requires no prior experience of Python coding, and it can be completed in around an hour.
Pixel art examples by Mission Zero 2023/24 participants
To take part, young people design and code pixel art inspired by nature on Earth and beyond, to display on the Astro Pi computers for the astronauts on the ISS to see as they go about their daily tasks.
Using our step-by-step Mission Zero project guide, young people will learn to create simple Python programs in which they will code with variables and use the colour sensors on the Astro Pis to change the background colour in their images. To help your teams create their designs, check out the examples from teams that took part in Mission Zero in 2023/24 in the project guide.
Young people can create their Mission Zero programs individually or in teams of up to 4 people, and this year, we have added a save function for young people as they code. This will make it easier for mentors to run Mission Zero over more than one session, and also means that young people can finish their projects at home. They will need to use your classroom code and their team name to load their saved projects.
Mission Space Lab: Calculate the speed of the ISS
Mission Space Lab asks teams to solve a real-world scientific task in space. It is ideally suited to young people who would like to learn more about space science and stretch their programming skills.
A photo of Mexico taken using an Astro Pi computer during a team’s experiment in Mission Space Lab 2023/24
In Mission Space Lab this year, the task for teams of 2 to 6 young people is to calculate the speed at which the International Space Station is travelling — as accurately as possible. Teams need to write a Python program that:
Collects data from the Astro Pi computers’ sensors or cameras about the orientation and motion of the ISS as it orbits the Earth, and
Uses this data to calculate the travel speed
The Astro Pi computers at a window in the International Space Station.
This year we have created a new way for teams to test their programs, with an online version of the Astro Pi Replay tool. All teams need to do is select their program and run it in Astro Pi Replay, which will create a real-time simulation of the program running on the ISS, using historical data and images. Astro Pi Replay will also show program outputs and report errors. This means teams can code their program in their preferred code editor, then test with an internet browser. However, if they wish, teams can still run the Astro Pi Replay tool offline with Thonny.
Important dates for your diary
16 September 2024: Registration is now open for Mission Zero and Mission Space Lab!
24 February 2025: Mission Space Lab submissions close
24 March 2025: Mission Zero submissions close
April–May 2025: Astro Pi programs run on the International Space Station
June 2025: Astro Pi teams receive their certificates
Register today
Both missions are open to young people up to age 19 from eligible countries — all ESA Member States and beyond. To find out more and register, visit astro-pi.org.
Look out for updates and resources being shared on the Astro Pi website, including a Mission Zero video codealong and Mission Space Lab live streams. You can also keep up-to-date with all the Astro Pi news on the Astro Pi X account, our Facebook, LinkedIn, and Instagram, or by signing up to the newsletter at astro-pi.org.
Um dir ein optimales Erlebnis zu bieten, verwenden wir Technologien wie Cookies, um Geräteinformationen zu speichern und/oder darauf zuzugreifen. Wenn du diesen Technologien zustimmst, können wir Daten wie das Surfverhalten oder eindeutige IDs auf dieser Website verarbeiten. Wenn du deine Einwillligung nicht erteilst oder zurückziehst, können bestimmte Merkmale und Funktionen beeinträchtigt werden.
Funktional
Immer aktiv
Die technische Speicherung oder der Zugang ist unbedingt erforderlich für den rechtmäßigen Zweck, die Nutzung eines bestimmten Dienstes zu ermöglichen, der vom Teilnehmer oder Nutzer ausdrücklich gewünscht wird, oder für den alleinigen Zweck, die Übertragung einer Nachricht über ein elektronisches Kommunikationsnetz durchzuführen.
Vorlieben
Die technische Speicherung oder der Zugriff ist für den rechtmäßigen Zweck der Speicherung von Präferenzen erforderlich, die nicht vom Abonnenten oder Benutzer angefordert wurden.
Statistiken
Die technische Speicherung oder der Zugriff, der ausschließlich zu statistischen Zwecken erfolgt.Die technische Speicherung oder der Zugriff, der ausschließlich zu anonymen statistischen Zwecken verwendet wird. Ohne eine Vorladung, die freiwillige Zustimmung deines Internetdienstanbieters oder zusätzliche Aufzeichnungen von Dritten können die zu diesem Zweck gespeicherten oder abgerufenen Informationen allein in der Regel nicht dazu verwendet werden, dich zu identifizieren.
Marketing
Die technische Speicherung oder der Zugriff ist erforderlich, um Nutzerprofile zu erstellen, um Werbung zu versenden oder um den Nutzer auf einer Website oder über mehrere Websites hinweg zu ähnlichen Marketingzwecken zu verfolgen.


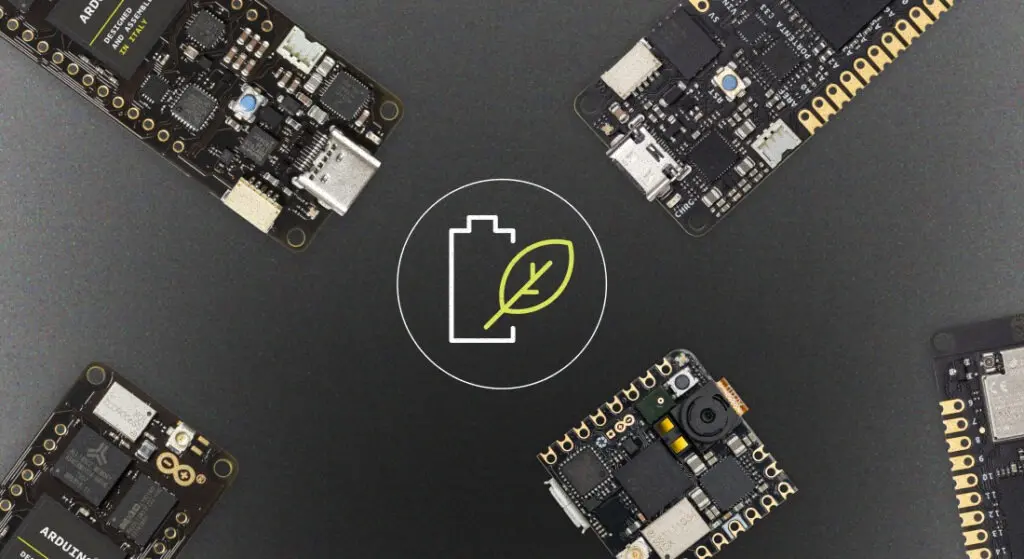


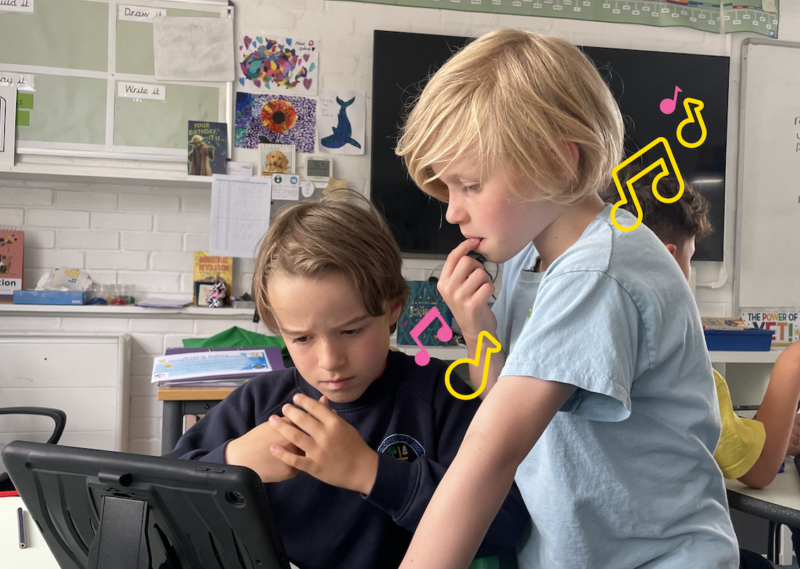
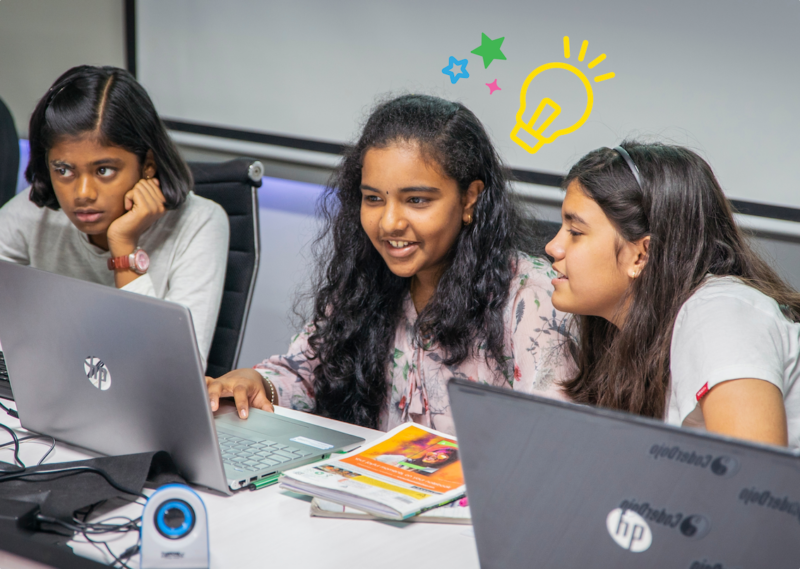
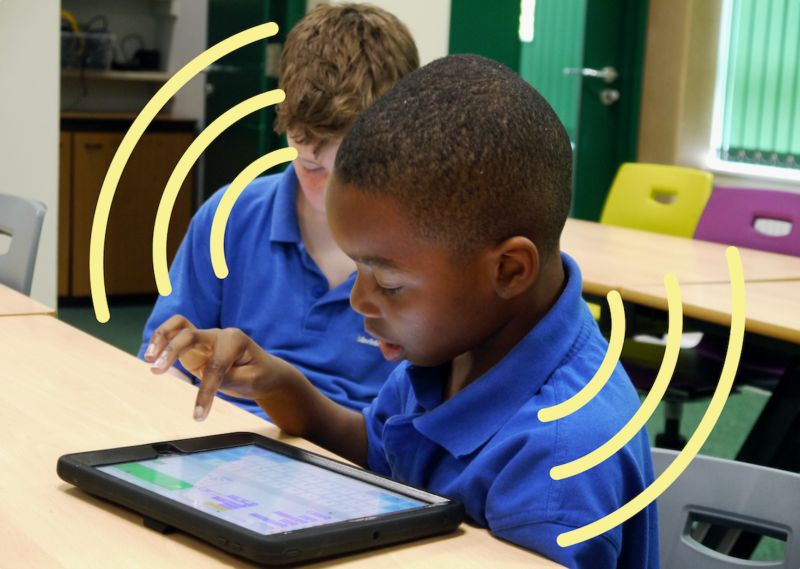

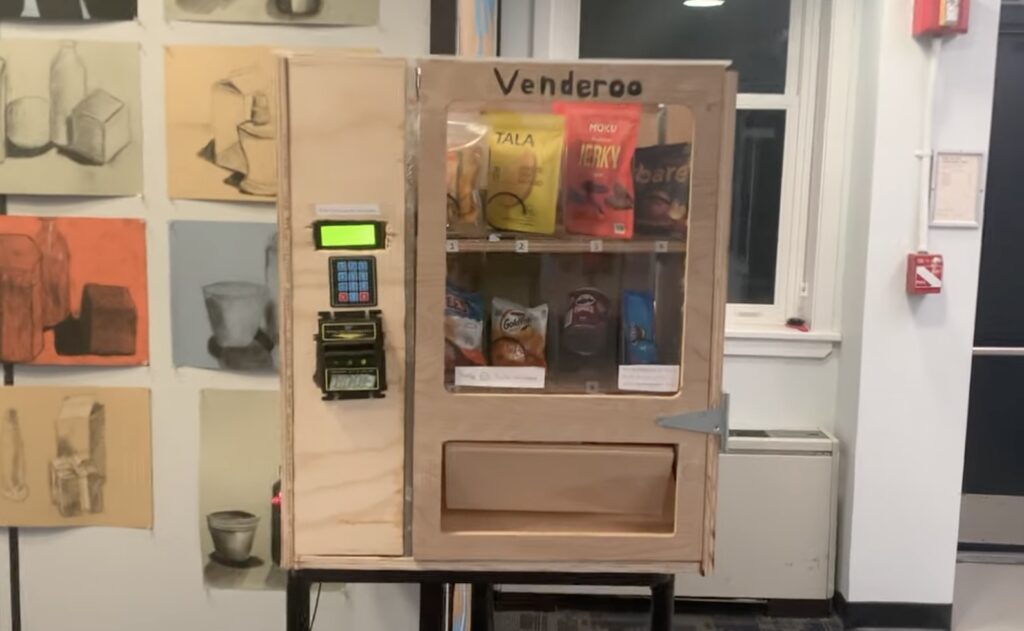
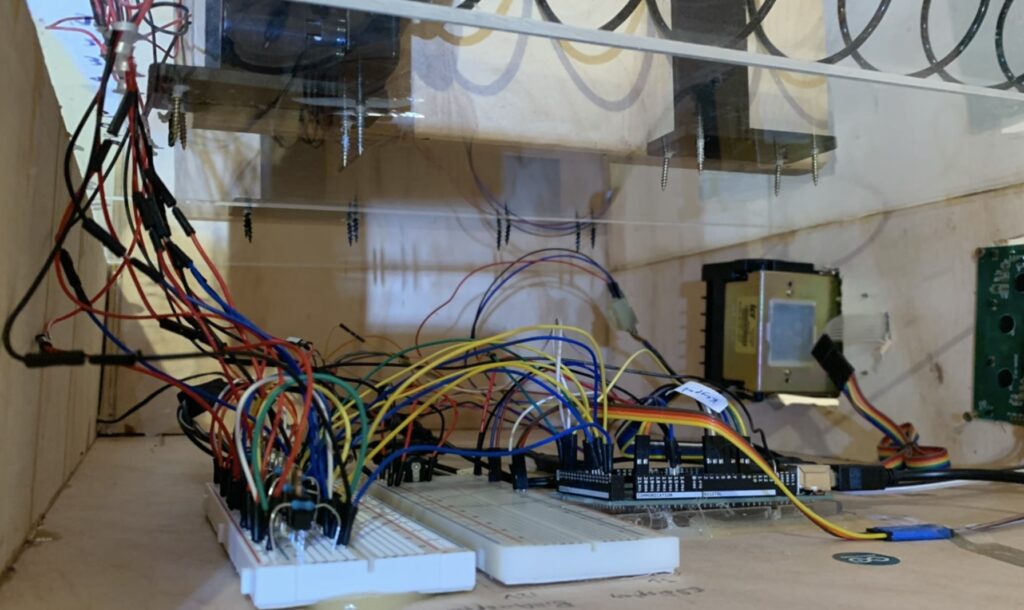
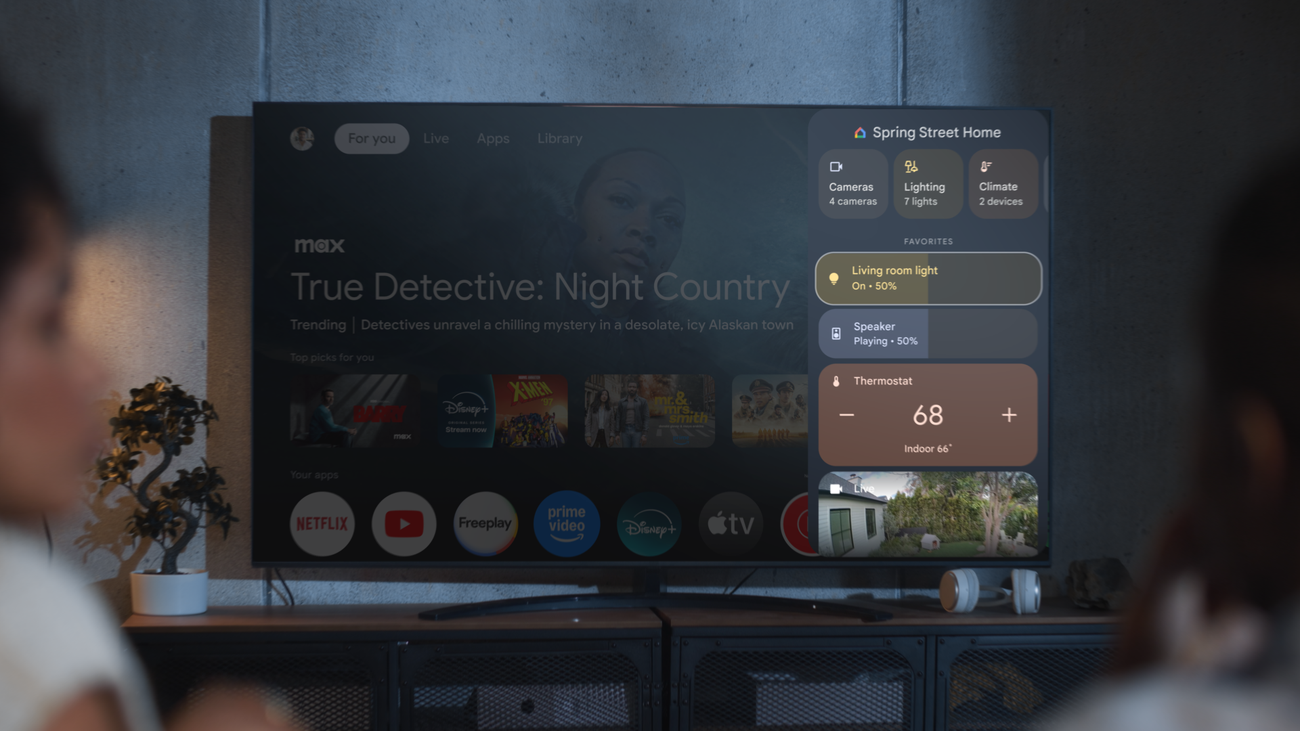


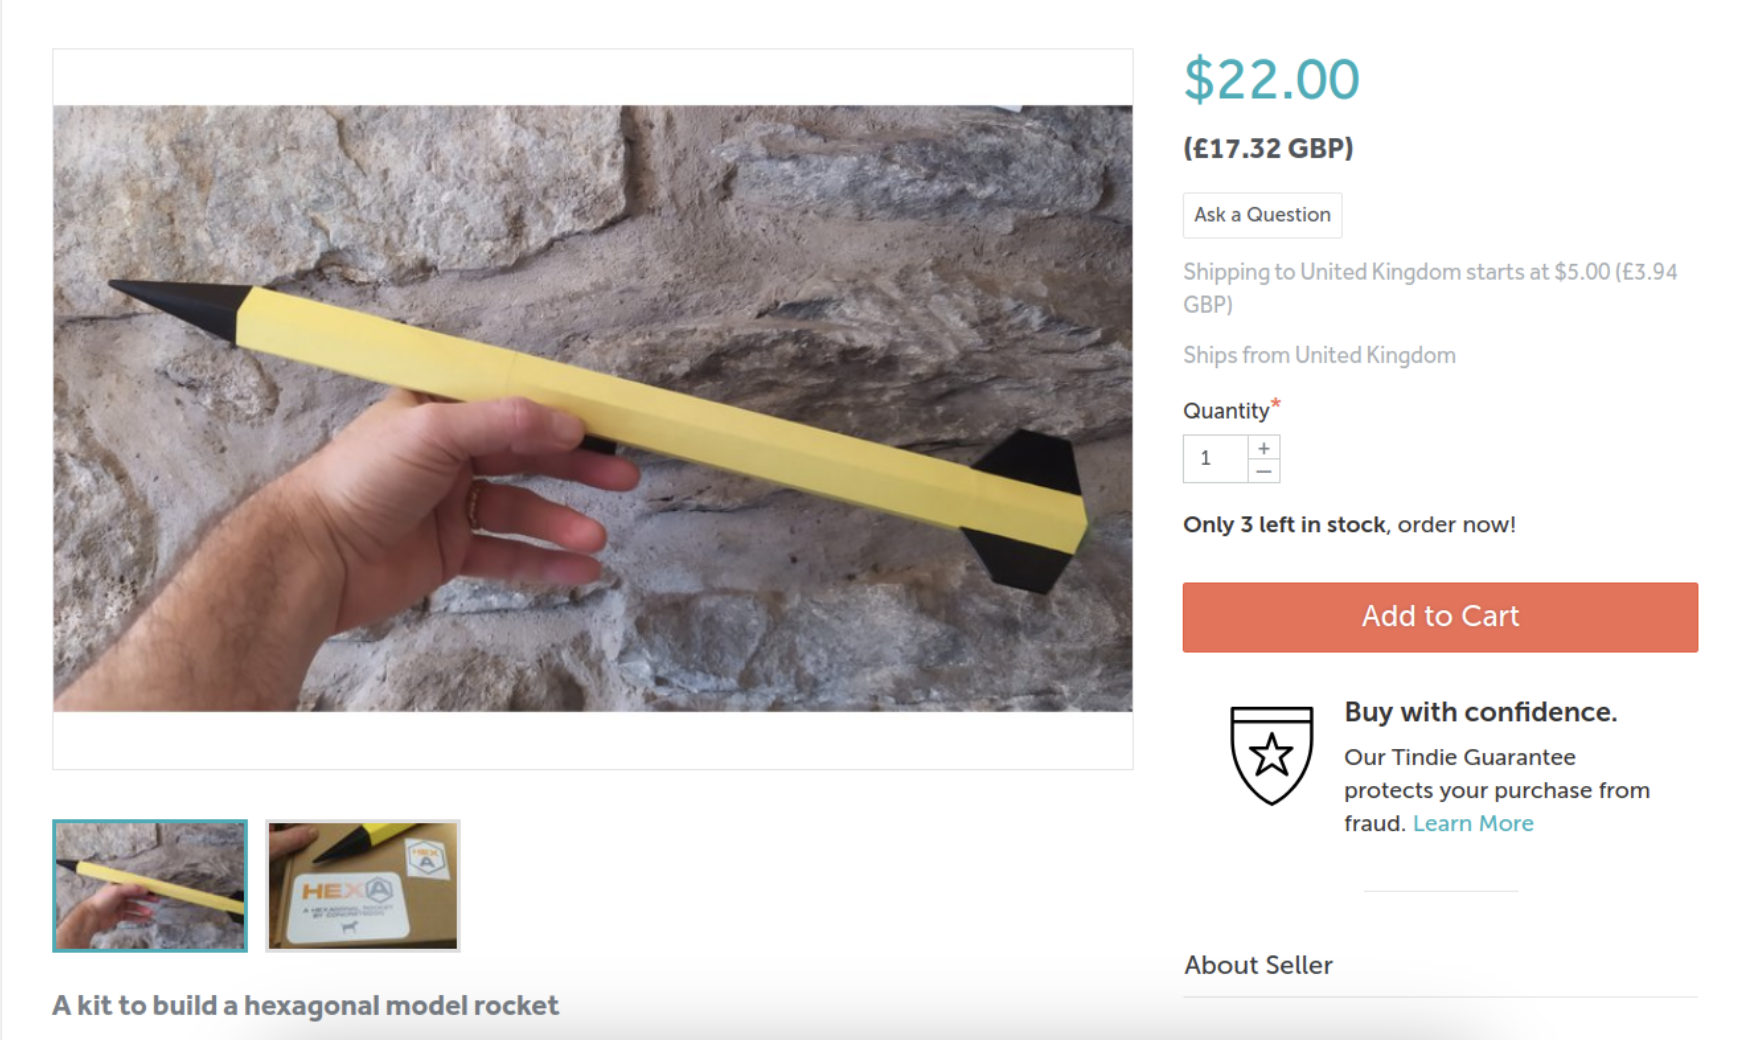
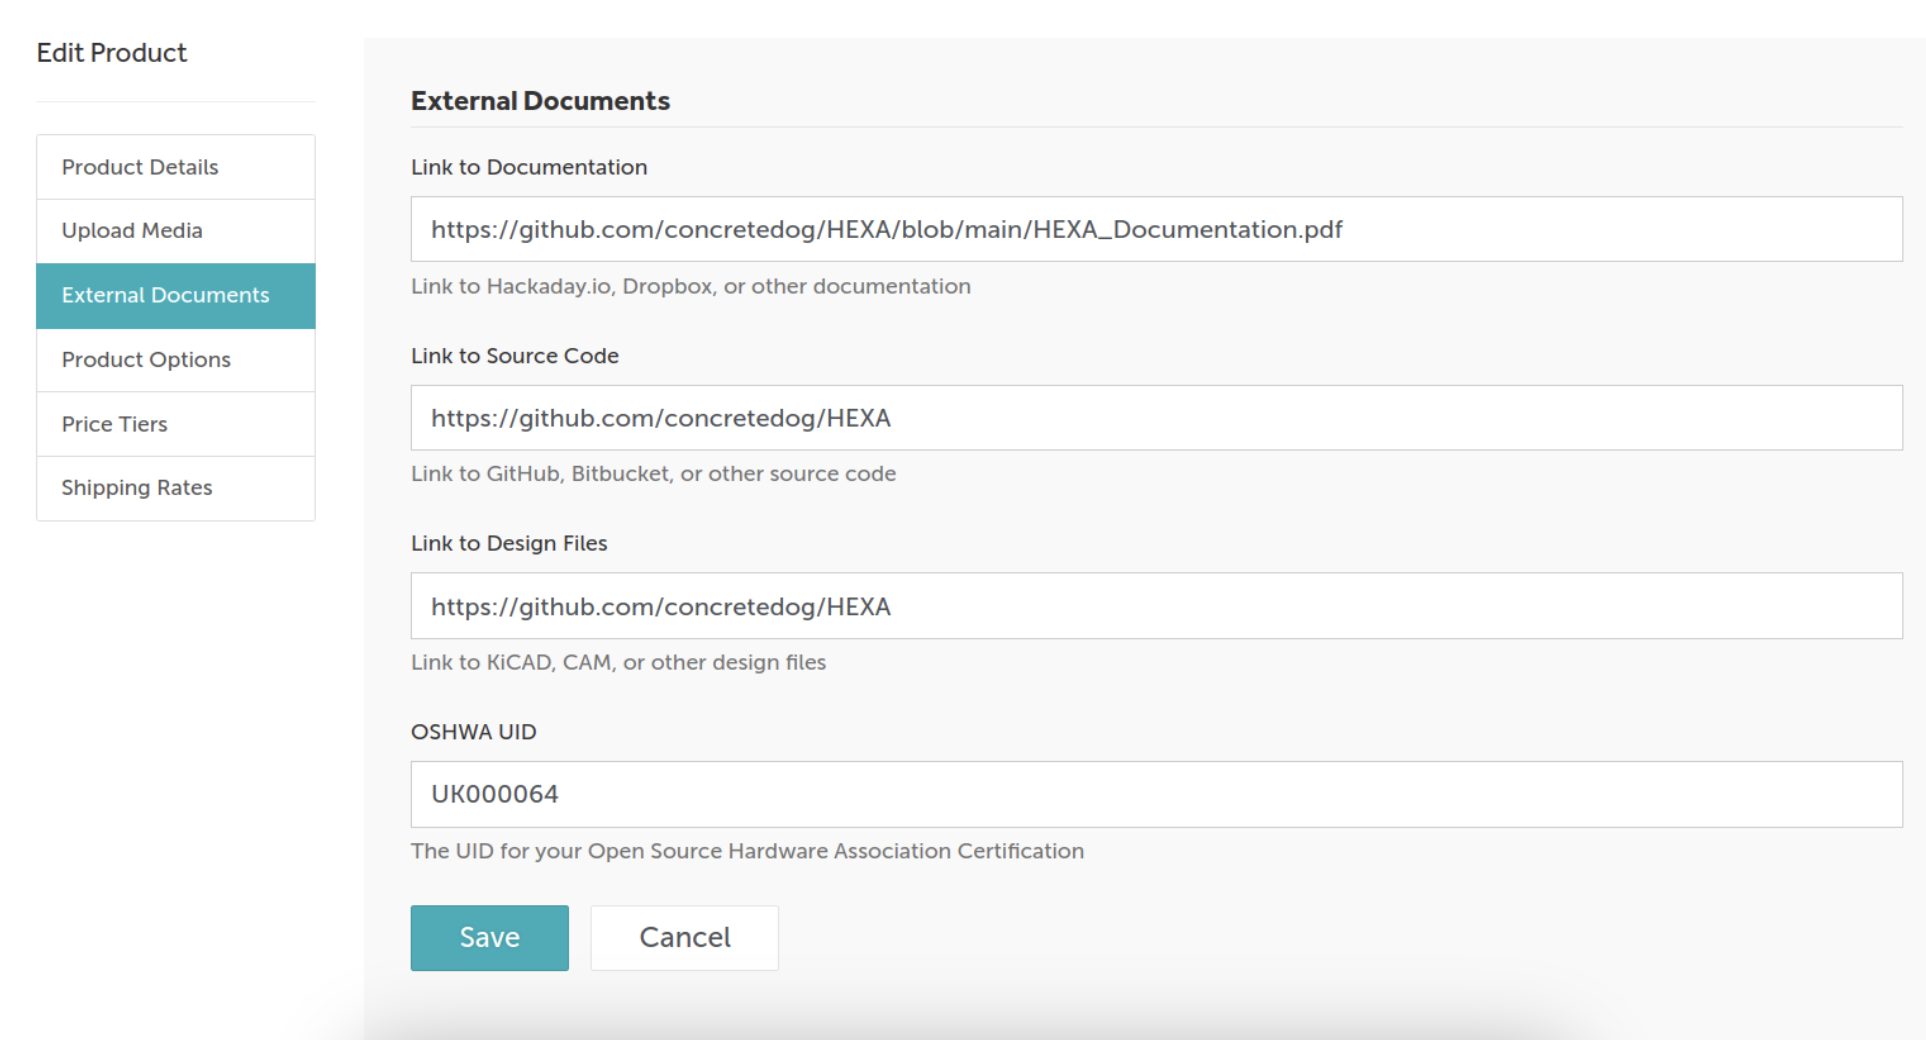
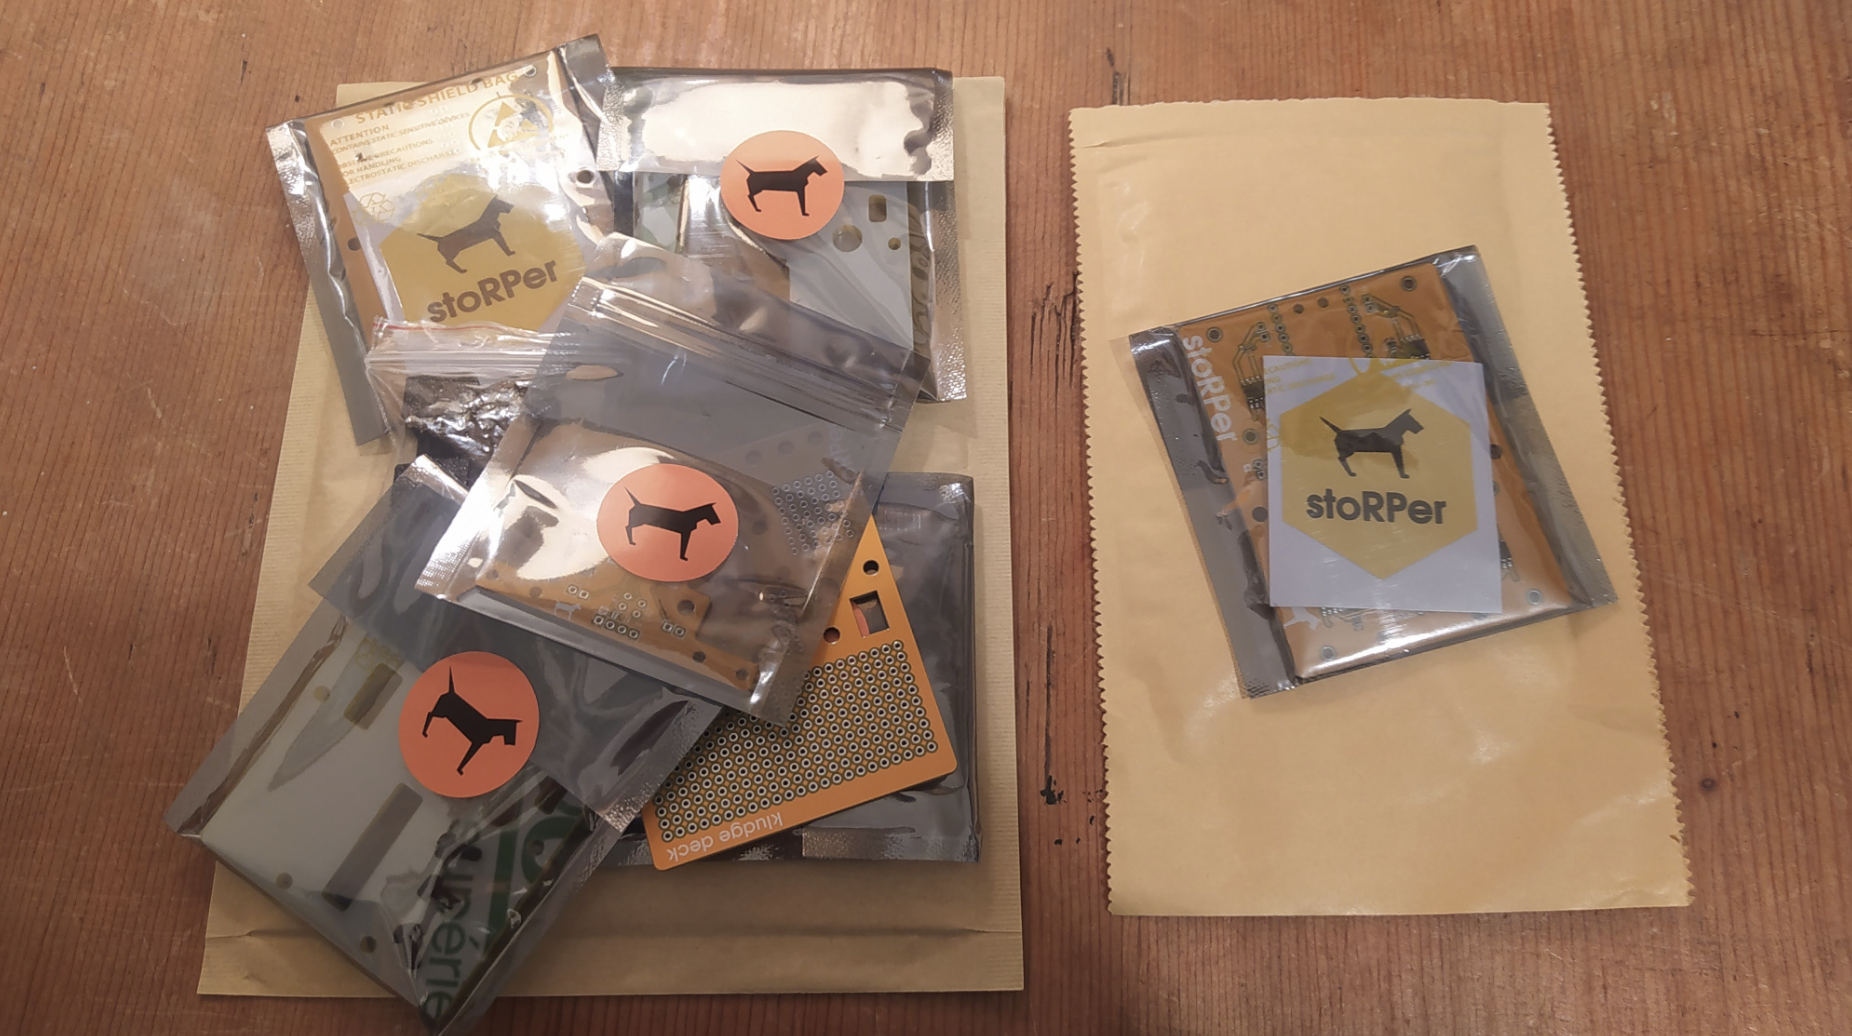

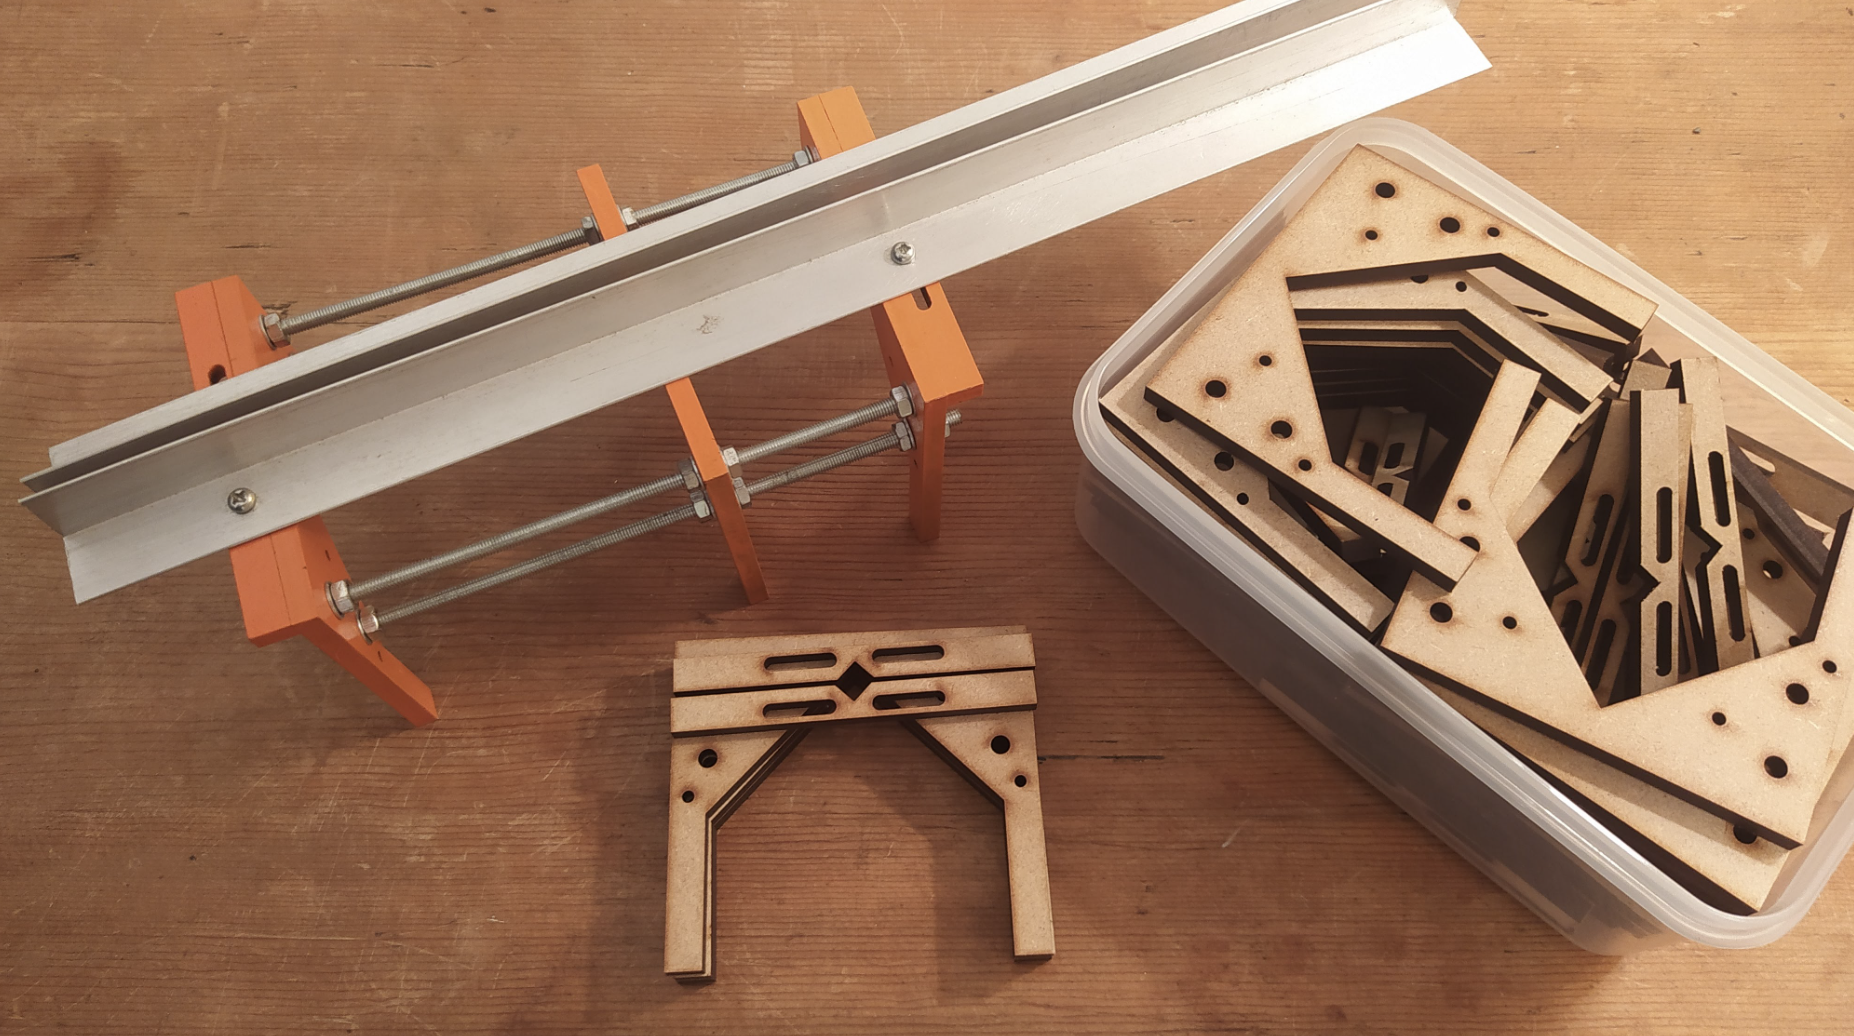
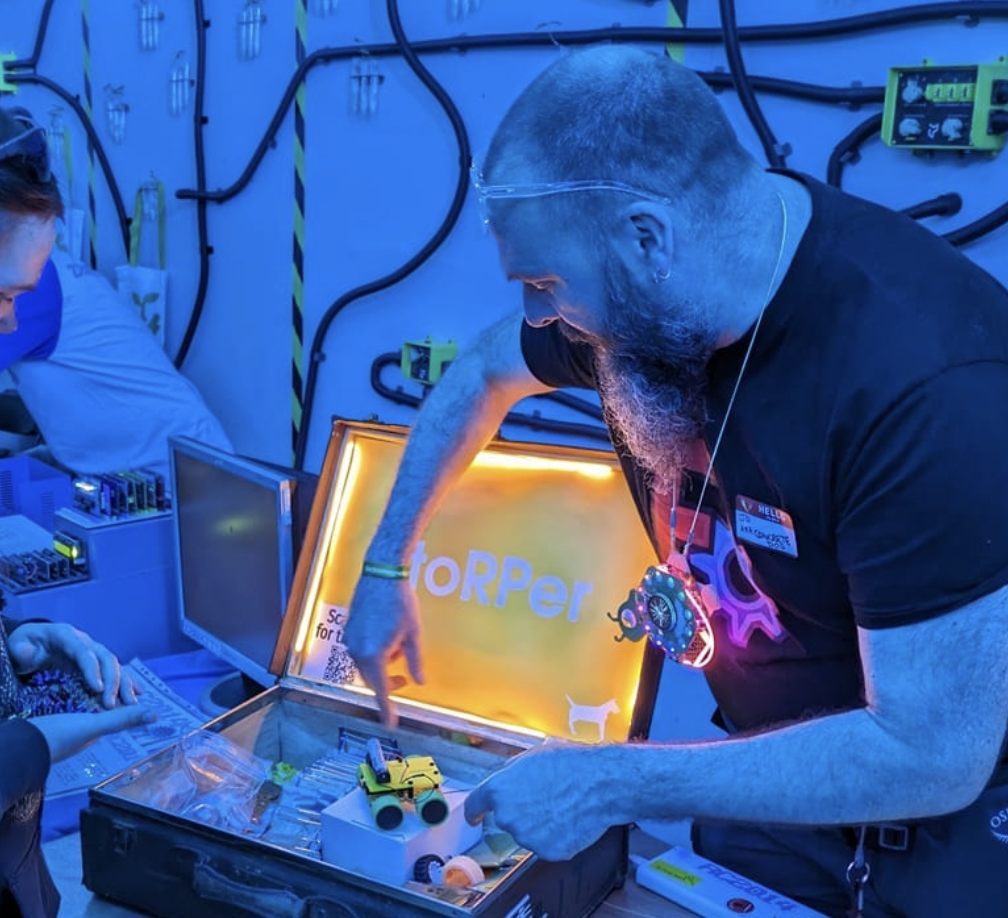


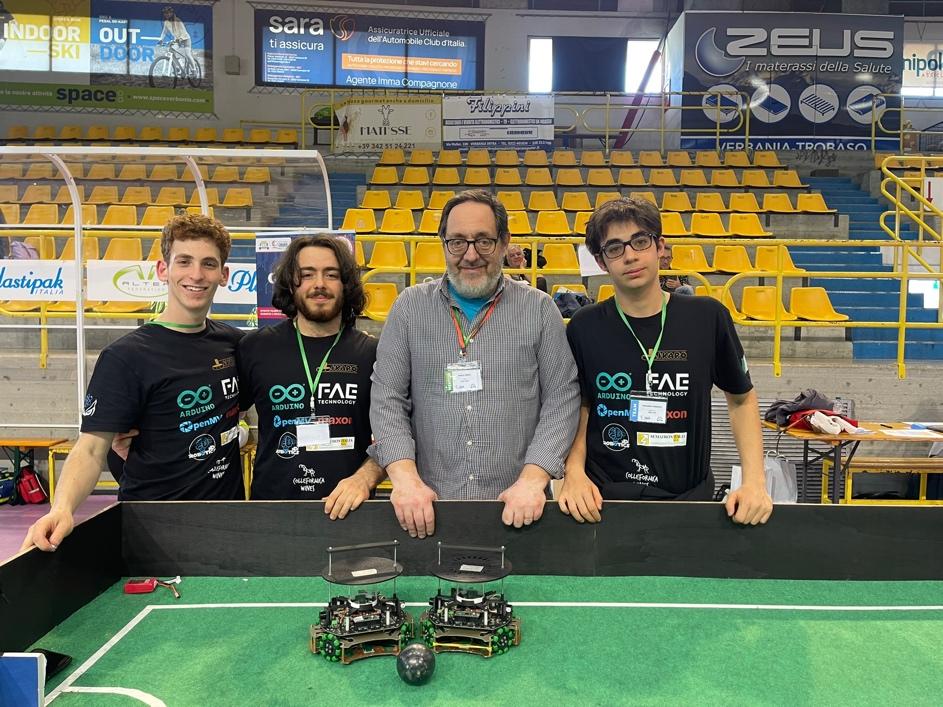


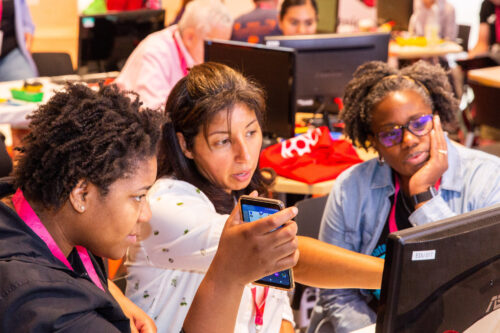
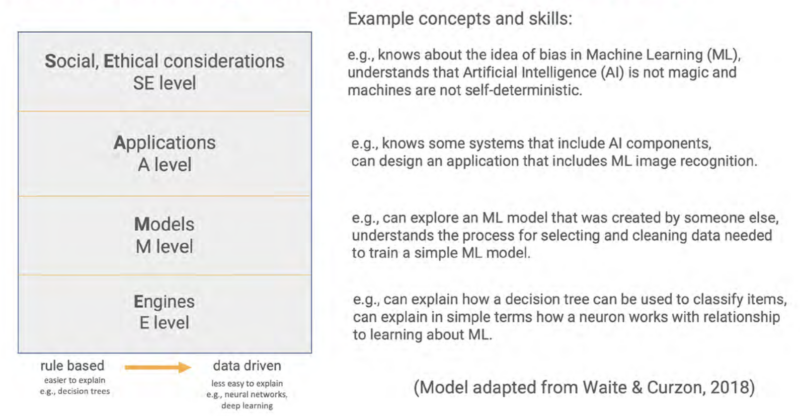
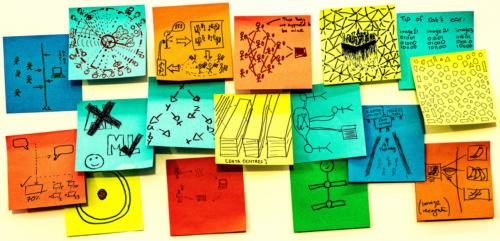


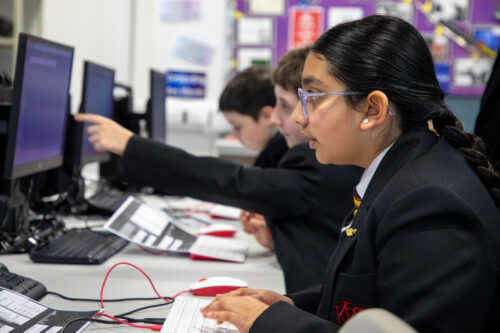
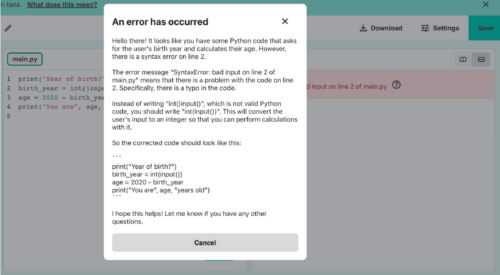

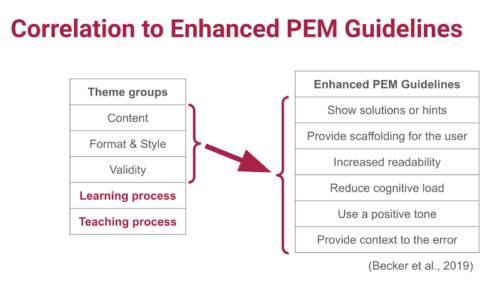
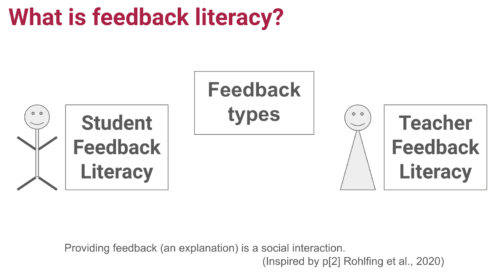


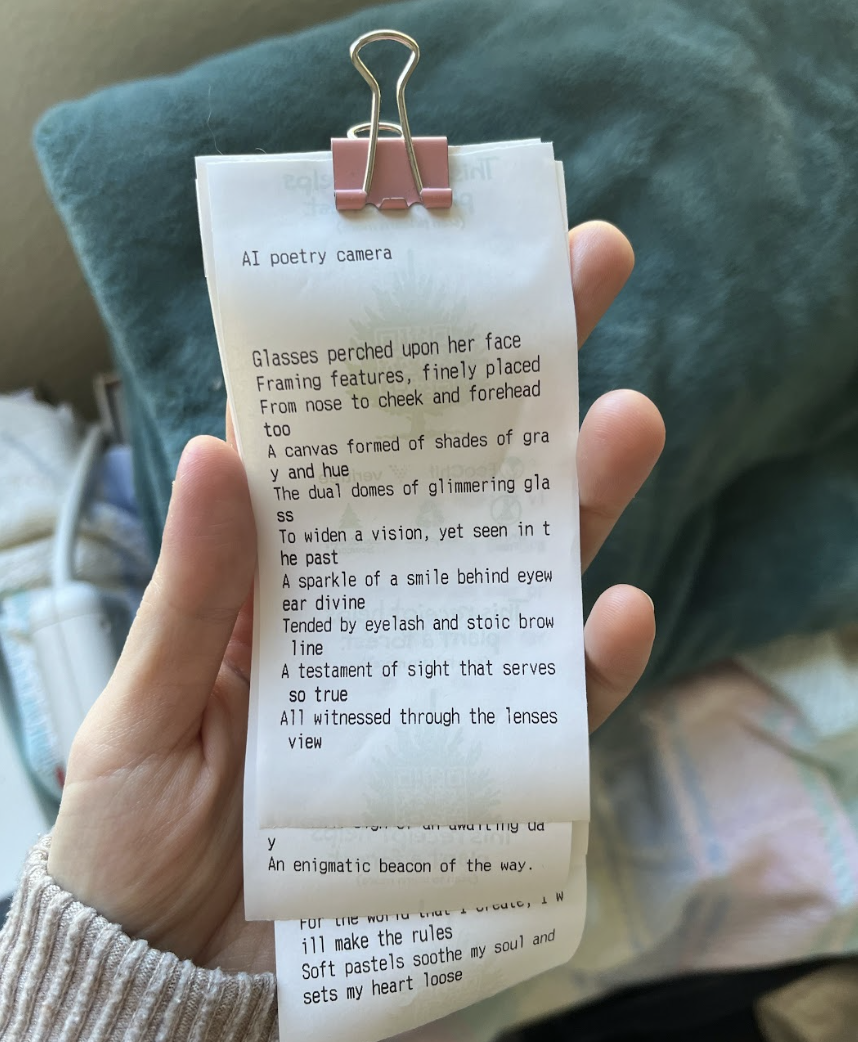

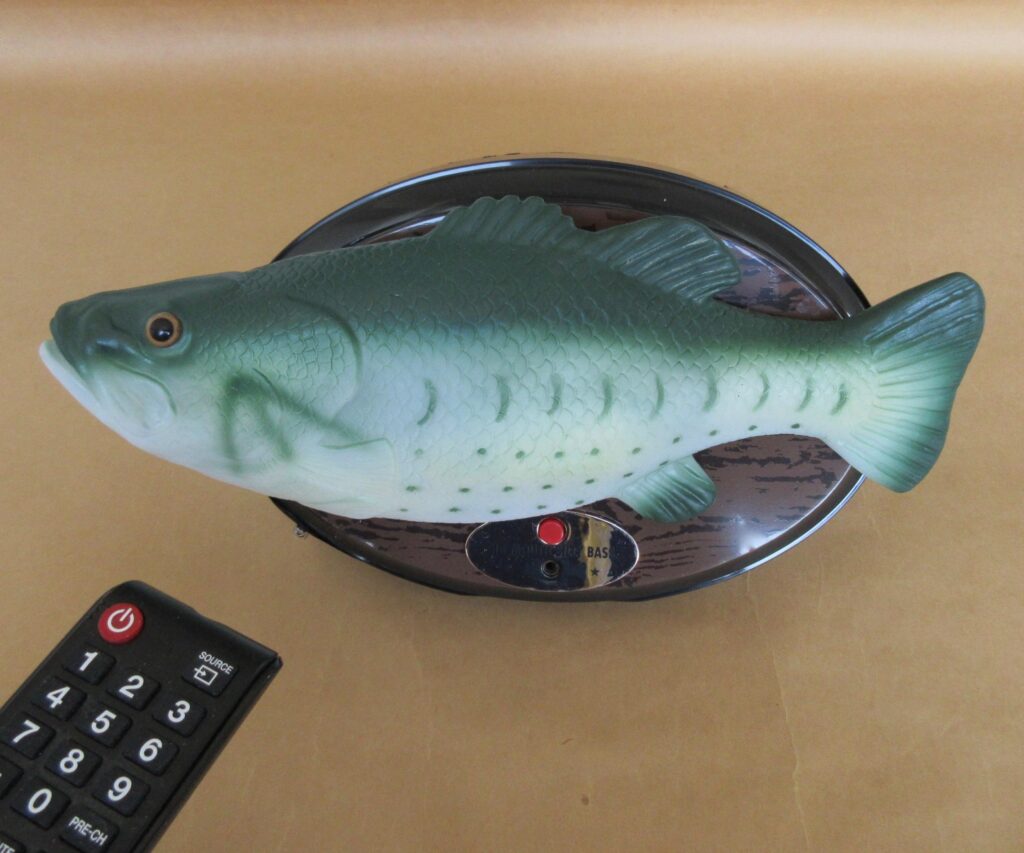
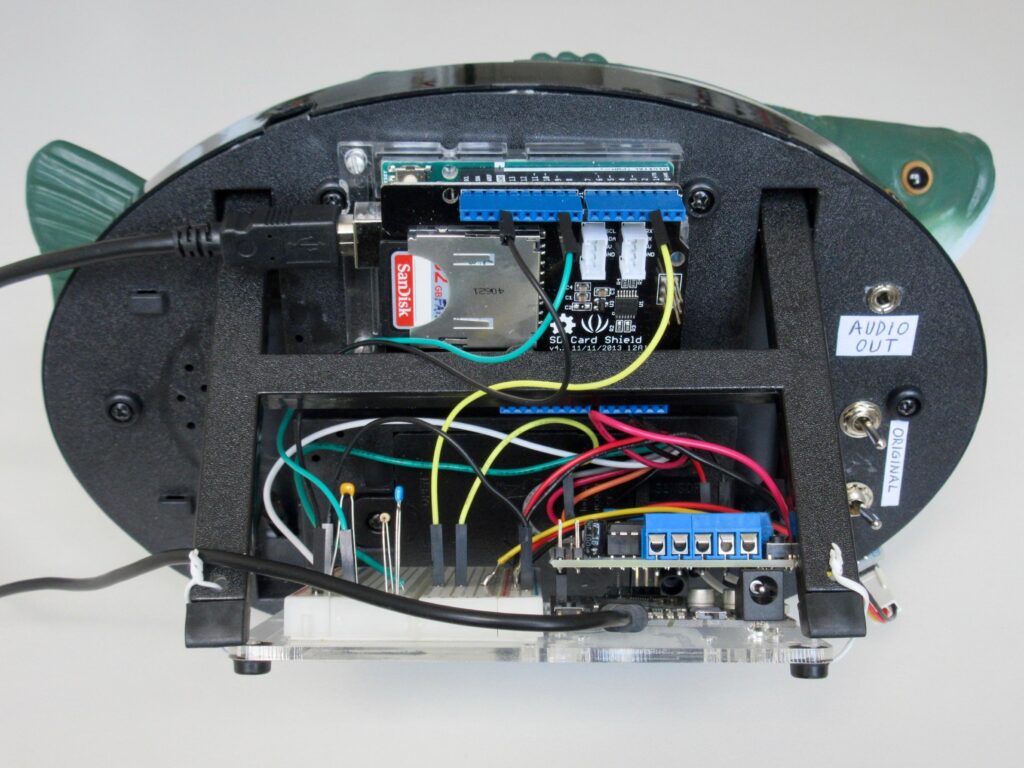


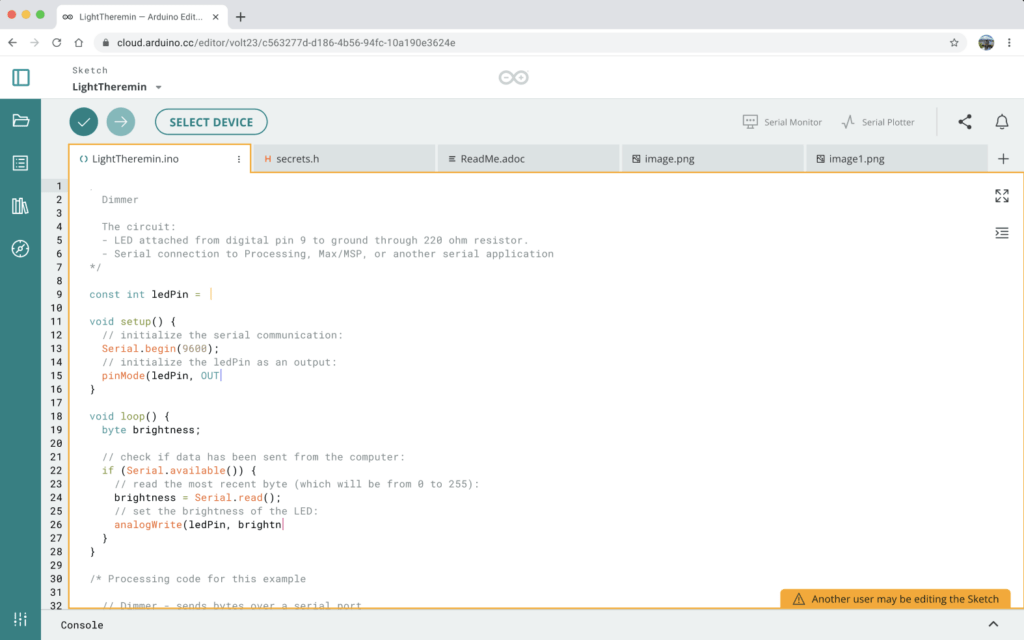
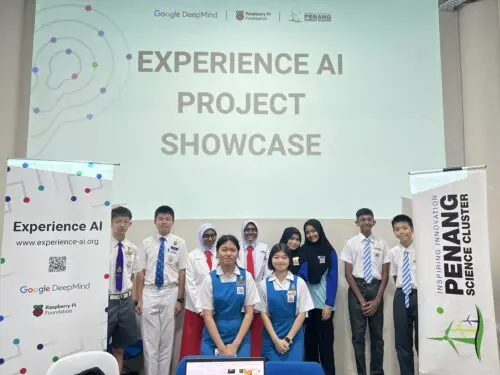
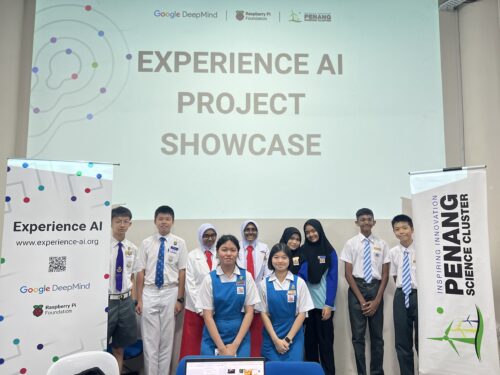
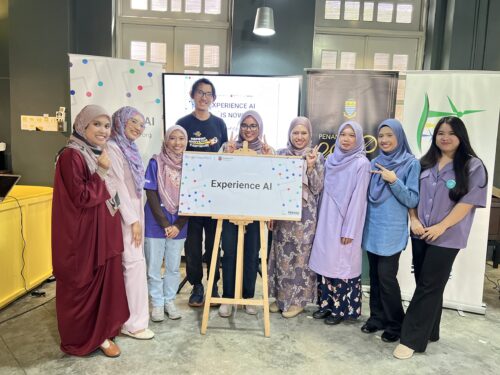

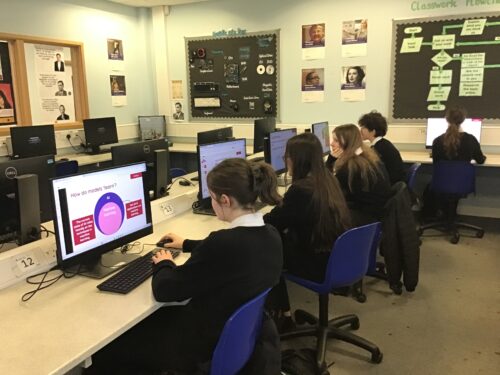


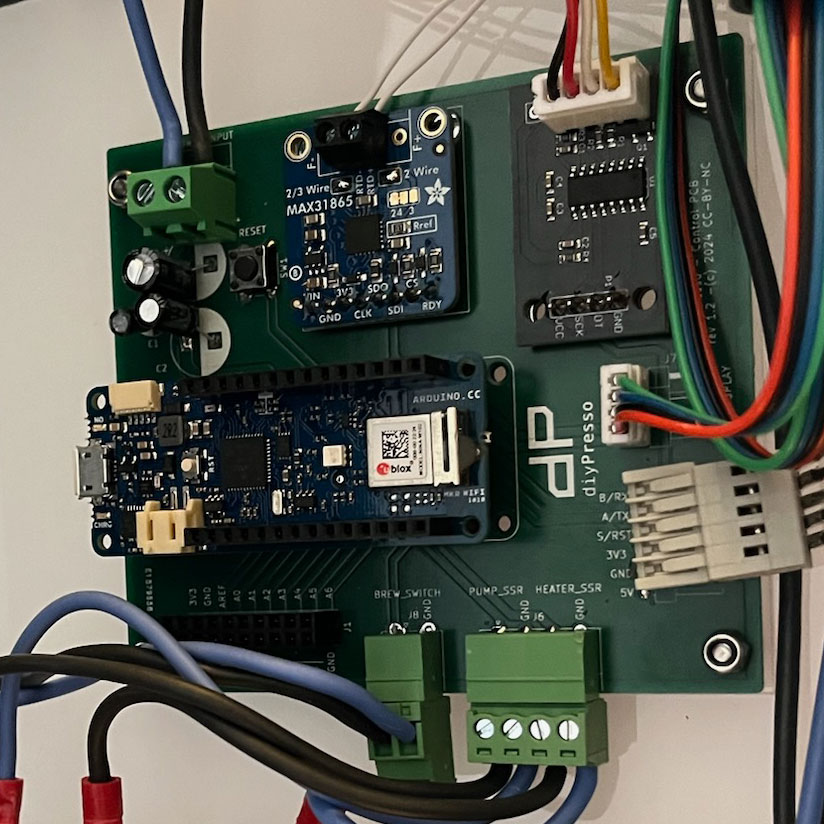

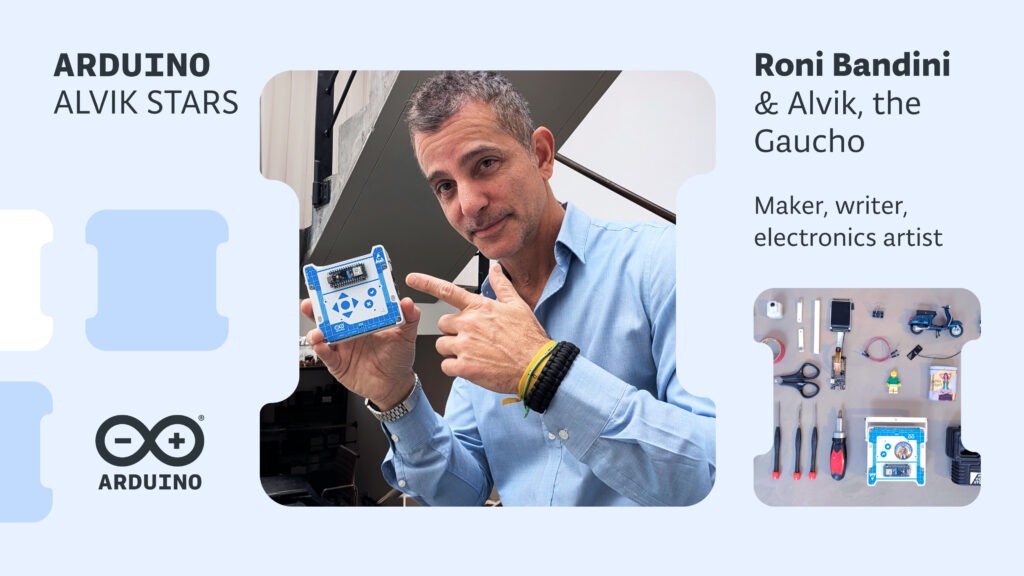
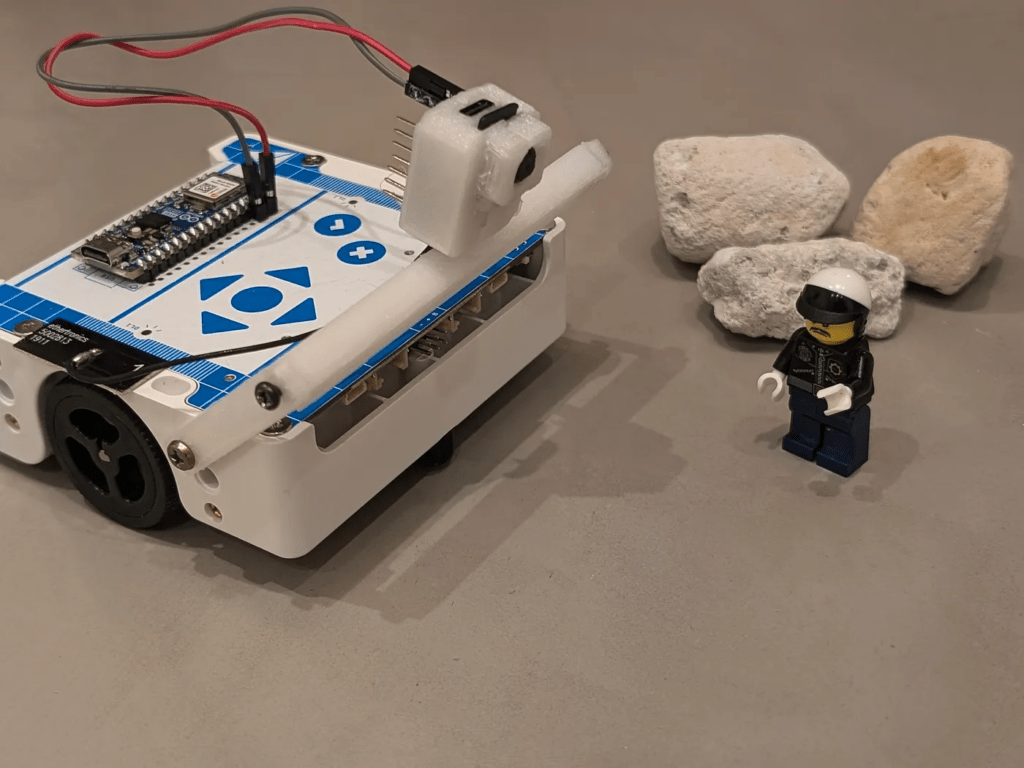

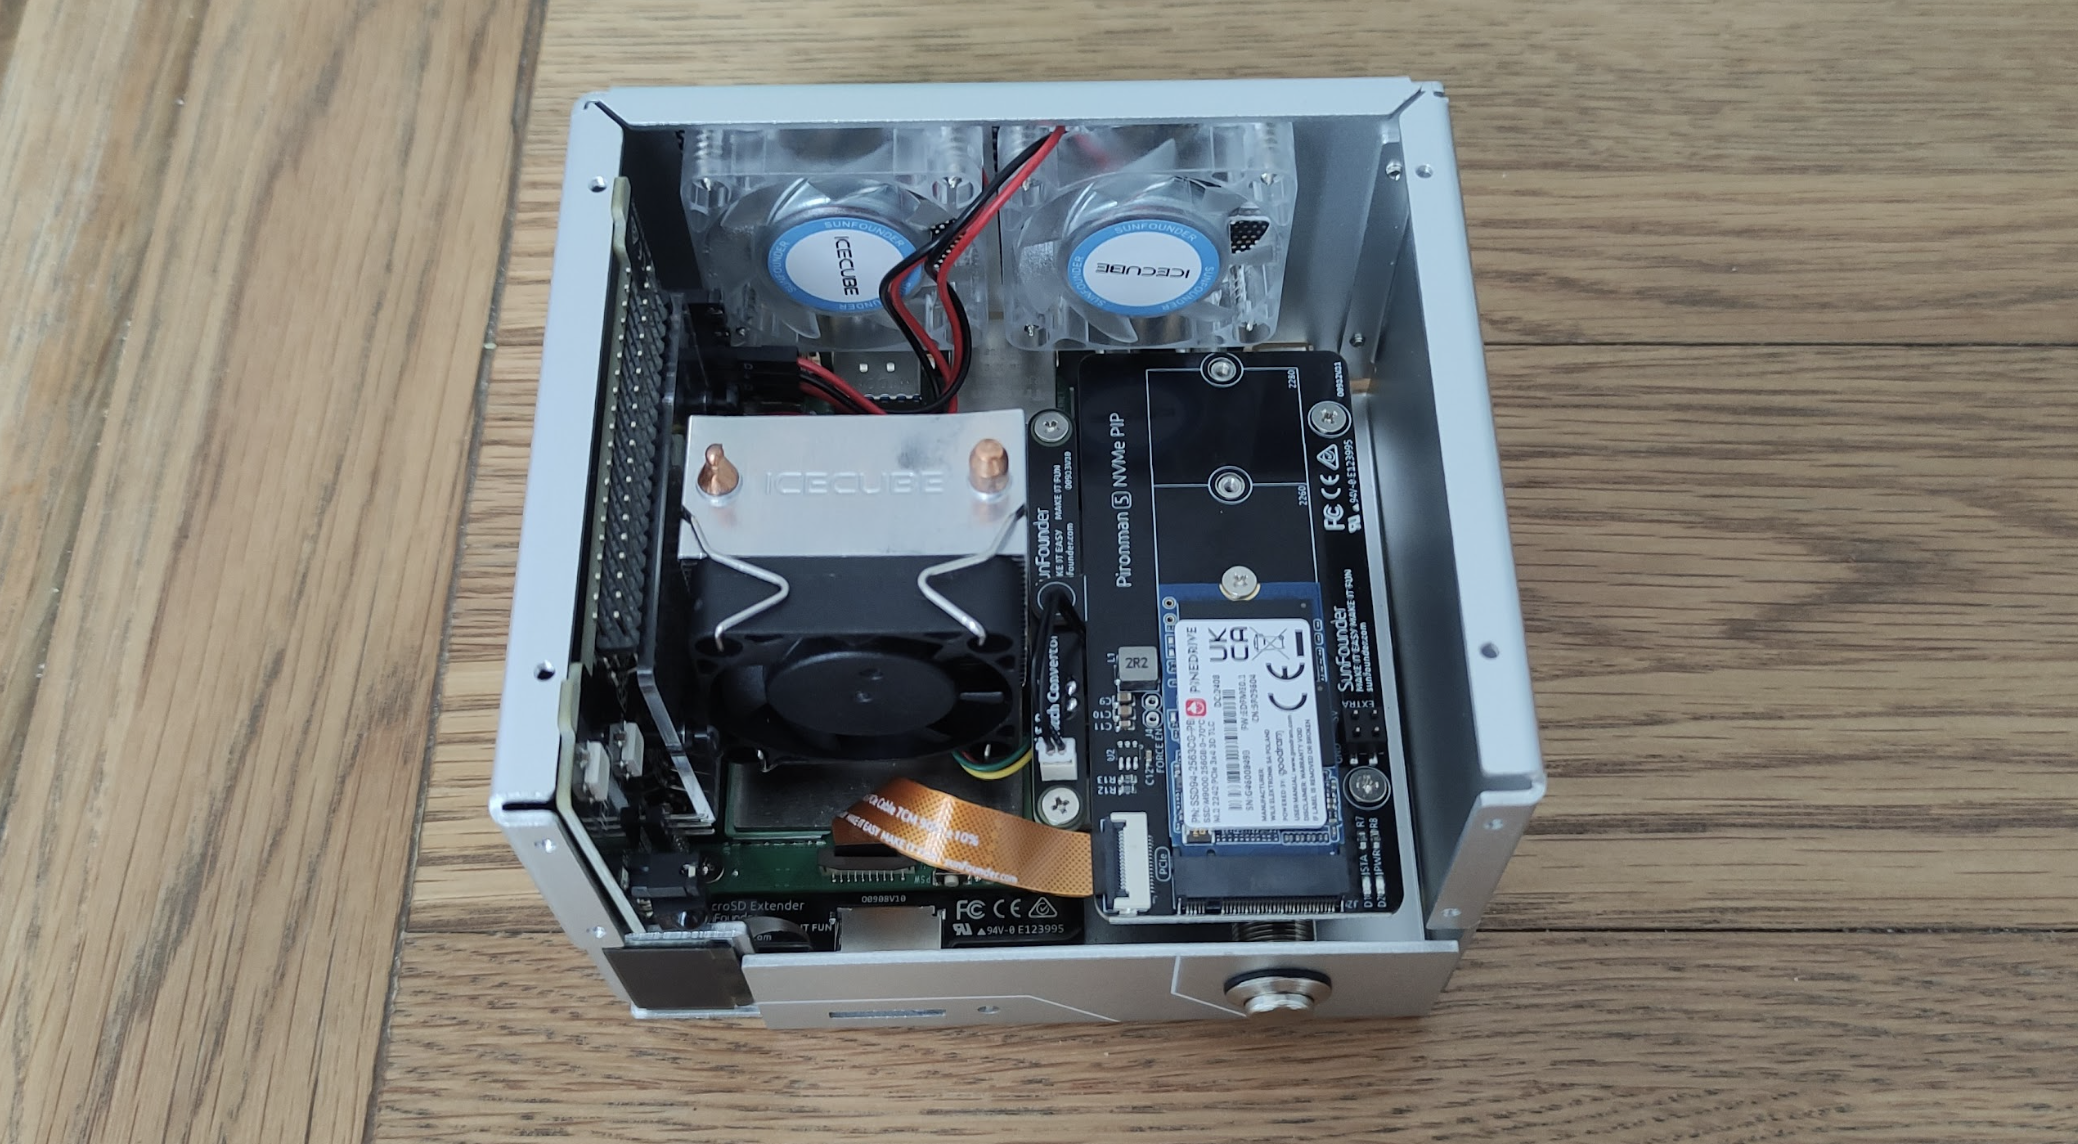


