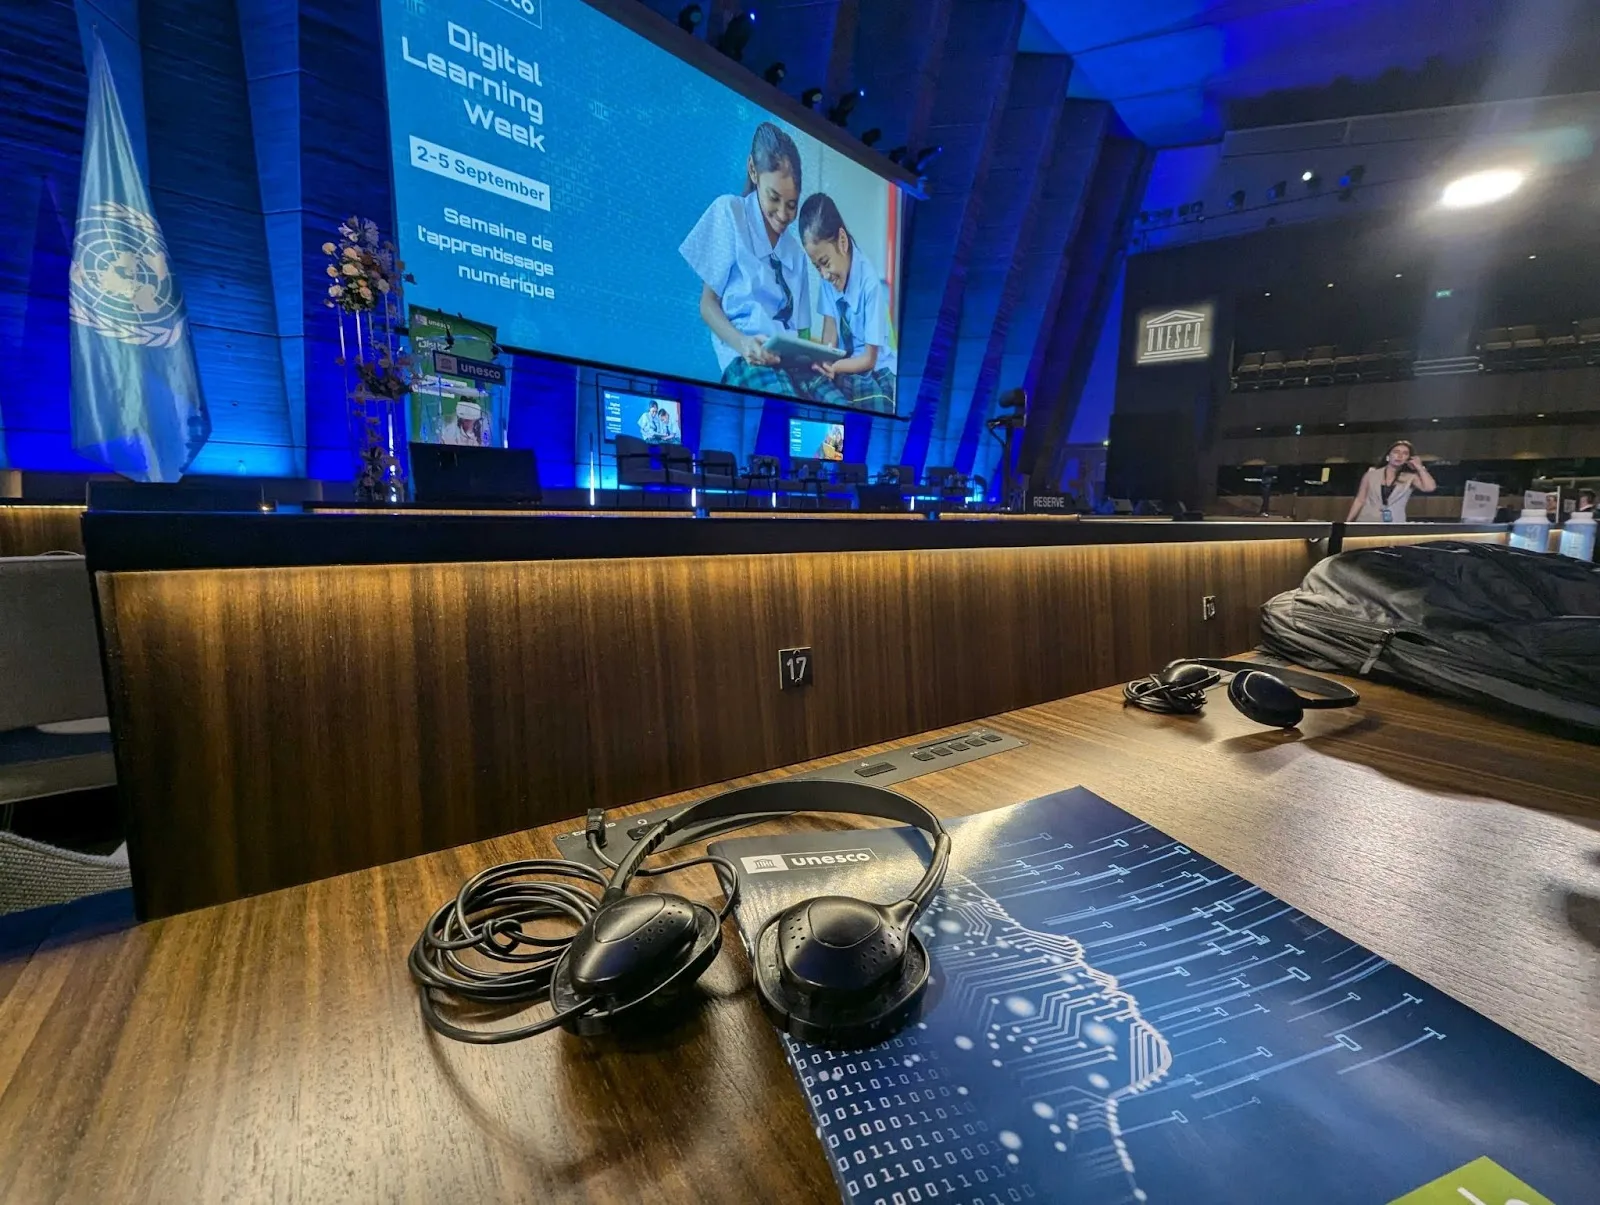
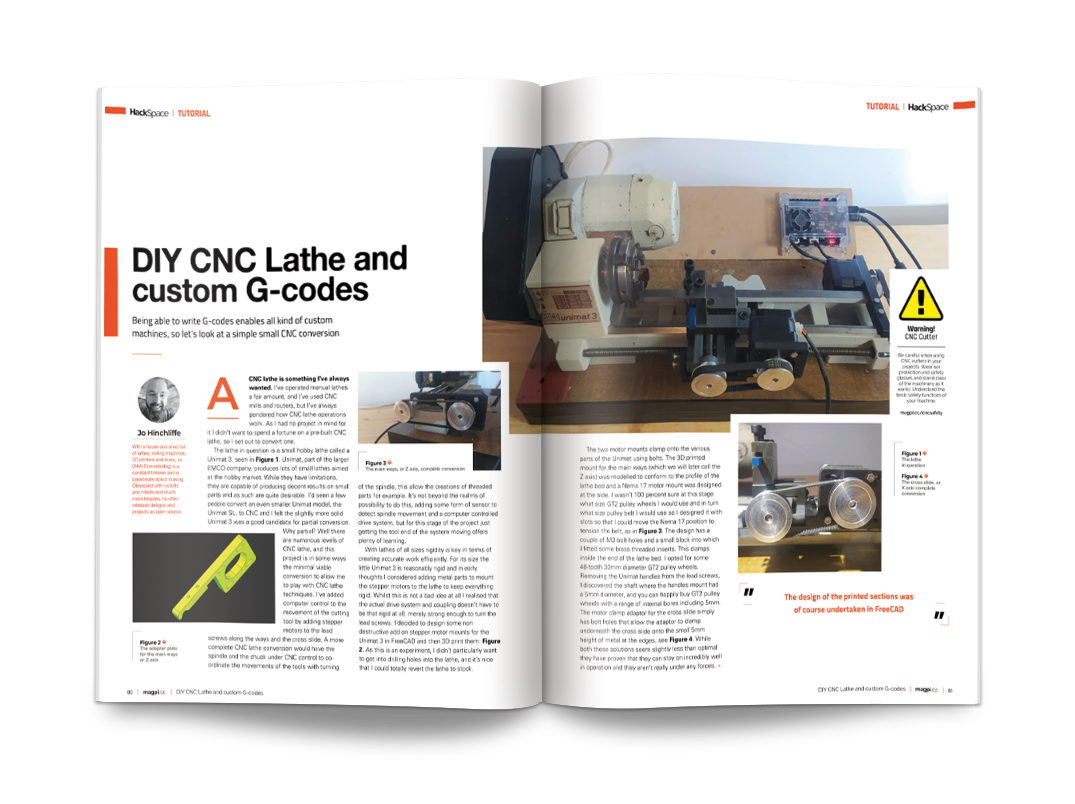
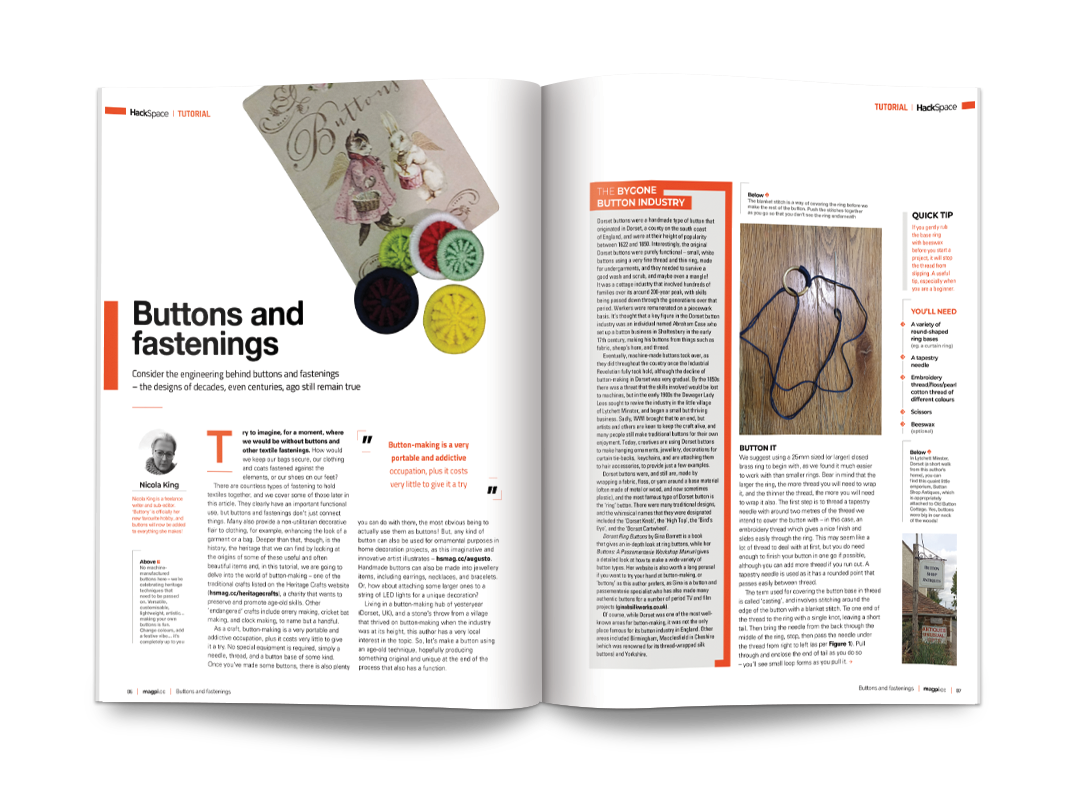
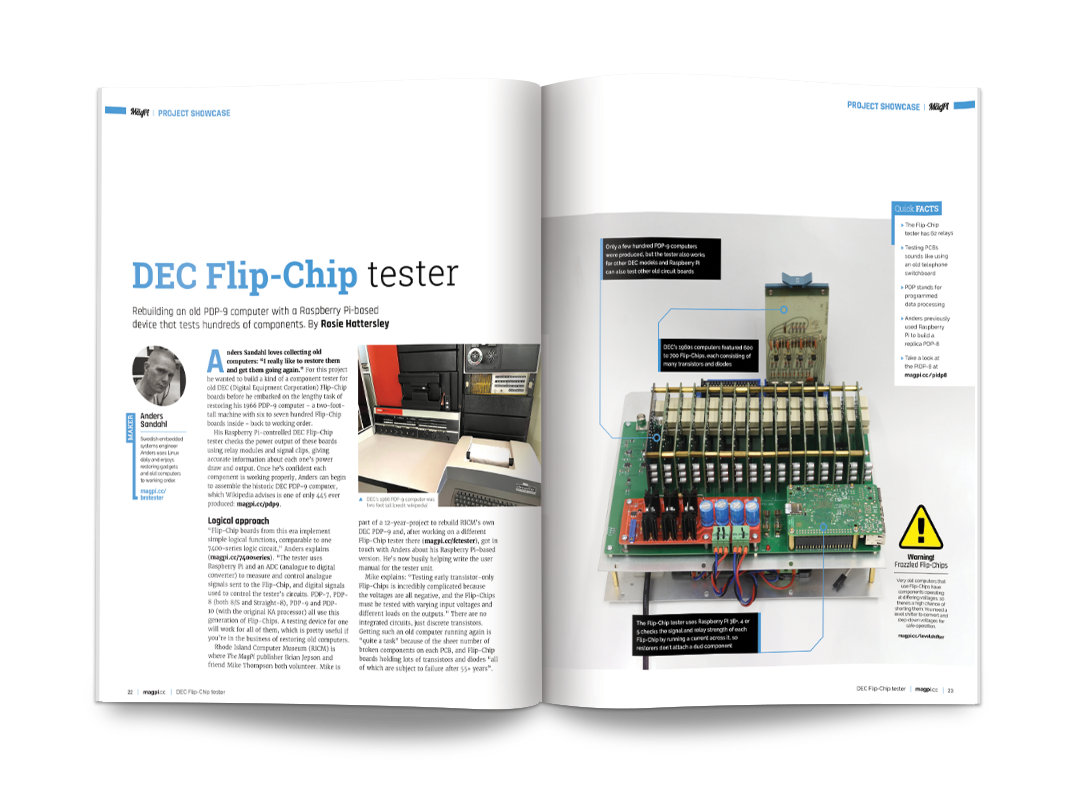
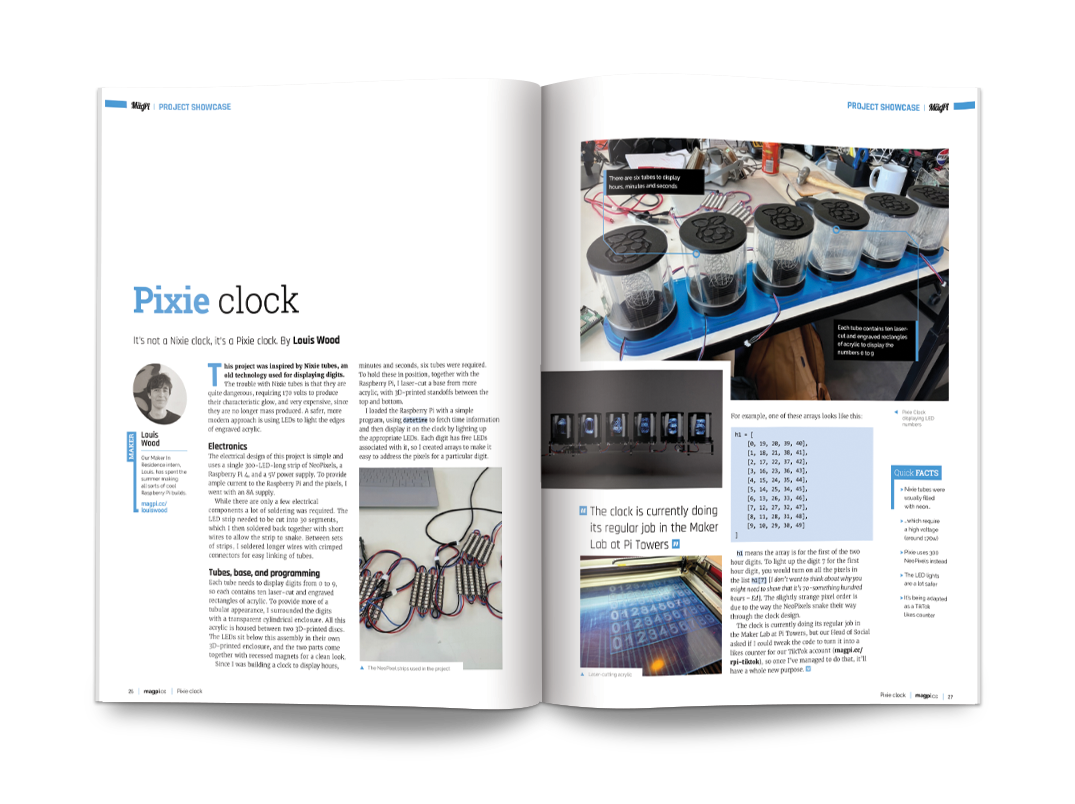
Kategorie: Mobile

  • Fably bedtime storyteller

    Fably bedtime storyteller

    Reading Time: 3 minutes

    Childhood wonder

    Stefano’s first computer, a Commodore Vic20, was something he could program himself and opened up a world of possibilities. Most importantly, this first computer awakened Stefano to the idea of tinkering and eventually led to him pursuing a degree in electronic engineering. Over the past 20 years he has worked with many tech startups and software companies, often with Apache Frontier Foundation, where he became a fellow and met many passionate inventors. Fably, however, was very much inspired by Stefano’s own family, particularly his nine-year-old daughter who kept asking him to invent new stories.

    Stefano had encountered LLMs (large language models) while working at Google Research and wondered whether he could use one to create a storytelling machine. Stefano found the command of language impressive but the LLM “felt like talking to a person that spoke like a college professor but had the understanding of the world of a five-year-old. It was a jarring experience especially when they confidently made stuff up.” The phenomenon is often referred to as ‘hallucination’ but Stefano says some colleagues at Google call it ‘fabulism’. He prefers this term and it is the origin of his Raspberry Pi project’s name. Importantly, ‘fably’ is also a word the text to speech synthesis API can pronounce.

    As well as making more sense than an overconfident LLM, the smart storyteller needed to come up with compelling stories that engaged the listener and be sufficiently autonomous that it could be used without continuous adult supervision. Being an ambitious, entrepreneurial type, Stefano also wondered about the commercial possibilities and whether Fably could be made at a sufficiently low cost to build a community around it. He notes that children are demanding users being both “impatient and used to interactivity as a foundational aspect of learning”. It would be critical that the “time to first speech” (the time from the last word the child said and the first word coming out of the machine) could not be more than a few seconds.

    Every cloud

    Since LLMs are very resource-intensive (as he knew from working on machine learning at Google), Stefano chose a cloud API-based approach to address the need for speed, and Raspberry Pi to keep costs down so other technically minded makers could create their own. Raspberry Pi felt like the best choice because of its price, availability, fantastic and very active community, and because it runs Linux directly – a development environment Stefano felt right at home in. Additional hardware such as a microphone could also be added easily. Stefano praised Raspberry Pi’s “relatively stable” I/O pinout across versions in ensuring “a healthy and diverse ecosystem of extension boards”, which could prove important should Fably become a commercial product.

    Fably makes full use of OpenAI cloud APIs, alongside a text-to-speech synthesiser with a warm and cosy voice. Stefano’s daughter enjoys the fact that she hears a slightly different story even if she makes the same request. Using a cloud setup means each story costs a few cents, but Fably can be set up to cache stories as well as to cap cloud costs.

  • Gear Guide 2025 in The MagPi magazine issue 148

    Gear Guide 2025 in The MagPi magazine issue 148

    Reading Time: 2 minutes

    Gear Guide 2025

    Gear Guide 2025!

    Our Gear Guide 2025! has your back. Discover a treasure trove of Raspberry Pi devices and great accessories taking us into a glittering new year.

    Gift a project

    Gift a project

    Sometimes the perfect gift is one you made yourself. Christmas Elf, Rob Zwetsloot has a fantastic feature for constructing your gifts using Raspberry Pi technology. On a budget? These projects break down the pricing so you can decide on what project to put together.

    Bumpin' Sticker

    Bumpin Sticker

    This issue is packed with amazing projects. Our favourite is this Bumpin Sticker that attaches an 11.3-inch LCD display to the bumper of a car and hooks up to the car radio. It displays the song and artist that you are listening to by scraping data from last.fm. It’s fun, but a serious demonstration of different technologies.

    Bluetooth bakelite phone headset

    Bluetooth Bakelite phone headset

    This Bluetooth headset is built into the body of a Dutch phone from 1950, simply called a ‘type 1950’. It’s powered by an ESP32 development board, and it works well enough that its creator, Jouke Waleson, can use it in a professional setting.

    PiDog

    PiDog tested

    Featuring 12 servos, PiDog is a metal marvel that can do (almost) anything a real dog can do. Walk, sit, lie down, doze, bark, howl, pant, scratch, shake a paw… Equipped with a bunch of sensors, it can self-balance, discern the direction of sounds, detect obstacles, and see where it’s going. You can even get a dog’s-eye view from its nose-mounted camera via a web page or companion app.

    You’ll find all this and much more in the latest edition of The MagPi magazine. Pick up your copy today from our store, or subscribe to get every issue delivered to your door.

  • How to use vintage LED bubble displays with your Arduino

    How to use vintage LED bubble displays with your Arduino

    Reading Time: 2 minutes

    If you want to add a display to your Arduino project, the easiest solution will likely be an LCD or OLED screen. But though those are affordable and work really well, they may not provide the vibe you’re looking for. If you want a more vintage look, Vaclav Krejci has a great tutorial that will walk you through using old-school LED bubble displays with your Arduino.

    Krejci’s video demonstrates how to use HPDL-1414 displays, which are what most people call “bubble” displays, because they have clear bubble-like lenses over each character’s array of LEDs. They were fairly popular in the late ‘70s and ‘80s on certain devices, like calculators. These specific bubble displays can show the full range of alphanumeric characters (uppercase only), plus a handful of punctuation marks and special symbols.

    The HPDL-1414 displays Krejci used come on driver boards that set the characters based on serial input. In the video, Krejci first connects those directly to a PC via a serial-to-USB adapter board. That helps to illustrate the control method through manual byte transmission.

    Then Krejci gets to the good stuff: connecting the HPDL-1414 bubble displays to an Arduino. He used an Arduino UNO Rev3, but the same setup should work with any Arduino board. As you may have guessed based on the PC demonstration, the Arduino controls the display via Serial.print() commands. The hex code for each character matches the standard ASCII table, which is pretty handy. That makes it possible to Serial.write() those hex codes and even Serial.write() the actual characters.

    Don’t worry if that sounds a little intimidating, because Krejci has sample code that will let you easily turn any arbitrary array of characters into the serial output you need. Now you can use those awesome bubble displays in your own projects!

    [youtube https://www.youtube.com/watch?v=qZ0up4YSiyE?feature=oembed&w=500&h=281]

    The post How to use vintage LED bubble displays with your Arduino appeared first on Arduino Blog.

    Website: LINK

  • Win one of three Thumby Color game systems

    Win one of three Thumby Color game systems

    Reading Time: < 1 minute

    A ton of supporting products launcged with Raspberry Pi Pico 2 and the RP2350, including a lot of items that were powered by RP2350. One of these included the excellent Thumby Color game system, and we finally have a few for a competition – enter below…

  • Turning a desk mat into a MIDI drum kit

    Turning a desk mat into a MIDI drum kit

    Reading Time: 2 minutes

    Playing drums is a lot of fun, but drum sets are very big and very loud. They also aren’t cheap. Those factors keep them from being an option for many people who would otherwise be interested. Conventional electronic drum sets are much quieter and a bit more compact, but they still take up a fair amount of space and come with hefty price tags. That’s why Cybercraftics designed this DIY drum set mat that solves all of those problems.

    This is an electronic drum set in the form of a flexible desk mat. It is affordable to build and can be tucked away in a closet or cupboard when not in use. It doesn’t have the same layout as a real drum set, but it can still help new drummers learn fundamentals like paradiddles. Those require a lot of practice to ingrain the motions into muscle memory and this mat makes it possible to run through the rudiments just about anywhere without loud noises disturbing anyone.

    Cybercraftics designed this drum mat to work like a standard MIDI (Musical Instrument Digital Interface) input device, but with piezoelectric sensors instead of buttons. Those produce a signal when struck. They are analog signals and there are seven sensors, so this project uses an Arduino Leonardo board that has enough analog input pins. The Leonardo also has a Microchip ATmega32U4 microcontroller, which means it is configurable as a USB HID — handy for interfacing with whatever MIDI software you may want to use.

    On the physical side, this is just two desk mats cut and glued together, which circular pieces covering the piezoelectric sensors. A small 3D-printed enclosure protects the Arduino.

    [youtube https://www.youtube.com/watch?v=3wSPyhD2FfM?feature=oembed&w=500&h=281]

    If you’ve ever wanted to get into drumming, this may the opportunity you’ve been waiting for.

    The post Turning a desk mat into a MIDI drum kit appeared first on Arduino Blog.

    Website: LINK

  • Exploring fungal intelligence with biohybrid robots powered by Arduino

    Exploring fungal intelligence with biohybrid robots powered by Arduino

    Reading Time: 3 minutes

    At Cornell University, Dr. Anand Kumar Mishra and his team have been conducting groundbreaking research that brings together the fields of robotics, biology, and engineering. Their recent experiments, published in Science, explore how fungal mycelia can be used to control robots. The team has successfully created biohybrid robots that move based on electrical signals generated by fungi – a fascinating development in the world of robotics and biology.

    A surprising solution for robotics: fungi

    Biohybrid robots have traditionally relied on animal or plant cells to control movements. However, Dr. Mishra’s team is introducing an exciting new component into this field: fungi – which are resilient, easy to culture, and can thrive in a wide range of environmental conditions. This makes them ideal candidates for long-term applications in biohybrid robotics.

    Dr. Mishra and his colleagues designed two robots: a soft, starfish-inspired walking one, and a wheeled one. Both can be controlled using the natural electrophysiological signals produced by fungal mycelia. These signals are harnessed using a specially designed electrical interface that allows the fungi to control the robot’s movement.

    The implications of this research extend far beyond robotics. The integration of living systems with artificial actuators presents an exciting new frontier in technology, and the potential applications are vast – from environmental sensing to pollution monitoring.

    [youtube https://www.youtube.com/watch?v=M1-3YlfVQks?feature=oembed&w=500&h=281]

    How it works with Arduino

    At the heart of this innovative project is the Arduino platform, which served as the main interface to control the robots. As Dr. Mishra explains, he has been using Arduino for over 10 years and naturally turned to it for this experiment: “My first thought was to control the robot using Arduino.” The choice was ideal in terms of accessibility, reliability, and ease of use – and allowed for seamless transition from prototyping with UNO R4 WiFi to final solution with Arduino Mega.

    To capture and process the tiny electrical signals from the fungi, the team used a high-resolution 32-bit ADC (analog-to-digital converter) to achieve the necessary precision. “We processed each spike from the fungi and used the delay between spikes to control the robot’s movement. For example, the width of the spike determined the delay in the robot’s action, while the height was used to adjust the motor speed,” Dr. Mishra shares.

    The team also experimented with pulse width modulation (PWM) to control the motor speed more precisely, and managed to create a system where the fungi’s spikes could increase or decrease the robot’s speed in real-time. “This wasn’t easy, but it was incredibly rewarding,” says Dr. Mishra. 

    And it’s only the beginning. Now the researchers are exploring ways to refine the signal processing and enhance accuracy – again relying on Arduino’s expanding ecosystem, making the system even more accessible for future scientific experiments.

    All in all, this project is an exciting example of how easy-to-use, open-source, accessible technologies can enable cutting-edge research and experimentation to push the boundaries of what’s possible in the most unexpected fields – even complex biohybrid experiments! As Dr. Mishra says, “I’ve been a huge fan of Arduino for years, and it’s amazing to see how it can be used to drive advancements in scientific research.”

    The post Exploring fungal intelligence with biohybrid robots powered by Arduino appeared first on Arduino Blog.

    Website: LINK

  • Ada Computer Science: What have we learnt so far

    Ada Computer Science: What have we learnt so far

    Reading Time: 3 minutes

    It’s been over a year since we launched Ada Computer Science, and we continue to see the numbers of students and teachers using the platform all around the world grow. Our recent year in review shared some of the key developments we’ve made since launching, many of which are a direct result of feedback from our community.

    Today, we are publishing an impact report that includes some of this feedback, along with what users are saying about the impact Ada Computer Science is having.

    Computer science students at a desktop computer in a classroom.

    Evaluating Ada Computer Science

    Ada Computer Science is a free learning platform for computer science students and teachers. It provides high-quality, online learning materials to use in the classroom, for homework, and for revision. Our experienced team has created resources that cover every topic in the leading GCSE and A level computer science specifications.

    From May to July 2024, we invited users to provide feedback via an online survey, and we got responses from 163 students and 27 teachers. To explore the feedback further, we also conducted in-depth interviews with three computer science teachers in September 2024.

    How is Ada being used?

    The most common ways students use Ada Computer Science — as reported by more than two thirds of respondents — is for revision and/or to complete work set by their teacher. Similarly, teachers most commonly said that they direct students to use Ada outside the classroom.

    “I recommend my students use Ada Computer Science as their main textbook.” — Teacher

    What is users’ experience of using Ada?

    Most respondents agreed or strongly agreed that Ada is useful for learning (82%) and high quality (79%).

    “Ada Computer Science has been very effective for independent revision, I like how it provides hints and pointers if you answer a question incorrectly.” — Student

    Ada users were generally positive about their overall experience of the platform and using it to find the information they were looking for.

    “Ada is one of the best for hitting the nail on the head. They’ve really got it in tune with the depth that exam boards want.” — Ian Robinson, computer science teacher (St Alban’s Catholic High School, UK)

    What impact is Ada having?

    Around half of the teachers agreed that Ada had reduced their workload and/or increased their subject knowledge. Across all respondents, teachers estimated that the average weekly time saving was 1 hour 8 minutes.

    Additionally, 81% of students agreed that as a result of using Ada, they had become better at understanding computer science concepts. Other benefits were reported too, with most students agreeing that they had become better problem-solvers, for example.

    “I love Ada! It is an extremely helpful resource… The content featured is very comprehensive and detailed, and the visual guides… are particularly helpful to aid my understanding.” — Student

    Future developments

    Since receiving this feedback, we have already released updated site navigation and new question finder designs. In 2025, we are planning improvements to the markbook (for example, giving teachers an overview of the assignments they’ve set) and to how assignments can be created.

    If you’d like to read more about the findings, there’s a full report for you to download. Thank you to everyone who took the time to take part — we really value your feedback!

    Website: LINK

  • Alumnus Software joins Arduino’s System Integrators Partnership Program

    Alumnus Software joins Arduino’s System Integrators Partnership Program

    Reading Time: 2 minutes

    We are thrilled to announce that Alumnus Software, based in India and the United States, has joined our System Integrators Partnership Program (SIPP) at the Gold level. With over 20 years of expertise in embedded software, IoT applications, and Edge AI development, Alumnus has a strong track record of building custom embedded systems and data-driven IoT applications for industries ranging from automotive and healthcare to industrial automation and consumer electronics.

    As an official SIPP partner, Alumnus will enable Arduino users to leverage their expertise in resource-constrained environments – overcoming challenges like limited CPU, memory, and storage, low bandwidth, extended battery life requirements, and real-time response demands. This collaboration means faster deployment, quicker revenue generation, and a seamless bridge between connected devices and cloud-based applications for enterprise-scale projects.

    Ashis Khan, Board Member at Alumnus Software, shared his enthusiasm for the partnership:  

    “With Arduino, businesses have achieved a 25-40% faster time-to-market and up to 60% reduction in non-recurring engineering (NRE) costs when connecting their data to the cloud. Through this partnership, Alumnus Software plans to help Arduino users scale enterprise-class applications more efficiently, leveraging data and AI with our two decades of expertise in Data, IoT, Edge AI, Cloud enablement, and embedded software development.”

    Rob Ponsoby, Partner Sales Manager – AMER at Arduino, added: “We are excited to welcome Alumnus to the SIPP program. Their depth of experience in embedded software and IoT solutions will provide valuable resources for Arduino users, helping them bring their innovative ideas to life in faster, more efficient ways.”

    Follow Alumnus Software’s journey on LinkedIn and Facebook, and learn more about their contributions to advancing embedded technology by visiting the company website.


    The System Integrators Partnership Program by Arduino Pro is an exclusive initiative designed for professionals seeking to implement Arduino technologies in their projects. This program opens up a world of opportunities based on the robust Arduino ecosystem, allowing partners to unlock their full potential in collaboration with us.

    The post Alumnus Software joins Arduino’s System Integrators Partnership Program appeared first on Arduino Blog.

    Website: LINK

  • A riddle wrapped in an enigma… made easy, with Arduino Plug and Make Kit

    A riddle wrapped in an enigma… made easy, with Arduino Plug and Make Kit

    Reading Time: 3 minutes

    The Arduino Plug and Make Kit was designed to open up infinite possibilities, breaking down the idea that technology is a “black box” reserved for experts. With its snap-together system, this kit gives everyone – beginners and seasoned makers alike – the power to create and innovate without barriers. Forget being a passive user! With the Plug and Make Kit, technology is accessible and ready to bring your ideas to life.

    Meet Giulio Pilotto, Plug and Make Kit Star

    Giulio Pilotto is one of Arduino’s senior software engineers and works closely on Arduino Cloud projects. When we held a “Make Tank” workshop at our Turin office to showcase the potential of the Plug and Make Kit, he joined in with inspiration from a recent escape room experience. 

    The result was Riddle Treasure, a puzzle-based game that allows you to recreate the excitement of an escape room anywhere you are.

    [youtube https://www.youtube.com/watch?v=qMewu2yG1CE?feature=oembed&w=500&h=281]

    At this year’s Maker Faire, Pilotto had the opportunity to present Riddle Treasure at the Arduino booth. While he had showcased his own creations at previous Maker Faire editions, this time felt special: “The Maker Faire is always a wonderful high-energy event,” he says. “I was happy to represent the Arduino team as we focus more than ever on the community: all our products were presented in the light of what people can do with them.” 

    Riddle Treasure

    To be honest, this is probably the most advanced project our in-house “Make Tank” came up with (so far!). After all, it has to be somewhat complicated to emulate intricate escape room puzzles! However, following Pilotto’s step-by-step instructions on Project Hub and leveraging the easy snap-together mechanism of Modulino nodes, anyone can recreate Riddle Treasure – or even invent a personal, unique variation.

    The goal of the game is to unlock a safe. But to get there, you need to complete three steps in order. 

    1. Combination Lock: First, you must rotate the encoder in Modulino Knob like a safe’s combination lock. When you hit the right position, one of the lights on Modulino Pixels turns from red to green. When you get all five LEDs to turn green, you can move on to the next step. 

    2. Secret Sentence: Use the banana cables to connect the words in the panel. When you get them all in the right order to form the secret sentence, a password is revealed on the LED matrix of the UNO R4 included in the Plug and Make Kit. 

    3. Final Unlock: Input the password via Modulino Buttons, and watch the safe unlock! 

    We take care of the complexity, so you can simply plug into tech!

    Arduino has done the hard work so you can play and have fun even with deliberately complex projects like this one. 

    “Building this without having to solder, or even worry about settings or any electronics aspect at all, is a game changer. With Plug and Make Kit, Arduino has already selected and optimized the Modulino sensors: all you have to do is put them together to get started on your ideas,” Pilotto says. 

    Search Project Hub for “Plug and Make” to find Riddle Treasure and many more ideas, and get inspired to create your own amazing projects with the Plug and Make Kit!

    The post A riddle wrapped in an enigma… made easy, with Arduino Plug and Make Kit appeared first on Arduino Blog.

    Website: LINK

  • Receive an alert when your device goes offline in Arduino Cloud

    Receive an alert when your device goes offline in Arduino Cloud

    Reading Time: 3 minutes

    You’re managing a network of IoT sensors that monitor air quality across multiple locations. Suddenly, one of the sensors goes offline, but you don’t notice until hours later. The result? A gap in your data and a missed opportunity to take corrective action. This is a common challenge when working with IoT devices: staying informed about the real-time status of each device is crucial to ensure smooth operation and timely troubleshooting.

    This is where Device Status Notifications, the latest feature in the Arduino Cloud, comes in. Whether you’re an individual maker or an enterprise, this feature empowers you to stay on top of your devices by sending real-time alerts when a device goes online or offline.

    What is “Device Status Notifications?”

    Device Status Notifications allow you to receive instant alerts whenever one of your devices changes its connectivity status, whether it’s going offline or coming back online. You can customize these alerts for individual devices or all devices under your account, with the flexibility to exclude specific devices from triggering notifications.

    We announced it a while ago, Arduino Cloud already supports Triggers and Notifications, allowing you to create alerts based on specific conditions like sensor readings or thresholds. With the addition of Device Status Notifications, you can now monitor device connectivity itself. This means you can now receive an alert the moment a device loses connection, providing a proactive way to manage your IoT ecosystem. For more details on the original feature, check out our Triggers and Notifications blog post.

    Key benefits for users

    • Real-time monitoring: Get notified instantly when a device disconnects or reconnects, helping you take corrective actions promptly.
    • Customization: Configure your alerts to focus on specific devices or apply rules to all your devices, with the flexibility to add exceptions. You can also decide when the notification should be sent — either immediately upon a status change or after a set period of downtime.
    • Convenience: Choose to receive notifications via email or directly on your mobile device through the Arduino IoT Remote app, making it easy to stay informed wherever you are.

    How to set up Device Status Notifications

    Video link

    [youtube https://www.youtube.com/watch?v=OKxlaJ5XknM?feature=oembed&w=500&h=281]

    1. Set up a Trigger

    Go to the Triggers section and select “+ TRIGGER

    2. Choose “Device Status” as your condition

    Decide whether to monitor the status of:

    • A specific device (select “Single device”), or
    • Any device (select “Any device (existing and upcoming)”).

    If you select “Single device,” you can choose the device that you want to be monitored.

    If your selection is “Any device,” you can add exceptions for devices you don’t want to trigger the alert.

    3. Configure what you are going to monitor

    Choose whether to monitor when the device goes online, offline, or both. Then decide if the notification should be sent immediately or after a set period (options range from 10 minutes to 48 hours).

    4. Customize the notification settings

    Notifications are configured in the same way as any other Trigger. You can add the action of sending an email or a push notification to your phone via a push notification on the Arduino IoT Remote app.

    Ready to test Device Notifications?

    Want to make sure your IoT devices stay connected and functioning? Start using the Device Status Notifications feature today. Simply log in to your Arduino IoT Cloud account, and configure your notifications to stay informed whenever your devices go online or offline. 

    Make sure you’re on a Maker, Enterprise, or School plan to access this feature.

    And don’t forget to download the Arduino IoT Remote app from the App Store or Google Play  to receive real-time alerts on the go and stay connected, wherever you are.

    Black Friday is here – Save Big on Arduino Cloud!

    Take your IoT projects to the next level this Black Friday!

    Black Friday Arduino Cloud deals 25% off Maker Yearly Plan

    For a limited time, enjoy 25% off the Arduino Cloud Maker Yearly plan with code BLACKFRIDAY. Don’t miss this opportunity to access premium features and elevate your creativity. Hurry—this offer is valid for new Maker Yearly plan subscriptions only and ends on December 1st, 2024.

    The post Receive an alert when your device goes offline in Arduino Cloud appeared first on Arduino Blog.

    Website: LINK

  • Celebrating the community: Prabhath

    Celebrating the community: Prabhath

    Reading Time: 5 minutes

    We love hearing from members of the community and sharing the stories of amazing young people, volunteers, and educators who are using their passion for technology to create positive change in the world around them.

    An educator sits in a library.

    Prabhath, the founder of the STEMUP Educational Foundation, began his journey into technology at an early age, influenced by his cousin, Harindra.

    “He’s the one who opened up my eyes. Even though I didn’t have a laptop, he had a computer, and I used to go to their house and practise with it. That was the turning point in my life.”

    [youtube https://www.youtube.com/watch?v=gNRn6SmdBek?feature=oembed&w=500&h=281]

    This early exposure to technology, combined with support from his parents to leave his rural home in search of further education, set Prabhath on a path to address a crucial issue in Sri Lanka’s education system: the gap in opportunities for students, especially in STEM education. 

    “There was a gap between the kids who are studying in Sri Lanka versus the kids in other developed markets. We tried our best to see how we can bridge this gap with our own capacity, with our own strengths.” 

    Closing the gap through STEMUP

    Recognising the need to close this gap in opportunities, Prabhath, along with four friends who worked with him in his day job as a Partner Technology Strategist, founded the STEMUP Educational Foundation in 2016.  STEMUP’s mission is straightforward but ambitious — it seeks to provide Sri Lankan students with equal access to STEM education, with a particular focus on those from underserved communities.

    A group of people stands together, engaged in a lively discussion.

    To help close the gap, Prabhath and his team sought to establish coding clubs for students across the country. Noting the lack of infrastructure and access to resources in many parts of Sri Lanka, they partnered with Code Club at the Raspberry Pi Foundation to get things moving. 

    Their initiative started small with a Code Club in the Colombo Public Library, but things quickly gained traction. 

    What began with just a handful of friends has now grown into a movement involving over 1,500 volunteers who are all working to provide free education in coding and emerging technologies to students who otherwise wouldn’t have access.

    An educator helps a young person at a Code Club.

    A key reason for STEMUP’s reach has been the mobilisation of university students to serve as mentors at the Code Clubs. Prabhath believes this partnership has not only helped the success of Code Club Sri Lanka, but also given the university students themselves a chance to grow, granting them opportunities to develop the life skills needed to thrive in the workforce. 

    “The main challenge we see here today, when it comes to graduate students, is that they have the technology skills, but they don’t have soft skills. They don’t know how to do a presentation, how to manage a project from A to Z, right? By being a volunteer, that particular student can gain 360-degree knowledge.” 

    Helping rural communities

    STEMUP’s impact stretches beyond cities and into rural areas, where young people often have even fewer opportunities to engage with technology. The wish to address this imbalance  is a big motivator for the student mentors.

    “When we go to rural areas, the kids don’t have much exposure to tech. They don’t know about the latest technologies. What are the new technologies for that development? And what subjects can they  study for the future job market? So I think I can help them. So I actually want to teach someone what I know.” – Kasun, Student and Code Club mentor

    This lack of access to opportunities is precisely what STEMUP aims to change, giving students a platform to explore, innovate, and connect with the wider world.

    Coolest Projects Sri Lanka

    STEMUP recently held the first Coolest Projects Sri Lanka, a showcase for the creations of young learners. Prabhath first encountered Coolest Projects while attending the Raspberry Pi Foundation Asia Partner summit in Malaysia. 

    “That was my first experience with the Coolest Projects,” says Prabhath, “and when I came back, I shared the idea with our board and fellow volunteers. They were all keen to bring it to Sri Lanka.” 

    For Prabhath, the hope is that events like these will open students’ eyes to new possibilities. The first event certainly lived up to his hope. There was a lot of excitement, especially in rural areas, with multiple schools banding together and hiring buses to attend the event. 

    “That kind of energy… because they do not have these opportunities to showcase what they have built, connect with like minded people, and connect with the industry.”

    Building a better future

    Looking ahead, Prabhath sees STEMUP’s work as a vital part of shaping the future of education in Sri Lanka. By bringing technology to public libraries, engaging university students as mentors, and giving kids hands-on experience with coding and emerging technologies, STEMUP is empowering the next generation to thrive in a digital world. 

    “These programmes are really helpful for kids to win the future, be better citizens, and bring this country forward.”

    Young people showcase their tech creations at Coolest Projects.

    STEMUP is not just bridging a gap — it’s building a brighter, more equitable future for all students in Sri Lanka. We can’t wait to see what they achieve next!

    Inspire the next generation of young coders

    To find out how you and young creators you know can get involved in Coolest Projects, visit coolestprojects.org. If the young people in your community are just starting out on their computing journey, visit our projects site for free, fun beginner coding projects.

    For more information to help you set up a Code Club in your community, visit codeclub.org.

    Help us celebrate Prabhath and his inspiring journey with STEMUP by sharing this story on X, LinkedIn, and Facebook.

    Website: LINK

  • Pibo the bipedal robot review

    Pibo the bipedal robot review

    Reading Time: 2 minutes

    It comes fully assembled, which is very nice as putting together the various motors and other components together correctly has been a pain with similar products in the past. All you need to do is turn it on and get it connected to your Wi-Fi network, either via a wireless access point the robot creates, or via a wired connection if you have a USB to Ethernet adapter handy.

    The whole thing is powered by a Raspberry Pi Compute Module 4, so it has plenty of oomph – especially needed for the computer vision and voice recognition tasks.

    A cute little robot – well, it’s 40cm tall which isn’t that little

    I have control

    The robot itself is made in Korea, and most of the surrounding documentation and such are in Korean as a result. However, the tools and IDE (integrated development environment) can be switched to English just fine, and we didn’t experience any language issues.

    The tools allow you to play around with the various functions of the robot. Changing the colours of the eyes (independently if you wish), checking if the motion-sensing and touch inputs are working, recording sounds, playing sounds, moving the various motors – you can get a great feel for what the robot can do. With a solid grasp of this, you can then start programming the robot in the IDE.

    There’s a couple of programming methods – one is a block-based flow a little like NODE-Red, which also helps you understand the coding logic and variables of Pibo, and then there’s the Python programming mode which allows for full control.

    The functionality is huge, and we were really impressed by the object detection built into the camera. We also like making little messages and images on small LED screens, so having interactive elements that worked with the 128×64 display scratched a specific itch for us.

    Pibo comes pre-made in this fancy briefcase. Just pop on the antenna

    Learning for all ages

    While the whole system may not be useful to teach people on their very first steps into coding, or even maybe robotics, it’s a great next step thanks to its intuitive design that lets you play with its features, and block based programming that can lead into Python. The price is a little hefty, and some English features are still incoming, but we had a great time using Pibo either way – one for the little desk display we think.

    Specs

    Dimensions: 250(w) × 395(h) × 125(d) mm, 2.2kg

    Inputs: Touch sensor, MEMS microphone, PIR sensor, USB 2.0 port

    Outputs: 2x speakers, 128×64 OLED display, USB 2.0 port

    Verdict

    9/10

    A cute and very easy to use robot with a ton of functionality that will take some time to fully discover.

  • Exploring how well Experience AI maps to UNESCO’s AI competency framework for students

    Exploring how well Experience AI maps to UNESCO’s AI competency framework for students

    Reading Time: 9 minutes

    During this year’s annual Digital Learning Week conference in September, UNESCO launched their AI competency frameworks for students and teachers. 

    What is the AI competency framework for students? 

    The UNESCO competency framework for students serves as a guide for education systems across the world to help students develop the necessary skills in AI literacy and to build inclusive, just, and sustainable futures in this new technological era.

    It is an exciting document because, as well as being comprehensive, it’s the first global framework of its kind in the area of AI education.

    The framework serves three specific purposes:

    • It offers a guide on essential AI concepts and skills for students, which can help shape AI education policies or programs at schools
    • It aims to shape students’ values, knowledge, and skills so they can understand AI critically and ethically
    • It suggests a flexible plan for when and how students should learn about AI as they progress through different school grades

    The framework is a starting point for policy-makers, curriculum developers, school leaders, teachers, and educational experts to look at how it could apply in their local contexts. 

    It is not possible to create a single curriculum suitable for all national and local contexts, but the framework flags the necessary competencies for students across the world to acquire the values, knowledge, and skills necessary to examine and understand AI critically from a holistic perspective.

    How does Experience AI compare with the framework?

    A group of researchers and curriculum developers from the Raspberry Pi Foundation, with a focus on AI literacy, attended the conference and afterwards we tasked ourselves with taking a deep dive into the student framework and mapping our Experience AI resources to it. Our aims were to:

    • Identify how the framework aligns with Experience AI
    • See how the framework aligns with our research-informed design principles
    • Identify gaps or next steps

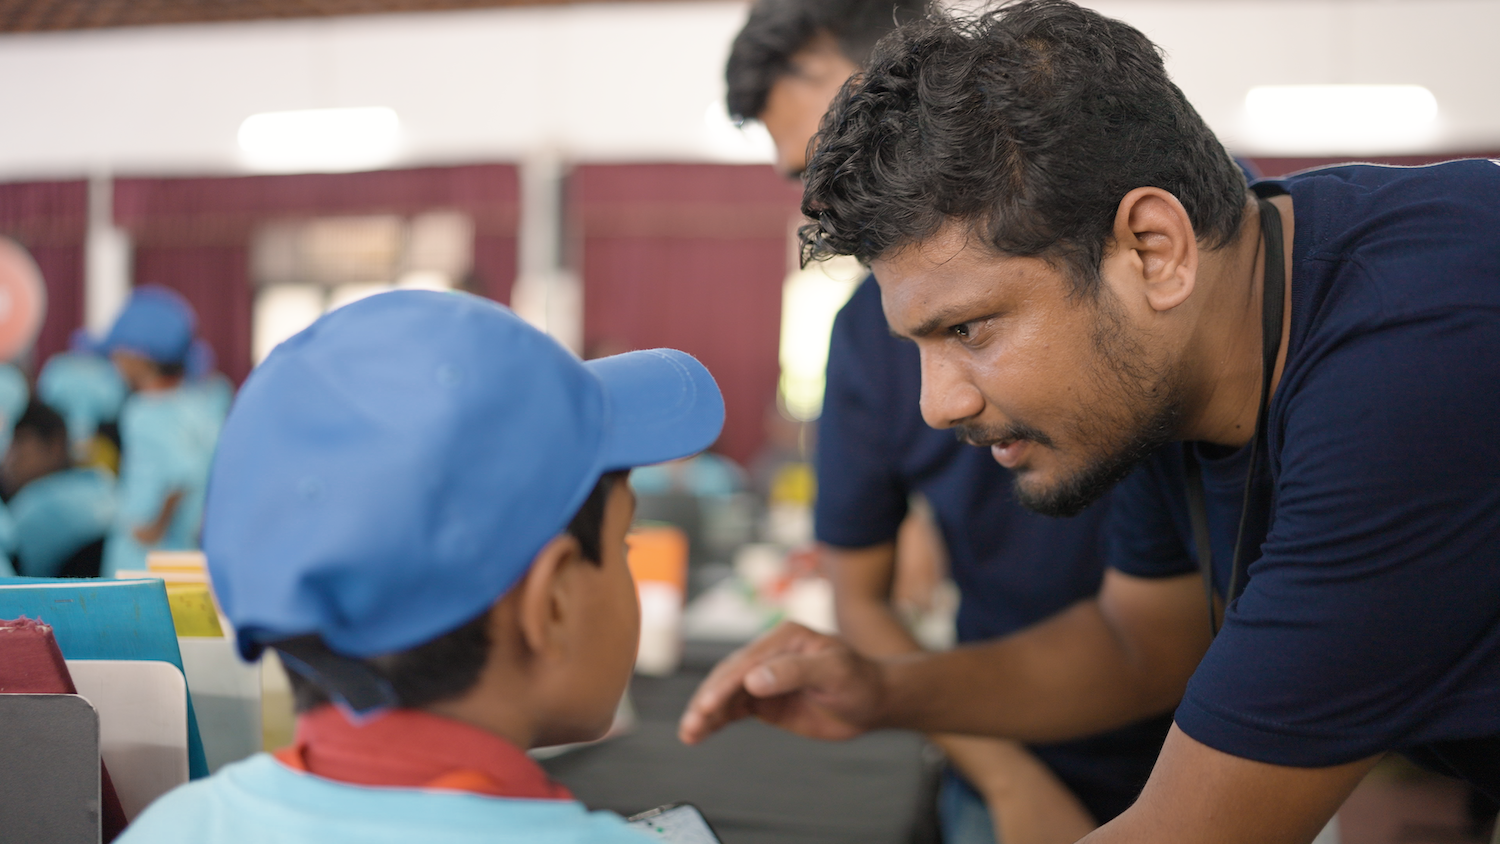
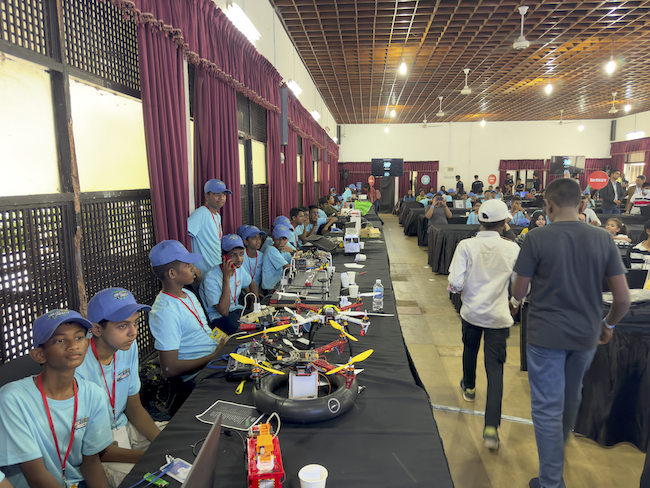
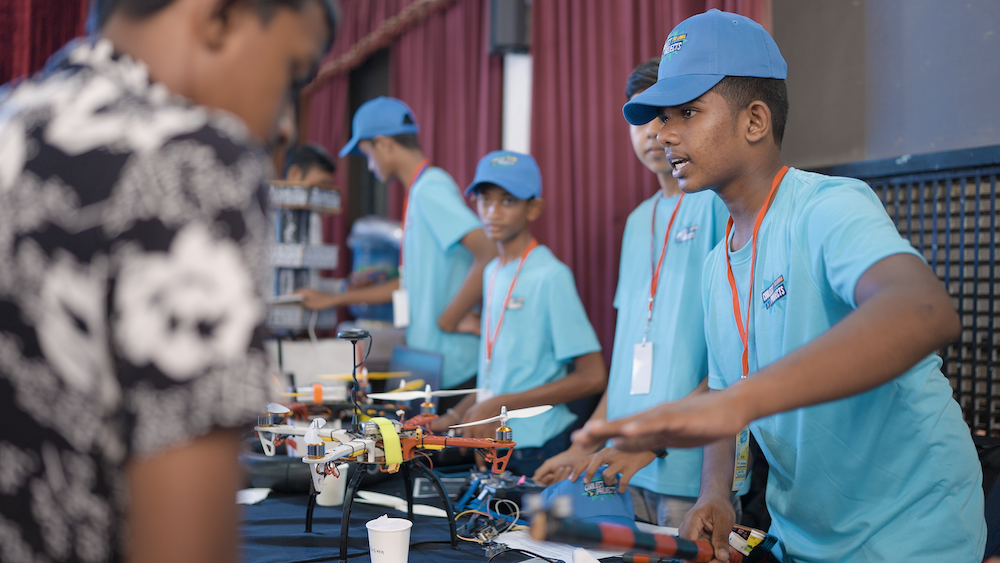
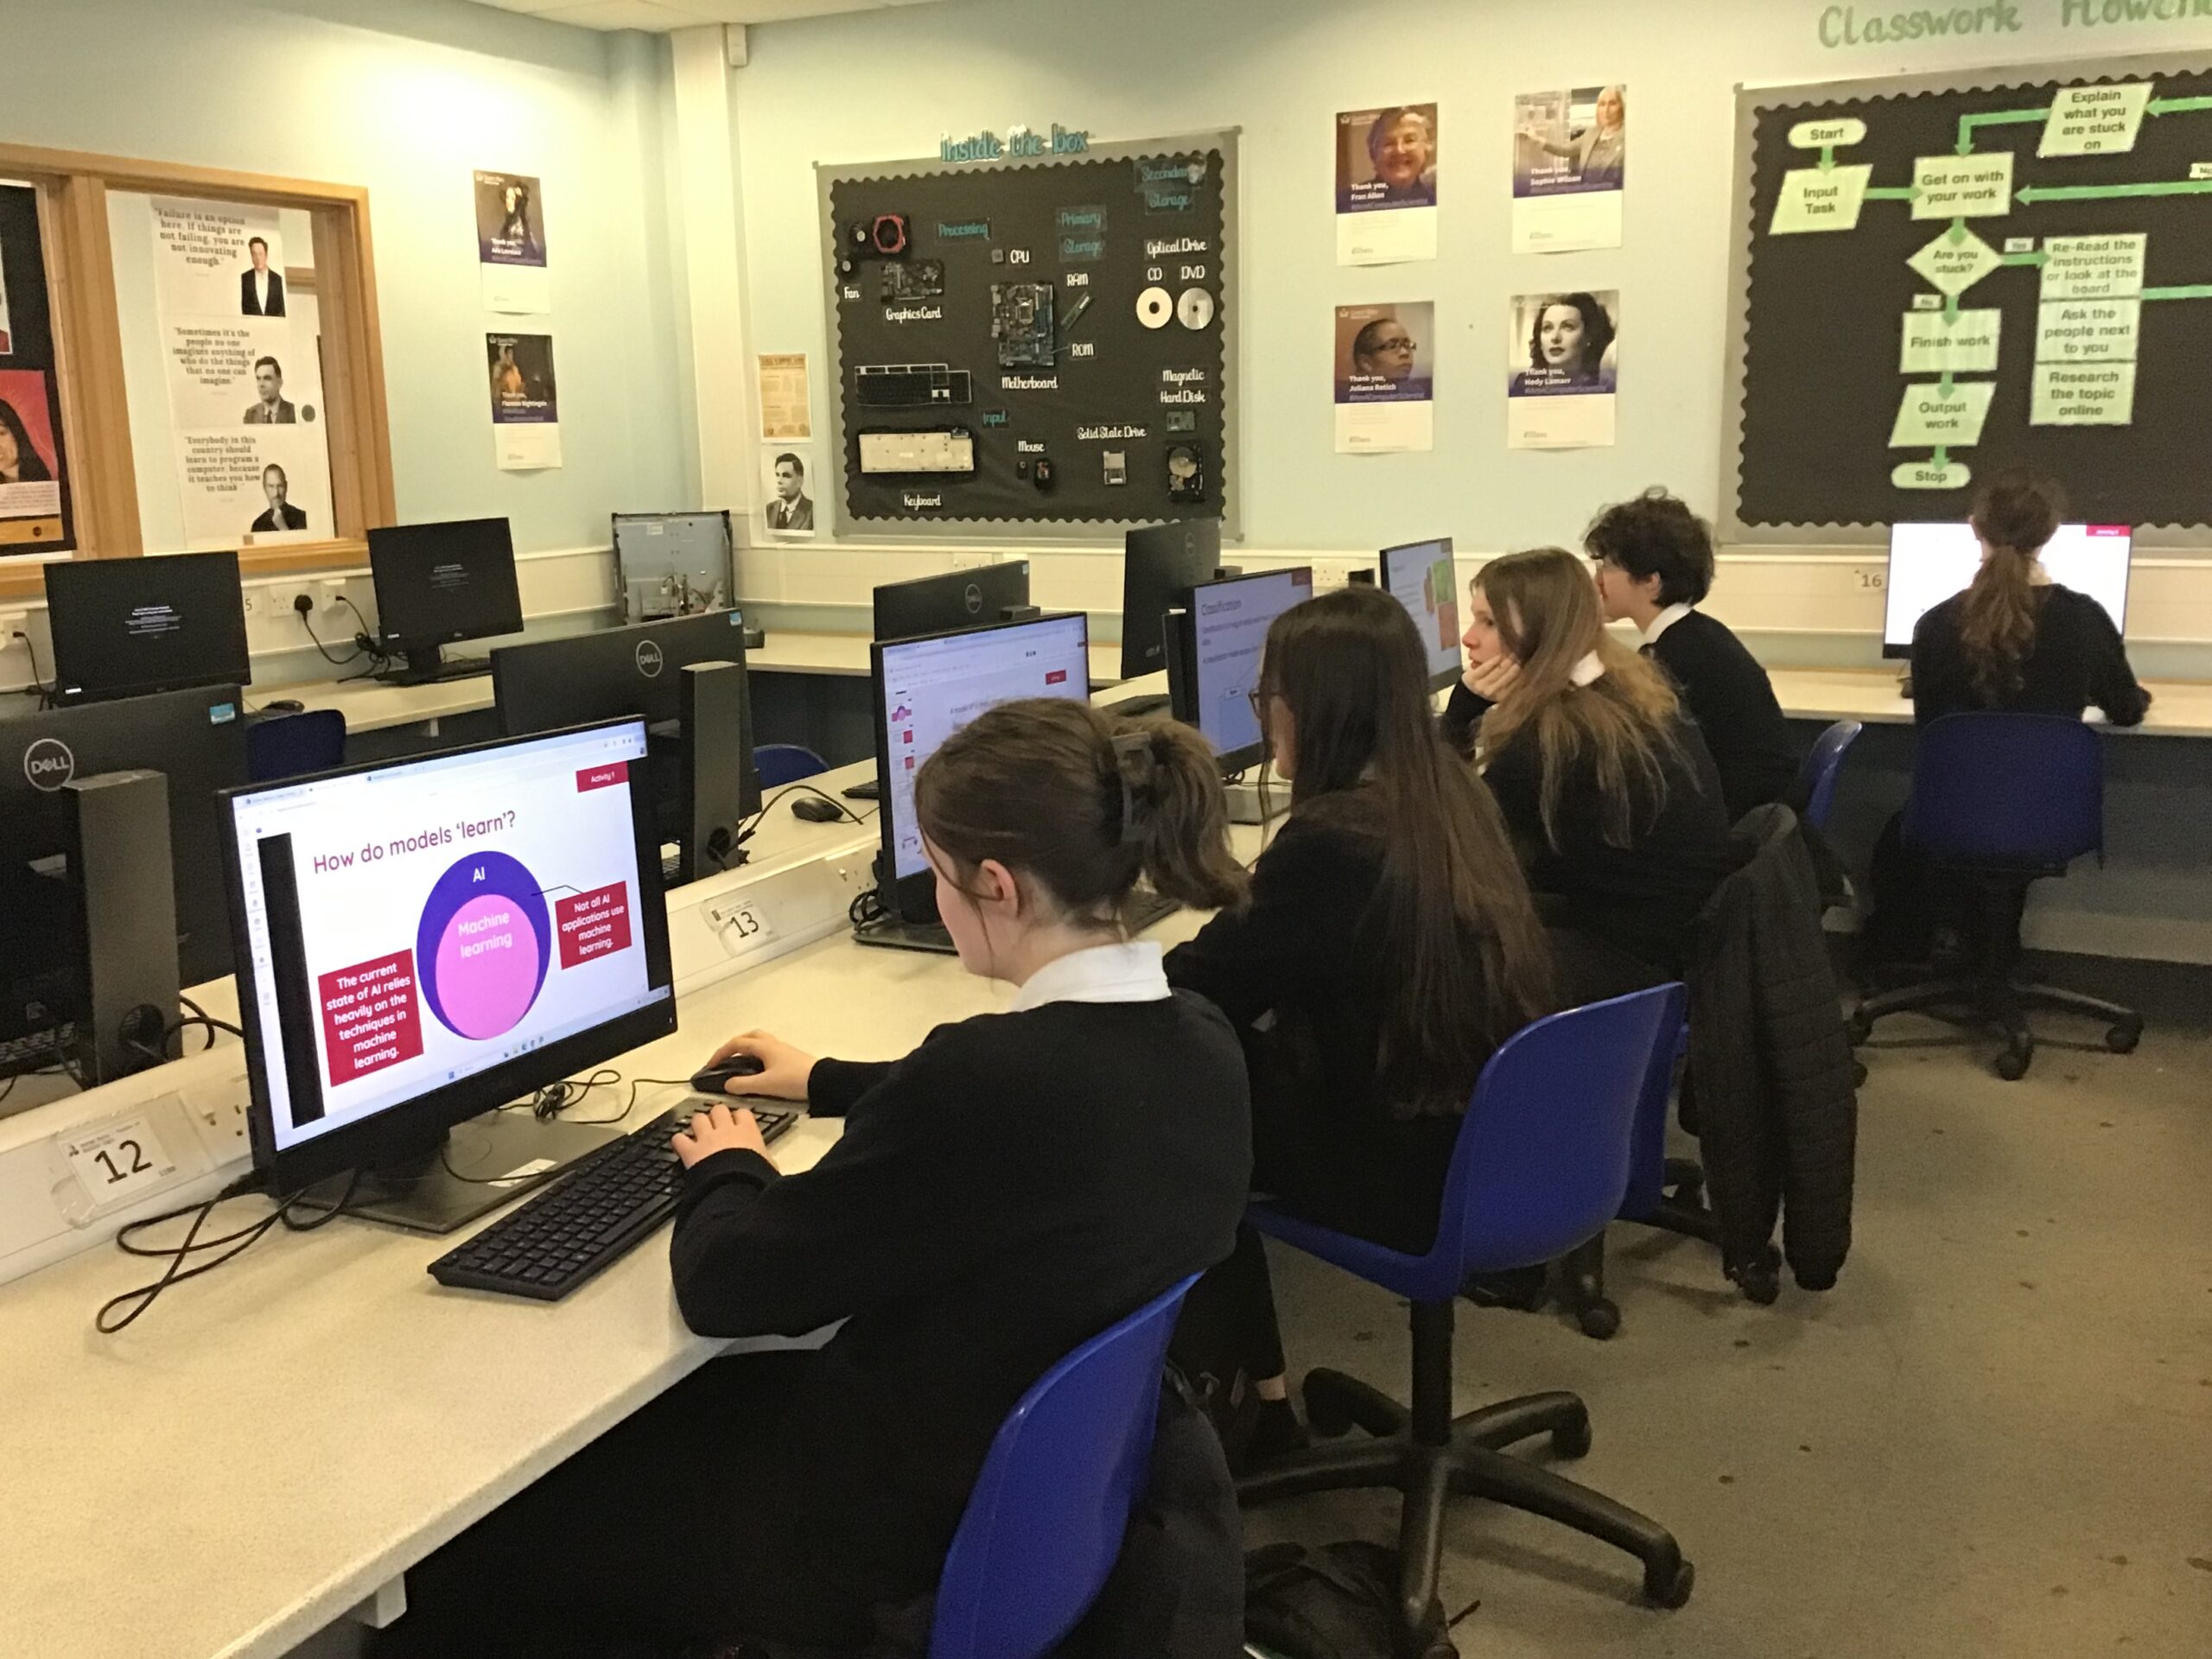
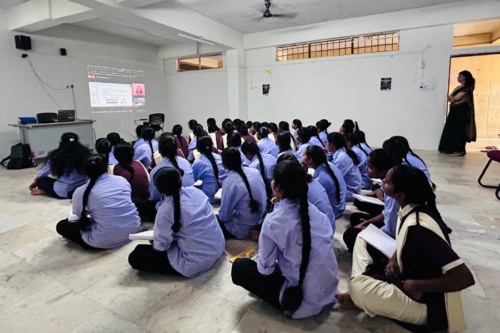
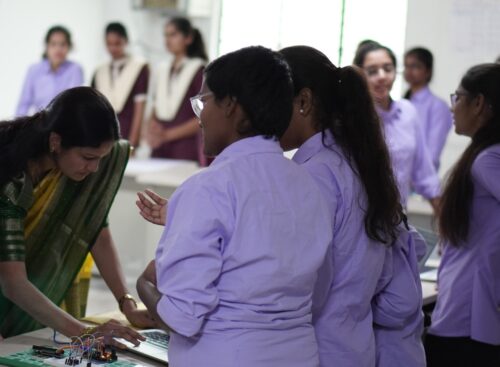
    Experience AI is a free educational programme that offers cutting-edge resources on artificial intelligence and machine learning for teachers, and their students aged 11 to 14. Developed in collaboration with the Raspberry Pi Foundation and Google DeepMind, the programme provides everything that teachers need to confidently deliver engaging lessons that will teach, inspire, and engage young people about AI and the role that it could play in their lives. The current curriculum offering includes a ‘Foundations of AI’ 6-lesson unit, 2 standalone lessons (‘AI and ecosystems’ and ‘Large language models’), and the 3 newly released AI safety resources. 

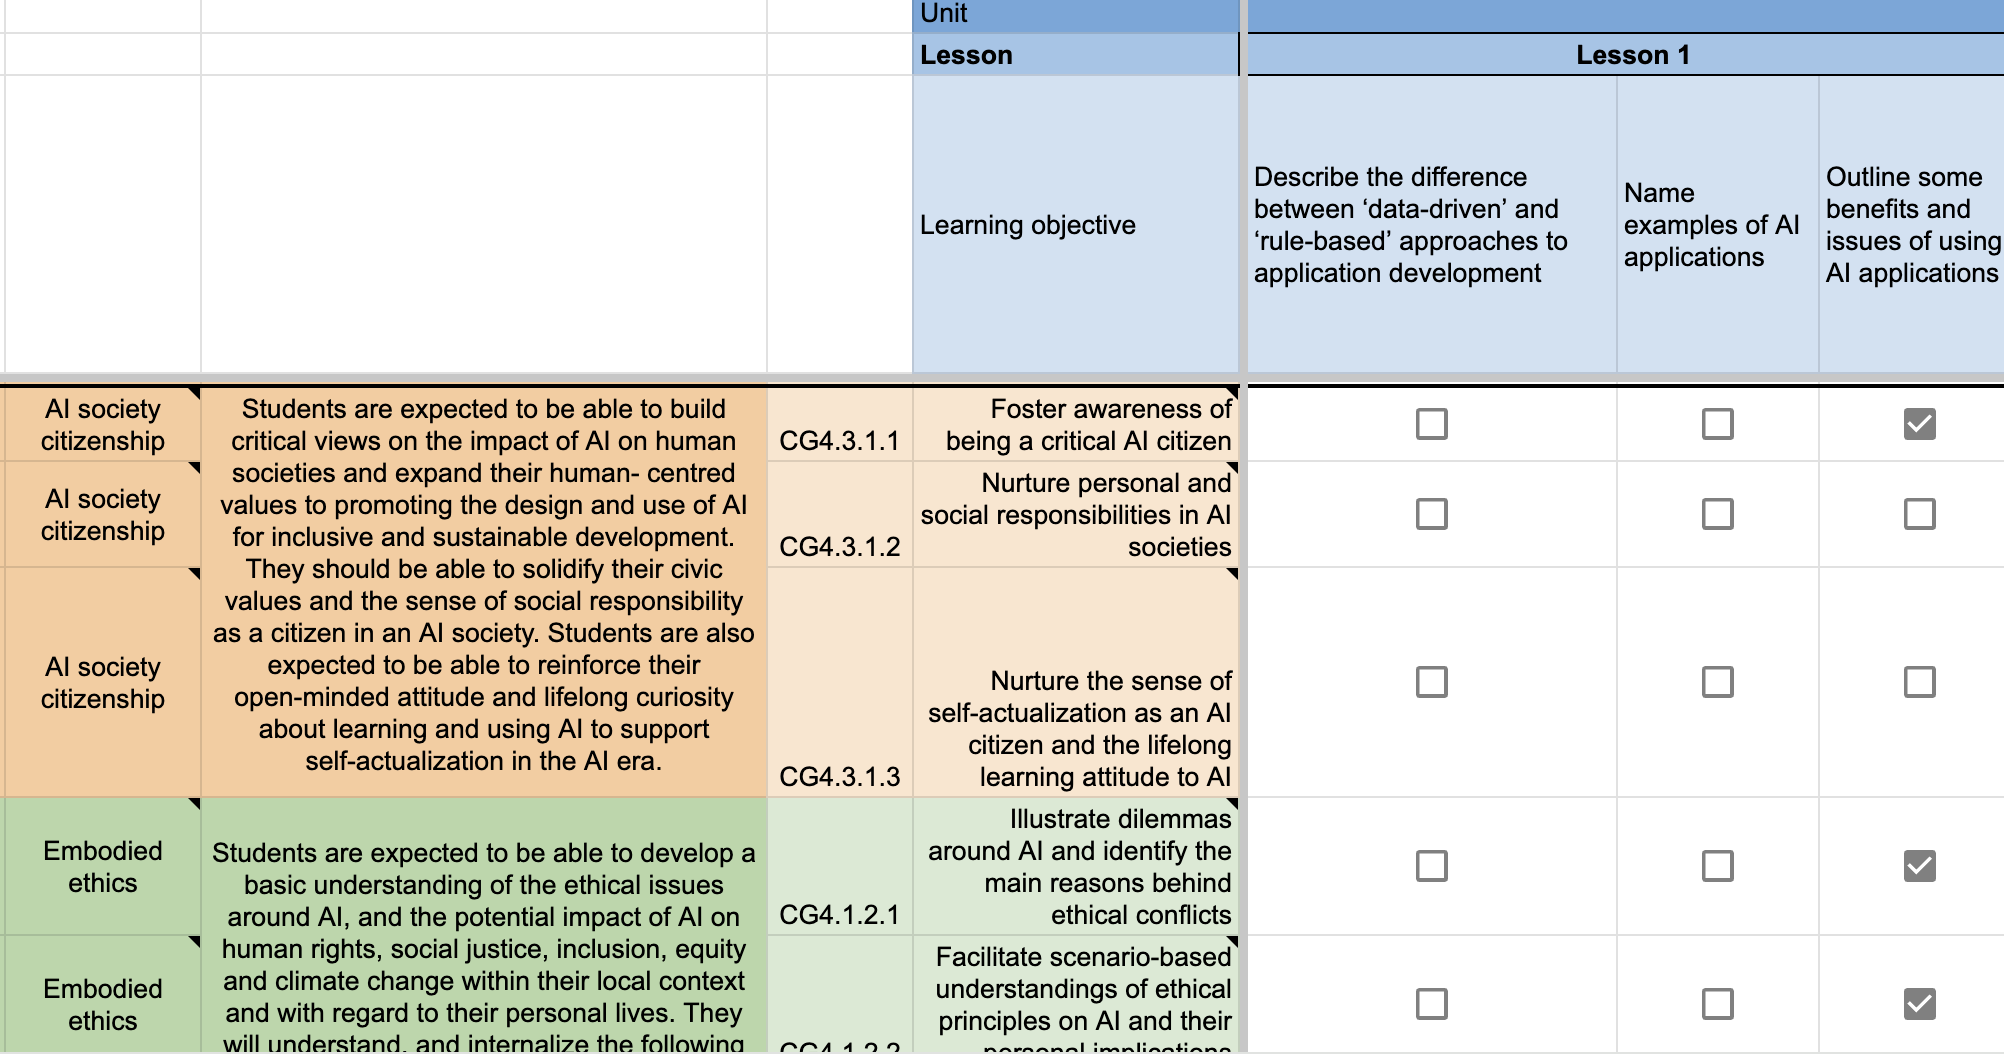
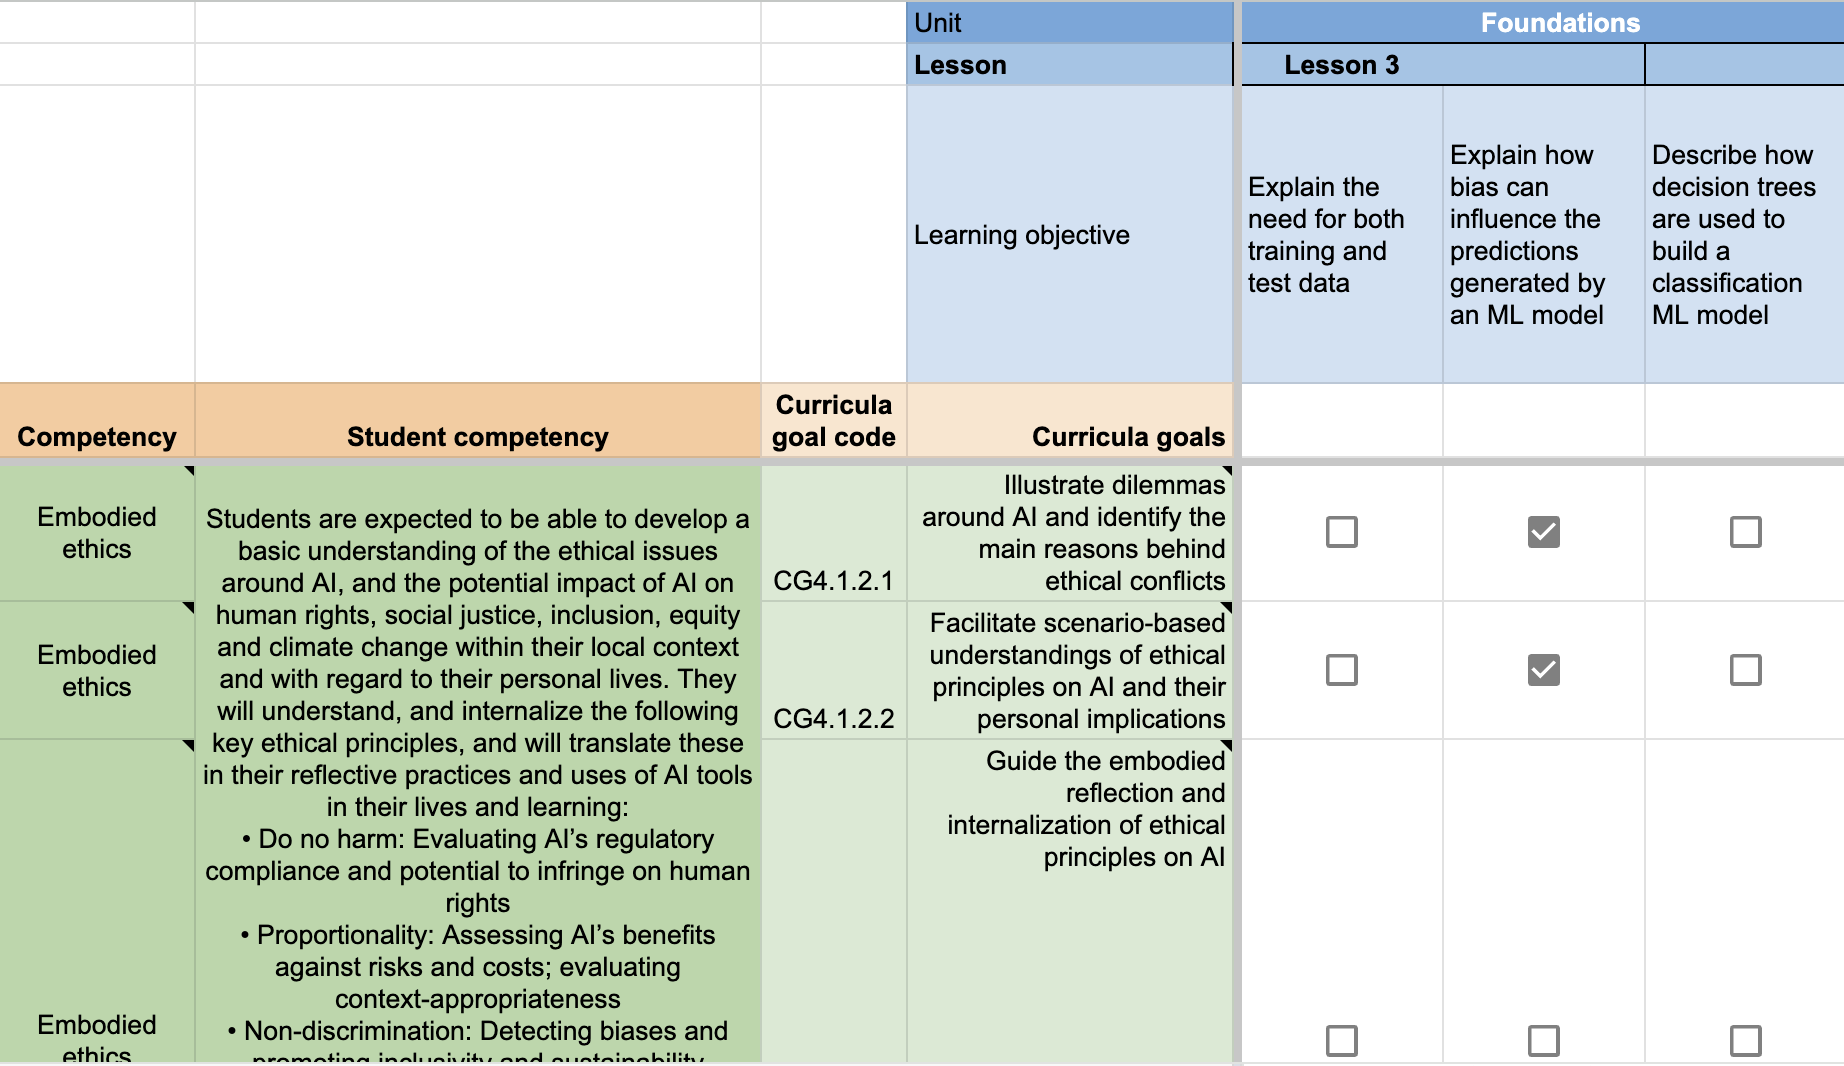
    Working through each lesson objective in the Experience AI offering, we compared them with each curricular goal to see where they overlapped. We have made this mapping publicly available so that you can see this for yourself: Experience AI – UNESCO AI Competency framework students – learning objective mapping (rpf.io/unesco-mapping)

    The first thing we discovered was that the mapping of the objectives did not have a 1:1 basis. For example, when we looked at a learning objective, we often felt that it covered more than one curricular goal from the framework. That’s not to say that the learning objective fully met each curricular goal, rather that it covers elements of the goal and in turn the student competency. 

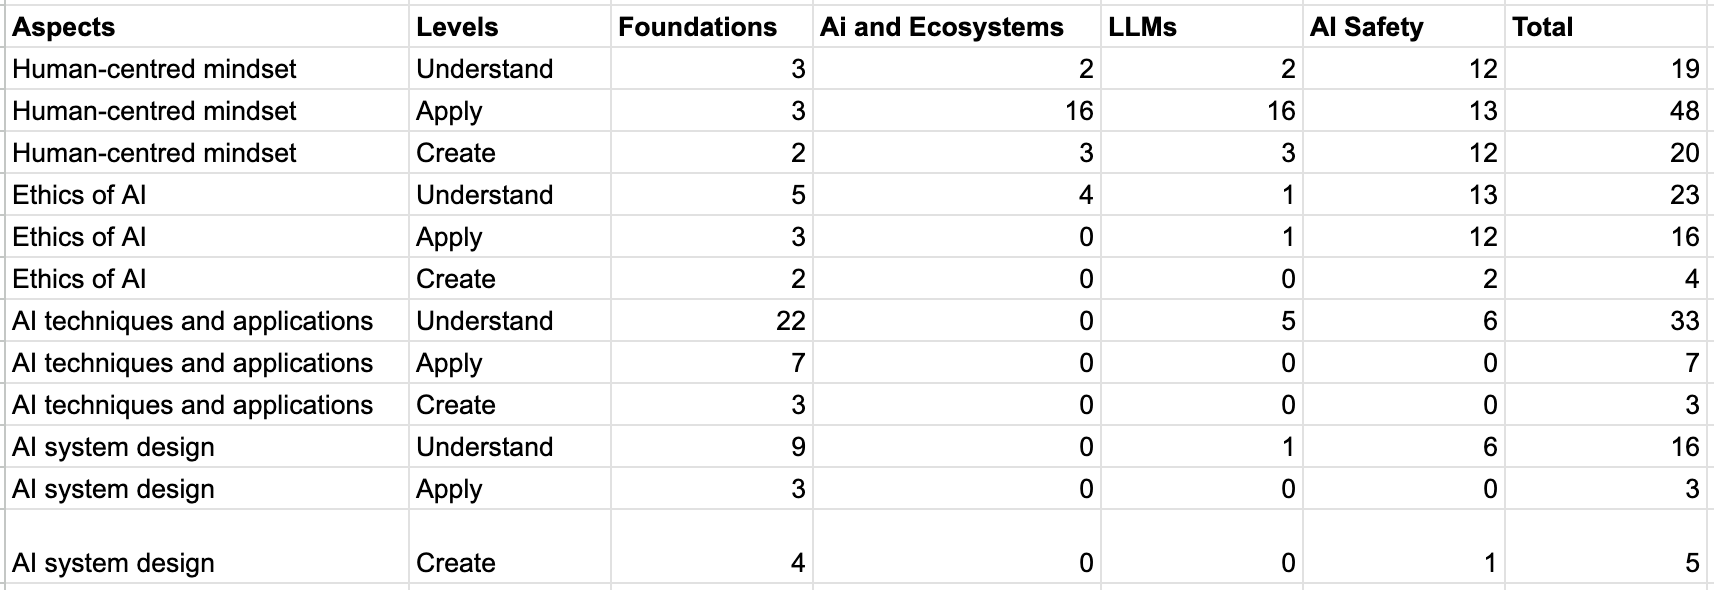
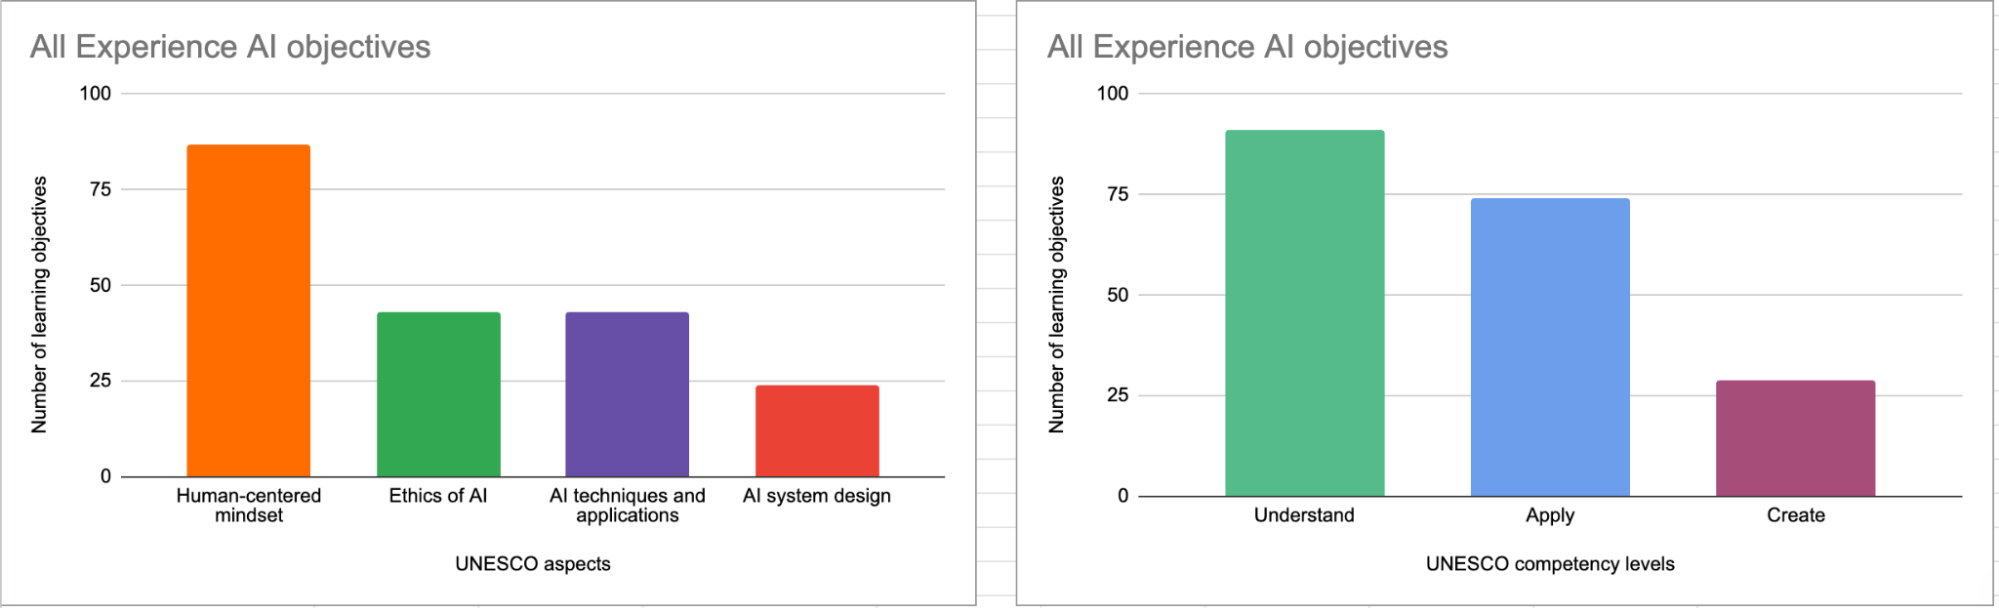
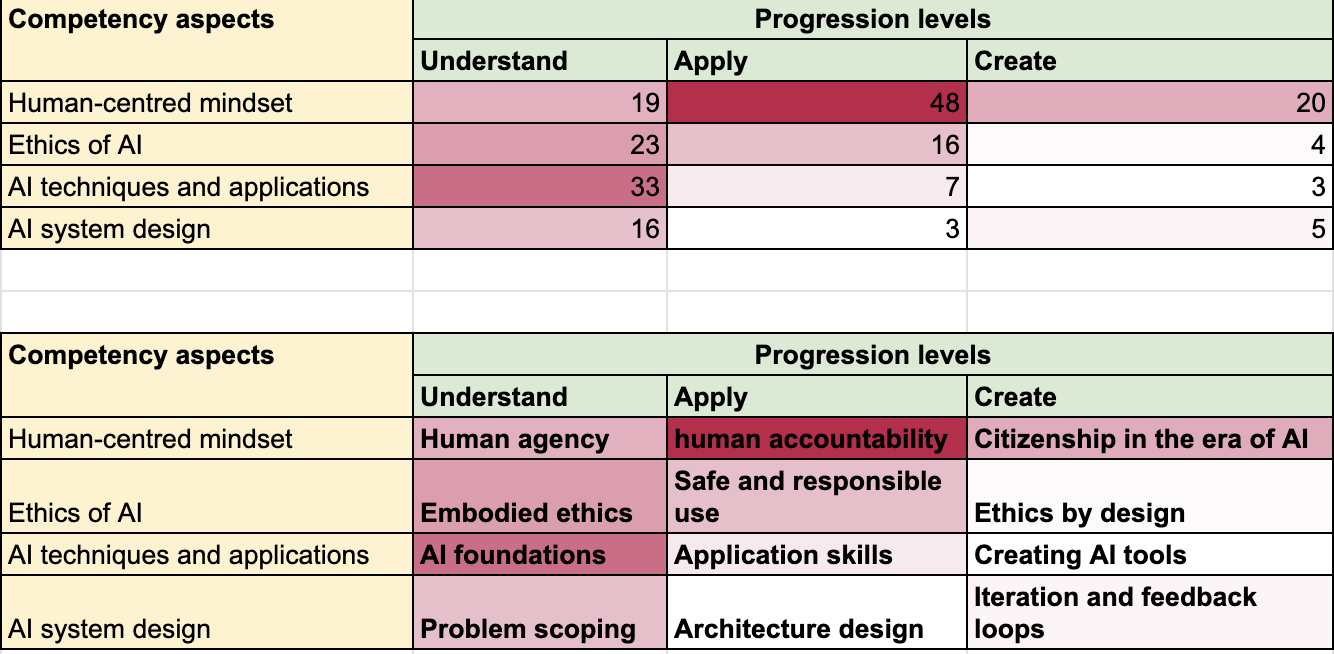
    Once we had completed the mapping process, we analysed the results by totalling the number of objectives that had been mapped against each competency aspect and level within the framework.

    This provided us with an overall picture of where our resources are positioned against the framework. Whilst the majority of the objectives for all of the resources are in the ‘Human-centred mindset’ category, the analysis showed that there is still a relatively even spread of objectives in the other three categories (Ethics of AI, ML techniques and applications, and AI system design). 

    As the current resource offering is targeted at the entry level to AI literacy, it is unsurprising to see that the majority of the objectives were at the level of ‘Understand’. It was, however, interesting to see how many objectives were also at the ‘Apply’ level. 

    It is encouraging to see that the different resources from Experience AI map to different competencies in the framework. For example, the 6-lesson foundations unit aims to give students a basic understanding of how AI systems work and the data-driven approach to problem solving. In contrast, the AI safety resources focus more on the principles of Fairness, Accountability, Transparency, Privacy, and Security (FATPS), most of which fall more heavily under the ethics of AI and human-centred mindset categories of the competency framework. 

    What did we learn from the process? 

    Our principles align 

    We built the Experience AI resources on design principles based on the knowledge curated by Jane Waite and the Foundation’s researchers. One of our aims of the mapping process was to see if the principles that underpin the UNESCO competency framework align with our own.

    Avoiding anthropomorphism 

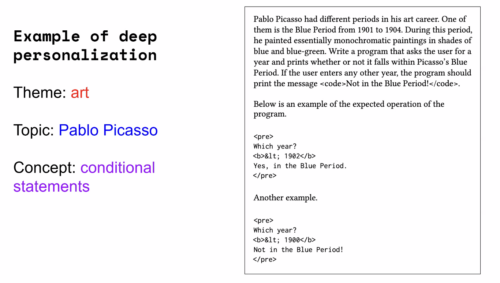
    Anthropomorphism refers to the concept of attributing human characteristics to objects or living beings that aren’t human. For reasons outlined in the blog I previously wrote on the issue, a key design principle for Experience AI is to avoid anthropomorphism at all costs. In our resources, we are particularly careful with the language and images that we use. Putting the human in the process is a key way in which we can remind students that it is humans who design and are responsible for AI systems. 

    Young people use computers in a classroom.

    It was reassuring to see that the UNESCO framework has many curricular goals that align closely to this, for example:

    • Foster an understanding that AI is human-led
    • Facilitate an understanding on the necessity of exercising sufficient human control over AI
    • Nurture critical thinking on the dynamic relationship between human agency and machine agency
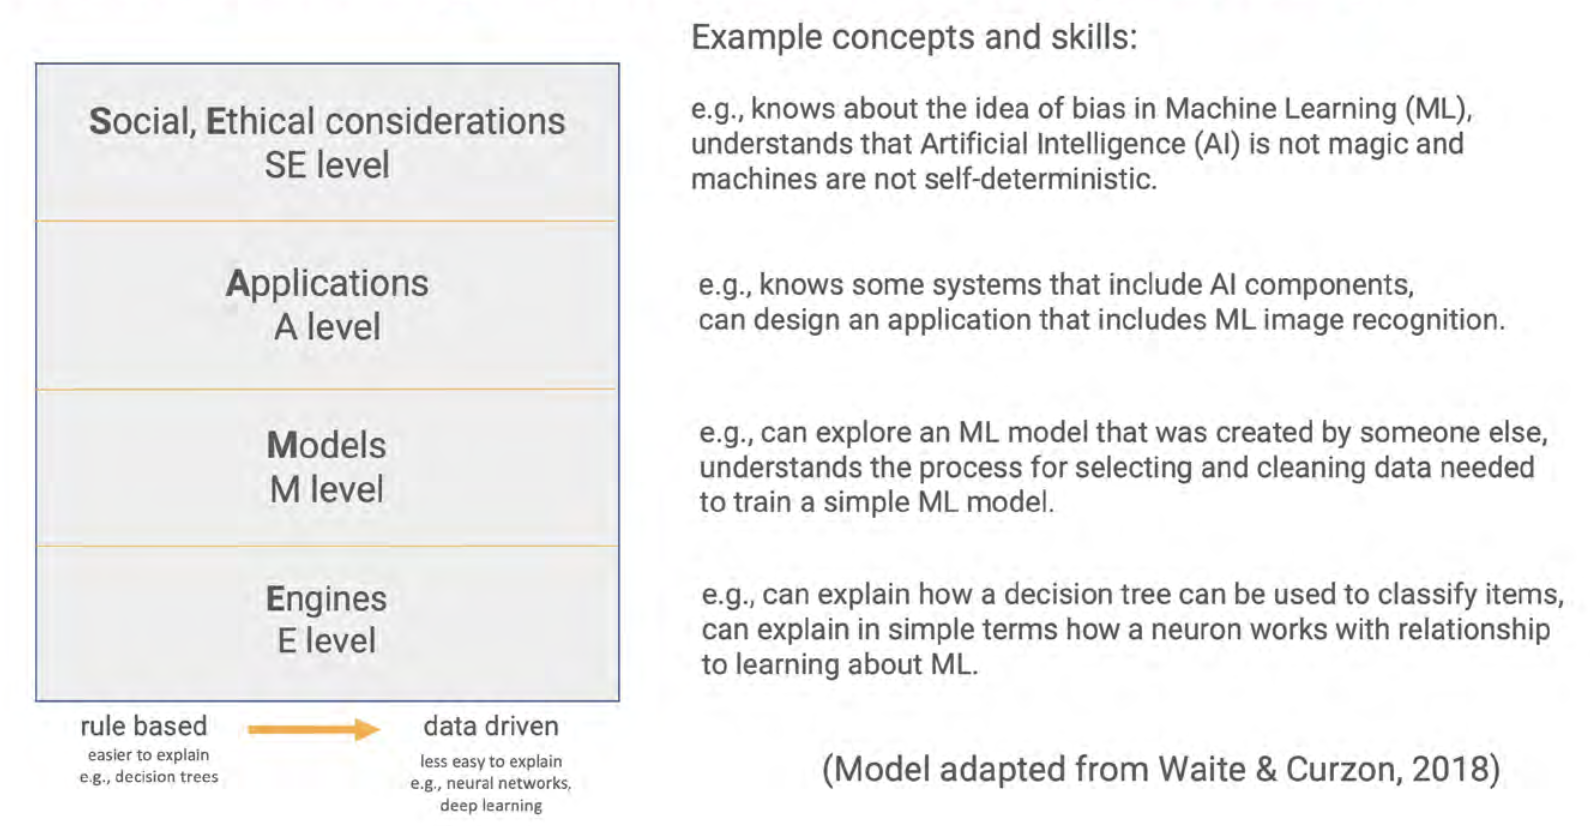
    SEAME

    The SEAME framework created by Paul Curzon and Jane Waite offers a way for teachers, resource developers, and researchers to talk about the focus of AI learning activities by separating them into four layers: Social and Ethical (SE), Application (A), Models (M), and Engines (E). 

    The SEAME model and the UNESCO AI competency framework take two different approaches to categorising AI education — SEAME describes levels of abstraction for conceptual learning about AI systems, whereas the competency framework separates concepts into strands with progression. We found that although the alignment between the frameworks is not direct, the same core AI and machine learning concepts are broadly covered across both. 

    Computational thinking 2.0 (CT2.0)

    The concept of computational thinking 2.0 (a data-driven approach) stems from research by Professor Matti Tedre and Dr Henriikka Vartiainen from the University of Eastern Finland. The essence of this approach establishes AI as a different way to solve problems using computers compared to a more traditional computational thinking approach (a rule-based approach). This does not replace the traditional computational approach, but instead requires students to approach the problem differently when using AI as a tool. 

    An educator points to an image on a student's computer screen.

    The UNESCO framework includes many references within their curricular goals that places the data-driven approach at the forefront of problem solving using AI, including:

    • Develop conceptual knowledge on how AI is trained based on data 
    • Develop skills on assessing AI systems’ need for data, algorithms, and computing resources

    Where we slightly differ in our approach is the regular use of the term ‘algorithm’, particularly in the Understand and Apply levels of the framework. We have chosen to differentiate AI systems from traditional computational thinking approaches by avoiding the term ‘algorithm’ at the foundational stage of AI education. We believe the learners need a firm mental model of data-driven systems before students can understand that the Model and Engines of the SEAME model refer to algorithms (which would possibly correspond to the Create stage of the UNESCO framework). 

    We can identify areas for exploration

    As part of the international expansion of Experience AI, we have been working with partners from across the globe to bring AI literacy education to students in their settings. Part of this process has involved working with our partners to localise the resources, but also to provide training on the concepts covered in Experience AI. During localisation and training, our partners often have lots of queries about the lesson on bias. 

    As a result, we decided to see if mapping taught us anything about this lesson in particular, and if there was any learning we could take from it. At close inspection, we found that the lesson covers two out of the three curricular goals for the Understand element of the ‘Ethics of AI’ category (Embodied ethics). 

    Specifically, we felt the lesson:

    • Illustrates dilemmas around AI and identifies the main reasons behind ethical conflicts
    • Facilitates scenario-based understandings of ethical principles on AI and their personal implications

    What we felt isn’t covered in the lesson is:

    • Guide the embodied reflection and internalisation of ethical principles on AI

    Exploring this further, the framework describes this curricular goal as:

    Guide students to understand the implications of ethical principles on AI for their human rights, data privacy, safety, human agency, as well as for equity, inclusion, social justice and environmental sustainability. Guide students to develop embodied comprehension of ethical principles; and offer opportunities to reflect on personal attitudes that can help address ethical challenges (e.g. advocating for inclusive interfaces for AI tools, promoting inclusion in AI and reporting discriminatory biases found in AI tools).

    We realised that this doesn’t mean that the lesson on bias is ineffective or incomplete, but it does help us to think more deeply about the learning objective for the lesson. This may be something we will look to address in future iterations of the foundations unit or even in the development of new resources. What we have identified is a process that we can follow, which will help us with our decision making in the next phases of resource development. 

    How does this inform our next steps?

    As part of the analysis of the resources, we created a simple heatmap of how the Experience AI objectives relate to the UNESCO progression levels. As with the barcharts, the heatmap indicated that the majority of the objectives sit within the Understand level of progression, with fewer in Apply, and fewest in Create. As previously mentioned, this is to be expected with the resources being “foundational”. 

    The heatmap has, however, helped us to identify some interesting points about our resources that warrant further thought. For example, under the ‘Human-centred mindset’ competency aspect, there are more objectives under Apply than there are Understand. For ‘AI system design’, architecture design is the least covered aspect of Apply. 

    By identifying these areas for investigation, again it shows that we’re able to add the learnings from the UNESCO framework to help us make decisions.

    What next? 

    This mapping process has been a very useful exercise in many ways for those of us working on AI literacy at the Raspberry Pi Foundation. The process of mapping the resources gave us an opportunity to have deep conversations about the learning objectives and question our own understanding of our resources. It was also very satisfying to see that the framework aligns well with our own researched-informed design principles, such as the SEAME model and avoiding anthropomorphisation. 

    The mapping process has been a good starting point for us to understand UNESCO’s framework and we’re sure that it will act as a useful tool to help us make decisions around future enhancements to our foundational units and new free educational materials. We’re looking forward to applying what we’ve learnt to our future work! 

    Website: LINK

  • Using generative AI to teach computing: Insights from research

    Using generative AI to teach computing: Insights from research

    Reading Time: 7 minutes

    As computing technologies continue to rapidly evolve in today’s digital world, computing education is becoming increasingly essential. Arto Hellas and Juho Leinonen, researchers at Aalto University in Finland, are exploring how innovative teaching methods can equip students with the computing skills they need to stay ahead. In particular, they are looking at how generative AI tools can enhance university-level computing education. 

    In our monthly seminar in September, Arto and Juho presented their research on using AI tools to provide personalised learning experiences and automated feedback to help requests, as well as their findings on teaching students how to write effective prompts for generative AI systems. While their research focuses primarily on undergraduate students — given that they teach such students — many of their findings have potential relevance for primary and secondary (K-12) computing education. 

    Students attend a lecture at a university.

    Generative AI consists of algorithms that can generate new content, such as text, code, and images, based on the input received. Ever since large language models (LLMs) such as ChatGPT and Copilot became widely available, there has been a great deal of attention on how to use this technology in computing education. 

    Arto and Juho described generative AI as one of the fastest-moving topics they had ever worked on, and explained that they were trying to see past the hype and find meaningful uses of LLMs in their computing courses. They presented three studies in which they used generative AI tools with students in ways that aimed to improve the learning experience. 

    Using generative AI tools to create personalised programming exercises

    An important strand of computing education research investigates how to engage students by personalising programming problems based on their interests. The first study in Arto and Juho’s research  took place within an online programming course for adult students. It involved developing a tool that used GPT-4 (the latest version of ChatGPT available at that time) to generate exercises with personalised aspects. Students could select a theme (e.g. sports, music, video games), a topic (e.g. a specific word or name), and a difficulty level for each exercise.

    A student in a computing classroom.

    Arto, Juho, and their students evaluated the personalised exercises that were generated. Arto and Juho used a rubric to evaluate the quality of the exercises and found that they were clear and had the themes and topics that had been requested. Students’ feedback indicated that they found the personalised exercises engaging and useful, and preferred these over randomly generated exercises. 

    Arto and Juho also evaluated the personalisation and found that exercises were often only shallowly personalised, however. In shallow personalisations, the personalised content was added in only one sentence, whereas in deep personalisations, the personalised content was present throughout the whole problem statement. It should be noted that in the examples taken from the seminar below, the terms ‘shallow’ and ‘deep’ were not being used to make a judgement on the worthiness of the topic itself, but were rather describing whether the personalisation was somewhat tokenistic or more meaningful within the exercise. 

    In these examples from the study, the shallow personalisation contains only one sentence to contextualise the problem, while in the deep example the whole problem statement is personalised. 

    The findings suggest that this personalised approach may be particularly effective on large university courses, where instructors might struggle to give one-on-one attention to every student. The findings further suggest that generative AI tools can be used to personalise educational content and help ensure that students remain engaged. 

    How might all this translate to K-12 settings? Learners in primary and secondary schools often have a wide range of prior knowledge, lived experiences, and abilities. Personalised programming tasks could help diverse groups of learners engage with computing, and give educators a deeper understanding of the themes and topics that are interesting for learners. 

    Responding to help requests using large language models

    Another key aspect of Alto and Juho’s work is exploring how LLMs can be used to generate responses to students’ requests for help. They conducted a study using an online platform containing programming exercises for students. Every time a student struggled with a particular exercise, they could submit a help request, which went into a queue for a teacher to review, comment on, and return to the student. 

    The study aimed to investigate whether an LLM could effectively respond to these help requests and reduce the teachers’ workloads. An important principle was that the LLM should guide the student towards the correct answer rather than provide it. 

    The study used GPT-3.5, which was the newest version at the time. The results found that the LLM was able to analyse and detect logical and syntactical errors in code, but concerningly, the responses from the LLM also addressed some non-existent problems! This is an example of hallucination, where the LLM outputs something false that does not reflect the real data that was inputted into it. 

    An example of how an LLM was able to detect a logical error in code, but also hallucinated and provided an unhelpful, false response about a non-existent syntactical error. 

    The finding that LLMs often generated both helpful and unhelpful problem-solving strategies suggests that this is not a technology to rely on in the classroom just yet. Arto and Juho intend to track the effectiveness of LLMs as newer versions are released, and explained that GPT-4 seems to detect errors more accurately, but there is no systematic analysis of this yet. 

    In primary and secondary computing classes, young learners often face similar challenges to those encountered by university students — for example, the struggle to write error-free code and debug programs. LLMs seemingly have a lot of potential to support young learners in overcoming such challenges, while also being valuable educational tools for teachers without strong computing backgrounds. Instant feedback is critical for young learners who are still developing their computational thinking skills — LLMs can provide such feedback, and could be especially useful for teachers who may lack the resources to give individualised attention to every learner. Again though, further research into LLM-based feedback systems is needed before they can be implemented en-masse in classroom settings in the future. 

    Teaching students how to prompt large language models

    Finally, Arto and Juho presented a study where they introduced the idea of ‘Prompt Problems’: programming exercises where students learn how to write effective prompts for AI code generators using a tool called Promptly. In a Prompt Problem exercise, students are presented with a visual representation of a problem that illustrates how input values will be transformed to an output. Their task is to devise a prompt (input) that will guide an LLM to generate the code (output) required to solve the problem. Prompt-generated code is evaluated automatically by the Promptly tool, helping students to refine the prompt until it produces code that solves the problem.

    Feedback from students suggested that using Prompt Problems was a good way for them to gain experience of using new programming concepts and develop their computational thinking skills. However, students were frustrated that bugs in the code had to be fixed by amending the prompt — it was not possible to edit the code directly. 

    How these findings relate to K-12 computing education is still to be explored, but they indicate that Prompt Problems with text-based programming languages could be valuable exercises for older pupils with a solid grasp of foundational programming concepts. 

    Balancing the use of AI tools with fostering a sense of community

    At the end of the presentation, Arto and Juho summarised their work and hypothesised that as society develops more and more AI tools, computing classrooms may lose some of their community aspects. They posed a very important question for all attendees to consider: “How can we foster an active community of learners in the generative AI era?” 

    In our breakout groups and the subsequent whole-group discussion, we began to think about the role of community. Some points raised highlighted the importance of working together to accurately identify and define problems, and sharing ideas about which prompts would work best to accurately solve the problems. 

    As AI technology continues to evolve, its role in education will likely expand. There was general agreement in the question and answer session that keeping a sense of community at the heart of computing classrooms will be important. 

    Arto and Juho asked seminar attendees to think about encouraging a sense of community. 

    Further resources

    The Raspberry Pi Computing Education Research Centre and Faculty of Education at the University of Cambridge have recently published a teacher guide on the use of generative AI tools in education. The guide provides practical guidance for educators who are considering using generative AI tools in their teaching. 

    Join our next seminar

    In our current seminar series, we are exploring how to teach programming with and without AI technology. Join us at our next seminar on Tuesday, 12 November at 17:00–18:30 GMT to hear Nicholas Gardella (University of Virginia) discuss the effects of using tools like GitHub Copilot on the motivation, workload, emotion, and self-efficacy of novice programmers. To sign up and take part in the seminar, click the button below — we’ll then send you information about joining. We hope to see you there.

    The schedule of our upcoming seminars is online. You can catch up on past seminars on our previous seminars and recordings page.

    Website: LINK

  • Teaching about AI in schools: Take part in our Research and Educator Community Symposium

    Teaching about AI in schools: Take part in our Research and Educator Community Symposium

    Reading Time: 4 minutes

    Worldwide, the use of generative AI systems and related technologies is transforming our lives. From marketing and social media to education and industry, these technologies are being used everywhere, even if it isn’t obvious. Yet, despite the growing availability and use of generative AI tools, governments are still working out how and when to regulate such technologies to ensure they don’t cause unforeseen negative consequences.

    How, then, do we equip our young people to deal with the opportunities and challenges that they are faced with from generative AI applications and associated systems? Teaching them about AI technologies seems an important first step. But what should we teach, when, and how?

    A teacher aids children in the classroom

    Researching AI curriculum design

    The researchers at the Raspberry Pi Foundation have been looking at research that will help inform curriculum design and resource development to teach about AI in school. As part of this work, a number of research themes have been established, which we would like to explore with educators at a face-to-face symposium. 

    These research themes include the SEAME model, a simple way to analyse learning experiences about AI technology, as well as anthropomorphisation and how this might influence the formation of mental models about AI products. These research themes have become the cornerstone of the Experience AI resources we’ve co-developed with Google DeepMind. We will be using these materials to exemplify how the research themes can be used in practice as we review the recently published UNESCO AI competencies.

    A group of educators at a workshop.

    Most importantly, we will also review how we can help teachers and learners move from a rule-based view of problem solving to a data-driven view, from computational thinking 1.0 to computational thinking 2.0.

    A call for teacher input on the AI curriculum

    Over ten years ago, teachers in England experienced a large-scale change in what they needed to teach in computing lessons when programming was more formally added to the curriculum. As we enter a similar period of change — this time to introduce teaching about AI technologies — we want to hear from teachers as we collectively start to rethink our subject and curricula. 

    We think it is imperative that educators’ voices are heard as we reimagine computer science and add data-driven technologies into an already densely packed learning context. 

    Educators at a workshop.

    Join our Research and Educator Community Symposium

    On Saturday, 1 February 2025, we are running a Research and Educator Community Symposium in collaboration with the Raspberry Pi Computing Education Research Centre

    In this symposium, we will bring together UK educators and researchers to review research themes, competency frameworks, and early international AI curricula and to reflect on how to advance approaches to teaching about AI. This will be a practical day of collaboration to produce suggested key concepts and pedagogical approaches and highlight research needs. 

    Educators and researchers at an event.

    This symposium focuses on teaching about AI technologies, so we will not be looking at which AI tools might be used in general teaching and learning or how they may change teacher productivity. 

    It is vitally important for young people to learn how to use AI technologies in their daily lives so they can become discerning consumers of AI applications. But how should we teach them? Please help us start to consider the best approach by signing up for our Research and Educator Community Symposium by 9 December 2024.

    Information at a glance

    When:  Saturday, 1 February 2025 (10am to 5pm) 

    Where: Raspberry Pi Foundation Offices, Cambridge

    Who: If you have started teaching about AI, are creating related resources, are providing professional development about AI technologies, or if you are planning to do so, please apply to attend our symposium. Travel funding is available for teachers in England.

    Please note we expect to be oversubscribed, so book early and tell us about why you are interested in taking part. We will notify all applicants of the outcome of their application by 11 December.

    Website: LINK

  • Introducing new artificial intelligence and machine learning projects for Code Clubs

    Introducing new artificial intelligence and machine learning projects for Code Clubs

    Reading Time: 4 minutes

    We’re pleased to share a new collection of Code Club projects designed to introduce creators to the fascinating world of artificial intelligence (AI) and machine learning (ML). These projects bring the latest technology to your Code Club in fun and inspiring ways, making AI and ML engaging and accessible for young people. We’d like to thank Amazon Future Engineer for supporting the development of this collection.

    A man on a blue background, with question marks over his head, surrounded by various objects and animals, such as apples, planets, mice, a dinosaur and a shark.

    The value of learning about AI and ML

    By engaging with AI and ML at a young age, creators gain a clearer understanding of the capabilities and limitations of these technologies, helping them to challenge misconceptions. This early exposure also builds foundational skills that are increasingly important in various fields, preparing creators for future educational and career opportunities. Additionally, as AI and ML become more integrated into educational standards, having a strong base in these concepts will make it easier for creators to grasp more advanced topics later on.

    What’s included in this collection

    We’re excited to offer a range of AI and ML projects that feature both video tutorials and step-by-step written guides. The video tutorials are designed to guide creators through each activity at their own pace and are captioned to improve accessibility. The step-by-step written guides support creators who prefer learning through reading. 

    The projects are crafted to be flexible and engaging. The main part of each project can be completed in just a few minutes, leaving lots of time for customisation and exploration. This setup allows for short, enjoyable sessions that can easily be incorporated into Code Club activities.

    The collection is organised into two distinct paths, each offering a unique approach to learning about AI and ML:

    Machine learning with Scratch introduces foundational concepts of ML through creative and interactive projects. Creators will train models to recognise patterns and make predictions, and explore how these models can be improved with additional data.

    The AI Toolkit introduces various AI applications and technologies through hands-on projects using different platforms and tools. Creators will work with voice recognition, facial recognition, and other AI technologies, gaining a broad understanding of how AI can be applied in different contexts.

    Inclusivity is a key aspect of this collection. The projects cater to various skill levels and are offered alongside an unplugged activity, ensuring that everyone can participate, regardless of available resources. Creators will also have the opportunity to stretch themselves — they can explore advanced technologies like Adobe Firefly and practical tools for managing Ollama and Stable Diffusion models on Raspberry Pi computers.

    Project examples

    A piece of cheese is displayed on a screen. There are multiple mice around the screen.

    One of the highlights of our new collection is Chomp the cheese, which uses Scratch Lab’s experimental face recognition technology to create a game students can play with their mouth! This project offers a playful introduction to facial recognition while keeping the experience interactive and fun. 

    A big orange fish on a dark blue background, with green leaves surrounding the fish.

    Fish food uses Machine Learning for Kids, with creators training a model to control a fish using voice commands.

    An illustration of a pink brain is displayed on a screen. There are two hands next to the screen playing the 'Rock paper scissors' game.

    In Teach a machine, creators train a computer to recognise different objects such as fingers or food items. This project introduces classification in a straightforward way using the Teachable Machine platform, making the concept easy to grasp. 

    Two men on a blue background, surrounded by question marks, a big green apple and a red tomato.

    Apple vs tomato also uses Teachable Machine, but this time creators are challenged to train a model to differentiate between apples and tomatoes. Initially, the model exhibits bias due to limited data, prompting discussions on the importance of data diversity and ethical AI practices. 

    Three people on a light blue background, surrounded by music notes and a microbit.

    Dance detector allows creators to use accelerometer data from a micro:bit to train a model to recognise dance moves like Floss or Disco. This project combines physical computing with AI, helping creators explore movement recognition technology they may have experienced in familiar contexts such as video games. 

    A green dinosaur in a forest is being observed by a person hiding in the bush holding the binoculars.

    Dinosaur decision tree is an unplugged activity where creators use a paper-based branching chart to classify different types of dinosaurs. This hands-on project introduces the concept of decision-making structures, where each branch of the chart represents a choice or question leading to a different outcome. By constructing their own decision tree, creators gain a tactile understanding of how these models are used in ML to analyse data and make predictions. 

    These AI projects are designed to support young people to get hands-on with AI technologies in Code Clubs and other non-formal learning environments. Creators can also enter one of their projects into Coolest Projects by taking a short video showing their project and any code used to make it. Their creation will then be showcased in the online gallery for people all over the world to see.

    Website: LINK

  • AI special edition in The MagPi 147

    AI special edition in The MagPi 147

    Reading Time: 2 minutes

    Discover the best AI projects for Raspberry Pi

    AI Projects

    Discover a range of practical AI Projects that put Raspberry Pi’s AI smarts to good use. We’ve got people detectors, ANPR trackers, pose detectors, text generators, music generators, and an intelligent pill dispenser.

    Handheld gaming with Raspberry Pi

    Handheld gaming

    Retro gaming on the move can be fun and
    creative. PJ Evans grabs some spare batteries and builds a handheld gaming console.

    DIY CNC Lathe and custom G-codes

    DIY CNC Lathe

    Being able to write G-codes enables all kind of custom machines. In this tutorial Jo Hinchcliffe looks at a simple small CNC lathe conversion.

    Buttons and fastenings in The MagPi 147

    Buttons and fastenings

    Where would we be without buttons and fasteners. Nicola King takes a deep dive into the types of fastenings that you can use in your crafting projects.

    DEC Flip-Chip tester

    DEC Flip-Chip tester

    Rebuilding an old PDP-9 computer with a Raspberry Pi-based device that tests hundreds of components.

    How to build a Nixie-style clock with Raspberry Pi and LEDs

    Pixie clock

    This project recreates an old Nixie tube clock, only using ultra-modern (and vastly safer) LED lights.

    You’ll find all this and much more in the latest edition of The MagPi magazine. Pick up your copy today from our store, or subscribe to get every issue delivered to your door.

  • Implementing a computing curriculum in Telangana

    Implementing a computing curriculum in Telangana

    Reading Time: 4 minutes

    Last year we launched a partnership with the Government of Telangana Social Welfare Residential Educational Institutions Society (TGSWREIS) in Telangana, India to develop and implement a computing curriculum at their Coding Academy School and Coding Academy College. Our impact team is conducting an evaluation. Read on to find out more about the partnership and what we’ve learned so far.

    Aim of the partnership 

    The aim of our partnership is to enable students in the school and undergraduate college to learn about coding and computing by providing the best possible curriculum, resources, and training for teachers. 

    Students sit in a classroom and watch the lecture slides.

    As both institutions are government institutions, education is provided for free, with approximately 800 high-performing students from disadvantaged backgrounds currently benefiting. The school is co-educational up to grade 10 and the college is for female undergraduate students only. 

    The partnership is strategically important for us at the Raspberry Pi Foundation because it helps us to test curriculum content in an Indian context, and specifically with learners from historically marginalised communities with limited resources.

    Adapting our curriculum content for use in Telangana

    Since our partnership began, we’ve developed curriculum content for students in grades 6–12 in the school, which is in line with India’s national education policy requiring coding to be introduced from grade 6. We’ve also developed curriculum content for the undergraduate students at the college. 

    Students and educators engage in digital making.

    In both cases, the content was developed based on an initial needs assessment — we used the assessment to adapt content from our previous work on The Computing Curriculum. Local examples were integrated to make the content relatable and culturally relevant for students in Telangana. Additionally, we tailored the content for different lesson durations and to allow a higher frequency of lessons. We captured impact and learning data through assessments, lesson observations, educator interviews, student surveys, and student focus groups.

    Curriculum well received by educators and students

    We have found that the partnership is succeeding in meeting many of its objectives. The curriculum resources have received lots of positive feedback from students, educators, and observers.

    Students and educators engage in digital making.

    In our recent survey, 96% of school students and 85% of college students reported that they’ve learned new things in their computing classes. This was backed up by assessment marks, with students scoring an average of 70% in the school and 69% in the college for each assessment, compared to a pass mark of 40%. Students were also positive about their experiences of the computing and coding classes, and particularly enjoyed the practical components.

    “My favourite thing in this computing classes [sic] is doing practical projects. By doing [things] practically we learnt a lot.” – Third year undergraduate student, Coding Academy College

    “Since their last SA [summative assessment] exam, students have learnt spreadsheet [concepts] and have enjoyed applying them in activities. Their favourite part has been example codes, programming, and web-designing activities.” – Student focus group facilitator, grade 9 students, Coding Academy School

    However, we also found some variation in outcomes for different groups of students and identified some improvements that are needed to ensure the content is appropriate for all. For example, educators and students felt improvements were needed to the content for undergraduates specialising in data science — there was a wish for the content to be more challenging and to more effectively prepare students for the workplace. Some amendments have been made to this content and we will continue to keep this under review. 

    In addition, we faced some challenges with the equipment and infrastructure available. For example, there were instances of power cuts and unstable internet connections. These issues have been addressed as far as possible with Wi-Fi dongles and educators adapting their delivery to work with the equipment available.

    Our ambition for India

    Our team has already made some improvements to our curriculum content in preparation for the new academic year. We will also make further improvements based on the feedback received. 

    Students and educators engage in digital making.

    The long-term vision for our work in India is to enable any school in India to teach students about computing and creating with digital technologies. Over our five-year partnership, we plan to work with TGSWREIS to roll out a computing curriculum to other government schools within the state. 

    Through our work in Telangana and Odisha, we are learning about the unique challenges faced by government schools. We’re designing our curriculum to address these challenges and ensure that every student in India has the opportunity to thrive in the 21st century. If you would like to know more about our work and impact in India, please reach out to us at india@raspberrypi.org.

    We take the evaluation of our work seriously and are always looking to understand how we can improve and increase the impact we have on the lives of young people. To find out more about our approach to impact, you can read about our recently updated theory of change, which supports how we evaluate what we do.

    Website: LINK

  • Using Arduino UNO to sync a visual neuroscience lab

    Using Arduino UNO to sync a visual neuroscience lab

    Reading Time: 3 minutes

    Common research methods to study the visual system in the laboratory include recording and monitoring neural activity in the presence of sensory stimuli, to help scientists study how neurons encode and respond, for example, to specific visual inputs. 

    One of the biggest technical problems in the neural recording setups used in such experiments, is achieving precise synchronization of multiple devices communicating with each other, including microscopes and screens displaying the stimuli, to accurately map neural responses to the visual events.

    For example, in the Rompani Lab, a visual neuroscience laboratory at the European Molecular Biology Laboratory (EMBL) in Rome, the recording system (a two-photon microscope) needs to communicate with the visual stimulation system (composed of two screens) that are used to show visual stimuli while recording neural activity. To synchronize these systems efficiently, they turned to an Arduino UNO Rev3. “Its simplicity, reliability, and ease of integration made it an ideal tool for handling the timing and communication between different devices in the lab,” says Pietro Micheli, PhD student at EMBL Rome. 

    How the setups works

    The Arduino UNO Rev3 is used to signal to the microscope when the stimulus (which is basically just a short video) starts and when it ends. While the microscope is recording and acquiring frames, a simple firmware tells the UNO to listen to the data stream on a COM port of the computer used to control the visual stimulation. 

    Within the Python® script used for controlling the screens, every time a new stimulus starts a command is written on the serial port. The microcontroller reads the command, which can be either ‘H’ or ‘L’, and sets the voltage of the output TTL at pin 9 to 5V or 0V, respectively. This TTL signal goes to the microscope controller, which generates time stamps for the microscope status. These timestamps contain the exact frame numbers of the microscope recording at which the stimulus started (rising edge of the TTL) and ended (falling edge of the TTL).

    All this information is essential for the analysis of the recording, as it allows the researchers at EMBL Rome to align the neural responses recorded to the stimulation protocol presented. Once the neural activity is aligned, the downstream analysis can begin, focusing on understanding the deeper brain activity. 

    Ever wonder what neurons that are firing look like? 

    Micheli shared with us an example of the type of neural activity acquired during an experimental session with the setup described above. 

    The small blinking dots are individual neurons recorded from the visual cortex of an awake, behaving mouse. The signal being monitored is the fluorescence of a particular protein produced by neurons, which indicates their activity level. After the light emitted by the neurons has been recorded and digitised, researchers extract fluorescence traces for each neuron. At this point, they can proceed with the analysis of the neural activity, to try to understand how the visual stimuli shown are actually encoded by the recorded neural population.

    The post Using Arduino UNO to sync a visual neuroscience lab appeared first on Arduino Blog.

    Website: LINK

  • Win! One of five brand new Raspberry Pi AI Cameras

    Win! One of five brand new Raspberry Pi AI Cameras

    Reading Time: < 1 minute

    Subscribe

  • Is there an online Arduino IDE?

    Is there an online Arduino IDE?

    Reading Time: 5 minutes

    Since the inception of Arduino, the Arduino IDE has been a go-to tool for people learning to code and creating projects ranging from remote-controlled cars to soil moisture monitoring. No wonder it’s been downloaded over 24 million times this year, so far! 

    Now if you’ve ever wondered whether you can use Arduino IDE online, you’re not alone. Many Arduino enthusiasts, from hobbyists to professionals, have been asking the same question. The good news? Yes, there is an online Arduino IDE, and it’s called the Arduino Cloud Editor! Available through Arduino Cloud, the Cloud Editor (previously known as the Arduino Web Editor), offers a seamless, free way to code from anywhere without the hassle of traditional software. It gives you peace of mind knowing that there is no risk of losing your valuable sketches – or all the hours you spent developing them.  

    Both the traditional Arduino IDE and the Cloud Editor have their strengths, but choosing the right one depends on your specific needs and project requirements. So, in this post, we’ll dive into the details so you can make an informed choice and pick the editor that is most suitable for you.

    Arduino IDE: greater control, offline use, and stability

    Screenshot of the Arduino IDE 2.3.2

    The traditional Arduino IDE is installed on your computer, allowing you to write and upload code directly to your Arduino board via a USB cable. Once installed, the IDE can be used offline, making it a reliable choice for projects in areas with limited or no internet access, for example while camping or in remote work locations.

    It gives you complete control over updates, letting you maintain a stable environment by choosing when (or if) to install the latest changes. Plus, it’s equipped with a robust debugger, a serial monitor, and access to thousands of libraries contributed by the Arduino community.

    Key features of the desktop IDE include:

    • Serial Monitor & Serial Plotter: Essential tools for debugging and visualizing data.
    • Library Manager: Access to over 5,000 libraries created by the Arduino community.
    • Autocompletion: The easiest way to speed up your coding process.

    In short, the traditional IDE offers more control, such as the option to manually update or freeze the version you’re using, and requires only occasional internet connection for updates. 

    Who can benefit from the Arduino IDE? Teachers and users who prefer a stable environment without frequent changes may find it particularly valuable.

    Arduino Cloud Editor: a convenient Arduino IDE online experience

    The Arduino Cloud Editor offers a similar experience to the traditional version but adds the convenience of cloud storage and extra features.

    One of its most appealing benefits is accessibility: you can access your projects from any computer, whether you’re at school, at home, or at work. Actually, you can even have them in your backpocket on your smartphone when you’re on the go! Cloud auto saving also ensures you never lose progress due to technical issues, providing a safeguard for your projects.

    The Cloud Editor automatically updates itself as well as pre-installed libraries, saving you from manual maintenance. Real-time collaborative coding is another standout feature, enabling teams and students to work together on sketches seamlessly.

    The Cloud Editor is available through Arduino Cloud, a full integrated development experience. In other words, it’s part of a bigger ecosystem. You can build IoT projects faster with pre-built templates, customize dashboards to monitor and control your devices remotely, and even integrate voice commands via Alexa or Google Home without writing a single line of code.

    Screenshot of the templates section in Arduino Cloud

    Who can benefit from the Cloud Editor? Anyone who needs real-time collaboration and easy access to their projects from anywhere.

    Which editor should you choose?

    The traditional Arduino IDE is ideal for users who need offline access and greater control over updates. It’s faster when compiling and uploading code, and offers advanced debugging tools that the Cloud Editor lacks.

    On the other hand, if you need flexibility to work from multiple locations or collaborate in real-time, the Arduino Cloud Editor’s seamless integration with cloud storage and automatic updates make it a more convenient option, especially for beginners. Features like OTA updates are particularly useful for projects requiring frequent, remote updates.

    As a quick summary:

    Choose the traditional Arduino IDE if:

    • You prefer working offline or in remote locations without internet access.
    • You want full control over when updates are installed.
    • You’re using non-Arduino hardware that requires specific libraries or configurations.

    Choose the Arduino Cloud Editor if:

    We’ve summarized the features available in the two editors in the detailed comparison table below, to help you decide which option best suits your project needs.

    Arduino IDE vs Arduino Cloud Editor

    Ultimately, your choice should reflect your project’s complexity, collaboration needs, and hardware requirements.

    How to get started with the IDE of your choice

    Having decided which IDE is best for you, are you now ready to dive in? 

    To get started with the traditional Arduino IDE, download the software and check out the Arduino Docs guide that shows you how to program using the IDE.

    For the Cloud Editor, simply create an Arduino account and explore the detailed Cloud documentation to help you bring your dream project ideas to life!

    The post Is there an online Arduino IDE? appeared first on Arduino Blog.

    Website: LINK

  • Discover #Virgil: history comes to life with Arduino

    Discover #Virgil: history comes to life with Arduino

    Reading Time: 2 minutes

    We’re excited to introduce #Virgil, an innovative project that combines the power of Arduino technology with a passion for history, creating a groundbreaking interactive experience for museums

    Using Arduino’s versatile and scalable ecosystem, #Virgil operates completely offline, allowing visitors to interact with 3D avatars in a seamless and immersive way. The project brings the past to life, offering dialogue-driven encounters with key historical figures thanks to voice recognition and edge AI – with the option to choose among many different languages.

    “#Virgil is meant to celebrate the past and, more importantly, open new avenues for education and inspiration. We want to prove how technology, when guided by ethical values, can amplify and perpetuate our cultural heritage in ways that used to be unimaginable,” comments Enrico Benevenuta, coordinator of the Territori Svelati project and AI expert.

    [youtube https://www.youtube.com/watch?v=hQBPIePZDMs?feature=oembed&w=500&h=281]

    Matteo Olivetti, great-grandson of Olivetti’s founder Camillo, drew inspiration from the iconic Divisumma to design a dedicated hardware setup, Olivox. 

    Powered by the Portenta X8 and Max Carrier, the device connects via HDMI to any screen, engaging visitors in a rich, interactive experience without the need for smartphones or a stable internet connection. This approach allows the project to adapt easily to different exhibitions and contexts, while offering full control over the visitor experience.

    Internationally renowned 3D artist Elvis Morelli was entrusted with creating the first avatar of the project – and it’s no coincidence that Camillo Olivetti was chosen. 

    The story of Olivetti resonates deeply with Arduino’s own mission of pushing the boundaries of technology, and #Virgil represents a continuation of that legacy by bridging the gap between the past and future through cutting-edge tools.

    To find out more about the project and perhaps have a chat with your favorite pioneer of technology and innovation, visit #Virgil’s booth at the upcoming 2024 Maker Faire Rome, booth E.09. Don’t forget to stop by Arduino’s booth N.07 to find out more about our products, and let us know what you asked Camillo!

    The post Discover #Virgil: history comes to life with Arduino appeared first on Arduino Blog.

    Website: LINK