Kategorie: Mobile

  • Connect and share in more ways with new Android featuresConnect and share in more ways with new Android featuresSenior Director, Android Platform

    Connect and share in more ways with new Android featuresConnect and share in more ways with new Android featuresSenior Director, Android Platform

    Reading Time: < 1 minute

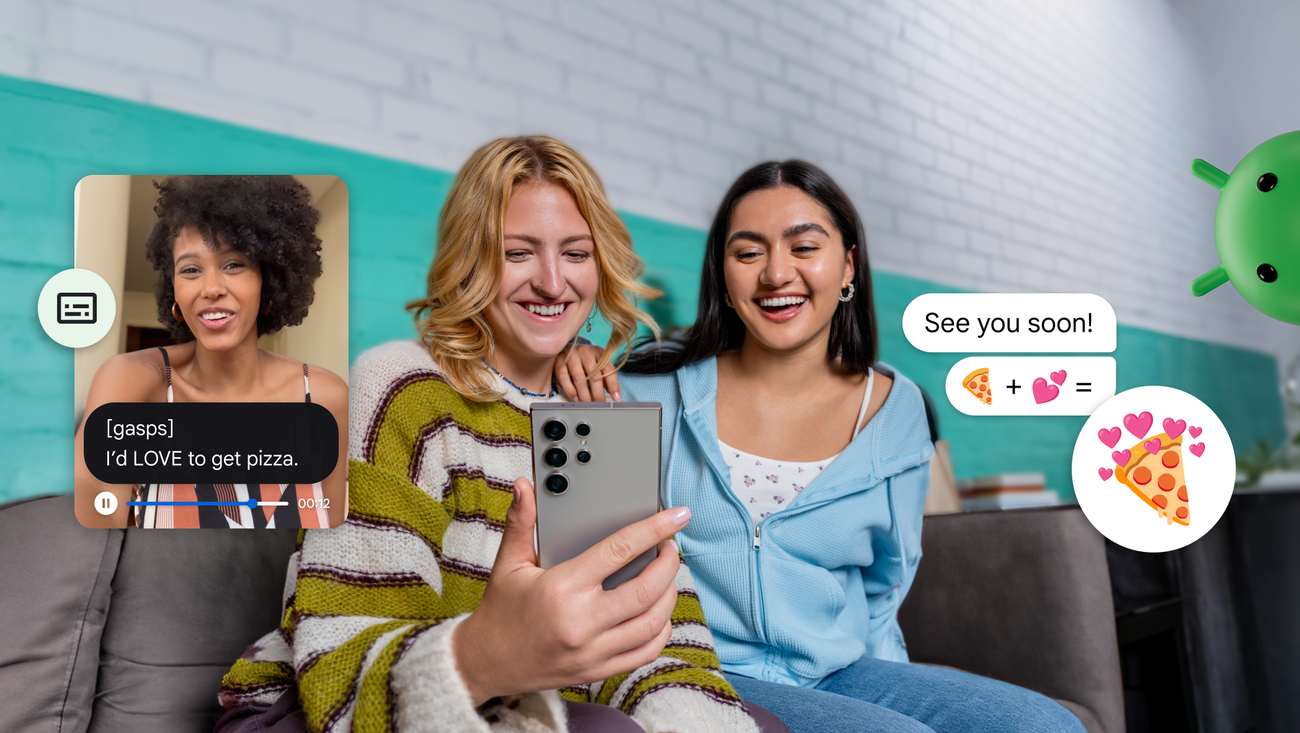
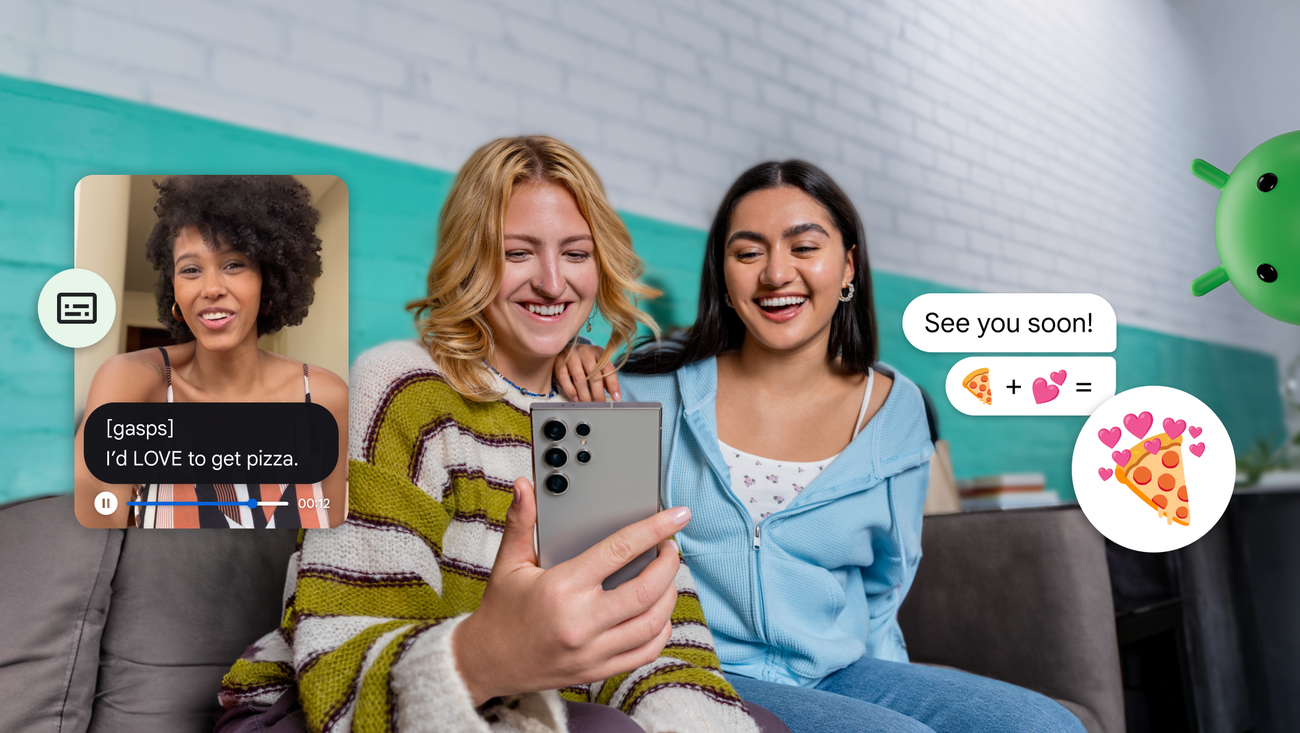
    Starting today, new AI features and more from Android can help you express yourself authentically and connect your digital life with real-world experiences. From audio captions that capture intensity and emotion, to image descriptions enhanced with Gemini, to clearer scans in Google Drive, check out the latest updates:

    Website: LINK

  • Android’s Expressive Captions uses AI to bring emotion to captionsAndroid’s Expressive Captions uses AI to bring emotion to captionsDirector, Product Management

    Android’s Expressive Captions uses AI to bring emotion to captionsAndroid’s Expressive Captions uses AI to bring emotion to captionsDirector, Product Management

    Reading Time: < 1 minute

    Expressive Captions are part of Live Caption, so they’re built into the operating system and available across apps on your phone. This means you can use Expressive Captions with most things you watch, like livestreams on social platforms, memories in your Google Photos reel and video messages from friends and family. When enabled, captions will occur in real time and on device, so you can use them even while you’re on airplane mode.

    Bringing Expressive Captions to life

    To build Expressive Captions, our Android and Google DeepMind teams worked to understand how we engage with content on our devices without sound. Using multiple AI models, Expressive Captions not only captures spoken words but also translates them into stylized captions, while providing labels for an even wider range of background sounds. This makes captions just as vibrant as listening to audio. It’s just one way we’re building for the real lived experiences of people with disabilities and using AI to build for everyone.

    Starting today, Expressive Captions will be available in the U.S. in English on any Android device running Android 14 and above that has Live Caption. This is part of our work to find even more ways to bring emotional expression and context to captions.

    Website: LINK

  • Introducing Arduino cores with ZephyrOS (beta): take your embedded development to the next level

    Introducing Arduino cores with ZephyrOS (beta): take your embedded development to the next level

    Reading Time: 3 minutes

    Last July, when we announced the beginning of the transition from Mbed to Zephyr, we promised to release the first beta by the end of 2024. Today, we are excited to announce the first release of Arduino cores with ZephyrOS in beta!

    ZephyrOS is an open-source, real-time operating system (RTOS) designed for low-power, resource-constrained devices. We are transitioning Arduino cores to ZephyrOS to ensure continued support and innovation for developers. This change follows ARM’s deprecation of MbedOS, which has historically powered some of our cores. By adopting ZephyrOS, we are introducing a more modern, scalable, and feature-rich RTOS that aligns with the evolving needs of the embedded development community. This ensures that Arduino users have access to a robust, actively maintained platform for creating advanced applications.

    With this brand new beta program, we invite our community to explore, test, and contribute to this significant new development in Arduino’s evolution – one that will allow old and new Arduino users all around the world to continue using the language and libraries they know and love for many years to come.

    What is ZephyrOS?

    ZephyrOS is a state-of-the-art RTOS designed to enable advanced embedded systems. It is modular, scalable, and supports multiple hardware architectures, making it an excellent choice for the next generation of Arduino projects.

    Its key features include:

    • Real-time performance: Build responsive applications requiring precise timing.
    • Flexibility: Customize and scale the system to your specific needs.
    • Extensibility: Benefit from a rich ecosystem of libraries and subsystems.
    • Community-driven innovation: Collaborate with a vibrant open-source community.

    What’s new in this core?

    The Arduino core for ZephyrOS brings significant changes to how Arduino sketches are built and executed. However, the integration between Arduino core and ZephyrOS operates seamlessly under the hood, providing advanced RTOS capabilities like real-time scheduling and multitasking, while keeping the development process as straightforward as ever. This means you can enjoy the best of both worlds: the ease of Arduino and the power of a modern, robust RTOS.

    • Dynamic sketch loading: Sketches are compiled as ELF files and dynamically loaded by a precompiled Zephyr-based firmware.
    • Zephyr subsystems: Leverage features like threading, inter-process communication, and real-time scheduling.
    • Fast compiling: Since only a thin layer of user code and libraries are compiled, while the rest of the ZephyrOS is already binary, compilation is faster and resulting binary files are smaller.

    How to get started

    Ready to dive into the future of Arduino development with ZephyrOS? Head over to our repository for comprehensive installation instructions, troubleshooting tips, and detailed technical documentation.

    Contribute to the beta!

    This is your opportunity to shape the future of Arduino development! We welcome feedback, bug reports, and contributions to the core. Visit the GitHub Issues page to report bugs or suggest features. Your feedback will play a critical role in refining this integration and unlocking new possibilities for embedded systems.

    Visit the ArduinoCore-Zephyr GitHub repository today and start exploring this exciting new platform! Thank you for being a part of the Arduino community.

    The post Introducing Arduino cores with ZephyrOS (beta): take your embedded development to the next level appeared first on Arduino Blog.

    Website: LINK

  • Addressing the digital skills gap

    Addressing the digital skills gap

    Reading Time: 3 minutes

    The digital skills gap is one of the biggest challenges for today’s workforce. It’s a growing concern for educators, employers, and anyone passionate about helping young people succeed.

    Digital literacy is essential in today’s world, whether or not you’re aiming for a tech career — yet too many young people are entering adulthood without the skills to navigate it confidently and recent research shows that many young people finish school without formal digital qualifications.

    Whilst this challenge is a global one, we’re exploring solutions in England where computing has been part of the national curriculum for a decade and the option of studying for a qualification (GCSE) in computer science is available to many 14-year-olds.

    The SCARI report shows that GCSE computer science isn’t available in every school in England, and even where it is available, only a fraction of students opt to study it. Where GCSE computer science is offered, the focus is not on broader digital skills, but more on programming and theoretical knowledge which, while important, doesn’t support young people with the knowledge they need to succeed in the modern workplace.

    How the Manchester Baccalaureate will help tackle the digital divide

    At the Raspberry Pi Foundation, we’re working with the Greater Manchester Combined Authority to tackle this challenge head-on. Together, as part of their Manchester Baccalaureate initiative, we’re developing a self-paced course and certification to tackle the digital skills gap directly. 

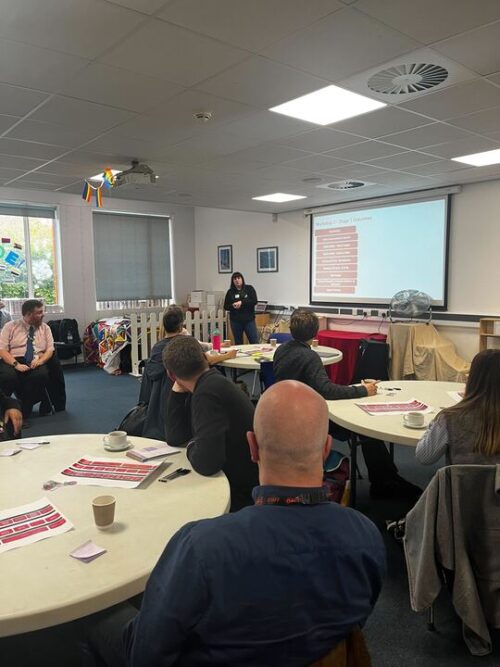
    Teachers listening to a presentation at a recent workshop the Raspberry Pi Foundation held in Manchester.

    The Raspberry Pi Foundation Certificate in Applied Computing is designed to be accessed by any pupil, anywhere. It includes a series of flexible modules that students can work through at their own pace. Targeted at young people ages 14 and up, the certificate covers three stages:

    • Stage 1 – Students gain essential digital skills, preparing them for a wide range of careers
    • Stages 2 and 3 – Students dive into specialisations in key tech areas, building expertise aligned with in-demand roles

    What we’ve learnt in Manchester so far

    We recently visited Oasis Academy Media City to hold a workshop on digital skills and get input on the certificate. We welcomed educators and industry experts to share their insights, and their feedback has been invaluable.

    Teachers pointed out a common challenge: while they see the importance of digital skills, they often lack the time and resources to add new material to an already packed curriculum. By offering the certification as bite-sized modules that focus on specific skills, it makes it easier to slot the content into the timetable, and helps students with limited access to school (due to illness, for example) engage with the course.

    Teachers listening to a presentation at a recent workshop the Raspberry Pi Foundation held in Manchester.

    Educators were particularly excited about the opportunity for students to specialise in areas tied to in-demand roles that are currently being recruited for and our goal is to make the qualification engaging and relevant, helping students see how their learning applies in the real world.  

    Next steps

    We’re thrilled to share that, in November, we’ll be piloting this qualification in schools throughout Manchester. We’ll gather invaluable feedback from young people as they embark on this learning experience, which will help us refine the course. 

    Our full qualification will launch in 2025, and we can’t wait to help students approach their futures with curiosity and confidence.

    Website: LINK

  • Does AI-assisted coding boost novice programmers’ skills or is it just a shortcut?

    Does AI-assisted coding boost novice programmers’ skills or is it just a shortcut?

    Reading Time: 6 minutes

    Artificial intelligence (AI) is transforming industries, and education is no exception. AI-driven development environments (AIDEs), like GitHub Copilot, are opening up new possibilities, and educators and researchers are keen to understand how these tools impact students learning to code. 

    In our 50th research seminar, Nicholas Gardella, a PhD candidate at the University of Virginia, shared insights from his research on the effects of AIDEs on beginner programmers’ skills.

    Headshot of Nicholas Gardella.
    Nicholas Gardella focuses his research on understanding human interactions with artificial intelligence-based code generators to inform responsible adoption in computer science education.

    Measuring AI’s impact on students

    AI tools are becoming a big part of software development, but what does that mean for students learning to code? As tools like GitHub Copilot become more common, it’s crucial to ask: Do these tools help students to learn better and work more effectively, especially when time is tight?

    This is precisely what Nicholas’s research aims to identify by examining the impact of AIDEs on four key areas:

    • Performance (how well students completed the tasks)
    • Workload (the effort required)
    • Emotion (their emotional state during the task)
    • Self-efficacy (their belief in their own abilities to succeed)

    Nicholas conducted his study with 17 undergraduate students from an introductory computer science course, who were mostly first-time programmers, with different genders and backgrounds.

    Girl in class at IT workshop at university.
    By luckybusiness

    The students completed programming tasks both with and without the assistance of GitHub Copilot. Nicholas selected the tasks from OpenAI’s human evaluation data set, ensuring they represented a range of difficulty levels. He also used a repeated measures design for the study, meaning that each student had the opportunity to program both independently and with AI assistance multiple times. This design helped him to compare individual progress and attitudes towards using AI in programming.

    Less workload, more performance and self-efficacy in learning

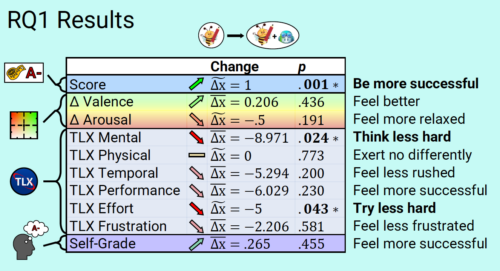
    The results were promising for those advocating AI’s role in education. Nicholas’s research found that participants who used GitHub Copilot performed better overall, completing tasks with less mental workload and effort compared to solo programming.

    Graphic depicting Nicholas' results.
    Nicholas used several measures to find out whether AIDEs affected students’ emotional states.

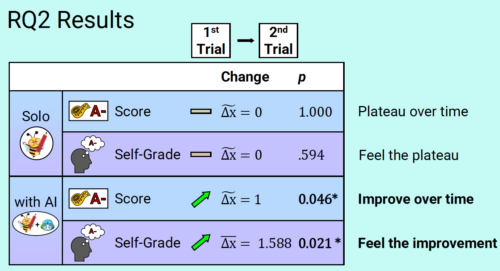
    However, the immediate impact on students’ emotional state and self-confidence was less pronounced. Initially, participants did not report feeling more confident while coding with AI. Over time, though, as they became more familiar with the tool, their confidence in their abilities improved slightly. This indicates that students need time and practice to fully integrate AI into their learning process. Students increasingly attributed their progress not to the AI doing the work for them, but to their own growing proficiency in using the tool effectively. This suggests that with sustained practice, students can gain confidence in their abilities to work with AI, rather than becoming overly reliant on it.

    Graphic depicting Nicholas' RQ1 results.
    Students who used AI tools seemed to improve more quickly than students who worked on the exercises themselves.

    A particularly important takeaway from the talk was the reduction in workload when using AI tools. Novice programmers, who often find programming challenging, reported that AI assistance lightened the workload. This reduced effort could create a more relaxed learning environment, where students feel less overwhelmed and more capable of tackling challenging tasks.

    However, while workload decreased, use of the AI tool did not significantly boost emotional satisfaction or happiness during the coding process. Nicholas explained that although students worked more efficiently, using the AI tool did not necessarily make coding a more enjoyable experience. This highlights a key challenge for educators: finding ways to make learning both effective and engaging, even when using advanced tools like AI.

    AI as a tool for collaboration, not replacement

    Nicholas’s findings raise interesting questions about how AI should be introduced in computer science education. While tools like GitHub Copilot can enhance performance, they should not be seen as shortcuts for learning. Students still need guidance in how to use these tools responsibly. Importantly, the study showed that students did not take credit for the AI tool’s work — instead, they felt responsible for their own progress, especially as they improved their interactions with the tool over time.

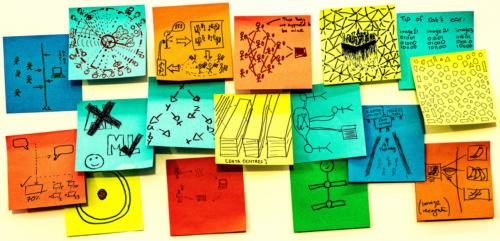
    Seventeen multicoloured post-it notes are roughly positioned in a strip shape on a white board. Each one of them has a hand drawn sketch in pen on them, answering the prompt on one of the post-it notes "AI is...." The sketches are all very different, some are patterns representing data, some are cartoons, some show drawings of things like data centres, or stick figure drawings of the people involved.
    Rick Payne and team / Better Images of AI / Ai is… Banner / CC-BY 4.0

    Students might become better programmers when they learn how to work alongside AI systems, using them to enhance their problem-solving skills rather than relying on them for answers. This suggests that educators should focus on teaching students how to collaborate with AI, rather than fearing that these tools will undermine the learning process.

    Bridging research and classroom realities

    Moreover, the study touched on an important point about the limits of its findings. Since the experiment was conducted in a controlled environment with only 17 participants, researchers need to conduct further studies to explore how AI tools perform in real-world classroom settings. For example, the role of internet usage plays a fundamental role. It will be relevant to understand how factors such as class size, prior varying experience, and the age of students affect their ability to integrate AI into their learning.

    In the follow-up discussion, Nicholas also demonstrated how AI tools are becoming more accessible within browsers and how teachers can integrate AI-driven development environments more easily into their courses. By making AI technology more readily available, these tools are democratising access to advanced programming aids, enabling students to build applications directly in their web browsers with minimal setup.

    The path ahead

    Nicholas’s talk provided an insightful look into the evolving relationship between AI tools and novice programmers. While AI can improve performance and reduce workload, it is not a magic solution to all the challenges of learning to code.

    Based on the discussion after the talk, educators should support students in developing the skills to use these tools effectively, shaping an environment where they can feel confident working with AI systems. The researchers and educators agreed that more research is needed to expand on these findings, particularly in more diverse and larger-scale educational settings. 

    As AI continues to shape the future of programming education, the role of educators will remain crucial in guiding students towards responsible and effective use of these technologies, as we are only at the beginning.

    Join our next seminar

    In our current seminar series, we are exploring how to teach programming with and without AI technology. Join us at our next seminar on Tuesday, 10 December at 17:00–18:30 GMT to hear Leo Porter (UC San Diego) and Daniel Zingaro (University of Toronto) discuss how they are working to create an introductory programming course for majors and non-majors that fully incorporates generative AI into the learning goals of the course. 

    To sign up and take part in the seminar, click the button below — we’ll then send you information about joining. We hope to see you there.

    The schedule of our upcoming seminars is online. You can catch up on past seminars on our previous seminars and recordings page.

    Website: LINK

  • Argon Poly+ 5 Raspberry Pi case review

    Argon Poly+ 5 Raspberry Pi case review

    Reading Time: 2 minutes

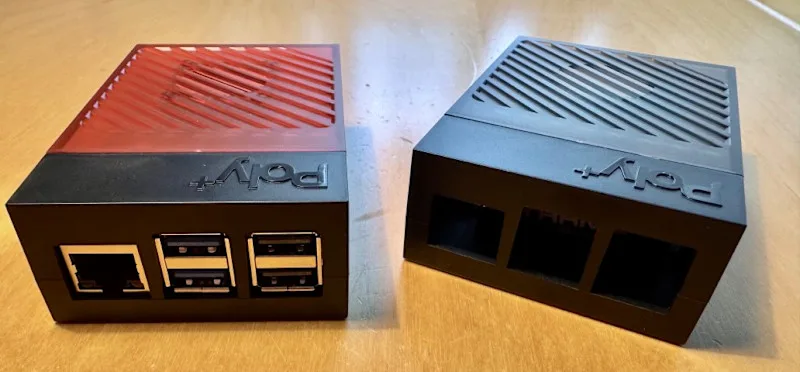
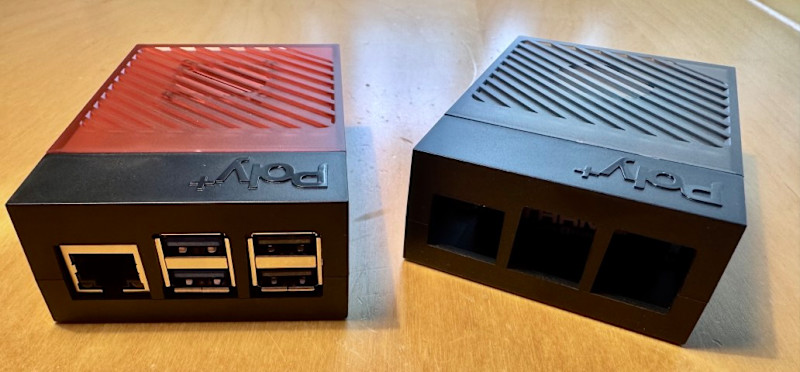
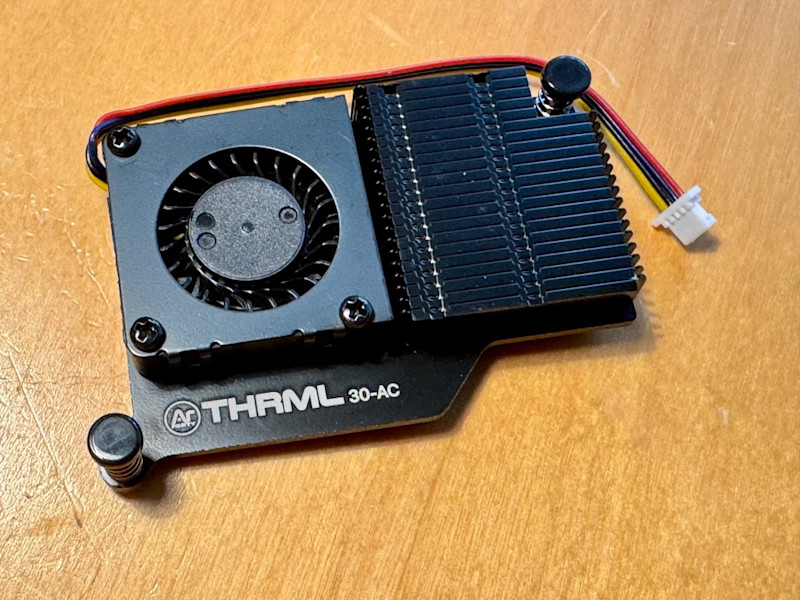
    The Poly+ 5 is a Raspberry Pi 5 case in two flavours and colours. The case itself is moulded plastic with none of the aluminium work we’ve come to expect. The slightly transparent slidable top cover is available in red or black with a black base in both cases. The standard model comes with a 30mm PWM fan and an array of heatsinks. For a few more pounds you can opt for the mightier THRML-30 unit if you’re going to be running things hot. This is a similar unit to the official cooler with a fan and a large heatsink in one. If you forgo the fan you can fit a standard HAT in the case too (albeit one without any protrusions).

    Assembling the case is straightforward. Attach the fan to the cover, pop on the heatsinks and clip everything together. It took no more than a few minutes. This is a clip-together screwless case (with the exception of the fan). The fan connects to the new fan header, so you get active, responsive cooling, just like the official equivalent.

    The Argon Poly+ 5 comes in two colour options for the sliding ‘hood’

    In that case

    In terms of usage: well, it’s a case and it does that job well. At no point did the Raspberry Pi leap out and do a runner, so we’ll call that a win. The fan was whisper-quiet throughout. There are no impediments to port access with the exception of the GPIO, which is fully covered. A thoughtful touch is the addition of a power button in a striking orange on the exterior, and next to that, unusually for a budget case, is a cover for the SD card (although this cannot be secured as with the NEO case). The base features ventilation slats to ensure good air movement from the fan. It stands on four rubber feet (also supplied).

    Need more aggressive cooling? This powerful unit is available as an option

    Argon is trying to bring its design ethos to the budget market, and does it succeed? It’s certainly pleasing to look at, although lacking the sleek lines of the ONE or the elegant curvature of the official cases. What it does have in spades is value for money. At just £6 this is a great choice if you just need a protective, cooling.

    Verdict

    8/10

    It’s a case. No fancy features, no extravagant design, no fancy lights. It is something that will protect and cool your Raspberry Pi well and at a fantastic price. If that’s what you need, look no further.

    Specs

    Form factor: Raspberry Pi 5 plus fan or HAT

    Assembly: Snap-together

    Material: ABS Plastic

  • Build Button Clash in minutes: a new fun game with Plug and Make Kit 

    Build Button Clash in minutes: a new fun game with Plug and Make Kit 

    Reading Time: 3 minutes

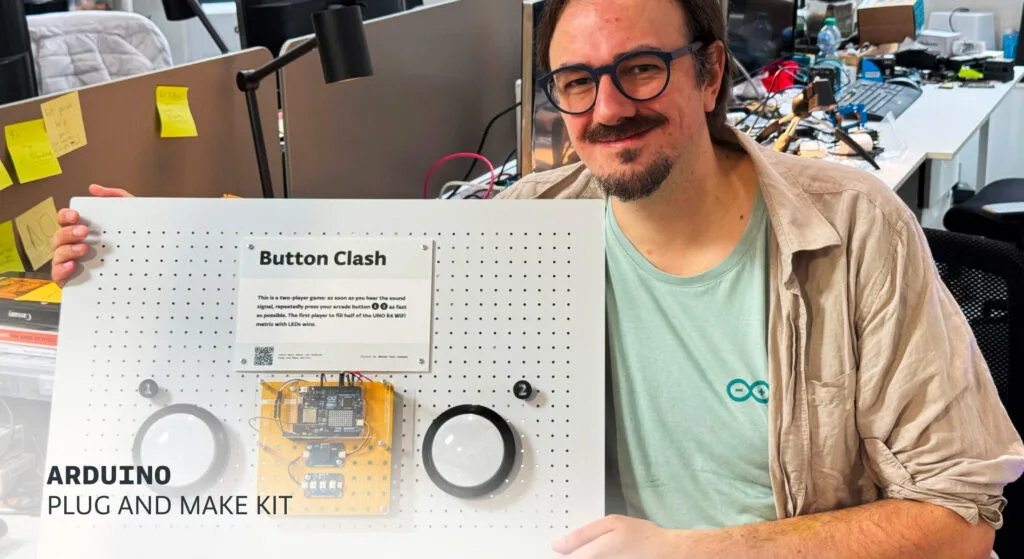
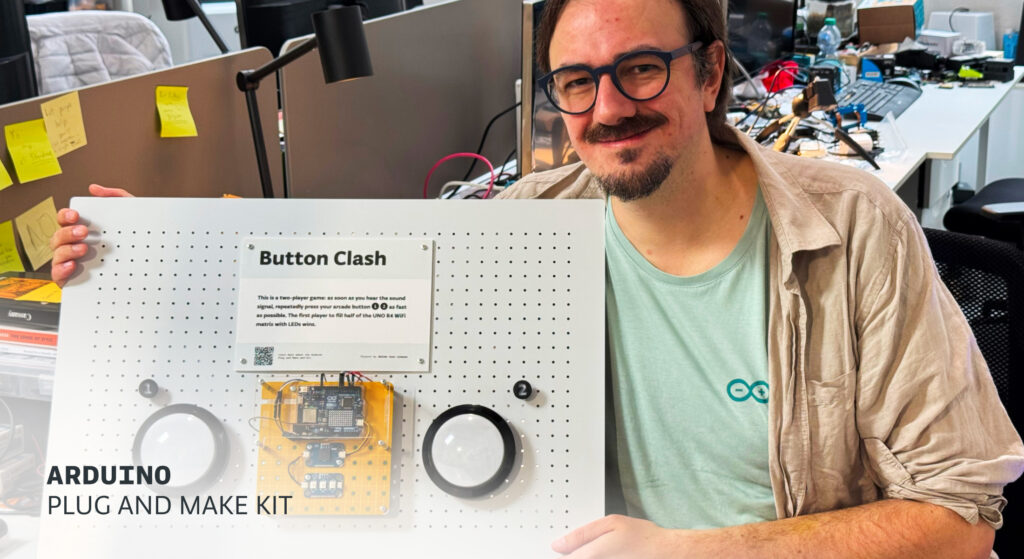
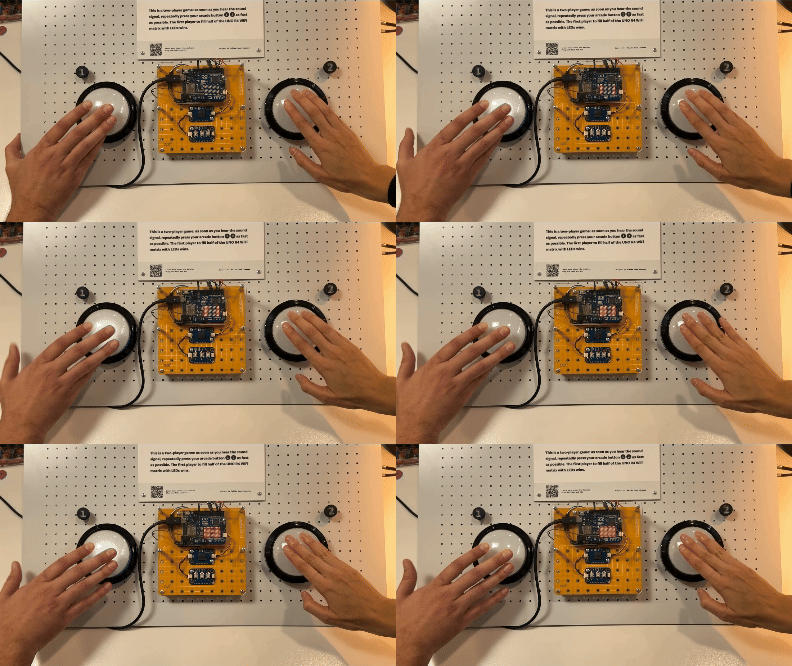
    The Arduino Plug and Make Kit is all about turning creative sparks into reality in mere minutes. With its intuitive, snap-together design, even the wildest ideas become achievable – fast, fun, and frustration-free. That’s exactly what Julián Caro Linares, Arduino’s Product Experience team leader, discovered when he built his latest project for our in-house Make Tank: Button Clash, an arcade-inspired game for two players.  

    Button Clash was a popular attraction among the interactive demos we had at the Arduino booth at this year’s Maker Faire Rome! By connecting it via Arduino Cloud, we were able to collect stats in real time (fun fact: the left side won 54% of the matches!). 

    Meet Julián Caro Linares, Plug and Make Kit Star  

    Julián brings together technical expertise and passion for robotics, making, and human-centered design to create documentation, tutorials, and more for the Arduino Pro ecosystem. “Our team gets to truly transform prototypes into products,” he says. “It’s exciting to figure out the best way to explain to users how awesome these tools are, and to help them truly learn to create what they want or need.”  

    Outside of work, he loves creating projects that inspire connection and joy. From social robots that mimic emotional states to interactive gift boxes, his creations show how technology can engage people in meaningful and unexpected ways. And have you seen his recent LEGO®-Alvik mashup?

    When it came to Button Clash, Julián drew inspiration from his love of physical interfaces and the pure satisfaction of smashing arcade buttons: “This game puts players into ‘inner childhood’ mode, where all you want to do is beat your opponent!”

    Button Clash 

    Button Clash is a two-player game that challenges you to press an arcade button faster than your opponent. The rules are few and intuitive:  

    • Once both players press their buttons simultaneously, the game begins with a simple melody played by the Modulino Buzzer node.  
    • Smash your button as fast as possible, to fill your side of the LED matrix on the Arduino UNO R4 provided in the Plug and Make Kit.  
    • The first player to take over half the matrix wins!  

    Building this game is a breeze thanks to the Modulino nodes and Qwiic cables in the kit. The arcade buttons require just a bit of soldering, but add a unique retro charm: well worth the extra step, in our opinion! The result is a highly engaging, customizable game that’s perfect for parties, family nights, or just unleashing your competitive spirit.  

    Creativity made easy  

    For Julián, the best part of the Plug and Make Kit is how it simplifies the process of turning out-of-the-box ideas into real projects. “Like the name says, you can just plug the different Modulino together and make your project: no matter how unconventional it is,” he says.  
    Explore the full tutorial to replicate Button Clash on Arduino’s Project Hub and get inspired to create your own fun and interactive games! With the Plug and Make Kit, you can start your creative adventure today.

    The post Build Button Clash in minutes: a new fun game with Plug and Make Kit  appeared first on Arduino Blog.

    Website: LINK

  • Zoo elephants get a musical toy to enrich their lives

    Zoo elephants get a musical toy to enrich their lives

    Reading Time: 2 minutes

    Everyone loves looking at exotic animals and most of us only get to do that at zoos. But, of course, there is a lot to be said about the morality of keeping those animals in captivity. So, good zoos put a lot of effort into keeping their animals healthy and happy. For more intelligent animals, like elephants, enrichment through intellectual stimulation is a solid strategy. With that in mind, a team of Georgia Tech students worked with Zoo Atlanta to give elephants a musical toy to enrich their lives.

    Like the toys you get for your dog, this device’s purpose is to give the elephants some mental stimulation. It provides them with an activity that they can enjoy, thus improving their lives. It works by playing specific tones (known to please elephant ears) when the elephants stick their trunks in holes in a wall. In essence, it is similar to an electronic toy piano for kids — just optimized for elephant physiology.

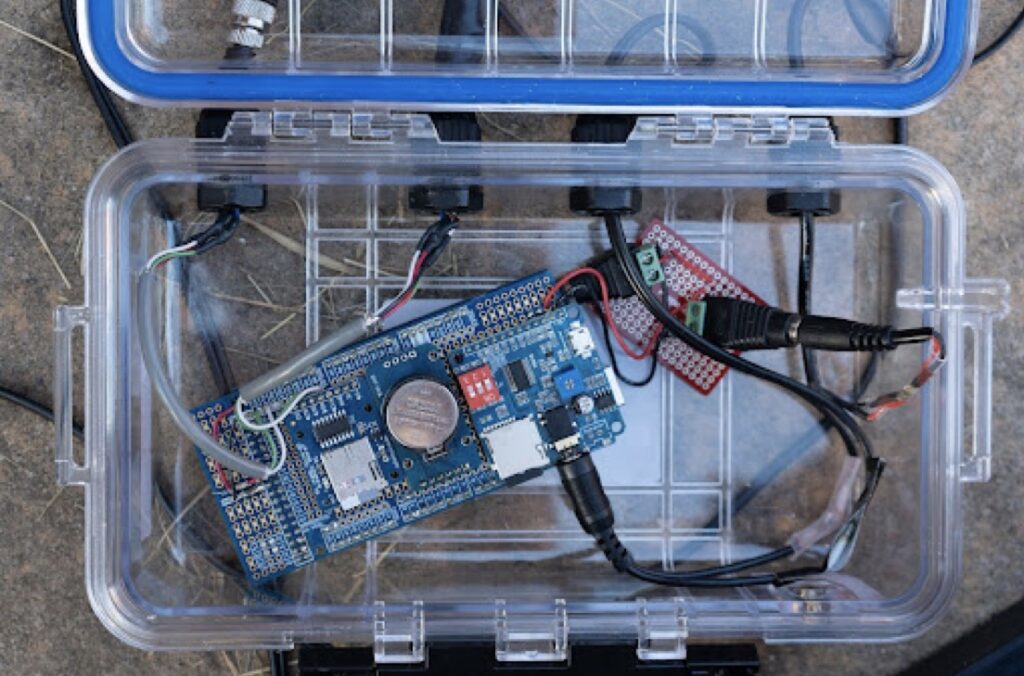
    An Arduino Mega 2560 board plays the tones through a DY-SV5W media player module, which outputs an audio signal to an outdoor speaker system. Each hole in the wall has a VL53L0X ToF (Time of Flight) sensor to detect trunks. Those sensors were paired with ATtiny85 microcontrollers that tell the Arduino when a trunk is present.

    The researchers also added a real-time clock and an SD card reader to log activity, giving the team the ability to evaluate the response from the elephants. In the same way that you can tell your dog loves his new toy by how much he plays with it, the team was able to determine that the elephants enjoyed their musical device over the course of about a week.

    Image credit: A. Mastali et al.

    The post Zoo elephants get a musical toy to enrich their lives appeared first on Arduino Blog.

    Website: LINK

  • CatBot animal feeder

    CatBot animal feeder

    Reading Time: 2 minutes

    “I used Raspberry Pi because I was recently working with Raspberry Pi and cameras for another project, a digital sensor for a film camera,” says Michael. “Although there are definitely simpler solutions with cheaper microcontrollers, I find it valuable to start with techniques I know rather than going down rabbit holes of learning new tools. I used two separate boards because Raspberry Pi 5 is my home server and NAS, which I did not want to mount on the kitchen window.”

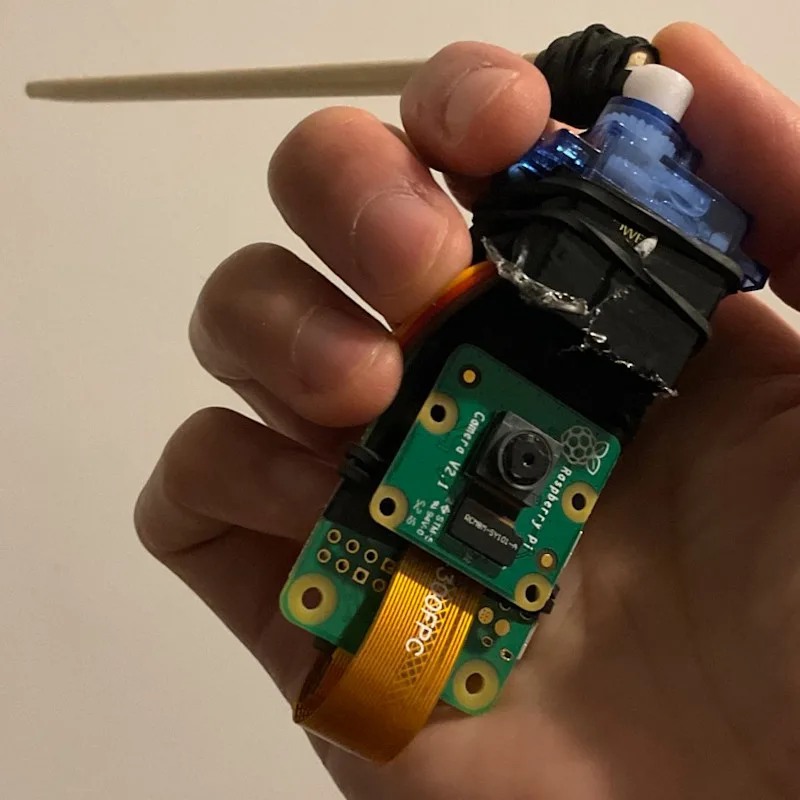
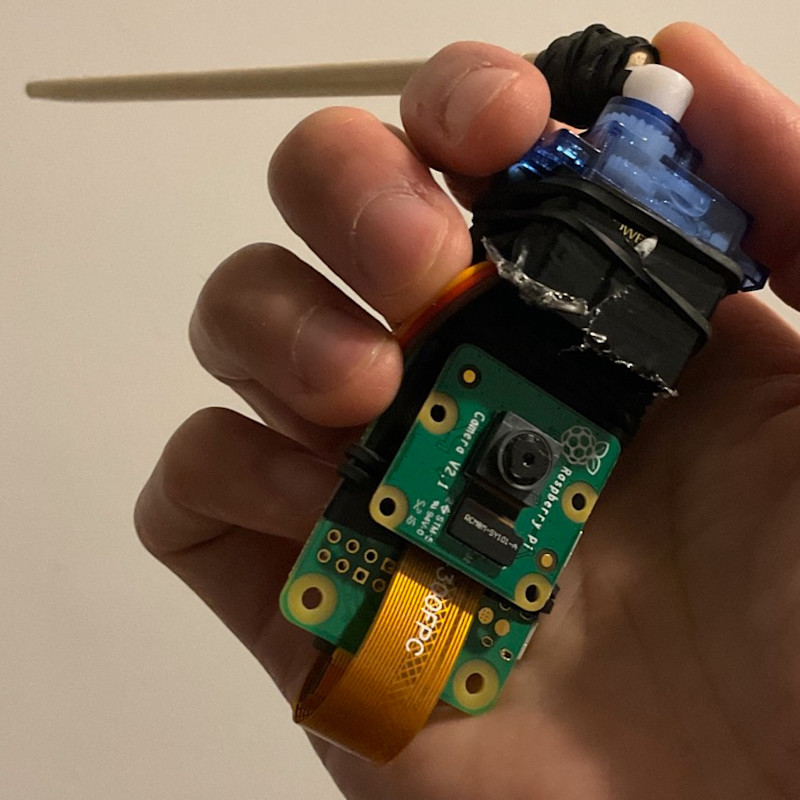
    But there’s a catch: the food that Michael was leaving out for the cats was also attracting birds, for which cat food is potentially unhealthy, so he needed to find a way of identifying birds and scaring them away. He eventually settled on a minimal solution that just – only just – qualifies for the label of ‘robot’: an actuator (a Tower Pro micro servo) connected to a chopstick that taps on the window to scare the birds away. If Raspberry Pi 5 detects a bird, it sends a request to Raspberry Pi Zero to activate the servo.

    Raspberry Pi Zero links to a Raspberry Pi 5, which does the heavy computation

    “Defining ‘robot’ is hard to pin down and frequently leads to disagreement among roboticists,” says Michael. “I believe that a robot is any physical thing with sensors and actuators. While some definitions require autonomy, that excludes arguably robotic things like human-piloted mecha or heavy industrial equipment. Relaxing the requirement of autonomy frames robots as tools that complement rather than supplant our abilities, which I find valuable in the current hype wave of AI and ML.

    “There are commercial products that do similar things, like the Bird Buddy or pet-oriented indoor security cameras. By the time that I could hack those to get the functionality I wanted, I might as well have started with open-source tools.”

    The AI model correctly identifies cats, and sends pictures to Michael’s phone

    “My favorite projects include Blossom, an open-source robot platform that I developed during my PhD, and the Leica MPi, a swappable digital sensor for a Leica film camera. I’m currently taking a sabbatical at the Recurse Center, a programming retreat in New York, where I am exploring alternative HCI hardware and brushing up on AIML for robotics.”

  • Simplifying IoT for smarter manufacturing: Join the chat with Arduino, AWS, and Atlas Machine

    Simplifying IoT for smarter manufacturing: Join the chat with Arduino, AWS, and Atlas Machine

    Reading Time: 2 minutes

    We all know that the future of manufacturing lies in IoT — yet the path to adoption can sometimes feel daunting. But what if you could simplify the process and start seeing results quickly? That’s exactly what we’re going to explore in our upcoming Arduino Cloud Café webinar on December 10 at 5PM CET / 11AM EST.

    This session is a unique opportunity to hear from experts at Arduino, AWS, and Atlas Machine as they dive into how industrial IoT is transforming manufacturing operations. Whether you’re just starting to explore IoT or looking for ways to optimize your existing systems, this webinar is for you.

    What to expect

    In this session, we’ll be sharing actionable tips and insights to help you easily integrate IoT into your operations:

    • Learn how to collect data quickly — without months of delays.
    • Understand how to retrofit your legacy equipment and get real-time visibility into your operations.
    • Discover how to integrate the data from Arduino devices with the rest of your business systems on AWS for smarter decision-making.

    We’ll also be sharing real-world success stories, including how Atlas Machine & Supply leveraged Arduino (Opta and Arduino Cloud) and AWS solutions for predictive maintenance and remote monitoring across their global fleet of industrial equipment.

    And don’t forget, we’ll have a live Q&A session at the end, where you can ask our experts anything. Feel free to submit your questions throughout the webinar, and we’ll do our best to address as many as possible.

    Meet the speakers

    We’re excited to be joined by a fantastic lineup of speakers who are experts in their fields:

    • Richie Gimmel, CEO at Atlas Machine & Supply
    • Danny Kent, IoT Development Director at Atlas Machine & Supply
    • Andrea Richetta, Principal Product Evangelist at Arduino
    • Gabriel Verreault, Senior Manufacturing Partner Solutions Architect at AWS

    Why you should join

    If you’ve been looking for a way to simplify IoT adoption in your manufacturing operations, this is your chance to learn from industry leaders who are making it happen. Whether you’re trying to modernize old equipment or integrate IoT into your larger business strategy, you’ll walk away with valuable insights and tips you can start using right away.

    Save your spot today! Don’t miss out on this chance to hear from the experts and get your questions answered. We can’t wait to see you there!

    The post Simplifying IoT for smarter manufacturing: Join the chat with Arduino, AWS, and Atlas Machine appeared first on Arduino Blog.

    Website: LINK

  • Disney+ and Hulu now available with Google Play PointsDisney+ and Hulu now available with Google Play PointsGeneral Manager, Apps on Google Play

    Disney+ and Hulu now available with Google Play PointsDisney+ and Hulu now available with Google Play PointsGeneral Manager, Apps on Google Play

    Reading Time: < 1 minute

    Disney+ is the streaming home of Disney, Pixar, Marvel, Star Wars and National Geographic, with thousands of award-winning classics and originals. Eligible Play Points members in the United States, Germany, Italy, Spain, United Kingdom, Japan, and Taiwan can claim Disney+ on us, and watch new releases like Disney and Pixar’s “Inside Out 2” and Marvel Television’s “Agatha All Along.”

  • Ocean Prompting Process: How to get the results you want from an LLM

    Ocean Prompting Process: How to get the results you want from an LLM

    Reading Time: 5 minutes

    Have you heard of ChatGPT, Gemini, or Claude, but haven’t tried any of them yourself? Navigating the world of large language models (LLMs) might feel a bit daunting. However, with the right approach, these tools can really enhance your teaching and make classroom admin and planning easier and quicker. 

    That’s where the OCEAN prompting process comes in: it’s a straightforward framework designed to work with any LLM, helping you reliably get the results you want. 

    The great thing about the OCEAN process is that it takes the guesswork out of using LLMs. It helps you move past that ‘blank page syndrome’ — that moment when you can ask the model anything but aren’t sure where to start. By focusing on clear objectives and guiding the model with the right context, you can generate content that is spot on for your needs, every single time.

    5 ways to make LLMs work for you using the OCEAN prompting process

    OCEAN’s name is an acronym: objective, context, examples, assess, negotiate — so let’s begin at the top.

    1. Define your objective

    Think of this as setting a clear goal for your interaction with the LLM. A well-defined objective ensures that the responses you get are focused and relevant.

    Maybe you need to:

    • Draft an email to parents about an upcoming school event
    • Create a beginner’s guide for a new Scratch project
    • Come up with engaging quiz questions for your next science lesson

    By knowing exactly what you want, you can give the LLM clear directions to follow, turning a broad idea into a focused task.

    2. Provide some context 

    This is where you give the LLM the background information it needs to deliver the right kind of response. Think of it as setting the scene and providing some of the important information about why, and for whom, you are making the document.

    You might include:

    • The length of the document you need
    • Who your audience is — their age, profession, or interests
    • The tone and style you’re after, whether that’s formal, informal, or somewhere in between

    All of this helps the LLM include the bigger picture in its analysis and tailor its responses to suit your needs.

    3. Include examples

    By showing the LLM what you’re aiming for, you make it easier for the model to deliver the kind of output you want. This is called one-shot, few-shot, or many-shot prompting, depending on how many examples you provide.

    You can:

    • Include URL links 
    • Upload documents and images (some LLMs don’t have this feature)
    • Copy and paste other text examples into your prompt

    Without any examples at all (zero-shot prompting), you’ll still get a response, but it might not be exactly what you had in mind. Providing examples is like giving a recipe to follow that includes pictures of the desired result, rather than just vague instructions — it helps to ensure the final product comes out the way you want it.

    4. Assess the LLM’s response

    This is where you check whether what you’ve got aligns with your original goal and meets your standards.

    Keep an eye out for:

    • Hallucinations: incorrect information that’s presented as fact
    • Misunderstandings: did the LLM interpret your request correctly?
    • Bias: make sure the output is fair and aligned with diversity and inclusion principles

    A good assessment ensures that the LLM’s response is accurate and useful. Remember, LLMs don’t make decisions — they just follow instructions, so it’s up to you to guide them. This brings us neatly to the next step: negotiate the results.

    5. Negotiate the results

    If the first response isn’t quite right, don’t worry — that’s where negotiation comes in. You should give the LLM frank and clear feedback and tweak the output until it’s just right. (Don’t worry, it doesn’t have any feelings to be hurt!) 

    When you negotiate, tell the LLM if it made any mistakes, and what you did and didn’t like in the output. Tell it to ‘Add a bit at the end about …’ or ‘Stop using the word “delve” all the time!’ 

    How to get the tone of the document just right

    Another excellent tip is to use descriptors for the desired tone of the document in your negotiations with the LLM, such as, ‘Make that output slightly more casual.’

    In this way, you can guide the LLM to be:

    • Approachable: the language will be warm and friendly, making the content welcoming and easy to understand
    • Casual: expect laid-back, informal language that feels more like a chat than a formal document
    • Concise: the response will be brief and straight to the point, cutting out any fluff and focusing on the essentials
    • Conversational: the tone will be natural and relaxed, as if you’re having a friendly conversation
    • Educational: the language will be clear and instructive, with step-by-step explanations and helpful details
    • Formal: the response will be polished and professional, using structured language and avoiding slang
    • Professional: the tone will be business-like and precise, with industry-specific terms and a focus on clarity

    Remember: LLMs have no idea what their output says or means; they are literally just very powerful autocomplete tools, just like those in text messaging apps. It’s up to you, the human, to make sure they are on the right track. 

    Don’t forget the human edit 

    Even after you’ve refined the LLM’s response, it’s important to do a final human edit. This is your chance to make sure everything’s perfect, checking for accuracy, clarity, and anything the LLM might have missed. LLMs are great tools, but they don’t catch everything, so your final touch ensures the content is just right.

    At a certain point it’s also simpler and less time-consuming for you to alter individual words in the output, or use your unique expertise to massage the language for just the right tone and clarity, than going back to the LLM for a further iteration. 

    Ready to dive in? 

    Now it’s time to put the OCEAN process into action! Log in to your preferred LLM platform, take a simple prompt you’ve used before, and see how the process improves the output. Then share your findings with your colleagues. This hands-on approach will help you see the difference the OCEAN method can make!

    Sign up for a free account at one of these platforms:

    • ChatGPT (chat.openai.com)
    • Gemini (gemini.google.com)

    By embracing the OCEAN prompting process, you can quickly and easily make LLMs a valuable part of your teaching toolkit. The process helps you get the most out of these powerful tools, while keeping things ethical, fair, and effective.

    If you’re excited about using AI in your classroom preparation, and want to build more confidence in integrating it responsibly, we’ve got great news for you. You can sign up for our totally free online course on edX called ‘Teach Teens Computing: Understanding AI for Educators’ (helloworld.cc/ai-for-educators). In this course, you’ll learn all about the OCEAN process and how to better integrate generative AI into your teaching practice. It’s a fantastic way to ensure you’re using these technologies responsibly and ethically while making the most of what they have to offer. Join us and take your AI skills to the next level!

    A version of this article also appears in Hello World issue 25.

    Website: LINK
  • 10 indie game studios making moves in Latin America10 indie game studios making moves in Latin AmericaGoogle Play

    10 indie game studios making moves in Latin America10 indie game studios making moves in Latin AmericaGoogle Play

    Reading Time: < 1 minute

    Minimol Games, Brazil

    “Securing this funding [is] a transformative opportunity for our studio, enabling us to finally bring ‚Chessarama’ to the mobile platform — a crucial step in our long-term growth strategy. We recognize the immense potential of the mobile market, particularly on Google Play, and with this support, we can expand our reach, connecting with new audiences and delivering an accessible, high-quality experience for chess and puzzle fans worldwide.”

    Raphael Dias da Silva and Helena Magarinos Souto (co-founders)

  • Putting AI to use

    Putting AI to use

    Reading Time: < 1 minute

    Lucy Hattersley has all the AI kit and an urge to build something real

  • Play’s Best Of awards showcase Asia-Pacific developersPlay’s Best Of awards showcase Asia-Pacific developersVice President

    Play’s Best Of awards showcase Asia-Pacific developersPlay’s Best Of awards showcase Asia-Pacific developersVice President

    Reading Time: 2 minutes

    Today we released Play’s 2024 Best of Awards, which honor the year’s most creative apps and games. Developers from Asia-Pacific took home over 60% of the awards — a testament to the creativity coming from the region, powered by millions of Android developers.

    In the gaming category, Asia-Pacific developers took home 62% of all gaming awards handed out in the United States, Japan, Korea, India, Indonesia and Taiwan. Chinese studio FARLIGHT’s AFK Journey claimed the “Best Game” honor for its stunning visuals and immersive fantasy world, while Korea’s Devsisters Corporation took home the “Best for Google Play Games on PC” award for CookieRun: Tower of Adventures, delighting players with its adventurous gameplay across mobile and web.

    Asia-Pacific developers picked up a third of the global awards in the entertainment apps category, with China and Korea emerging as powerhouses, particularly with mobile-friendly, short-form content. China’s DramaBox – Stream Drama Shorts won “Best for Fun” in Indonesia and Hong Kong, while Korea’s Vigloo – Premier Short Dramas snagged “Best Hidden Gem” in Korea, proving the strong appeal of drama shorts and showing how Play is critical for developers who aspire to go global. In fact, 85% of monthly active users of Korean-developed apps were based overseas in 2023.

    Manga apps continued to thrive in Japan, where we recently launched a dedicated Comics space on Play to help fans discover new apps and content. SHOGAKUKAN INC’s MangaONE, which won the „Best App“ award, redesigned its interface to celebrate its 10th anniversary, giving manga fans a fresh way to enjoy their favorite titles. JumpTOON, a new app from SHUEISHA INC. designed specifically for webtoons, snagged the „Best for Fun“ award.

    AI is also increasingly transforming app experiences, and developers from Asia-Pacific are leading the way. In India, almost 1,000 apps and games are using AI technology. One example is Hey Alle’s Alle – Your AI Fashion Stylist, which offers AI-powered personalized style advice based on occasion, body type and facial features. The app snagged both the „Best App“ and „Best for Fun“ awards in the country.

    Singapore’s Notewise stood out with its AI-powered note-taking app, earning the “Best for Personal Growth” award in Taiwan and Hong Kong for making work and learning more efficient. China’s Starii Tech also made waves with Winkit – AI Video Enhancer, an app that allows users to create custom videos and animated avatars, winning the “Best Hidden Gem” award in several Asia-Pacific markets.

  • 4 ways Android has made switching even better4 ways Android has made switching even betterSenior Director, Android

    4 ways Android has made switching even better4 ways Android has made switching even betterSenior Director, Android

    Reading Time: 2 minutes

    Over the past two years, we’ve been working behind the scenes to improve the process of setting up your Android phone and transferring your information, so you can bring what’s important to you, with you.

    Here are the top four updates we’ve made to make the switch even easier:

    1. Android Switch on phones around the world

    To make the process of switching to a new device as simple and straightforward as possible, we launched Android Switch, our streamlined onboarding experience, with several phone manufacturers.

    We know it’s important to be able to get your chats, calendars, contacts and more on your new device, including the nitty-gritty information like your Wi-Fi, screen lock and Google account. That’s why our Android Switch experience walks you through clear steps to get set up and to learn about the features on your new device.

    2. Faster data transfers

    If you’re using a cable to switch from iOS to Android, it’s 40% faster to transfer your data compared to 2023. This saves hours for people who have a lot of data to move from phone to phone.

    Having the information you care about on your new phone is essential to making it feel like your own.

    3. More flexibility for switchers and upgraders

    If you’d rather check out your new phone first and transfer your data later, we’ve got you covered. Available with Pixel 9 and coming to more Android phone makers in 2025, you can quickly complete your initial setup and get your data when you’re ready. When ready, just head to Settings to copy data from your old device or check out the app on Google Play. From there, you’ll be able to connect to your old device and get the information you want, when you want it.

    For those upgrading an Android device to a new one, we’ve got an express setup option. You can opt to transfer only the information that is stored on the device, and none of the information you already have stored in the cloud. And, if you have a Pixel Watch, that device will prompt you to transfer data to your new phone at the end of setup.

    4. Easier messaging with the people you love

    Of course, the way you connect with friends and family is just as important as the information on your phone. This year, Apple adopted RCS. Now, whether your loved ones are on Android or iOS devices, you can send high-res images and videos, react to text messages with any emoji you like, and add or remove people from group chats.

    Check out more on our Android Switch website, or find the next best phone for you.

    Website: LINK
  • 2024’s greatest hits on Google TV2024’s greatest hits on Google TVAssociate Product Marketing Manager

    2024’s greatest hits on Google TV2024’s greatest hits on Google TVAssociate Product Marketing Manager

    Reading Time: < 1 minute

    This year’s top entertainment on Google TV had it all: action-packed thrills, dramatic twists, and even a few laughs. But with so much great content out there, it can be hard to keep up.

    Today, we’re making it easier for you to look back at the most popular shows, movies, and music from this year with the Best of 2024 collection on Google TV devices and the Google TV app. So whether you’re in the mood to re-watch, or finally tune in to that show everyone was talking about, Google TV makes it easier to choose what to watch, with the best of 2024 all in one place.

    You can save Best of 2024 content to your watchlist to enjoy later and share your favorite titles with friends and family using the share button on the Google TV app.

    Dive into action with the most watched movie

    Looking for a good action thriller for your next movie night? “Road House,” the remake of the 1989 classic, has an edge-of-your-seat plot, a superstar cast, and a touch of nostalgia. Check

    Website: LINK
  • This fake CRT TV works using lasers and UV magic

    This fake CRT TV works using lasers and UV magic

    Reading Time: 2 minutes

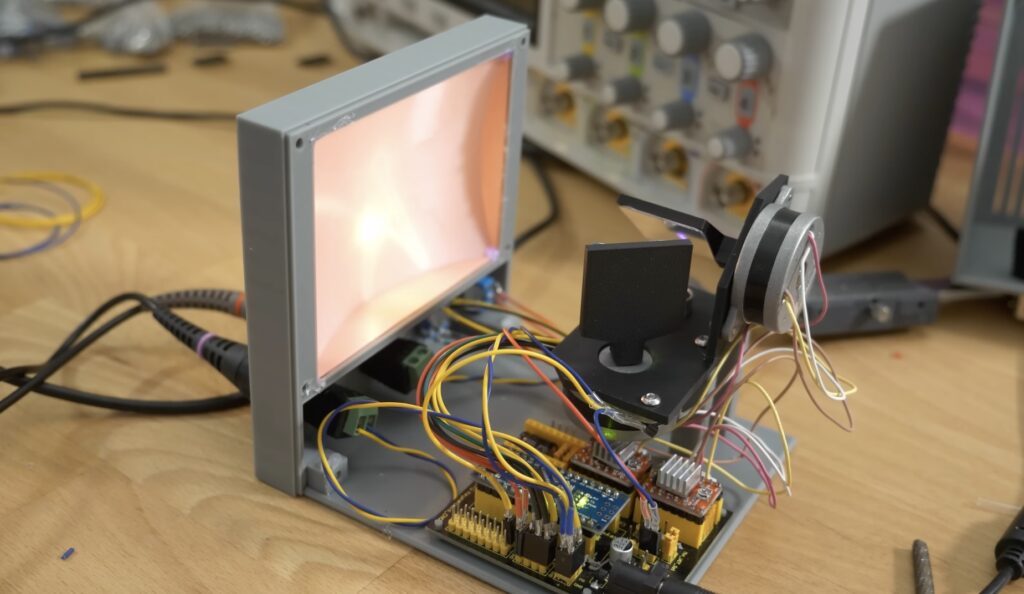
    Until the 21st century, cathode-ray tube (CRT) TVs were pretty much the only option. As such, media was made to suit them. Retro video game consoles in particular look best on CRT TVs. But those old TVs are getting hard to find and desirable models are now quite expensive. So, bitluni built his own “fake CRT TV” that works using lasers and UV magic.

    Conventional CRT TVs work by shining an electron beam onto a phosphorescent screen, which glows for a moment after being excited by the electrons. Electromagnetic coils deflect that beam so it can scan across the X and Y axes of the screen. Add some clever modulation and you’ve got moving pictures.

    The fake CRT made by bitluni works in a similar manner, except it has a 405nm laser pointer instead of an electron beam, stepper motors instead of deflection coils, and a screen printed in special UV-reactive filament instead of a phosphorescent screen. The two stepper motors move mirrors to direct the laser and an Arduino Nano board controls those through a CNC shield.

    However, that system is far slower than that of a real CRT, so bitluni had to operate it a bit differently. CRT TVs normally make raster images by scanning across the entire screen, row by row, until the beam reaches the bottom and the process repeats. The fake CRT TV works displays vector graphics instead. That means that it moves the laser to trace the lines of the shapes to display, which is the same way that old tube oscilloscopes worked.

    But that is still pretty slow, so bitluni can’t display anything particularly complex or fast-moving. Still, it looks great in the 3D-printed retro-style enclosure. It isn’t suited to playing Super Mario Bros., but it is a nice decorative piece. 

    [youtube https://www.youtube.com/watch?v=9qPc_I1V6go?feature=oembed&w=500&h=281]

    The post This fake CRT TV works using lasers and UV magic appeared first on Arduino Blog.

    Website: LINK
  • It’s silver, it’s green, it’s the Batteryrunner! An Arduino-powered, fully custom electric car

    It’s silver, it’s green, it’s the Batteryrunner! An Arduino-powered, fully custom electric car

    Reading Time: 5 minutes

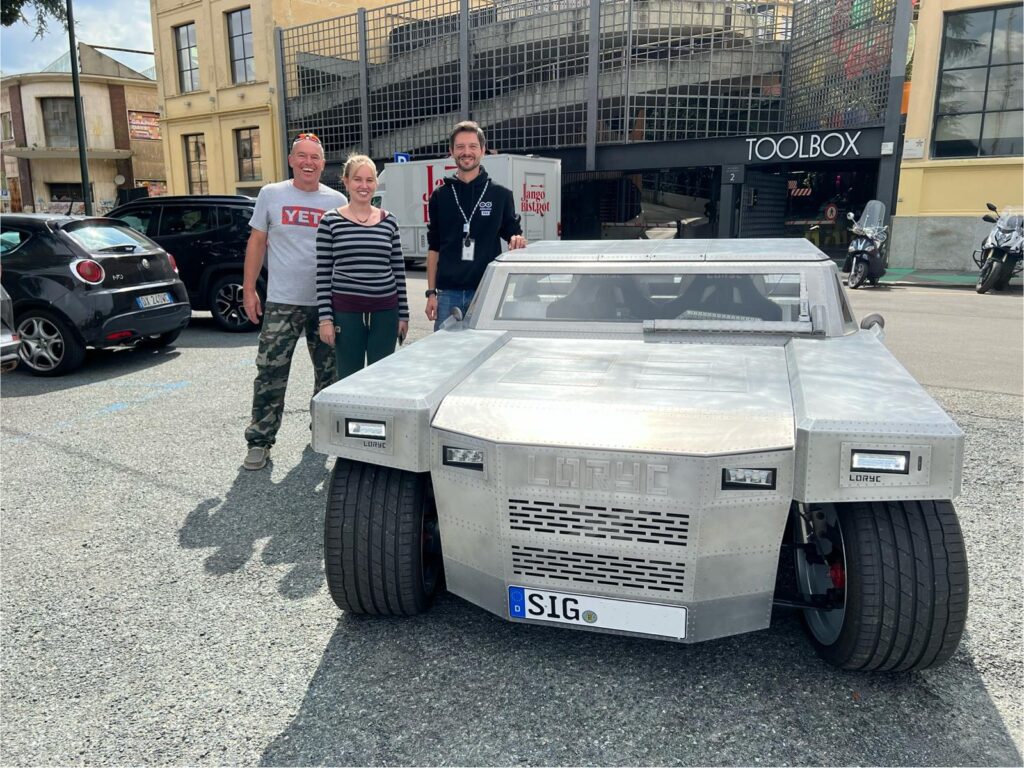
    Inventor Charly Bosch and his daughter Leonie have crafted something truly remarkable: a fully electric, Arduino-powered car that’s as innovative as it is sustainable. Called the Batteryrunner, this vehicle is designed with a focus on environmental impact, simplicity, and custom craftsmanship. Get ready to be inspired by a car that embodies the spirit of creativity!

    When the Arduino team saw the Batteryrunner up close at our offices in Turin, Italy, we were genuinely impressed – especially knowing that Charly and Leonie had driven over 1,000 kilometers in this unique car! Their journey began on a small island in Spain, took them across southern France, and brought them to Italy before continuing on to Austria. 

    Building a car with heart – and aluminum

    In 2014, Charly took over LORYC – a Mallorca carmaker that became famous in the 1920s for its winning mountain racing team. His idea was to ??build a two-seater as a tribute to the LORYC sports legacy, but with a contemporary electric drive: that’s how the first LORYC Electric Speedster was born. “We’re possibly the smallest car factory in the world, but have a huge vision: to prove electric cars can be cool… and crazy,” Charly says. 

    With a passion for EVs rooted in deep environmental awareness, he decided to push the boundaries of car manufacturing with the Batteryrunner: a car where each component can be replaced and maintained, virtually forever. 

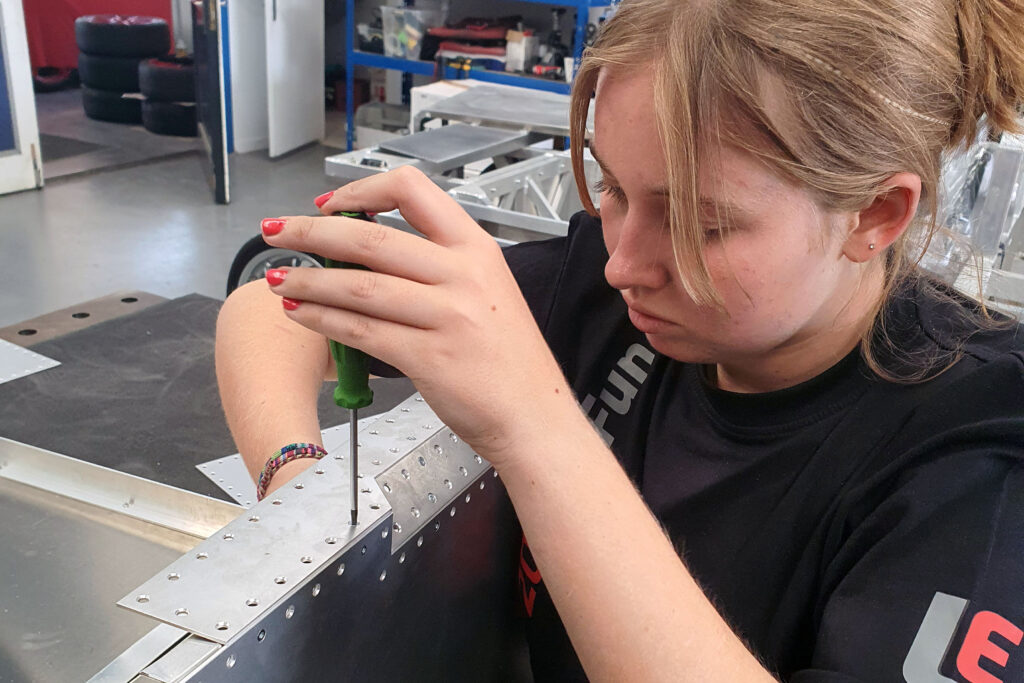
    Indeed, it’s impossible not to notice that the vehicle is made entirely from aluminum: specifically, 5083 aluminum alloy. This material is extremely durable and can be easily recycled, unlike plastics or carbon fiber which end up as waste at the end of their lifecycle. 

    The car’s bodywork includes thousands of laser-cut aluminum pieces. “This isn’t just a prototype: it’s a real car – one that we’ve already been able to drive across Europe,” Charly says.

    The magic of learning to do-it-yourself

    “People sometimes ask me why I use Arduino, as if it was only for kids. Simple: Arduino never failed me,” is Charly’s quick reply. After over a decade of experience with a variety of maker projects, it was an easy choice for the core of Batteryrunner’s system. 

    In addition to reliability, Charly appreciates the built-in ease-of-use and peer support: “The Arduino community helps me with something new every week. If you are building a whole car on your own, you can’t be an expert in every single aspect of it. So, anytime I google something, I start by typing ‘Arduino’, and follow with what I need to know. That’s how I get content that I can understand.” 

    This has allowed Charly and Leonie to handle every part of the car’s design, coding, and assembly, creating a fully integrated system without needing to rely on external suppliers. 

    Using Arduino for unstoppable innovation

    A true labor of love, after four years since its inception the Batteryrunner is a working (and talking!) car, brought to life by 10+ Arduino boards, each with specific functions

    For instance:

    • An Arduino Nano is used to manage the speedometer (a.k.a. the “SpeedCube”), in combination with a CAN bus module, stepper motor module, and stepper motor.

    • Different Arduino Mega 2560, connected via CAN bus modules, control the dashboard, steering wheel, lights and blinkers, allowing users to monitor and manage various functions.

    Arduino UNO R4 boards with CAN bus transceivers are used to handle different crucial tasks – from managing the 400-V battery system and Tesla drive unit to operating the linear windshield wiper and the robotic voice system.

    Charly already plans on upgrading some of the current solutions with additional UNO R4 boards, and combining the GIGA R1 WiFi and GIGA Display Shield for a faster and Wi-Fi®-connected “InfoCube” dashboard.

    All in all, the Batteryrunner is more than a car: it’s a rolling platform for continuous innovation, which Charly is eager to constantly improve and refine. His next steps? Integrating smartphone control via Android, adding sensors for self-parking, and experimenting with additional features that Arduino makes easy to implement. “This is a car that evolves,” Charly explains. “I can add or change features as I go, and Arduino makes it possible.”

    Driving environmental awareness

    Finally, we see Batteryrunner as more than a fun, showstopping car. Given Charly’s commitment to low-impact choices, it’s a way to shift people’s mindset about sustainable mobility. The environmental challenges we face today require manufacturers to go well beyond simply replacing traditional engines with electric ones: vehicles need to be completely redesigned, according to sustainability and simplicity principles. To achieve this, we need people who are passionate about the environment, technology, and creativity. That’s why we fully agree with Charly, when he says, “I love makers! We need them to change the world.”

    Follow LORYC on Facebook or Instagram to see Charly and Leonie’s progress, upgrades, and experiments, and stay inspired by this incredible, Arduino-powered journey.

    The post It’s silver, it’s green, it’s the Batteryrunner! An Arduino-powered, fully custom electric car appeared first on Arduino Blog.

    Website: LINK

  • PiDog robot review

    PiDog robot review

    Reading Time: 3 minutes

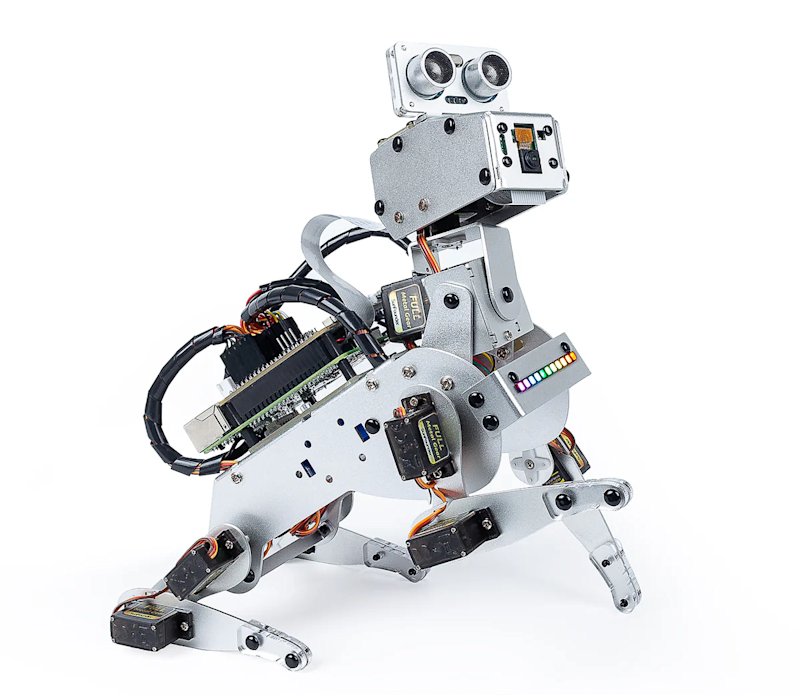
    The first thing to decide is which Raspberry Pi model to use before assembling the kit. PiDog will work with Raspberry Pi 4, 3B+, 3B, and Zero 2 W. Using a Raspberry Pi 5 is not recommended since its extra power requirements put too much of a strain on the battery power – PiDog uses a lot of current when standing or moving – so it’s likely to suffer from under-voltage. We opted for a Raspberry Pi 4, although even then we did have a few issues with crashes when the battery level was low.

    Canine construction

    With a kit comprising a huge array of parts, building a PiDog is no mean feat. We reckon it took us around five to six hours, although we were taking our time to get it right. The printed diagram-based instructions are easy to follow, however, and there are online videos if you get stuck. Apart from a few fiddly bits, including manipulating some tiny screws and nuts, it’s an enjoyable process. Helpfully, the fixtures and fittings – including numerous sizes of screws and plastic rivets – come in labelled bags. The kit includes a couple of screwdrivers too.

    The main chassis is built from aluminium alloy panels, giving this dog a shiny and robust ‘coat’. There are also several acrylic pieces, including some to build a stand to place PiDog on when calibrating its leg servos. A nice touch.

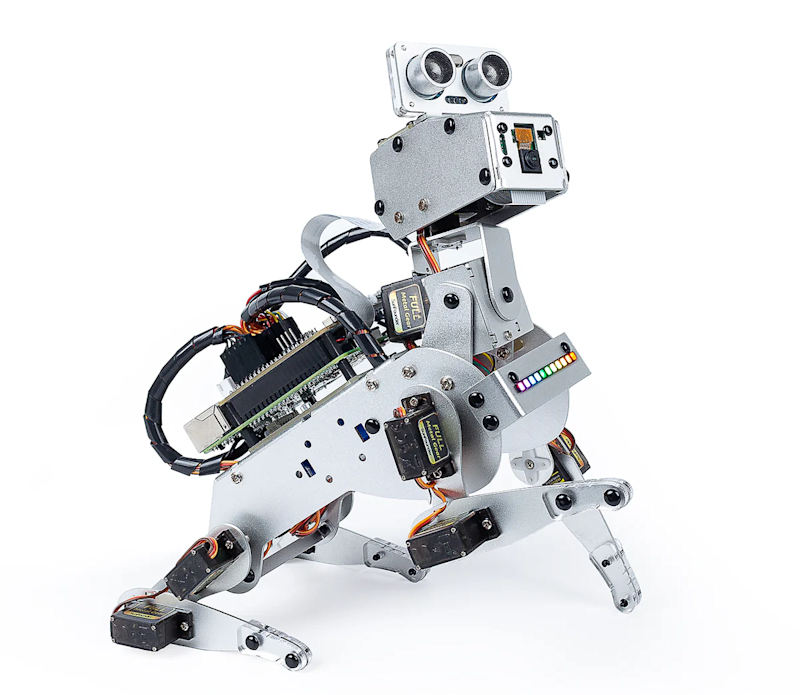
    PiDog takes a while to build from the kit, but is a lot of fun to play with and program in Python

    Raspberry Pi sits on a sound direction sensor module and is then mounted with a Robot HAT which handles all the servos (via PWM pins), sensor inputs, and battery management. Portable power is supplied by a custom battery pack comprising two 18650 batteries with a capacity of 2000mAh, which takes a couple of hours to charge fully.

    Doggy-do code

    Once you’ve assembled the kit, it’s time to fine-tune the calibration of the servos with a script. You’ll have used a zeroing script during assembly to get the rough positions right, so will have already installed the PiDog libraries and software in Raspberry Pi OS.

    Detailed online documentation guides you through everything, including running a script to enable I2S sound from the robot’s speaker. It also covers a good range of Python example programs that showcase what PiDog can do.

    In patrol mode, for instance, PiDog walks forward and stops to bark when it detects something ahead. The react demo sees it rear up and bark when approached from the front, but roll its head and wag its tail when you pet the touch sensor on its neck. There’s also a balance demo to showcase its 6DOF IMU module that enables PiDog to self-balance when walking on a tilting tabletop.

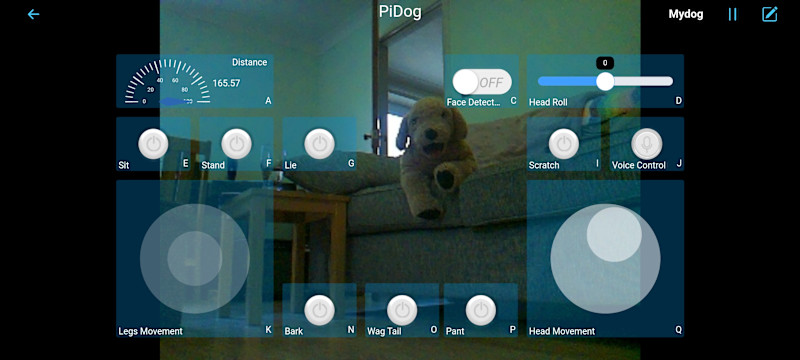
    Control PiDog remotely from an app, with a customisable widget layout, and view its camera feed

    There are a few examples using the camera module with OpenCV computer vision. A face-tracking demo generates a web server, enabling you to see the camera view on a web page. There’s also the option to control PiDog with an iOS or Android app, complete with live camera feed.

    You can even communicate with your PiDog via GPT-4o AI, using text or spoken commands – with a USB mic (not supplied) equipped. It takes a bit of setting up, using an API key, but the online guide takes you through the process.

    Verdict

    9/10

    Great fun to play with, this smart canine companion has an impressive feature set and lots of possibilities for further training.

    Specs

    Features: 12 × metal-gear servos, Robot HAT, camera module, RGB LED strip

    Sensors: Sound direction, 6-DOF IMU, dual touch, ultrasonic distance

    Works with: Raspberry Pi 4, 3B+, 3B, Zero 2 W

    Power: USC-C, rechargeable 2×18650 battery pack

  • This Halo helmet features an adjustable-transparency RGB-backlit visor

    This Halo helmet features an adjustable-transparency RGB-backlit visor

    Reading Time: 2 minutes

    The Halo franchise is full of iconic designs, from vehicles like the Warthog to weapons like the Needler. But the armor, such as the Spartan armor worn by Master Chief, is arguably the most recognizable. The helmets are especially cool, and LeMaster Tech put his own unique spin on an ODST-style helmet by adding an adjustable-transparency RGB-backlit visor.

    The ODST helmet that LeMaster Tech used for this project was made by Anthony Andress, AKA “enforce_props,” and it is a solid resin casting. LeMaster Tech’s goal was to make the coolest visor imaginable for that helmet.

    He achieved that using a PDLC (Polymer Dispersed Liquid Crystal) “smart film” that changes from opaque to transparent when it receives current. That film can be cut to shape without causing any harm. He further enhanced the effect with some RGB LED backlighting, which illuminates the interior of the helmet and helps to make the wearer’s face more visible when the visor is transparent.

    LeMaster Tech used an Arduino Nano board to the control the PDLC film and the NeoPixel individually addressable RGB LEDs. Momentary buttons in a 3D-printed enclosure control the LED lighting color, the lighting effect modes, and the visor transparency. The PDLC needs 20V to become transparent, so LeMaster Tech used a large battery to power that and a step-down converter to power the Arduino and LEDs. 

    The result looks fantastic and this helmet is going back to enforce_props, who will finish turning it into a cosplay masterpiece. 

    [youtube https://www.youtube.com/watch?v=TNV_GaneIJE?feature=oembed&w=500&h=281]

    The post This Halo helmet features an adjustable-transparency RGB-backlit visor appeared first on Arduino Blog.

    Website: LINK

  • CapibaraZero: a student’s journey in reinventing hacking tools with Arduino

    CapibaraZero: a student’s journey in reinventing hacking tools with Arduino

    Reading Time: 2 minutes

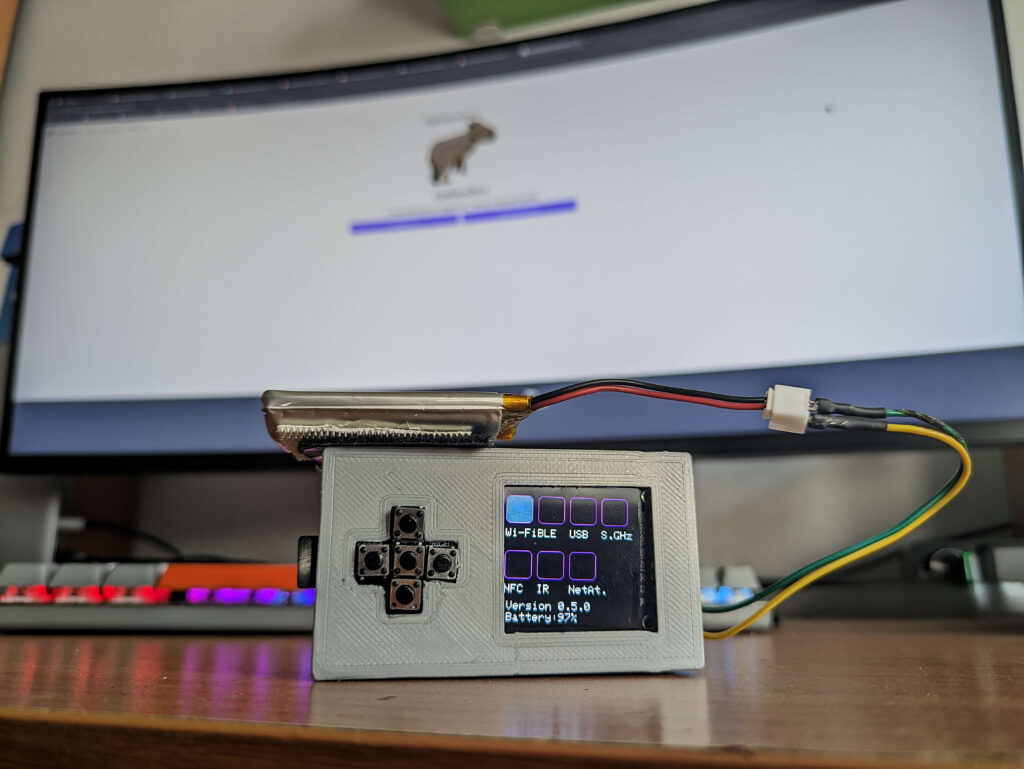
    Inventive, open-source, and cost-effective – these words perfectly describe CapibaraZero, a multifunctional security and hacking tool developed by young innovator Andrea Canale.

    Inspired by the popular Flipper Zero, a portable device used to interact with digital systems, Canale sought to create a more accessible, Arduino-based alternative. 

    The original Flipper Zero, known for its ability to read, copy, and emulate RFID tags, NFCs, and even remote control signals, has become a valuable tool for tech enthusiasts. Canale’s CapibaraZero captures much of this functionality but adds his own unique approach and vision.

    A student’s vision for an accessible, open-source alternative

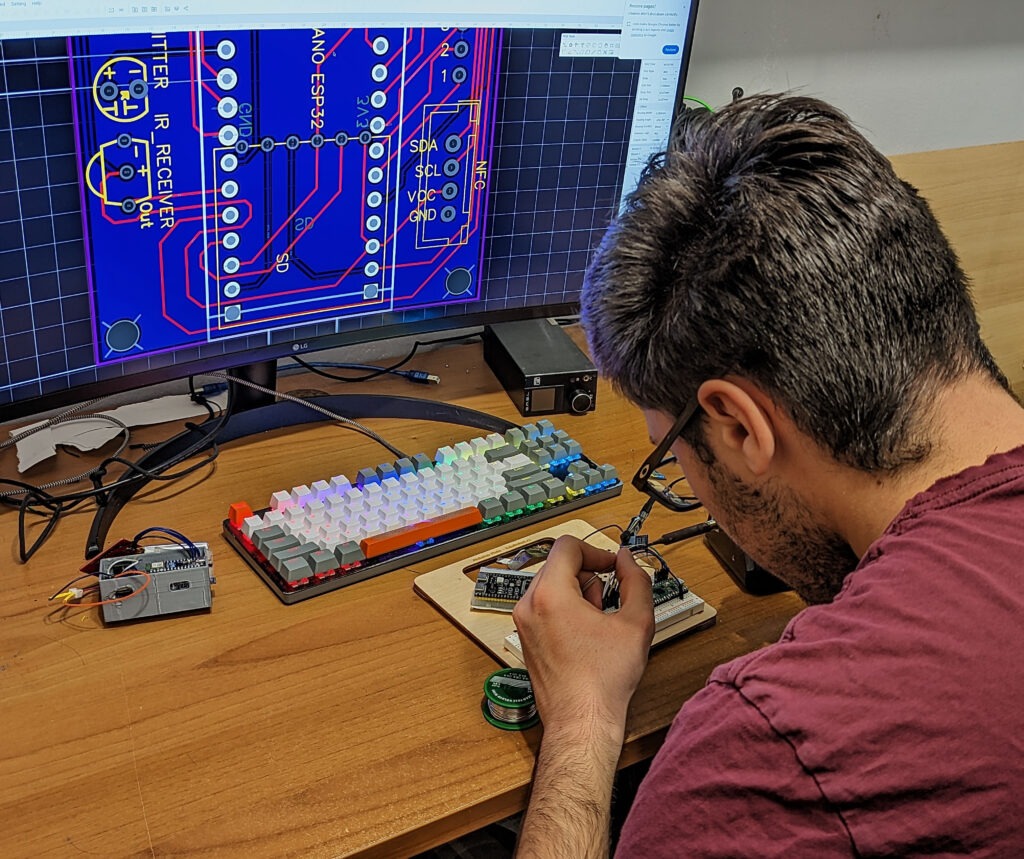
    A passionate student from the University of Turin, Canale began working on CapibaraZero while still in high school, driven by the desire to build a tool that didn’t just replicate Flipper Zero’s capabilities but improved upon them through the power of open-source design. 

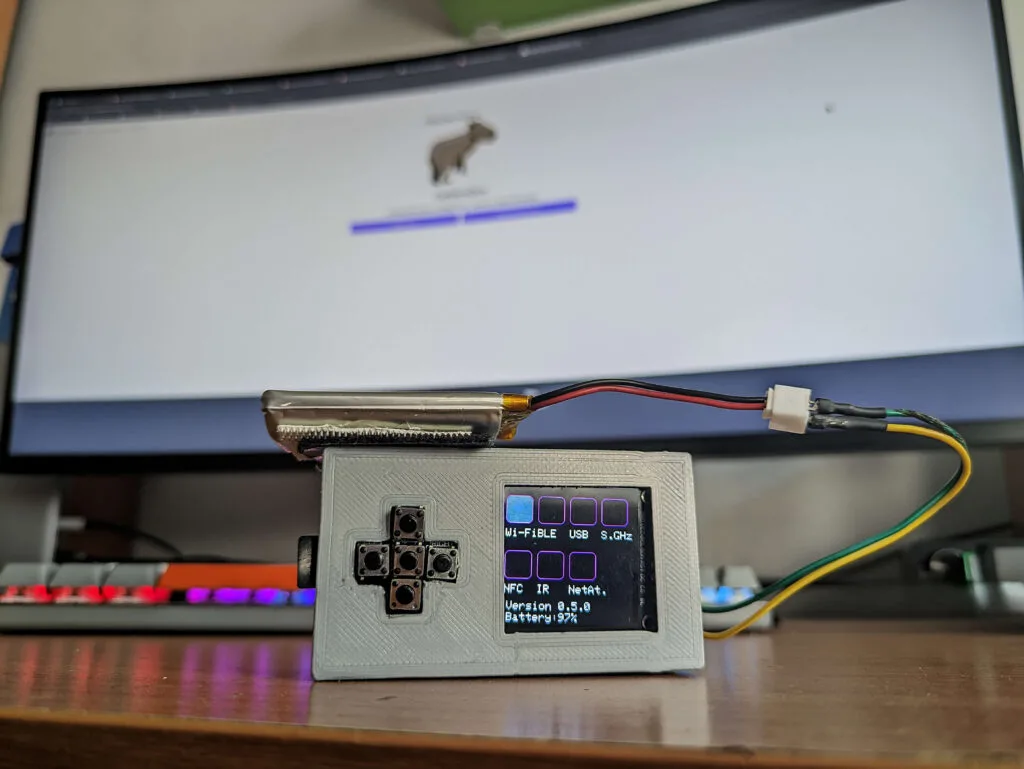
    CapibaraZero, named after Canale’s favorite animal, combines an Arduino Nano ESP32 with custom-designed PCB boards, making it adaptable and expandable. With sections dedicated to Wi-Fi®, Bluetooth®, infrared, NFC, and even network attacks, CapibaraZero allows users to experiment with multiple forms of wireless communication and digital security protocols in a way that’s affordable and accessible.

    A tool for experimentation and learning

    What makes CapibaraZero remarkable is not only its functionality but also Canale’s dedication to ensuring it remains open-source, user-friendly, and continually evolving. With additional modules for advanced features like Sub-GHz communication and network attacks (such as ARP poisoning and DHCP starvation), CapibaraZero empowers enthusiasts to expand the tool’s potential beyond traditional hacking devices

    Canale has even provided an in-depth tutorial for anyone interested in building or exploring CapibaraZero on Arduino’s Project Hub. He also is sharing the project on a dedicated website and public GitHub repository. Check out the details and join Canale’s journey to push the boundaries of DIY security tools!

    The post CapibaraZero: a student’s journey in reinventing hacking tools with Arduino appeared first on Arduino Blog.

    Website: LINK