The latest edition of The MagPi covers all the new products in depth, with detailed specifications, documentation, and interviews with the CM5 engineer. We’ve also got information on the new Raspberry Pi Pico 2 W, Raspberry Pi Hub, and Raspberry Pi Connect service.
There’s a lot of new products this month and we haven’t forgotten about the makers. This month’s mag is also packed with projects, from a Hackberry Pi to an Adventure Time electric guitar.
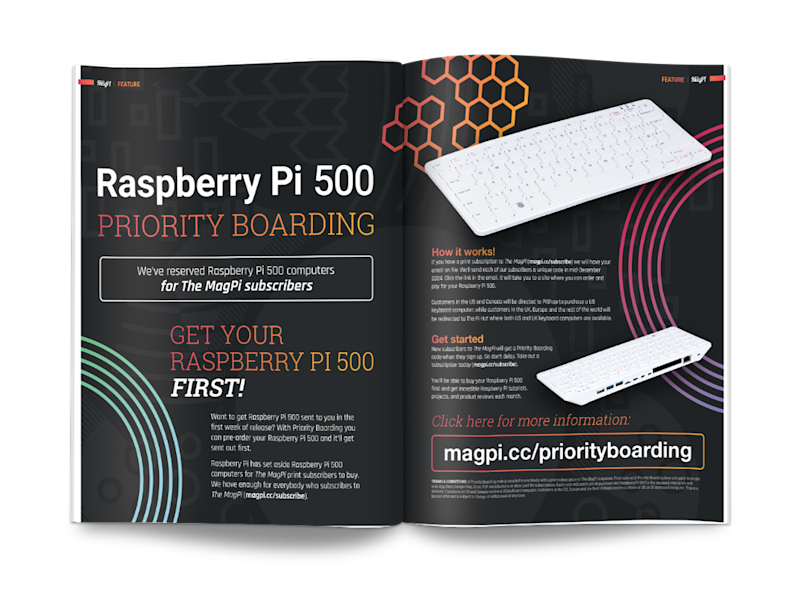
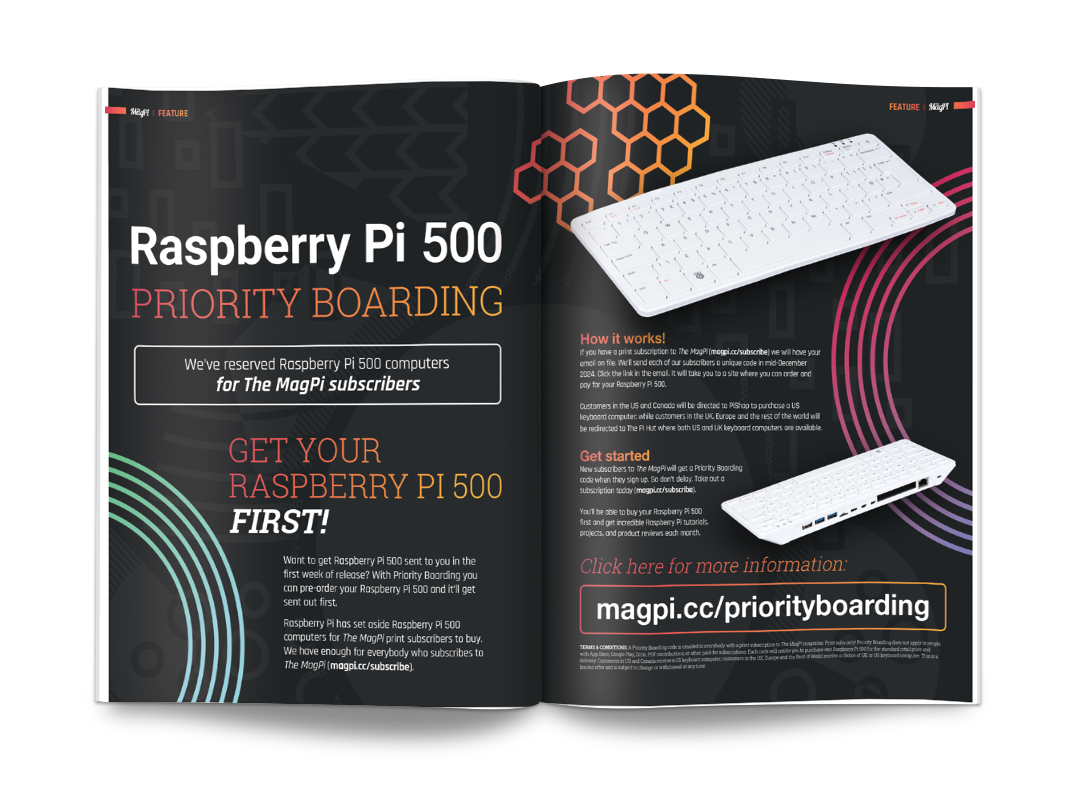
Priority Boarding is back!
Raspberry Pi 500 is in high demand. Subscribers to The MagPi can buy a Raspberry Pi 500 first with our Priority Boarding scheme. Take out a subscription to The MagPi and you’ll get a code via email to skip the line and get your Raspberry Pi 500 computer.
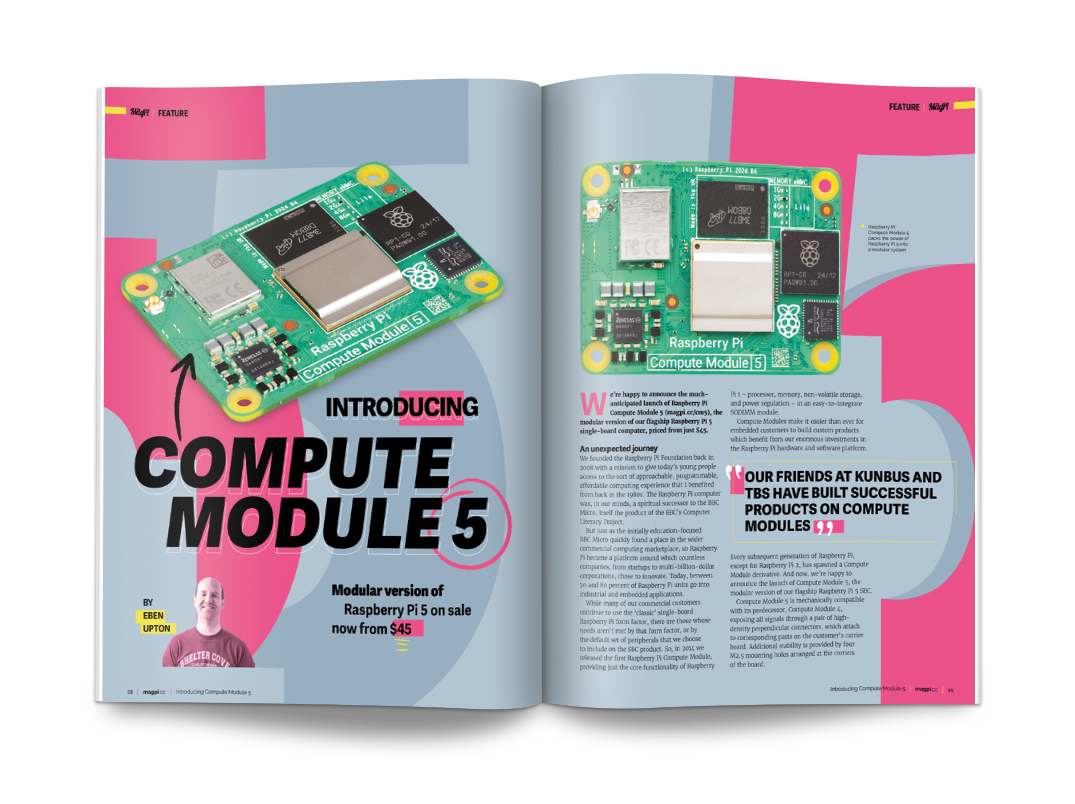
Introducing Compute Module 5
Compute Modules make it easier for embedded customers to build custom products using Raspberry Pi hardware. Compute Module 5 puts all the power of Raspberry Pi 5 into an embeddable, programmable board that can be placed inside a development product.
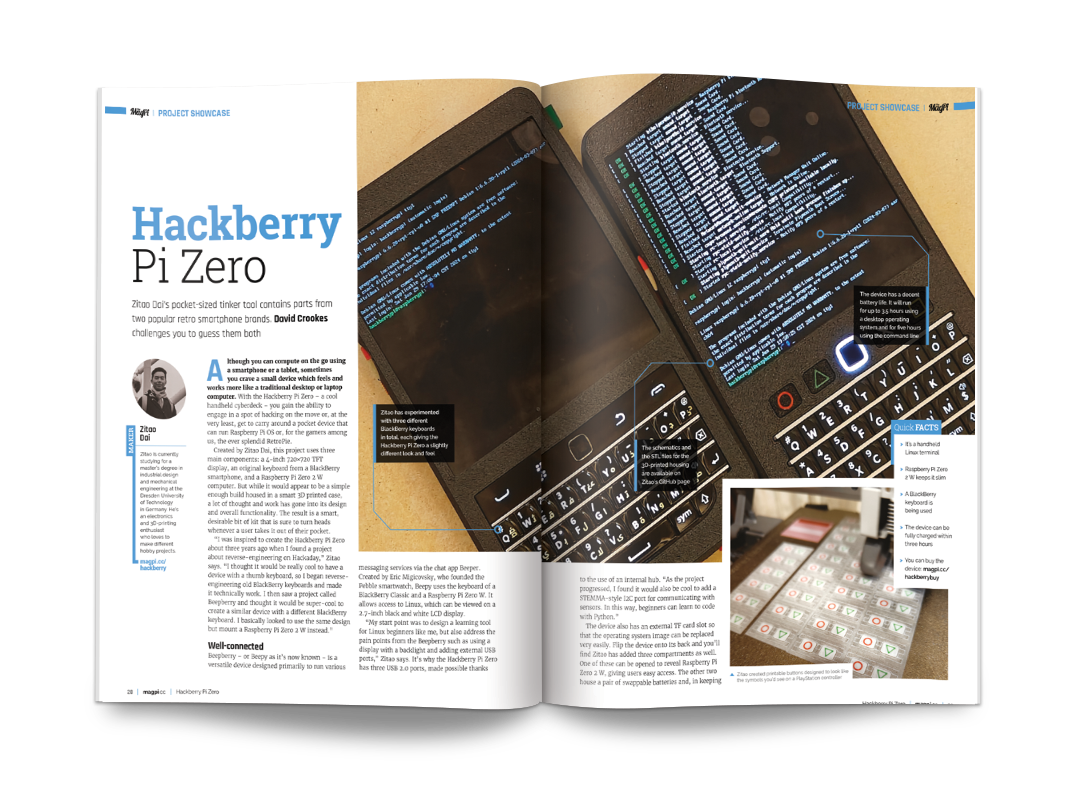
Hackberry Pi Zero
This project takes an original keyboard from a BlackBerry phone and combines it with an ultra-modern Raspberry Pi Zero 2 W and 4-inch display.
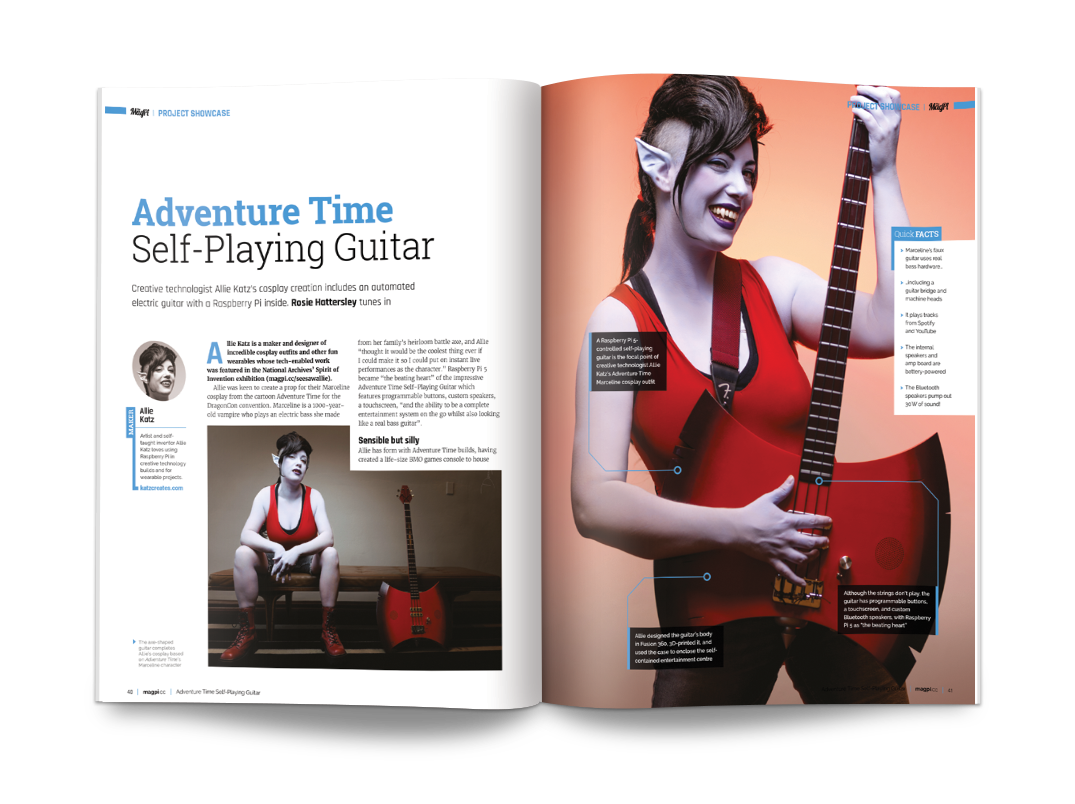
Adventure Time Guitar
Raspberry Pi 5 is “the beating heart” of this impressive Adventure Time Self-Playing Guitar which features programmable buttons, custom speakers, and a touchscreen.
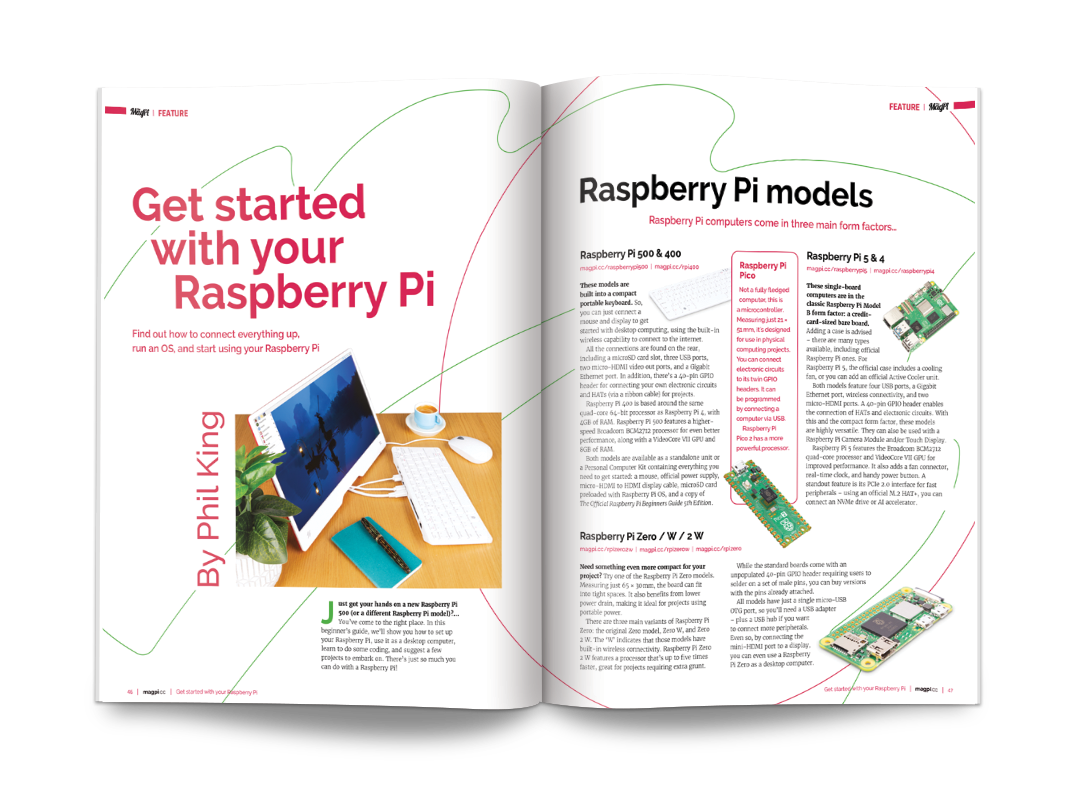
Get started with Raspberry Pi
It’s that time of the year when we welcome a new generation of makers to Raspberry Pi. Find out how to connect everything up, run an OS, and start using your Raspberry Pi with our guide to desktop computing and digital making.
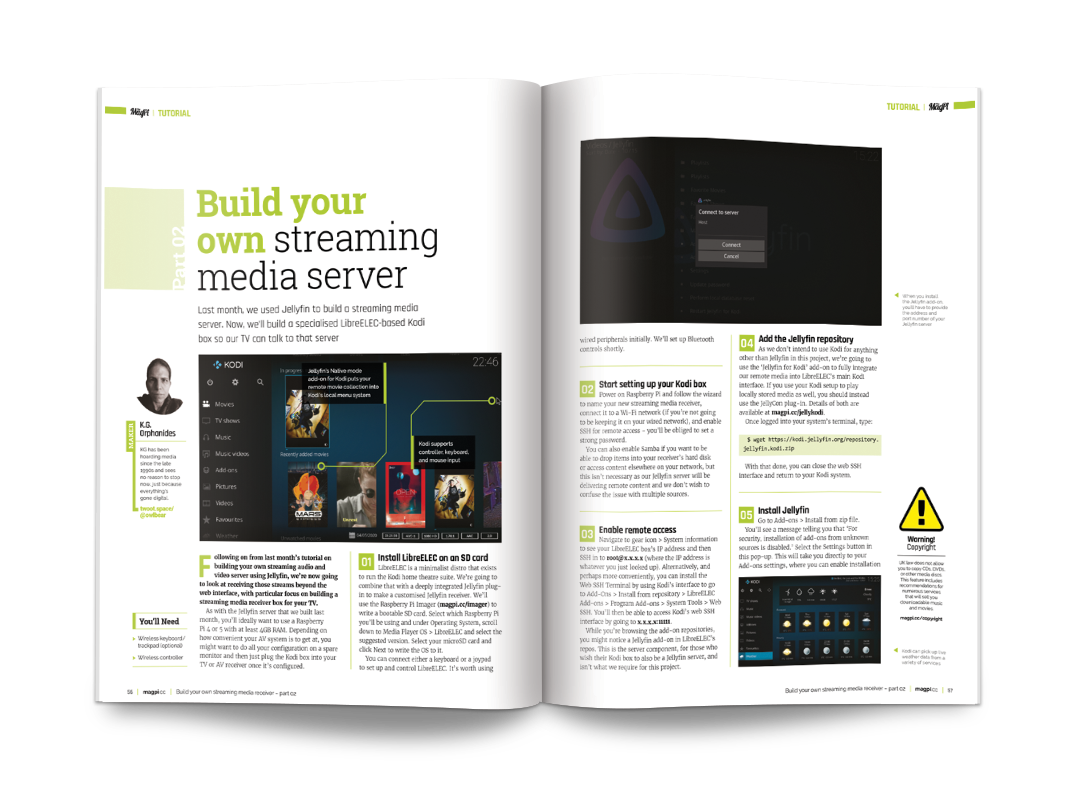
Build your own streaming server
This month KG builds a specialised LibreELEC-based Kodi box so our TV can talk to a server we build in issue 148. We look at receiving those streams beyond the web interface by building a streaming media receiver box for your TV
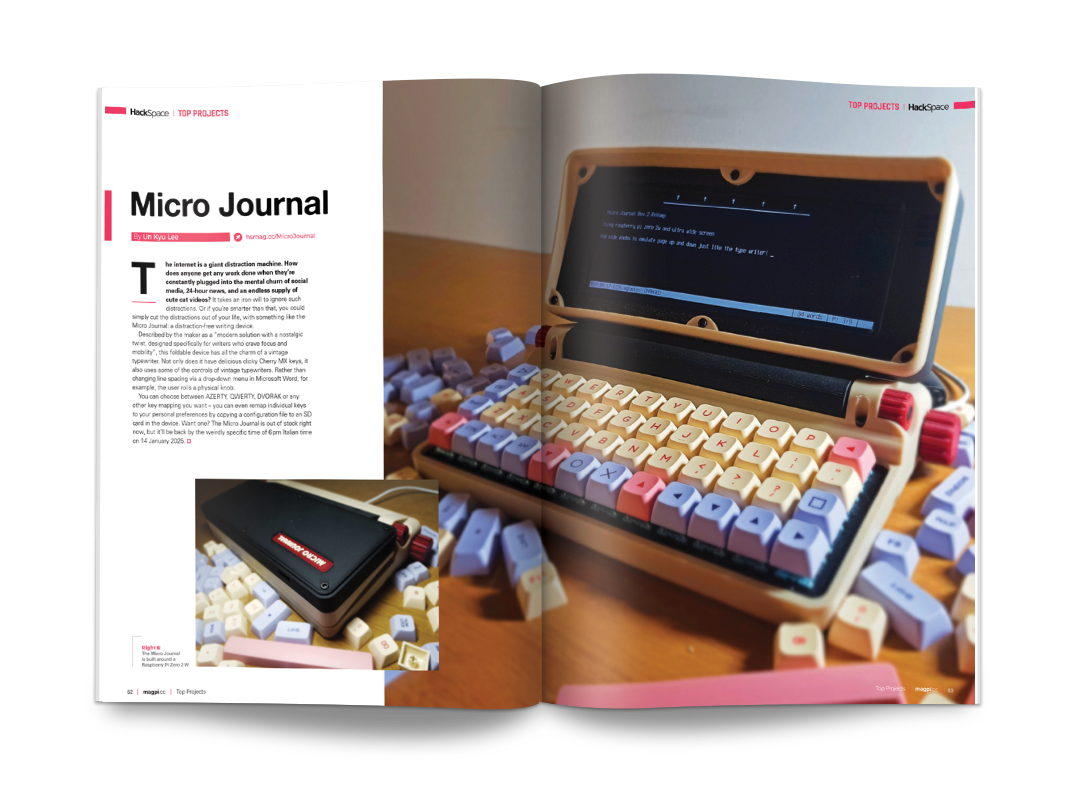
Micro Journal
This Raspberry Pi Zero 2-based computer offers distraction-free writing Micro Journal is a modern solution with a nostalgic twist with all the charm of a vintage typewriter and delicious clicky Cherry MX keys.
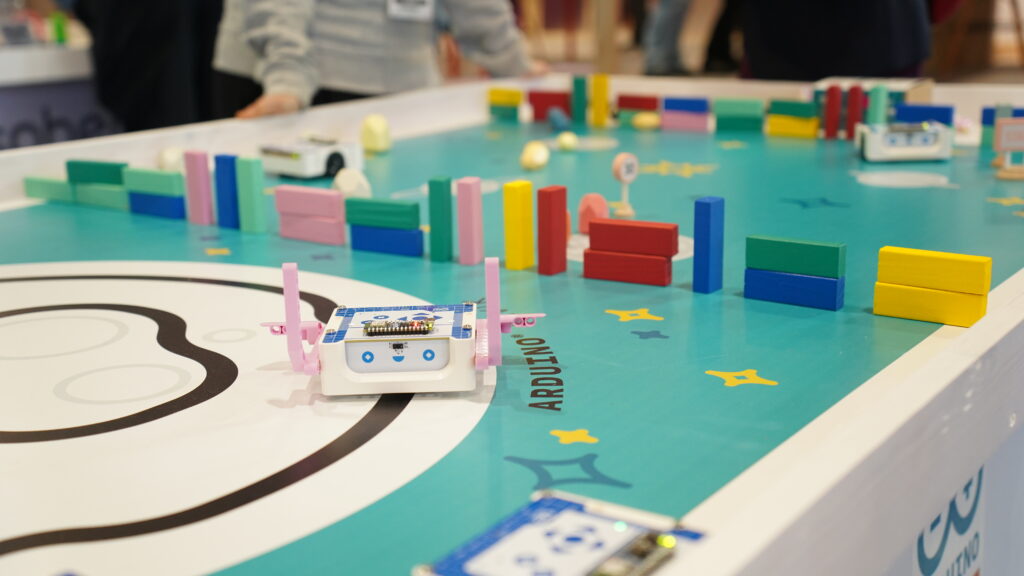
Alvik is cute, it’s smart, it’s fun… so what can it actually do?
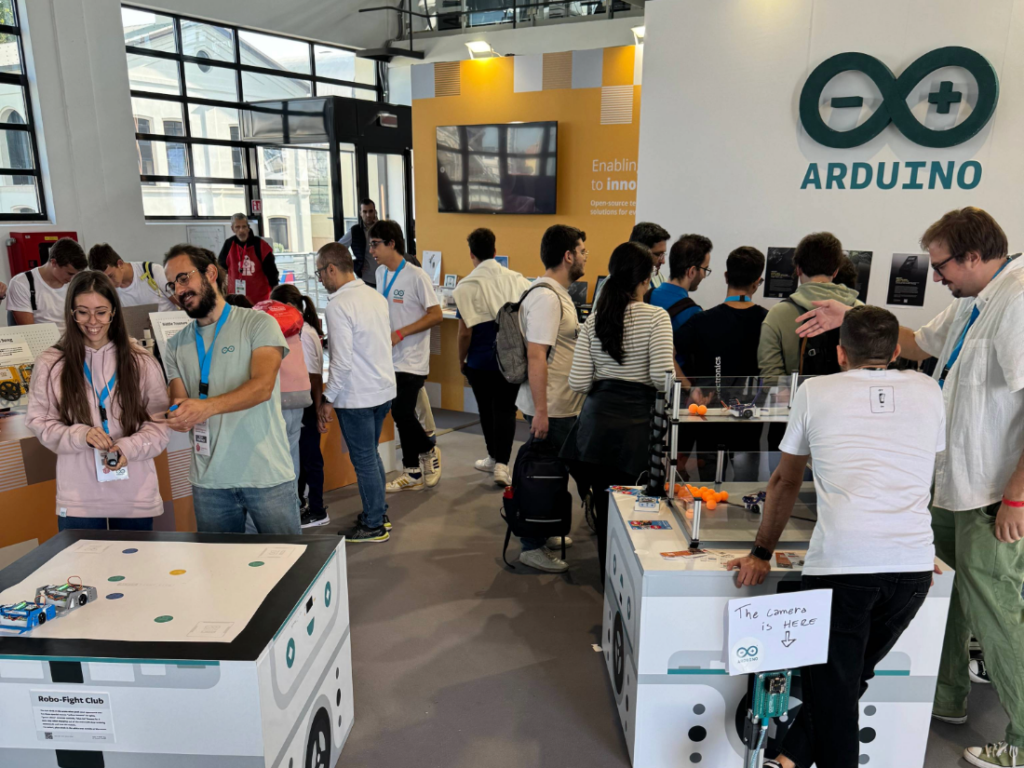
To answer this question, we decided to have fun and put the robot to the test with some of the most creative people we know – our own team! A dozen Arduino employees volunteered for a dedicated Make Tank session earlier this fall, and came up with a few great in-house projects for us to share – and you to try!
We were so happy with the creative and engaging ideas that we took them on the road for the Maker Faire Rome 2024: they were a hit and attracted many curious visitors to the Arduino booth.
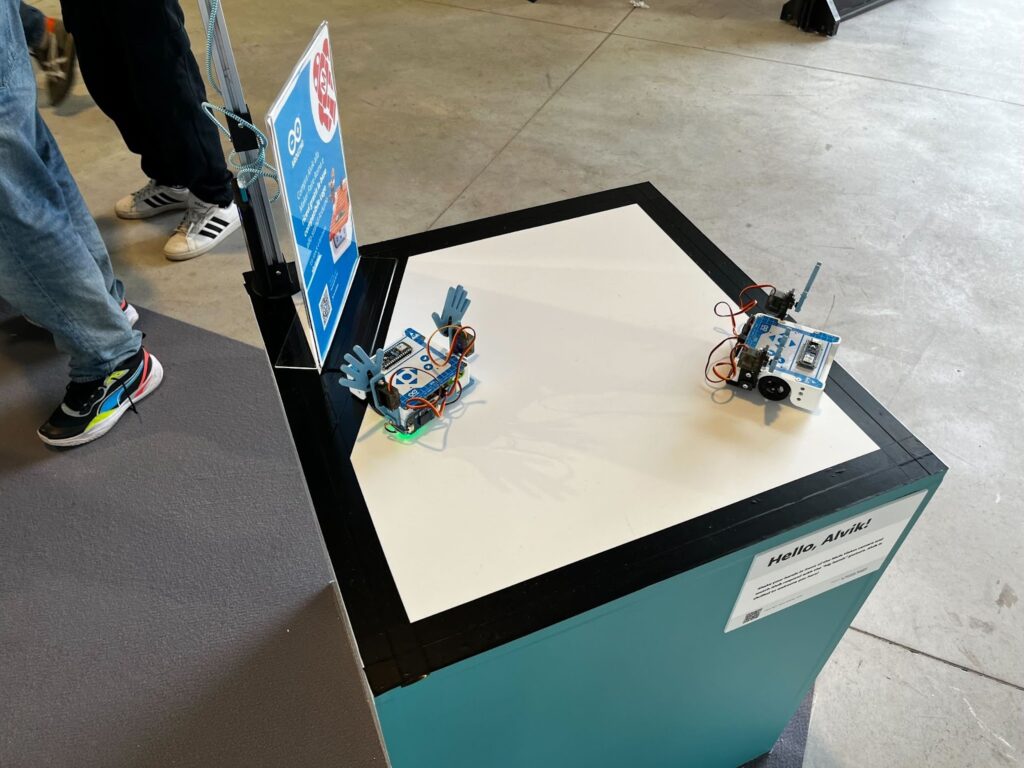
Hello, Alvik!
This interactive project, created by Christian Sarnataro and Leonardo Cavagnis, brings to life Alvik’s friendly personality. By waving your hands in front of a Nicla Vision camera, you trigger a cheerful “big hands” gesture in response: it’s Alvik’s way of welcoming newcomers to robotics!
Why it’s great: The project highlights Alvik’s ease of use and intuitive interactivity, while demonstrating how advanced learners can tap into the robot’s AI capabilities to create meaningful, engaging robotic experiences.
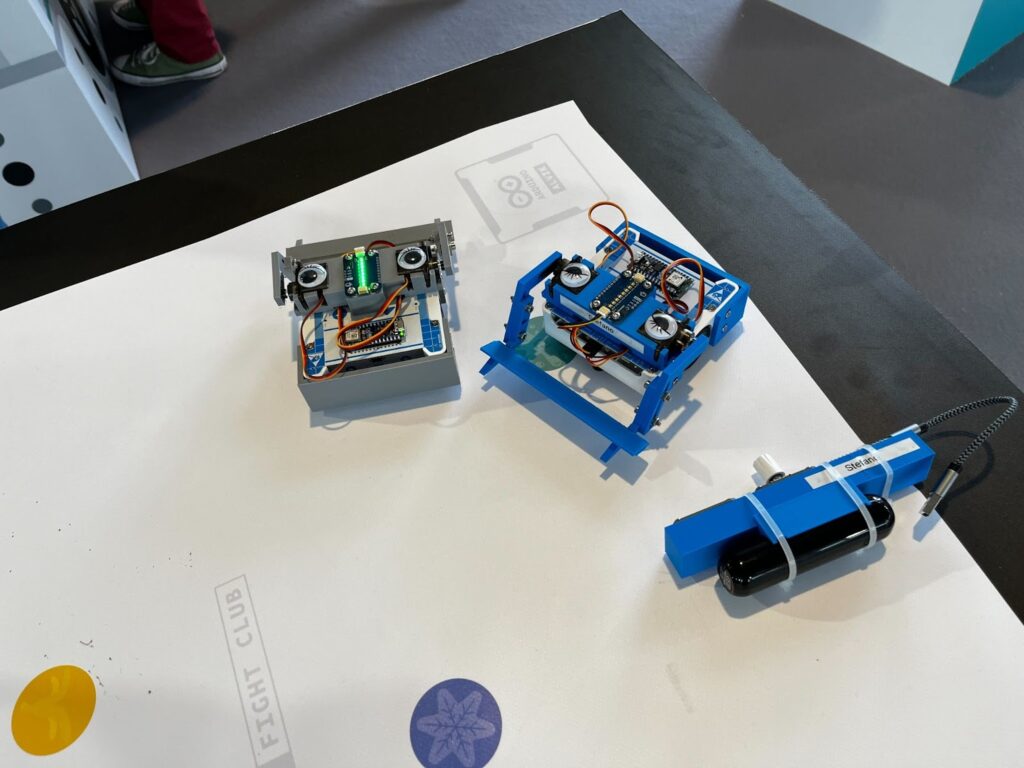
Robo-Fight Club
Developed by Davide Neri and Alexander Entinger, this competitive game turns Alvik into a feisty battling robot. Participants control their Alvik to push opponents out of the arena, while trying special moves like “yellow-banana” for spins, “green-slime” to reverse controls, and “blue-ice” to freeze competitors for five seconds. Any robot stepping out of the arena automatically loses the match.
Why it’s great: Robo-Fight Club demonstrates how Alvik can be used for multiplayer, interactive gaming experiences while teaching users about programming logic and control systems.
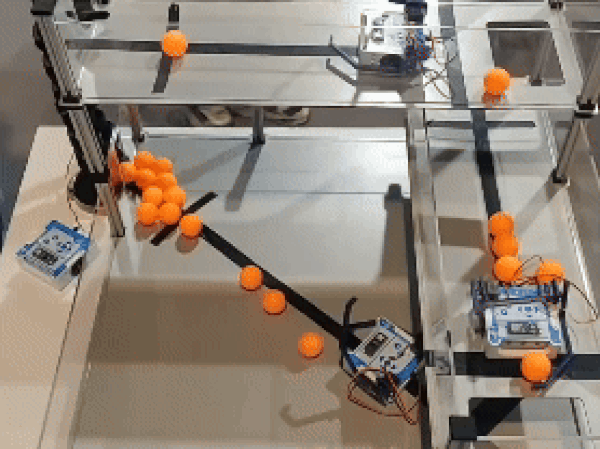
Alvik Mini City
In this project by Giovanni Bruno, Julián Caro Linares, and Livia Luo, Alvik works tirelessly in a mini city, moving balls from one floor to another. The project showcases how robotics can assist in repetitive and potentially hazardous tasks, inspiring us to imagine practical applications for robotics in their daily lives.
Why it’s great: This project emphasizes how Alvik is more than just an educational robot – it’s a tool for exploring real-world use cases in automation and problem-solving.
Your turn!
Alvik is the perfect companion to learn coding and robotics because it’s easy to get started with, but powerful enough to support complex projects. With the option to program using block-based coding, in MicroPython or the Arduino language, everyone from beginners to advanced users can choose the environment that suits their needs best!
Inspired by these projects? Check out all of Alvik’s features and specs on this page, or go ahead and start your journey today! Don’t forget to share your creations with us: upload your projects to Project Hub or email creators@arduino.cc – we can’t wait to see what you build!
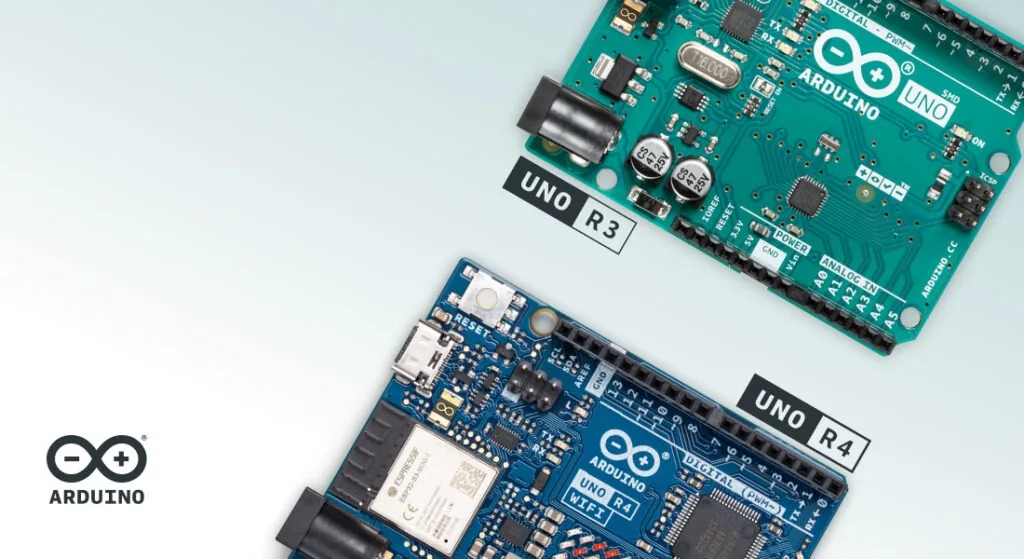
The Arduino UNO is legendary among makers, and with the release of the UNO R4 in 2023, the family gained a powerful new member. But with two incredible options, which UNO should you pick for your project? Here’s a breakdown of what makes each board shine, depending on your needs, skills, and goals.
Why the UNO Rev3 is still a go-to classic
The UNO Rev3 has been around for over a decade, earning its reputation as a solid, reliable board perfect for beginners. Simple, robust, and versatile, it’s the “base camp” of the Arduino ecosystem. Its 8-bit architecture makes it straightforward to understand exactly what’s happening in your code.
Applications and ideal uses
The UNO Rev3 is fantastic for projects like controlling LEDs, motors, and simple sensors – as well as any of the 15 projects included in our best-selling Arduino Starter Kit.
Its ability to handle a higher current directly from each pin makes it ideal for connecting power-hungry sensors or motors without needing extra components. It’s also compatible with an enormous number of sketches and libraries that have been built around it over the years.
One key advantage? The microcontroller on the UNO Rev3 can be removed, allowing you to use it independently – a feature that many seasoned users love.
The UNO R4 builds on everything makers love about the Rev3, adding features that bring it up to speed with the needs of today’s tech. Its 32-bit Arm® Cortex®-M4 guarantees significantly faster processing power and can handle more advanced projects. It comes in two versions: the UNO R4 Minima for essential functionality and the UNO R4 WiFi for Internet-connected projects.
The latter is the brains of the Plug and Make Kit: the easiest way to go from zero to tech hero, with step-by-step tutorials to create a custom weather station, a video game controller, a smart timer and so much more!
Advanced features for new possibilities
The UNO R4 packs in features that are groundbreaking for the UNO family:
12-bit DAC: Enables analog output for audio waveforms or other analog components without external circuitry.
CAN bus: Ideal for connecting multiple devices in robotics or automotive projects.
Wi-Fi® and Bluetooth® on the R4 WiFi model: Easily build IoT projects and connect to the Arduino Cloud to control your devices remotely.
Enhanced Diagnostics: The R4 WiFi includes an error-capturing mechanism that helps beginners by identifying issues in the code, a fantastic learning tool.
Applications and ideal uses
With increased memory and processing power, the UNO R4 is perfect for projects that require complex calculations or manage multiple processes. Think IoT, data sensing, automation systems, creative installations or scientific equipment where precise measurements and real-time adjustments are key.
What’s more, the UNO R4 has the capability to leverage AI – and our community has jumped at the chance of exploring whole new realms. One user built a gesture recognition system made of cardboard, another added smart detection to a pet door to always know if their cat was home or not, and another yet came up with a great tool to always know what song is playing. Not to mention the possibilities for advanced animationslike this one – inspired by Bad Apple – developed thanks to the LED matrix right on the UNO R4.
Is a 32-bit MCU always better than an 8-bit?
The short answer is, no. We believe the best solution is always determined by the requirements of the project at hand: bigger, faster, more powerful or more expensive is not always better.
8-bit microcontrollers process data in 8-bit chunks, which limits the size of numbers they can handle directly to values between 0 and 255 (or -127 and 128). This limitation makes them best suited for applications with minimal data processing needs, such as basic tasks like toggling LEDs or controlling simple sensors. However, they also tend to be more affordable and to consume less power, making hardware design less expensive, and have a simpler architecture, which translates to easier programming. So, if you are still learning the basics and need the most straightforward tool, or you are tackling a project with minimal requirements, an 8-bit MCU is not only all you need, but probably your best option.
On the other hand, if you need to work on much larger numbers and perform data-heavy calculations, 32-bit microcontrollers can handle advanced applications like image processing and real-time analytics. The difference is not just 4-fold going from 8 to 32: it’s a huge jump from 255 to 4,294,967,295! Almost by definition, any solution that requires this kind of performance will be more complex to design and program, require more memory, and consume more power, often affecting battery life. The upside, of course, is the incredible potential of what you can achieve!
Compatibility and transitioning from UNO Rev3 to UNO R4
If you already have experience with the UNO Rev3 and are considering the R4, but have concerns about compatibility, rest assured: they have the same form factor, pinout, and 5V operating voltage. This makes it easy to transfer accessories such as shields from one to the other.
On the software side, tutorials and projects are often compatible. We have even created a GitHub repository where you can check compatibility for libraries with the new R4 (and even help us update information or add new R4-friendly versions). This is part of the effort we share with our community to make sure that transitioning to the UNO R4 – if you choose to do so – is as seamless as possible.
Which Arduino UNO should I choose?
UNO Rev3
UNO R4
• Best for beginners or those working on foundational projects.
• Great for educational settings, where understanding core programming concepts and hardware interactions are the focus.
• Ideal if you need a reliable, budget-friendly, no-frills board with vast project resources available online.
• Perfect for advanced users or beginners looking to push boundaries with more complex projects.
• Best for IoT, data-intensive, or networked applications that require more processing power.
• A smart choice if you’re experimenting with new peripherals like CAN bus, DAC, or Wi-Fi/Bluetooth connectivity.
Choose your UNO and start creating!
Whether you choose the classic UNO Rev3 or the more recent UNO R4, you’re joining a global community of makers, educators, and inventors who love to create. Both boards offer incredible opportunities, each tailored to different stages and styles of making. Ready to dive into a new project? Buy your next UNO and discover limitless possibilities!
We’ve been looking forward to the new Raspberry Pi Monitor for ages now – the inexpensive and lightweight display is perfect for so many uses, whether you’re in a classroom, at your desk, or on the go. We have five to giveaway, and you can enter the competition below…
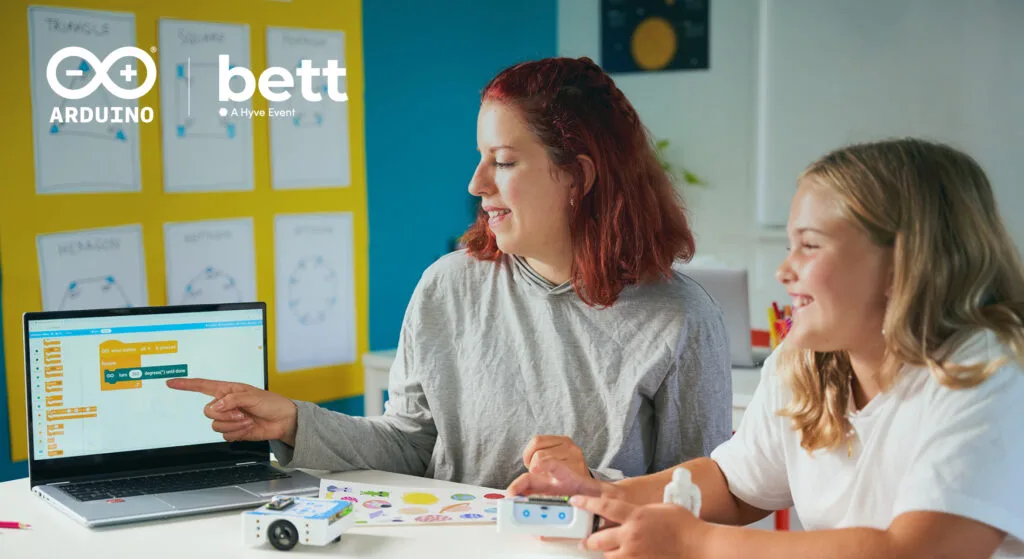
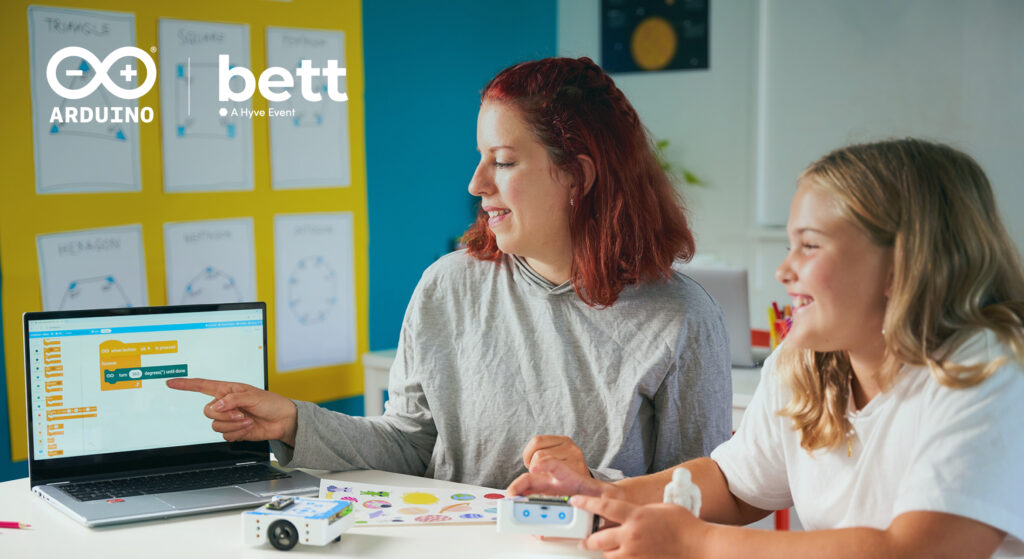
Mark your calendars… Arduino Education is coming to Bett UK 2025! Taking place for three days from January 22nd-24th at the ExCeL exhibition center in London, Bett is the ultimate global event for educational innovation.
We are attending the stand with our partner CreativeHut again this year. Join us at our booth (Stand NF10) where we’ll bring the future of education to life. Get hands-on with our latest solutions, meet our passionate team of experts, and discover how you can use Arduino Education kits in the classroom to boost STEAM skills and improve learning outcomes.
Explore the latest EdTech solutions for K-12 teachers
If you’ve been keeping up with our social media posts, you’ll know that we recently launched block-based coding for the Alvik robot. Now’s your chance to see it in action. Perfect for younger learners, block-based coding with Alvik enables students as young as seven to engage with robotics through hands-on, cross-disciplinary projects and lessons. And don’t miss our live demos showcasing just how simple it is to program Alvik using MicroPython too.
But that’s not all. You’ll also have the chance to get hands-on with the Plug and Make Kit – a powerful tool that allows educators and students to explore the world of IoT (Internet of Things). Designed for hands-on learning, the kit includes seven engaging projects that provide a structured starting point. And with seamless integration into Arduino Cloud, collaboration and innovation have never been easier.
Are you an HE educator? We’ve got you covered too!
If you’re teaching at the higher education level, we’ve got something special for you too. Stop by our stand to explore the cutting-edge PLC Starter Kit, an incredible resource for teaching industrial automation. Designed to bridge the gap between theory and practice, this kit prepares students for real-world challenges and helps them grasp complex concepts with ease.
And here’s the really exciting part – we’ll be showcasing a brand-new kit specifically designed for higher education in industry automation. Be among the first to experience this innovative solution, designed to take advanced learning to the next level. You heard it here first!
Get involved with interactive demos and more
At our booth, you’ll have the opportunity to take part in interactive demonstrations and explore a comprehensive content platform catering to K-12 and higher education. This includes resources on coding, robotics, DIY smart IoT projects, PLC (Programmable Logic Controllers), and computer vision solutions, all aimed at enriching the educational journey.
Will we be award winners?
We’re beyond excited to share that Arduino Education has been shortlisted for the Bett Awards 2025 in the category of AV, VR/AR, Robotics, or Digital Devices – and it’s all thanks to our incredible Alvik robot! Watch this space to find out if we win!
We can’t wait to see you at Bett 2025. For more information and to book your ticket, visit the Bett website.
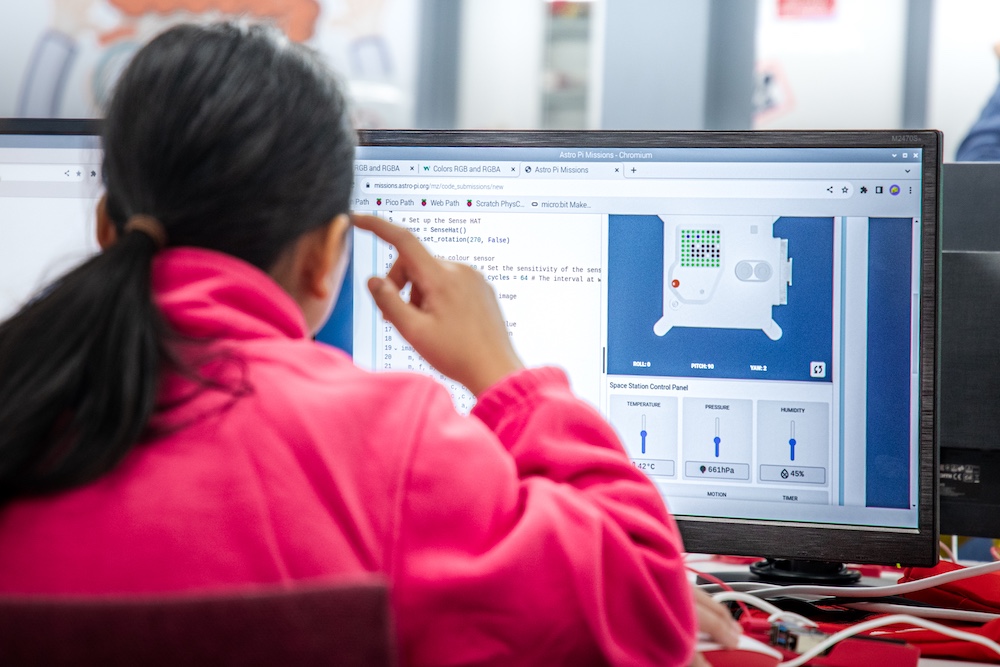
We are excited to share our report on the impact of the 2023/24 Astro Pi Challenge. Earlier this year we conducted surveys and focus groups with mentors who took part in the Astro Pi Challenge, to understand the value and impact the challenge offers to young people and mentors. You can read the full report here, but here are the highlights.
What is the Astro Pi Challenge?
The European Astro Pi Challenge is an ESA Education project run in collaboration with the Raspberry Pi Foundation. It offers young people the amazing opportunity to learn how to code and conduct scientific investigations in space, by writing computer programs that run on Raspberry Pi computers on board the International Space Station (ISS). The annual Astro Pi Challenge is open to young people up to age 19 in ESA member and associate countries.
Each year, there are two missions: Mission Zero and Mission Space Lab.
Five reasons to take part in the Astro Pi Challenge
Based on the findings in this report, we wanted to highlight five great reasons to take part in the Astro Pi Challenge, and direct you to some resources to help you get started — there is still plenty of time to enter the 2024/25 challenge!
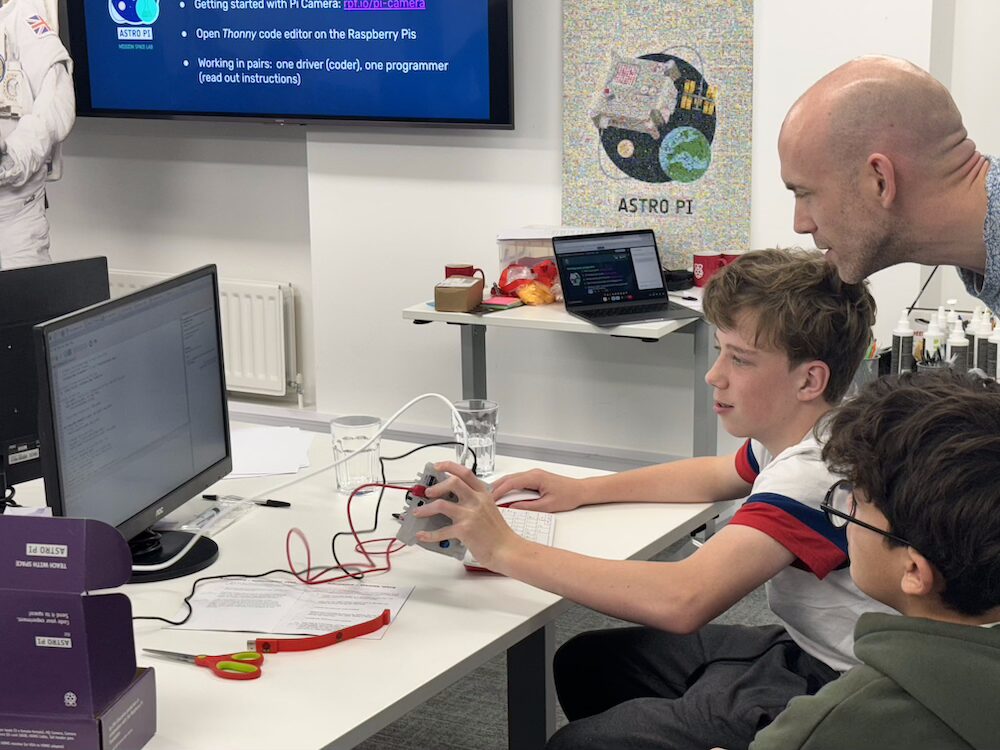
1. Young people get to run their code in space
Mentors told us how excited young people were to be working on something that connected with the real world, and how proud they were that their code ran on the International Space Station.
“Participating in Mission Space Labs offers students a great opportunity to work with the International Space Station, to see the Earth from above, to challenge them to overcome the terrestrial limits.” – Mission Space Lab mentor
2. Young people are inspired to continue to learn
91% of mentors told us that young people who successfully wrote code for Mission Space Lab were likely or very likely to participate in computing and digital making challenges in the future.
Mission Zero mentors shared that young people who saw others take part in the mission were inspired to get involved.
3. Young people learn new skills
Mission Space Lab mentors told us that young people who successfully wrote code for Mission Space Lab had a greater understanding of STEM concepts, and increased their skills and confidence in computing and digital making.
Mentors also said that Mission Zero provides a great first step into using Python.
“I think it was very good at setting up the first bit of Python and just having a very limited command set and a very quick result…” – Mission Zero mentor
4. Astro Pi mentors have fun
It’s not just the young people that enjoy Astro Pi — 95% of Mission Space Lab mentors and 99% of Mission Zero mentors said they somewhat or very much enjoyed taking part.
5. We provide the resources and support Astro Pi mentors need
Mentors gave us positive feedback on the guidance we provided to help them support young people. This year, we have produced even more resources and ways to support mentors to lead missions.
“The Mission [Space] Lab guide was fantastic for my students; step by step” – Mission Space Lab mentor
How to get involved
Astro Pi opened for registration on 16 September this year, and there is still plenty of time for you to sign up and run the missions with your young people. You can find all the information you need to take part on astro-pi.org, including the mentor guides, which help you prepare to run the activities.
We also provide project guides for Mission Zero and Mission Space Lab that walk young people through the steps they need to follow to get a working program ready for submission.
If you would like some help getting started, you can:
Key dates
17:30 – 18:30 CET, 16 January – Mission Space Lab livestream and technical Q&A 17:30 – 18:30 CET, 28 January – Mission Zero codealong 09:00 CET, 24 February – Mission Space Lab closes 09:00 CET, 24 March – Mission Zero closes
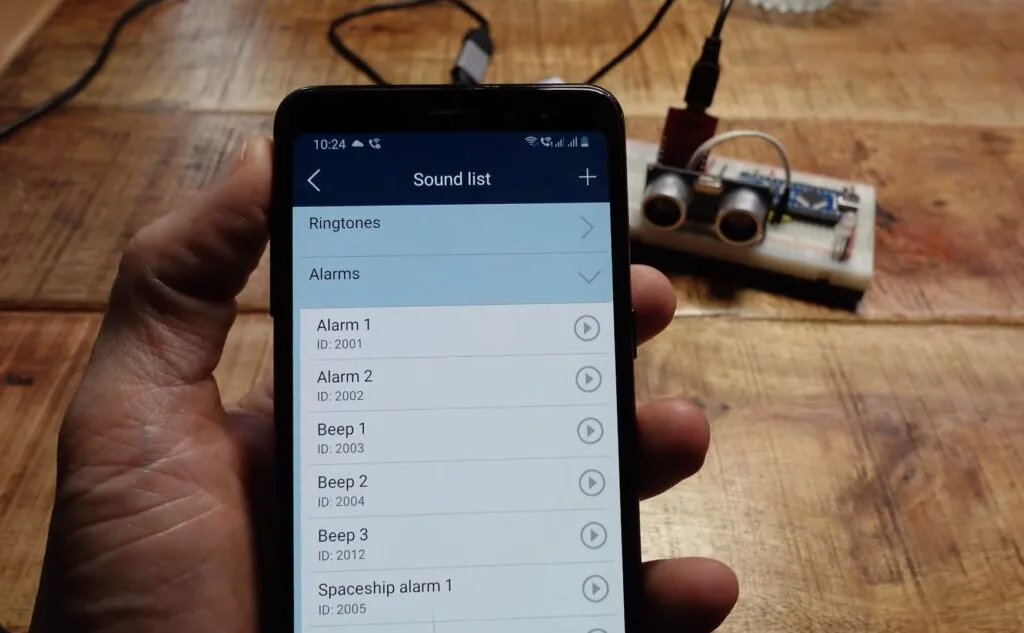
Each component you add to your Arduino project increases its complexity and the opportunity for mistakes. But most projects require some “auxiliary” hardware — components that you use to interact with the Arduino or to help it do the job you’re asking of it. Buttons and displays are great examples. But as Doctor Volt demonstrates in his most recent video, you can replace both of those with the high-quality touchscreen on your old Android smartphone using the RemoteXY app.
You likely learned early in your Arduino journey that the serial connection between the Arduino development board and a PC is very handy. It lets the Arduino output information and also lets you input commands. But an entire computer (even a laptop) is pretty bulky and requires a lot of power. The RemoteXY app, available for Android devices, lets you use your smartphone to do the same job.
Even better, you can use the RemoteXY app with an Arduino library to get an interface much more sophisticated than a normal serial terminal. The app still communicates with the Arduino via serial behind the scenes, but it uses that data to enable nice touchscreen-friendly GUI controls, graphs, and more.
For that to work, you need a way for your Android smartphone to establish a serial connection with your Arduino board. That is easy to do using an OTG cable with a USB-to-Serial adapter. Together, those let your smartphone talk to your Arduino just like your PC does. Doctor Volt’s video walks you through setting up and using the RemoteXY Arduino library and how to configure the app.
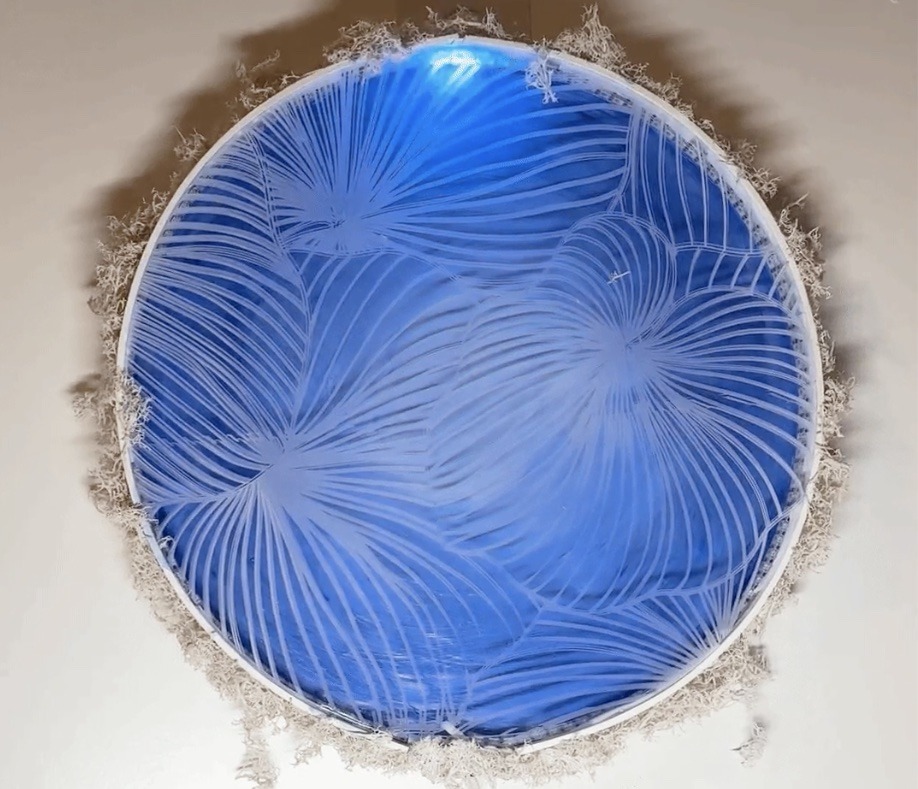
We all need ways to calm down and relax, and few things are as effective as nature itself. Taking inspiration from organic patterns and smooth, flowing waves, dzeng on Instructables has built an LED wall light that responds in real-time to the sounds within a room.
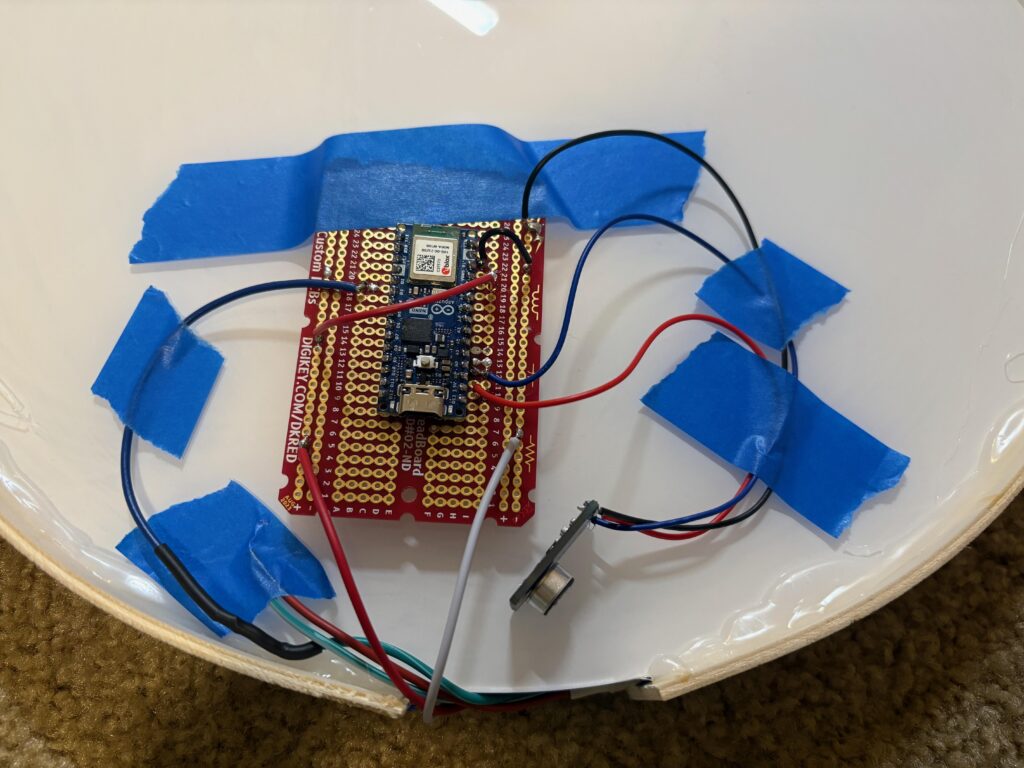
The project started out as a 2D vector graphic that featured several overlapping, organic leaf patterns arranged within a circle. This pattern was then etched onto a piece of clear acrylic via a laser cutter before being attached to a blue-painted base. For the lighting effects, dzeng added an LED strip between the two layers before connecting it to an Arduino Nano ESP32.
The reactive lighting effects are provided by the Nano ESP32’s sketch, which maintains two variables: brightness and delay. Every loop, the current sound levels are read from a microphone and averaged before being mapped onto the aforementioned values. Finally, the currently-illuminated LED is shifted by one position on the strip and the calculated brightness is applied.
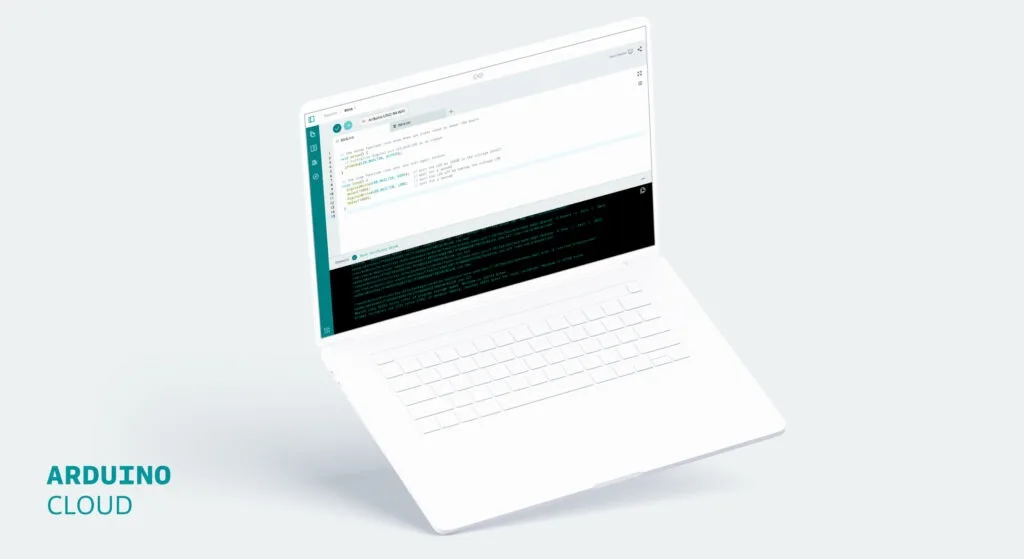
At Arduino, we know how precious your time is when you’re building your next big project or experimenting with new ideas. That’s why we’re thrilled to introduce a game-changing update to the Cloud Editor Builder — the engine behind compiling your sketches in Arduino Cloud.
This update is all about you: making your development faster, smoother, and more secure, so you can focus on what truly matters — creating.
Here’s what’s new:
Faster compilations: Up to 50% faster!
No more waiting around! With the new builder, sketch compilations are now up to 50% faster, enabling you to focus more on creating and testing your projects, and less on waiting. Two years ago, we significantly improved the Cloud Editor Builder, setting a new standard for performance.
And now, whether you’re working on a quick prototype or a complex IoT solution, we provide you with faster compilation times, which means you can iterate and innovate more efficiently.
See compilation progress at a glance
One of the standout features of the new builder is the introduction of a dedicated compilation progress bar. Now, you can see exactly how far along the compilation process is, with clear visibility into its completeness percentage. No more guesswork — just a smoother and more transparent experience.
Your IoT projects, more secure
We’ve also made improvements under the hood, adding an extra layer of security and reliability to the Cloud Editor Builder. Your data and projects are safer than ever, giving you peace of mind while you create.
IDE vs. Cloud Editor: Which one fits your workflow?
We understand that every Arduino user has unique needs, which is why we offer both the Arduino IDE and the Cloud Editor. Wondering which option suits your workflow best? We’ve prepared a clear comparison table showcasing the key differences between the two tools. From compilation speeds to storage options, see how the Cloud Editor stacks up against the IDE.
The new Cloud Editor Builder will be live in the coming days, and we can’t wait for you to try it! Stay tuned for updates, and get ready to enjoy faster compilations, improved usability, and enhanced security.
We’re excited to see how this update will elevate your projects. As always, we’d love to hear your feedback. Please share your thoughts, questions, and experiences with us on social media or Arduino Forum.
Let’s build something amazing together!
Ready to elevate your projects? Discover the full potential of the Arduino Cloud Editor and explore all its powerful features here. Need guidance? Dive into our comprehensive documentation.
Wax differs from most existing music managers in three ways. Instead of individual tracks, music is catalogued as ‘works’ – such as an album, a symphony, an opera, etc. Secondly, works are categorised by genre, but it also allows you to tag works in a way that is relevant to the genre too; symphonic works can include composer and conductor, while pop music comes with the group and title.
The final feature is that it will start playing music as soon as you’ve given it enough requirements (in the form of metadata), which you can then change on the fly.
Multi-core wonder
Wax is specifically designed for Raspberry Pi 4 because of its quad-core processor. “Wax uses one core to run the user interface, one for playing, one for ripping, and the fourth for time-consuming tasks like fetching metadata from the cloud, like MusicBrainz and Cover Art Archive,” Jeffrey says. “Many audiophiles worry needlessly that burdening a processor involved in playing a sound file can impair the quality of the sound it produces. The multi-processing architecture of Wax obviates this concern as the core responsible for playing the music is not simultaneously performing any other tasks.”
From the app you can select music starting by genre. “Works by the same composer are listed together,” Jeffrey tells us. “Likewise, multiple versions of each work are listed together. This hierarchical sorting makes it easy to survey the collection for the desired recording – possibly one that you forgot you had. Wax also provides incremental search if you already have a specific work in mind.”
Individual tracks or even the entire work can be added to the queue. You can also group tracks within a work – perhaps to represent the acts of an opera. “The other interesting feature is that the values in any column can alternatively be represented as a filter button,” Jeffrey continues. “[I can convert] the ‘subgenre’ field to a filter button by dragging the column header to the filter button area. Selecting a value with the filter button removes works from the list that do not match that value.”
Dive deeper
While the ‘gears and levers’ are usually hidden, you can enter a robust edit mode that lets you customise metadata, as well as creating new metadata for works. You can use the metadata downloaded from the online sources when creating and editing too.
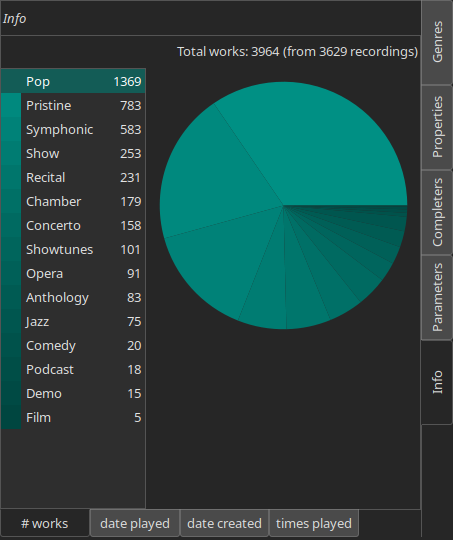
Specific data is used to filter inside genres – the categories of data can be edited too. “WaxConfig is a separate program used for configuring Wax,” Jeffrey says. “Most importantly, this is where you specify genres, including their name and the primary and secondary keys. The Info page provides information about your collection, including the number of works in each genre.”
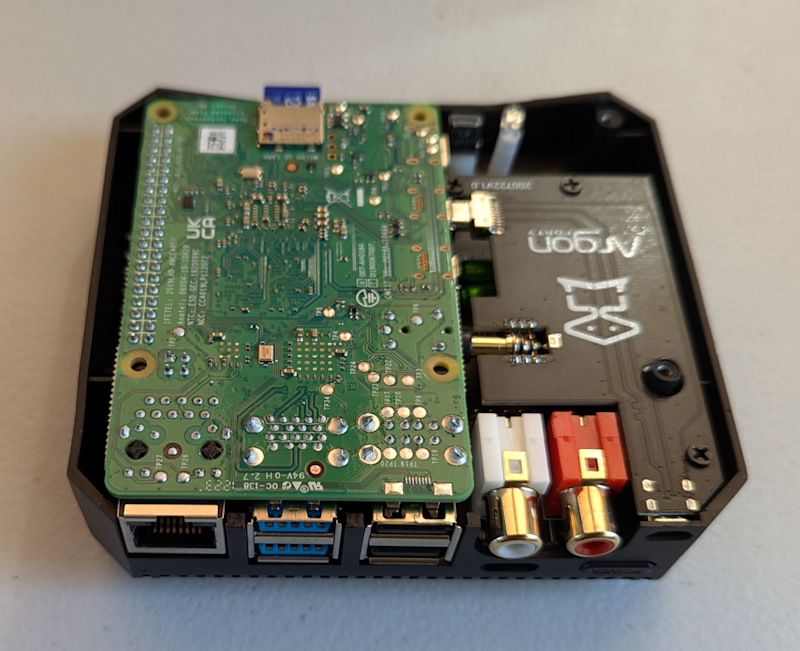
You can see an example of this in the image to the left. Jeffrey has put together a very in-depth guide on how to install and setup Wax, as well as going into more depth on how to use it. Performance on Raspberry Pi 4 is good too, especially on Jeffrey’s setup.
“I run Wax on a Raspberry Pi 4 with 4 GB of RAM,” Jeffrey tells us. “I use the NanoSound One DAC with the Argon One M.2 case. The NanoSound One DAC uses the TI PCM5122 DAC for high-quality audio output – 112 dB SNR. The Argon case makes it possible to integrate a 2TB SSD which I use for storing my sound archive.”
Even with the high-power audio hardware and no active cooling, the CPU temperature only reached 45C, with a CPU load of 2.4 (of a theoretical maximum of 4.0 due to the quad-core architecture). He even reckons a 2GB Raspberry Pi would do the job just fine.
“Wax makes it easy to find and appreciate the music I want to hear,” Jeffrey says. “Finding a recording of a specific work was often hard and always inconvenient when I had to sort through thousands of LPs and CDs. With Wax, I can make a selection from the comfort of my listening position. I sacrifice nothing for this convenience because Wax presents all the information I need to appreciate the recording — artist names, for example — and I am able to explore further, as I used to do by reading record jackets or CD liner notes, by accessing Wikipedia and liner notes in Wax from the comfort of my listening position. Instead of a wall full of recordings, my entire collection now fits in a tiny box powered by a Raspberry Pi.”
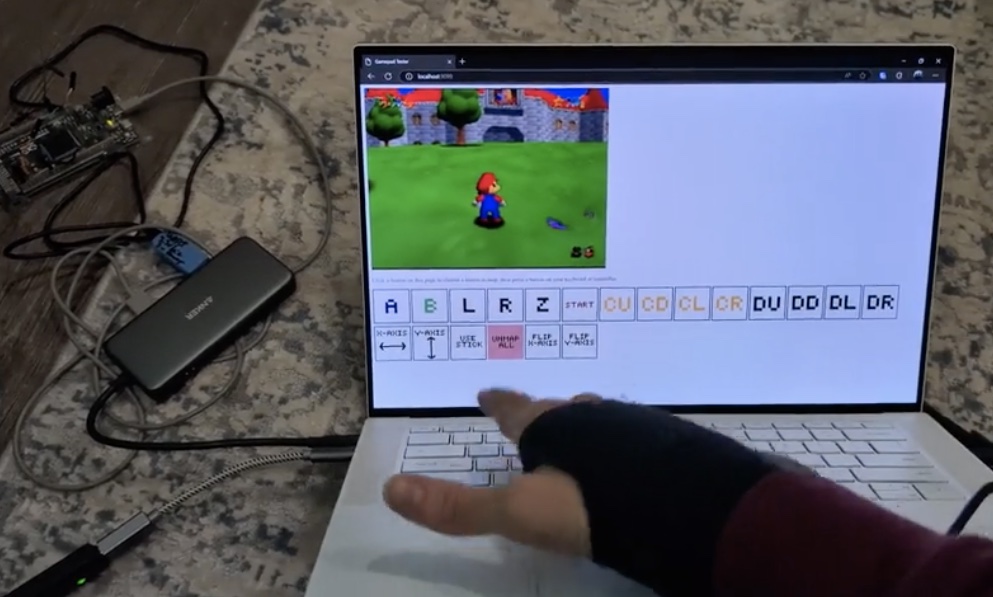
For obvious reasons, video game console controls provide input commands directly to the console. Modern consoles may do so wirelessly, but the effect is the same: direct input. But what if you connected a “controller” to the internet? Then you could play from anywhere and that is exactly what Redditor Lovelyroyalette achieved with this Arduino Due-based N64 controller.
The N64 controller communication protocol has been well-documented for decades now and is pretty easy to replicate using an Arduino. In fact, there is even a handy library available (called N64Controller) that makes that simple to achieve. Connect a few wires and it will send commands to the N64 like they’re coming from a real controller.
Normally, people use that functionality to build their own custom N64 controllers. But Lovelyroyalette chose to do something a little different and connected the Arduino Due to their laptop, which runs a server hosting a web interface where visitors can input controller commands. Push “A” on that interface and the laptop will tell the Due to send the “A” command to the N64, causing Mario to jump.
Not only is that neat from a technical standpoint, but it has some practical uses. The most obvious is to allow remote play — including remote multiplayer sessions in Goldeneye. With a video capture card, the web interface can display the game for remote players to see. This also has interesting applications for streamers, who could, for instance, let the chat send controller commands for some added interactivity.
Blending technology with everyday life, with help from AI
Android XR will first launch on headsets that transform how you watch, work and explore. The first device, code named Project Moohan and built by Samsung, will be available for purchase next year.
With headsets, you can effortlessly switch between being fully immersed in a virtual environment and staying present in the real world. You can fill the space around you with apps and content, and with Gemini, our AI assistant, you can even have conversations about what you’re seeing or control your device. Gemini can understand your intent, helping you plan, research topics and guide you through tasks.
We’re also reimagining some of your favorite Google apps for headsets. You can watch YouTube and Google TV on a virtual big screen, or relive your cherished memories with Google Photos in 3D. You’ll be able to explore the world in new ways with Google Maps, soaring above cities and landmarks in Immersive View. And with Chrome, multiple virtual screens will let you multitask with ease. You can even use Circle to Search to quickly find information on whatever’s in front of you, with just a simple gesture.
Plus, because it’s Android, your favorite mobile and tablet apps from Google Play will work right out of the box, with even more apps, games and immersive content made for XR arriving next year.
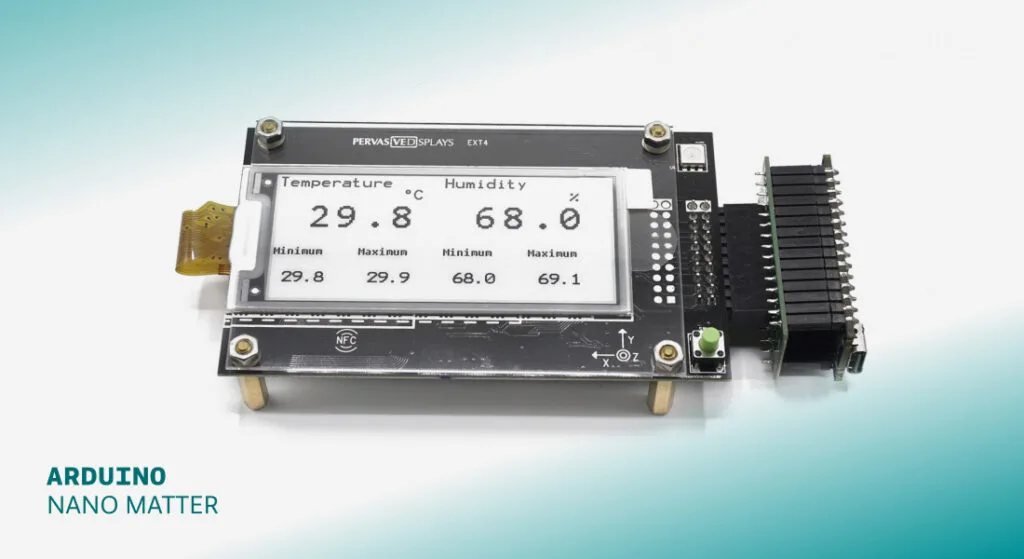
We’re excited to share that Pervasive Displays has just launched the E-Paper Development Kit for Matter! This groundbreaking, self-contained kit is designed to revolutionize how smart home devices use e-paper displays, enhancing user experience while driving down energy consumption. Created in collaboration with us and our long-time partner Silicon Labs, this kit marks a significant milestone in the integration of Matter protocol and e-paper technology
What is e-paper?
E-paper technology is a display technology that mimics the appearance of ink on paper, using minimal power and providing excellent visibility in various lighting conditions, making it ideal for energy-efficient and highly readable digital displays.
Discover the new kit!
The E-Paper DevelopmentDisplay Kit for Matter (or “EPDK–Matter”) includes everything you need to explore the possibilities of e-paper technology in smart homes, building automation, and industrial IoT applications.
It includes an EXT4 Expansion Board, a state-of-the-art 2.90” e-paper screen, and an adapter board for easy connectivity (all designed and manufactured by Pervasive Displays) – and it bundles with an Arduino Nano Matter, which we developed based on the MGM240S SoC from Silicon Labs. The open-source libraries include Matter examples and leverage the Arduino SDK, together with extensive documentation.
Peripherals include a 3-axis accelerometer and temperature/humidity sensors, a button, an RGB LED, and a passive NFC antenna. The Matter protocol ensures seamless communication between devices, further improving connectivity and interoperability in smart home environments.
Perfect for both beginners and advanced developers, the kit provides ready-to-use examples for Arduino IDE, alongside a GitHub repository for deeper customization. It’s even compatible with other boards from the Nano family.
All in all, it’s the full package for prototyping and developing your own ultra-low power, high-performance projects with e-paper displays: the possibilities are endless!
AI, machine learning (ML), and data science infuse our daily lives, from the recommendation functionality on music apps to technologies that influence our healthcare, transport, education, defence, and more.
What jobs will be affected by AL, ML, and data science remains to be seen, but it is increasingly clear that students will need to learn something about these topics. There will be new concepts to be taught, new instructional approaches and assessment techniques to be used, new learning activities to be delivered, and we must not neglect the professional development required to help educators master all of this.
As AI and data science are incorporated into school curricula and teaching and learning materials worldwide, we ask: What’s the research basis for these curricula, pedagogy, and resource choices?
In 2024, we showcased researchers who are investigating how AI can be leveraged to support the teaching and learning of programming. But in 2025, we look at what should be taught about AI, ML, and data science in schools and how we should teach this.
Our 2025 seminar speakers — so far!
We are very excited that we have already secured several key researchers in the field.
On 21 January, Shuchi Grover will kick off the seminar series by giving an important overview of AI in the K–12 landscape, including developing both AI literacy and AI ethics. Shuchi will provide concrete examples and recently developed frameworks to give educators practical insights on the topic.
Our second session will focus on a teacher professional development (PD) programme to support the introduction of AI in Upper Bavarian schools. Franz Jetzinger from the Technical University of Munich will summarise the PD programme and share how teachers implemented the topic in their classroom, including the difficulties they encountered.
Again from Germany, Lukas Höper from Paderborn University, with Carsten Schulte will describe important research on data awareness and introduce a framework that is likely to be key for learning about data-driven technology. The pair will talk about the Data Awareness Framework and how it has been used to help learners explore, evaluate, and be empowered in looking at the role of data in everyday applications.
Our April seminar will see David Weintrop from the University of Maryland introduce, with his colleagues, a data science curriculum called API Can Code, aimed at high-school students. The group will highlight the strategies needed for integrating data science learning within students’ lived experiences and fostering authentic engagement.
Later in the year, Jesús Moreno-Leon from the University of Seville will help us consider the thorny but essential question of how we measure AI literacy. Jesús will present an assessment instrument that has been successfully implemented in several research studies involving thousands of primary and secondary education students across Spain, discussing both its strengths and limitations.
What to expect from the seminars
Our seminars are designed to be accessible to anyone interested in the latest research about AI education — whether you’re a teacher, educator, researcher, or simply curious. Each session begins with a presentation from our guest speaker about their latest research findings. We then move into small groups for a short discussion and exchange of ideas before coming back together for a Q&A session with the presenter.
Attendees of our 2024 series told us that they valued that the talks “explore a relevant topic in an informative way“, the “enthusiasm and inspiration”, and particularly the small-group discussions because they “are always filled with interesting and varied ideas and help to spark my own thoughts”.
The seminars usually take place on Zoom on the first Tuesday of each month at 17:00–18:30 GMT / 12:00–13:30 ET / 9:00–10:30 PT / 18:00–19:30 CET.
You can find out more about each seminar and the speakers on our upcoming seminar page. And if you are unable to attend one of our talks, you can watch them from our previous seminar page, where you will also find an archive of all of our previous seminars dating back to 2020.
How to sign up
To attend the seminars, please register here. You will receive an email with the link to join our next Zoom call. Once signed up, you will automatically be notified of upcoming seminars. You can unsubscribe from our seminar notifications at any time.
Android’s unknown tracker alerts automatically notify you if an unfamiliar Bluetooth tracker is moving with you to help you take action to protect yourself.
As part of our ongoing commitment to safety, we’ve made technology improvements to bring you alerts faster and more often. We’re also rolling out two new features for Find My Device compatible tags:
Temporarily Pause Location: You can now temporarily pause location updates from your phone to prevent your device’s location from being used by a detected unknown tag for up to 24 hours. This provides an extra layer of privacy and control, allowing you to take a first action quickly while you locate and physically disable the tag.
Find Nearby: If you receive an unknown tracker alert, you can now use the „Find Nearby“ feature to pinpoint the tag’s location. Your Android device will guide you to the tag, to help you find it if it’s hidden.
Your safety is our priority, so we’re continuously improving unknown tracker alerts to help you stay ahead of unwanted tracking. Learn more about these new features in our help center.
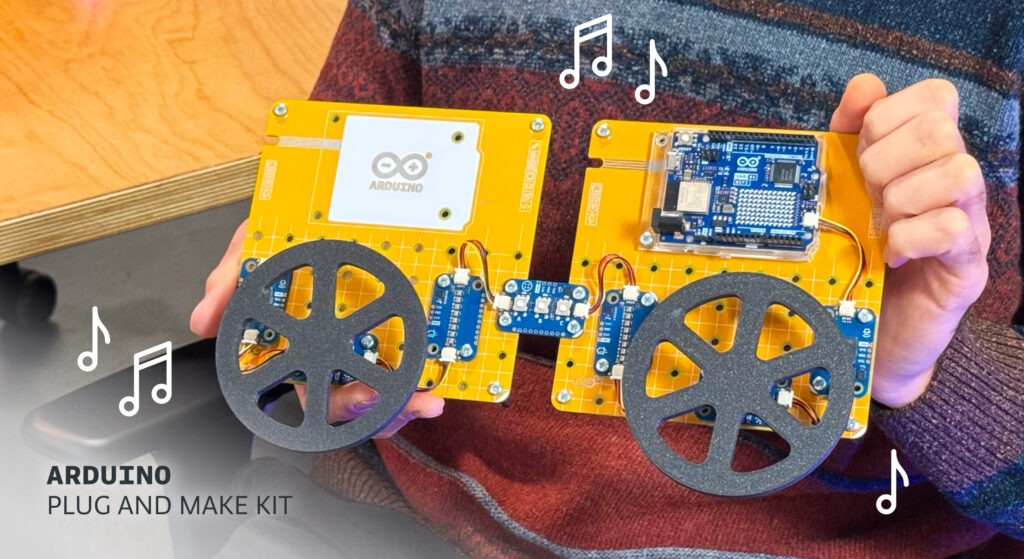
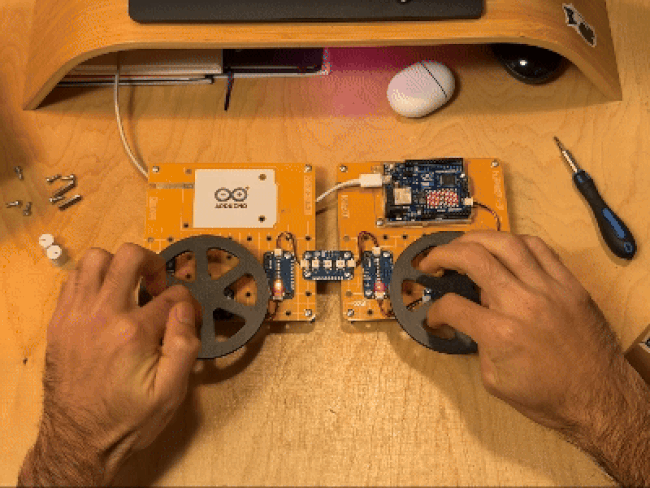
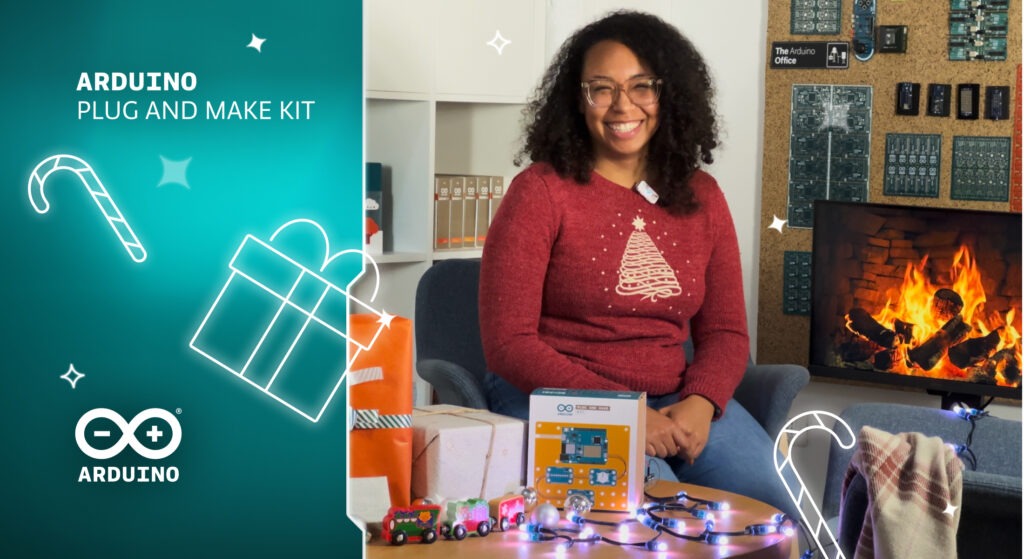
The Arduino Plug and Make Kit is all about unleashing creativity while simplifying the process of turning ideas into reality. It enables everyone to focus on the fun of creating with the power of the UNO R4 WiFi and a user-friendly, modular design – bypassing the complexities of traditional circuit building.
Case in point: the kit’s intuitive features inspired Loris Bottello to create a project that combines his passion for music with playful interaction. A project he kindly shared with us – and all of you! – with this great step-by-step guide on Project Hub.
Meet Loris Bottello, Plug and Make Kit Star
Bottello worked for years at Arduino as a Senior Product Designer, focusing on Arduino Cloud and Project Hub. An expert at creating user-friendly tools and platforms that empower makers, he was excited to participate in our role-reversing Make Tank – where colleagues from different teams joined efforts to put the Plug and Make Kit to the test.
It was during one of these in-house sessions that some experimentation with Modulino nodes led to Sync a Song. The concept of syncing music and lights came naturally to Bottello, who is also a singer and guitarist in a rock band.
Sync a Song is a game for one or two players, reminiscent of vintage reel-to-reel tape recorders: the challenge is to spin two reels at the same speed. When in perfect sync, you’ll see LEDs light up green and hear a song as your reward. Want a new tune? Simply press the buttons on Modulino Buttons to switch tracks!
While you’ll need two Plug and Make Kits to complete this project, assembly is straightforward: just use two Modulino bases connected by Qwiic cables – you can even top them with 3D-printed reels for an authentic retro look.
And have fun customizing your own version! It’s easy to add a favorite song or tweak the visuals to create your own interactive, creative experience, mixing playful nostalgia and modern tech.
Less (complexity) is more (fun)
For Bottello, the Plug and Make Kit’s biggest strength lies in its simplicity and flexibility. “In the past, I spent a lot of time figuring out circuits and debugging hardware. With the kit, I can dive straight into coding and focus on building an interesting experience,” he explains. By eliminating the need for breadboards, wires, and resistors, the kit allows creators to dedicate more time to refining their ideas and exploring new possibilities.
“The Plug and Make Kit is perfect for experimenting and learning by creating a variety of projects without overthinking the technical setup. It’s a true enabler of creativity.”
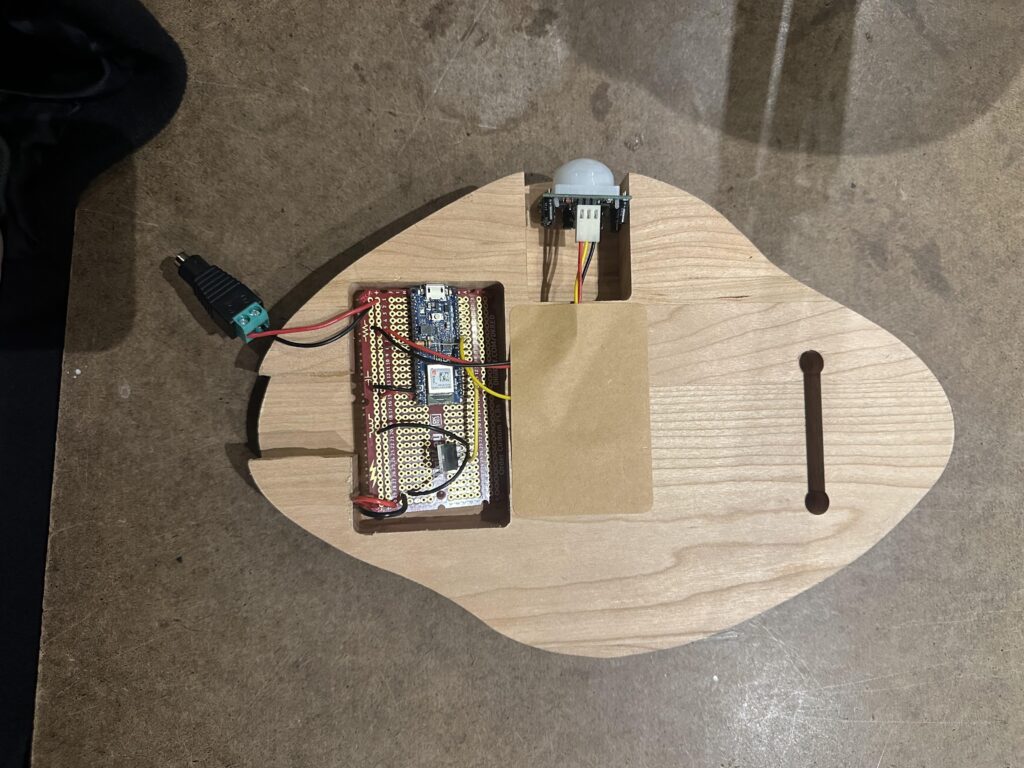
Have you ever walked through your front door after a long day of work and realized that your home just isn’t as inviting as it seems like it should be? While it may not work miracles, some nice and welcoming lighting can make a big difference. That’s why Lauren Palazzi made this unique wall sconce called Acceptus that automatically turns on when it detects your arrival.
Smart features aside, this is an intriguing design with a shape that generates interest all on its own. The wood base, carved in two pieces with a CNC router, has a profile that feels organic. Even before the light comes on, it projects warmth. The LED lighting on the internal perimeter enhances that effect with a soothing glow. Laser-cut acrylic “cover” panels on the front give the sconce a modern art vibe that is sure to appeal to many.
The key smart feature of Acceptus is the presence detection, which lets it turn on the LED lighting when it senses your arrival. That works using an Arduino Nano ESP32 board that monitors an area, such as the entry way by the front door, through a PIR (passive infrared) motion sensor. That’s the same kind of sensor used for security floodlights and the technology is very reliable. When the Arduino “sees” movement through that PIR sensor, it uses a transistor to connect power to the LED strip.
Palazzi recommends mounting Acceptus next to the door frame, opposite the hinges. That way, the movement of the door will activate the light. If you want to build your own Acceptus, Palazzi was kind enough to upload all of the necessary files to Instructables.
The human face is remarkably complex, with 43 different muscles contorting the skin in all kinds of ways. Some of that is utilitarian — your jaw muscles are good for chewing, after all. But a lot of it seems to be the result of evolution giving us fantastic non-verbal communication abilities. That isn’t an easy thing to replicate by artificial means, but Will Cogley managed to make this silicone-skinned animatronic head that is frighteningly realistic.
Most people, when seeing this animatronic head, will feel something between unease and outright disgust or terror. Cogley purposefully exaggerated the movements and proportions to give the head a more cartoonish appearance in an attempt to navigate around the uncanny valley, but it still looks a bit too human to be comfortable.
That is largely the result of the realistic silicone skin that Cogley molded and then attached onto the internal skeleton (skull?) frame using magnets. That attachment method is pretty similar to the way our own people skin attaches to our muscles and tendons, and it produces expressions that are quite human.
The internal skeleton was 3D-printed and actuated by a plethora of small servo motors. Cogley designed a custom shield PCB for an Arduino Mega 2560 to control the servos. He hasn’t yet programmed it beyond a handful of basic movements and facial expressions, but he’s set it up so that there is a great deal of potential for future programmatic upgrades.
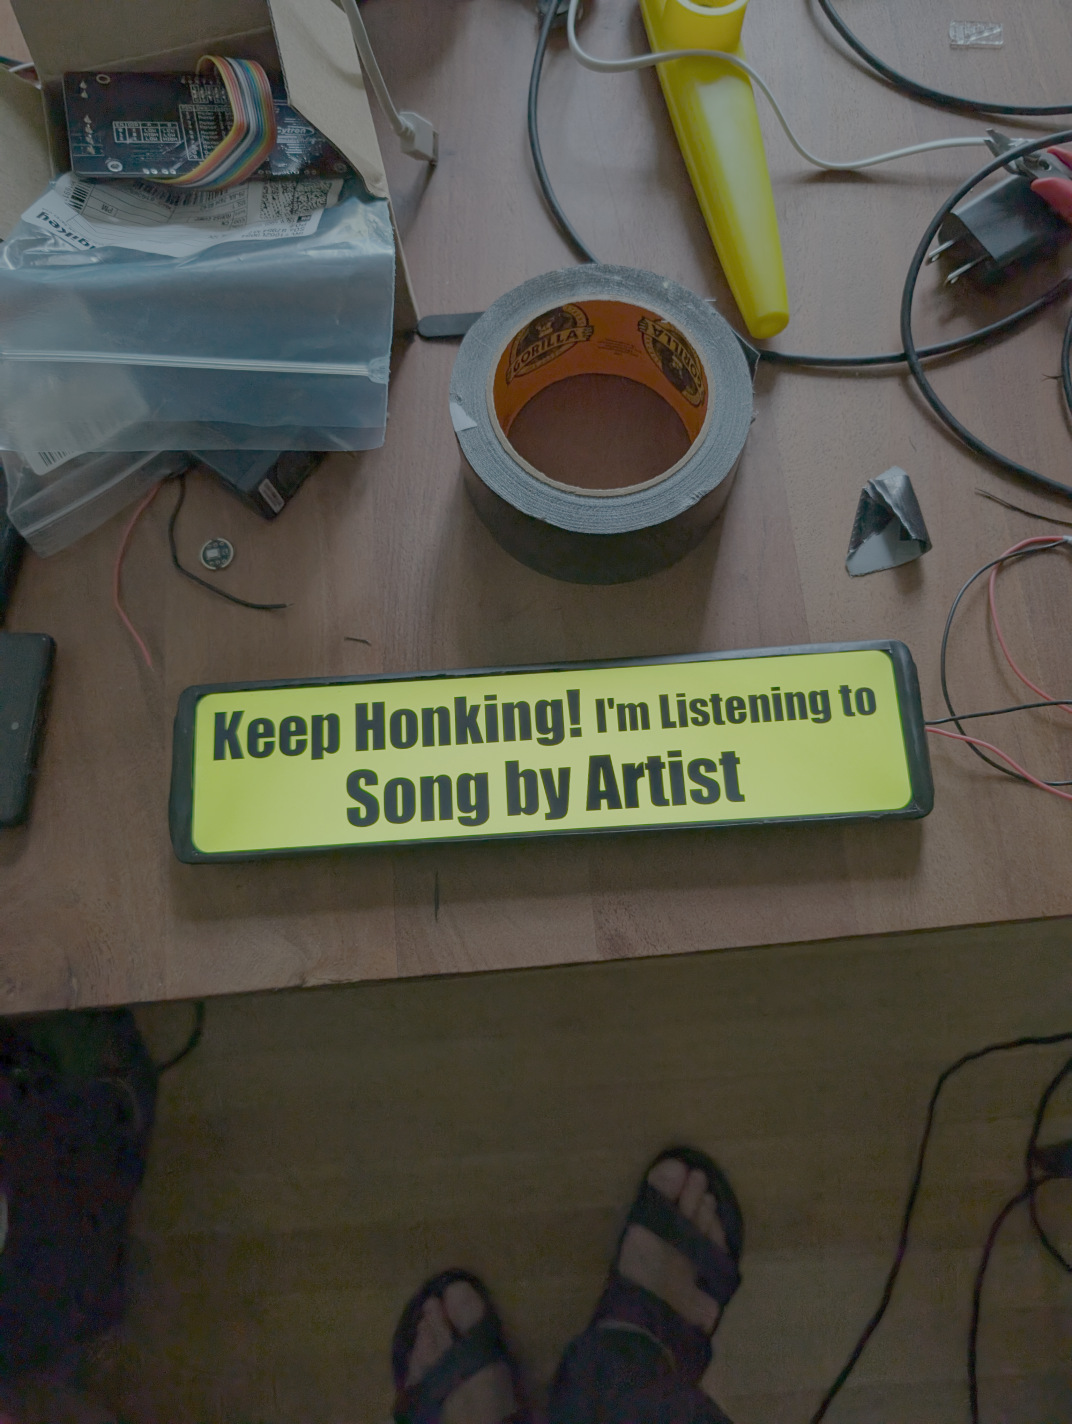
“I love the idea of using bumper stickers as a form of self-expression, but I got to thinking about how ‘permanent’ they are, and how my own style, mood and taste tends to change relatively quickly,” he says. “I wanted to see how I could resolve those things – could I make a bumper sticker that was always up to date? Would it still be interesting if it wasn’t permanent?”
On track
Figuring a changeable bumper sticker would be both practical and fun, he initially decided to experiment by connecting a Raspberry Pi Zero 2 W computer to a 5-volt HDMI display before working out a way to gather and share information about the song he was currently listening to in near real-time. He figured the best method would be to connect the Raspberry Pi device to the internet and make use of the online music service Last.fm. “It’s a ‘scrobbling’ tool that you can use to keep track of everything you listen to, regardless of where you’re listening from,” Guy explains.
By connecting Spotify to his Last.fm account, Guy had a way of grabbing details about his most recently played tune. Raspberry Pi could then pull that information and send it to the display for others to view. Since he wanted his project to look like a bumper sticker, this entailed creating an easily updated graphic – one with black text on a yellow background – that could be easily updated with new details – and Guy came up with the idea of using an image file that could be produced and rendered just before it was shown.
To enable this, Guy turned to a social website called Val Town which allows developers to code in the cloud. He wrote a small chunk of code – referred to as a val – that would access and fetch his Last.fm profile to gather details of the last song he was listening to. He then, with the assistance of Val Town’s AI, wrote another val to use a Javascript HTML5 canvas library to lay out the bumper sticker using the information gathered. This involved a lot of trial and error to make the text fit correctly, but he was able to successfully create, export and display a PNG image without any manual intervention.
Driving forward
With the nuts and bolts of the project in place, it was time to start refining. “I always start with components I already have or already know how to use,” Guy says. “I then quickly get as close as I can to a finished version, and then I see if there are any deal-breakers or cheap and obvious ways to improve the design. I find that momentum, as well as the ability to see and feel a project early on, really helps me stay on track, even if I know I’m going to have to revise things.
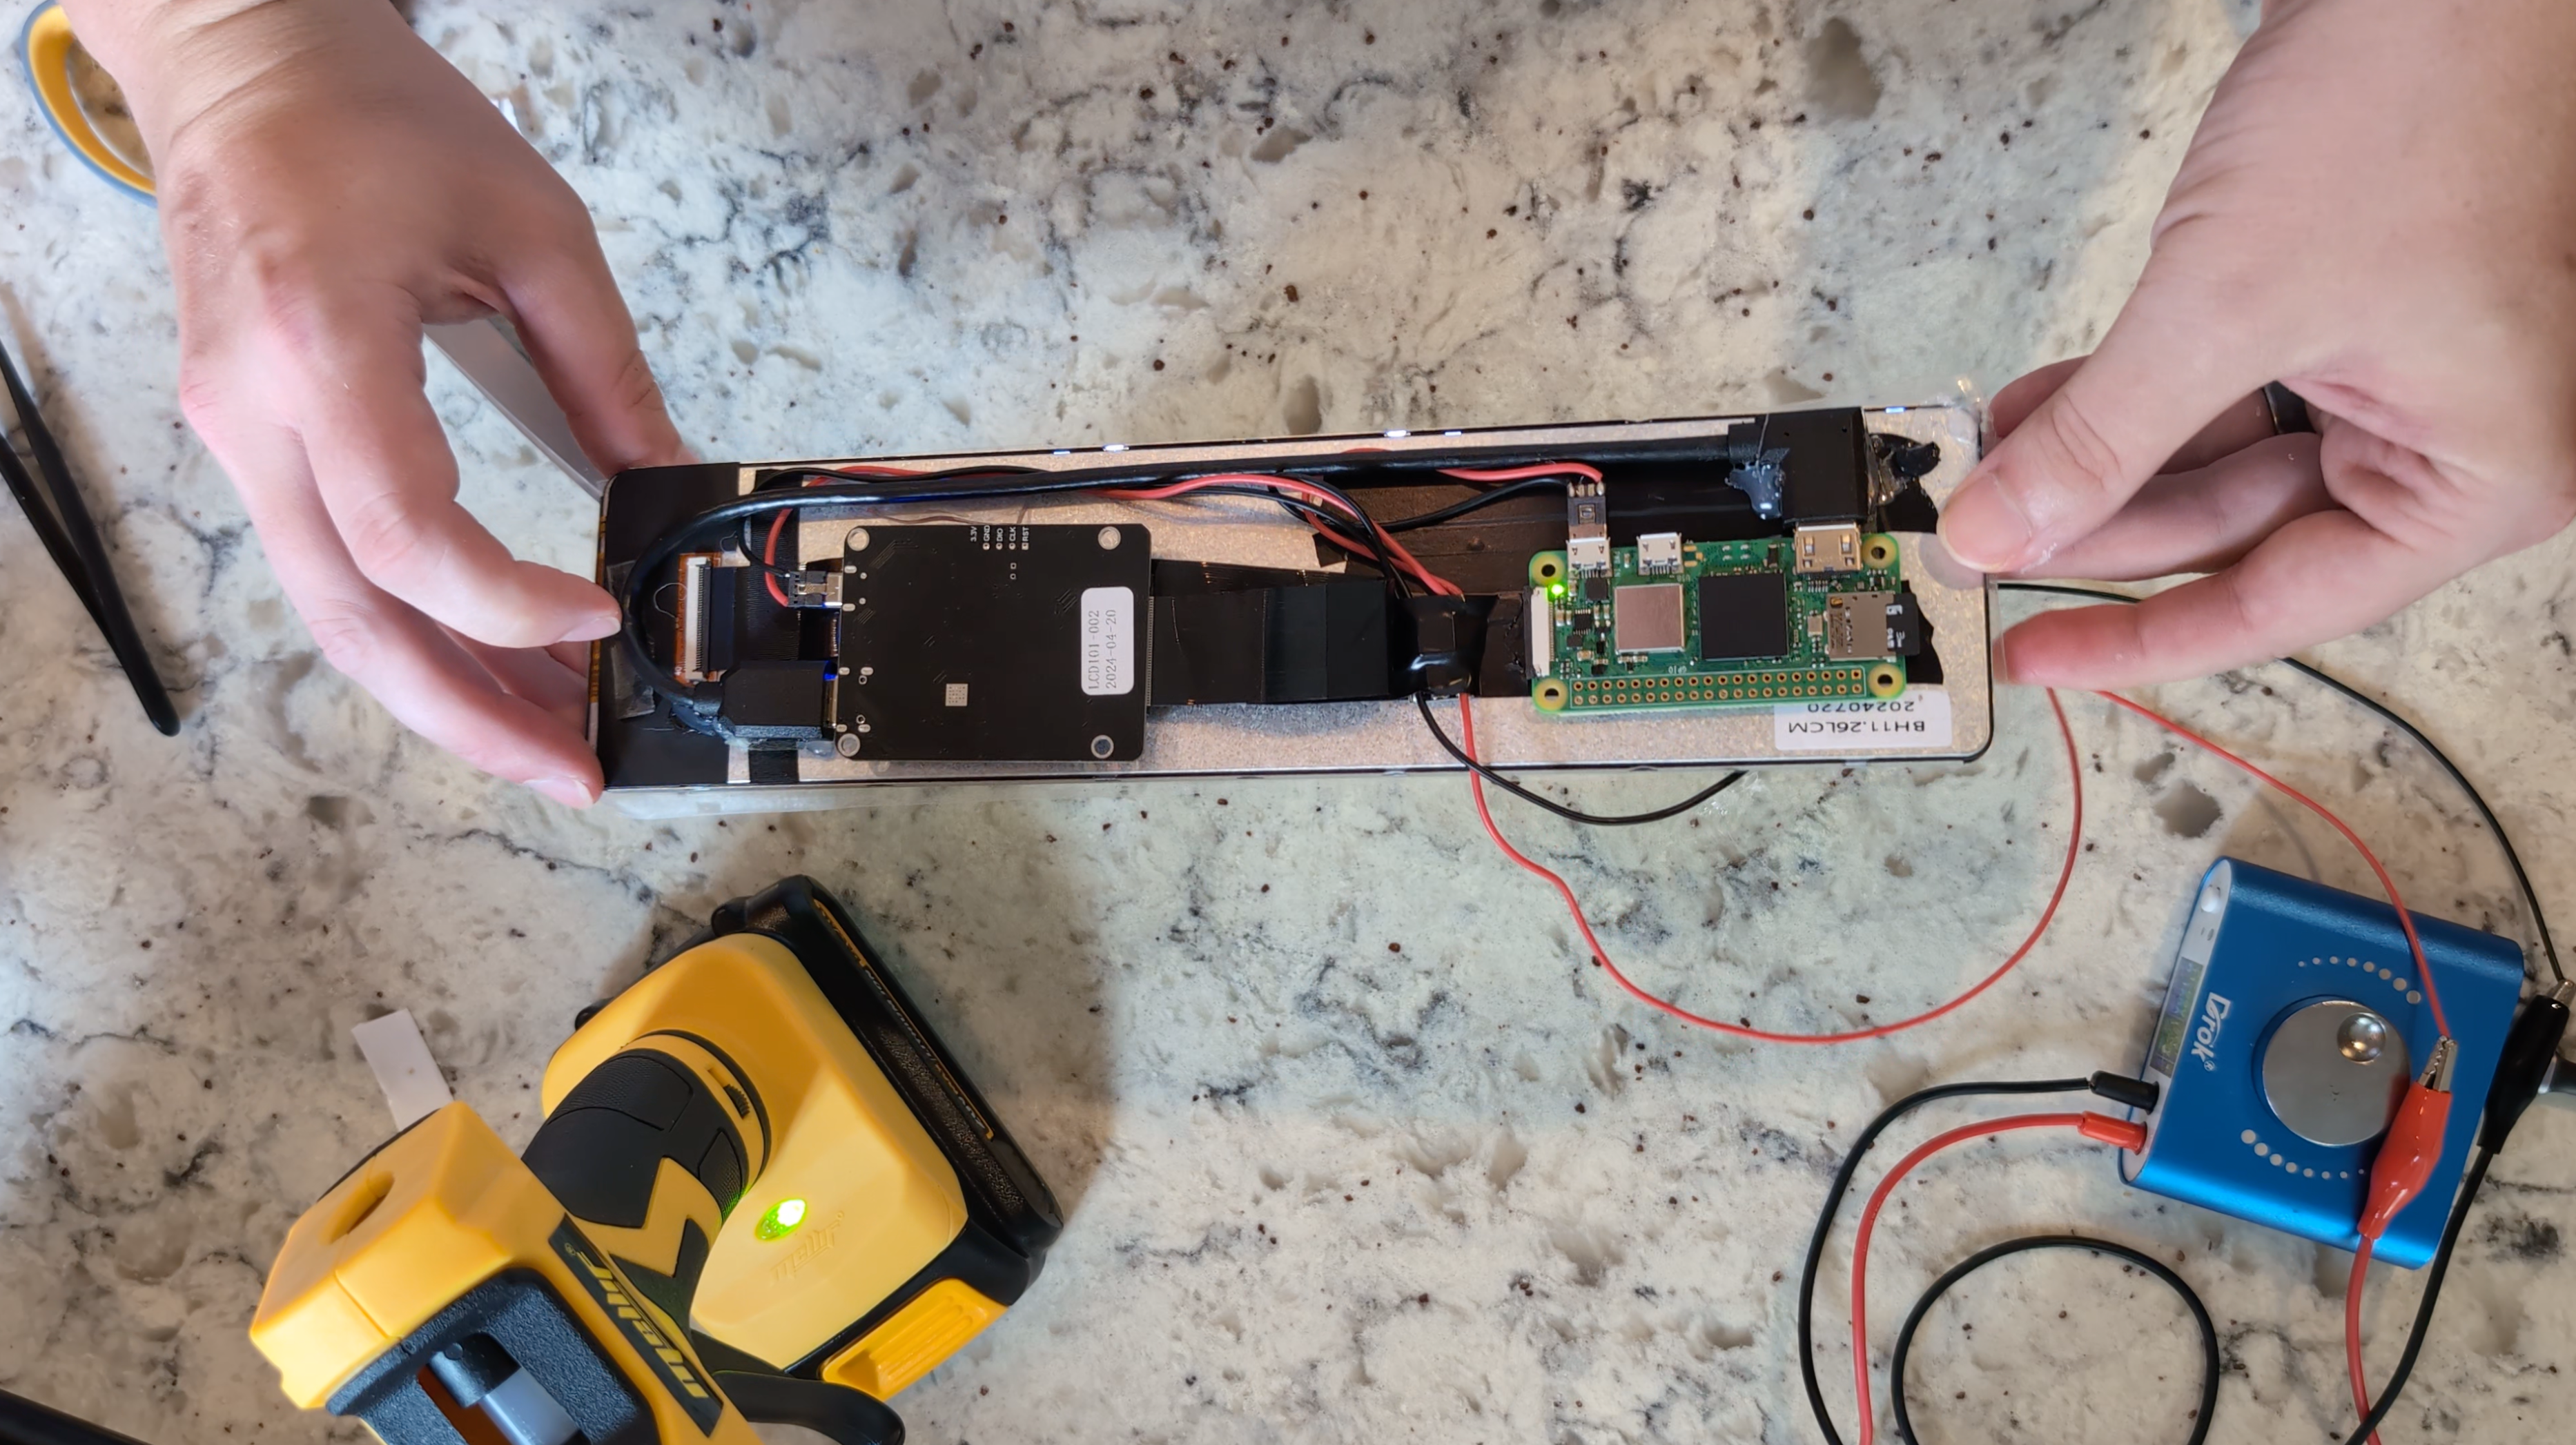
Given the idea was to create a device that looked as much like a real bumper sticker as possible, Dupont swapped out the display for an 11.3-inch strip LCD. “Size, shape, and readability came before anything else,” he explained. Figuring he’d be drawing power from a 12-volt car battery, he also grabbed a couple of breakout connectors and a buck converter to knock the power down to five volts.
Initial plans to connect the Raspberry Pi computer to the internet using a hotspot on his phone were revised as well. Dupont realised that he’d need to manually connect Raspberry Pi to the hotspot every time he got into his car and he knew, in his heart of hearts, that he would eventually tire of doing this, causing him to eventually consign the project to a drawer. To avoid this situation, he utilised a Particle Baron IoT development board which he also happened to have lying around.
“The main advantage of the board versus using the phone as a hotspot is that I never have to touch it or remember to turn it on,” he says. The board connects to Raspberry Pi and uses cellular data, the bonus being there are no monthly fees. The data is limited in quantity, but there’s more than enough for Guy’s intended use which makes for a perfect fit. With everything working, it was then a case of installing it, which required a spot of in-car wiring – and some dismantling of the vehicle’s interior panels.
The right path
The Raspberry Pi and other components were affixed to the back of the display panel which was also fitted with magnets to allow the device to be easily secured to the back of the car. For a neat finish, the device was placed in a heat-shrink sleeve that happened to be the perfect size. A bit of cutting was then required to allow the screen to show through, and Guy used some glue around the cuts for weatherproofing.
It works well. Powered by the car battery as soon as the vehicle is turned on, it immediately connects to the internet, grabs the required information and displays it. “Honestly, everything went pretty smoothly with this build,” Guy said. “It’s funny, but the thing that held me up the most was trying to figure out which HDMI settings would make this oddball display show what I wanted it to!”
Guy particularly likes the fact that it’s entirely automated so he always knows that it’ll be displaying his songs when he tootling down the road. “It lives with the car, which also means the sticker continues to work even if my wife is driving,” he laughs. “I’m afraid to ask whether she thinks that’s a bug or feature!”
Looking for a fun and creative way to brighten up the holiday season? With the Arduino Plug and Make Kit, you can build an interactive LED light installationthat reacts when someone walks by – perfect for spreading cheer and adding a high-tech twist to your decorations.
This project is easy to make, super fun to use, and fully customizable. The component includes the UNO R4 WiFi, Modulino Distance, and Modulino Buttons as well as all the cables and accessories you need to bring your decorations to life. All you have to add is a 5 V LED strip (like this one, for example).
Your step-by-step guide to LED magic
Anyone can recreate and personalize this project for festive lights: with the Plug and Make Kit’s snap-together design and Arduino Cloud integration, creating something amazing has never been easier. Just follow this step-by-step tutorial on Project Hub, complete with code templates and wiring instructions.
Here’s what you’ll need:
Arduino Plug and Make Kit, which already includes UNO R4 WiFi, Modulino Distance, Modulino Buttons, and Qwiic cables
A 5 V LED strip
Some jumper wires
A power bank (optional)
The project starts similarly to our recent jack-o’-lantern project, with the Modulino Distance sensor detecting movement and triggering an action. But in this case, instead of a scary cackle you’ll recreate whimsical light animations on the LED strip. These are pre-configured, and can be easily controlled either with Modulino Buttons or remotely, via the Arduino Cloud dashboard: you can adjust the color of the LEDs, select your favorite animation, and even set the lights to react only when someone is near – perfect for adding a playful surprise.
Why stop at festive lights?
The Arduino Plug and Make Kit makes it easy to expand your project. With its versatility, you can modify the interactive lights to fit any creative idea. Add more sensors for different triggers, or use other Modulino nodes to include audio effects, track data, or create patterns based on the weather – your imagination is the limit!Ready to spread some light and joy? Build your own interactive light project and share it with us! Upload your designs to Project Hub or email creators@arduino.cc to get in touch. We can’t wait to see how you make the season bright with Arduino!
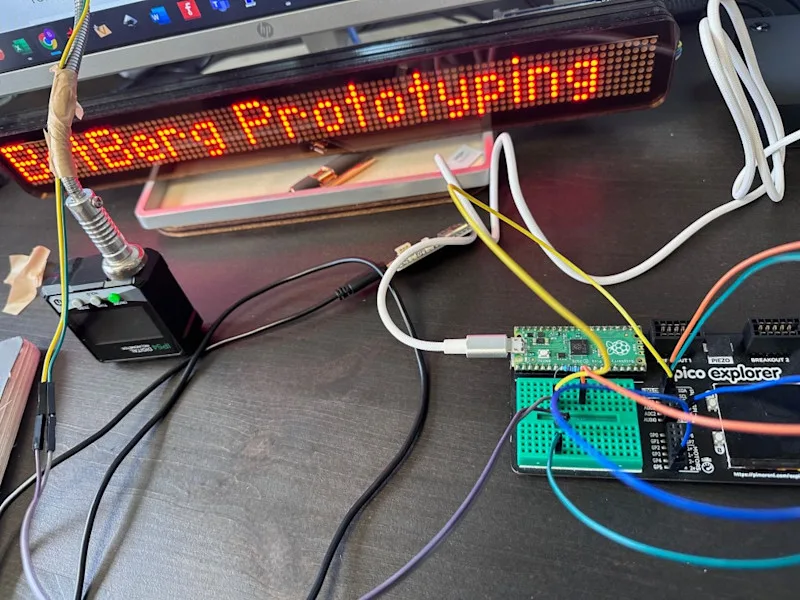
“Using a Raspberry Pi Pico, a light dependent resistor (LDR), a breadboard, some DuPont cables, and tape, I automated the famous Google T-Rex game,” Bas explains. “The LDR detects differences in analogue measurements whenever it senses cacti, which are always dark-coloured and appear on the same plane. The analogue-digital converter [ADC] port of the Pico measures each passing cactus ten times per second. After a 0.2-second delay, the Human Interface Device [HID] library simulates pressing the ‘up’ button on the keyboard, making the T-Rex jump at the right time.”
For Bas it was a fun way to show people he teaches and trains how the HID libraries work in code: “I’ve found that simulating single or multiple key presses with embedded processors stimulates the creativity and inventiveness of training participants,” he tells us.
See the light
Raspberry Pi Pico was the obvious choice for Bas. “[It’s] easy to obtain, very cost-effective, and supports MicroPython, CircuitPython, and Arduino C++,” Bas says. “It has a small form factor, can be easily soldered onto a prototyping board using castellated connections, or placed into a breadboard using headers. Personally, I like the Pimoroni Pico Explorer Base for prototyping, as it includes a breadboard, LCD screen, buttons, and breakout connectors. I especially appreciate the MicroPython and CircuitPython capabilities – they’re easy to explain to students, powerful, [and have a] wide range of libraries.”
The build itself is fairly simple – an LDR is placed in front of the screen, with tape acting as ‘blinders’ to stop other light interference. A pull-up resistor was used to stabilise the measurements too.
“The program displayed the measured [light] values in real time, making it easy to define and adjust the threshold values to trigger the T-Rex’s jump,” Bas further explains. “I stored the delay time for simulating the ‘up’ button press in a Python variable, allowing for easy adjustments through Thonny.”
Jumping ahead
What’s next for the T-Rex Jumper? “I have various future plans for these types of educational setups,” Bas says. “I’m always excited when participants in my trainings come up with creative ideas for using HID functions in combination with sensors and actuators, as it means I’ve succeeded in educating them about computer science and improving their digital literacy. Personally, I find it very rewarding to develop and create accessibility tools for people with disabilities, as they can greatly improve quality of life and make a meaningful difference.
Speaking of the creative ideas they came up, here’s just a few: automatic typing poem generators, pedal-based keyboards, automated testing tools for user interfaces, automatic swiping of dating apps… the list goes on.
Our latest updates for Android and Pixel are packed with tons of AI-powered features — including Expressive Captions, an all-new feature that brings more feeling to captions, Gemini’s saved info, which remembers important information for you, and updates for Call Screen so it’s even easier to respond. Check out all the updates below.
Um dir ein optimales Erlebnis zu bieten, verwenden wir Technologien wie Cookies, um Geräteinformationen zu speichern und/oder darauf zuzugreifen. Wenn du diesen Technologien zustimmst, können wir Daten wie das Surfverhalten oder eindeutige IDs auf dieser Website verarbeiten. Wenn du deine Einwillligung nicht erteilst oder zurückziehst, können bestimmte Merkmale und Funktionen beeinträchtigt werden.
Funktional
Immer aktiv
Die technische Speicherung oder der Zugang ist unbedingt erforderlich für den rechtmäßigen Zweck, die Nutzung eines bestimmten Dienstes zu ermöglichen, der vom Teilnehmer oder Nutzer ausdrücklich gewünscht wird, oder für den alleinigen Zweck, die Übertragung einer Nachricht über ein elektronisches Kommunikationsnetz durchzuführen.
Vorlieben
Die technische Speicherung oder der Zugriff ist für den rechtmäßigen Zweck der Speicherung von Präferenzen erforderlich, die nicht vom Abonnenten oder Benutzer angefordert wurden.
Statistiken
Die technische Speicherung oder der Zugriff, der ausschließlich zu statistischen Zwecken erfolgt.Die technische Speicherung oder der Zugriff, der ausschließlich zu anonymen statistischen Zwecken verwendet wird. Ohne eine Vorladung, die freiwillige Zustimmung deines Internetdienstanbieters oder zusätzliche Aufzeichnungen von Dritten können die zu diesem Zweck gespeicherten oder abgerufenen Informationen allein in der Regel nicht dazu verwendet werden, dich zu identifizieren.
Marketing
Die technische Speicherung oder der Zugriff ist erforderlich, um Nutzerprofile zu erstellen, um Werbung zu versenden oder um den Nutzer auf einer Website oder über mehrere Websites hinweg zu ähnlichen Marketingzwecken zu verfolgen.