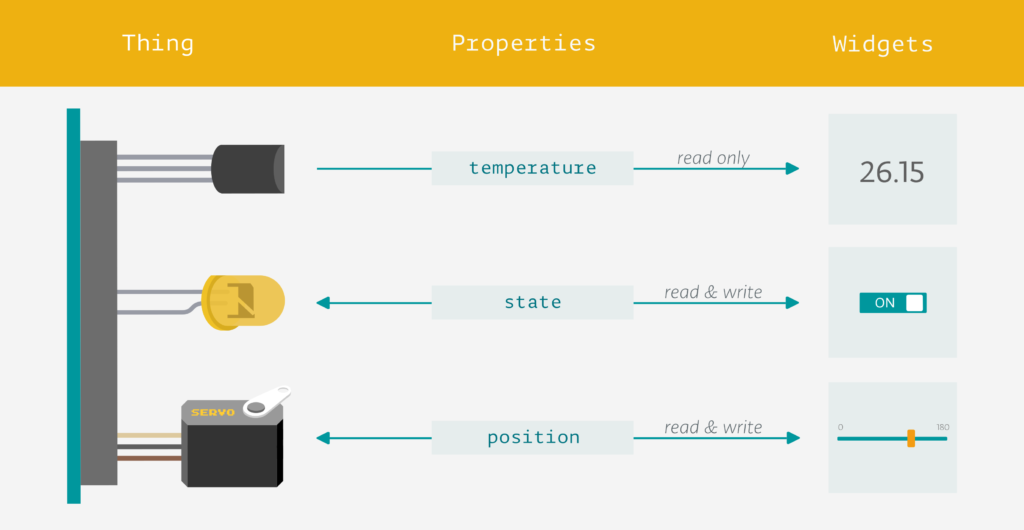
Kategorie: Linux

  • Make your own MIDI keyboard matrix (or just buy one?)

    Make your own MIDI keyboard matrix (or just buy one?)

    Reading Time: 2 minutes

    Make your own MIDI keyboard matrix (or just buy one?)

    Arduino TeamFebruary 19th, 2019

    If you’ve ever seen a MIDI pad with dozens of light-up buttons producing electronic music, you may have considered building one using an Arduino. As shown in GreatScott!’s latest write-up, you can indeed create your own Novation Launchpad-like device using a Nano for control, but the real question is should you?

    In the video below, GreatScott! shares how made a 6×6 pad, using a 3D-printed body and buttons arranged in a matrix to save I/O, along with WS2812B LEDs. He also goes over the MIDI protocol, which he was able to implement using loopMIDI and Hairless MIDI to serial bridge for Arduino interface. 

    While the DIY option may or may not be right for you, the concepts presented could be applied to a wide range of electronic musical interface projects.

    In this episode of DIY or Buy I will be showing you how I created my own Launchpad. That means I will show you how I combined a design idea with 3D prints, WS2812 LEDs, tactile switches and an Arduino to create a proper MIDI instrument. While building I will also tell you a bit about a keyboard matrix and in the end determine what advantages the DIY Launchpad offers. 

    [youtube https://www.youtube.com/watch?v=wyKStRyez5Y?feature=oembed&w=500&h=281]

    Website: LINK

  • Build a dial-up ISP server using a Raspberry Pi

    Build a dial-up ISP server using a Raspberry Pi

    Reading Time: 3 minutes

    Trying to connect an old, dial-up–compatible computer to modern-day broadband internet can be a chore. The new tutorial by Doge Microsystems walks you through the process of using a Raspberry Pi to bridge the gap.

    The Sound of dial-up Internet

    I was bored so I wanted to see if I could get free dial up internet so I found that NetZero still has free service so I put in the number and heard the glorious sound of the Dial-up. Remind me of years gone. Unfortunately I was not able to make a connection.

    Dial-up internet

    Ah, there really is nothing quite like it: listen to the sweet sound of dial-up internet in the video above and reminisce about the days of yore that you spent waiting for your computer to connect and trying to convince other members of your household to not use the landline for a few hours.

    But older computers have fallen behind these times of ever faster broadband and ever more powerful processors, and getting your beloved vintage computer online isn’t as easy as it once was.

    For one thing, does anyone even have a landline anymore?

    Enter Doge Microsystems, who save the day with their Linux-based dial-up server, the perfect tool for connecting computers of yesteryear to today’s broadband using a Raspberry Pi.

    Disclaimer: I’m going to pre-empt a specific topic of conversation in the comment section by declaring that, no, I don’t like the words ‘vintage’, ‘retro’, and yesteryear’ any more than you do. But we all need to accept that the times, they are a-changing, OK? We’re all in this together. Let’s continue.

    Building a Raspberry Pi dial-in server

    For the build, you’ll need a hardware modem — any model should work, as long as it presents as a serial device to the operating system. You’ll also need a Linux device such as a Raspberry Pi, a client device with a modem, and ‘some form of telephony connection to link the two modems’, described by Doge Microsystems as one of the following:

    We need a way to connect our ISP modem to clients. There are many ways to approach this:

    • Use the actual PSTN (i.e. real phone lines)
    • Use a PBX to provide local connectivity
    • Build your own circuity (not covered here, as it would require extra configuration)
    • Build a fake PSTN using VoIP ATAs and a software PBX

    I’ve gone with the fourth option. Here’s the breakdown:

    • Asterisk — a VoIP PBX — is configured on the dial-in server to accept connections from two SIP client accounts and route calls between them
    • A Linksys PAP2T ATA — which supports two phone lines — is set up as both of those SIP clients connected to the PBX
    • The ISP-side modem is connected to the first line, and the client device to the second line

    Doge Microsystems explains how to set up everything, including the Linux device, on the wiki for the project. Have a look for yourself if you want to try out the dial-up server first-hand.

    The sound of dial-up

    For funsies, I asked our Twitter followers how they would write down the sound of a dial-up internet connection. Check them out.

    Alex on Twitter

    @Raspberry_Pi dialtone, (phone beeps), rachh racchh rachh rechhhhhhh reccchhhhhh rechhhh, DEE-DONG-DEE-DONG-DI, BachhhhhhhhhhhhBACHHHHBACHHHHHHHHHHHHHHHHHHHHHHHHH

    Website: LINK

  • Play Mario Kart: Double Dash with a hacked VTech steering wheel

    Play Mario Kart: Double Dash with a hacked VTech steering wheel

    Reading Time: < 1 minute

    Play Mario Kart: Double Dash with a hacked VTech steering wheel

    Arduino TeamFebruary 19th, 2019

    YouTuber “Insert Controller Here” has been creating gaming controllers out of a variety of objects, like bananas, mayonnaise, and meat. For his latest iteration, the YouTuber decided to convert a VTech Turn and Learn Driver into—what else?—a Mario Kart: Double Dash steering console.

    As seen in the video below, the build consists of disassembling the toy, then soldering wires to the correct points to recreate steering wheel input, braking, and throttle. An Arduino Leonardo is used for the gaming interface, allowing Mario and Luigi to make it around the track by turning the wheel and applying brakes, while the accelerator is simply “shifted” into place.

    [youtube https://www.youtube.com/watch?v=iNuI0311-qA?start=2&feature=oembed&w=500&h=281]

    Website: LINK

  • Build your own Commodore PET model 8032

    Build your own Commodore PET model 8032

    Reading Time: 2 minutes

    Build a mini version of one of history’s most iconic personal computers with Lorenzo ‘Tin Cat’ Herrera and his Commodore PET Mini, which is based on the Commodore PET model 8032.

    Commodore PET Mini Retrowave intro

    3D Print your own Commodore PET Mini retro computer with a Raspberry Pi and Retropie for retro gaming or retro emulation. Fully documented DIY project: https://commodorepetmini.com The Commodore PET is one of the most iconic-looking computer of the 70’s, it reminds us of an era of frenetic innovation, harsh competition and bold design choices that shaped the computer industry as we know it today.

    Commodore PET — a (very) brief history

    Presented to the world in 1977, the Commodore PET represents a truly iconic piece of computer history: it was the first personal computer sold to the general public. With a built-in keyboard, screen, and cassette deck, and an introductory price of US$795 — roughly $3287 today — it offered everything a home computer user needed. And it beat the Apple II to market by a few months, despite Jobs and Wozniak offering to sell their Apple II technology to Commodore in September 1976.

    Commodore PET model 8032

    Commodore was also the first company to license Microsoft’s 6502 BASIC, and in the 1980s the Commodore became a staple in many school classrooms, bringing about a surge in the numbers of future computer engineers — a few of which now work in the Raspberry Pi Trading office.

    The Commodore PET model was discontinued in 1982, then resurrected briefly in 1986, before finally stepping aside to make way for the popular Commodore 128, 1571, and 1581 models.

    Redesigning a mini PET

    Based on the Commodore PET model 8032, Lorenzo Herrera’s 3D-printable remake allows users to fit an entire computer — the Raspberry Pi — inside a miniature iconic shell. Lorenzo designed this case to house a working screen, and once you connect the Pi to a Bluetooth keyboard, your Commodore PET Mini will be fully functional as well as stylish and cute as a button.

    You’ll need access to a 3D printer to build your own — all parts are listed on the project’s website. You can also purchase them as a kit directly from Lorenzo if you want to save time on sourcing your own.

    3D-printing the Commodore PET

    To build your own Commodore PET Mini, start by visiting its official website. And if you don’t own a 3D printer, search online for your nearest maker space or 3D printing service to get the parts made.

    We’re definitely going to be building our own here at Raspberry Pi, and if you build one for yourself, or use a Raspberry Pi in any iconic computer rebuild, let us know.

    Website: LINK

  • Controlling a toaster oven robot with Arduino

    Controlling a toaster oven robot with Arduino

    Reading Time: 2 minutes

    Controlling a toaster oven robot with Arduino

    Arduino TeamFebruary 15th, 2019

    As seen in our earlier post, James Bruton has been working on a breakfast-making robot, and has now moved from boiling eggs to making toast… or apparently hot dogs/sausages as shown in the video’s demo. 

    What he’s come up with uses a one degree-of-freedom gantry assembly to move servo-powered forks into position. These can then manipulate a cooking tray as needed to heat food up, flipping it out into a hand-held container when done. Two other servos take care of turning the device on and opening the door.

    The control setup looks extremely similar to the previous build, with control via buttons, an Arduino Mega, and a small LCD display. Bruton notes that the Mega is used here because of its multiple serial ports, which will be useful to link everything together in the future.

    [youtube https://www.youtube.com/watch?v=iZ0l46Njn5Q?feature=oembed&w=500&h=281]

    Website: LINK

  • Mechanical tulip is a glowing work of Valentine’s Day art

    Mechanical tulip is a glowing work of Valentine’s Day art

    Reading Time: 2 minutes

    Mechanical tulip is a glowing work of Valentine’s Day art

    Arduino TeamFebruary 14th, 2019

    Tulips come in all shapes and sizes, but Jirí Praus has created a mechanical version like nothing you’ve ever seen. It’s masterfully crafted as a gift for his wife, using bent wire to form its six petals and stem. 

    In order to make this present truly amazing, however, a servo-driven linkage system opens up the tulip when touched, exposing seven programmable LEDs in the center, along with 30 bright white SMD LEDs on the petals themselves.

    Control for the freeform flower is accomplished via an Arduino Nano, hidden inside its wooden base. It’s a truly spectacular build, shown below illuminating the surrounding area with a brilliant light and shadow pattern.

    Website: LINK

  • Inside the Dreamcast homebrew scene | Wireframe issue 7

    Inside the Dreamcast homebrew scene | Wireframe issue 7

    Reading Time: 4 minutes

    Despite its apparent death 17 years ago, the Sega Dreamcast still has a hardcore group of developers behind it. We uncover their stories in this excerpt from Wireframe issue 7, available now.

    In 1998, the release of the Dreamcast gave Sega an opportunity to turn around its fortunes in the home console market. The firm’s earlier system, the Saturn, though host to some beloved titles, was running a distant third in sales behind the Nintendo 64 and PlayStation. The Dreamcast, by contrast, saw a successful launch and quickly became the go-to system for arcade-quality ports of fighting games, among other groundbreaking titles like Seaman and Crazy Taxi.

    Unfortunately for fans, it wasn’t to last. The Dreamcast struggled to compete against the PlayStation 2, which launched in 2000, and at the end of March 2001, in the face of the imminent launch of the Nintendo GameCube and Microsoft’s new Xbox, Dreamcast left the stage, and Sega abandoned the console market altogether.

    None of this stopped a vibrant homebrew development scene springing up around the console in Sega’s place, and even years later, the Dreamcast remains a thriving venue for indie developers. Roel van Mastbergen codes for Senile Team, the developers of Intrepid Izzy, a puzzle platformer coming soon to the PC, PS4, and Dreamcast.

    Of the port to Sega’s ageing console, van Mastbergen tells us, “I started this project with only the PC in mind. I’m more used to developing for older hardware, though, so I tend to write code with low CPU and RAM requirements by force of habit. At some point I decided to see if I could get it running on the Dreamcast, and I was happy to find that it ran almost perfectly on the first try.”

    It runs at a lower resolution than on PC, but Intrepid Izzy still maintains a smooth 60fps on Dreamcast.

    One of the pluses of the Dreamcast, van Mastbergen points out, is how easy it is to develop for. “There are free tools and sufficient documentation available, and you can run your own code on a standard Dreamcast without any hardware modifications or hacks.”

    Games burned to CD will play in most models of unmodified Dreamcast, usually with no extra software required. While this doesn’t result in a huge market — the customer base for new Dreamcast games is difficult to measure but certainly small — it makes development for original hardware far more viable than on other systems, which often need expensive and difficult-to-install modchips.

    Many of the games now being developed for the system are available as digital downloads, but the state of Dreamcast emulation lags behind that of its competitors, with no equivalent to the popular Dolphin and PCSX2 emulators for GameCube and PS2. All this makes boxed games on discs more viable than on other systems — and, in many cases, physical games can also become prized collectors’ items.

    Intrepid Izzy is developed with a custom code library that works across multiple systems; it’s simple to downscale PC assets and export a Dreamcast binary.

    Kickstarting dreams

    By now, you might be asking yourself what the point of developing for these old systems is — especially when creating games for PC is a much easier and potentially more profitable route to take. When it comes to crowdfunding, though, catering to a niche but dedicated audience can pay dividends.

    Belgian developer Alice Team, creators of Alice Dreams Tournament, asked for €8000 in funding to complete its Dreamcast exclusive, which began development in 2006. It eventually raised €28,000 — more than treble its goal.

    Intrepid Izzy didn’t quite reach such dizzying heights, only just meeting its €35,000 target, but van Mastbergen is clear it wouldn’t have been funded at all without the dedicated Dreamcast base. “The project has been under-funded since the beginning, which is slightly problematic,” van Mastbergen tells us. “Even so, it is true that the Dreamcast community is responsible for the lion’s share of the funding, which is a testament to how well-loved this system still is.”

    You can read the rest of the feature in Wireframe issue 7, available in Tesco, WHSmith, and all good independent UK newsagents.

    Or you can buy Wireframe directly from us – worldwide delivery is available. And if you’d like to own a handy digital version of the magazine, you can also download a free PDF.

    Face your fears in the indie horror, Someday You’ll Return.

    Make sure to follow Wireframe on Twitter and Facebook for updates and exclusives, and for subscriptions, visit the Wireframe website to save 49% compared to newsstand pricing!

    Website: LINK

  • Official Arduino Day 2019 celebration coming to Milan!

    Official Arduino Day 2019 celebration coming to Milan!

    Reading Time: 3 minutes

    As recently announced, Arduino Day 2019 will be celebrated on March 16th. If you plan on organizing your your own event, don’t forget to submit your proposal by March 3rd!

    We have already received a hundred submissions from all across the globe and will continue to update our map regularly with new events — we are hoping to make it even bigger and better than last year!

    As we prepare for the festivities, we have an important announcement for our community: the Arduino team will be holding this year’s official event at Milano Luiss Hub for Makers and Students in Milan, Italy.

    The Official Arduino Day program will include an exhibition area with Arduino projects, a talk area, and an activity space for kids. The event is organized in collaboration with Manifattura Milano, a local initiative dedicated to craftsmanship, urban manufacturing and Industry 4.0 promoted by Milan Municipality – Labour Policies Department.  

    We are currently seeking makers, speakers and activities for the Official Arduino Day in Milan. If you are able to physically attend and/or want to showcase your creations and their impact on your community, please fill out this form by March 3rd. Additionally, we are looking for volunteers to help out during the event, welcoming guests and assisting visitors. If you are interested in this opportunity, please feel free to complete this application. The call for local makers and volunteers will be powered by WeMake.

    On Arduino Day, we will also support LoRa and the City, a hackathon organized by Codemotion and A2A, that will take place in Milan at Casa dell’Energia from March 16th to 17th. If you want to join the hackathon as an individual or a group, apply here — the winners of the two challenges (urban mobility and monitoring and energy and sustainability) will receive a €3,000 Amazon coupon.

    Stay tuned over the next few weeks as we will be providing updates on the Official Arduino Day agenda. In the meantime, don’t forget to apply on the Arduino Day website and share your celebration on social media using the hashtag #ArduinoD19.


    Come annunciato di recente, il 16 marzo celebreremo Arduino Day 2019; se volete festeggiare con noi e organizzare un evento community, avete tempo fino al 3 Marzo per mandare la vostra proposta attraverso questo form!

    Abbiamo già ricevuto un centinaio di candidature da tutto il mondo e continueremo ad aggiornare regolarmente la nostra mappa con nuovi eventi: speriamo di renderlo ancora più grande rispetto agli scorsi anni!

    Mentre ci prepariamo per la festa, abbiamo un annuncio importante per la nostra community: Official Arduino Day, ovvero quello organizzato dal team Arduino, per il 2019 si terrà al Milano Luiss Hub for Makers and Students a Milano!

    Il programma prevede un’area espositiva con progetti Arduino, un’area talk e uno spazio per con attività gratuite per i più piccoli. L’evento è organizzato in collaborazione con Manifattura Milano, l’iniziativa dedicata all’artigianato, alla produzione urbana e all’Industria 4.0 promossa dal Comune di Milano – Assessorato Politiche del Lavoro.

    Call for maker and volunteers! Stiamo cercando maker e speaker per l’Official Arduino Day a Milano. Se puoi partecipare fisicamente all’evento e vuoi mostrare il tuo progetto o raccontare l’impatto che ha avuto sulla tua comunità, completa questo form entro il 3 Marzo. Stiamo anche cercando volontari e volontarie che diano una mano durante l’evento, dando il benvenuto ai nostri ospiti, oppure aiutandoci con le attività. Se ti interessa questa opportunità, compila questo form. La call for maker and volunteers di Milano e dintorni è supportata da WeMake.

    Durante Arduino Day, daremo supporto ad un’altra iniziativa a Milano, LoRa and the City, un hackathon che avrà luogo presso la Casa dell’Energia tra il 16 e il 17 Marzo. Se vuoi partecipare come singolo o con il tuo gruppo, clicca qui – in palio per le due sfide dell’hackathon (Urban Mobility and monitoring and Energy and Sustainability) ci saranno due buoni da 3000 € per Amazon.

    Continua a seguirci, durante le prossime settimane condivideremo tutti i dettagli dell’agenda di Arduino Day. Nel frattempo, non dimenticarti di mandare la tua application attraverso il sito di Arduino Day e di condividere i festeggiamenti sui social con l’hashtag #ArduinoD19.

    Website: LINK

  • GPIO Zero v1.5 is here!

    GPIO Zero v1.5 is here!

    Reading Time: 6 minutes

    GPIO Zero is a zero-boilerplate Python library that makes physical computing with Python more accessible and helps people progress from zero to hero.

    Today, I’m pleased to announce the release of GPIO Zero v1.5.0. It’s packed full of updates, including new features, bug fixes, and lots of improvements to the documentation.

    Guido, the creator of Python, happened across the library recently, and he seemed to like it:

    Guido van Rossum on Twitter

    GPIOzero I love you! https://t.co/w3CnUGx3yO

    Pin factories – take your pick

    GPIO Zero started out as a friendly API on top of the RPi.GPIO library, but later we extended it to allow other pin libraries to be used. The pigpio library is supported, and that includes the ability to remotely control GPIO pins over the network, or on a Pi Zero over USB.

    This also gave us the opportunity to create a “mock” pin factory, so that we could emulate the effect of pin changes without using real Raspberry Pi hardware. This is useful for prototyping without hardware, and for testing. Try it yourself!

    As well as the pin factories we provide with the library (RPi.GPIO, pigpio, RPIO, and native), it’s also possible to write your own. So far, I’m aware of only one custom pin factory, and that has been written by the AIY team at Google, who created their own pin factory for the pins on the AIY Vision Kit. This means that you can connect devices to these pins, and use GPIO Zero to program them, despite the fact they’re not connected to the Pi’s own pins.

    If you have lots of experience with RPi.GPIO, you might find this guide on migrating from RPi.GPIO to GPIO Zero handy.

    Ultrasonic distance sensor

    We had identified some issues with the results from the DistanceSensor class, and we dealt with them in two ways. Firstly, GPIO Zero co-author Dave Jones did some work under the hood of the pins API to use timing information provided by underlying drivers, so that timing events from pins will be considerably more accurate (see #655). Secondly, Dave found that RPi.GPIO would often miss edges during callbacks, which threw off the timing, so we now drop missed edges and get better accuracy as a result (see #719).

    The best DistanceSensor results come when using pigpio as your pin factory, so we recommend changing to this if you want more accuracy, especially if you’re using (or deploying to) a Pi 1 or Pi Zero.

    Connecting devices

    A really neat feature of GPIO Zero is the ability to connect devices together easily. One way to do this is to use callback functions:

    button.when_pressed = led.on
    button.when_released = led.off

    Another way is to set the source of one device to the values of another device:

    led.source = button.values

    In GPIO Zero v1.5, we’ve made connecting devices even easier. You can now use the following method to pair devices together:

    led.source = button

    Read more about this declarative style of programming in the source/values page in the docs. There are plenty of great examples of how you can create projects with these simple connections:

    Testing

    An important part of software development is automated testing. You write tests to check your code does what you want it to do, especially checking the edge cases. Then you write the code to implement the features you’ve written tests for. Then after every change you make, you run your old tests to make sure nothing got broken. We have tools for automating this (thanks pytest, tox, coverage, and Travis CI).

    But how do you test a GPIO library? Well, most of the GPIO parts of our test suite use the mock pins interface, so we can test our API works as intended, abstracted from how the pins behave. And while Travis CI only runs tests with mock pins, we also do real testing on Raspberry Pi: there are additional tests that ensure the pins do what they’re supposed to. See the docs chapter on development to learn more about this process, and try it for yourself.
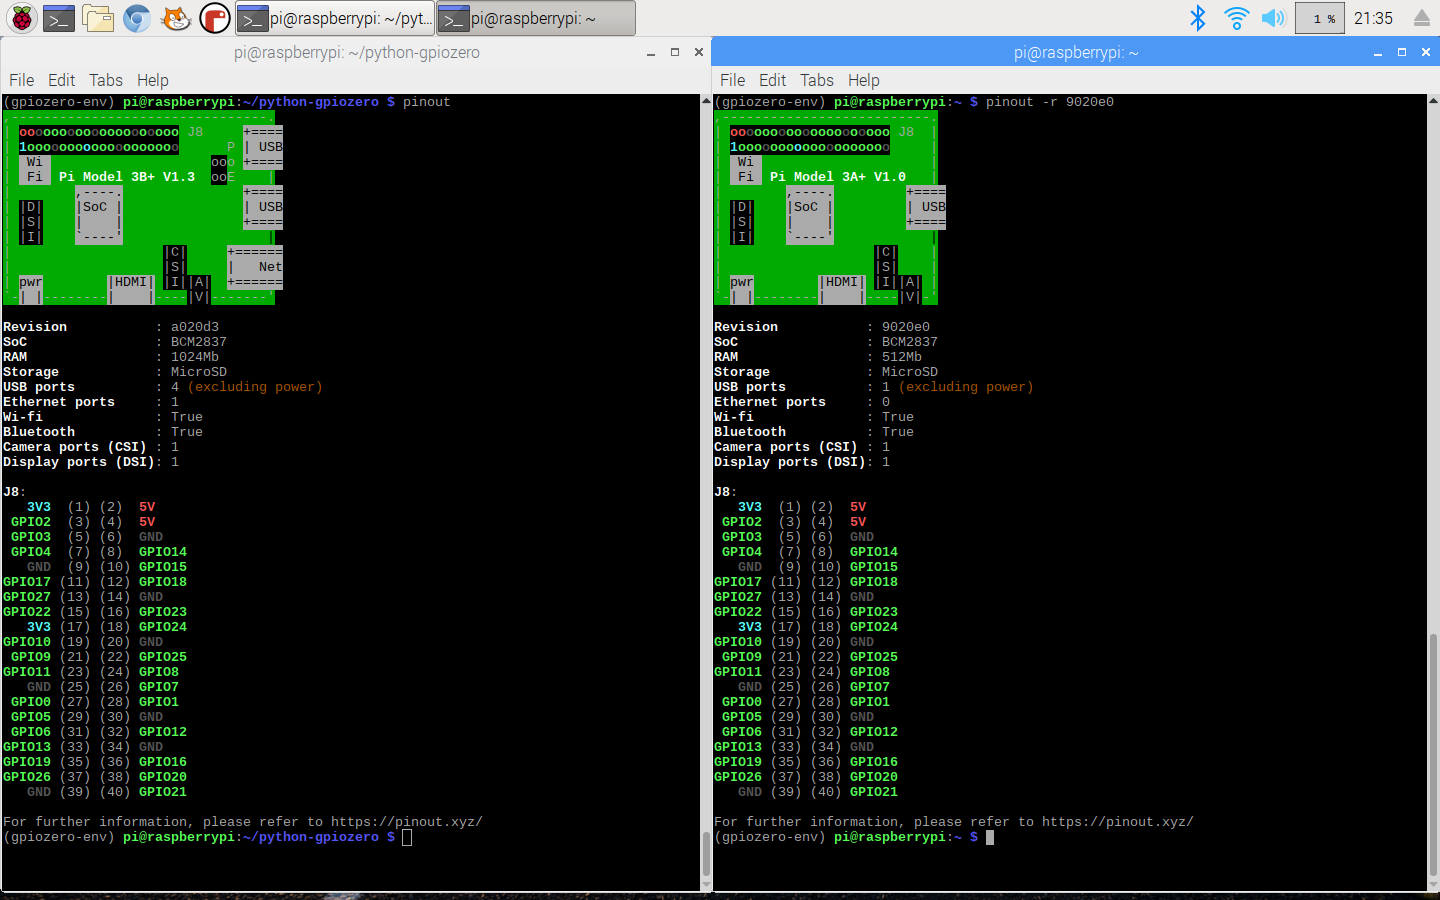
    pinout

    You may remember that the last major GPIO Zero release introduced the pinout command line tool. We’ve added some new art for the Pi 3A+ and 3B+:

    pinout also now supports the -x (or --xyz) option, which opens the website pinout.xyz in your web browser.

    Zero boilerplate for hardware

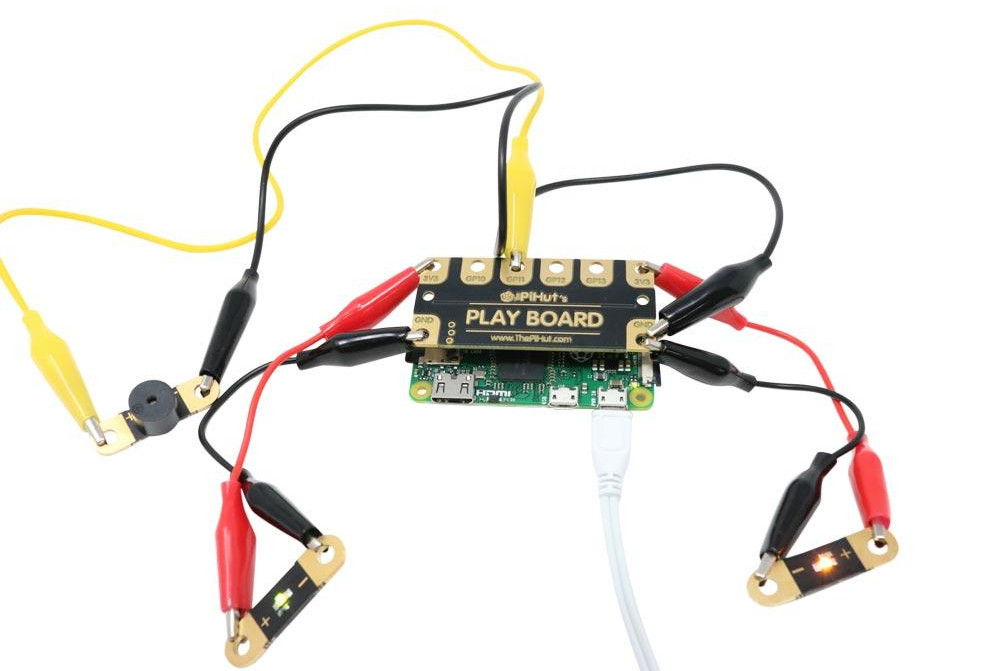
    The goal of all this is to remove obstacles to physical computing, and Rachel Rayns has designed a wonderful board that makes a great companion to GPIO Zero for people who are learning. Available from The Pi Hut, the PLAY board provides croc-clip connectors for four GPIO pins, GND, and 3V3, along with a set of compatible components:

    Since the board simply breaks out GPIO pins, there’s no special software required. You can use Scratch or Python (or anything else).

    New contributors

    This release welcomed seven new contributors to the project, including Claire Pollard from PiBorg and ModMyPi, who provided implementations for TonalBuzzer, PumpkinPi, and the JamHat. We also passed 1000 commits!

    Watch your tone

    As part of the work Claire did to add support for the Jam HAT, she created a new class for working with its buzzer, which works by setting the PWM frequency to emit a particular tone. I took what Claire provided and added some maths to it, then Dave created a whole Tones module to provide a musical API. You can play buzzy jingles, or you can build a theremin:

    GPIO Zero theremin

    from gpiozero import TonalBuzzer, DistanceSensor buzzer = TonalBuzzer(20) ds = DistanceSensor(14, 26) buzzer.source = ds

    …or you can make a siren:

    GPIO Zero TonalBuzzer sine wave

    from gpiozero import TonalBuzzer from gpiozero.tools import sin_values buzzer = TonalBuzzer(20) buzzer.source = sin_values()

    The Tones API is a really neat way of creating particular buzzer sounds and chaining them together to make tunes, using a variety of musical notations:

    >>> from gpiozero.tones import Tone
    >>> Tone(440.0)
    >>> Tone(69)
    >>> Tone('A4')

    We all make mistakes

    One of the important things about writing a library to help beginners is knowing when to expect mistakes, and providing help when you can. For example, if a user mistypes an attribute or just gets it wrong – for example, if they type button.pressed = foo instead of button.when_pressed = foo – they wouldn’t usually get an error; it would just set a new attribute. In GPIO Zero, though, we prevent new attributes from being created, so you’d get an error if you tried doing this. We provide an FAQ about this, and explain how to get around it if you really need to.

    Similarly, it’s common to see people type button.when_pressed = foo() and actually call the function, which isn’t correct, and will usually have the effect of unsetting the callback (as the function returns None). Because this is valid, the user won’t get an error to call their attention to the mistake.

    In this release, we’ve added a warning that you’ll see if you set a callback to None when it was previously None. Hopefully that will be useful to people who make this mistake, helping them quickly notice and rectify it.

    Update now

    Update your Raspberry Pi now to get the latest and greatest GPIO Zero goodness in your (operating) system:

    sudo apt update
    sudo apt install python3-gpiozero python-gpiozero

    Note: it’s currently syncing with the Raspbian repo, so if it’s not available for you yet, it will be soon.

    What’s next?

    We have plenty more suggestions to be working on. This year we’ll be working on SPI and I2C interfaces, including I2C expander chips. If you’d like to make more suggestions, or contribute yourself, find us over on GitHub.

    Website: LINK

  • Versatile multimeter made with Arduino Nano

    Versatile multimeter made with Arduino Nano

    Reading Time: < 1 minute

    Versatile multimeter made with Arduino Nano

    Arduino TeamFebruary 12th, 2019

    If you ever wondered about building your own multimeter, YouTuber Electronoobs shows us just how to do so with an Arduino Nano.

    Aside from the Nano, he’s using a 128×64 OLED screen to display stats and battery level, and a 16-bit ADC for precise measurements. Power is provided by a small onboard LiPo battery, and he’s even included a charging module to help keep things topped off. Everything is housed inside a custom 3D-printed case. 

    The device doesn’t just measure voltage, resistance, and current, but is capable of reading capacitance and inductance as well—measurements that you wouldn’t necessarily expect on a commercial meter. If you’d like to create your own, the schematic and code are available on Electronoobs’ site.

    [youtube https://www.youtube.com/watch?v=L6PJSht1oZc?feature=oembed&w=500&h=281]

    Website: LINK

  • Washing machine motor robots!

    Washing machine motor robots!

    Reading Time: < 1 minute

    Washing machine motor robots!

    Arduino TeamFebruary 12th, 2019

    Powering small robots could be considered the specialty of Arduino boards, but what if you want to control something much bigger? There are, of course, ways to do this, but larger motors are naturally more difficult to source. This hasn’t deterred YouTuber The Post Apocalyptic Inventor, however, who has been exploring the use of European-style washing machine motors to drive a large steel tubing robot chassis.

    While the project is not yet finished, he’s turned to an Arduino Uno for experimental control along with a variety of other components to provide the proper power. 

    Be sure to check out video below of this robot-in-progress if you’re interested in “beefing up” your next project!

    [youtube https://www.youtube.com/watch?v=OE5UPXjyaIw?feature=oembed&w=500&h=281]

    Website: LINK

  • An Arduino-controlled robotic button dispenser for your next event

    An Arduino-controlled robotic button dispenser for your next event

    Reading Time: 2 minutes

    An Arduino-controlled robotic button dispenser for your next event

    Arduino TeamFebruary 12th, 2019

    Giving away buttons at Maker Faires or trade shows is a great way to promote your brand, but what if you want to dispense these trinkets in style? That was the idea behind this automated button dispenser mechanism from Jeremy S. Cook, which drops buttons one at a time, and uses a capacitive sensor to detect when someone presses a marked “activation circle” on its base.

    When triggered, the Arduino Uno commands two servo motors in sequence to release the lower button, while holding the other stacked buttons in place. The button-in-motion then proceeds down a 3D-printed slide, shooting out into the receiver’s hands—or floor depending on one’s reflexes! 

    Be sure to check out the build process in the video below, and you can find code/print files on GitHub if you’d like to make your own!

    [youtube https://www.youtube.com/watch?v=3mXGkIkcyXI?feature=oembed&w=500&h=281]

    Website: LINK

  • Researchers develop new device to easily measure fluoride in drinking water

    Researchers develop new device to easily measure fluoride in drinking water

    Reading Time: 2 minutes

    Fluoride can be healthy in certain concentrations, but above a certain level it instead has the opposite effect, causing serious dental and bone diseases. While the cost and benefit of any substance use has to be carefully weighted, up until now, verification that water source isn’t contaminated—above just 2 ppm—has been the purview of well-equipped laboratories.

    The prototype device used with SION-105 to detect fluoride anions in drinking water
    (Photo: Marie-Thé and Etienne Roux)

    Researchers at EPFL in Lausanne, Switzerland, however, have come up with a technique that can accurately determine fluoride concentrations using only a few drops of water. The key to this development is a new compound known as SION-105, which is normally luminescent, but darkens when it encounters fluoride. This means that instead of more expensive laboratory equipment, UV LEDs can be used with a photodiode to quantitatively measure the substance’s appearance, and thus the quantity of fluoride in drinking water. 

    A photograph of SION-105 suspended in solvents with (L) and without (R) fluoride ion contamination. (Photo: Mish Ebrahim)

    From the images in EPFL’s write-up, the prototype test apparatus appears to utilize several commonly available components, including an Arduino Uno and small OLED display for user feedback.

    Published in the Journal of the American Chemical Society (JACS), the device is named SION-105, is portable, considerably cheaper than current methods, and can be used on-site by virtually anyone.

    The key to the device is the design of a novel material that the scientists synthesized (and after which the device is named). The material belongs to the family of “metal-organic frameworks” (MOFs), compounds made up of a metal ion (or a cluster of metal ions) connected to organic ligands, thus forming one-, two-, or three-dimensional structures. Because of their structural versatility, MOFs can be used in an ever-growing list of applications, e.g. separating petrochemicals, detoxing water, and getting hydrogen or even gold out of it.

    SION-105 is luminescent by default, but darkens when it encounters fluoride ions. “Add a few droplets of water and by monitoring the color change of the MOF one can say whether it is safe to drink the water or not,” explains Mish Ebrahim, the paper’s first author. “This can now be done on-site, without any chemical expertise.”

    Website: LINK

  • Jenni Sidey inspires young women in science with Astro Pi

    Jenni Sidey inspires young women in science with Astro Pi

    Reading Time: 3 minutes

    Today, ESA Education and the Raspberry Pi Foundation are proud to celebrate the International Day of Women and Girls in Science! In support of this occasion and to encourage young women to enter a career in STEM (science, technology, engineering, mathematics), CSA astronaut Jenni Sidey discusses why she believes computing and digital making skills are so important, and tells us about the role models that inspired her.

    Jenni Sidey inspires young women in science with Astro Pi

    Today, ESA Education and the Raspberry Pi Foundation are proud to celebrate the International Day of Women and Girls in Science! In support of this occasion and to encourage young women to enter a career in STEM (science, technology, engineering, mathematics), CSA astronaut Jenni Sidey discusses why she believes computing and digital making skills are so important, and tells us about the role models that inspired her.

    Happy International Day of Women and Girls in Science!

    The International Day of Women and Girls in Science is part of the United Nations’ plan to achieve their 2030 Agenda for Sustainable Development. According to current UNESCO data, less than 30% of researchers in STEM are female and only 30% of young women are selecting STEM-related subjects in higher education
    Jenni Sidey

    That’s why part of the UN’s 2030 Agenda is to promote full and equal access to and participation in science for women and girls. And to help young women and girls develop their computing and digital making skills, we want to encourage their participation in the European Astro Pi Challenge!

    The European Astro Pi Challenge

    The European Astro Pi Challenge is an ESA Education programme run in collaboration with the Raspberry Pi Foundation that offers students and young people the amazing opportunity to conduct scientific investigations in space! The challenge is to write computer programs for one of two Astro Pi units — Raspberry Pi computers on board the International Space Station.

    Astro Pi Mission Zero logo

    Astro Pi’s Mission Zero is open until 20 March 2019, and this mission gives young people up to 14 years of age the chance to write a simple program to display a message to the astronauts on the ISS. No special equipment or prior coding skills are needed, and all participants that follow the mission rules are guaranteed to have their program run in space!

    Take part in Mission Zero — in your language!

    To help many more people take part in their native language, we’ve translated the Mission Zero resource, guidelines, and web page into 19 different languages! Head to our languages section to find your version of Mission Zero and take part.

    If you have any questions regarding the European Astro Pi Challenge, email us at [email protected].

    Website: LINK

  • Stereoscopic photography with StereoPi and a Raspberry Pi

    Stereoscopic photography with StereoPi and a Raspberry Pi

    Reading Time: 3 minutes

    StereoPi allows users to attached two Camera Modules to their Raspberry Pi Compute Module — it’s a great tool for building stereoscopic cameras, 360º monitors, and virtual reality rigs.

    StereoPi draft 1

    No Description

    My love for stereoscopic photography goes way back

    My great-uncle Eric was a keen stereoscopic photographer and member of The Stereoscopic Society. Every memory I have of visiting him includes looking at his latest stereo creations through a pair of gorgeously antique-looking, wooden viewers. And I’ve since inherited the beautiful mahogany viewing cabinet that used to stand in his dining room.

    It looks like this, but fancier

    Stereoscopic photography has always fascinated me. Two images that seem identical suddenly become, as if by magic, a three-dimensional wonder. As a child, I couldn’t make sense of it. And even now, while I do understand how it actually works, it remains magical in my mind — like fairies at the bottom of the garden. Or magnets.

    So it’s no wonder that I was instantly taken with StereoPi when I stumbled across its crowdfunding campaign on Twitter. Having wanted to make a Pi-based stereoscopic camera ever since I joined the organisation, but not knowing how best to go about it, I thought this new board seemed ideal for me.

    The StereoPi board

    Despite its name, StereoPi is more than just a stereoscopic camera board. How to attach two Camera Modules to a Raspberry Pi is a question people ask us frequently and for various projects, from home security systems to robots, cameras, and VR.

    Slim and standard editions of the StereoPi

    Slim and standard editions of the StereoPi

    The board attaches to any version of the Raspberry Pi Compute Module, including the newly released CM3+, and you can use it in conjunction with Raspbian to control it via the Python module picamera.

    StereoPi stereoscopic livestream over 4G

    StereoPi stereoscopic livestream over 4G. Project site: http://StereoPi.com

    When it comes to what you can do with StereoPi, the possibilities are almost endless: mount two wide-angle lenses for 360º recording, build a VR rig to test out virtual reality games, or, as I plan to do, build a stereoscopic camera!

    It’s on Crowd Supply now!

    StereoPi is currently available to back on Crowd Supply, and purchase options start from $69. At 69% funded with 30 days still to go, we have faith that the StereoPi project will reach its goal and make its way into the world of impressive Raspberry Pi add-ons.

    Website: LINK

  • Arduino Nano turned into universal IR translator

    Arduino Nano turned into universal IR translator

    Reading Time: < 1 minute

    Arduino Nano turned into universal IR translator

    Arduino TeamFebruary 7th, 2019

    After purchasing a new television, maker Andreas Spiess’ remote no longer worked seamlessly with the controller his family had been using. While a universal remote could have solved the problem, in order to keep things simple to use, he instead came up with an infrared “babel fish” signal translator—named after the language translation animal Hitchhiker’s Guide to the Galaxy’s.

    The device receives infrared signals from the original remote, then uses an Arduino Nano to pass the properly translated pulses on to his TV and receiver. A 3W IR diode transmits these new signals with the help of an N-channel MOSFET, giving it enough power to control each component, even without the proper line-of-sight orientation. 

    It’s a hack that could be useful in many situations, and Speiss goes over how it was made, along with design requirements in the video below.

    [youtube https://www.youtube.com/watch?v=5yyy7h7qh80?feature=oembed&w=500&h=281]

    Website: LINK

  • Visualize tunes with James Bruton’s laser projector graphic EQ display

    Visualize tunes with James Bruton’s laser projector graphic EQ display

    Reading Time: 2 minutes

    Visualize tunes with James Bruton’s laser projector graphic EQ display

    Arduino TeamFebruary 7th, 2019

    If you’d like to visualize your music, VU meters make an excellent tool. While they are generally built into audio equipment, maker James Bruton had the idea to construct his own using lasers. His setup features an MSGEQ7 module to separate sound frequencies, sending data on seven different ranges to an ArduinoMega board.

    The Arduino then uses this information to selectively lower seven shutters via servos. When lowered, these shutters hide part of the lines formed by lasers and a spinning mirror assembly to indicate each sound frequency’s intensity.

    The resulting machine not only effectively projects a visual of the music playing on a nearby wall, but also looks like some sort of mythical beast or contraption, progressively waving its appendages while emitting eerie green light!

    Although this kind of project can be fun, be sure to wear the proper safety equipment when dealing with powerful lasers!

    [youtube https://www.youtube.com/watch?v=7u3TRbWFYgk?feature=oembed&w=500&h=281]

    Website: LINK

  • Guess what…

    Guess what…

    Reading Time: < 1 minute

    Raspberry Pi Store – NOW OPEN #RPiStore

    We opened a store! Visit us in the Grand Arcade, Cambridge, UK, and follow #RPiStore for more photos and funtimes!

    Raspberry Pi Store
    First Floor
    Grand Arcade
    Cambridge

    OPEN FROM 9am

    #RPiStore

    For more information, visit the Raspberry Pi Store webpage.

    Website: LINK

  • How do you define ‘maker’?

    How do you define ‘maker’?

    Reading Time: 3 minutes

    In our brand-new video, we ask some of our favourite content creators how they define the word ‘maker’, and what being a maker means to them.

    How do you define ‘maker’?

    We asked some of our favourite content creators how they define the word ‘maker’, and what being a maker means to them.

    Joel Telling

    Joel took the ultimate content creator plunge in early 2018, quitting his job at Adobe to follow his 3D printing passion full time.

    Joel Telling – 3D Printing Nerd on Twitter

    It was at this very hour 1 year ago TODAY I left the Adobe offices for the last time and began my career as a host and content creator. ONE YEAR HOLY COW! #highfive https://t.co/fQ6wBGY8Ch

    You can find Joel on YouTube as 3D Printing Nerd, and he also makes appearances for Matter Hatters at various conventions — including Maker Faire New York, where we accosted him for this video.

    Jackie Craft

    Jackie Craft is a cosplay goddess. She has turned her passion for prop making and costume design into her career, and her creations are incredible. Seriously, look at how cool they are:

    You can find Jackie on Instagram, and at her website, where you can also buy costume patterns to recreate her designs.

    Laura Kampf

    Based in Cologne, Germany, Laura Kampf is best known for her dog, Smudo. Avid Smudo devotees may have noticed that Laura is a talented wood and metal worker with a penchant for turning unwanted scrap into fantastic and stylish creations. She also built her own tiny house, complete with an additional tiny house for Smudo.

    Smudo´s Tiny Doghouse

    Thank You Rockler for supporting this Project! visit them at www.rockler.com I had so much leftover material from my Tiny House Trailer that i figured i might as well build smudo his own Tiny Doghouse.

    Yes, okay, we’re all about Smudo here at Raspberry Pi.

    Bob Clagett

    Bob Clagett likes to make stuff. All kinds of stuff, from wood, to metal, to electronics. His 2.3 million YouTube subscribers tune in for weekly tutorials, tips, and Josh, who occasionally makes appearances on screen, and otherwise helps Bob run I Like To Make Stuff behind the scenes.

    Please note: our actual favourite member of the ILTMS team is Ginny Clagget, Queen of Hugs and Wonderfulness.

    Jimmy DiResta

    You know who he is. We know who he is. So here’s Jimmy cutting things in half with Ron Swanson Nick Offerman.

    Making It – “Will It Saw?” with Nick Offerman and Jimmy DiResta (Digital Exclusive)

    In the most exciting video you ever saw, Nick Offerman and Jimmy DiResta test the durability of a rollerblade, bongos, a baseball and a roll of salami.

    What does it mean to you?

    From woodwork and electronics, to crocheting and baking: makers come in all flavours. How do you define the word ‘maker’, and what does being a maker mean to you? Tell us on YouTube, or in the comments below.

    Website: LINK

  • Announcing the Arduino IoT Cloud Public Beta

    Announcing the Arduino IoT Cloud Public Beta

    Reading Time: 2 minutes

    In our pursuit to democratize Internet of Things development, today we are excited to announce the Arduino IoT Cloud!

    The Arduino IoT Cloud is an easy-to-use platform that makes it very simple for anyone to develop and manage their IoT applications, then deploy them to a large number of users. It allows users to create applications that solve real-life problems, and hopefully, improve their lives.

    With the launch of the Arduino IoT Cloud, Arduino now provides its one million users a complete end-to-end approach to IoT that includes hardware, firmware, cloud services, and knowledge. After six months of private beta testing, I am very pleased to release the public beta of the Arduino IoT Cloud with automatic dashboard generation, Webhooks support, and full TLS secure transport.

    — Luca Cipriani, Arduino CIO

    Convenience and flexibility are key considerations for the Arduino IoT Cloud. Arduino boards usually require you to program them by entering code by way of a sketch — now the Arduino IoT Cloud can do this for you. It will quickly and automatically generate a sketch when setting up a new thing, thus enabling a developer to go from unboxing their board to a working device within five minutes. The Arduino IoT Cloud also provides other methods of interaction, including HTTP REST API, MQTT, Command-Line Tools, Javascript, and Websockets.

    Going from an idea to a fully-functional IoT device has been a tedious process even for the most advanced engineers and developers… until now. Arduino now offers a complete platform with the MKR family providing a streamlined way to create local IoT nodes and edge devices using a range of connectivity options and compatibility with third-party hardware, gateway, and cloud systems. Whilst the Arduino IoT Cloud lets users manage, configure, and connect not only Arduino hardware but the vast majority of Linux-based devices — truly democratizing IoT development.

    — Massimo Banzi, Arduino CTO and Co-Founder

    Want to learn more or try out the Arduino IoT Cloud for yourself? You’re just a click away!

    Website: LINK

  • Automatic eye protection triggered by sound

    Automatic eye protection triggered by sound

    Reading Time: 2 minutes

    Automatic eye protection triggered by sound

    Arduino TeamFebruary 5th, 2019

    Görkem Bozkurt has a bit of a problem. When he gets going with a build, sometimes safety glasses are forgotten in the excitement of making something new. While understandable, this doesn’t make things any less dangerous, so he came up with a novel idea to put on his safety specs on automatically.

    His wearable creation attaches an Arduino Nano and a MAX4466 electret mic amplifier to the top of a previously normal hat, along with a small servo connected to a pair of lens below the bill. If a loud sound is heard, the goggles are lowered by the servo in response. They’re then retracted when the noise, and hopefully the danger, is gone. 

    While the system is still very much a work-in-progress, it’s an entertaining concept that Bozkurt hopes to develop further.

    [youtube https://www.youtube.com/watch?v=bMhx1hWMXbo?feature=oembed&w=500&h=281]

    Website: LINK

  • “Rare Candy” played on even more rare electronic instrument

    “Rare Candy” played on even more rare electronic instrument

    Reading Time: 2 minutes

    “Rare Candy” played on even more rare electronic instrument

    Arduino TeamFebruary 5th, 2019

    According to musician/maker Ruben Dax, “Few things make him happier than being able to create things that create things.” As seen in the video below, what he’s created is a very strange cylindrical instrument with an array of buttons and what appears to be an auxiliary loop controller. 

    What he creates with it is music that starts off as simple “plink-plonk” sounds, but builds up into something of an orchestral arrangement.

    The DIY device utilizes an Arduino Mega for control, with a bunch of pushbuttons and a dual-axis joystick for inputs. Button info is then sent to his computer over Bluetooth, which takes care of actual MIDI generation. 

    As cool as this is, a new gadget is in the works, which uses a Leonardo and other hardware for plug-and-play functionality. Whether this will interfere with the instrument’s unique rotating action remains to be seen!

    [youtube https://www.youtube.com/watch?v=9NQq0aNMtMs?feature=oembed&w=500&h=281]

    Website: LINK