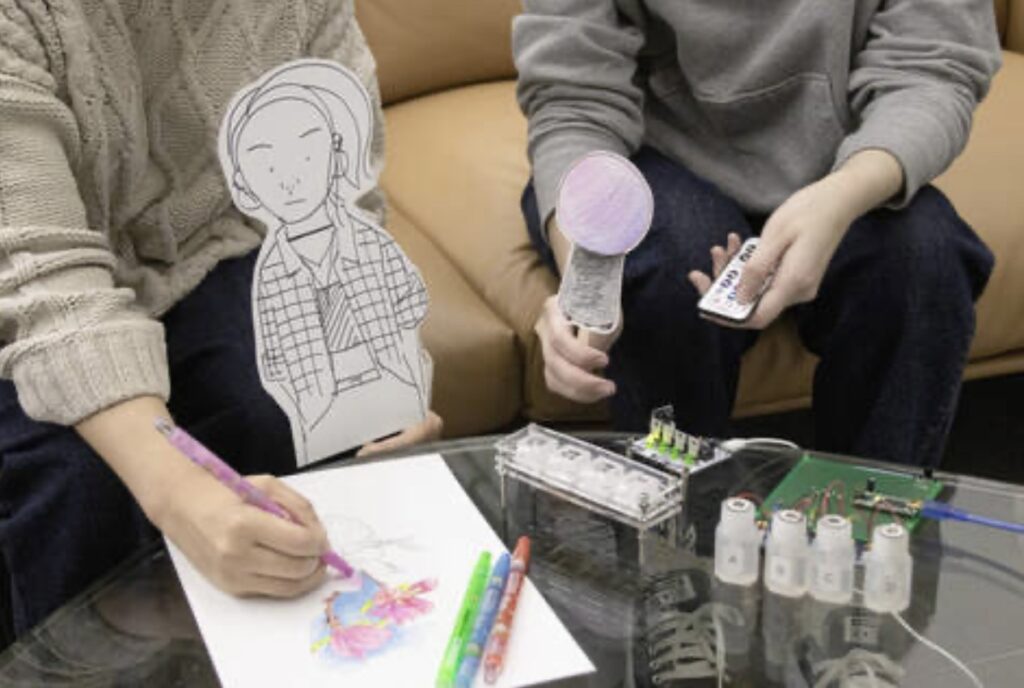
Almost all human-robot interaction (HRI) approaches today rely on three senses: hearing, sight, and touch. Your robot vacuum might beep at you, or play recorded or synthesized speech. An LED on its enclosure might blink to red to signify a problem. And cutting-edge humanoid robots may even shake your hand. But what about the other senses? Taste seems like a step too far, so researchers at KAIST experimented with “Olfactory Puppetry” to test smell’s suitability for HRI communication.
This concept seems pretty obvious, but there is very little formal research on the topic. What if a robot could communicate with humans by emitting scents?
Imagine if a factory worker suddenly began smelling burning rubber. That could effectively communicate the idea that a nearby robot is malfunctioning, without relying on auditory or visual cues. Or a personal assistant robot could give off the smell of sizzling bacon to tell its owner that it is time to wake up.
The researchers wanted to test these ideas and chose to do so using puppets instead of actual robots. By using puppets — paper cutouts on popsicle sticks — test subjects could act out scenarios. They could then incorporate scent and observe the results.
For that to work, they needed a way to produce specific smells on-demand. They achieved that with a device built using an Arduino Nano R3 board that controls four atomizers. Those emit rose, citrus, vanilla, and musk scents, respectively. Another device performs a similar function, but with solid fragrances melted by heating elements.
This research was very open-ended, but the team was able to determine that people prefer subtle scents, don’t want those to happen too frequently, and want them to mesh well with what their other senses are telling them. That knowledge could be helpful for scent-based HRI experiments in the future.
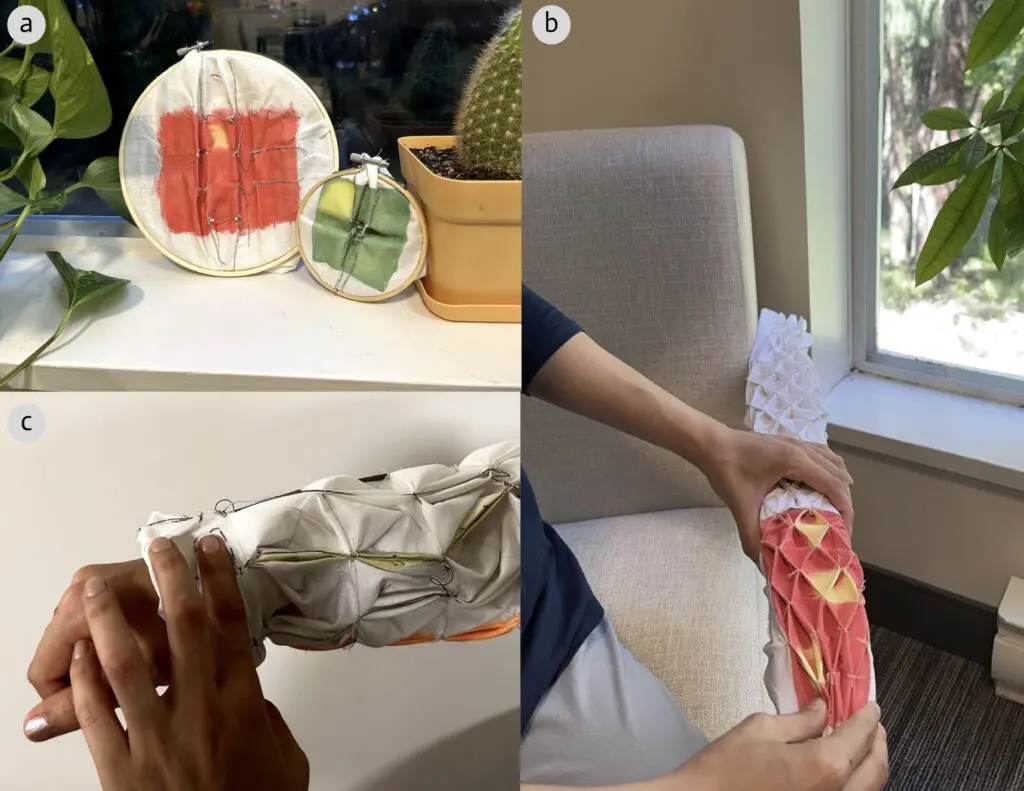
Elastic use in the textile industry is relatively recent. So, what did garment makers do before elastic came along? They relied on smocking, which is a technique for bunching up fabric so that it can stretch to better fit the form of a body. Now a team of computer science researchers from Canada’s University of Victoria are turning to smocking to create interesting new “data physicalization” displays for clothing.
These “smocking displays,” part of the researchers’ VISMOCK approach, can convey information through changes in form and changes in color. The practical implementation of this idea would be up to the garment maker, but there are many intriguing possibilities. Imagine, for instance, that your shirt sleeve could get tighter to indicate that it is time for an appointment on your daily calendar. Or if your pants could show the current time.
Both of those concepts — and much more — are entirely feasible. The team made that true by combining two techniques. The first is impregnating the fabric with thermochromic pigments that change color in the presence of heat. Heating elements embedded in the fabric, controlled by an Arduino Mega 2560 board through MOSFETs, influence that change. Resolution is low, because heat spreads, but this is enough to show quite a bit of information.
The second technique is smocking, but with special SMA (Shape Memory Alloy) wires and springs. Those can be deformed, but will then return to their original shape when current (and heat) runs through them. By integrating SMA into the smocking pattern, the fabric can change shape on-demand. As with the thermochromic heating elements, this occurs under the control of an Arduino.
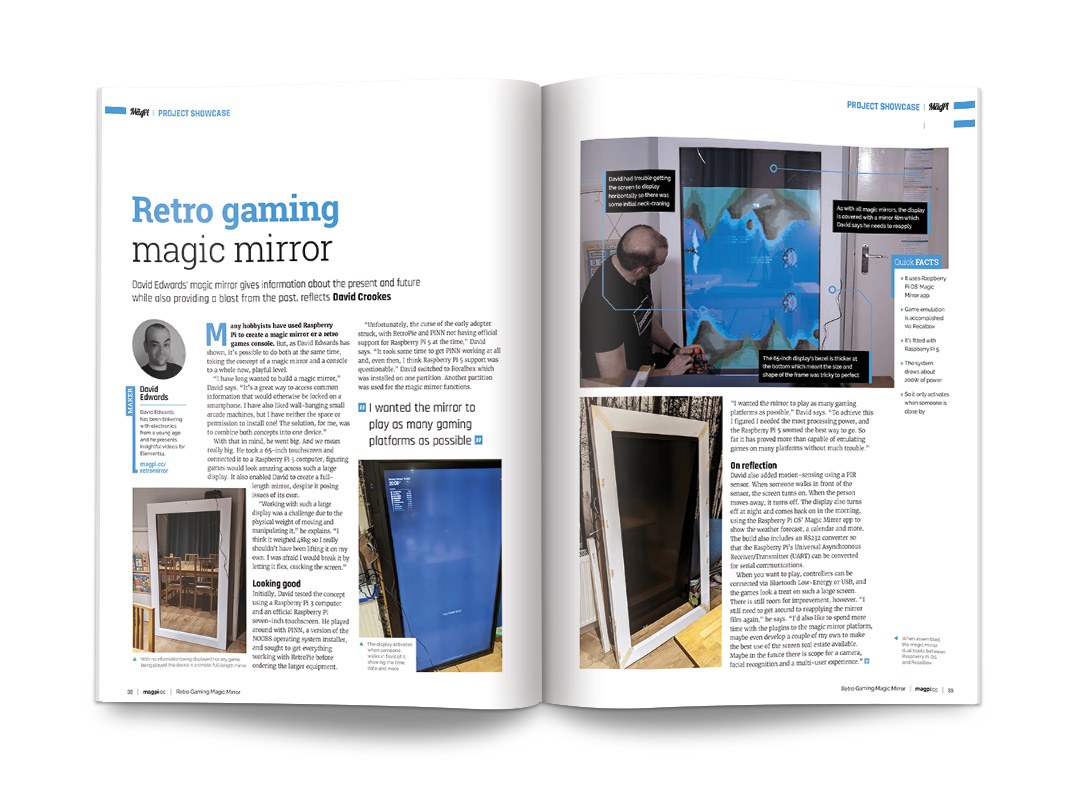
With that in mind, he went big. And we mean really big. He took a 65-inch touchscreen and connected it to a Raspberry Pi 5 computer, figuring games would look amazing across such a large display. It also enabled David to create a full-length mirror, despite it posing issues of its own.
“Working with such a large display was a challenge due to the physical weight of moving and manipulating it,” he explains. “I think it weighed 48kg so I really shouldn’t have been lifting it on my own. I was afraid I would break it by letting it flex, cracking the screen.”
Looking good
Initially, David tested the concept using a Raspberry Pi 3 computer and an official Raspberry Pi seven-inch touchscreen. He played around with PINN, a version of the NOOBS operating system installer, and sought to get everything working with RetroPie before ordering the larger equipment.
“Unfortunately, the curse of the early adopter struck, with RetroPie and PINN not having official support for Raspberry Pi 5 at the time,” David says. “It took some time to get PINN working at all and, even then, I think Raspberry Pi 5 support was questionable.” David switched to Recalbox which was installed on one partition. Another partition was used for the magic mirror functions.
“I wanted the mirror to play as many gaming platforms as possible,” David says. “To achieve this I figured I needed the most processing power, and the Raspberry Pi 5 seemed the best way to go. So far it has proved more than capable of emulating games on many platforms without much trouble.”
On reflection
David also added motion-sensing using a PIR sensor. When someone walks in front of the sensor, the screen turns on. When the person moves away, it turns off. The display also turns off at night and comes back on in the morning, using the Raspberry Pi OS’ Magic Mirror app to show the weather forecast, a calendar and more. The build also includes an RS232 converter so that the Raspberry Pi’s Universal Asynchronous Receiver/Transmitter (UART) can be converted for serial communications.
When you want to play, controllers can be connected via Bluetooth Low-Energy or USB, and the games look a treat on such a large screen. There is still room for improvement, however. “I still need to get around to reapplying the mirror film again,” he says. “I’d also like to spend more time with the plugins to the magic mirror platform, maybe even develop a couple of my own to make the best use of the screen real estate available. Maybe in the future there is scope for a camera, facial recognition and a multi-user experience.”
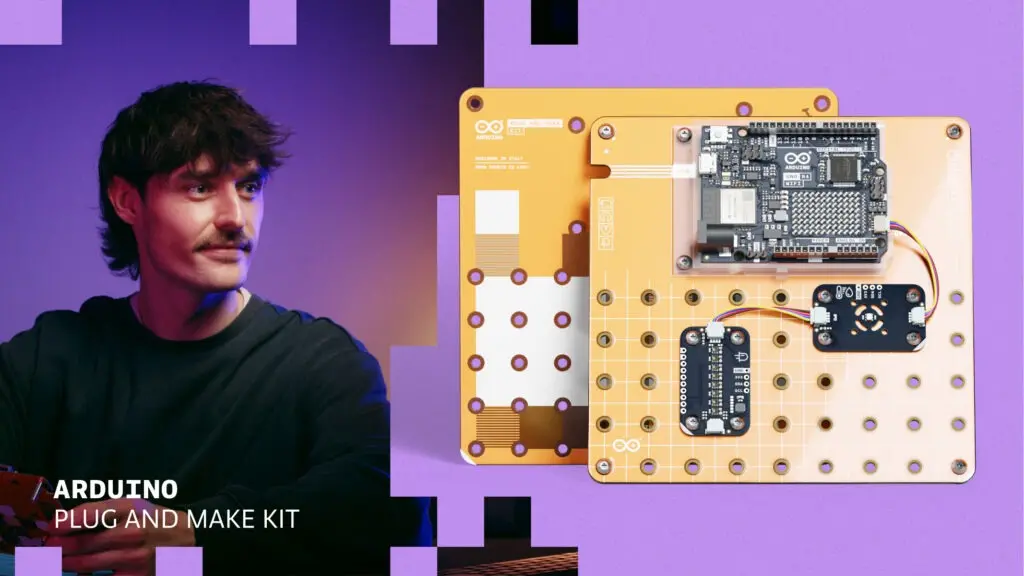
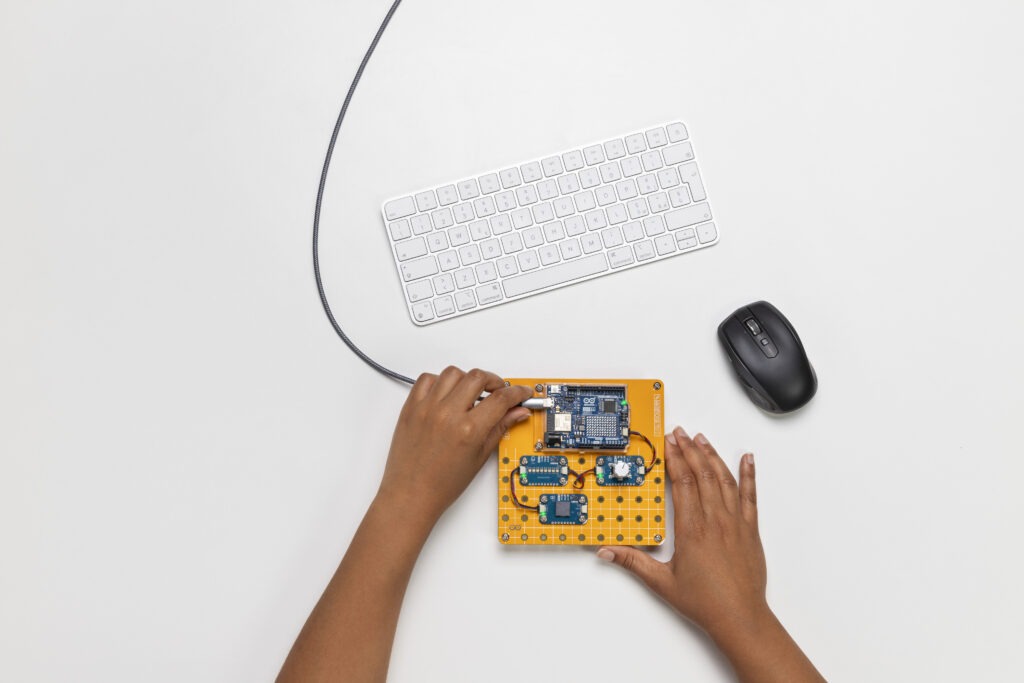
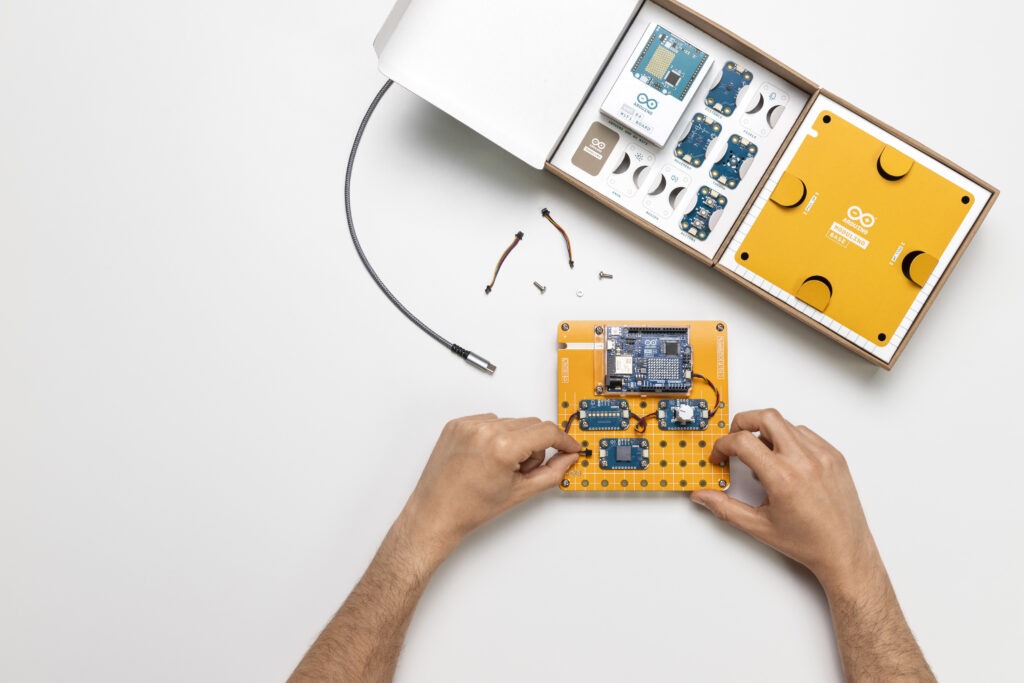
Hey, creating an IoT device shouldn’t be rocket science. We believe technology is for everyone. That’s why we’ve developed the whole new, beginner-friendly Plug and Make Kit – the easiest way to get started with Arduino!
Inside the box, you’ll find everything you need to create your first smart solution for everyday life. For example, you can build a fully functional timer, a weather forecast station, or even a game controller – in a single session.
There are seven projects complete with step-by-step instructions ready to try (and dedicated tutorials on how to use individual components included): start wherever you like, follow your interests, and have fun with it!
Weather Report: Never get caught in the rain again, with a visual reminder to take an umbrella when needed.
Hourglass: Who needs an egg timer? Customize your own digital hourglass.
Eco Watch: Make sure your plants thrive in the perfect temperature and humidity.
Game Controller: Level up with your very own HID (human interface device) gamepad.
Sonic Synth: Get one step closer to being a rockstar, DJ or sound engineer!
Smart Lights: Set the mood with your very own smart lamp.
Touchless Lamp: Control lights with a simple gesture.
Our hope is that the skills you learn and satisfaction you gain will fuel your tech journey in making for years to come, wherever your passions may take you.
This is just the beginning
The components in the Plug and Make Kit can be used to come up with endless new applications – also swiftly integrating with our full ecosystem of hardware and software tools.
We can’t wait to see the original ideas you will share, for new projects the community can try!
Build it in a snap, control it via the app!
For the Plug and Make Kit, we’ve developed a whole new hardware approach: components just connect together – no breadboard, jumper wires or soldering needed.
Once you’ve built your device, you’ll find all the resources and support you may need to get going via the Arduino Cloud:
Save precious time and focus on bringing your next idea to life, by simply importing templates (pre-configured projects for quick device setup), freely available to turn your ideas into fully operational devices within minutes.
Visualize data any way you wish, with unlimited dashboards, also on your smartphone.
Based on makers’ favorite, the UNO R4 WiFi
The Arduino UNO R4 WiFi features a powerful microcontroller with Wi-Fi®/Bluetooth® Low Energy connectivity, a Qwiic connector, a large LED matrix, and more. If you don’t fully understand what that all means for now, don’t worry: the UNO is the definition of ease of use, and its latest version is perfect for beginners and beyond.
Plug & play with Modulino®
The Plug and Make Kit offers a collection of seven Modulino® sensors and actuators, all included in the box:
Knob: for super-fine value setting
Pixels: eight LEDs to shine bright or dim down – you choose!
Distance: a time-of-flight proximity sensor to measure distances
Movement: to perfectly capture movements like pitch, roll or tilt
Buzzer: to compose your own alarm sounds or simple tunes
Thermo: a sensor for both temperature and humidity
Buttons: three buttons for quick user selection
Each Modulino simply connects via the UNO R4 WiFi’s onboard Qwiic connector: no breadboard, no soldering – and no wondering which side goes where, because the connector is polarized.
If you like the sense of accomplishment you get when things just click, you’ll love this: once you have a few nodes, you can keep your project looking neat by arranging everything on the Modulino Base structural frame.
Connect to your passions
Whether you are new to making or want to share your passion with someone taking their first steps in this world, the Plug and Make Kit offers the easiest, most fun introduction to a world of possibilities where technology is open to all.
Ready to put your hands on technology? The Plug and Make Kit can be purchased worldwide from the Arduino Store, as well as from official network of Arduino partners listed below:
We love hearing from members of the community and sharing the stories of amazing young people, volunteers, and educators who are using their passion for technology to create positive change in the world around them.
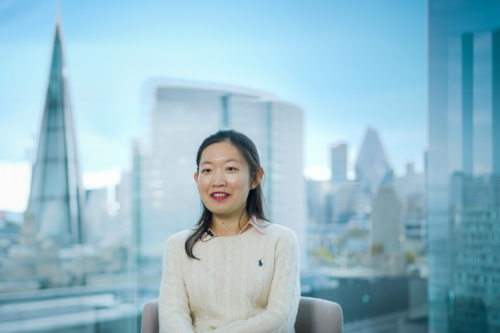
In our latest story, we’re heading to London to meet Yang, a Manager in Technology Consulting at EY specialising in Microsoft Business Applications, whose commitment to CoderDojo is truly inspiring. Yang’s passion for volunteering has grown since she first volunteered at a CoderDojo club at a local museum. In recent years, she has actively searched for ways to bring the CoderDojo movement to more children, and encouraged her colleagues to come along on the journey too.
When Yang was growing up, both of her parents worked in STEM, but her own journey into a career in technology took a varied route. After initially studying journalism in China, her path shifted when she pursued a Master’s in Digital Humanities at UCL, London, broadening her digital skills and paving the way for her current role.
On a weekend visit to a museum, Yang found the opportunity to volunteer at their CoderDojo. This experience sparked an enthusiasm to create more opportunities for young people to explore the world of computing, and this soon evolved into a plan to implement clubs at the EY offices.
Building a community of mentors
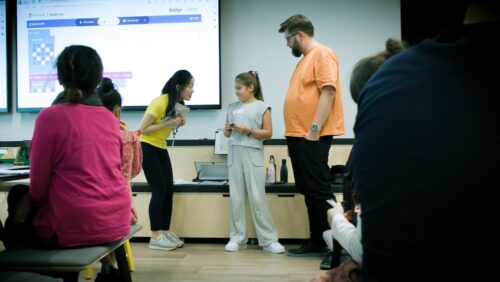
With support from the EY Corporate Responsibility team, and fellow colleagues, Yang started to deliver Dojo sessions at the EY office in London. From the very first session, Yang was blown away by the level of enthusiasm among her colleagues, and their willingness to volunteer their time to support the club. She soon realised it was possible to roll this initiative out to other offices around the country, expanding the volunteer network and increasing their impact.
Clubs have now been run in four EY offices across the UK, and the team has even seen the first international club take place, at the EY office in Baku, Azerbaijan. In total, EY clubs have seen around 350 young people attend and give coding a go.
Championing diversity in tech
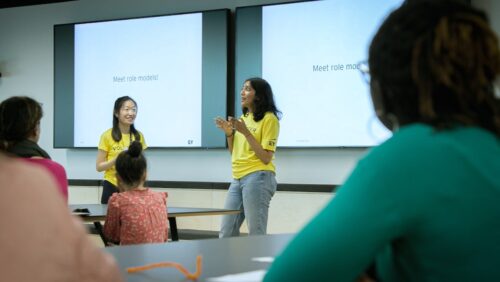
As a woman in tech, Yang is all too aware of the gender imbalance in the industry, and this is something she wanted the clubs at the EY offices to address.
“If there are some female role models, I think for a little girl grow up that means so much. Because if they can see somebody thrive in this industry, they will see themselves there one day. And that’s the inspiration.” – Yang
Yang actively encourages female participation in Dojo sessions, for example through holding sessions with a focus on engaging girls to mark International Women’s Day and Ada Lovelace Day. Through her leadership, she creates an inclusive environment where girls can envision themselves as future leaders.
Yang’s motivation doesn’t only inspire the young people attending her clubs, but also resonates with those who work with her on a daily basis, including colleagues like Iman and Elizabeth, who shared how much they admire Yang’s dedication and energy.
“I would love to have had a role model like [Yang] when I was younger. She’s just so inspiring. She’s so full of energy. I mean, from my personal experience, when I was younger, we didn’t have anything to do with coding.
There were situations where I was vaguely interested [in computing] but was told that it wasn’t for girls. And now with Yang running these events, seeing the girls come here and being so interested and wanting to learn, it really opens up so many more doors for them that they don’t even realise.” – Elizabeth, colleague and CoderDojo volunteer
Seeing the impact of her mentorship and the enthusiasm of young participants has fueled Yang’s passion even further.
“This has been a great opportunity to set up CoderDojo sessions for young people. I’ve had a lot of support from colleagues and other volunteers who have helped to run the sessions […] I feel super proud of what we’ve achieved so far.” – Yang
For Yang, mentorship isn’t just about teaching technical skills; it’s about helping young people develop confidence and resilience, and letting everyone know there is a place for them in computing should they want one.
Continuing to make a difference in her community and beyond, Yang recently participated in the 68th annual UN Women’s Commission on the Status of Women, which is the UN’s largest annual gathering on gender equality and women’s empowerment.
We’re delighted to be part of Yang’s journey, and can’t wait to see what she contributes to the world of tech next.
Help us celebrate Yang and her inspiring journey by sharing her story on X, LinkedIn, and Facebook.
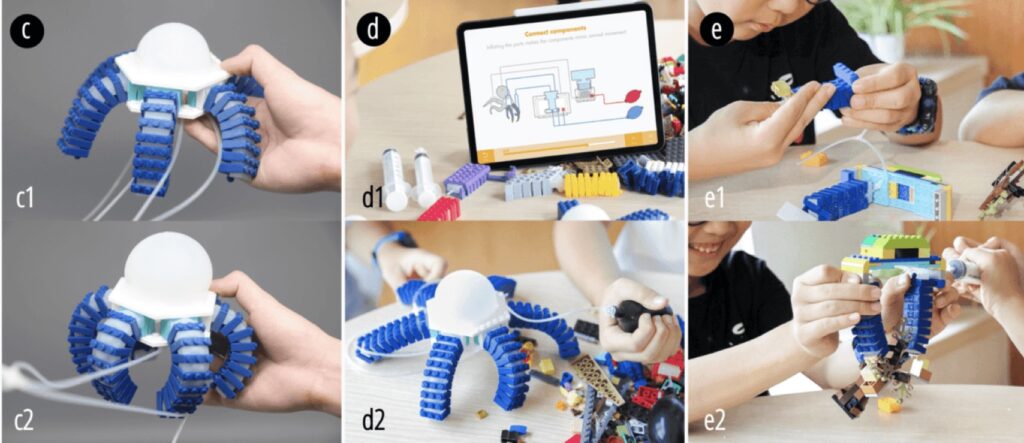
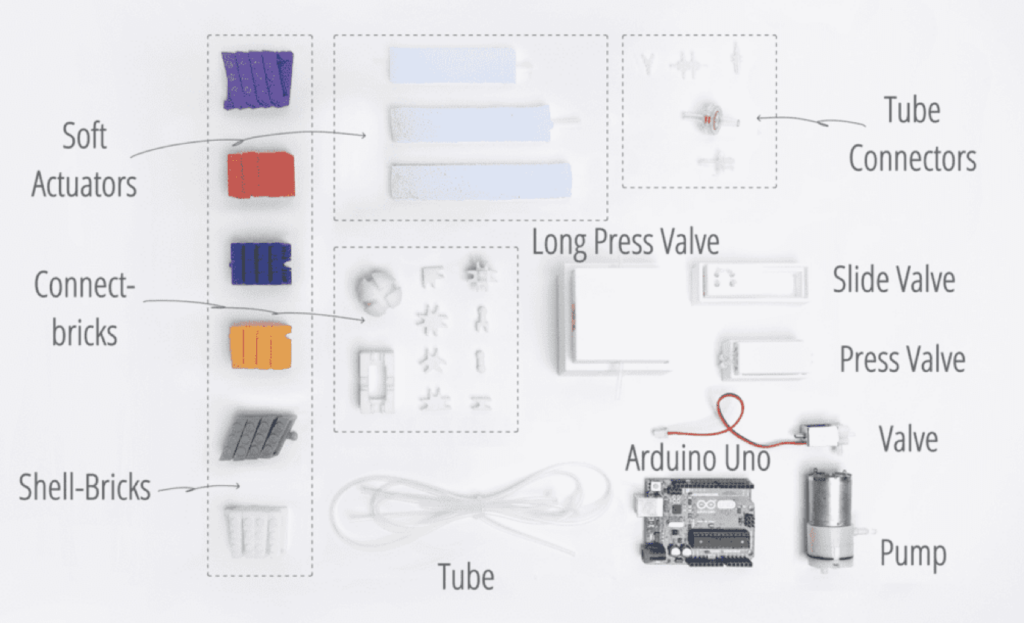
Biomimicry, which is a method for developing new technology inspired by nature, has been one of humanity’s greatest assets. But systems reliant on soft tissue, such as an octopus’s tentacles, have been notoriously difficult to reproduce in the robotics world. To give STEAM students an advantage in the soft robotics arena, a team of Chinese researchers developed a pneumatic biomimicry platform called KiPneu.
Pneumatics are ideal for biomimetic soft robots because they’re subject to fewer of the constraints typical of electric motors and rigid mechanical linkages. KiPneu is a hardware and software ecosystem designed to speed up the assembly of pneumatically actuated soft robots. It consists of inflatable pneumatic actuators and custom bricks compatible with LEGO bricks. Users can use those bricks and actuators to construct the physical forms of their robots.
After construction, students can make their robot move by pumping in air and controlling the flow of that air using valves. The initial prototype relied on an Arduino UNO Rev3 board to control power going to the pump, as well as the positions of the valves. The Arduino could, of course, perform those functions in sequence or in response to input commands, giving the robots the ability to move in complex ways.
But the team also created an electronics-free version, which relies on a hand pump and “tangible valves.” Together, those allow for similar functionality, but the user must pump air and change valve positions manually.
Both KiPneu systems have potential, with the manual system better suited to younger students and the more versatile Arduino-controlled system for the older students.
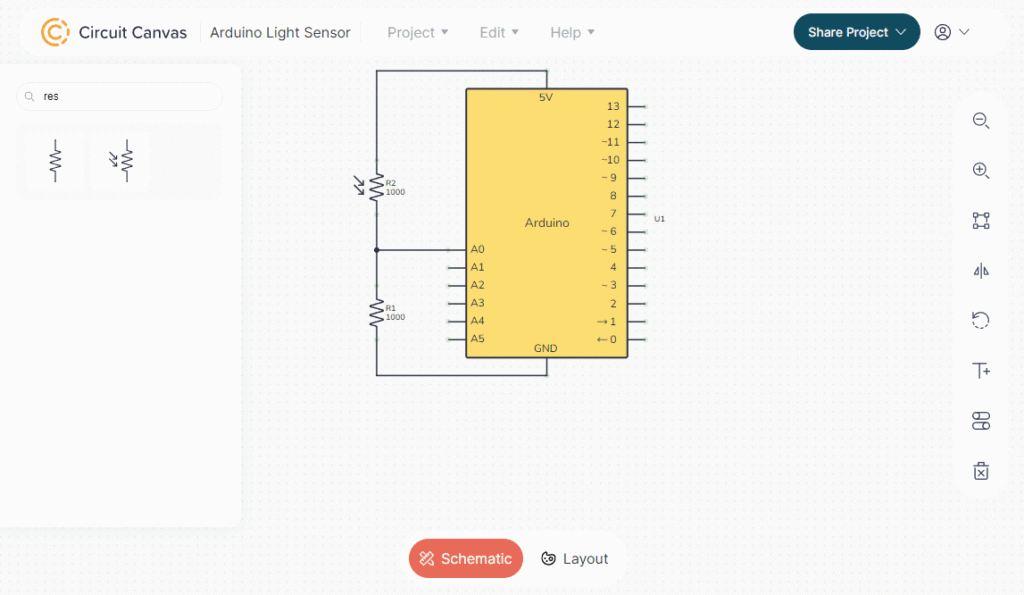
Good documentation is extremely useful when conceiving, building, or sharing electronic circuit designs, but traditional schematics and technical drawings are difficult for non-professionals to interpret and create. Makers can benefit from intuitive illustrations that look good enough to share. Circuit Canvas, developed by Oyvind Nydal Dahl, makes it easy to quickly create beautiful and useful illustrated diagrams.
Circuit Canvas is quite similar to Fritzing, but developed with the goals of being easy to use and fast. A user can create a schematic or an illustrated diagram for a basic circuit in less than a minute — if the components already exist in the library. But as with Fritzing, users may end up in a situation where they need to add custom parts. Circuit Canvas promises to make that process as painless as possible and even supports Fritzing parts, so it can take advantage of that ecosystem’s huge library.
At this time, Circuit Canvas already has a substantial library of parts. That includes Arduino UNO and Arduino Nano development boards, as well as other boards that are compatible with the Arduino IDE, such as the Seeed Studio XIAO ESP32C3 and the Raspberry Pi Pico. And, of course, there are many discrete components, ICs, and modules in the library to work with.
Users can either build schematics using standard symbols, or more friendly illustrated diagrams. In the future, the two document types will link together. Creating a diagram is as simple as placing components and drawing wires between them. After making the connections, users can move components around and the wires will automatically follow.
If you’ve been looking for a way to improve the documentation for your Arduino projects, then Circuit Canvas is worth checking out. It is free to try and you can run it right in your browser now.
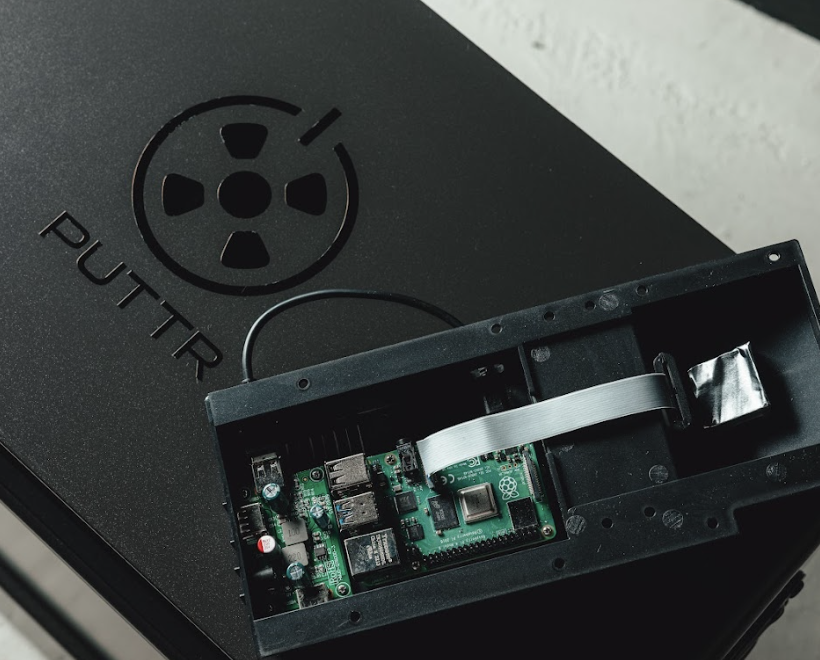
Like many great ideas, Puttr came about because of some enforced downtime during lockdown. Entrepreneur and founder of several successful start-ups Matthew Allard had been on the golf team at university, and lockdown had him contemplating an at-home putting game that he and his son could both enjoy. Matthew had a personal interest in how software and computers can interact with the real world, and having taken post-graduate courses in embedded systems was keen to make use of what he’d learned.
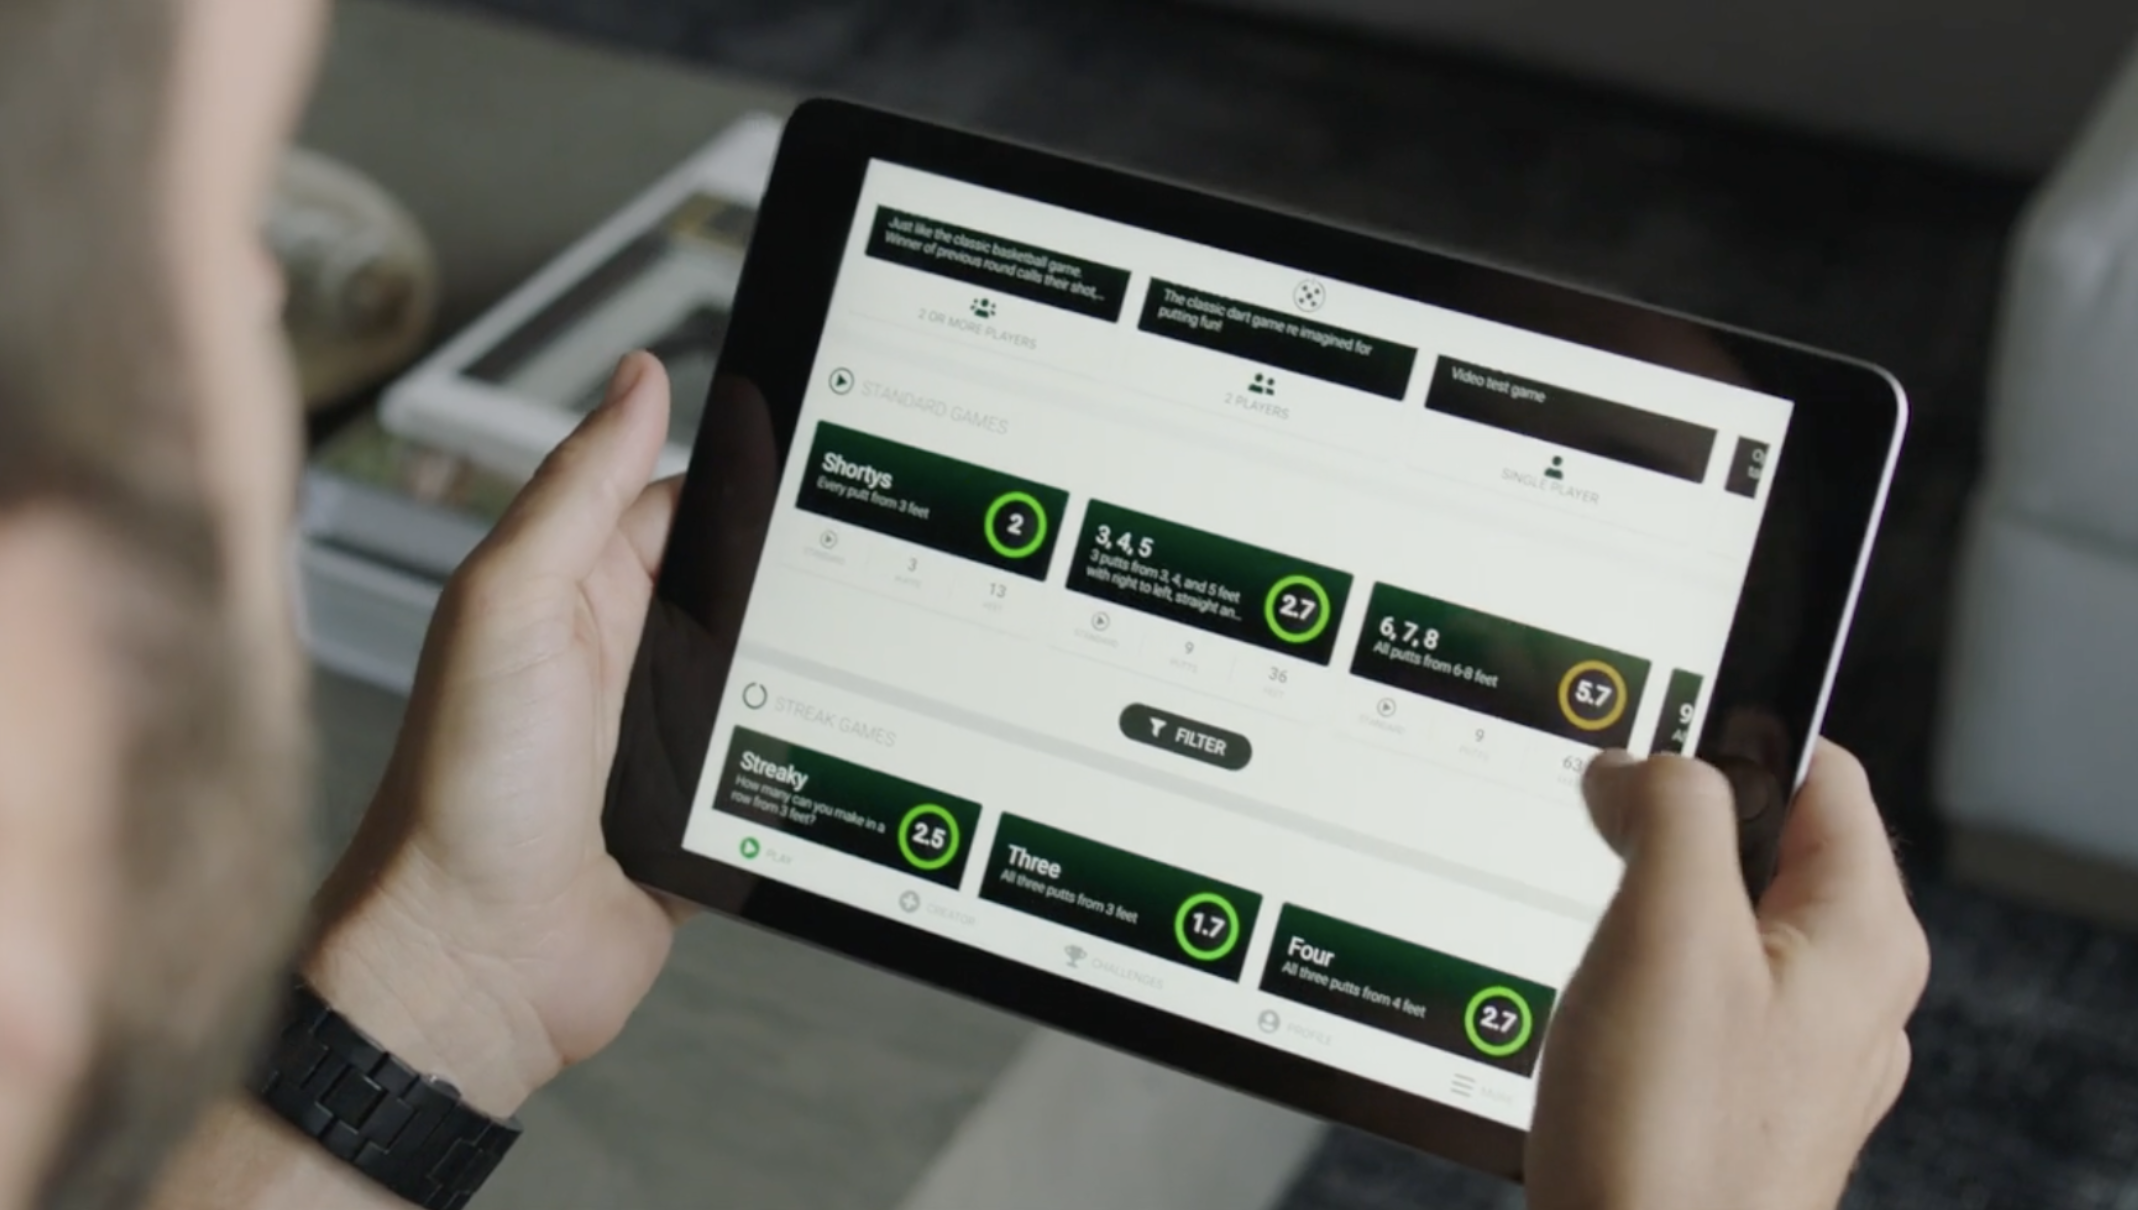
One thing Matthew knew already was that “putting practice is boring and lonely” (don’t they have crazy golf courses in the US?) yet it accounts for 42% of time golfers put in. Creating a means to connect fellow golfers and ‘gamify’ putting could transform this rote activity and allow members of the golfing community to challenge each other with online tournaments.
Hits and misses
Matthew originally aimed to track made and missed putts via an app using sensors in the hole of an at-home putting mat hooked up to GPIO pins. However, he soon discovered this approach was limited: “I could detect when a ball went in the hole, [but] I couldn’t detect missed putts.” Next, Matthew tried break-beam IR sensors to get more precision and measure missed putts, as well as ‘makes’, but “quickly realised that any sun exposure would cause false positives in the break-beam”.
A friend tipped him off about Raspberry Pi, and Matthew soon saw he could use computer vision and a wide-angle lens to detect the location of the physical hole, then track any golf ball that passed its field of view. Once a ball has entered or exited, it sends the full ball path data over Bluetooth to a connected app on an iOS or Android device, he explains. Details of each putt are logged, with the user able to access stats on their performance and optionally share it with other Puttr users.
Raspberry Pi quickly proved a great choice, since it offered an operating system with all the tools he needed for the software along with good value hardware that worked well together. “Many suppliers tried to talk me into creating my own board [but] there were many reasons to use Raspberry Pi.” The camera connection, Bluetooth, Wi-Fi, and processor were all included. Matthew was also encouraged by the strong community keen to help with any troubleshooting he might need, given this was his first ever Raspberry Pi project.
Embrace the light
At first, Matthew stuck with his infrared break-beam idea, testing it in his garage in the evenings after long days at his day job. There were “a ton of tweaks” to get the computer vision to work well under different lighting conditions. Eventually, it seemed as though the beams were working just as he expected. “I would get a break when the ball enters the ramp, and another one when and if it entered the hole. Perfect!”
Replicating results when demonstrating the embryonic Puttr game to his son was less successful. In fact, it didn’t work at all in daylight. Matthew eventually realised that sunlight hitting the beam’s receiver was preventing the circuit being broken even when a ball passed through it because it emits infrared rays of its own: “Apparently I missed that in school!” Connecting Raspberry Pi 4 to a GATT server (for Apple devices) as a headless Bluetooth peripheral meant code pairing was not an option. Instead, Matthew created a Bluetooth Write Characteristic that can receive a Wi-Fi SSID and password specifically for the task. He then wrote all the computer vision code and app software to make Puttr work.
Prototyping involved laser-cutting Baltic birchwood, and Matthew’s first foray into 3D design and printing using CraftCloud to create the box used as both ball tracker and holdall, the ramp, and ball return chute. The clever design is portable, with the mat rolling up inside.
Matthew praises the “stable, tested OS, camera interface, Bluetooth and Wi-Fi, and says choosing Raspberry Pi meant R&D took at least a year less than choosing a different setup with costs that would have been much higher. New versions and applications are already planned. Since launching 18 months ago (after a successful Indigogo crowdfunder), the Puttr app has logged more than a million putts. The clever take on pitch and putt now has worldwide league tables, games and challenges, with a subscription model for golfers keen to pit their skills against others.
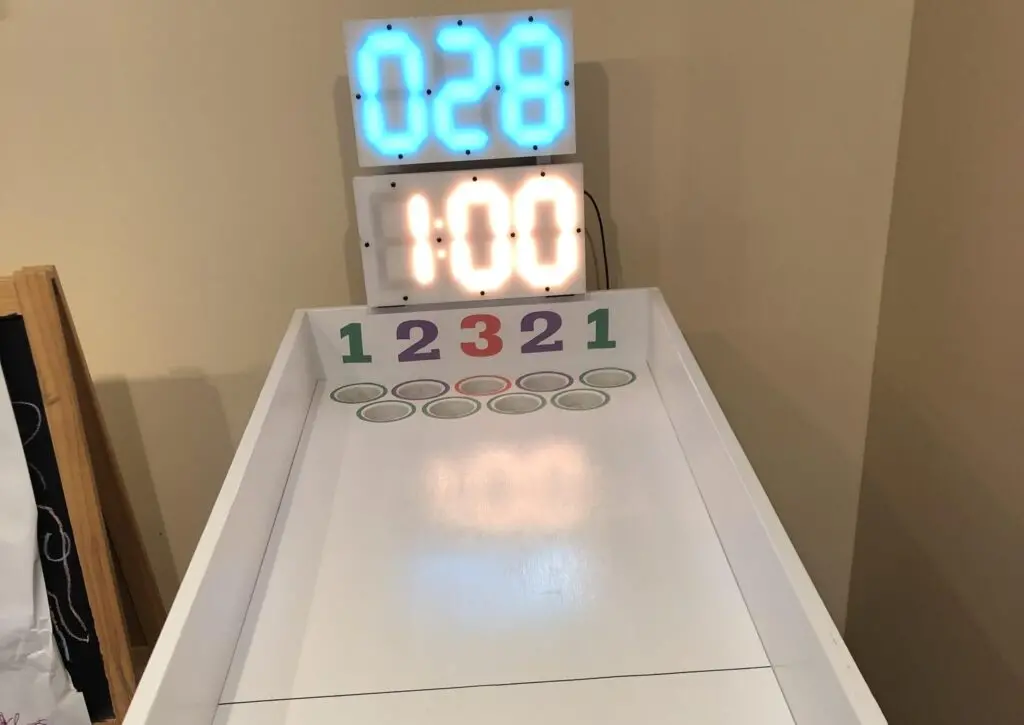
Ask your friends about their favorite games at the arcade and the most common answer will likely be Skee-Ball. But while many other popular arcade games have viable at-home alternatives, Skee-Ball doesn’t — at least not unless you’re willing to spend a serious amount of money. Luckily, you can get your Skee-Ball fix with a similar carnival-style rolling ball game by Gary Nelis.
This isn’t exactly the same as Skee-Ball; it seems to be a unique creation inspired by several different ball-rolling games that you might come across at carnivals and arcades. The player rolls balls across the table and into an array of holes. If the ball falls through a hole, the player gets the number of points associated with that specific hole. To make this even more fun, Nelis added electronic scorekeeping and fun sound effects.
The hardest part of this project is constructing the table, which will require some woodworking experience. Next, you’ll need to add the electronics, including the Arduino UNO Rev3 board that detects balls and keeps score. It detects balls falling through the holes using infrared break beam sensors. Nelis grouped those by point value, wiring the sensors in parallel so that they only use a total of three Arduino pins.
The Arduino shows the score and remaining time on a pair of three-digit, seven-segment displays made using strips of WS2812B individually addressable RGB LEDs. Those can be set to any color and they even support animated effects. Finally, the Arduino plays sound effects through an Adafruit Audio FX Sound Board module.
If you’re lucky enough to visit the Netherlands and you order a hot drink, you’ll likely be given a sweet treat as well. That is a stroopwafel, a crispy little waffle-syrup sandwich that the Dutch like to rest on top of their drink so that the rising heat will soften the pastry. But Eamon Magd is just a visitor to the country and didn’t know how long to leave it, so he built this stroopwafel doneness detection device.
Magd inferred that there are three factors that, together, might help him determine when a stroopwafel becomes ready for consumption: heat, time, and movement. That last one might seem strange, but stroopwafels tend to curl up after they reach a certain point — probably a result of the sandwich style construction and a differential in temperature/moisture. So, by looking for movement, Magd thought he could detect the beginning of that process.
A computer vision application, running on Magd’s laptop, detects that movement by looking for blurry pixels. Assuming the image is otherwise sharp, blurry pixels indicate movement. Magd also used an Arduino UNO Rev3 board to detect the temperature on the surface of the stroopwafel with a simple temperature sensor. The Arduino displays the current time since start on a small LCD and sounds an alarm through a buzzer when it determines that the stroopwafel has softened to Magd’s liking.
The system attempts to guess the right moment using a linear regression model trained on input data Magd collected. He tried to account for beverage types, as some might soften the stroopwaffel faster than others, but the model is really just working on averages anyway. It doesn’t, for instance, differentiate between stroopwafel makers. Regardless, this is an amusing project.
Nintendo’s Joy-Con controller system is very innovative and generally well-regarded, with one major exception: stick drift. That’s a reliability issue that eventually affects a large percentage of Joy-Cons, to the frustration of gamers. But what if that was intentional and gamepads were designed to deteriorate in short order? That’s the idea behind ICY Interfaces.
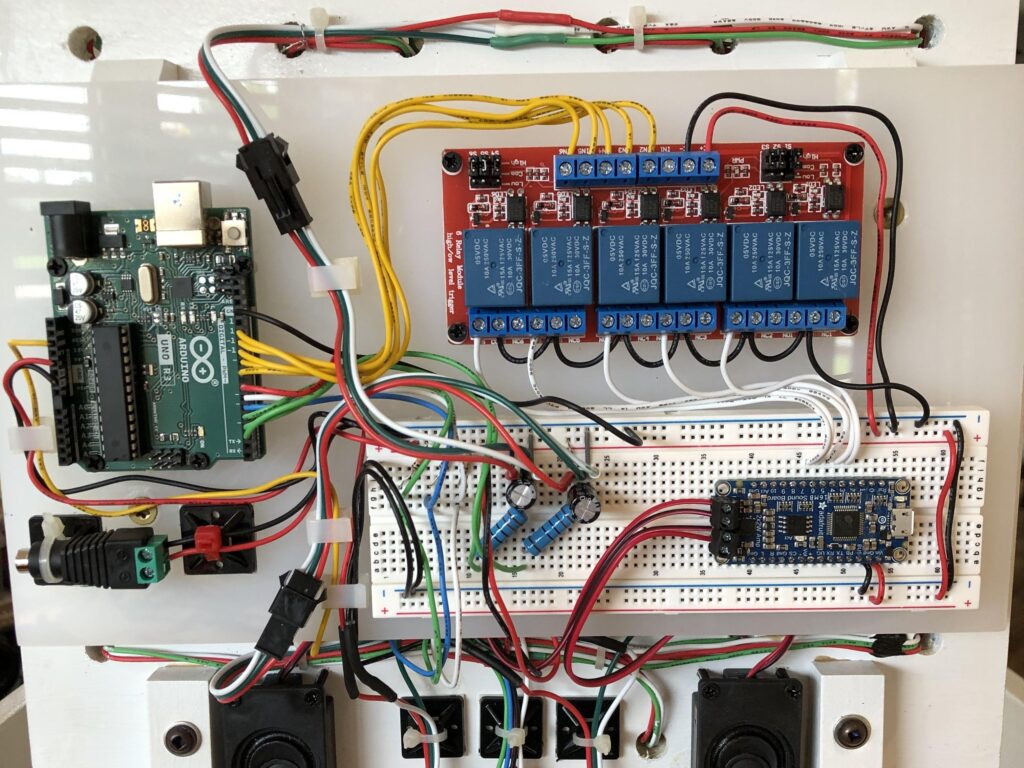
Yoonji Lee and Chang Hee Lee at KAIST (Korea Advanced Institute of Science & Technology) created three devices under the ICY Interfaces umbrella: MeltPress, FrostPad, and IceSquish. Each incorporate ice — literal frozen water — in a manner meant to make use of the material’s ephemeral nature. Imagine, for instance, a gamepad with buttons that melt at an increasing rate as you touch them. Or another gamepad with buttons that don’t become accessible until a protective sheet of ice melts away. The ICY Interfaces are experiments in this kind of dynamic design.
Each device contains an Arduino Mega 2560 board to read button presses and control additional hardware, like Peltier coolers. Those are thermoelectric solid-state heat pumps capable of refreezing the ice after it melts.
The researchers developed a simple game, called Iceland: Frozen Journeys, to work with ICY Interfaces. They built that game in Processing in order to take advantage of its strong compatibility with Arduino boards and the Arduino IDE. The game challenges players to build snowmen, capitalizing on the ice theme.
MeltPress has an array of buttons with key caps made of ice. FrostPad has a surface with several capacitive touch pads covered in a layer of ice. IceSquish has buttons made of ice-filled silicone balls, which don’t become flexible enough to press until they’ve melted a bit. All of them make use of ice in an interesting way to explore new gameplay ideas.
Elsewhere on the board you’ll find a USB-C power input, speakers, an LED display, GPIO pins, an RFID chip, plenty of sensors and switches and LEDs, and more besides. In the box there’s also a startling array of extra components, including a pair of SNES-like gamepads, a US-style power plug (with a three-pin adapter for UK sockets), servo and stepper motors, an IR remote, LEDs, a small stylus, headphones (3.5mm, so there’s nowhere to plug them in on a Raspberry Pi 5 board) and more. A GPIO ribbon cable is meant to bridge the gap between the Raspberry Pi’s pins and those on the carrier, but one wasn’t included in the package sent to us for review. Something that will fit is pretty cheap and easy to get online, but it would have been nice to have had it included.
It takes a bit of force to successfully mate your Raspberry Pi 5 board with the CrowPi carrier, as the cables put up some resistance to getting it in exactly the right place, and once it’s screwed down the microSD slot is inaccessible. You might also need to rely on Wi-Fi for networking, as the USB cable goes across the Ethernet port, though you may be able to negotiate a fit with a slim cable. Having a power connection enter vertically at the top right of the motherboard feels clunky too – it would have been so much tidier to have it pierce the casing at the rear.
A screw loose
A version of the Raspberry Pi OS with appropriate drivers is available from the CrowPi website – a 3.9GB download – and while the board booted first time, it threw an error when we tried to use the Recommended Software tool and the Terminal (the Terminal text is tricky to read on such a small screen, but that’s not Elecrow’s fault) to install new programs. There was also a loose screw in the case, which fell out when we tried giving it an experimental shake.
These problems are ones that can be fixed via software patches or by updating the package contents for future orders, and don’t affect the fact this is a convenient and well-made electronics board with prolific features. What they do mean is that, in its current state, it’s slightly difficult to recommend the CrowPi Compact Raspberry Pi Educational Kit, which is a shame, as it could be brilliant.
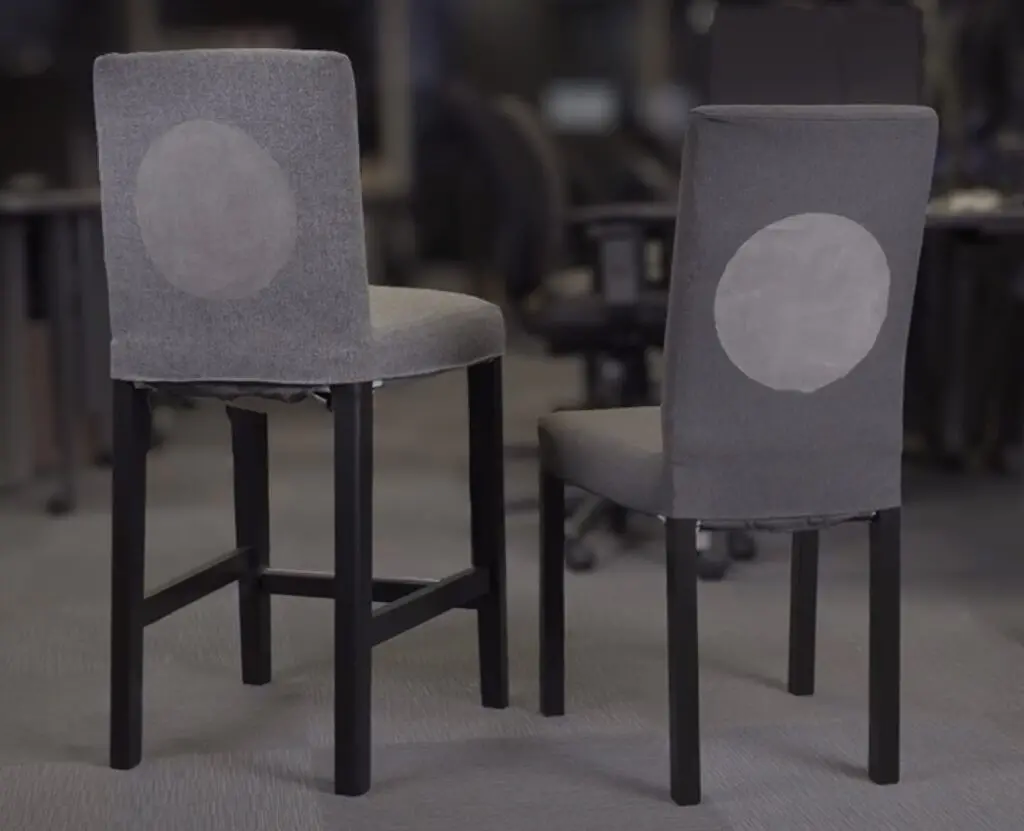
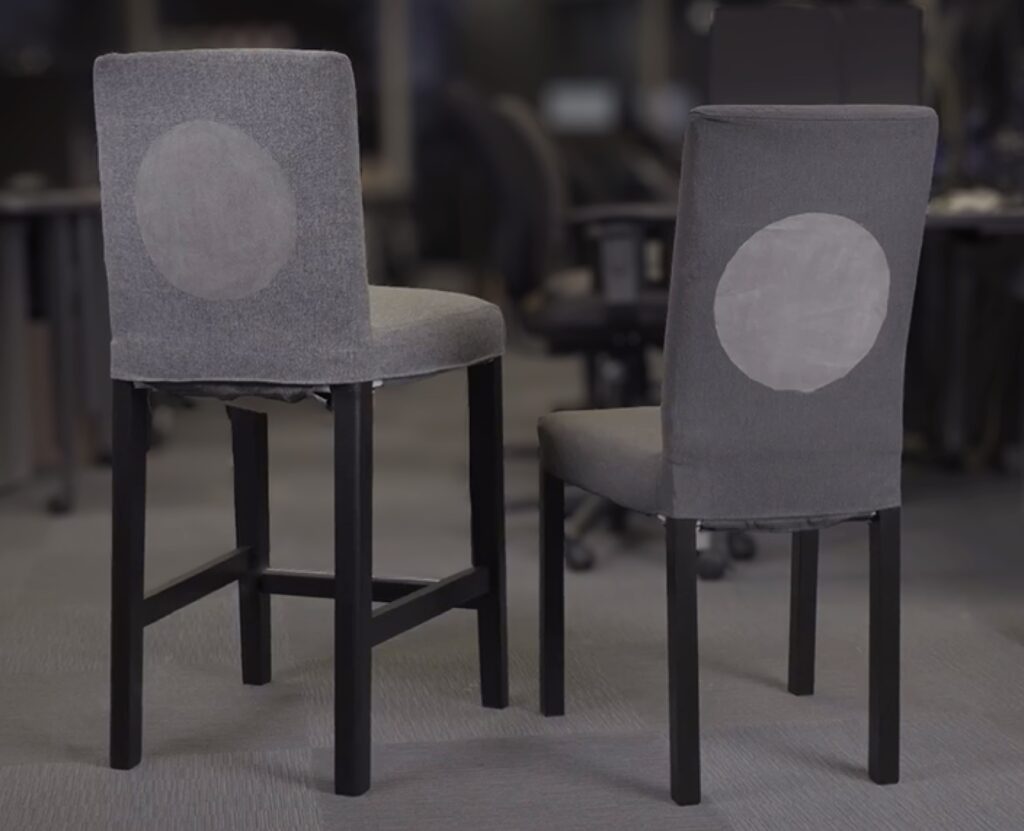
The pandemic made a lot of things obvious, not the least of which is that humans need social interaction to maintain good mental health. Sadly, many of us spend our lives physically separated from our loved ones by great distances or inopportune circumstances. That’s why a team of researchers decided to explore remote co-presence design within the category of smart home technology.
The goal of this design research, conducted by an interdisciplinary team from McMaster University and Simon Fraser University, was to experiment with technology that fosters human connection over long distances. But in contrast to typical communication, like email and video chats, this creates a sense of shared physical proximity.
The team developed two devices to demonstrate the concept. The first is a paired chair system called There Chair, with one chair visually indicating when someone occupies the other. If one chair is in a loved one’s home and the other in your own, then you would see when they sit down — and vice-versa. The visual indicator is a “display” made up of a spiral wire covered in special fabric that changes color when current flow causes that wire to heat up. There are also heating pads in the seat to mimic the warmth of a person’s body. Those operate under the control of an Arduino UNO Rev3 board.
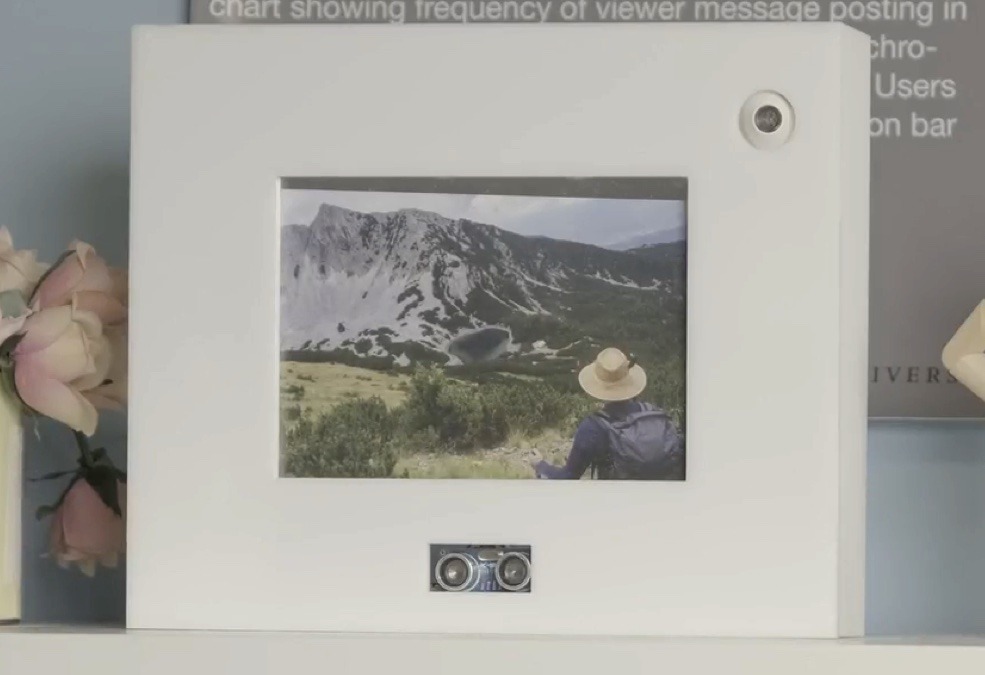
The other device, called The Fragrance Frame, is also intended to pair with a remote equivalent. It, too, contains an UNO Rev3. The device looks like a picture frame, but with an ultrasonic sensor and a fragrance sprayer. When one unit detects someone nearby, it tells the paired unit to spray its scent. Ideally, a specific scent will trigger a memory associated with that individual.
Both of these are an attempt at using technology to create a feeling of closeness. These specific devices may not make it onto the consumer market, but the idea behind them will inevitably catch on.
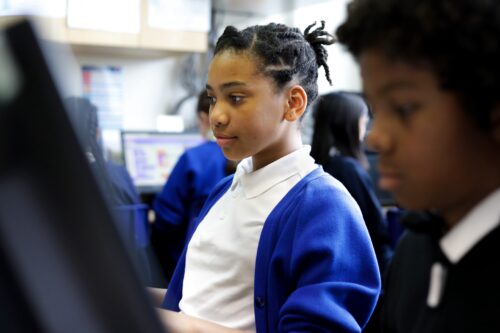
As the Experience AI Challenge has closed for submissions, we would like to thank all the talented young people who participated and submitted their projects this year.
The Challenge, created by us in collaboration with Google DeepMind, guides young people under the age of 18, and their mentors, through the process of creating their own unique AI project. It encourages young people to seek out real-world problems and create possible AI-based solutions. From January to May, participants in the UK were also able to submit their projects for feedback from AI experts.
In response to the submissions, Richard Hayler, our Director of Youth Programmes commented:
“In running the Challenge, we have seen an incredible display of creativity, ingenuity, and curiosity about AI among young people. The dedication and innovation they demonstrated in their submitted projects has been truly inspiring. The Challenge has not only showcased the immense potential of addressing problems using AI tools, but most of all the remarkable talent and dedication of the next generation of innovators.
We would also like to thank all the mentors who guided and encouraged participants throughout the Challenge for their invaluable support. Their expertise and mentorship were instrumental in the young people’s success.”
Some Challenge highlights
These are some examples of the innovative projects young people created:
AI creation: River Water Quality Prediction App
Creator: Shreyas, age 13
What does it do:
“The model predicts how good the water quality of a river is based on several factors such as the levels of ammonium, nitrates, and dissolved oxygen.”
Who is it for:
”It can be used to tell if river water is safe to drink, or safe for life. This can also be used by authorities to decide where to deploy limited resources to purify water depending on its toxicity.”
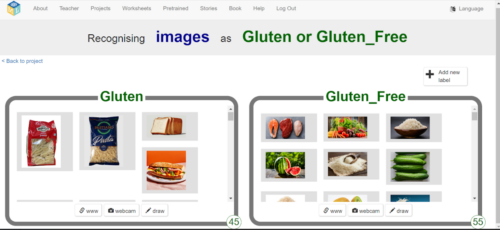
AI creation: Coeliac Disease
Creator: Zainev, age 14–18
What does it do:
“The model aims to identify foods that contain the allergen gluten.”
Who is it for:
“It is for people with gluten allergy and/or people trying to arrange food for those with a gluten allergy, as it will easily help them identify foods that contain gluten and are not safe to eat.”
AI creation: Spacepuppy’s colour adventure
Creator: Charlotte, age 12
What does it do:
“Teaches children about colours.”
Who is it for:
“Teachers at primary schools/ nurseries.”
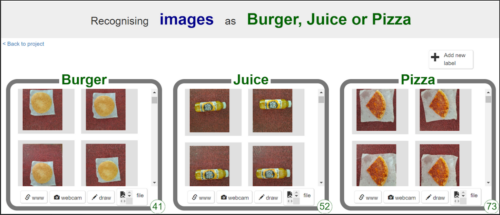
AI creation: Nutrify
Creator: Ishaan, age 14–18
What does it do:
“The model identifies the students’ food items through a webcam image, giving its specific nutritional information including calories, carbs, sugars and proteins.”
Who is it for:
“This model can be easily used by students to be aware of the nutritional information of their meals.”
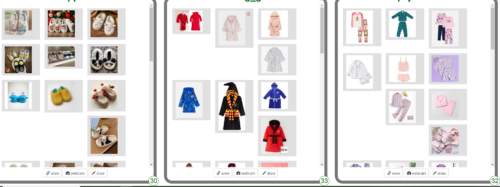
AI creation: Flossie
Creator: Florence, age 11
What does it do:
“Identifies dressing gowns, slippers and pyjamas.”
Who is it for:
“For young children to learn different clothing.”
AI creation: Dermalyst
Creator: Vedant, age 14–18
What does it do:
“Dermalyst is an AI-based dermatologist that analyses images of your skin to check if you have any skin infection or disease and also suggests solutions.”
Who is it for:
“This app is targeted at young people but anyone could use it. It saves them from having to wait for a GP appointment.”
AI creation: Bird identifier
Creator: William, age 13
What does it do:
“It is designed to identify common garden birds native to the United Kingdom. It can identify robins, blue tits, great tits and blackbirds by their photograph.”
Who is it for:
“Bird watchers may use the app to identify the birds that they see but don’t know what they are.”
Save the date for the celebratory webinar
We would like to invite you to an online webinar on Wednesday 10 July at 4pm BST to celebrate all Experience AI Challenge participants. Click ‘notify me’ on YouTube to be notified when the webinar starts.
During the webinar, Mark Calleja from the Raspberry Pi Foundation and Matko Bošnjak, Research Scientist at Google DeepMind, will highlight some young people’s AI creations, and discuss all things AI. You can share your questions about AI for Mark and Matko by filling in this form today.
Download the Experience AI Challenge resources
Once again thank you to everyone who participated in the Experience AI Challenge and submitted their projects.
If you’re interested in the Challenge, you can still download the resources and use them to create your own AI projects.
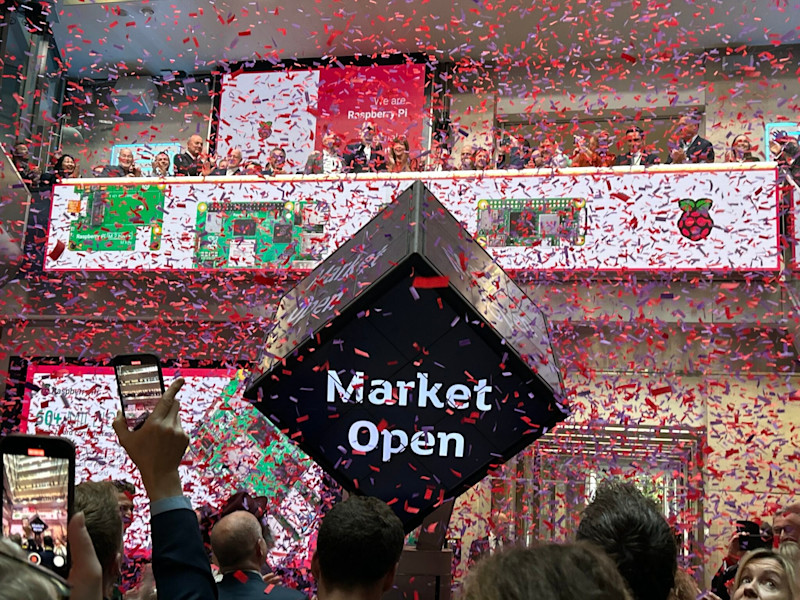
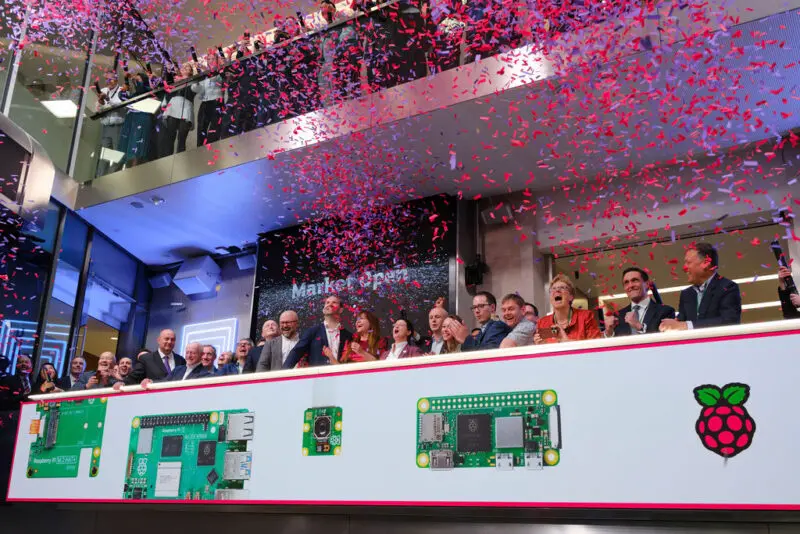
“This is a watershed moment for Raspberry Pi,” Eben posted on Raspberry Pi dot com that morning. “And the start of a new phase in our evolution: access to the public market will enable us to build more of the products you love, faster. And the money raised by the Raspberry Pi Foundation in the IPO will support its ambitions for global impact in its second decade.”
Philip Colligan, CEO of the Raspberry Pi Foundation wrote in a post a couple of weeks ago just how that would work: “To date, Raspberry Pi Ltd has donated nearly $50m from its profits to the Foundation, which we have used to advance our educational mission combined with over $60m in funding from philanthropy, sponsorship, and contracts for educational services,” he wrote. “From the Foundation’s perspective, an IPO provides us with the ability to sell some of our shares to raise money to finance a sustainable expansion of our educational activities. Put simply, instead of receiving a share of the company’s profits each year, we will convert some of our shareholding into an endowment that we will use to fund our educational programmes.”
What’s next
There’s been a whole lot of work behind the scenes for this for some time now – I’ve only caught glimpses on my monthly visits to Raspberry Pi Towers – so hopefully some of that pressure has now been alleviated. I’ll find out on my next visit.
Anyway, I thought I’d talk about it here as for various reasons we’ve not had a chance to mention it elsewhere in the magazine [lots of exciting new opportunities to end up in front of a judge – Ed]. Also, my car got returned the following day and now I sort of regret not having got up early for it. Ah well – onwards.
Tuesday 11 June 2024 will be remembered as one of the most important days in the history of Raspberry Pi.
At the London Stock Exchange on 11 June 2024.
The successful introduction of the Raspberry Pi Foundation’s commercial subsidiary on the London Stock Exchange is a genuinely remarkable achievement. I want to put on record my huge congratulations and thanks to Eben Upton, Martin Hellawell, and the whole team at Raspberry Pi Holdings plc for everything they have done to make this possible.
The purpose of the IPO was to secure the next stage of growth and impact for both the Foundation and the company. We have huge ambitions and the IPO has provided both organisations with the capital we need to pursue those ambitions at pace and scale. Our Chief Executive Philip Colligan has already explained what it means for the Raspberry Pi Foundation and our mission to empower young people all over the world.
In this post, I wanted to take a moment to acknowledge the significant contribution that others have made over the years, particularly all of the Trustees who have been so generous with their time, energy, and expertise.
Founding Trustees
The Raspberry Pi Foundation was established in 2008 by six founding Trustees: Alan Mycroft, David Braben, Eben Upton, Jack Lang, Pete Lomas, and Rob Mullins. All of them deserve credit and thanks for setting us off on this incredible journey.
Alan, Eben, Jack, and Rob were all involved with the Computer Lab at the University of Cambridge. They were dealing with a decline in applications to study the computer science undergraduate course, which was a symptom of the much wider challenge that far too many young people weren’t getting access to opportunities to learn computer science, or getting hands-on with programming and electronics.
David Braben brought an industry perspective, drawing on the challenges he was experiencing with recruiting engineers and programmers at the world-leading games company that he had founded, Frontier Developments.
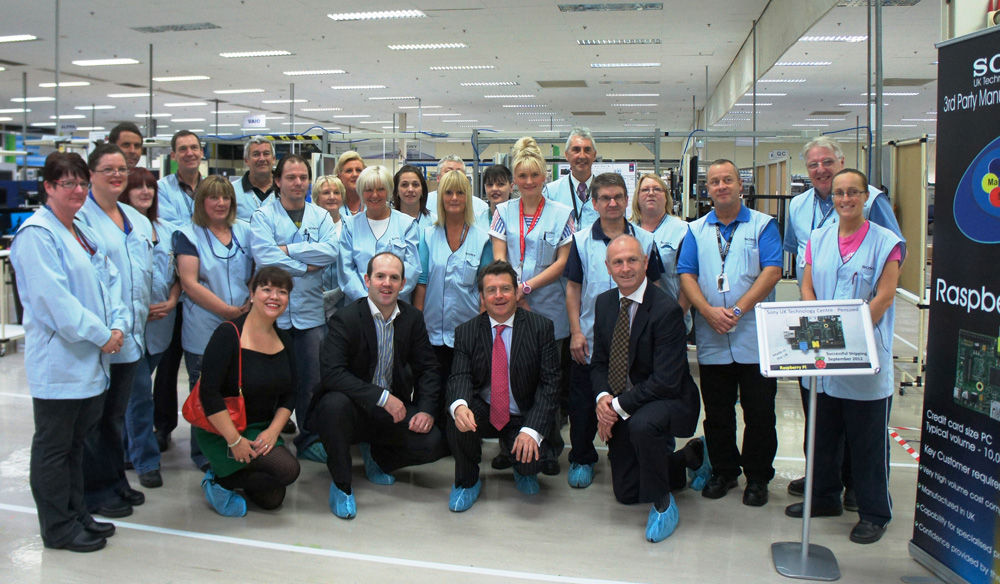
At the Sony factory in Pencoed, Wales, that produces Raspberry Pi computers.
For Pete Lomas, he was paying forward the support and inspiration that he received from a college technician who gave him the opportunity and encouragement to experiment with programming a DEC PDP-8. That experience ultimately led Pete to establish Norcott Technologies, an electronics design and manufacturing business that he still runs today.
The founding Trustees’ original idea was to create a low-cost programmable computer — available for the price of a textbook — that would remove price as a barrier to owning a computer and inspire young people to take their first steps with computing. It took four years for the first Raspberry Pi computer to be launched, an achievement for which Eben and Pete were rightly honoured, along with other members of the team, as recipients of the prestigious MacRobert Prize for engineering.
Combining social impact and commercial success
What none of our founding Trustees could have predicted was the enormous commercial success of Raspberry Pi computers. In realising their vision of a low-cost programmable computer for education, the team created a new category of single-board computers that found a home with enthusiasts and industry, enabling the team to evolve — through hard work and creativity — into a business that is now entering a new phase as a listed company.
They also delivered on the original mission, with computer science at the University of Cambridge now being one of the most oversubscribed undergraduate courses in the country and many applicants citing Raspberry Pi computers as part of their introduction to programming.
The commercial success of Raspberry Pi has enabled the Foundation to expand its educational programmes to the point where it is now established as one of the world’s leading nonprofits focused on democratising access to computing education, and is benefiting the lives of tens of millions of young people already.
It takes a village
While no-one really knows the origin of the proverb ‘It takes a village to raise a child’, we can all recognise the truth in that simple statement. It applies just as much for endeavours like Raspberry Pi.
Over the years, Raspberry Pi has been a genuine team game. Employees in the Foundation and our commercial subsidiary, advisers, partner organisations and supporters, volunteers and community members have all played a crucial role in the success of both the company and the Foundation.
At a Raspberry Pi birthday celebration.
Over the years there have been 21 Trustees of the Foundation, bringing an incredible range of skills and experience that has elevated our ambitions and supported the teams in both the Foundation and the company.
All of our Trustees have provided their time and expertise for free, never receiving any financial benefit for their contribution as Trustees.
Serving as a Trustee of a charity is a serious business, with significant responsibility and accountability. While many charities have commercial operations, there is no doubt that the scale and complexity of Raspberry Pi’s commercial business has placed significant additional responsibilities on all of our Trustees.
I especially want to pay tribute to my predecessors as chair of the Board of Trustees: Jack Lang, one of our founding Trustees, who sadly passed away this year; and David Cleevely, who continues to support our work as a Member of the Foundation. Both Jack and David played a particularly important part in the success of Raspberry Pi.
Welcoming our new Trustees
As we enter this new phase for the Foundation’s relationship with Raspberry Pi Holdings Ltd, we are delighted to welcome three new Trustees to the Board:
Andrew Sliwinski is a VP at Lego Education, formerly co-director of Scratch @ MIT, ex-Mozilla, and founder of DIY.org. Andrew is a technologist and maker with a deep understanding of education systems globally.
Laura Turkington leads global partnerships and programmes at EY, and was previously at Vodafone Foundation. Laura has extensive global experience (including Ireland and India), including supporting large-scale initiatives on digital skills, computing education, and AI literacy.
Stephen Greene is the founder and CEO of Rockcorps and the former chair of the National Citizen Service. Stephen brings huge experience of building global volunteer movements, social enterprise, marketing (especially to young people), government relations, and education of disadvantaged youth.
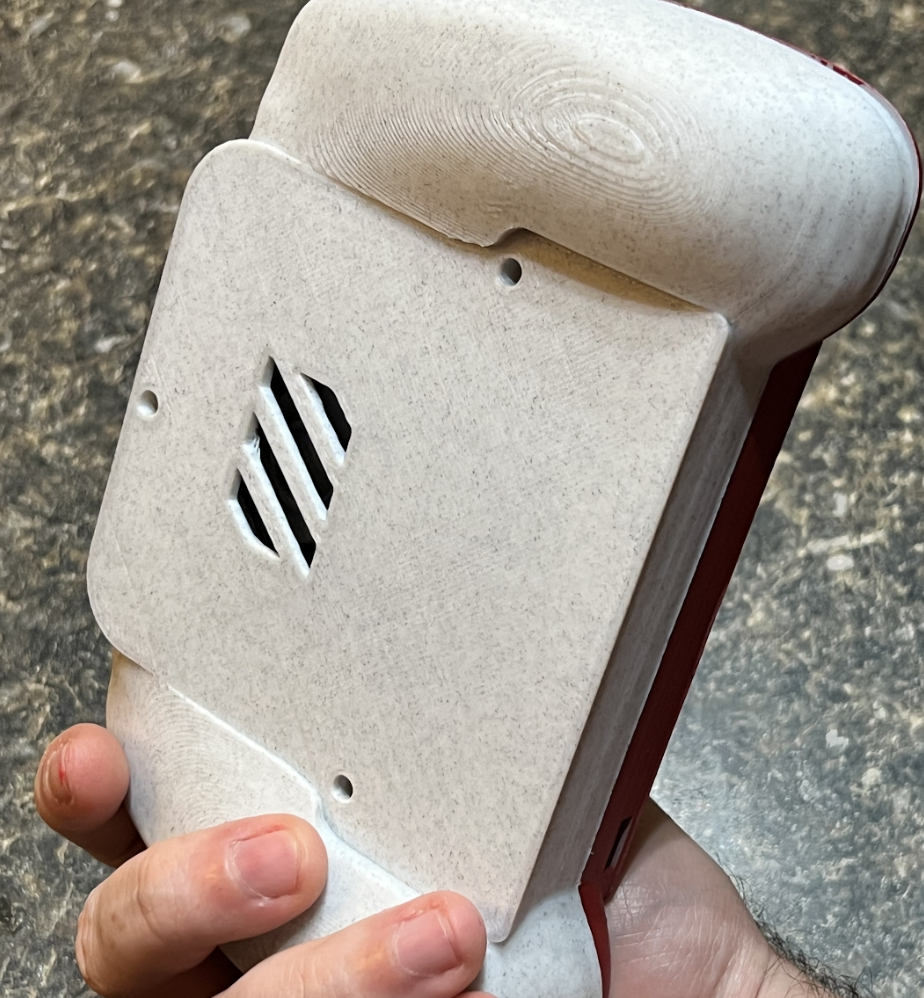
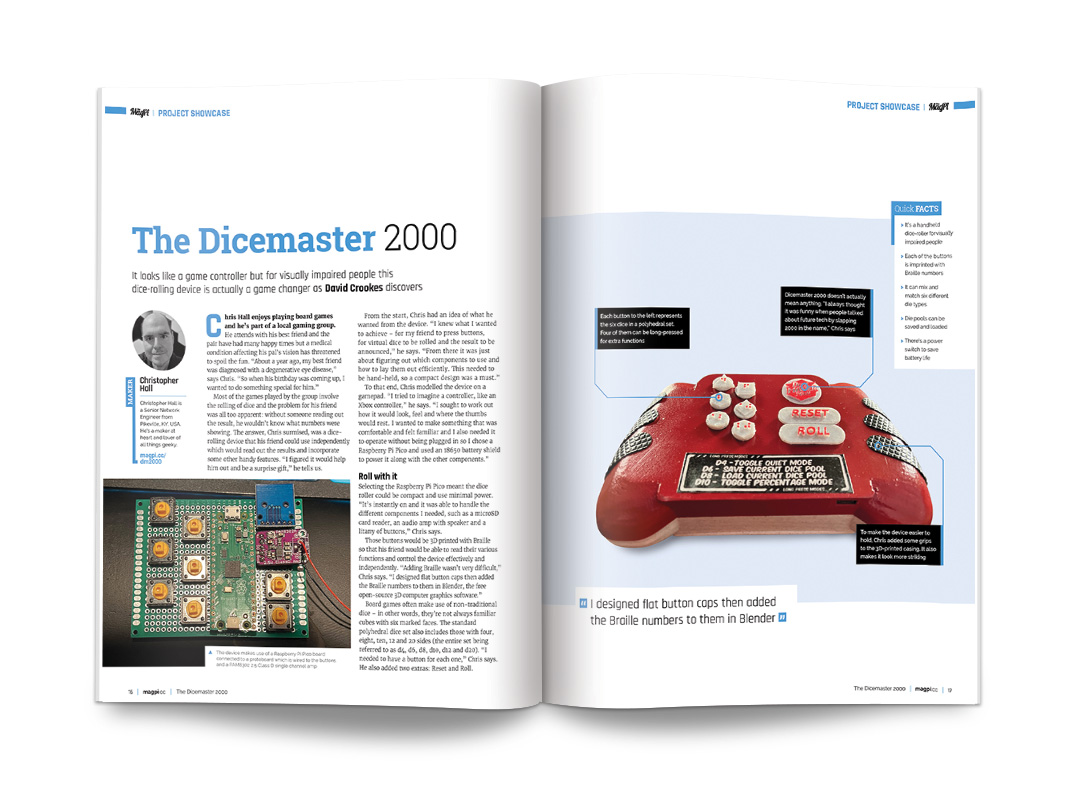
From the start, Chris had an idea of what he wanted from the device. “I knew what I wanted to achieve – for my friend to press buttons, for virtual dice to be rolled and the result to be announced,” he says. “From there it was just about figuring out which components to use and how to lay them out efficiently. This needed to be hand-held, so a compact design was a must.”
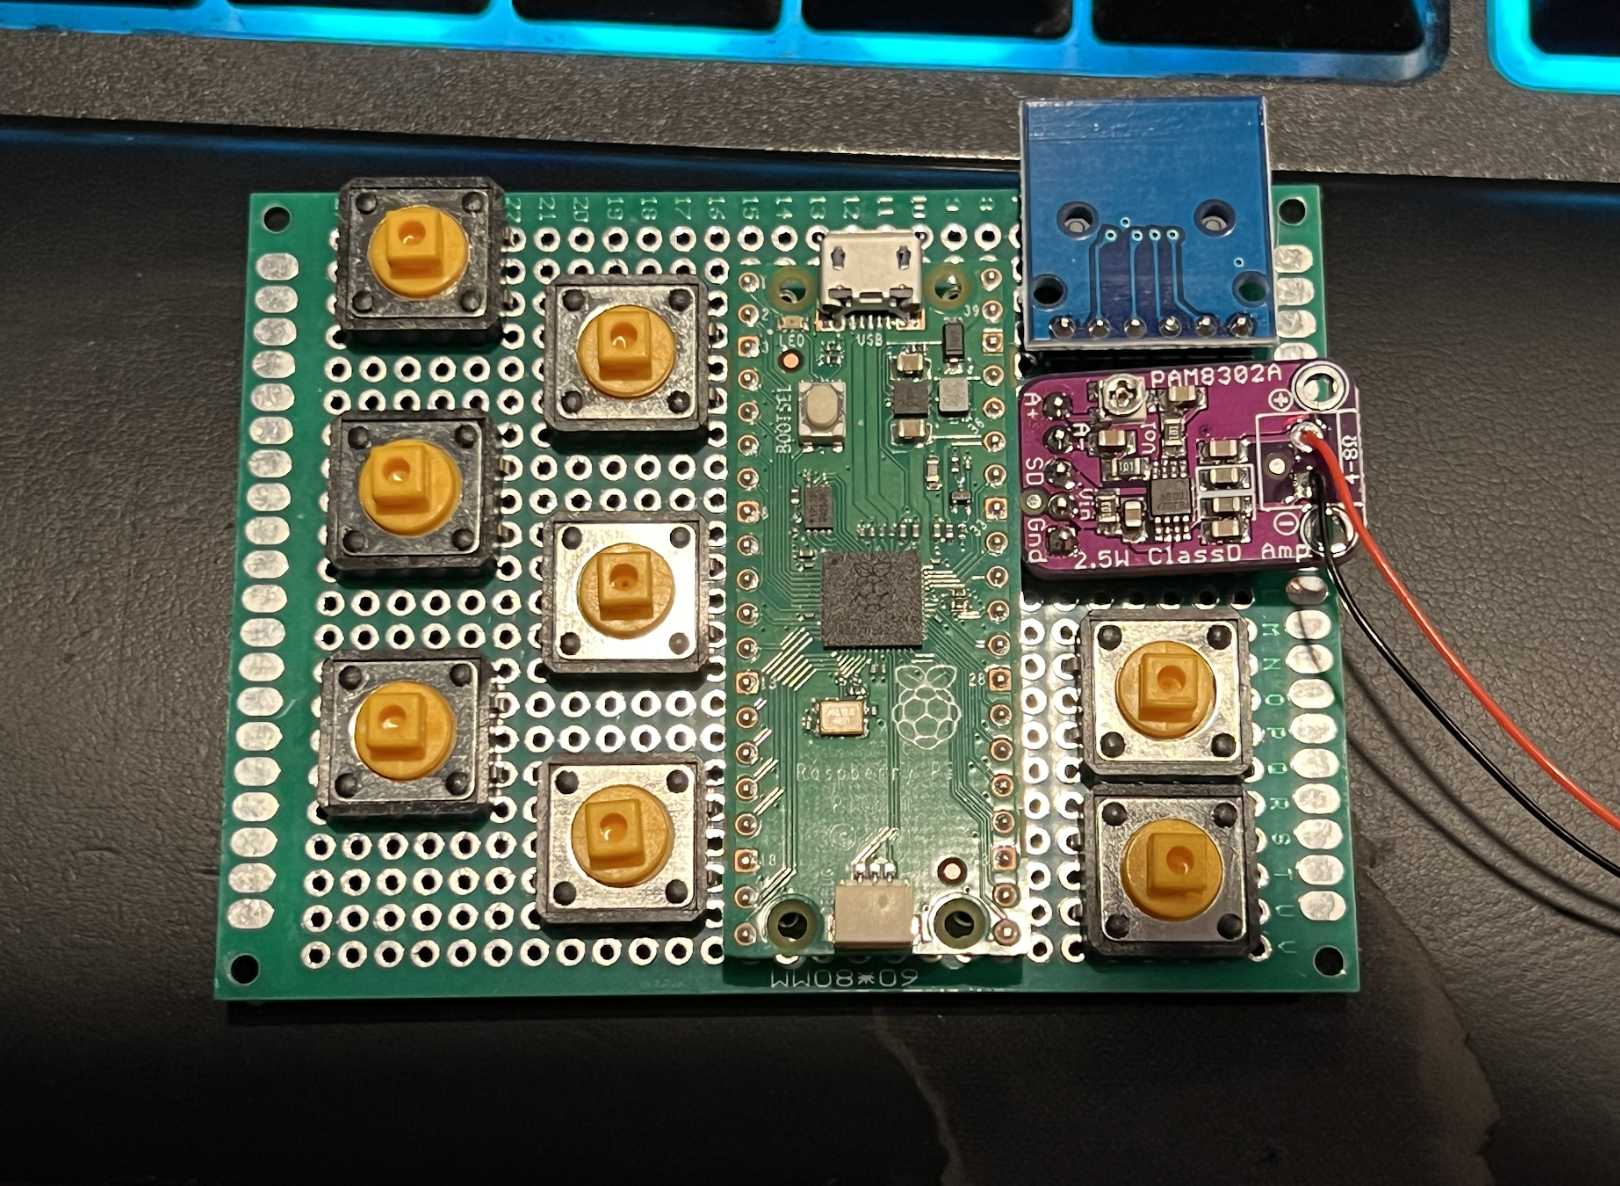
To that end, Chris modelled the device on a gamepad. “I tried to imagine a controller, like an Xbox controller,” he says. “I sought to work out how it would look, feel and where the thumbs would rest. I wanted to make something that was comfortable and felt familiar and I also needed it to operate without being plugged in so I chose a Raspberry Pi Pico and used an 18650 battery shield to power it along with the other components.”
Roll with it
Selecting the Raspberry Pi Pico meant the dice roller could be compact and use minimal power. “It’s instantly on and it was able to handle the different components I needed, such as a microSD card reader, an audio amp with speaker and a litany of buttons,” Chris says.
Those buttons would be 3D printed with Braille so that his friend would be able to read their various functions and control the device effectively and independently. “Adding Braille wasn’t very difficult,” Chris says. “I designed flat button caps then added the Braille numbers to them in Blender, the free open-source 3D computer graphics software.”
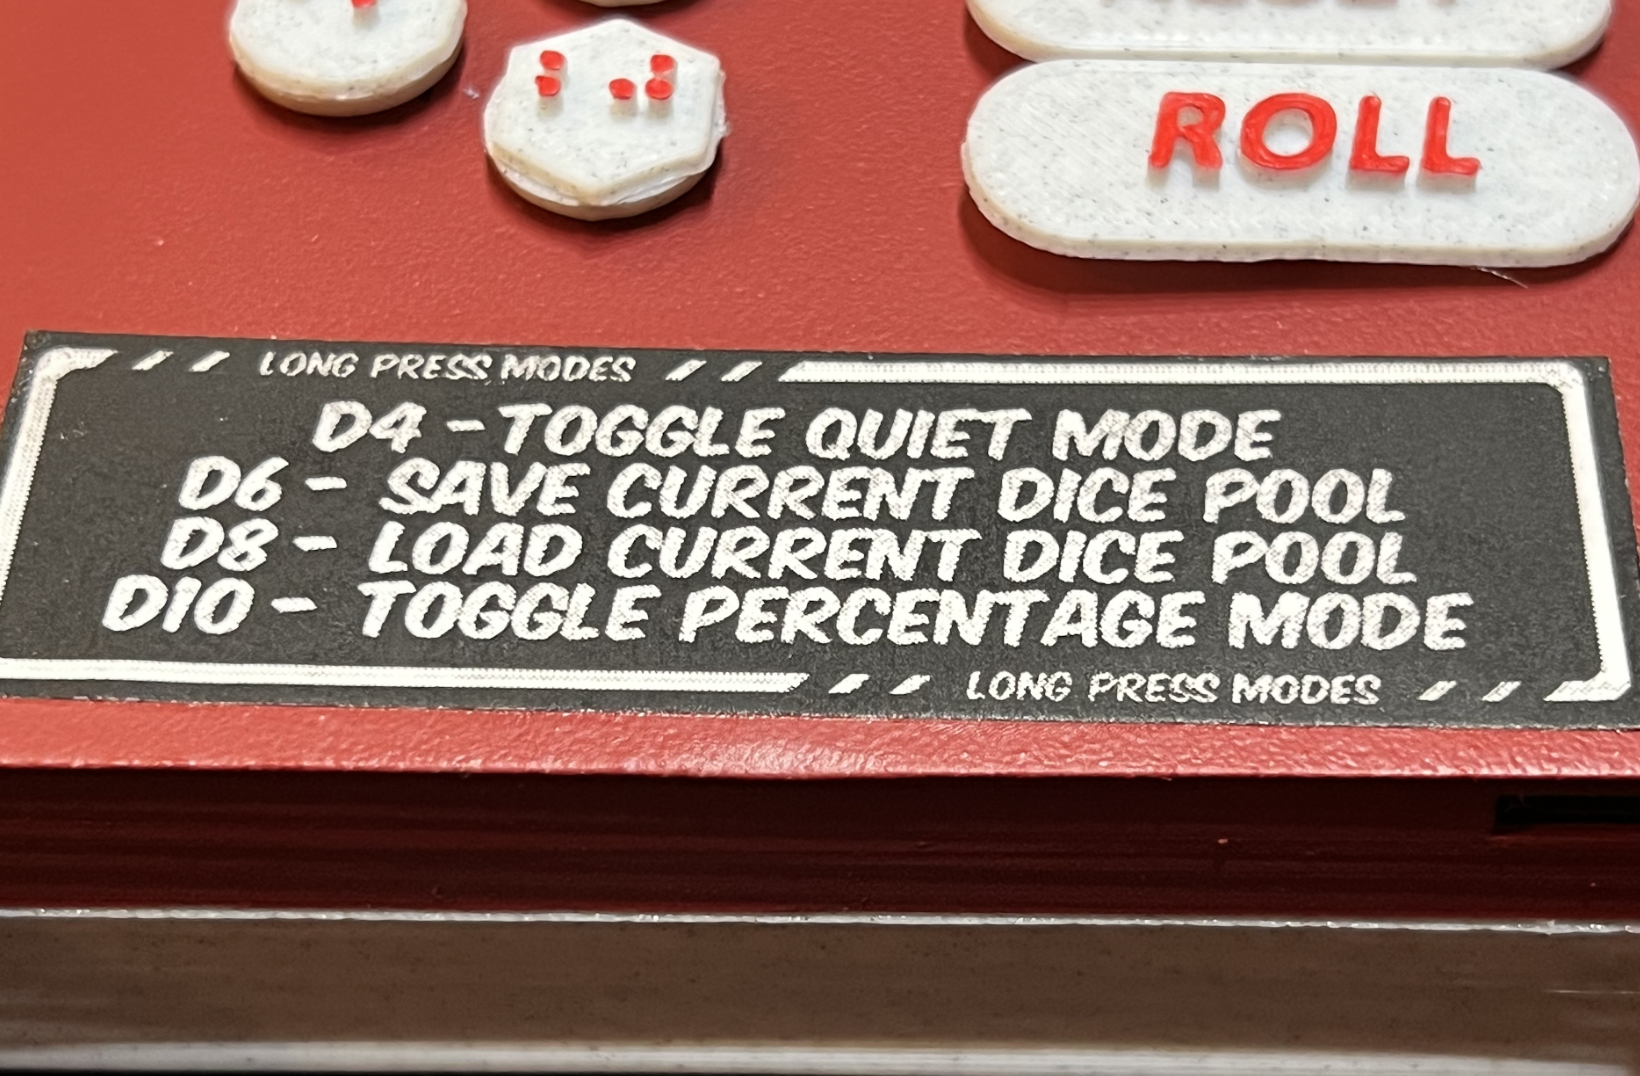
Board games often make use of non-traditional dice – in other words, they’re not always familiar cubes with six marked faces. The standard polyhedral dice set also includes those with four, eight, ten, 12 and 20 sides (the entire set being referred to as d4, d6, d8, d10, d12 and d20). “I needed to have a button for each one,” Chris says. He also added two extras: Reset and Roll.
Writing the project in CircuitPython, he created a device that would allow his friend to press one of the numbered buttons to add it to the die pool. When the dice are ready to be rolled, it’d be a case of pressing Roll and listening to the result when it’s announced. “In addition, there are some long press modes,” Chris adds. “If you hold the d4 button for a few seconds, you will enter quiet mode which plays chimes rather than speaking out every die entered and describing what it’s doing. It still announces the results of the roll, but it can cut down on time and I added it in case the normal mode was too distracting to other players at the table.”
Holding down d6 saves the current die pool. “This is useful if you’re playing something like Dungeons & Dragons and constantly need to roll that big 8d6 fireball [that’s eight d6 dice being rolled at once],” Chris continues. “Long-pressing d8 will load the saved die pool from the microSD card, and that means the saved pool will persist across uses.” Long-pressing the d10 enters percentage mode which, rather than rolling dice, will simply give a percentage between one and 100.
Play the game
Coding all of this was a challenge. “Interfacing with the audio amp was tricky and I wish the device was a bit easier to understand in terms of audio quality, but this may have been due to everything being built on a prototype board,” Chris laments. He also found it difficult to perfect the controller shape. “The housing was 3D printed in a single colour and the top was painted red. I had a good friend of mine help with the ergonomics of it. There was also a lot of soldering,” he adds.
Even so, it’s been worth the time and effort. Chris’ friend loves using the device and he finds it allows him to fully participate in games. It’s also comfortable to hold, easy to use and very effective. What’s more, you can replicate it because Chris has made the code open source and he has also shared the 3D files on Printables. In that sense, it’s capable of helping many other people with a visual impairment.
Chris is certainly happy overall even though he would have done some things differently. “If there is one part of this project I wish I had done, it would have been to design a custom PCB using something like KiCad – if only I’d had issue 138 of The MagPi when I started! It probably would have helped a lot with audio issues and made for a cleaner build overall. It’s definitely on my list of things to learn for future projects.”
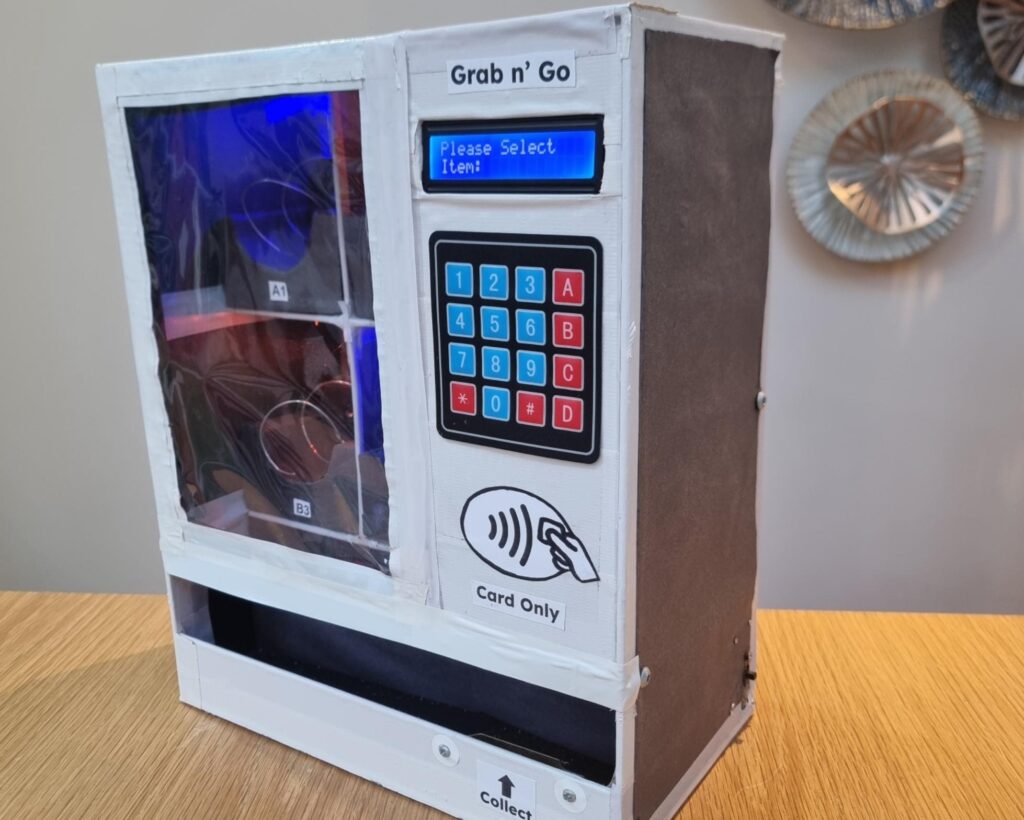
Have you ever wanted your very own vending machine? If so, you likely found that they’re expensive and too bulky to fit in most homes. But now you can experience vending bliss thanks to this miniature vending machine designed by m22pj, which you can craft yourself using an Arduino and other materials lying around the house.
This project is fun, because it gives makers the opportunity to experiment with vending machine features without a big budget. That even includes more modern payment options, like one might see on a college campus with vending machine that charge to student identification cards. This design lets DIYers work with those features to learn about RFID, security, and more. And, of course, this is a chance to get hands-on experience with vending mechanisms, too.
The best part is that you can build this with some cardboard and off-the-shelf electronic components. The enclosure and almost all of the mechanical parts are cardboard. The electronics include an Arduino Mega 2560 board, a keypad, an RFID reader module, LEDs, and servo motors. The servos must be full-rotation models, so they can drive the vending mechanisms.
As designed, this vending machine can serve up to four different treats. But it would be possible to expand that to include many more. The Arduino has plenty of pins available to control additional servo motors, so the sky is the limit.
Do you remember a time before social media? Mobile phones? Email? We are surrounded by digital technology, and new applications impact our lives whether we engage with them or not. Issue 24 of Hello World, out today for free, gives you ideas for how to help your learners think openly and critically about technology.
Teaching about the impact of technology
For learners to become informed, empowered citizens, they need to understand the impact technology has on them as individuals, and on society as a whole. In our brand-new issue of Hello World, educators share insights from their work in and around classrooms that will help you engage your learners in learning about and discussing the impact of tech.
For example:
Jasmeen Kanwal and the team at Data Education in Schools share their resources for how young people can start to learn the skills they need to change the world with data
Julie York writes about how incorporating AI education into any classroom can help students prepare for future careers
Ben Hall discusses whether technology is divisive or inclusive, and how you can encourage students to think critically about it
This issue also includes stories on how educators use technology to create a positive impact for learners:
Yolanda Payne tells you how she’s using teaching experiences from the COVID-19 pandemic to bring better remote learning to communities in Georgia, USA, and in the US Virgin Islands
Mitchel Resnik and Natalie Rusk from Lifelong Kindergarten group at MIT Media Lab introduce their new free mobile app, OctoStudio, and how it helps learners and educators in underresourced areas get creative with code
And there is lots more for you to discover in issue 24.
The issue also covers how you can make time to teach about the impact of technology in an already packed curriculum. Sway Grantham, Senior Learning Manager at the Raspberry Pi Foundation, says in her article:
“As adults, it is easy for us to see the impact technology has had on society and on our lives. Yet when I tell pupils that, within my lifetime, it wasn’t always illegal to hold your mobile phone to your ear and have a call while driving, they are horrified. They are living in the now and don’t yet have the perspective to allow them to see the change that has happened. However, knowing the impact of technology allows us to learn from previous mistakes, to make decisions around ethical behaviour (such as using a phone while driving), and to critically engage in real-world issues.
As teachers, allocating some time to this topic throughout the year can seem challenging, but with a few small changes, the impact might be more than you can imagine.”
Share your thoughts & subscribe to Hello World
With so many aspects of life impacted by technology, computing educators play a crucial role in supporting young people to become informed, empowered citizens. We hope you enjoy this issue of Hello World and find it useful in your teaching.
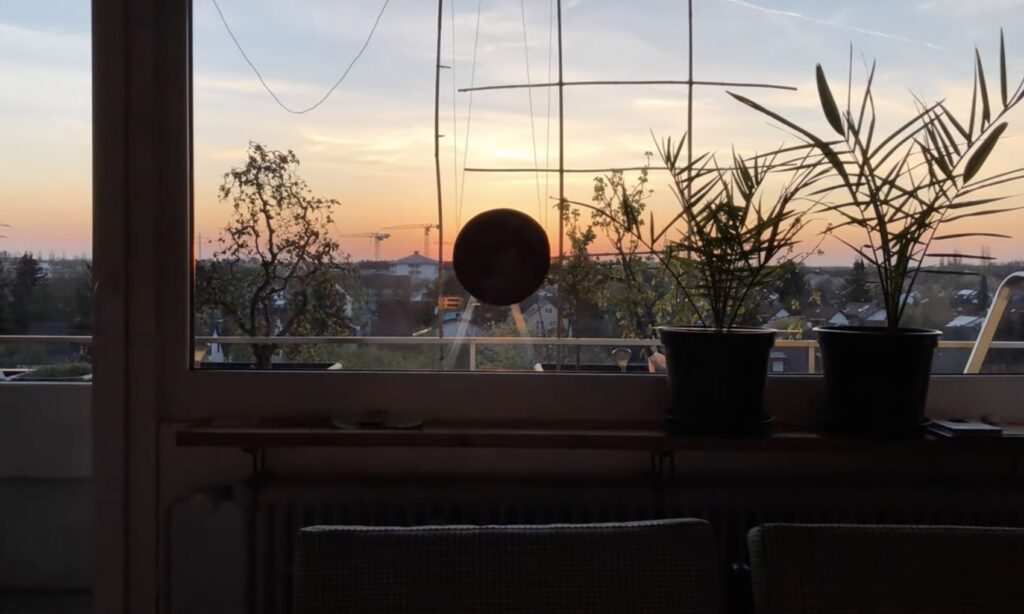
Total solar eclipses are rare — at least from the perspective of any specific point on the planet. A total eclipse will occur somewhere on Earth once every 18 months or so, but that is more likely to track across the middle of the Pacific Ocean than wherever you happen to be. That made Bernd Kraus feel like he was missing out, so he used an Arduino to build this machine that produces a personal solar eclipse every day.
This is a kind of robot that can move a cutout of the moon to any point on the 2D plane of Kraus’s window. Like the sun and actual moon, the size relationship is important and the cutout is the precise diameter necessary to block the sun. And also like the real deal, the position of the viewer is important. Luckily, Kraus tends to sit in the exact same location whenever he is in that room and the sun’s path (or, rather, Earth’s rotation and orbit) is predictable. A bit of fancy math is all it takes to determine where to place the cutout to project a shadow over the area where Kraus’s face should be.
The hardware of the robot consists of two stepper motors, a solar panel with charger, an 18650 lithium battery, an HM-10 module, and an Arduino Nano board to control everything. The solar panel attaches to the back side of the moon cutout so it gets good exposure. It sends power up through the wires from which it hangs. The Arduino receives position data from Kraus’s smartphone via Bluetooth, calculates the point where the cutout should be, and then moves the cutout to that point using the two stepper motors.
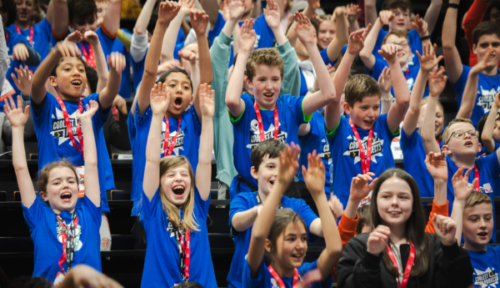
Our Coolest Projects 2024 online showcase has come to a close, with 7197 young people from 43 countries sharing the incredible things they have made with code. A huge congratulations to everyone who took part!
Coolest Projects is our annual global celebration of young digital creators and the cool things they make with technology. This year’s showcase featured 4678 amazing projects, from a doughnut clicker game created in Scratch to an app that tracks sunscreen usage and areas with high UV levels for users.
This week, we celebrated each and every young creator and their incredible tech projects in a special livestream:
Every year, we invite some very special VIP judges to choose their favourite projects to highlight. Meet our 2024 judges and find out about the projects they picked.
Azra Ismail’s favourite projects
Azra is the co-founder of MakerGhat, an education nonprofit based in India that aims to nurture underserved youth to become the next generation of entrepreneurs and leaders. MakerGhat has reached around a million youth to date through hands-on making programmes. She is also an Assistant Professor at Emory University, where she directs the CARE Lab (Collective Action & Research for Equity). Azra was named in the Forbes 30 under 30 Asia list, and has previously worked with Google, the Wadhwani Institute for AI, and United Nations Global Pulse. She has a PhD in Human-Centered Computing and Bachelor’s in Computer Engineering from Georgia Tech.
Greg is an award-winning Science Presenter and Producer who has written and hosted a bunch of stuff on TV, YouTube, radio, and stage over the past 20 years. Greg has a BBC Radio 4 show called Sliced Bread that investigates whether wonder products like face creams and air fryers are indeed ‘the best thing since sliced bread’, or marketing hype. Greg regularly pops up on TV — he’s a regular on the BBC’s Morning Live and was the in-house science guy on Blue Peter and Sunday Brunch for many years. He’s also hosted multiple TV series, made live shows for families on YouTube (Let’s Go Live), and toured science theatre shows around the UK.
Natalie is the Executive Director of the App Inventor Foundation, a global nonprofit that has empowered over 20 million inventors of all ages to create over 100 million apps to improve their lives and uplift their communities. She received her PhD in ML and AI education from MIT’s Computer Science and Artificial Intelligence Lab, and currently serves as Expert on Mission at UNESCO to develop the UN’s AI Competency Framework for K-12 Students.
Selin is a 17-year-old multi-award winner and changemaker who has been passionate about using tech for good since an early age. She taught herself to code at age 8 and started building robots at 10, and participated in Coolest Projects for many years. She has built seven robots to date, including the social good robot iC4U, a robot guide dog for visually impaired people, and BB4All, an anti-bullying school aid robot. She has also built a stray dog wellbeing app, JAVA, and an AI model for breast cancer diagnosis. Her aim is to inspire young people, especially girls, to see the fun and importance of using tech for good.
We partnered with Broadcom Foundation to give a special award to young creators using coding and computing to solve real-world problems that matter to their communities. Broadcom Coding with Commitment® is a special recognition for a Coolest Projects creator aged 11–14 who has used computing as an essential problem-solving tool to help those around them.
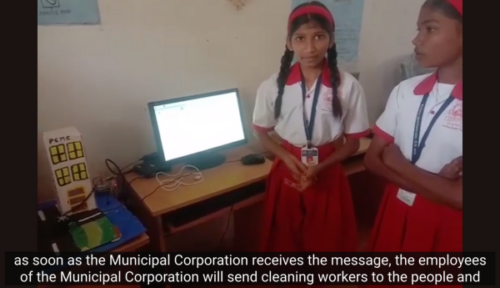
This year’s Broadcom Coding with Commitment® recipients are Naitik, Shravasti, and Nikita from India in recognition of their project Drainage alert system. Their thoughtful project uses a water flow sensor connected to a Raspberry Pi computer to detect when waste enters the drainage system and causes blockages and send an alert to the local council.
Get inspired and keep creating!
Now you’ve seen the judges’ favourite projects, it’s time to pick your own! Take a look at the Coolest Projects 2024 online showcase gallery to see all the amazing projects from young people all over the world, and get inspired to make your own.
Participants will shortly receive their own unique certificates and the personalised feedback on their projects from our team of judges, to celebrate their achievements.
Support from our Coolest Projects sponsors means we can make the online showcase and celebration livestream an inspiring experience for the young people taking part. We want to say a big thank you to all of them: Amazon Future Engineer, Broadcom Foundation, GoTo, Kingston Technology, Meta, and Qube Research & Technologies.
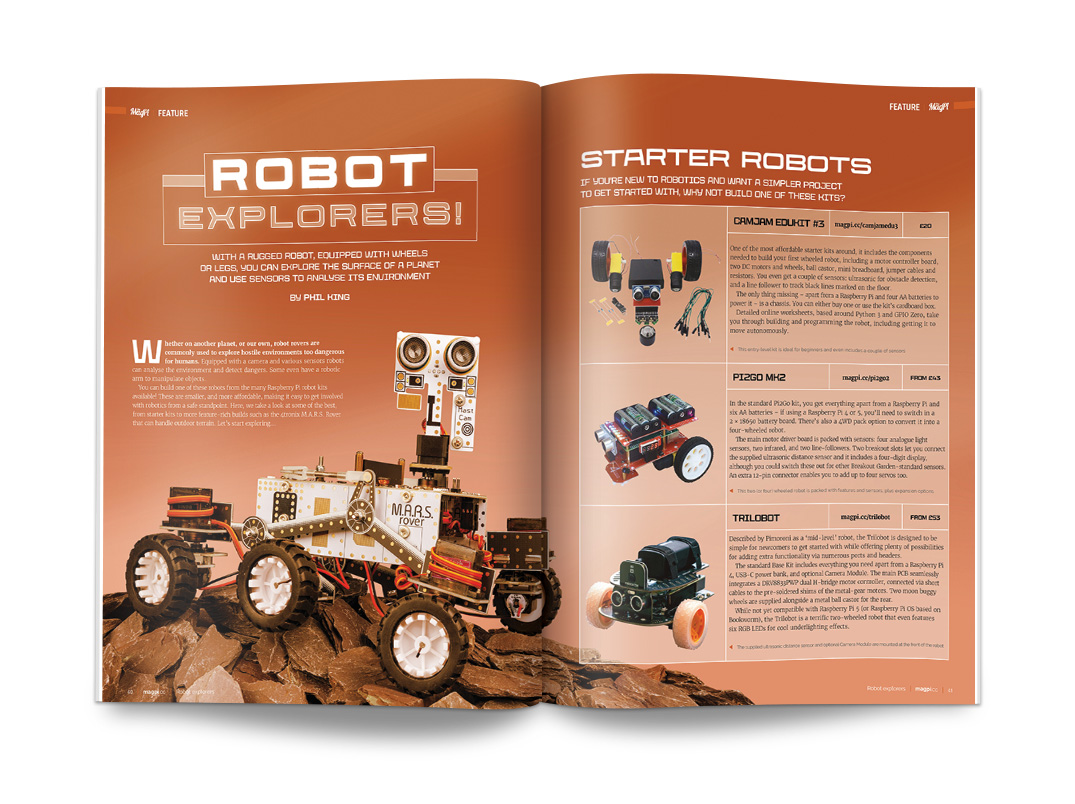
Turn Raspberry Pi into a rugged robot, equipped with wheels or legs, and you can explore the surface of a planet (or your backyard) and use sensors to analyse your environment. This month, we’ve got a guide to the best robotic parts, equipment, and sensors to use.
Dicemaster 2000
We love this game controller for visually impaired people. The buttons are 3D printed with Braille enabling the maker’s friend to take part in a gaming group. Dicemaster showcases maker skills with Raspberry Pi’s electronics to produce a fun, but seriously useful, controller.
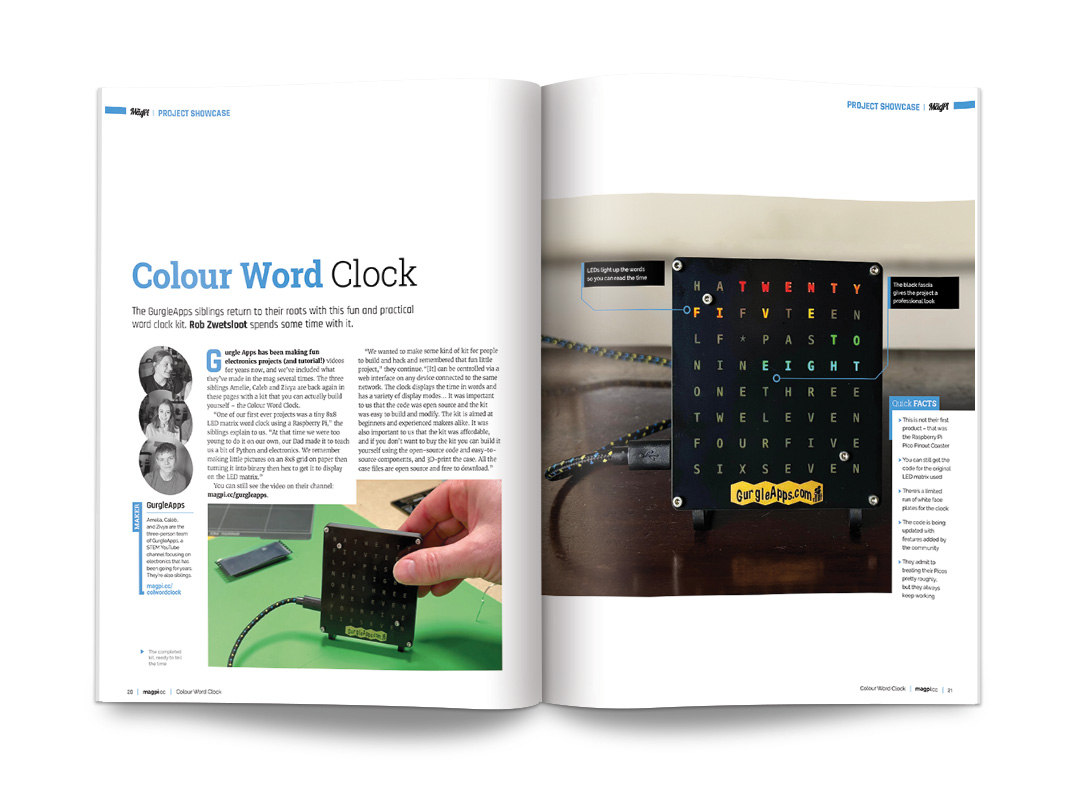
Colour Word Clock
Gurgle Apps has been making fun electronics projects for years now. The three siblings Amelie, Caleb and Zivya are back again with a kit that you can build yourself – the Colour Word Clock. It uses LEDs to light up letters in a 3D-printed case that spells out the time.
Retro Gaming Magic Mirror
David Edwards wanted to make a Magic Mirror, and he also wanted an arcade machine but didn’t have the space (or permission) to build one. The solution was this fabulous build that combines both concepts into one device. A 65-inch display turned into a magic mirror that plays as many different systems as possible.
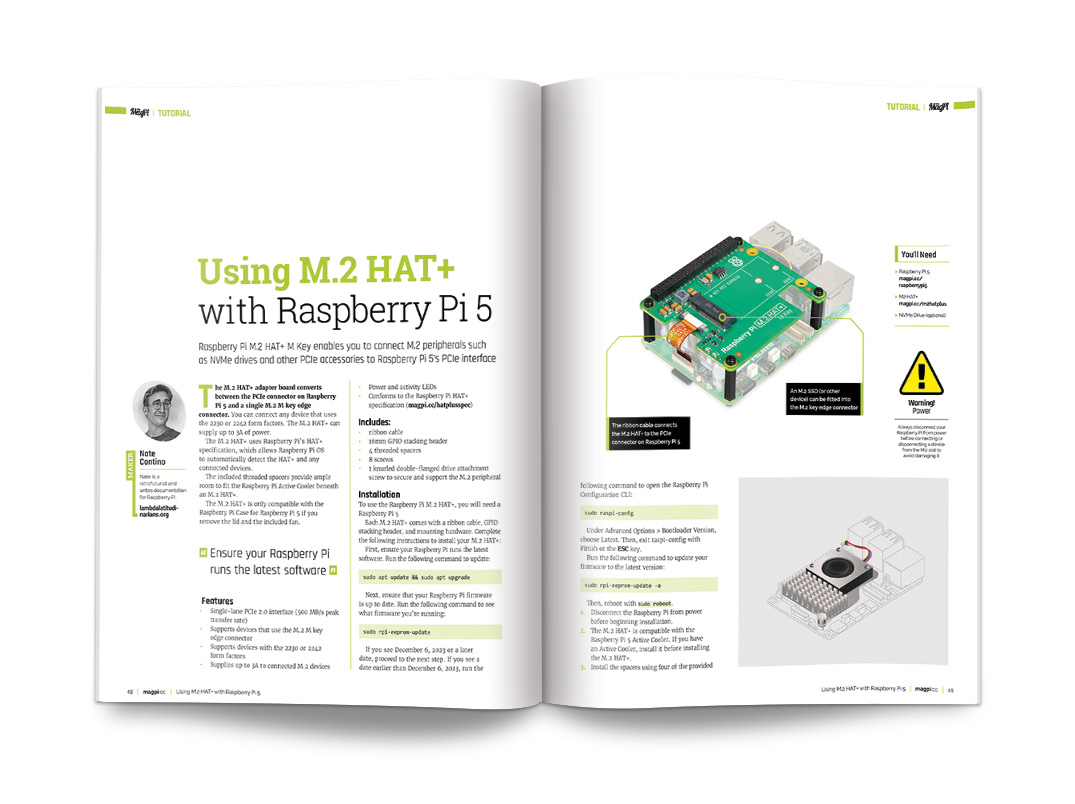
Using M.2 HAT+ with Raspberry Pi
The new M.2 HAT+ enables you to add super-fast SSD storage cards to Raspberry Pi, alongside other devices like the AI accelerator in the AI Kit. This month Nate shows us how to attach M.2 HAT+ to Raspberry Pi and set it up to expend Raspberry Pi 5 using the PCI-express compatible connector.
Raspberry Pi Success Stories
Raspberry Pi has been used as the bedrock for many homespun projects that turned into successful business ideas. It makes us so happy to see Raspberry Pi help people build a successful company from scratch, and some big-name companies have used Raspberry Pi to breathe life into their product range. Our Success Stories feature showcases some of the best business ideas around.
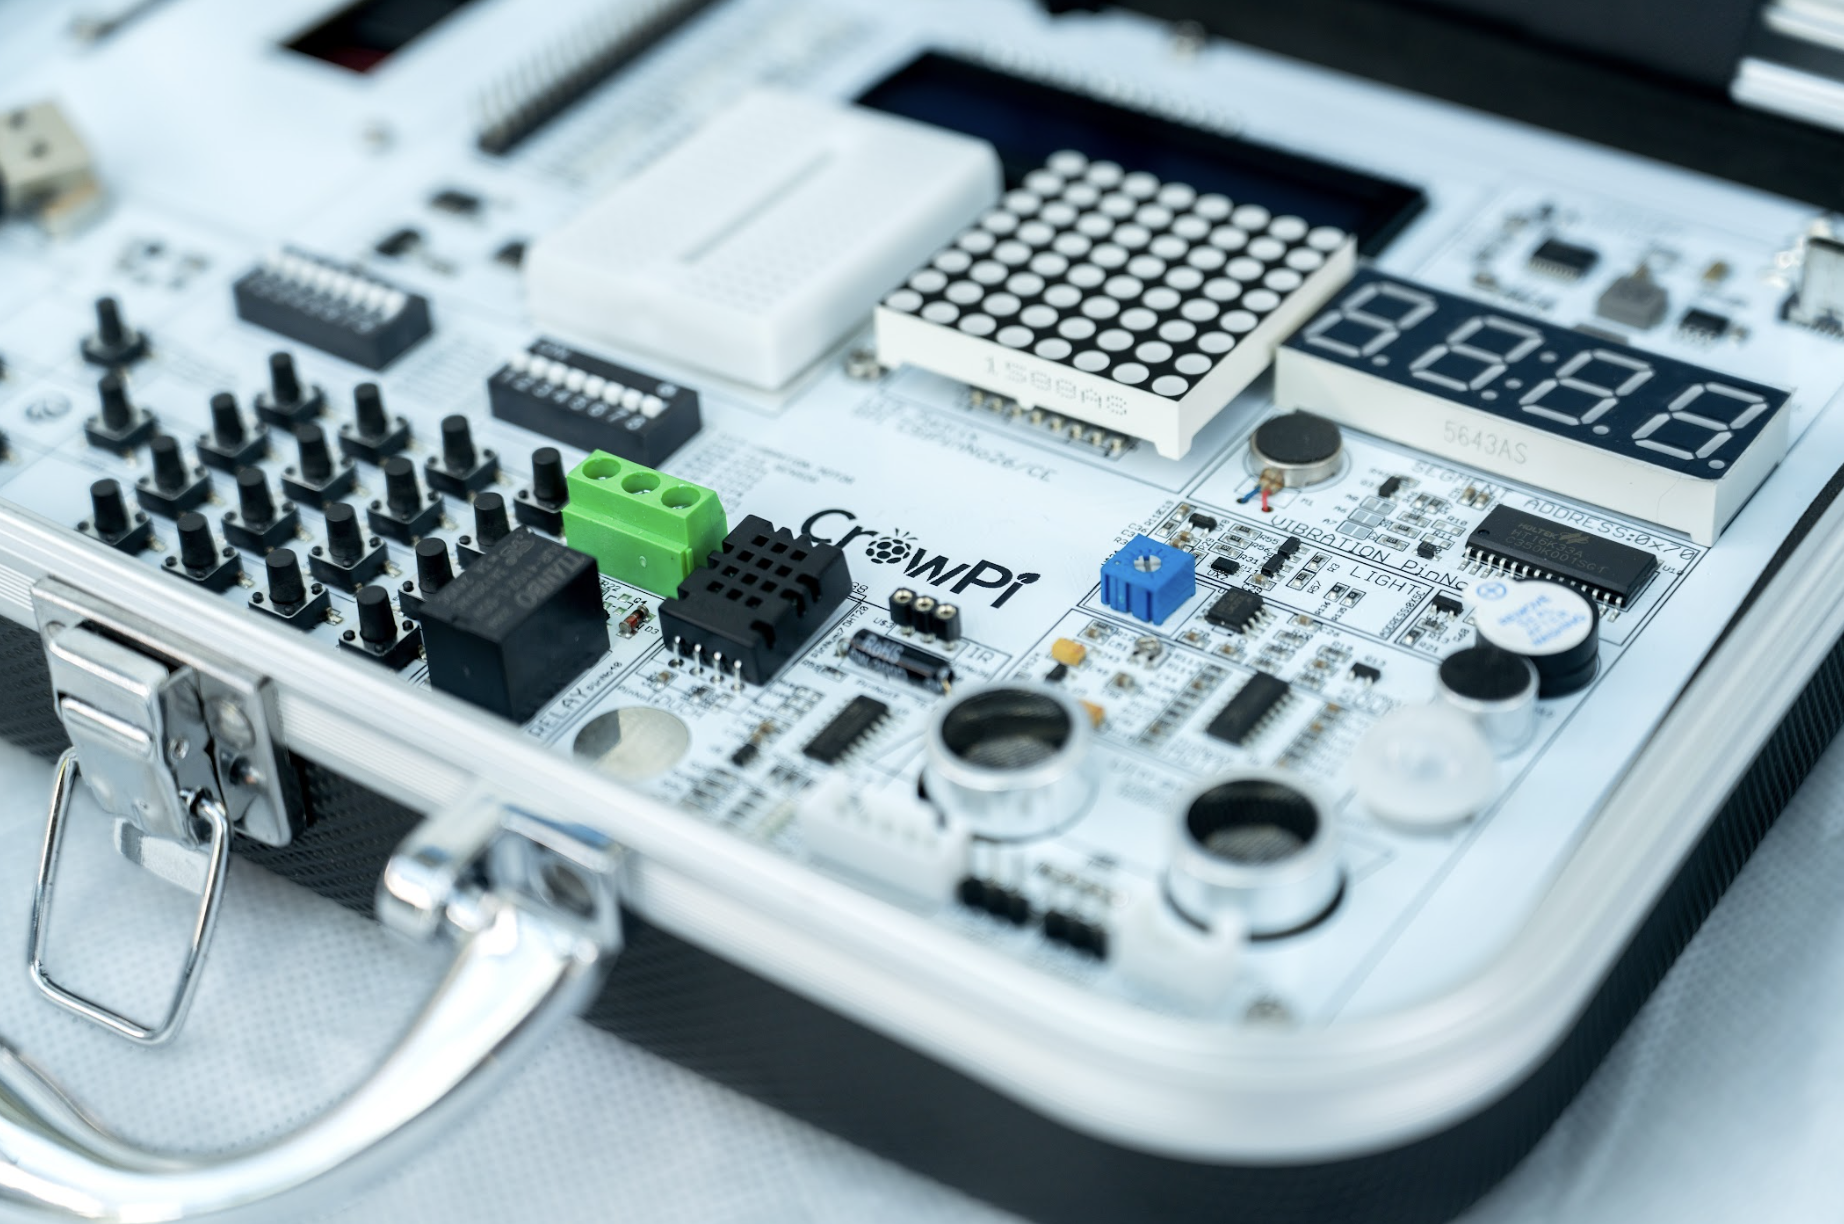
Learn electronics with CrowPi Compact
The CrowPi is a smart electronics kit that now serves up components to Raspberry Pi 5. Experimenting with electronics is an excellent, fun, and rewarding hobby and this kit will help you get started.
Einwilligung verwalten
Um dir ein optimales Erlebnis zu bieten, verwenden wir Technologien wie Cookies, um Geräteinformationen zu speichern und/oder darauf zuzugreifen. Wenn du diesen Technologien zustimmst, können wir Daten wie das Surfverhalten oder eindeutige IDs auf dieser Website verarbeiten. Wenn du deine Einwillligung nicht erteilst oder zurückziehst, können bestimmte Merkmale und Funktionen beeinträchtigt werden.
Funktional
Immer aktiv
Die technische Speicherung oder der Zugang ist unbedingt erforderlich für den rechtmäßigen Zweck, die Nutzung eines bestimmten Dienstes zu ermöglichen, der vom Teilnehmer oder Nutzer ausdrücklich gewünscht wird, oder für den alleinigen Zweck, die Übertragung einer Nachricht über ein elektronisches Kommunikationsnetz durchzuführen.
Vorlieben
Die technische Speicherung oder der Zugriff ist für den rechtmäßigen Zweck der Speicherung von Präferenzen erforderlich, die nicht vom Abonnenten oder Benutzer angefordert wurden.
Statistiken
Die technische Speicherung oder der Zugriff, der ausschließlich zu statistischen Zwecken erfolgt.Die technische Speicherung oder der Zugriff, der ausschließlich zu anonymen statistischen Zwecken verwendet wird. Ohne eine Vorladung, die freiwillige Zustimmung deines Internetdienstanbieters oder zusätzliche Aufzeichnungen von Dritten können die zu diesem Zweck gespeicherten oder abgerufenen Informationen allein in der Regel nicht dazu verwendet werden, dich zu identifizieren.
Marketing
Die technische Speicherung oder der Zugriff ist erforderlich, um Nutzerprofile zu erstellen, um Werbung zu versenden oder um den Nutzer auf einer Website oder über mehrere Websites hinweg zu ähnlichen Marketingzwecken zu verfolgen.