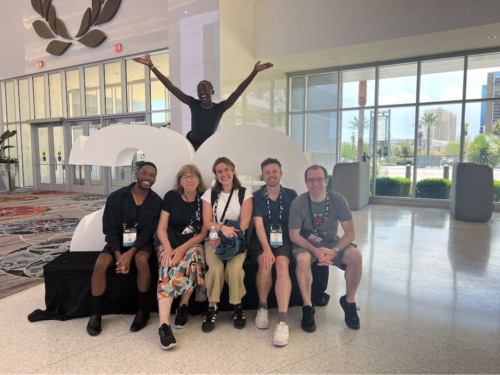
About three weeks ago, a small team from the Raspberry Pi Foundation braved high temperatures and expensive coffees (and a scarcity of tea) to spend time with educators at the CSTA Annual Conference in Las Vegas.
With thousands of attendees from across the US and beyond participating in engaging workshops, thought-provoking talks, and visiting the fantastic expo hall, the CSTA conference was an excellent opportunity for us to connect with and learn from educators.
Meeting educators & sharing resources
Our hope for the conference week was to meet and learn from as many different educators as possible, and we weren’t disappointed. We spoke with a wide variety of teachers, school administrators, and thought leaders about the progress, successes, and challenges of delivering successful computer science (CS) programs in the US (more on this soon). We connected and reconnected with so many educators at our stand, gave away loads of stickers… and we even gave away a Raspberry Pi Pico to one lucky winner each day.
The team with one of the winners of a Raspberry Pi Pico
As well as learning from hundreds of educators throughout the week, we shared some of the ways in which the Foundation supports teachers to deliver effective CS education. Our team was on hand to answer questions about our wide range of free learning materials and programs to support educators and young people alike. We focused on sharing our projects site and all of the ways educators can use the site’s unique projects pathways in their classrooms. And of course we talked to educators about Code Club. It was awesome to hear from club leaders about the work their students accomplished, and many educators were eager to start a new club at their schools!
We gave a copy of the second Big Book to all conference attendees.
Back in 2022 at the last in-person CSTA conference, we had donated a copy of our first special edition of Hello World magazine, The Big Book of Computing Pedagogy, for every attendee. This time around, we donated copies of our follow-up special edition, The Big Book of Computing Content. Where the first Big Book focuses on how to teach computing, the second Big Book delves deep into what we teach as the subject of computing, laying it out in 11 content strands.
Our talks about teaching (with) AI
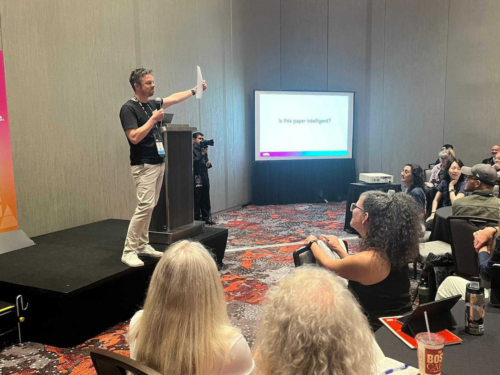
One of the things that makes CSTA conferences so special is the fantastic range of talks, workshops, and other sessions running at and around the conference. We took the opportunity to share some of our work in flash talks and two full-length sessions.
One of the sessions was led by one of our Senior Learning Managers, Ben Garside, who gave a talk to a packed room on what we’ve learned from developing AI education resources for Experience AI. Ben shared insights we’ve gathered over the last two years and talked about the design principles behind the Experience AI resources.
Ben discussed AI education with attendees.
Being in the room for Ben’s talk, I was struck by two key takeaways:
The issue of anthropomorphism, that is, projecting human-like characteristics onto artificial intelligence systems and other machines. This presents several risks and obstacles for young people trying to understand AI technology. In our teaching, we need to take care to avoid anthropomorphizing AI systems, and to help young people shift false conceptions they might bring into the classroom.
Teaching about AI requires fostering a shift in thinking. When we teach traditional programming, we show learners that this is a rules-based, deterministic approach; meanwhile, AI systems based on machine learning are driven by data and statistical patterns. These two approaches and their outcomes are distinct (but often combined), and we need to help learners develop their understanding of the significant differences.
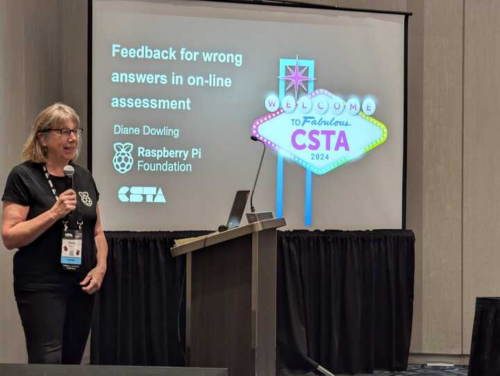
Our second session was led by Diane Dowling, another Senior Learning Manager at the Foundation. She shared some of the development work behind Ada Computer Science, our free platform providing educators and learners with a vast set of questions and content to help understand CS.
Diane presented our trial with using LLM-based automated feedback.
Recently, we’ve been experimenting with the use of a large language model (LLM) on Ada to provide assessment feedback on long-form questions. This led to a great conversation between Diane and the audience about the practicalities, risks, and implications of such feature.
More on what we learned from CSTA coming soon
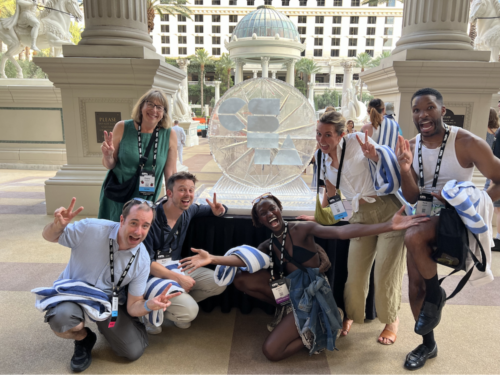
We had a fantastic time with the educators in Vegas and are grateful to CSTA and their sponsors for the opportunity to meet and learn from so many different people. We’ll be sharing some of what we learned from the educators we spoke to in a future blog post, so watch this space.
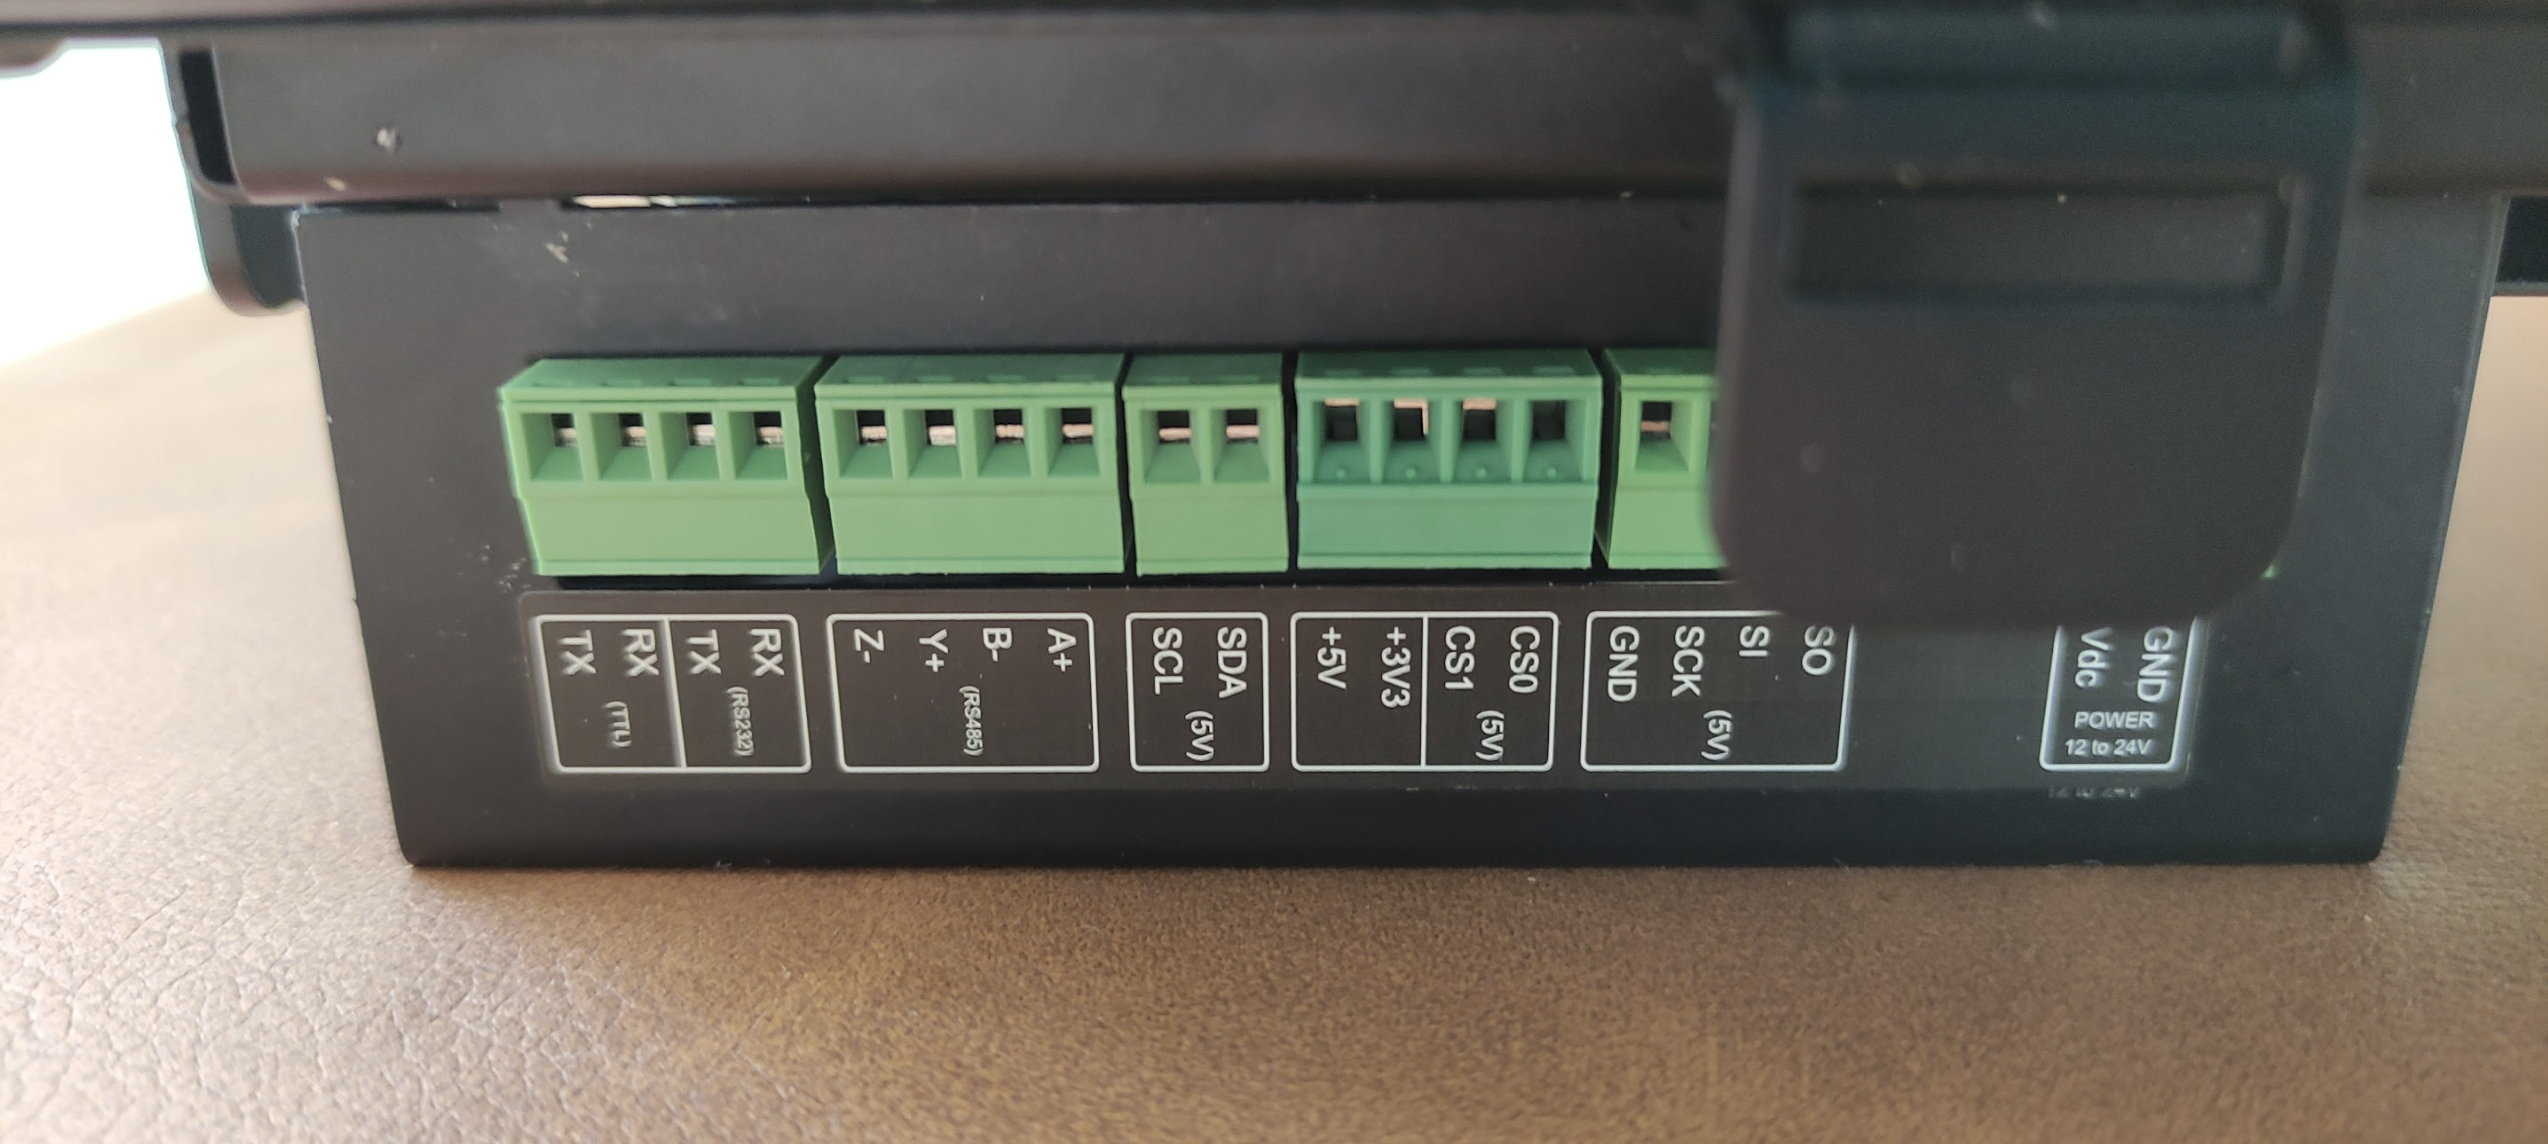
The touchscreen is surrounded by quite a large bezel which forms part of the protective case. With a lot of metal parts, it’s a pretty hefty unit that feels really solid – and heavy, at 1.67kg. Six mount points (two top and bottom, one either side) enable it to be mounted using the supplied brackets and bolts.
By default, the case has an IP (ingress protection) rating of 20, for protection against solid objects up to 12mm, but you can pay a little extra (€25) for IP65, which offers full protection against dust and low-pressure jets of water from all directions. Both versions have a wide operating temperature range of 0°C to 50°C, with humidity of 0% to 90%. The unit also has a shock resistance of 80m/s2 in the X, Y, and Z directions.
Powering it `up
After connecting a 12V (2.5A) or 24V (1.25A) DC power supply to the relevant screw terminals on the right-hand side (make sure the polarity is correct!), the TouchBerry comes to life, booting into Raspberry Pi OS – there’s no physical power button.
The pre-installed edition of Raspberry Pi OS is the older Buster version, although you could always re-flash or replace the microSD card by opening up the back of the case, a procedure which also enables you to move some jumper switches to reconfigure settings such as voltage levels for the I/O. The system runs fine, although we did experience occasional lag when trying to select items on the desktop.
You can connect to a Wi-Fi network from the desktop or command line (although we needed to manually add a network gateway to gain internet access), or plug in an Ethernet cable for a wired connection. The latter can also be used to network the TouchBerry Pi with a dedicated PLC to add extra I/O and exchange data. Naturally, you can install extra Raspberry Pi software in the usual way.
The only visual clue to the presence of Raspberry Pi 4 is provided by a cutouts for the latter’s USB and Ethernet ports, at the base of the unit. So you can plug in a mouse and keyboard if you want. Alternatively, you can install an on-screen keyboard.
Ins and outs
As mentioned, there are two sets of screw terminal connections on either side of the device for I/O. The right-hand side covers all of the main communications protocols: I2C, SPI, RS485 (half or full duplex), and RS232/TTL.
On the left side is the second set of I/Os, which requires an additional power supply to be connected to the 24V COM terminals there. Both the digital and analogue I/Os have self-insulation, so can be connected to power supplies with different voltages than 24V. Two analogue inputs can be used in the default 4–20mA configuration (requiring a 1kΩ resistor) or 0–10V. Three digital inputs and five digital outputs complete the set.
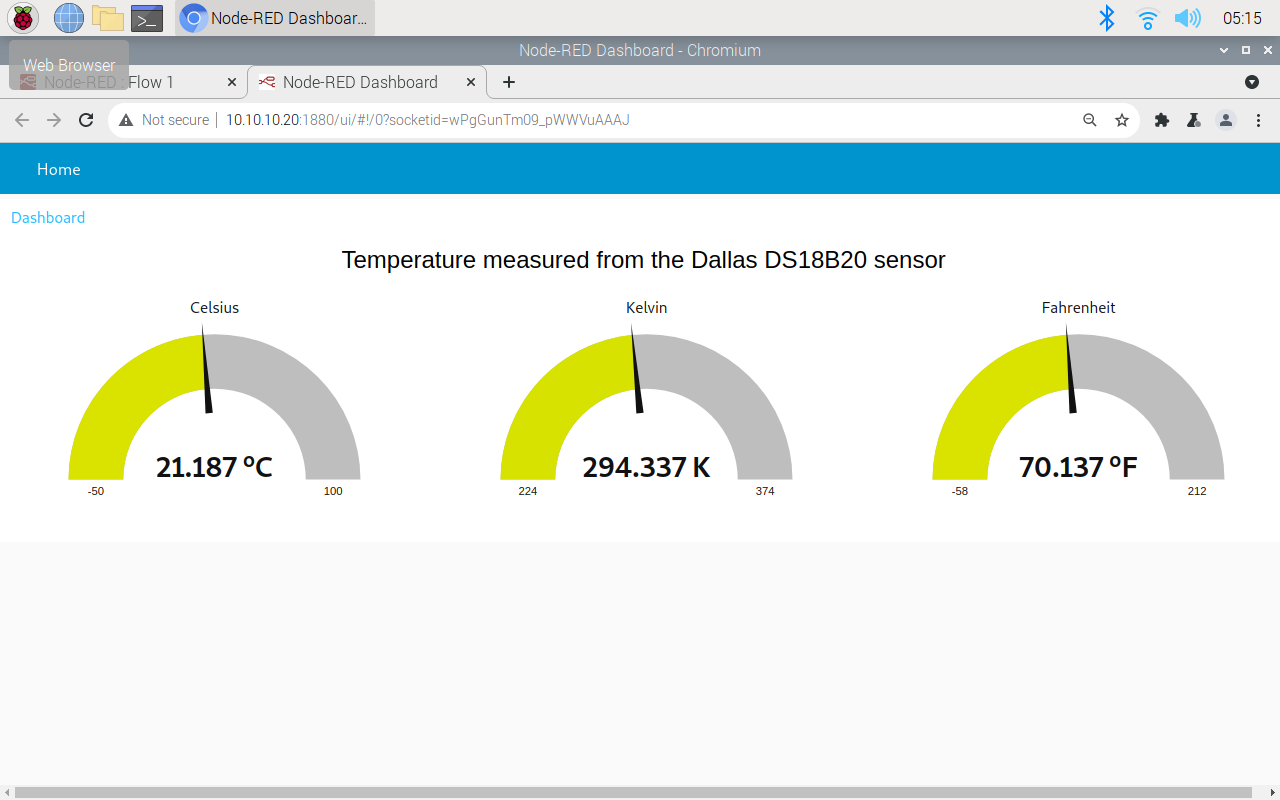
While the total number of I/Os on the TouchBerry Pi is no match for the huge number featured on a dedicated PLC, there should be enough here for many basic applications. We tested it out by connecting a DS18B20 temperature sensor and displaying the data in on-screen gauges using the Node-RED low-code environment, as detailed here. A little configuration is required, but it’s fairly easy to set up and deploy.
Verdict
8/10
A really solid unit with good hazard protection, a decent touchscreen, and enough I/O for simple applications.
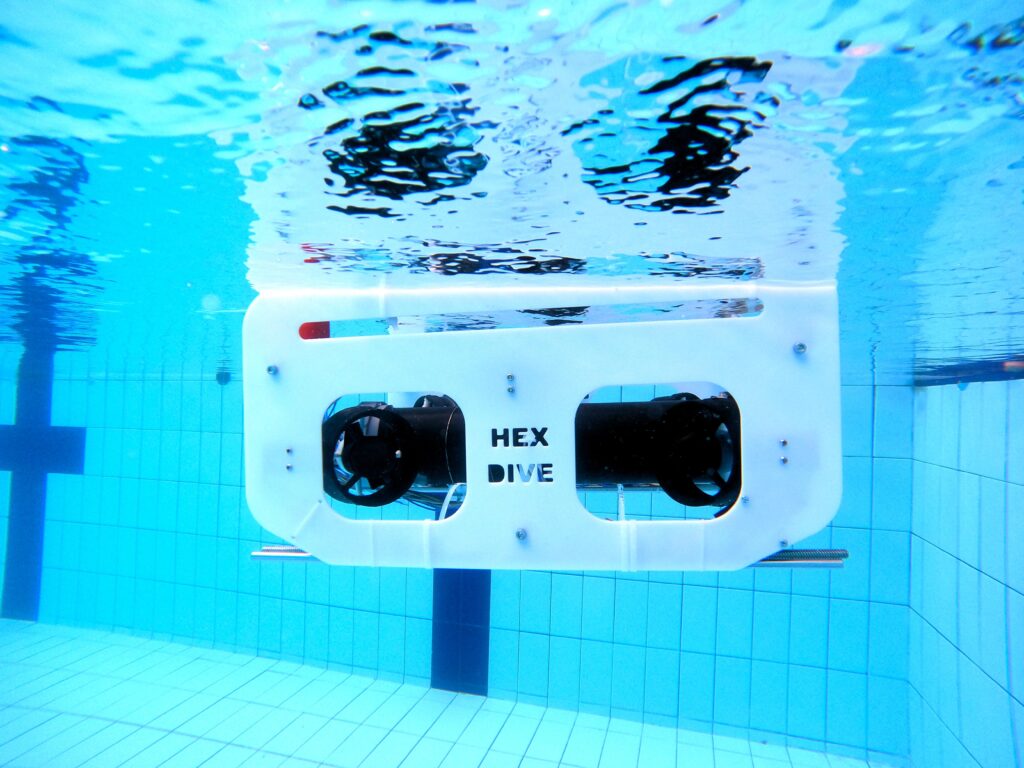
Who doesn’t want to explore underwater? To take a journey beneath the surface of a lake or even the ocean? But a remotely operated vehicle (ROV), which is the kind of robot you’d use for such an adventure, isn’t exactly the kind of thing you’ll find on the shelf at your local Walmart. You can, however, follow this guide from Ranuga Amarasinghe to build your own ROV for some aquatic fun.
Amarasinghe is a 16-year-old Sri Lankan student and this is actually the second iteration of his ROV design. As such, he’s dubbed it “ROV2” and it appears to be quite capable. All of its electronics sit safely within a 450mm length of sealed PVC tube. That mounts onto the aluminum extrusion frame structure that also hosts the six thrusters powered by drone-style brushless DC motors.
ROV2’s brain is an Arduino Mega 2560 board and it drives the BLDC motors through six electronic speed controllers (ESCs). It receives control commands from the surface via an umbilical. The operator holds a Flysky transmitter that sends radio signals to a receiver floating on the water. An Arduino UNO Rev3 reads those and then communicates the motor commands to the Mega through the tethered serial connection. That limits the maximum length of the tether to about 40 meters, which subsequently limits the maximum operating depth.
With the specified lithium battery pack, ROV2 can traverse the depths for 30-45 minutes. And when equipped with the 720p FPV camera, pilots can see and record all of the underwater action.
If you are into tech, keeping up with the latest updates can be tough, particularly when it comes to artificial intelligence (AI) and generative AI (GenAI). Sometimes I admit to feeling this way myself, however, there was one update recently that really caught my attention. OpenAI launched their latest iteration of ChatGPT, this time adding a female-sounding voice. Their launch video demonstrated the model supporting the presenters with a maths problem and giving advice around presentation techniques, sounding friendly and jovial along the way.
Adding a voice to these AI models was perhaps inevitable as big tech companies try to compete for market share in this space, but it got me thinking, why would they add a voice? Why does the model have to flirt with the presenter?
Working in the field of AI, I’ve always seen AI as a really powerful problem-solving tool. But with GenAI, I often wonder what problems the creators are trying to solve and how we can help young people understand the tech.
What problem are we trying to solve with GenAI?
The fact is that I’m really not sure. That’s not to suggest that I think that GenAI hasn’t got its benefits — it does. I’ve seen so many great examples in education alone: teachers using large language models (LLMs) to generate ideas for lessons, to help differentiate work for students with additional needs, to create example answers to exam questions for their students to assess against the mark scheme. Educators are creative people and whilst it is cool to see so many good uses of these tools, I wonder if the developers had solving specific problems in mind while creating them, or did they simply hope that society would find a good use somewhere down the line?
Whilst there are good uses of GenAI, you don’t need to dig very deeply before you start unearthing some major problems.
Anthropomorphism
Anthropomorphism relates to assigning human characteristics to things that aren’t human. This is something that we all do, all of the time, without it having consequences. The problem with doing this with GenAI is that, unlike an inanimate object you’ve named (I call my vacuum cleaner Henry, for example), chatbots are designed to be human-like in their responses, so it’s easy for people to forget they’re not speaking to a human.
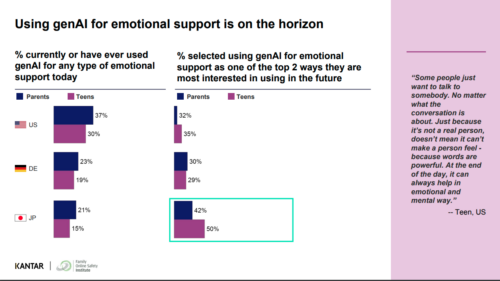
As feared, since my last blog post on the topic, evidence has started to emerge that some young people are showing a desire to befriend these chatbots, going to them for advice and emotional support. It’s easy to see why. Here is an extract from an exchange between the presenters at the ChatGPT-4o launch and the model:
ChatGPT (presented with a live image of the presenter): “It looks like you’re feeling pretty happy and cheerful with a big smile and even maybe a touch of excitement. Whatever is going on? It seems like you’re in a great mood. Care to share the source of those good vibes?” Presenter: “The reason I’m in a good mood is we are doing a presentation showcasing how useful and amazing you are.” ChatGPT: “Oh stop it, you’re making me blush.”
“Some people just want to talk to somebody. Just because it’s not a real person, doesn’t mean it can’t make a person feel — because words are powerful. At the end of the day, it can always help in an emotional and mental way.”
The prospect of teenagers seeking solace and emotional support from a generative AI tool is a concerning development. While these AI tools can mimic human-like conversations, their outputs are based on patterns and data, not genuine empathy or understanding. The ultimate concern is that this exposes vulnerable young people to be manipulated in ways we can’t predict. Relying on AI for emotional support could lead to a sense of isolation and detachment, hindering the development of healthy coping mechanisms and interpersonal relationships.
Arguably worse is the recent news of the world’s first AI beauty pageant. The very thought of this probably elicits some kind of emotional response depending on your view of beauty pageants. There are valid concerns around misogyny and reinforcing misguided views on body norms, but it’s also important to note that the winner of “Miss AI” is being described as a lifestyle influencer. The questions we should be asking are, who are the creators trying to have influence over? What influence are they trying to gain that they couldn’t get before they created a virtual woman?
DeepFake tools
Another use of GenAI is the ability to create DeepFakes. If you’ve watched the most recent Indiana Jones movie, you’ll have seen the technology in play, making Harrison Ford appear as a younger version of himself. This is not in itself a bad use of GenAI technology, but the application of DeepFake technology can easily become problematic. For example, recently a teacher was arrested for creating a DeepFake audio clip of the school principal making racist remarks. The recording went viral before anyone realised that AI had been used to generate the audio clip.
Easy-to-use DeepFake tools are freely available and, as with many tools, they can be used inappropriately to cause damage or even break the law. One such instance is the rise in using the technology for pornography. This is particularly dangerous for young women, who are the more likely victims, and can cause severe and long-lasting emotional distress and harm to the individuals depicted, as well as reinforce harmful stereotypes and the objectification of women.
Why we should focus on using AI as a problem-solving tool
Technological developments causing unforeseen negative consequences is nothing new. A lot of our job as educators is about helping young people navigate the changing world and preparing them for their futures and education has an essential role in helping people understand AI technologies to avoid the dangers.
Our approach at the Raspberry Pi Foundation is not to focus purely on the threats and dangers, but to teach young people to be critical users of technologies and not passive consumers. Having an understanding of how these technologies work goes a long way towards achieving sufficient AI literacy skills to make informed choices and this is where our Experience AI program comes in.
Experience AI is a set of lessons developed in collaboration with Google DeepMind and, before we wrote any lessons, our team thought long and hard about what we believe are the important principles that should underpin teaching and learning about artificial intelligence. One such principle is taking a problem-first approach and emphasising that computers are tools that help us solve problems. In the Experience AI fundamentals unit, we teach students to think about the problem they want to solve before thinking about whether or not AI is the appropriate tool to use to solve it.
Taking a problem-first approach doesn’t by default avoid an AI system causing harm — there’s still the chance it will increase bias and societal inequities — but it does focus the development on the end user and the data needed to train the models. I worry that focusing on market share and opportunity rather than the problem to be solved is more likely to lead to harm.
Another set of principles that underpins our resources is teaching about fairness, accountability, transparency, privacy, and security (Fairness, Accountability, Transparency, and Ethics (FATE) in Artificial Intelligence (AI) and higher education, Understanding Artificial Intelligence Ethics and Safety) in relation to the development of AI systems. These principles are aimed at making sure that creators of AI models develop models ethically and responsibly. The principles also apply to consumers, as we need to get to a place in society where we expect these principles to be adhered to and consumer power means that any models that don’t, simply won’t succeed.
Furthermore, once students have created their models in the Experience AI fundamentals unit, we teach them about model cards, an approach that promotes transparency about their models. Much like how nutritional information on food labels allows the consumer to make an informed choice about whether or not to buy the food, model cards give information about an AI model such as the purpose of the model, its accuracy, and known limitations such as what bias might be in the data. Students write their own model cards based on the AI solutions they have created.
What else can we do?
At the Raspberry Pi Foundation, we have set up an AI literacy team with the aim to embed principles around AI safety, security, and responsibility into our resources and align them with the Foundations’ mission to help young people to:
Be critical consumers of AI technology
Understand the limitations of AI
Expect fairness, accountability, transparency, privacy, and security and work toward reducing inequities caused by technology
See AI as a problem-solving tool that can augment human capabilities, but not replace or narrow their futures
Our call to action to educators, carers, and parents is to have conversations with your young people about GenAI. Get to know their opinions on GenAI and how they view its role in their lives, and help them to become critical thinkers when interacting with technology.
Shortly after attending a recent tinyML workshop in Sao Paolo, Brazil, Joao Vitor Freitas da Costa was looking for a way to incorporate some of the technologies and techniques he learned into a useful project. Given that he lives in an area which experiences elevated levels of pickpocketing and automotive theft, he turned his attention to a smart car security system.
His solution to a potential break-in or theft of keys revolves around the incorporation of an Arduino Nicla Vision board running a facial recognition model that only allows the vehicle to start if the owner is sitting in the driver’s seat. The beginning of the image detection/processing loop involves grabbing the next image from the board’s camera and sending it to a classification model where it receives one of three labels: none, unknown, or Joao, the driver. Once the driver has been detected for 10 consecutive seconds, the Nicla Vision activates a relay in order to complete the car’s 12V battery circuit, at which point the vehicle can be started normally with the ignition.
Through this project, da Costa was able to explore a practical application of vision models at-the-edge to make his friend’s car safer to use. To see how it works in more detail, you can check out the video below and delve into the tinyML workshop he attended here.
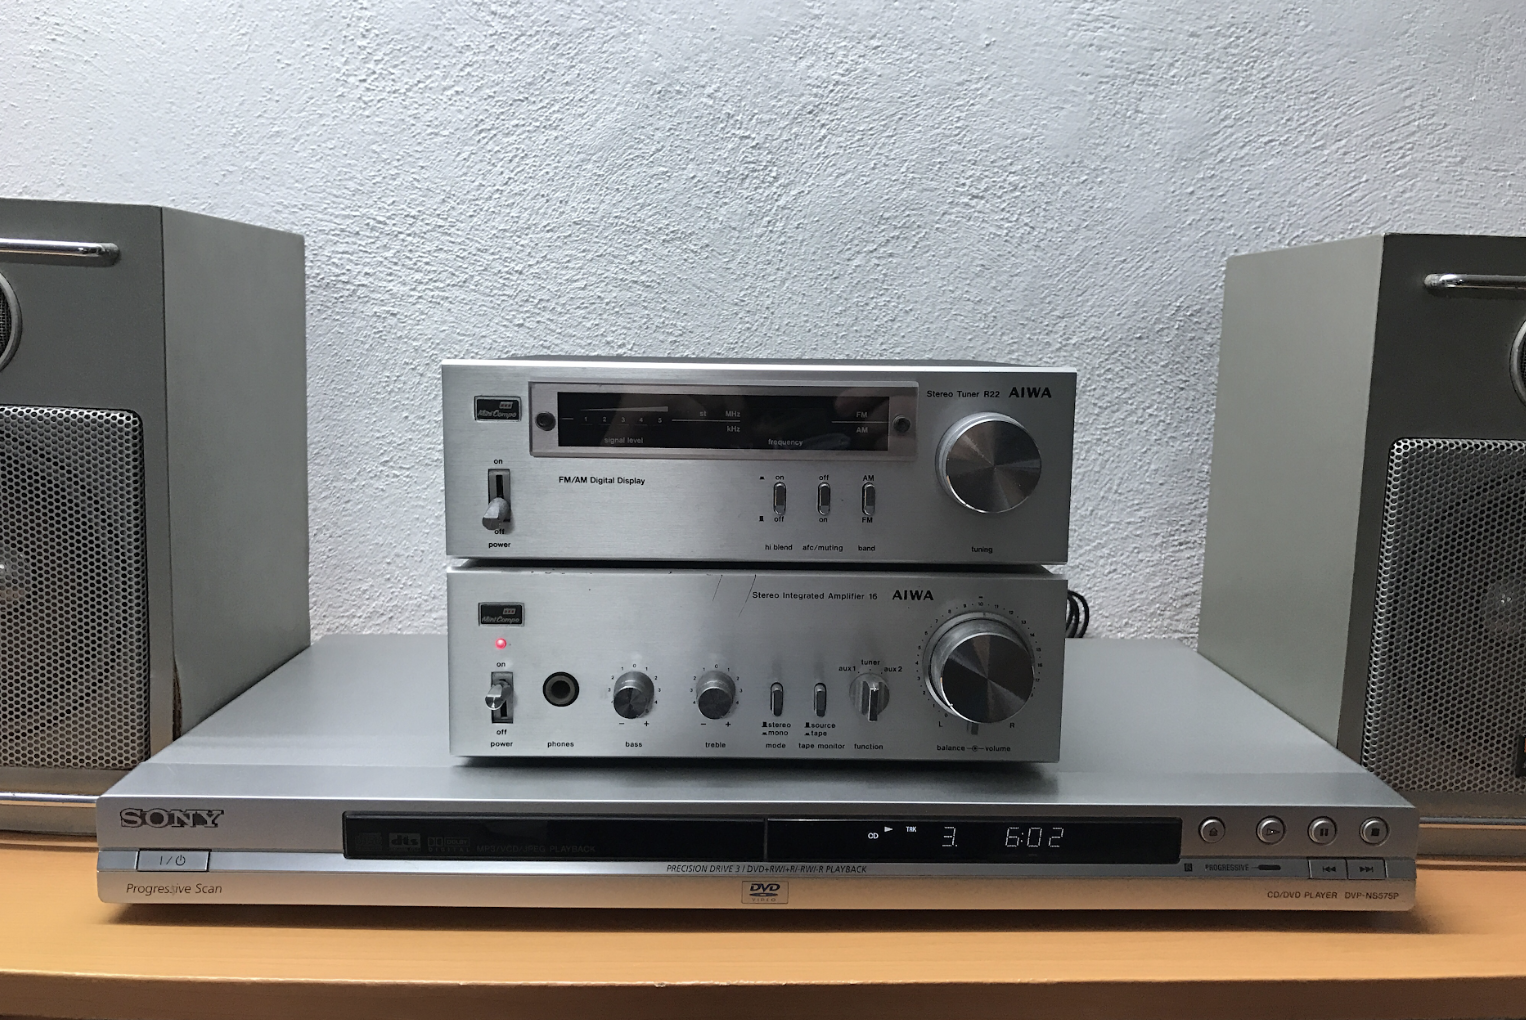
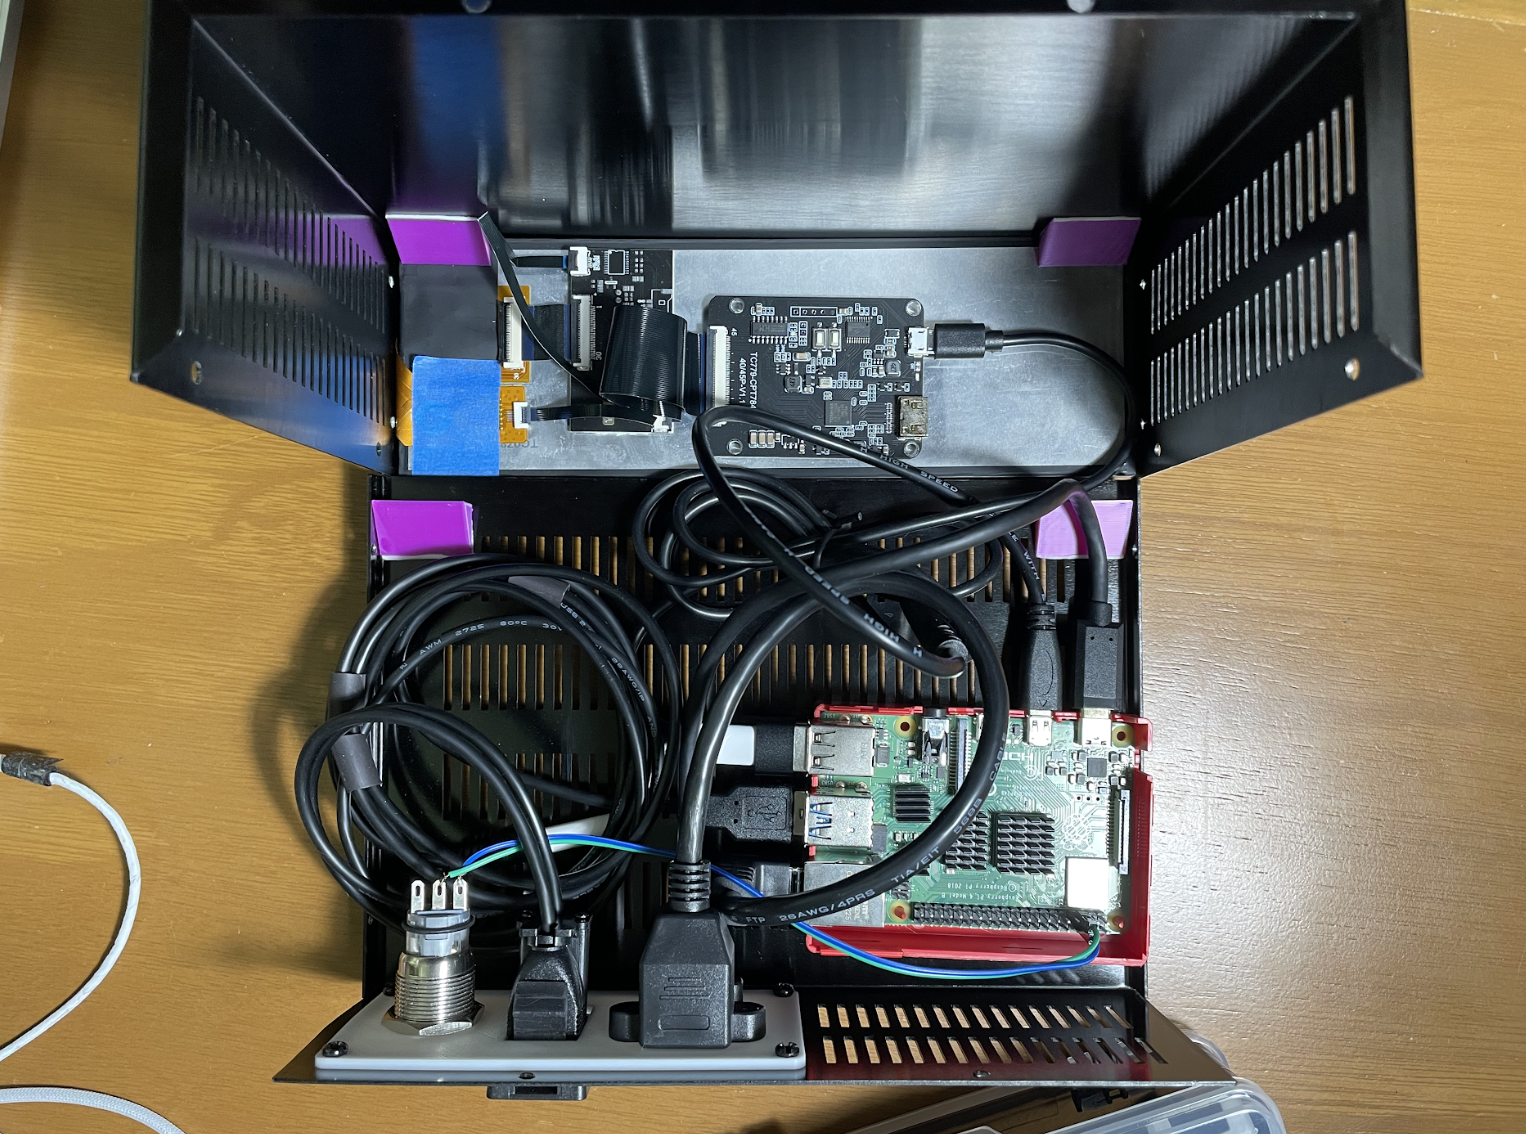
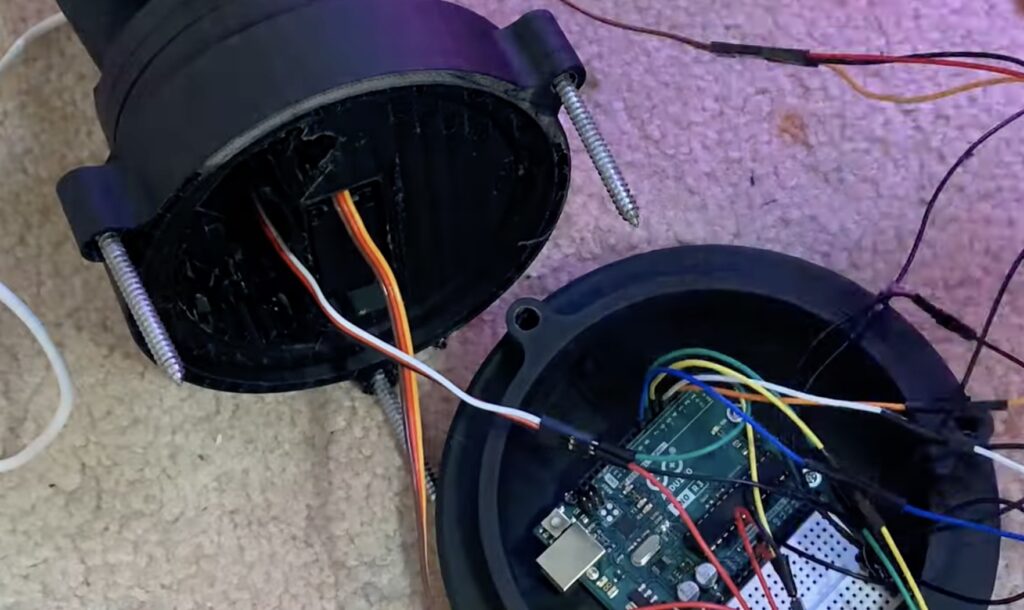
For his project, Rodrigo wanted to bring Winamp’s early days back to life in a more physical form so he decided to produce a music player that could easily be part of a hi-fi mini system. Specifically, he took inspiration from a Aiwa mini setup from around 1983, figuring he could create a case and have all of the functions available on a front touchscreen display.
One thing he noticed was the simplicity of design of the old devices. “Old electronics, especially audio devices, managed to look high-tech and yet elegant,” he explains. “They managed to fit in well with people’s home décor while using relatively simple construction techniques such as sheet metal or wood. I thought that, with all the new manufacturing services we have now, It wouldn’t be too hard to replicate some of the construction techniques of my old Aiwa system, so I set out to learn how to design sheet metal parts, which was in itself a fun exercise to do.”
Physical
Rodrigo based his build around a Raspberry Pi 4B with a 32GB microSD card. “I decided to use the Raspberry Pi because of the software support and extensive documentation and online resources,” he said. “In the past, I’ve completed projects with other single board computers and I’ve always found small details that made their usage much more complex, for example, limited documentation on how to do lower level things like interfacing with special displays, controlling the boot process, or even just supporting recent Linux kernels.
“Since this was a hobby project, I didn’t want to spend too much time figuring out those details on other SBCs. Also I chose Raspberry Pi 4 because it was the latest model at the time I started the project. Raspberry Pi 5 was announced after I’d begun and I figured I didn’t really need that device’s performance anyway.”
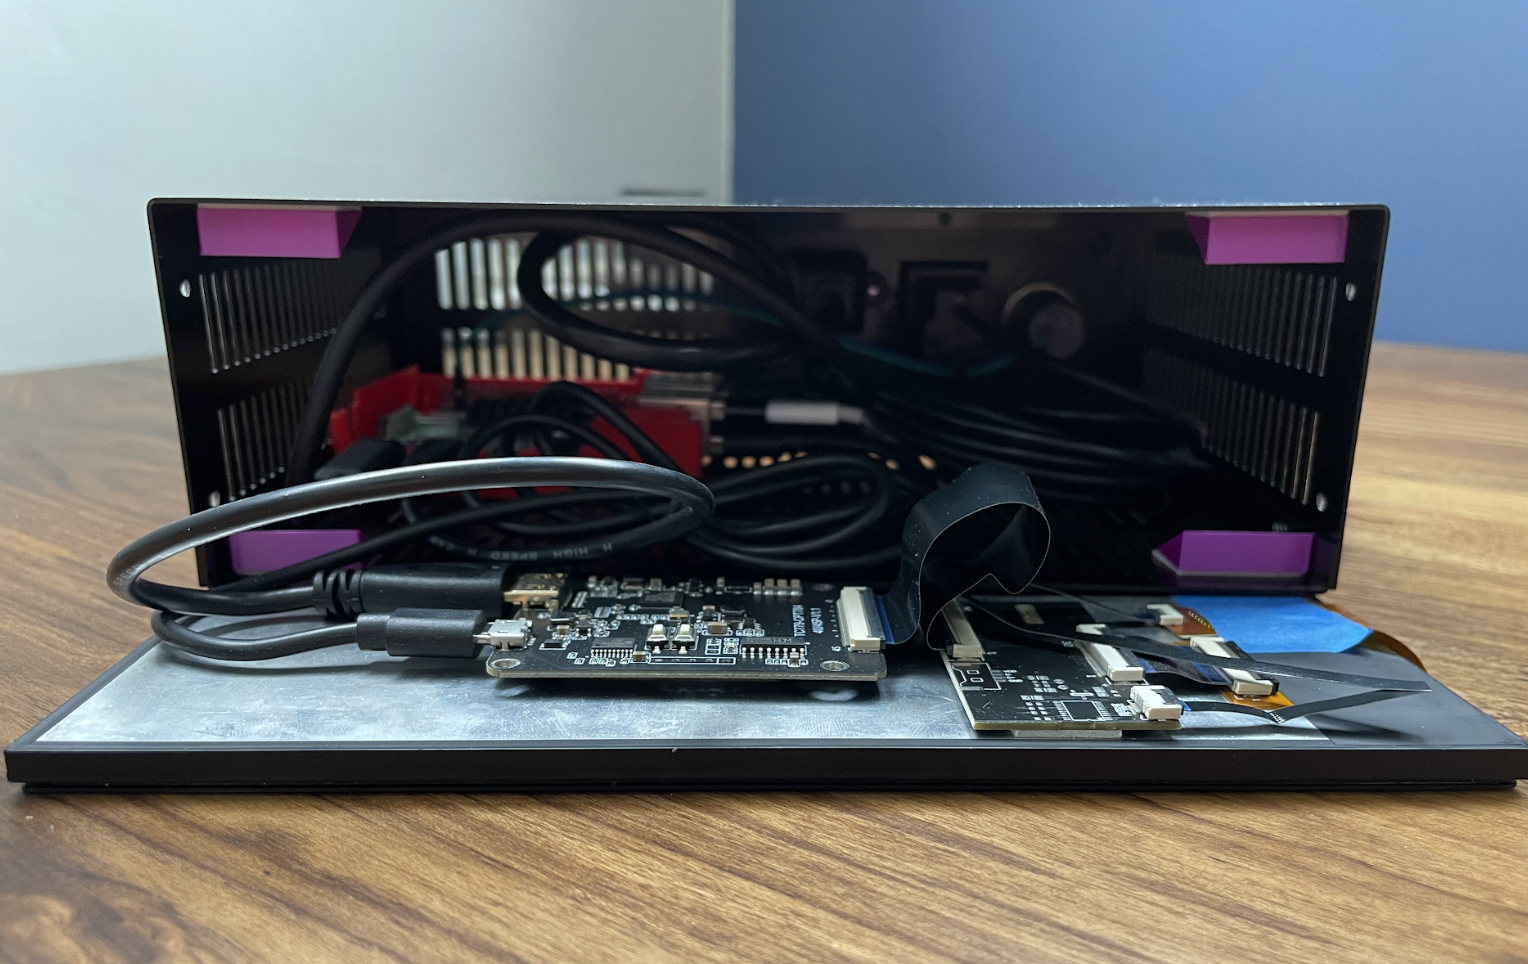
At first, Rodrigo toyed with the idea of making the front face physical. “I wanted to add real-life buttons using a 3D printer and I was going to design a custom PCB for the interface,” he says. But he couldn’t find screens with the correct size and dimensions for the spectrum analyser and song information displays that needed to be included to remain faithful to Winamp without making the build too complex.
“Making it physical would have made it less flexible as well,” he adds. For example, I would not be able to have the playlist view in the same display, which would make the device bigger and clunkier so I decided to go with a touchscreen.” This, he figured, would stretch across the entire front of the device and include all of the buttons as part of the UI. He reckoned his background as a software engineer meant this would prove to be relatively straightforward.
A little more love
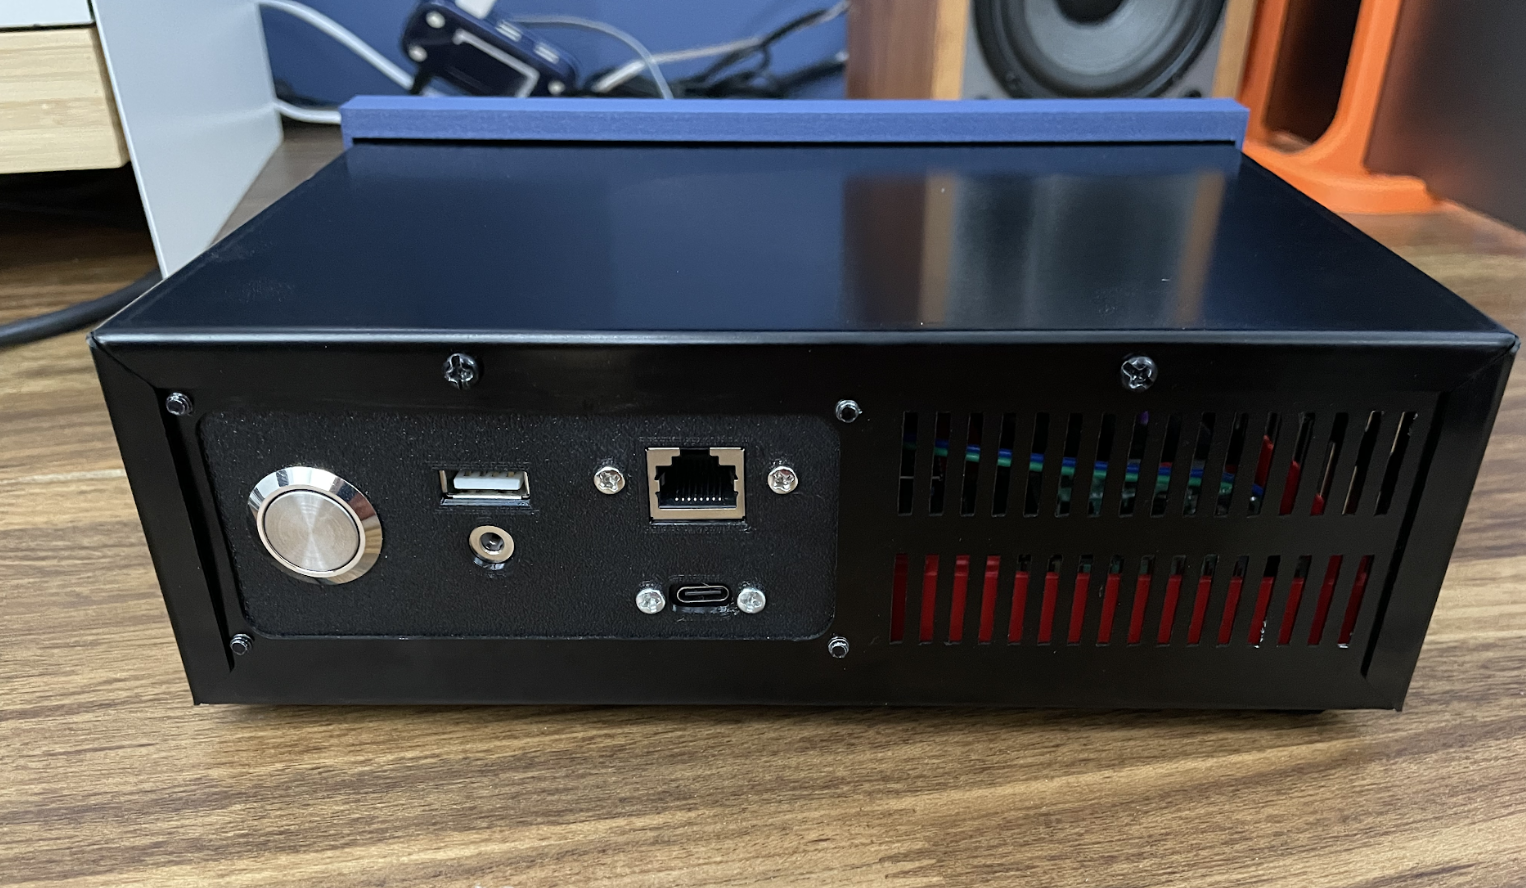
Rodrigo opted for a 7.9-inch extra-wide screen and he created the case using sheet metal, sending his Onshape designs to PCBWay so they could be produced using 1mm anodised aluminium. He’d closely analysed his Aiwa system so he could figure the correct dimensions and overall look and, for convenience, he placed a power button, Ethernet port, USB-A and USB-ports and 3.5mm stereo jack at the back.
The majority of his time was spent on the software, however. He created a custom Qt 6 app which he wrote in C++. “Replicating the layout itself wasn’t that hard, it was just a matter of getting rough dimensions at first and drafting the UI in Qt Creator using the graphical Qt Widget designer interface, and then fine tuning dimensions by comparing screenshots in GIMP,” he explains. “The complex part was replicating the spectrum analyser and getting the raw audio data to feed it. I did a lot of research and looked into other open-source projects’ code to get ideas and code to base my solution on.”
It’s proven to be a very vivid, eye-catching solution and it doesn’t feel as if any compromises have been made. Above all, it has the intended nostalgic flavour thanks in the main to the spectrum analyser and the way the name of the song and artist scroll across the top. It also retains the intuitive UI in full, so songs can be selected and played in no time. “Linamp supports playing music CDs from a CD/DVD drive connected via USB as well, but you need to use a powered USB hub in order for the drive to work, otherwise Raspberry Pi may not have enough power for the external drive,” Rodrigo adds.
Yet despite being feature packed, Rodrigo wants more. He’s also been overwhelmed by the positive reaction from people who have seen the project and he is working on adding Spotify playback and Bluetooth. “It had an amazing response,” Rodrigo says. “I never imagined it would have been that popular, especially on YouTube, where I uploaded a quick video of how the UI works as an afterthought.” With more than 100,000 views, we don’t think we’ve heard the last of this project.
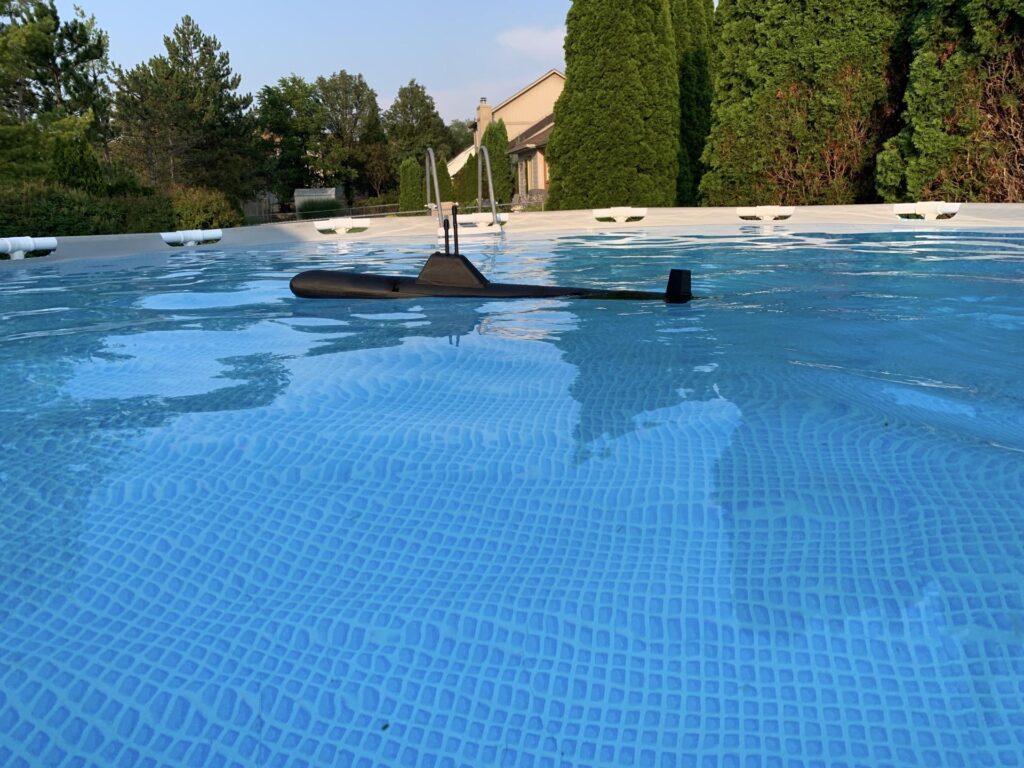
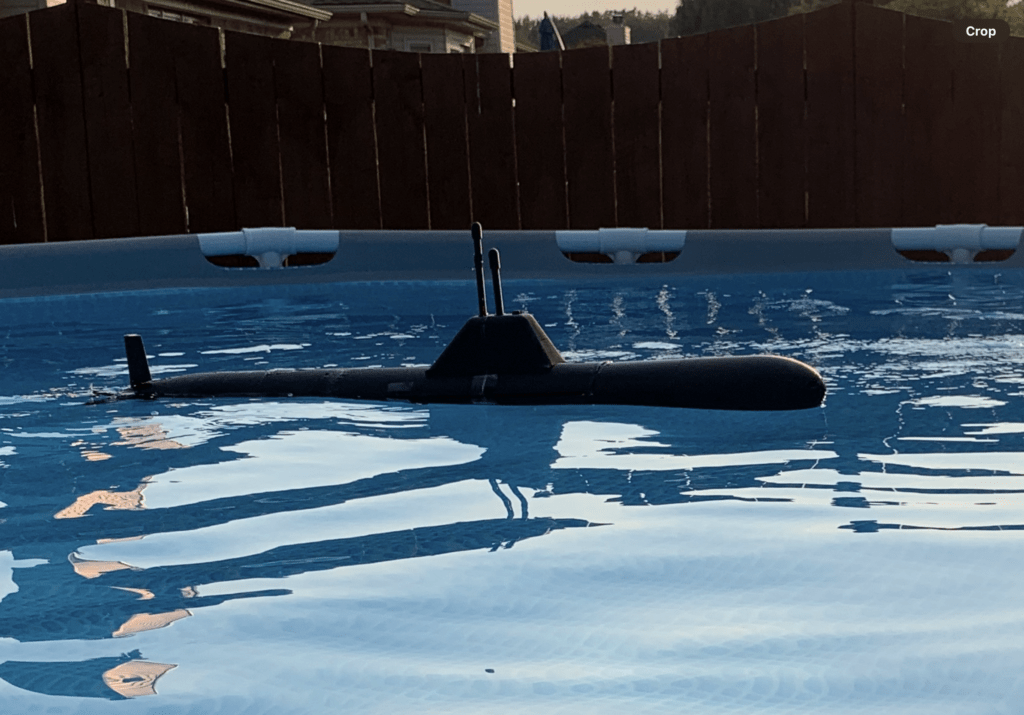
There is something inherently intriguing about submarines that doesn’t seem to apply to other vehicles. Maybe that reflects our natural fears and phobias, or maybe it is a result of our curiosity about the mysterious depths. Maybe it is simply that most of us will never get the chance to ride in a submarine. But you can get some of the experience with a model, like 15-year-old Ben Kennedy did with this DIY RC submarine.
This is a remote-controlled submarine built entirely from scratch and it is very impressive. It is a 500mm-long vessel loosely modeled after the Soviet (and now Russian) Akula-class submarine. But the resemblance is entirely superficial, as the Kennedy’s design is 100% original.
The hull and most of the rest of the parts were modeled in Autodesk Fusion 360 and then 3D-printed. An Arduino Nano board receives radio signals from a Flysky FS-i6X transmitter controller via a Flysky iA10B receiver. The Arduino then controls the various systems that allow the submarine to move through the water.
Four small aquarium pumps move water in and out of the ballast tanks to control buoyancy. A single brushless DC motor, which is naturally waterproof, provides thrust. Two waterproof MG995 servo motors actuate the rudders for yaw and pitch, which are necessary for diving/surfacing and steering. Most of the hull isn’t watertight, so Kennedy placed a waterproof plastic bag inside the hull to protect the Arduino and the lithium battery that provides power.
Kennedy tested the sub in his family’s backyard pool and it seems to have performed nicely. He posted his design files and code, so anyone can build their own RC submarine.
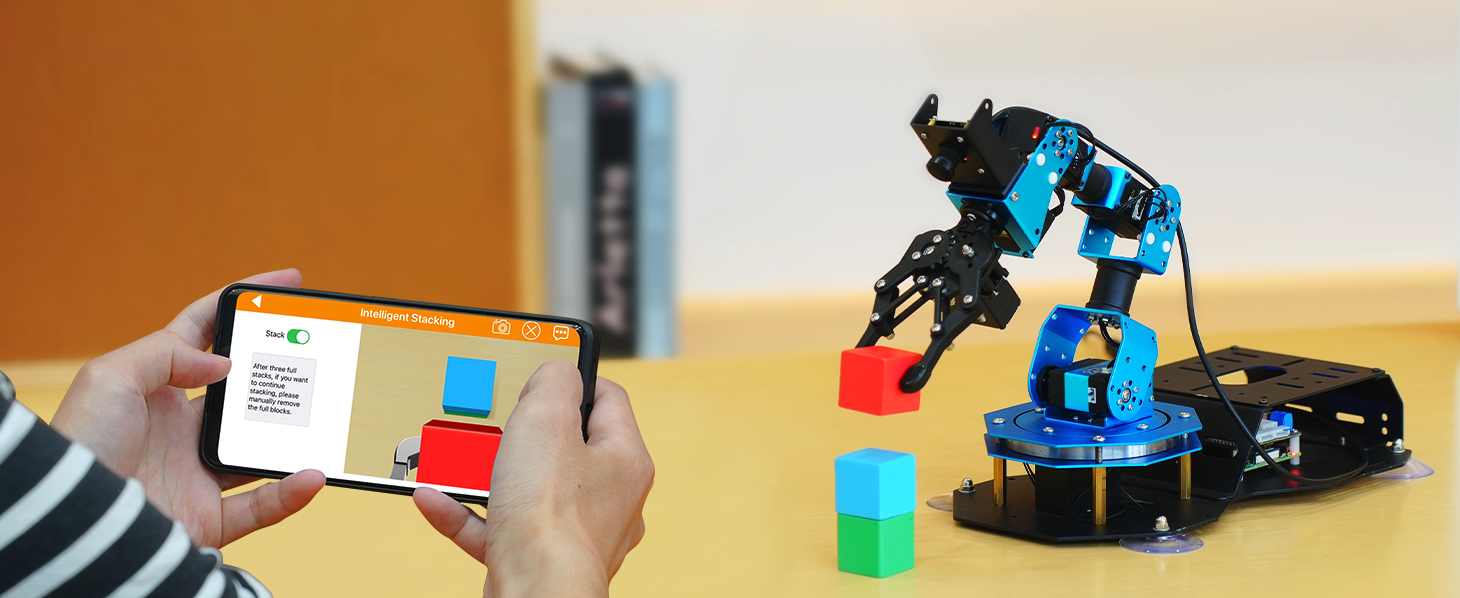
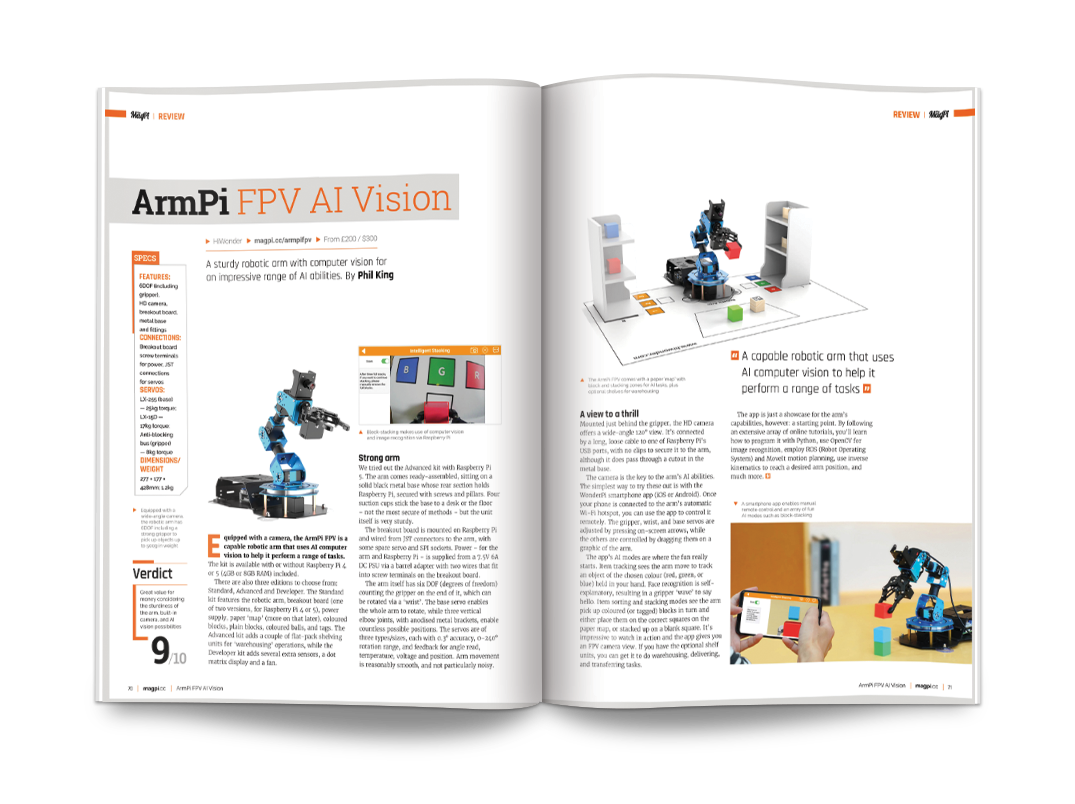
We tried out the Advanced kit with Raspberry Pi 5. The arm comes ready-assembled, sitting on a solid black metal base whose rear section holds Raspberry Pi, secured with screws and pillars. Four suction cups stick the base to a desk or the floor – not the most secure of methods – but the unit itself is very sturdy.
The breakout board is mounted on Raspberry Pi and wired from JST connectors to the arm, with some spare servo and SPI sockets. Power – for the arm and Raspberry Pi – is supplied from a 7.5V 6A DC PSU via a barrel adapter with two wires that fit into screw terminals on the breakout board.
The arm itself has six DOF (degrees of freedom) counting the gripper on the end of it, which can be rotated via a ‘wrist’. The base servo enables the whole arm to rotate, while three vertical elbow joints, with anodised metal brackets, enable countless possible positions. The servos are of three types/sizes, each with 0.3° accuracy, 0–240° rotation range, and feedback for angle read, temperature, voltage and position. Arm movement is reasonably smooth, and not particularly noisy.
A view to a thrill
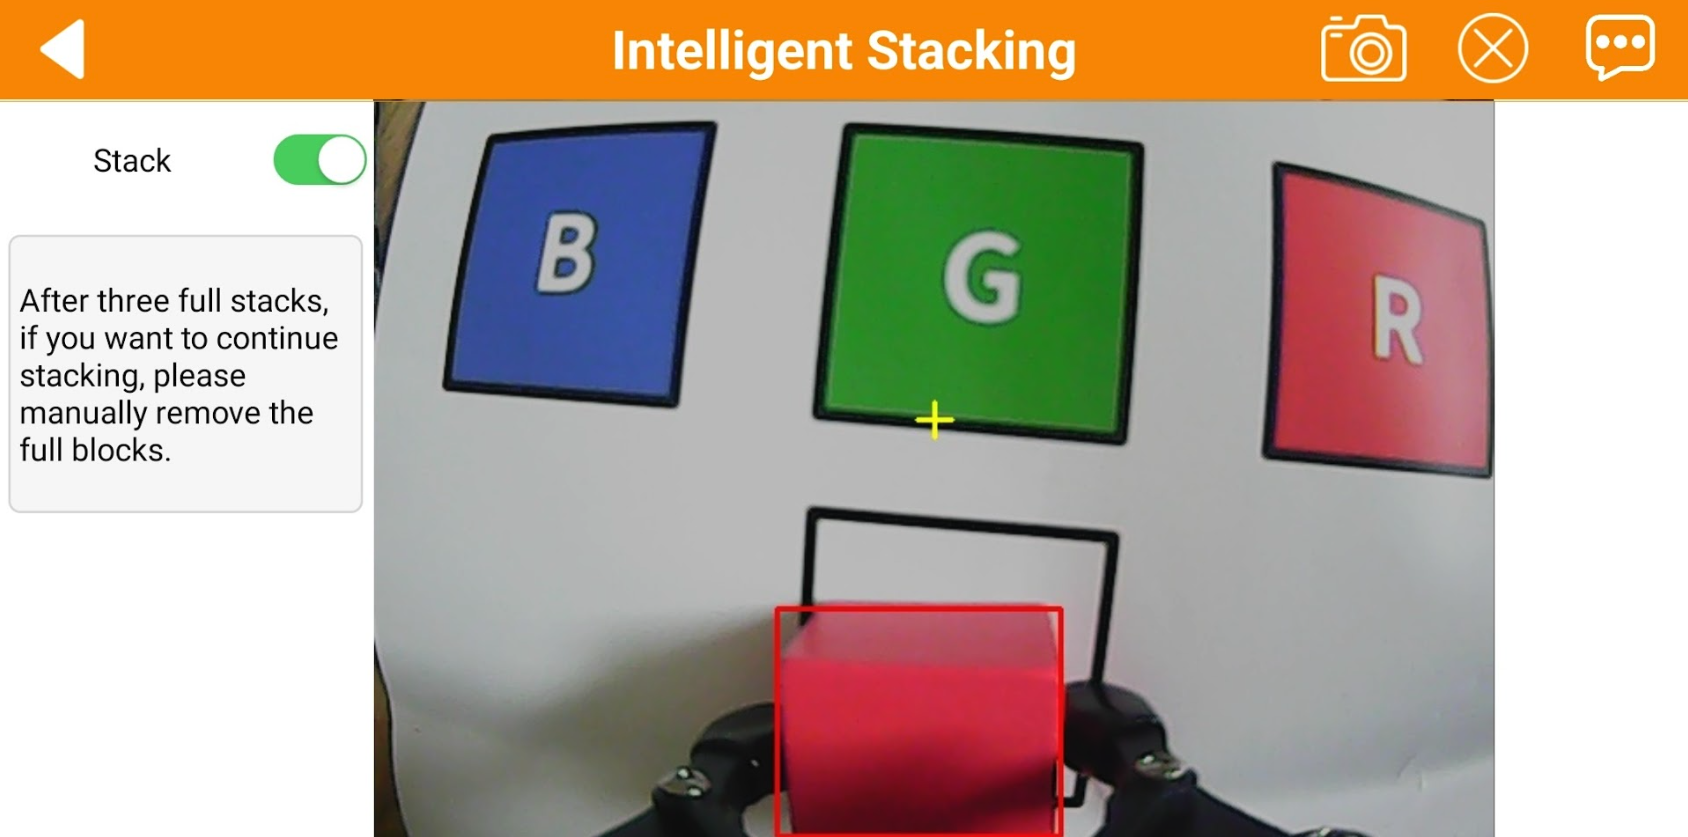
Mounted just behind the gripper, the HD camera offers a wide-angle 120° view. It’s connected by a long, loose cable to one of Raspberry Pi’s USB ports, with no clips to secure it to the arm, although it does pass through a cutout in the metal base.
The camera is the key to the arm’s AI abilities. The simplest way to try these out is with the WonderPi smartphone app (iOS or Android). Once your phone is connected to the arm’s automatic Wi-Fi hotspot, you can use the app to control it remotely. The gripper, wrist, and base servos are adjusted by pressing on-screen arrows, while the others are controlled by dragging them on a graphic of the arm.
The app’s AI modes are where the fun really starts. Item tracking sees the arm move to track an object of the chosen colour (red, green, or blue) held in your hand. Face recognition is self-explanatory, resulting in a gripper ‘wave’ to say hello. Item sorting and stacking modes see the arm pick up coloured (or tagged) blocks in turn and either place them on the correct squares on the paper map, or stacked up on a blank square. It’s impressive to watch in action and the app gives you an FPV camera view. If you have the optional shelf units, you can get it to do warehousing, delivering, and transferring tasks.
The app is just a showcase for the arm’s capabilities, however: a starting point. By following an extensive array of online tutorials, you’ll learn how to program it with Python, use OpenCV for image recognition, employ ROS (Robot Operating System) and MoveIt motion planning, use inverse kinematics to reach a desired arm position, and much more.
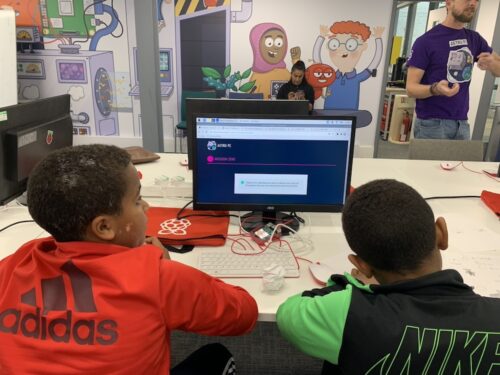
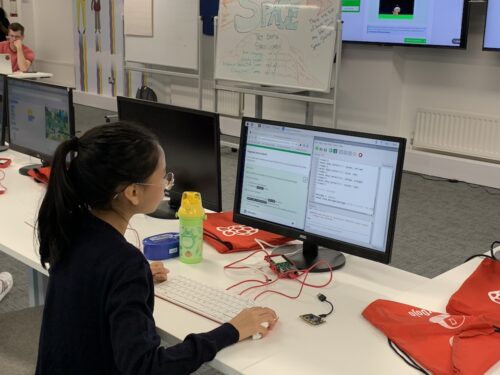
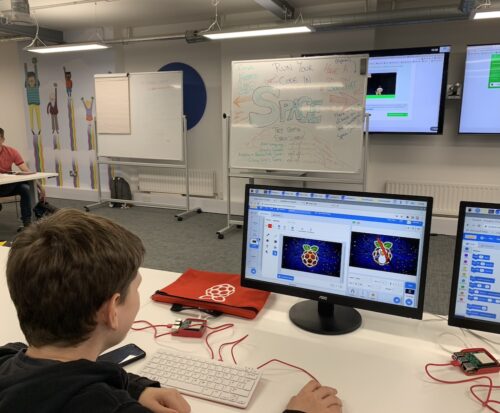
Over the past few months, young people across Europe have run their computer programs on the International Space Station (ISS) as part of Astro Pi Mission Zero and Mission Space Lab.
Mission Zero code deployment | Credits: ESA/NASA
Mission Zero offers young people the chance to write a simple program that takes a reading from the colour and luminosity sensor on an Astro Pi computer on board the ISS, and uses it to set the background colour in a personalised image for the astronauts to see as they go about their daily tasks. In total, 16,039 teams and 24,663 young people participated in Mission Zero this year. This was a 3% increase in teams entering compared to last year.
Mission Space Lab offers teams of young people the chance to run scientific experiments on board the ISS. This year, 564 teams and 2,008 young people participated in Mission Space Lab. Compared with last year, there was a 4% increase in the number of teams who managed to achieve flight status and run their code in space.
To evaluate the projects, we encouraged mentors to complete surveys once their teams had submitted their computer programs. Overall, 135 Mission Zero mentors (11% of mentors) and 56 Mission Space Lab mentors (15% of mentors) completed surveys. We also ran focus groups with mentors from both projects to understand their experiences and the impact of these projects on young people.
Impact on young people
Understanding how technology is changing the world
The mentors we spoke to told us how valuable Mission Zero and Mission Space Lab are because these experiences connect young people to real technology. Mentors felt that Mission Zero and Mission Space Lab bridge the gap between theoretical coding and tangible outcomes, giving young people the confidence to engage with technology.
“Participating in Mission Space Lab offers students a great opportunity to work with the International Space Station, to see the Earth from above, to challenge them to overcome the terrestrial limits. It’s very important.” — Mission Space Lab mentor
“We want students to use their digital skills as superpowers to make the world a better place and this competition really aligns with that because regardless of your race, your ethnicity, your gender, you can write some code that actually runs in space. And if you can do that, then you can make medical tech, or you can solve the big problem that the adults of the world are still grappling with, so it’s the opening up [of] opportunities.” — Mission Zero mentor
Mentors observed that the project inspired children to consider careers they previously thought were out of reach. Space exploration was no longer a far away and theoretical idea for the children, but something connected to their everyday lives and their own learning.
“Some of the people that I was teaching this to felt like becoming an astronaut was really difficult to learn… now it’s not necessarily a distant thing to study.” — Mission Zero mentor
Mentors also described how the young people gained confidence in their ability to engage with technologies. One mentor described the “self-esteem” and “pride” younger pupils gained from participation. Others talked about the confidence that came with achieving something like having their code run in space and receiving certificates proving they were “space scientists”.
Our mentors
None of this would be possible without the hard work and dedication of our mentors. So, as part of our evaluation, we wanted to understand how we can best support them. For Mission Space Lab, that took the form of assessing the new guidance that we published this year and that sits alongside the project. When we spoke to mentors, they told us this guide provided clear, step-by-step guidance that enabled the young people to work through the project, and the majority of survey respondents agreed: 89% rated the Mission Space Lab project guide as somewhat or very understandable.
We also heard from mentors about the ways they are using Mission Zero in a wider context. Some told us that their schools ran the project as part of space-themed weeks where they used Mission Zero in conversations about space exploration, the Hubble telescope, and learning the names of the stars. Others used Mission Zero across multiple subjects by designing images and holding art competitions based on the design, as well as learning about pixels and animations.
Additionally, it was a pleasure to hear about young people who had participated in Mission Zero in previous years gaining leadership skills by supporting other young people to complete Mission Zero this year.
Next steps
Thank you to all the mentors who provided constructive feedback through surveys and focus groups. We have read and considered every comment and will continue to consider how to improve the experience for mentors and young people.
We will publish an in-depth report with the findings of our evaluation later in the year; however, we’ve already made some changes to the programme that will be launching for the 2024/25 Astro Pi challenge and wanted to share these updates with you now.
Improvements for next year:
Mission Zero
We’re adding a save button to Mission Zero to allow young people to work on this across multiple sessions.
We’re adding new code examples to the Mission Zero project guide. These have been selected from team submissions from the 2023/24 challenge.
Mission Space Lab
We’re creating an online testing tool for Mission Space Lab so that it will be easier for teams to test whether or not their code works. It will feature new data and images captured from the ISS in spring 2024.
We hope that all the young people and mentors who participated in last year’s Astro Pi challenge enjoyed the experience and learnt a lot. With the exciting updates we’re working on for the 2024/25 Astro Pi challenge, we hope to see even more young people participate and share their creative projects next year.
Project launch dates
16 September 2024: Mission Zero and Mission Space Lab launch
24 February 2025: Mission Space Lab submissions close
24 March 2025: Mission Zero submissions close
April – May 2025: Programs run on the International Space Station
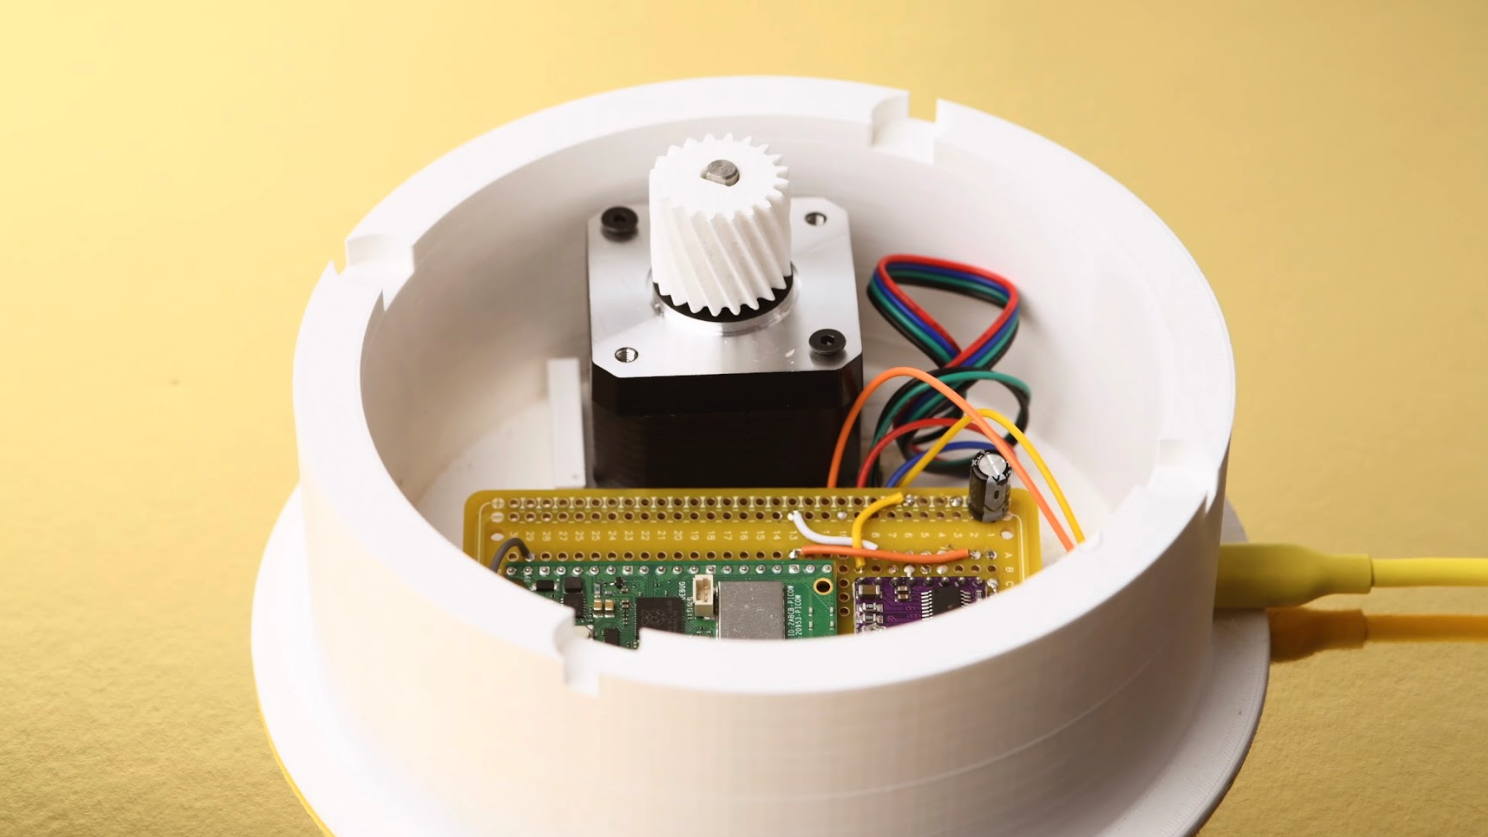
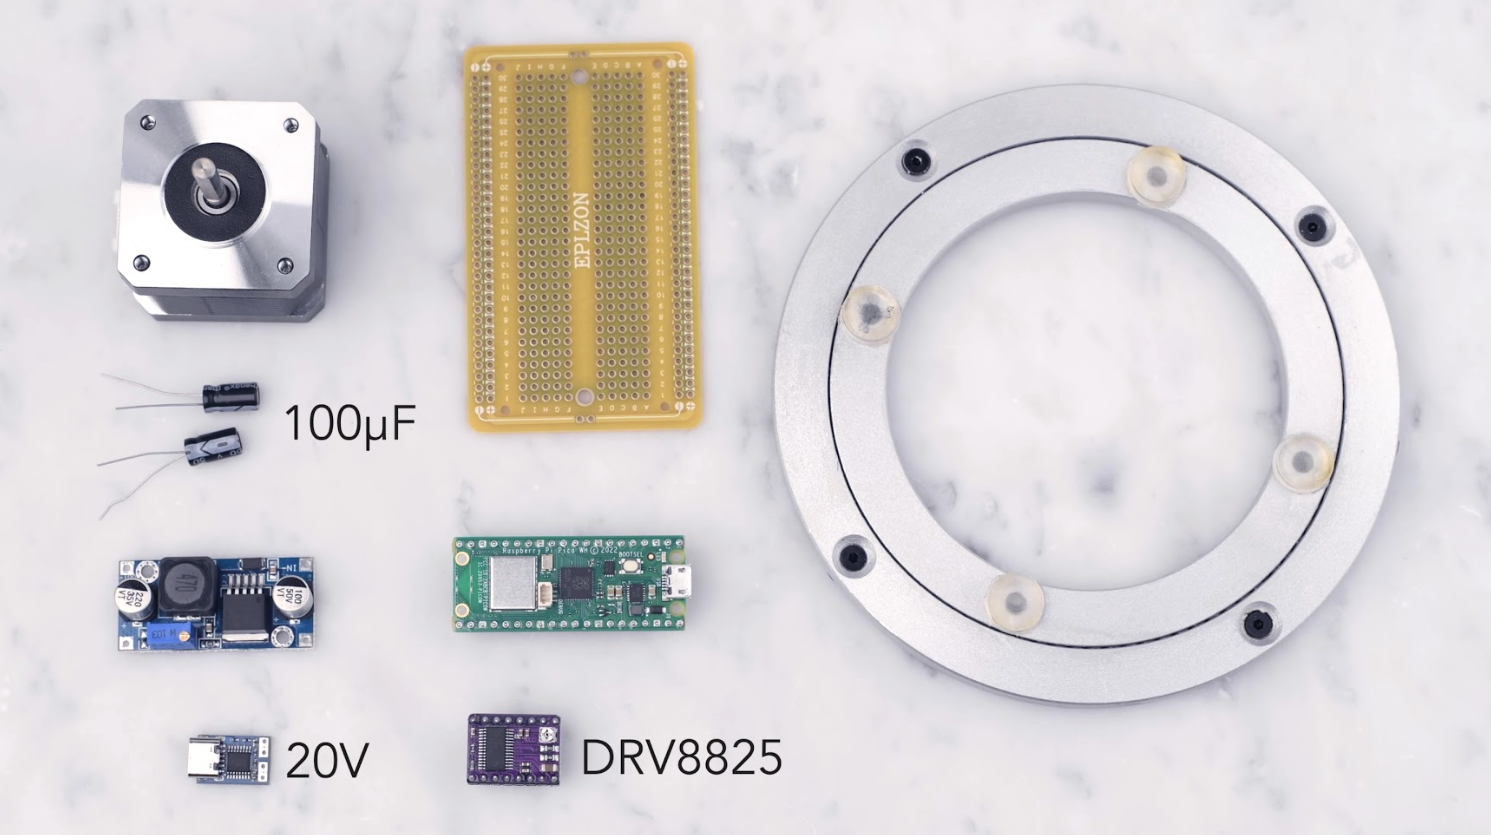
That first turntable used a DC motor, which lacks precision, resulting in inconsistent movements which vary with the weight of the object placed on it. “We wanted something more precise,” recalls Martin, “and we wanted a remote that we didn’t keep losing, so we put it as a page on a web server.”
In addition, they simplified the original version’s 3D-printed gearing system, which included a worm gear, to use two gears instead of three.
Web-based spinning
Raspberry Pico W has a web server running on it, based on Simon Prickett’s Phewap project. On that server sits a page that shows a virtual remote. “The buttons trigger some MicroPython code that tells the turntable’s stepper motor to turn, then 3D printed gears translate the movement from the motor to the bearing, which in turn moves the turntable.” The ‘lazy Susan’-style bearing, as used in turntables for the dining table, features multiple metal balls between two circular metal plates for low-friction movement.
Since the stepper motor they used requires a fairly hefty voltage, a 20V Power Delivery trigger board is used to step up the voltage supplied via USB-C. “Using PD triggers was one of the good bits: it makes for a much smaller build than having to try to cram a power brick in there too. They’re really cheap too, so it’s a rare win-win.”
VEEB chose Raspberry Pi Pico W for the project due to “a flat refusal to use C, due to lack of skill, and the knowledge that the documentation for Raspberry Pi stuff is less sparse than for other microcontrollers,” says Martin. “When we get stuck, there’s usually someone that has run into a similar problem and documented it somewhere.”
Learning process
Martin reckons the project took around a year to complete, working on and off. “There were a few mini projects in there: learning enough OpenSCAD for the gears, learning enough CSS for the remote page, getting the stepper motor to work. It was one of those things that you keep going back to when you learn something new during another project.”
An impressive stop-motion video of a roller-skate and disco ball for the Twirly Shirley YouTube video was shot using a camera taking photos at set intervals, but a possible upgrade would be to use a Raspberry Pi single-board computer to automate the process. “An SBC could take photos and send requests for the turntable to move,” notes Martin. “The last thing we made used web sockets to make a Pico listen for signals being broadcast from a [Raspberry] Pi with a camera attached.”
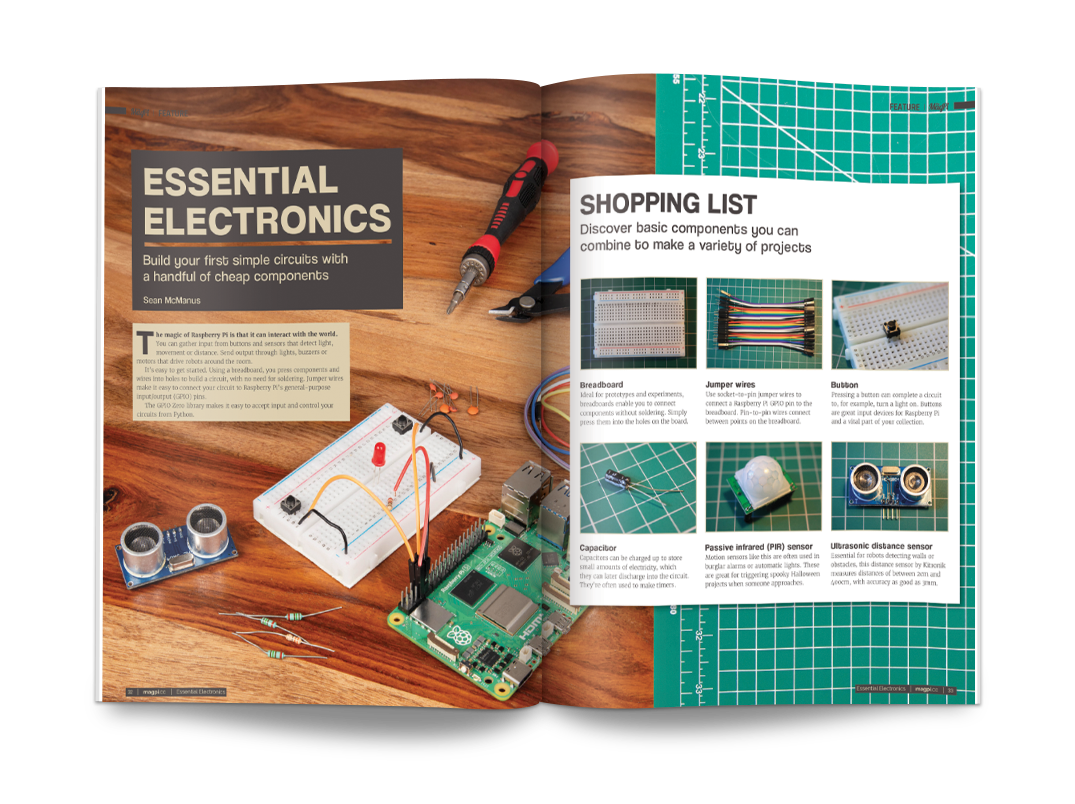
Become familiar with electronic components, circuit building, code and some great starter projects. This month’s lead feature will have you up and running with electronics and code in no time at all.
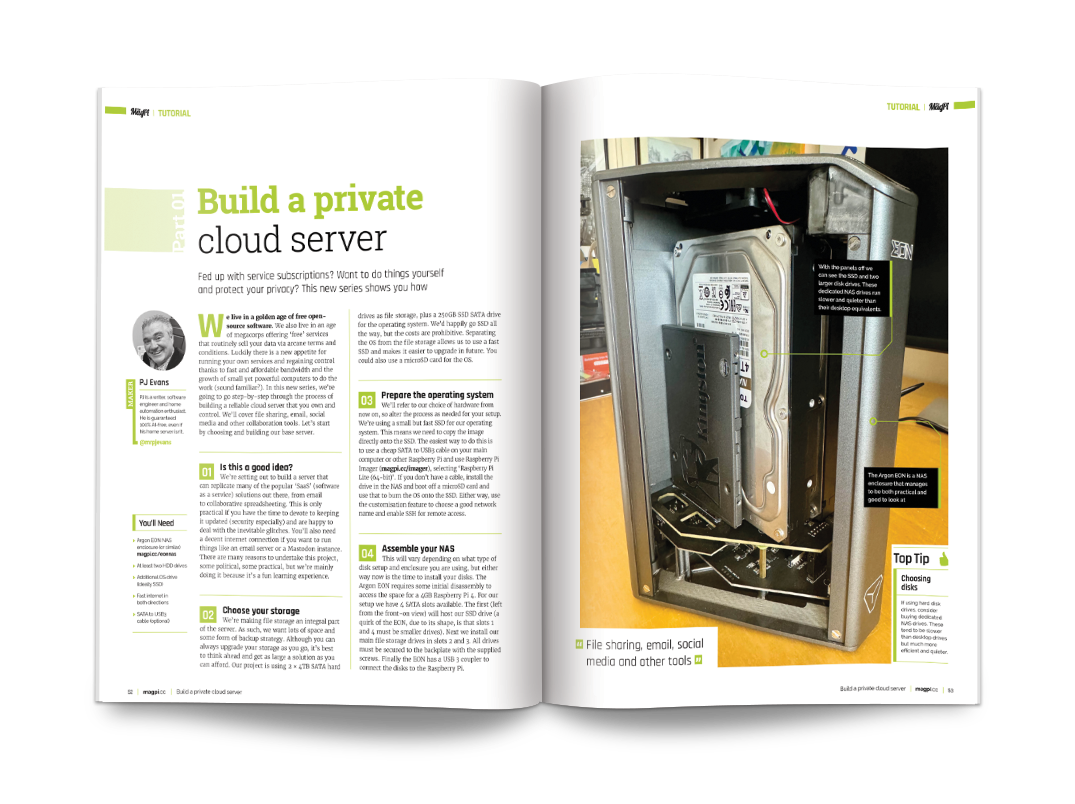
Build a private cloud server
Take control of your data by building a do-it-all email, documents, spreadsheets, email, file sharing and social media server. It’s the ultimate answer to keeping your data personal, private, and safe while discovering how cloud services work. Plus you get to save money!
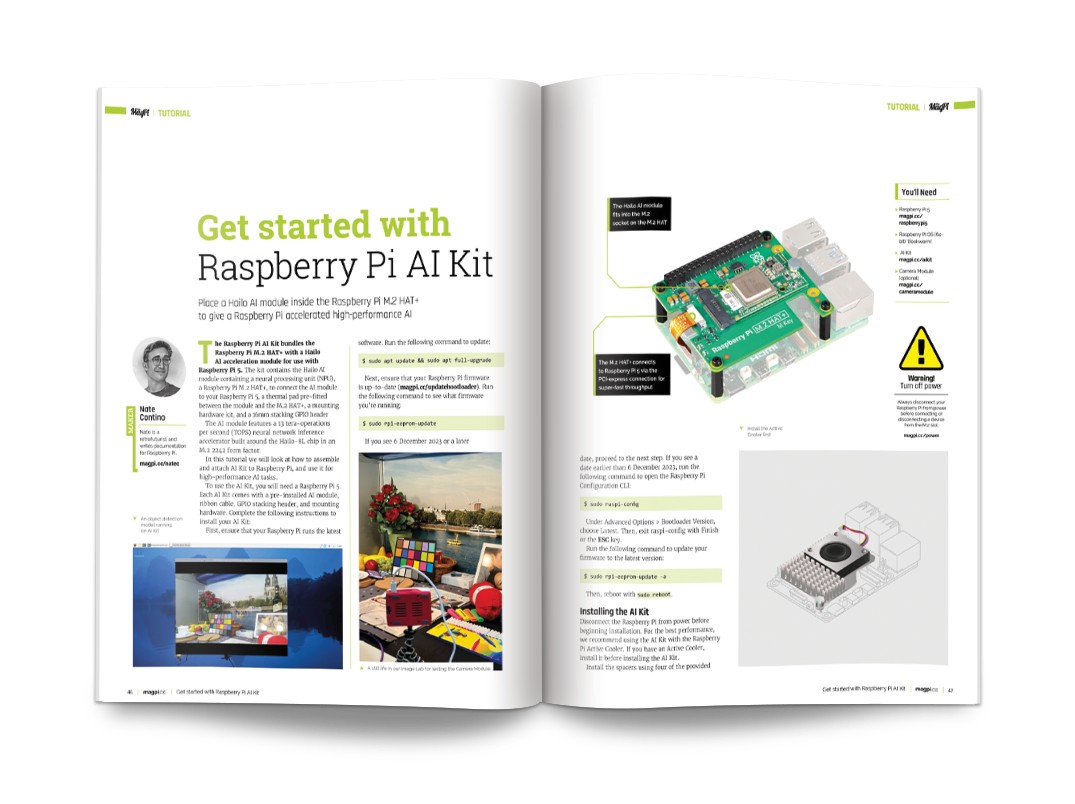
Learn to use the new AI Kit
Get to grips with ultra-fast image recognition by connecting the new AI Kit to Raspberry Pi. With 13-tera operations per second, this neural interface performs machine learning tasks at ultra-fast speeds. Add some smarts to your projects, and learn how artificial intelligence works with AI Kit and Raspberry Pi.
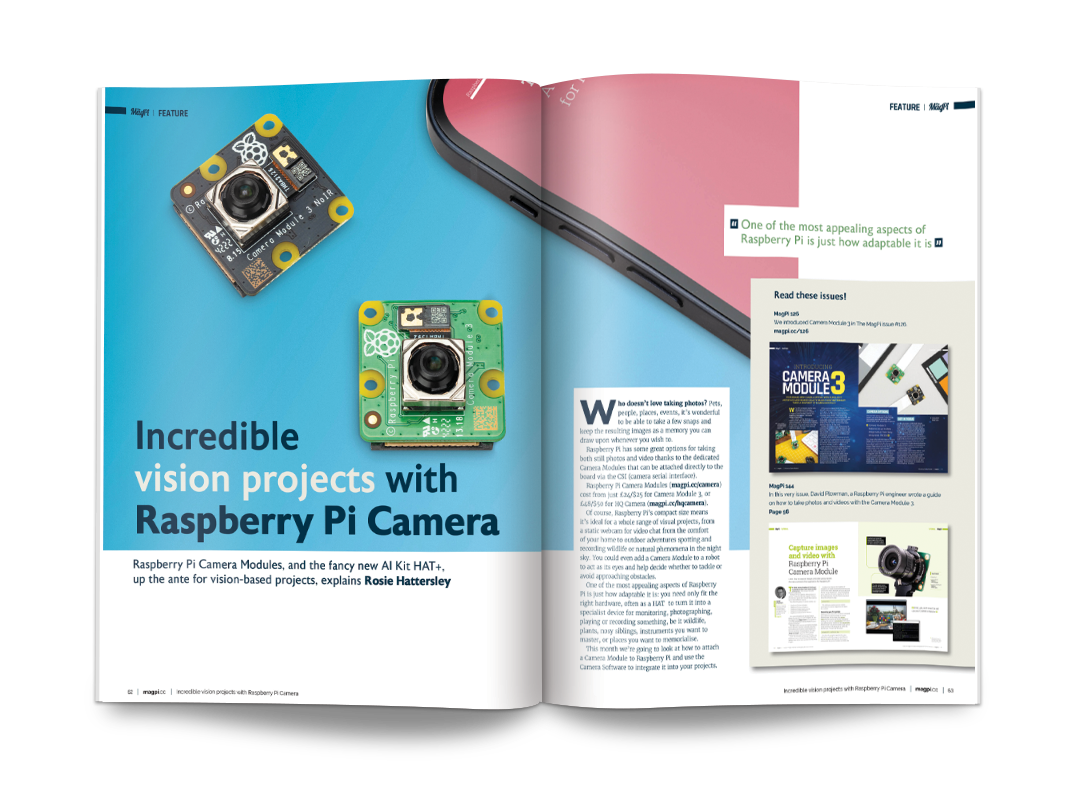
Incredible photo & vision projects
Put that Raspberry Pi Camera to use with these incredible vision-based projects. Adding a camera to Raspberry Pi is more than just a camera replacement, with eyes your Raspberry Pi can see and interact with the world around it.
ArmPi FPV AI Vision
Give your Raspberry Pi a hand! In fact, give it the whole arm with this incredible robotics arm project. We test out ArmPi, and AI-powered robotic arm for experimentation.
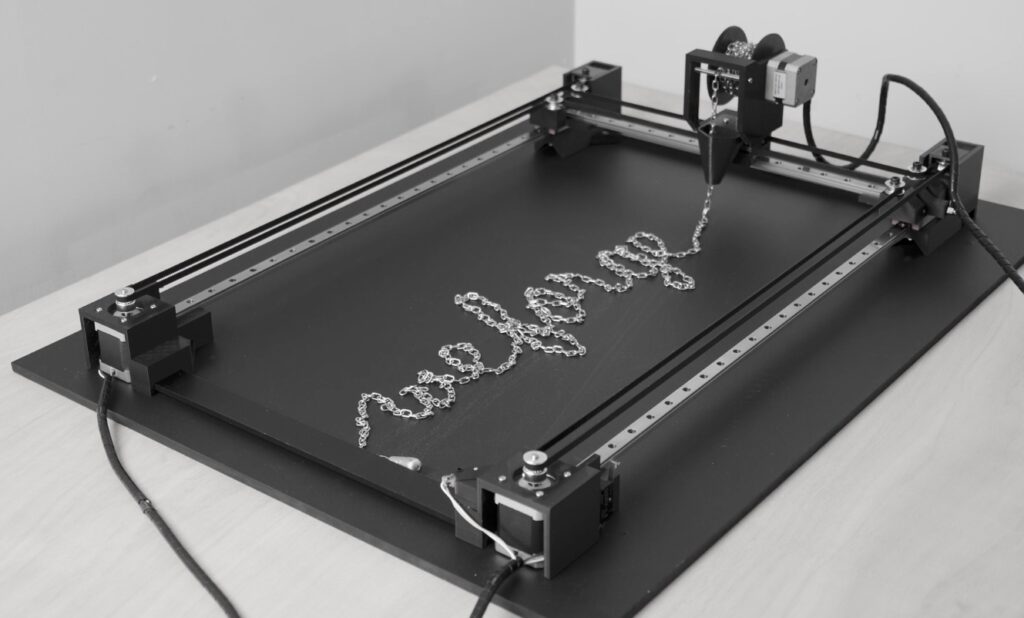
Art is very personal and we often consider the process of creation itself when evaluating the resulting piece. Does a sculpture have more artistic value when molded by human hands rather than a 3D printer? Most would say that it does. But what if the automation was, itself, part of the art? Yuichiro Katsumoto explored that idea with the “Renment (alpha)” chain art machine.
This is a bit like a large pen plotter, except that it “draws” with chains instead of ink. As the machine’s toolhead moves around the table following the paths of characters, a spool slowly drops steel chain into the form of those characters. After the machine finishes spelling out a word or phrase, it reels the chain back in and the process repeats.
In the published video demonstration, it writes out the phrase “we forge the chains we wear in life” coined by Charles Dickens.
The machine has three axes: the linear X and Y axes typical of a pen plotter, plus an additional rotary axis for the 3D-printed chain spool. Katsumoto based the design on DIY Machines Ltd’s coffee table kinetic sand art machine. An Arduino UNO Rev3 board controls the machine’s stepper motors through an Arduino CNC Shield V3.51, which is compatible with Grbl and can accept any g-code of that flavor.
Katsumoto created “Renment” with support from JSPS KAKENHI Grant Number JP20K12125 and displayed the piece at SIGGRAPH Art Galley ’24.
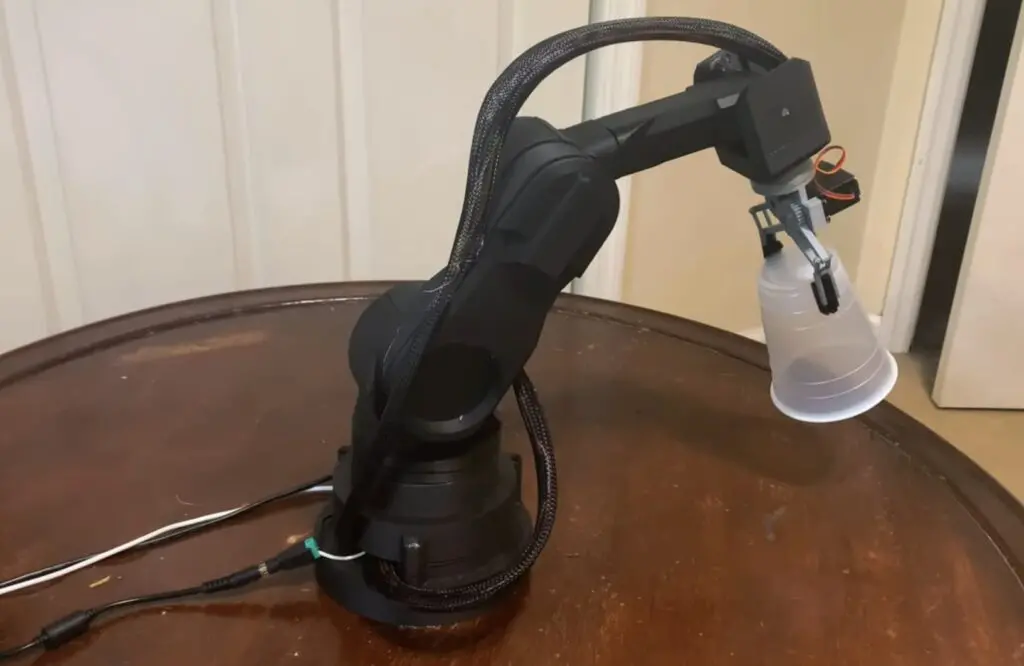
If you have an interest in robotics, then a robot arm is a great educational tool to start your journey. But professional robot arms are expensive and the DIY route is more informative anyway. That’s especially true if you take the time to design the arm yourself, as did Oliver Paff after he got himself a 3D printer and used his newfound fabrication capability to create this affordable 3D-printable robot arm.
Paff’s goal wasn’t to build the best robot arm in history. His goal was to learn the basics of robotics, including mechanical design, CAD, 3D printing, electronic design, and programming. This robot arm was perfect for that goal. It doesn’t have a high payload capacity or very good repeatability, but it was cheap to assemble and gave Paff a platform for experimentation and learning.
This is a 6DOF robot arm that Paff designed himself in Onshape. Almost all of the structural and mechanical parts were 3D-printed on an inexpensive Creality Ender 3.
An Arduino UNO Rev3 board controls the servo motors that actuate the joints. Paff initially tried to drive those directly from the Arduino, but ran into a common issue: the Arduino’s pins cannot supply a lot of current. So Paff added a servo motor driver module, which solved that problem and gave the motors plenty of power. Paff also redesigned the gripper to be more versatile. And the code even incorporates inverse kinematics to make user control more intuitive.
In testing, this worked quite well and Paff has plans to continue improving the design over time and expand its capabilities. If you’re interested in constructing the current version, Paff was kind enough to upload his files.
The news has sent ripples through the embedded development community, particularly affecting brands like micro:bit, Raspberry Pi and, of course, Arduino – all of which received Arm’s support over the years and “gained momentum in educational settings and among the maker community, enabling many of the features that Mbed offered to become more widespread and accessible, from browser-based IDEs and hardware abstraction to code hosting and remote build services.”
So, if you found yourself wondering how will Mbed’s retirement affect Arduino? – as a recent Hackster article did – this blog post is for you!
We’re always ready to innovate
At Arduino, we consider every new development in technology an opportunity to improve our platform and offer better and better tools to all our users. In the case of Mbed, which primarily affects a subset of our boards (see below), we knew the end of life was nearing and began proactively searching for a substitute years in advance. Spoiler: we found an excellent one in ZephyrOS! This is one of the reasons why we joined the Zephyr® Project as Silver members in 2023, as announced in our latest Open Source Report.
We are actively working to enable Arduino users to continue using the language and libraries they are familiar with. This involves creating an Arduino core based on an underlying Zephyr layer (you can dive deeper into some of the details about our progress with the project during the 2024 Arduino Days, with a conversation between our own Martino Facchin and Zephyr’s Benjamin Cabè). We plan to release the first beta of this transition by the end of 2024, with a rollout for various boards starting in 2025 – so we hope you’ll stay tuned and join the testing phase to support our efforts!
How is Mbed used in the Arduino ecosystem?
Every Arduino board has its corresponding “core,” i.e. the implementation of the Arduino programming language for its particular microcontroller architecture. The goal of Arduino cores is to expose the same commands and instructions (APIs) regardless of what board is being used.
For some boards – mainly GIGA, Nano 33 BLE, Nano RP2040 Connect, Portenta, Nicla family, and Opta – we implemented the Arduino core on top of an abstraction layer provided by Mbed OS in order to speed up development. The Arduino cores for other popular Arduino boards in the UNO, MKR and Nano families are implemented differently, and do not use Mbed OS.
In general, whether an Arduino core is based on Mbed or other underlying software layers does not have any practical impact on how end users program our boards.
We’re built for longevity
The advantage of using Arduino as an abstraction layer lies in its universal language, which remains consistent regardless of the underlying implementation. Therefore, programs written for Arduino will continue to work whether Mbed is there or not.
This is a significant reason to use Arduino for projects that need to stand the test of time.
We face change as a community
What do you think? Do you have any concerns about Mbed reaching its EOL two years from now? Comment below to let us know, or reach out to us on social media. We love to hear from you and want to support all our users in this transition.
Save 35% off the cover price with a subscription to The MagPi magazine. UK subscribers get three issues for just £10 and a FREE Raspberry Pi Pico W, then pay £30 every six issues. You’ll save money and get a regular supply of in-depth reviews, features, guides and other Raspberry Pi enthusiast goodness delivered directly to your door every month.
The world of education is loud with discussions about the uses and risks of generative AI — tools for outputting human-seeming media content such as text, images, audio, and video. In answer, there’s a new practical guide on using generative AI aimed at Computing teachers (and others), written by a group of classroom teachers and researchers at the Raspberry Pi Computing Education Research Centre and Faculty of Education at the University of Cambridge.
Their new guide is a really useful overview for everyone who wants to:
Understand the issues generative AI tools present in the context of education
Find out how to help their schools and students navigate them
Discover ideas on how to make use of generative AI tools in their teaching
Since generative AI tools have become publicly available, issues around data privacy and plagiarism are at the front of educators’ minds. At the same time, many educators are coming up with creative ways to use generative AI tools to enhance teaching and learning. The Research Centre’s guide describes the areas where generative AI touches on education, and lays out what schools and teachers can do to use the technology beneficially and help their learners do the same.
Teaching students about generative AI tools
It’s widely accepted that AI tools can bring benefits but can also be used in unhelpful or harmful ways. Basic knowledge of how AI and machine learning works is key to being able to get the best from them. The Research Centre’s guide shares recommended educational resources for teaching learners about AI.
One of the recommendations is Experience AI, a set of free classroom resources we’re creating. It includes a set of 6 lessons for providing 11- to 14-year-olds with a foundational understanding of AI systems, as well as a standalone lesson specifically for teaching about large language model-based AI tools, such as ChatGPT and Google Gemini. These materials are for teachers of any specialism, not just for Computing teachers.
You’ll find that even a brief introduction to how large language models work is likely to make students’ ideas about using these tools to do all their homework much less appealing. The guide outlines creative ways you can help students see some of generative AI’s pitfalls, such as asking students to generate outputs and compare them, paying particular attention to inaccuracies in the outputs.
Generative AI tools and teaching computing
We’re still learning about what the best ways to teach programming to novice learners are. Generative AI has the potential to change how young people learn text-based programming, as AI functionality is now integrated into many of the major programming environments, generating example solutions or helping to spot errors.
The Research Centre’s guide acknowledges that there’s more work to be done to understand how and when to support learners with programming tasks through generative AI tools. (You can follow our ongoing seminar series on the topic.) In the meantime, you may choose to support established programming pedagogies with generative AI tools, such as prompting an AI chatbot to generate a PRIMM activity on a particular programming concept.
As ethics and the impact of technology play an important part in any good Computing curriculum, the guide also shares ways to use generative AI tools as a focus for your classroom discussions about topics such as bias and inequality.
Using generative AI tools to support teaching and learning
Teachers have been using generative AI applications as productivity tools to support their teaching, and the Research Centre’s guide gives several examples you can try out yourself. Examples include creating summaries of textual materials for students, and creating sets of questions on particular topics. As the guide points out, when you use generative AI tools like this, it’s important to always check the accuracy of the generated materials before you give any of them to your students.
Putting a school-wide policy in place
Importantly, the Research Centre’s guide highlights the need for a school-wide acceptable use policy (AUP) that informs teachers, other school staff, and students on how they may use generative AI tools. This section of the guide suggests websites that offer sample AUPs that can be used as a starting point for your school. Your AUP should aim to keep users safe, covering e-safety, privacy, and security issues as well as offering guidance on being transparent about the use of generative tools.
It’s not uncommon that schools look to specialist Computing teachers to act as the experts on questions around use of digital tools. However, for developing trust in how generative AI tools are used in the school, it’s important to encourage as wide a range of stakeholders as possible to be consulted in the process of creating an AUP.
A source of support for teachers and schools
As the Research Centre’s guide recognises, the landscape of AI and our thinking about it might change. In this uncertain context, the document offers a sensible and detailed overview of where we are now in understanding the current impact of generative AI on Computing as a subject, and on education more broadly. The example use cases and thought-provoking next steps on how this technology can be used and what its known risks and concerns are should be helpful for all interested educators and schools.
I recommend that all Computing teachers read this new guide, and I hope you feel inspired about the key role that you can play in shaping the future of education affected by AI.
Developed by us and Google DeepMind, Experience AI provides teachers with free resources to help them confidently deliver lessons that inspire and educate young people about artificial intelligence (AI) and the role it could play in their lives.
Tracy Mayhead is a computer science teacher at Arthur Mellows Village College in Cambridgeshire. She recently taught Experience AI to her KS3 pupils. In this blog post, she shares 4 key learnings from this experience.
1. Preparation saves time
The Experience AI lesson plans provided a clear guide on how to structure our lessons.
Each lesson includes teacher-facing intro videos, a lesson plan, a slide deck, activity worksheets, and student-facing videos that help to introduce each new AI concept.
It was handy to know in advance which websites needed unblocking so students could access them.
“My favourite bit was making my own model, and choosing the training data. I enjoyed seeing how the amount of data affected the accuracy of the AI and testing the model.” – Student, Arthur Mellows Village College, UK
2. The lessons can be adapted to meet student’s needs
It was clear from the start that I could adapt the lessons to make them work for myself and my students.
Having estimated times and corresponding slides for activities was beneficial for adjusting the lesson duration. The balance between learning and hands-on tasks was just right.
I felt fairly comfortable with my understanding of AI basics. However, teaching it was a learning experience, especially in tailoring the lessons to cater to students with varying knowledge. Their misconceptions sometimes caught me off guard, like their belief that AI is never wrong. Adapting to their needs and expectations was a learning curve.
“It has definitely changed my outlook on AI. I went from knowing nothing about it to understanding how it works, why it acts in certain ways, and how to actually create my own AI models and what data I would need for that.” – Student, Arthur Mellows Village College, UK
3. Young people are curious about AI and how it works
My students enjoyed the practical aspects of the lessons, like categorising apples and tomatoes. They found it intriguing how AI could sometimes misidentify objects, sparking discussions on its limitations. They also expressed concerns about AI bias, which these lessons helped raise awareness about. I didn’t always have all the answers, but it was clear they were curious about AI’s implications for their future.
It’s important to acknowledge that as a teacher you won’t always have all the answers especially when teaching AI literacy, which is such a new area. This is something that can be explored in a class alongside students.
There is an online course you can use that can help get you started teaching about AI if you are at all nervous.
“I learned a lot about AI and the possibilities it holds to better our futures as well as how to train it and problems that may arise when training it.” – Student, Arthur Mellows Village College, UK
4. Engaging young people with AI is important
Students are fascinated by AI and they recognise its significance in their future. It is important to equip them with the knowledge and skills to fully engage with AI.
Experience AI provides a valuable opportunity to explore these concepts and empower students to shape and question the technology that will undoubtedly impact their lives.
“It has changed my outlook on AI because I now understand it better and feel better equipped to work with AI in my working life.” – Student, Arthur Mellows Village College, UK
What is your experience of teaching Experience AI lessons?
We completely agree with Tracy. AI literacy empowers people to critically evaluate AI applications and how they are being used. Our Experience AI resources help to foster critical thinking skills, allowing learners to use AI tools to address challenges they are passionate about.
We’re also really interested to learn what misconceptions students have about AI and how teachers are addressing them. If you come across misconceptions that surprise you while you’re teaching with the Experience AI lesson materials, please let us know via the feedback form linked in the final lesson of the six-lesson unit.
If you would like to teach Experience AI lessons to your students, download the free resources from experience-ai.org
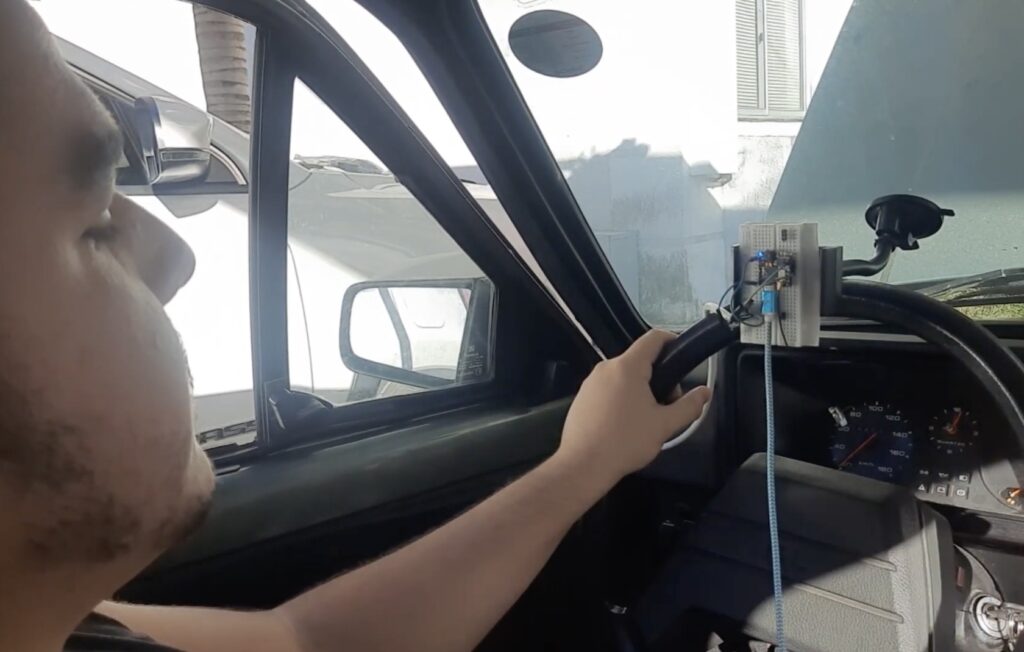
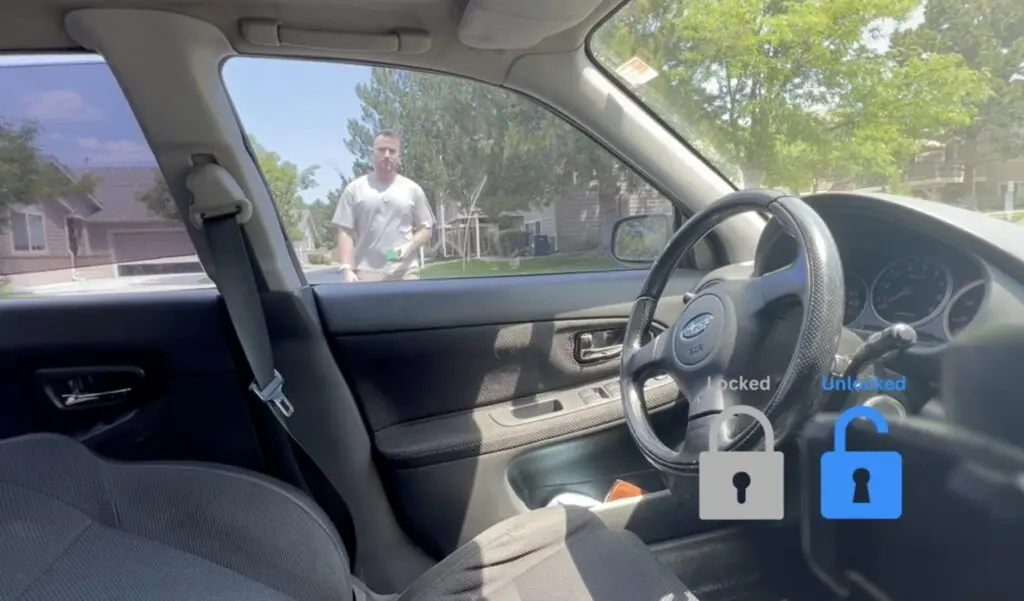
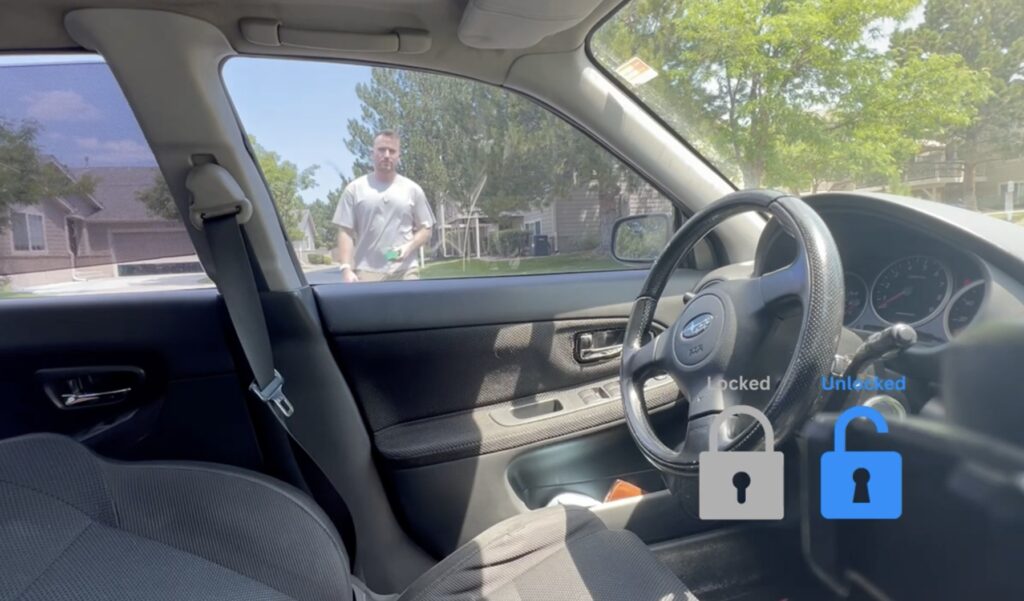
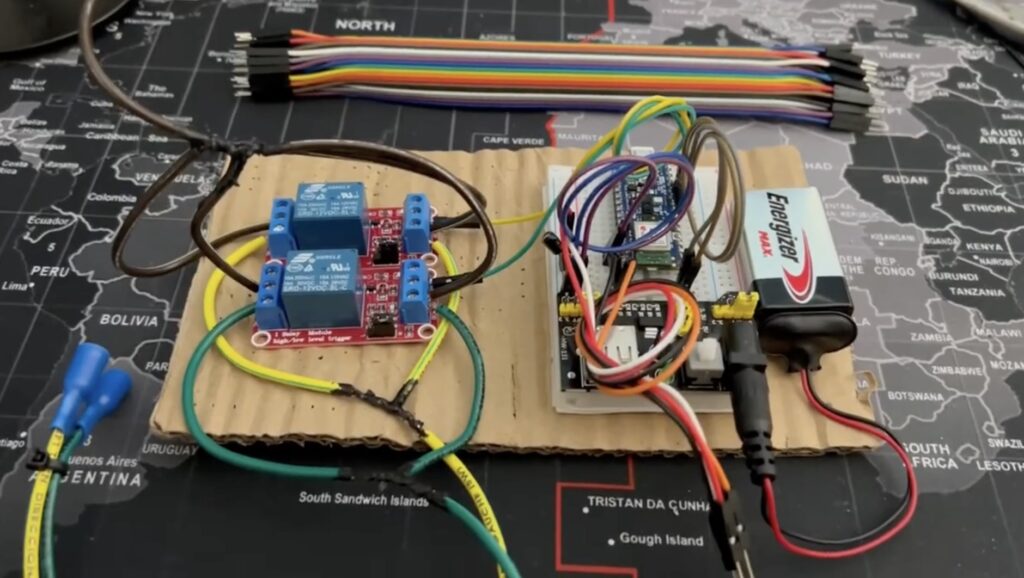
A lot of newer cars have a really nifty feature called “proximity unlock,” which automatically unlocks the doors when the driver approaches while carrying their key fob. When paired with a push-to-start ignition switch, the driver never has to take their keys out of their pocket. But Nick’s 2004 Subaru STI is too old to have come with that feature from the factory, so he used a couple of Arduino boards to create a DIY proximity unlock system.
Car manufacturers need to pay serious attention to security when designing their access and ignition systems, but Nick had a bit more freedom. It is unlikely that any thieves would suspect his car of possessing a feature like this and so they wouldn’t even bother trying to hack it.
Nick’s proximity unlock works by evaluating the received signal strength indicator (RSSI) of Bluetooth® Low Energy connection. If all else is equal, RSSI is inversely proportional to distance and that makes it useful for rough proximity detection. An Arduino Nano 33 BLE inside the car unlocks the doors when it has an active BLE connection with an RSSI over a set threshold. It unlocks the doors by shorting the switch with a 12V relay and it receives power from the car’s 12V system through a buck converter.
The driver-carried device (equivalent to a key fob) can be either another Arduino or Nick’s smartphone. In fact, it can be any device with a BLE adapter, so long as it can connect to the in-car Arduino with the proper device name.
Now, Nick can enjoy his classic car and the convenience of proximity unlock.
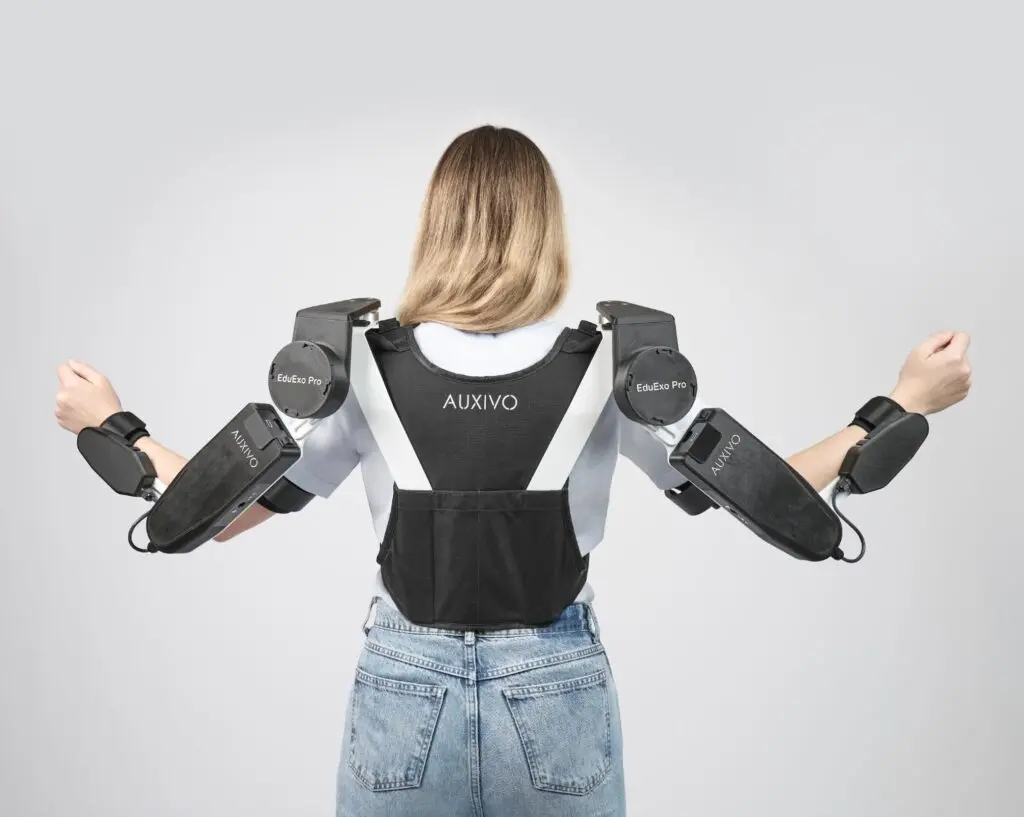
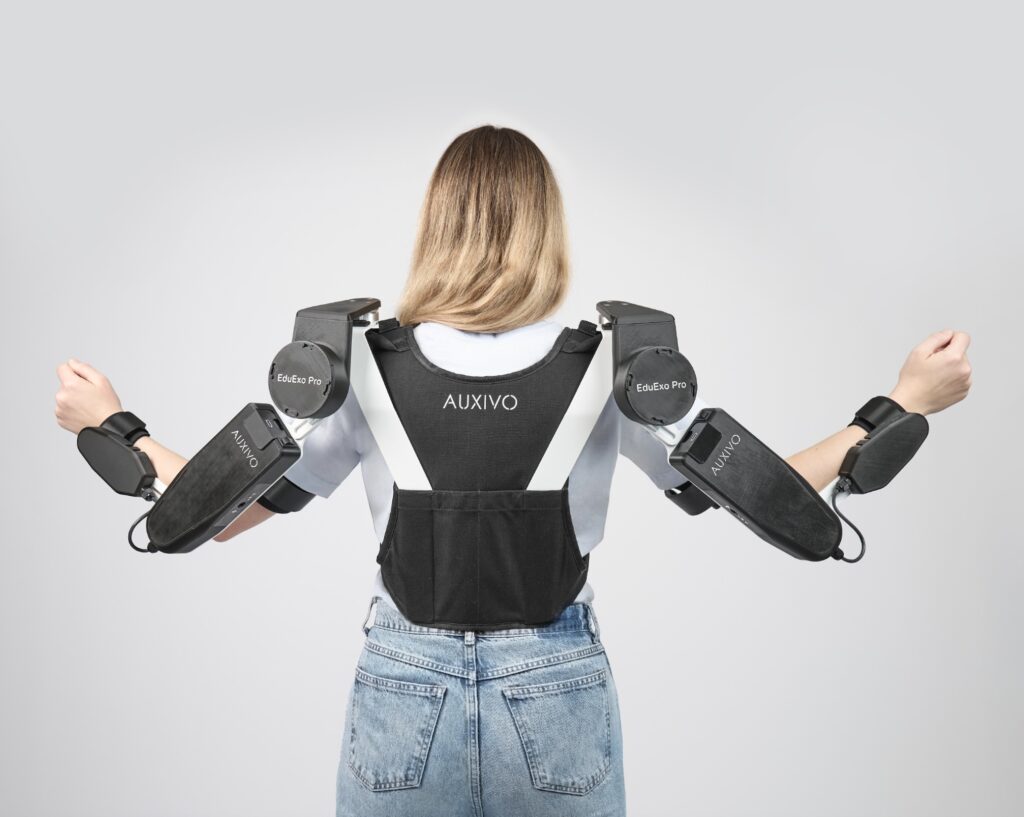
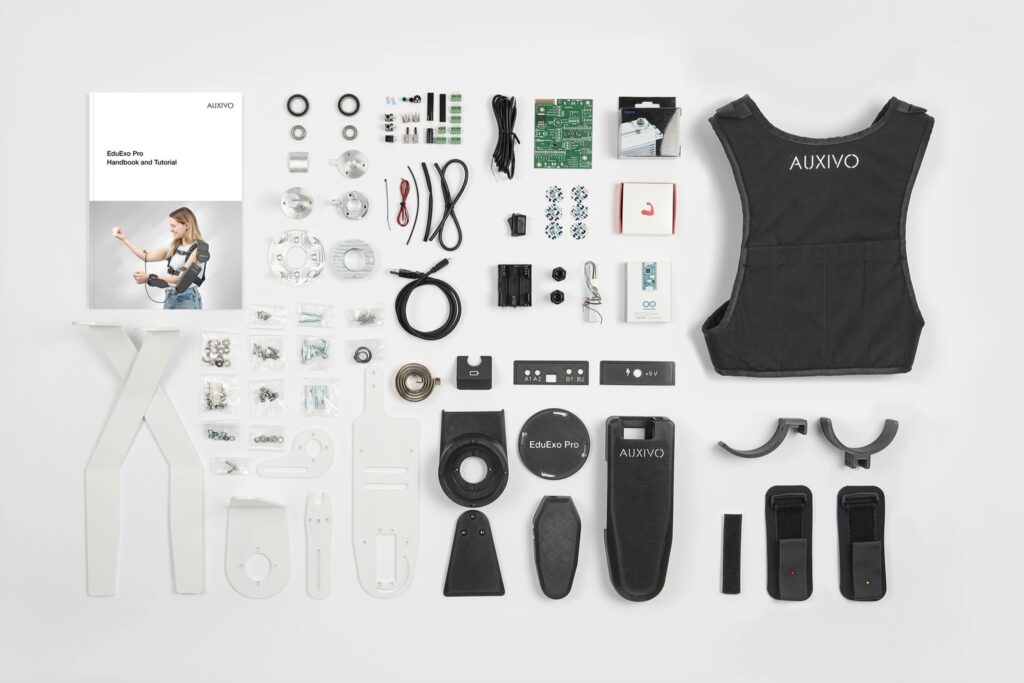
Emerging technologies initially develop at a slow pace and that is due in large part to the lack of resources available to students. Complex technology is built on existing knowledge and higher education students need the tools to gain hands-on experience. To help educate the next generation of exoskeleton engineers, Auxivo has just introduced the newly updated EduExo Pro exoskeleton kit.
The Auxivo EduExo Pro is an educational exoskeleton platform designed to help students learn fundamentals via a project-based learning approach, with enough flexibility for those students to experiment with their own designs. It originally launched on Kickstarter in 2021 and now Auxivo has released an updated version.
The hardware in the kit consists of structural parts, mechanical components, motorized actuators, sensors, and control electronics. The kit includes everything necessary — except 3D-printed parts — to build a full-arm exoskeleton that has a 2DOF (degrees of freedom) shoulder joint and a 1DOF elbow joint.
For maximum compatibility and versatility, the Auxivo EduExo Pro operates under the control of an Arduino Nano 33 IoT board. Students can take advantage of the powerful Arduino IDE to program sophisticated behaviors and integrate that with other software, such as Unity 3D.
The provided handbook will walk students through assembling and programming the arm exoskeleton, but educators can also create their own curriculums or let students devise new designs. That makes the Auxivo EduExo Pro perfect for high school and university-level engineering courses.
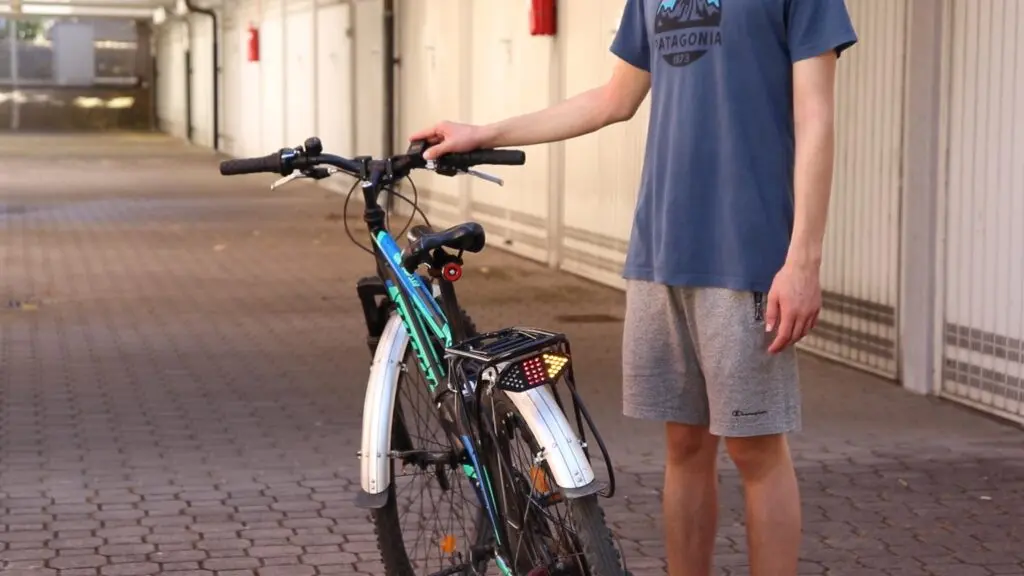
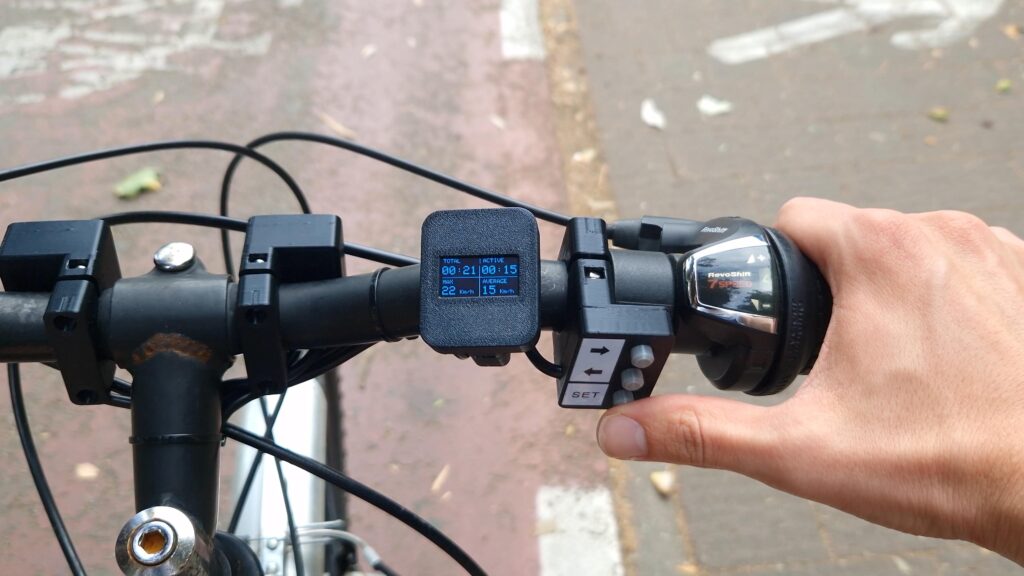
Many people around the world live in cities designed for cars, with bicycle use being a distant afterthought. That makes cycling dangerous and lights can do a lot to make riding safer. That’s why Giovanni Aggiustatutto designed this DIY system that includes headlights, a taillight, turn signals, and even an integrated odometer/speedometer.
Aggiustatutto wanted this system to work with most bicycles, so he designed the front lights and controls to clamp onto the handlebars. The rear light pod attaches to a cargo rack and should be compatible with a wide range of models. There are two bright white LED headlight arrays on the front with integrated yellow turn signal LEDs. Also on the front is an OLED display that shows the speed, time, and odometer, as well as three buttons. The back lights consist of red taillight LEDs and yellow turn signal LEDs in a single 3D-printed enclosure.
An Arduino Nano board controls everything, directing power to the LEDs from an 18650 lithium battery through IRFZ44N MOSFETs. A DS3231 RTC module helps the Arduino track time accurately and that gives it the ability to monitor speed — and therefore total distance — with the help of a Hall effect sensor. That sensor detects the passing of a magnet attached to a spoke, so the Arduino can count each rotation. The Arduino then displays the results on a 0.96” 128×64 monochrome OLED screen.
Finally, Aggiustatutto tucked the Arduino and battery into an enclosure disguised as a water bottle to prevent theft.
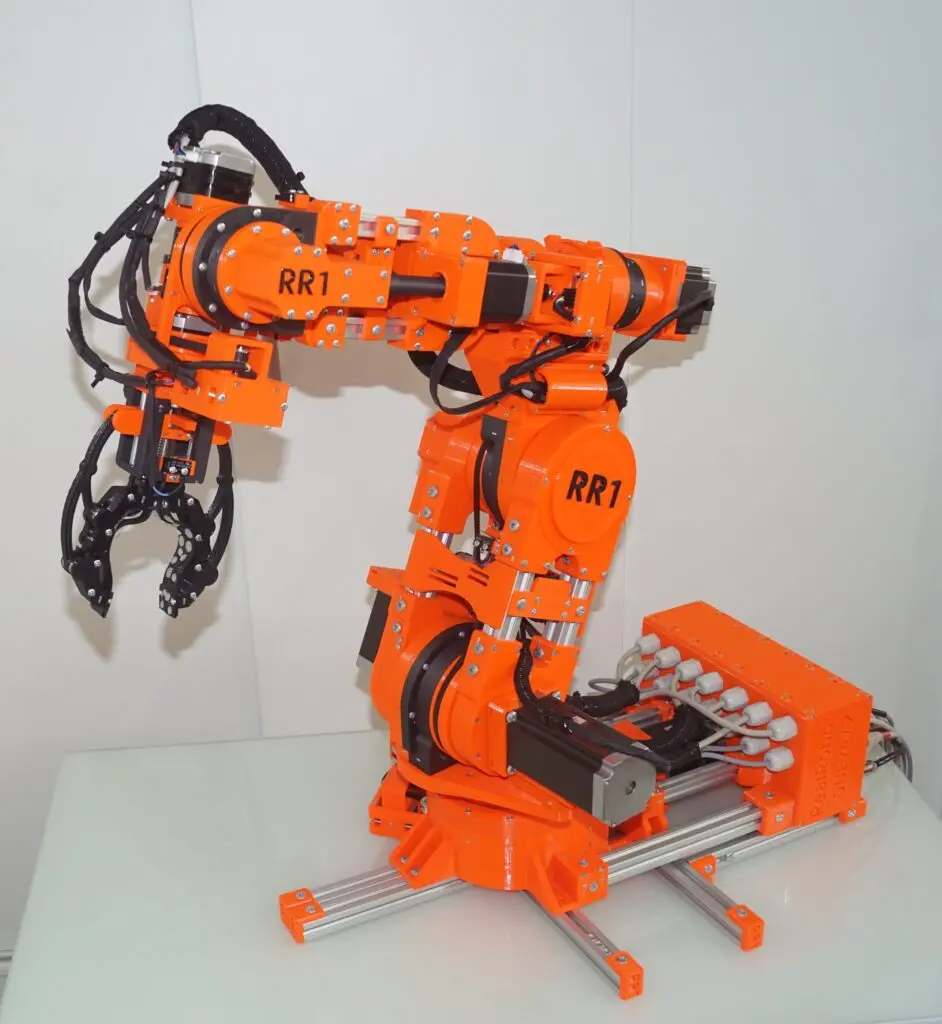
Started in 2022 as an exploration of what’s possible in the field of DIY robotics, Pavel Surynek’s Real Robot One (RR1) project is a fully-featured 6+1-axis robot arm based on 3D-printed parts and widely available electronics. The initial release was constructed with PETG filament, custom gearboxes for transferring the motor torque to the actuators, and a plethora of stepper motors/shaft-mounted encoders to provide closed-loop control.
The lessons learned from V1 were instrumental in helping Surynek design his next iteration of the RR1 project, including improved motion, rigidity, and control schemes. Replacing the more flexible PETG filament is a far stronger polycarbonate composite which aided in reducing backlash in the gearing. Beyond the plastic housing, Surynek also swapped the planetary gearboxes for a series of belt-driven mechanisms as well as moved the encoders to the perimeter of each joint to get better positional tracking. The last major change involved printing the gripper in TPU and securing it to the wrist assembly with more points of contact.
Controlling all seven stepper motors is an Arduino DUE, which talks to the host machine using its serial USB connection and a custom GUI. It is through this interface that each joint can be configured, set, and continuously monitored, thus giving a comprehensive way to operate the arm.
For more information about revision 2 of the Real Robot One project, watch Surynek’s video below!
As use of generative artificial intelligence (or generative AI) tools such as ChatGPT, GitHub Copilot, or Gemini becomes more widespread, educators are thinking carefully about the place of these tools in their classrooms. For undergraduate education, there are concerns about the role of generative AI tools in supporting teaching and assessment practices. For undergraduate computer science (CS) students, generative AI also has implications for their future career trajectories, as it is likely to be relevant across many fields.
Dr Stephen MacNeil, Andrew Tran, and Irene Hou (Temple University)
In a recent seminar in our current series on teaching programming (with or without AI), we were delighted to be joined by Dr Stephen MacNeil, Andrew Tran, and Irene Hou from Temple University. Their talk showcased several research projects involving generative AI in undergraduate education, and explored how undergraduate research projects can create agency for students in navigating the implications of generative AI in their professional lives.
Differing perceptions of generative AI
Stephen began by discussing the media coverage around generative AI. He highlighted the binary distinction between media representations of generative AI as signalling the end of higher education — including programming in CS courses — and other representations that highlight the issues that using generative AI will solve for educators, such as improving access to high-quality help (specifically, virtual assistance) or personalised learning experiences.
As part of a recent ITiCSE working group, Stephen and colleagues conducted a survey of undergraduate CS students and educators and found conflicting views about the perceived benefits and drawbacks of generative AI in computing education. Despite this divide, most CS educators reported that they were planning to incorporate generative AI tools into their courses. Conflicting views were also noted between students and educators on what is allowed in terms of generative AI tools and whether their universities had clear policies around their use.
The role of generative AI tools in students’ help-seeking
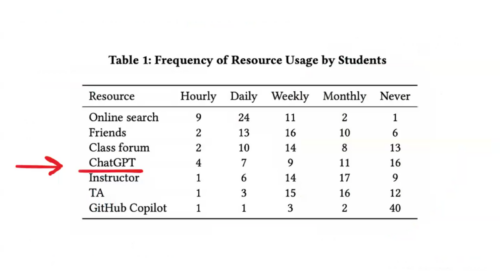
There is growing interest in how undergraduate CS students are using generative AI tools. Irene presented a study in which her team explored the effect of generative AI on undergraduate CS students’ help-seeking preferences. Help-seeking can be understood as any actions or strategies undertaken by students to receive assistance when encountering problems. Help-seeking is an important part of the learning process, as it requires metacognitive awareness to understand that a problem exists that requires external help. Previous research has indicated that instructors, teaching assistants, student peers, and online resources (such as YouTube and Stack Overflow) can assist CS students. However, as generative AI tools are now widely available to assist in some tasks (such as debugging code), Irene and her team wanted to understand which resources students valued most, and which factors influenced their preferences. Their study consisted of a survey of 47 students, and follow-up interviews with 8 additional students.
Undergraduate CS student use of help-seeking resources
Responding to the survey, students stated that they used online searches or support from friends/peers more frequently than two generative AI tools, ChatGPT and GitHub Copilot; however, Irene indicated that as data collection took place at the beginning of summer 2023, it is possible that students were not familiar with these tools or had not used them yet. In terms of students’ experiences in seeking help, students found online searches and ChatGPT were faster and more convenient, though they felt these resources led to less trustworthy or lower-quality support than seeking help from instructors or teaching assistants.
Some students felt more comfortable seeking help from ChatGPT than peers as there were fewer social pressures. Comparing generative AI tools and online searches, one student highlighted that unlike Stack Overflow, solutions generated using ChatGPT and GitHub Copilot could not be verified by experts or other users. Students who received the most value from using ChatGPT in seeking help either (i) prompted the model effectively when requesting help or (ii) viewed ChatGPT as a search engine or comprehensive resource that could point them in the right direction. Irene cautioned that some students struggled to use generative AI tools effectively as they had limited understanding of how to write effective prompts.
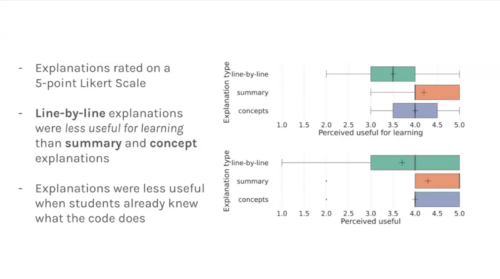
Using generative AI tools to produce code explanations
Andrew presented a study where the usefulness of different types of code explanations generated by a large language model was evaluated by students in a web software development course. Based on Likert scale data, they found that line-by-line explanations were less useful for students than high-level summary or concept explanations, but that line-by-line explanations were most popular. They also found that explanations were less useful when students already knew what the code did. Andrew and his team then qualitatively analysed code explanations that had been given a low rating and found they were overly detailed (i.e. focusing on superfluous elements of the code), the explanation given was the wrong type, or the explanation mixed code with explanatory text. Despite the flaws of some explanations, they concluded that students found explanations relevant and useful to their learning.
Perceived usefulness of code explanation types
Using generative AI tools to create multiple choice questions
In a separate study, Andrew and his team investigated the use of ChatGPT to generate novel multiple choice questions for computing courses. The researchers prompted two models, GPT-3 and GPT-4, with example question stems to generate correct answers and distractors (incorrect but plausible choices). Across two data sets of example questions, GPT-4 significantly outperformed GPT-3 in generating the correct answer (75.3% and 90% vs 30.8% and 36.7% of all cases). GPT-3 performed less well at providing the correct answer when faced with negatively worded questions. Both models generated correct answers as distractors across both sets of example questions (GPT-3: 11.1% and 10% of cases; GPT-4: 9.9% and 17.8%). They concluded that educators would still need to verify whether answers were correct and distractors were appropriate.
Undergraduate students shaping the direction of generative AI research
With student concerns about generative AI and its implications for the world of work, the seminar ended with a hopeful message highlighting undergraduate students being proactive in conducting their own research and shaping the direction of generative AI research in computer science education. Stephen concluded the seminar by celebrating the undergraduate students who are undertaking these research projects.
Our current seminar series is on teaching programming with or without AI.
In our next seminar, on 16 July at 17:00 to 18:30 BST, we welcome Laurie Gale (Raspberry Pi Computing Education Research Centre, University of Cambridge), who will discuss how to teach debugging to secondary school students. To take part in the seminar, click the button below to sign up, and we will send you information about how to join. We hope to see you there.
Um dir ein optimales Erlebnis zu bieten, verwenden wir Technologien wie Cookies, um Geräteinformationen zu speichern und/oder darauf zuzugreifen. Wenn du diesen Technologien zustimmst, können wir Daten wie das Surfverhalten oder eindeutige IDs auf dieser Website verarbeiten. Wenn du deine Einwillligung nicht erteilst oder zurückziehst, können bestimmte Merkmale und Funktionen beeinträchtigt werden.
Funktional
Immer aktiv
Die technische Speicherung oder der Zugang ist unbedingt erforderlich für den rechtmäßigen Zweck, die Nutzung eines bestimmten Dienstes zu ermöglichen, der vom Teilnehmer oder Nutzer ausdrücklich gewünscht wird, oder für den alleinigen Zweck, die Übertragung einer Nachricht über ein elektronisches Kommunikationsnetz durchzuführen.
Vorlieben
Die technische Speicherung oder der Zugriff ist für den rechtmäßigen Zweck der Speicherung von Präferenzen erforderlich, die nicht vom Abonnenten oder Benutzer angefordert wurden.
Statistiken
Die technische Speicherung oder der Zugriff, der ausschließlich zu statistischen Zwecken erfolgt.Die technische Speicherung oder der Zugriff, der ausschließlich zu anonymen statistischen Zwecken verwendet wird. Ohne eine Vorladung, die freiwillige Zustimmung deines Internetdienstanbieters oder zusätzliche Aufzeichnungen von Dritten können die zu diesem Zweck gespeicherten oder abgerufenen Informationen allein in der Regel nicht dazu verwendet werden, dich zu identifizieren.
Marketing
Die technische Speicherung oder der Zugriff ist erforderlich, um Nutzerprofile zu erstellen, um Werbung zu versenden oder um den Nutzer auf einer Website oder über mehrere Websites hinweg zu ähnlichen Marketingzwecken zu verfolgen.