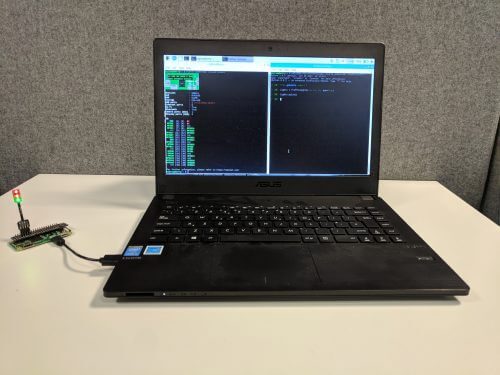
Use the GPIO pins of a Raspberry Pi Zero while running Debian Stretch on a PC or Mac with our new GPIO expander software! With this tool, you can easily access a Pi Zero’s GPIO pins from your x86 laptop without using SSH, and you can also take advantage of your x86 computer’s processing power in your physical computing projects.

What is this magic?
Running our x86 Stretch distribution on a PC or Mac, whether installed on the hard drive or as a live image, is a great way of taking advantage of a well controlled and simple Linux distribution without the need for a Raspberry Pi.
The downside of not using a Pi, however, is that there aren’t any GPIO pins with which your Scratch or Python programs could communicate. This is a shame, because it means you are limited in your physical computing projects.
I was thinking about this while playing around with the Pi Zero’s USB booting capabilities, having seen people employ the Linux gadget USB mode to use the Pi Zero as an Ethernet device. It struck me that, using the udev subsystem, we could create a simple GUI application that automatically pops up when you plug a Pi Zero into your computer’s USB port. Then the Pi Zero could be programmed to turn into an Ethernet-connected computer running pigpio to provide you with remote GPIO pins.
So we went ahead and built this GPIO expander application, and your PC or Mac can now have GPIO pins which are accessible through Scratch or the GPIO Zero Python library. Note that you can only use this tool to access the Pi Zero.
You can also install the application on the Raspberry Pi. Theoretically, you could connect a number of Pi Zeros to a single Pi and (without a USB hub) use a maximum of 140 pins! But I’ve not tested this — one for you, I think…
Making the GPIO expander work
If you’re using a PC or Mac and you haven’t set up x86 Debian Stretch yet, you’ll need to do that first. An easy way to do it is to download a copy of the Stretch release from this page and image it onto a USB stick. Boot from the USB stick (on most computers, you just need to press F10 during booting and select the stick when asked), and then run Stretch directly from the USB key. You can also install it to the hard drive, but be aware that installing it will overwrite anything that was on your hard drive before.
Whether on a Mac, PC, or Pi, boot through to the Stretch desktop, open a terminal window, and install the GPIO expander application:
sudo apt install usbbootgui
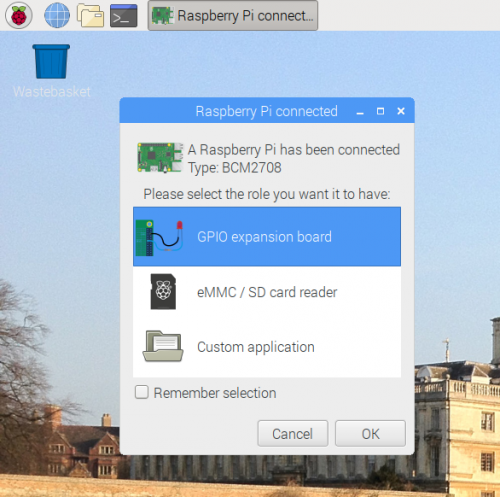
Next, plug in your Raspberry Pi Zero (don’t insert an SD card), and after a few seconds the GUI will appear.

The Raspberry Pi USB programming GUI
Select GPIO expansion board and click OK. The Pi Zero will now be programmed as a locally connected Ethernet port (if you run ifconfig, you’ll see the new interface usb0 coming up).
What’s really cool about this is that your plugged-in Pi Zero is now running pigpio, which allows you to control its GPIOs through the network interface.
With Scratch 2
To utilise the pins with Scratch 2, just click on the start bar and select Programming > Scratch 2.
In Scratch, click on More Blocks, select Add an Extension, and then click Pi GPIO.
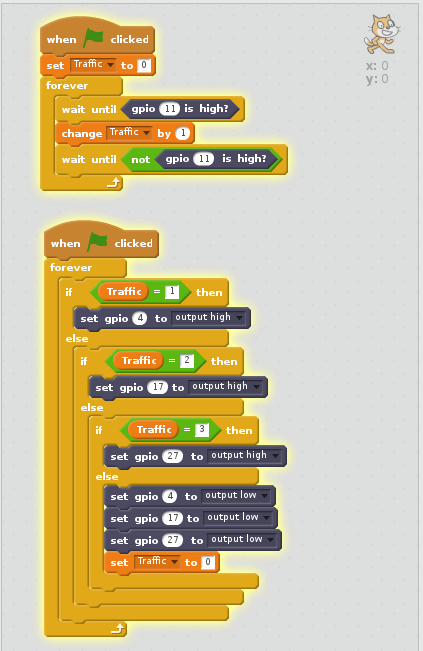
Two new blocks will be added: the first is used to set the output pin, the second is used to get the pin value (it is true if the pin is read high).
This a simple application using a Pibrella I had hanging around:

With Python
This is a Python example using the GPIO Zero library to flash an LED:
pi@raspberrypi:~ $ export GPIOZERO_PIN_FACTORY=pigpio
pi@raspberrypi:~ $ export PIGPIO_ADDR=fe80::1%usb0
pi@raspberrypi:~ $ python3
>>> from gpiozero import LED
>>> led = LED(17)
>>> led.blink()

The pinout command line tool is your friend
Note that in the code above the IP address of the Pi Zero is an IPv6 address and is shortened to fe80::1%usb0, where usb0 is the network interface created by the first Pi Zero.
With pigs directly
Another option you have is to use the pigpio library and the pigs application and redirect the output to the Pi Zero network port running IPv6. To do this, you’ll first need to set some environment variable for the redirection:
pi@raspberrypi:~ $ export PIGPIO_ADDR=fe80::1%usb0
pi@raspberrypi:~ $ pigs bc2 0x8000
pi@raspberrypi:~ $ pigs bs2 0x8000
With the commands above, you should be able to flash the LED on the Pi Zero.
The secret sauce
I know there’ll be some people out there who would be interested in how we put this together. And I’m sure many people are interested in the ‘buildroot’ we created to run on the Pi Zero — after all, there are lots of things you can create if you’ve got a Pi Zero on the end of a piece of IPv6 string! For a closer look, find the build scripts for the GPIO expander here and the source code for the USB boot GUI here.
And be sure to share your projects built with the GPIO expander by tagging us on social media or posting links in the comments!
Website: LINK
