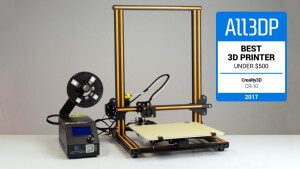
Creality CR-10 Review: A 3D Printer Worth The Hype
The CR-10 is the work of Chinese firm Shenzhen Creality 3D Technology, a surprisingly transparent producer of 3D printers with a full roster that is easily viewable online (rather than shrouded behind total obscurity amid a muddy network of resellers).
Founded in 2014, the company claims to have ties with multiple Chinese universities. And take a trip to their website at your own peril as they bombard you with customer support popups. As intrusive web events go, that’s probably the friendliest, but still a bit irritating.
The CR-10 came about in the summer of 2016, following the short development of the Creality CR-7 and its evolution into the CR-8. The CR-10 boasts a similar design to its CR-8 predecessor, albeit with the control box integrated into the base and the X-axis rail jutting freely out into space.
You can see how the CR-10 evolved from the CR-7 and CR-8. The addition of a full frame for stablization makes sense. The control box removal we can only guess was to add in a heated bed without overheating the printer’s control board.
After sleuthing around the web to find whether the CR-10 is the source of this particular design that is catching all the heat these days (see Anet’s E10 and Hictop’s low-effort rebadging), it would appear so. It’s rather difficult to keep up with these things when there are a dozen clones on the digital shelves of resellers. So it’s nice to know that you’re getting some sort of original thought with Creality’s CR-10.
On appearances alone, we find the Creality CR-10 to have quite the appealing figure. There’s a stark simplicity to it, with clean black-coated aluminum rails everywhere, a plain 300 x 300mm glass print bed, and all of the brains neatly curtailed off to one side in a control box with mounted filament holder. It looks slim, prints big, and has mustard color go-faster stripes.
But despite its slender frame, the Creality CR-10 is a big 3D printer. And we’re not just talking about its large build volume. This thing takes up more space in the All3DP print room than any other printer. “Hurr-hurr, no duh,” you may be thinking, “It prints big stuff, of course it’s a big printer”. But wait, hear us out.
The control box and filament holder sit at such a height and position that you must place it a certain distance from the frame of the CR-10 for filament to feed unhindered into the extruder. The frame itself is large enough on its own, but with the control box forced to sit a little apart, means in total the CR-10’s footprint is as wide as it is tall. Our test model, the smallest of the CR-10 family, sits a shade taller than the Zortrax M300 and wider even than the Makerbot Replicator+.
This could be solved by simply moving the filament holder off the control box, allowing you to scooch the box closer to the frame. Where the filament could go though, we don’t know. Perhaps to the top of the frame, a-la the Prusa i3 Mk2S, but we suspect that may have an unsettling effect on prints. The frame itself is integral to the Z-axis’ movements, what with the linear bearings riding up and down the tracks. Any wobbles from that extra weight would transfer to prints.
Zipping back and forth in only one dimension, the print head’s movement is constrained to the X-axis only. A rail held in place on both ends (unlike its predecessor mentioned above) is driven by a single lead screw on the lefthand side. The other end is stabilized on the opposite frame by fixed linear bearings and pulley secured in a track.
Seeing the Z-axis drive from only one side, you get the initial impression that it could be an area of weakness. With all the lifting done from one end, surely the other must sag under its own weight?
Of course, this is dispelled pretty quickly once you see the CR-10 in action and start popping quality prints off the bed. But still, it’s a part of the printer’s design that lingers in mind as being something that could degrade in time.
As we’ve become accustomed to with these kits and semi-assembled 3D printers, the Creality arrives in an unassuming cardboard box. Its acutely apparent that one of the first costs cut with the “cheap” printers is decent marketing materials. It’d be nice to at least see a picture of the printer on the box, or something to mark the occasion a little more.
First-world-problems aside, strip away the CR-10’s packaging and you find two foam packing trays with a handful of parts, including bundles of tools and spare screws — a thoughtful and welcome touch that we were happy to see.
Building the Creality CR-10 was intuitive and simple, no thanks to the frankly awful instructions that come with the printer. One glance at the single sheet of blurry, confusingly arranged pixels and we decided to move on without them.
If you’re brand new to 3D printing and are considering the CR-10 (which we wholeheartedly recommend), seek out a better set of instructions online. Everyone else with a vague understanding of the parts and arrangement of an FFF 3D printer will do just fine piecing it together without instructions. We did, and nothing has caught on fire (yet).
And perhaps the nicest feature of all for setup is the pre-shrouded and organized control box cabling. Tidy and secure male-female connectors with screw fastenings slot together without any incidence, and overall the “wiring” (if you can really call it that) was a dream. Plugging basic labelled connectors into their respective stepper motors and endstops is as complicated as this simple build gets.
A word of caution though. One of the pins for the Y-axis stepper motor was completely loose from the connector housing. A concerning blip of poor quality control for a printer that generally ups the build quality over other kit 3D printers we’ve encountered. It was no trouble to pop it back in, but had we missed it one wonders what problems it might’ve caused — critical or otherwise.
If you decide to drop the cash on a CR-10, give every connector a once over to ensure everything is secure before you start printing.
We use a lot of different 3D printers here in the All3DP workshop. And making the jump between them often highlights the quirks and foibles of each one. In the CR-10’s case, one pitfall is the fact that you must auto-home the printer before each print job. Forgetting to do so mostly results in the print head trying to rip the print bed off. You only make that horrifically jarring mistake once or twice before causing irreversible damage.
Initial prints on the CR-10 exhibited ringing, and some quite noticeable layer skipping. Nothing too troubling for a semi-assembled kit since such printers are usually a work-in-process — you should expect to be making tweaks to the CR-10 as you put more prints under the machine’s belt. For our first few Benchy prints, a once over with hex wrench to tighten screws helped. As did removing some of the comically excessive lubricant on the lead screw.
Scaling ambitions to match the print volume, you start to see why the CR-10 is so beloved in the community. The mind clears of the tat and trinkets smaller build volumes tend to nurture, and you begin to see handy large-scale inspiration everywhere.
Creepy wall-mounted hand coat holders? Charming lamp-shades for the kids’ room? Check and check. 1-1 scale Oscars trophy? Well, perhaps not. Of the few print problems encountered using the CR-10, one was minor tangles in filament spools pulling the control box (to which the filament holder is mounted) over onto its side. What might have otherwise cleared with a little pressure from the extruder instead throws part of the printer on its side. Not ideal.
The other issue lay with warping and print bed adhesion. The CR-10 comes with large individual sheets of painters tape and, curiously, a roll of the stuff too. Its just natural to use what they provide, but we found the CR-10’s glass bed with a spritz of print adhesive more than enough for flawlessly sticking prints.
That is, of course, for filaments that don’t have a tendency to curl at the first sign of trouble. In our experience, printing ABS with the CR-10 out of the box is difficult, if not impossible. The print bed, while rated for 100 degree Celsius, barely manages to hold this and, as such, has a tough time holding ABS. This fact rings true regardless of which adhesives you use.
And that’s just the first layers. With 400mm of possible print height completely open to the room and temperature fluctuations, warping and cracks are probably guaranteed. Which is curious then, that stores such as GearBest list it as good for ABS.
Add an enclosure to keep all that heat in and around the print, and we suspect the CR-10 could handle ABS admirably. But with an open design and large, as well as an exposed heated bed that reaches 100 degrees, it just didn’t seem to go well.
And speaking of the heated bed, crikey does it take an age to heat to high temperatures. On a couple of occasions we thought the print had stalled and resorted to a hard resetting the printer to try and fix the “problem”. It turns out at the upper end of its range, it takes a long time to achieve its target temperature.
But it’s not all doom and gloom. As with most 3D printers, it’ll only print as well as you have the settings dialed in, and we’d like to think we achieved some exceptional prints with the CR-10.
By no means perfect, the complexity of a large Eiffel Tower proved an impressive demo for the CR-10. Printed twice, once in 3DK Berlin’s purple PLA and once in Verbatim’s transparent PLA, it managed to complete both without failure — surviving bridging, severe overhangs and a mind-boggling number of retractions in the process all over some 60 hours of print time combined.
Website: LINK