
01 Install the software
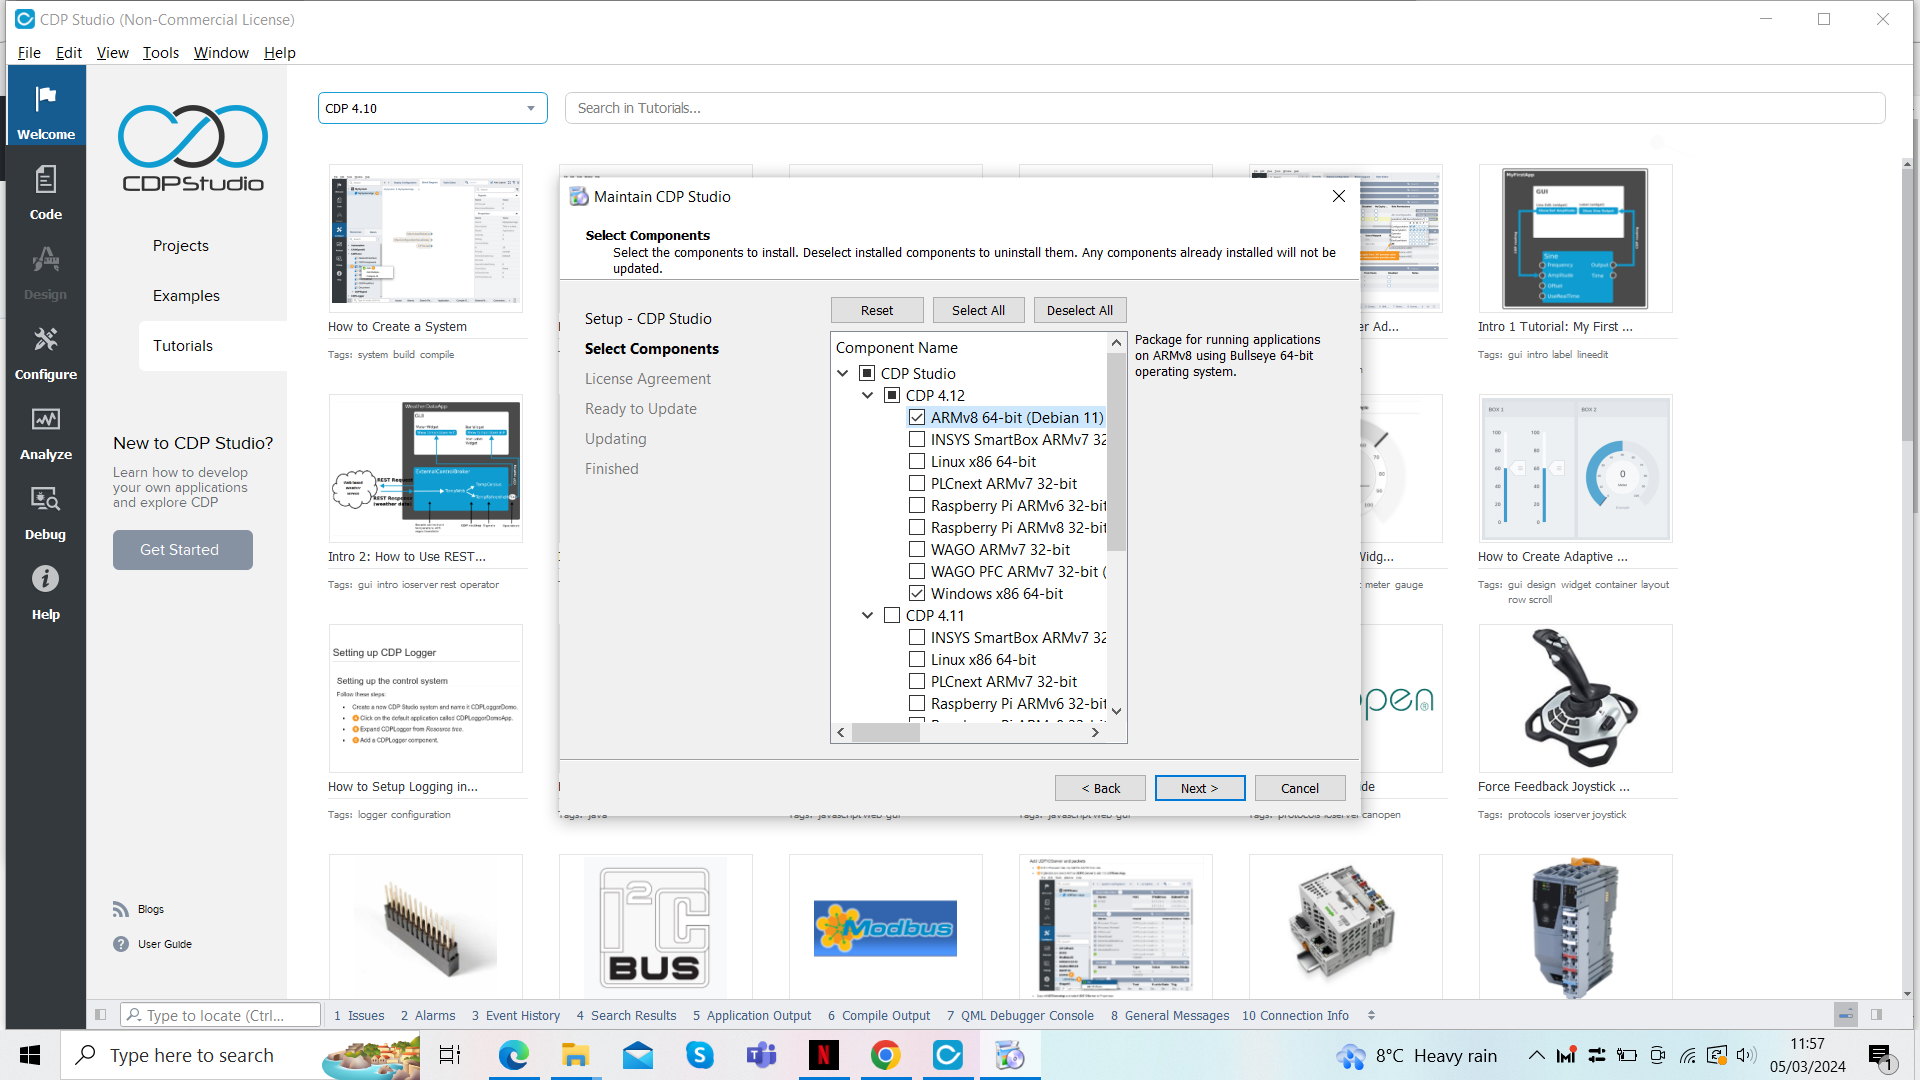
On your PC, visit cdpstudio.com/getstarted and download the free non-commercial version for Windows or Linux. During installation, select the ‘ARMv8 64-bit (Debian 11)’ component under CDP Studio 4.12, along with the one already ticked for your host PC. You will then be able to deploy projects to the myCobot 280 Pi arm, which uses a 64-bit version of Ubuntu.
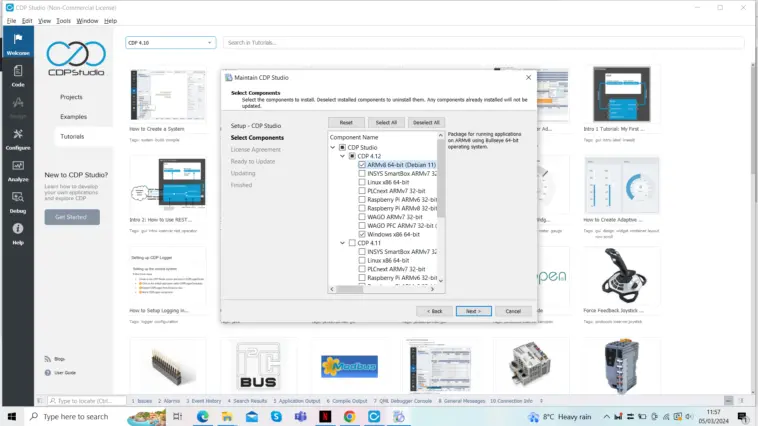
If you already have CDP Studio installed, make sure it’s updated to version 4.12, then go to Help > Package Manager and select ‘Add or remove CDP versions’ to add the ARMv8 64-bit (Debian 11) component.

02 Download the project
This is a complex project that would be time-consuming to build from scratch, so we’ll download it from CDP Studio’s GitHub repo. Go to magpi.cc/recordnplay, click the green Code button, and select Download ZIP. Unzip the file on your PC. Move the resulting myCobotRecordNPlay-main folder to the CDPStudioWorkspace/systems folder.
03 Download and build library
To deploy the project to the robot arm, you’ll also need the myCobotLib library. Go to the GitHub repo at magpi.cc/mycobotlib, click the Code button and Download ZIP. Extract it and then move the resulting myCobotLib-main folder to the CDPStudioWorkspace/libraries folder. Open the myCobotLib project file (with the .pro suffix) in CDPStudio, then right-click its name in the left panel and select Build.

04 Open the project
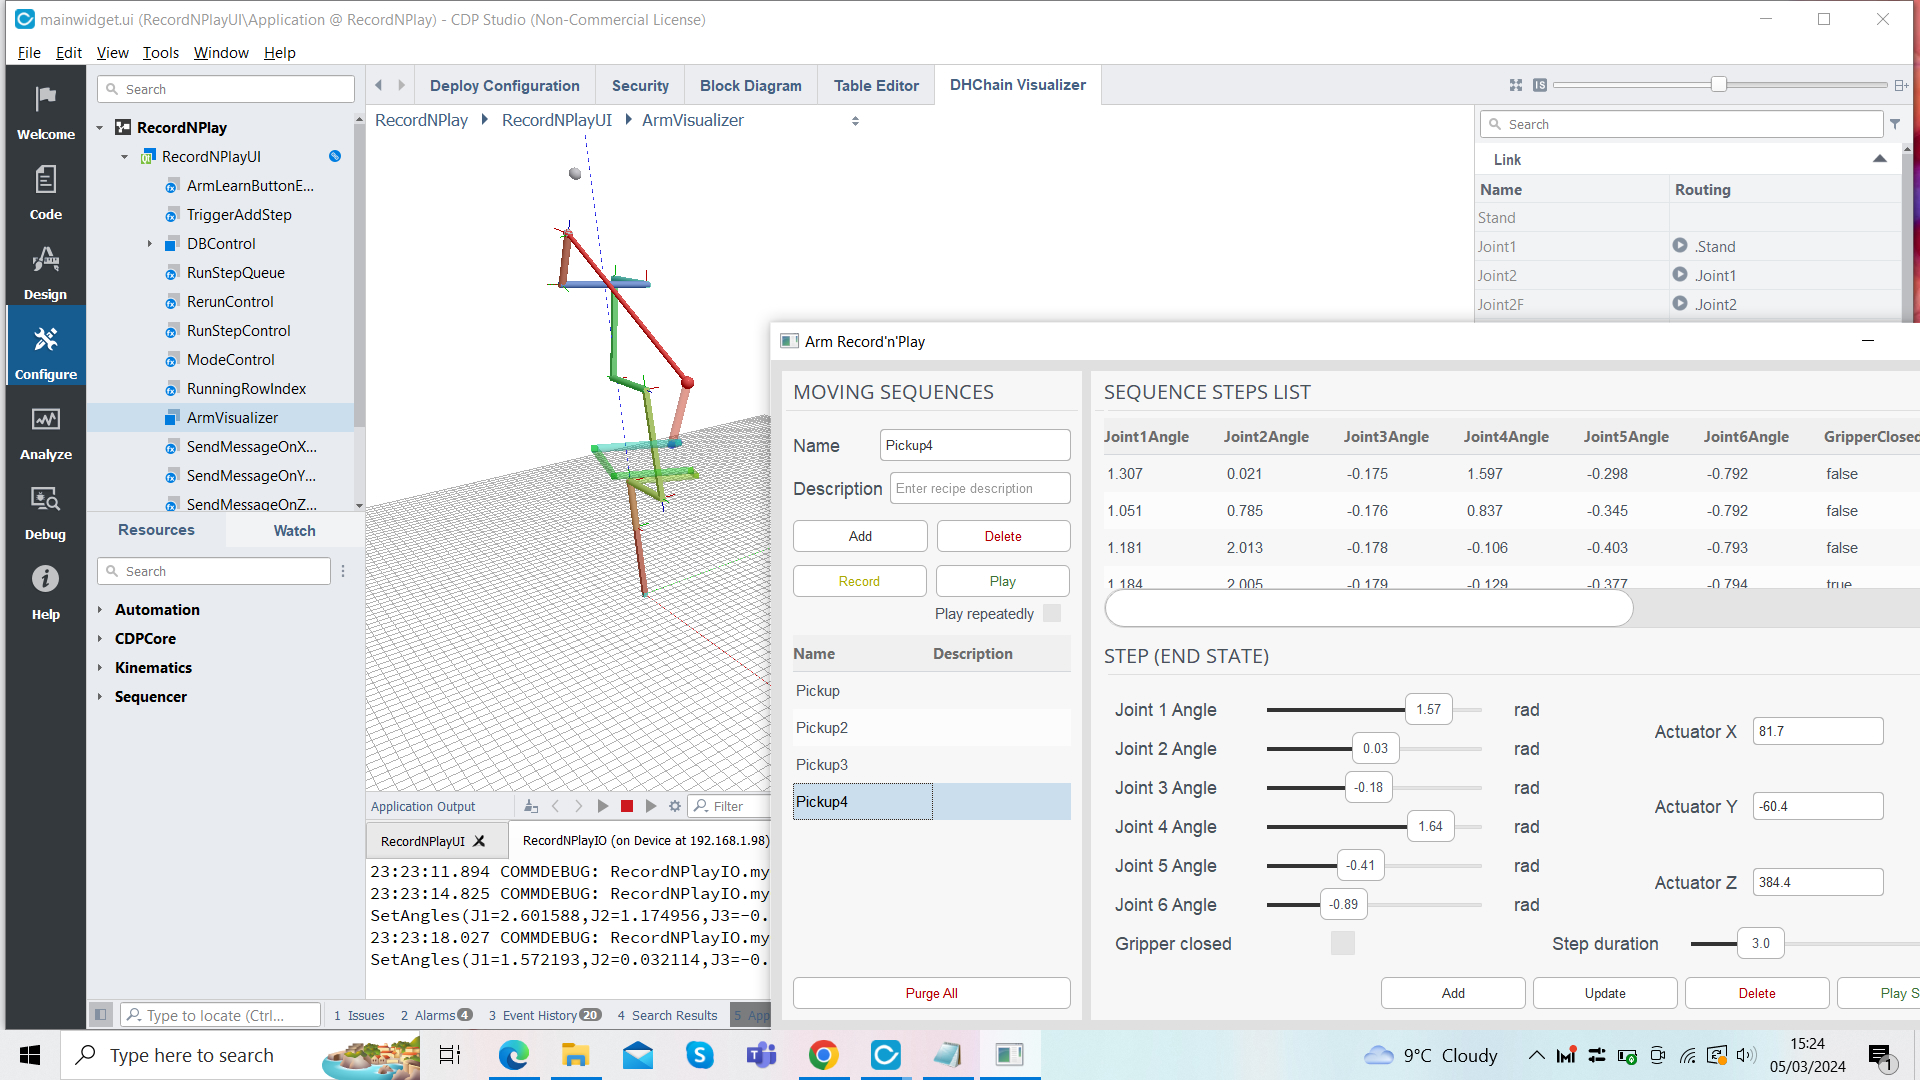
Now open the RecordNPlay CDP project file (.pro) in CDP Studio. If you click the arrow next to it in the left panel, you’ll note that it comprises two main applications. RecordNPlayUI runs the database logic for recording arm movement steps and shows a GUI on the PC to make programming the arm easier. It also has an ArmVisualizer pane that can be used to view the arm positions in 3D. This can be used even if you don’t have a real arm connected, so you can still run the project and see how recorded steps affect its movements.
The RecordNPlayIO application is the part of the project that’s deployed to the myCobot Pi arm over the network, once paired, enabling CDP Studio to communicate with it.
05 Prepare myCobot
The myCobot arm’s Ubuntu OS has a non-standard version of the OpenSSH server. So you’ll need to make a small change to a config file so CDP Studio can communicate with it over the network. SSH into the myCobot with the username ‘er’ at its IP address; the default password is ‘Elephant’. Then enter:
sudo nano /etc/ssh/sshd_config
Locate the line that sets the PubkeyAuthentication parameter and set it to yes (and make sure the line is not commented out). Press CTRL+X, then Y to exit and save. Then restart the OpenSSH server with:
sudo systemctl restart sshd
06 Pair the arm
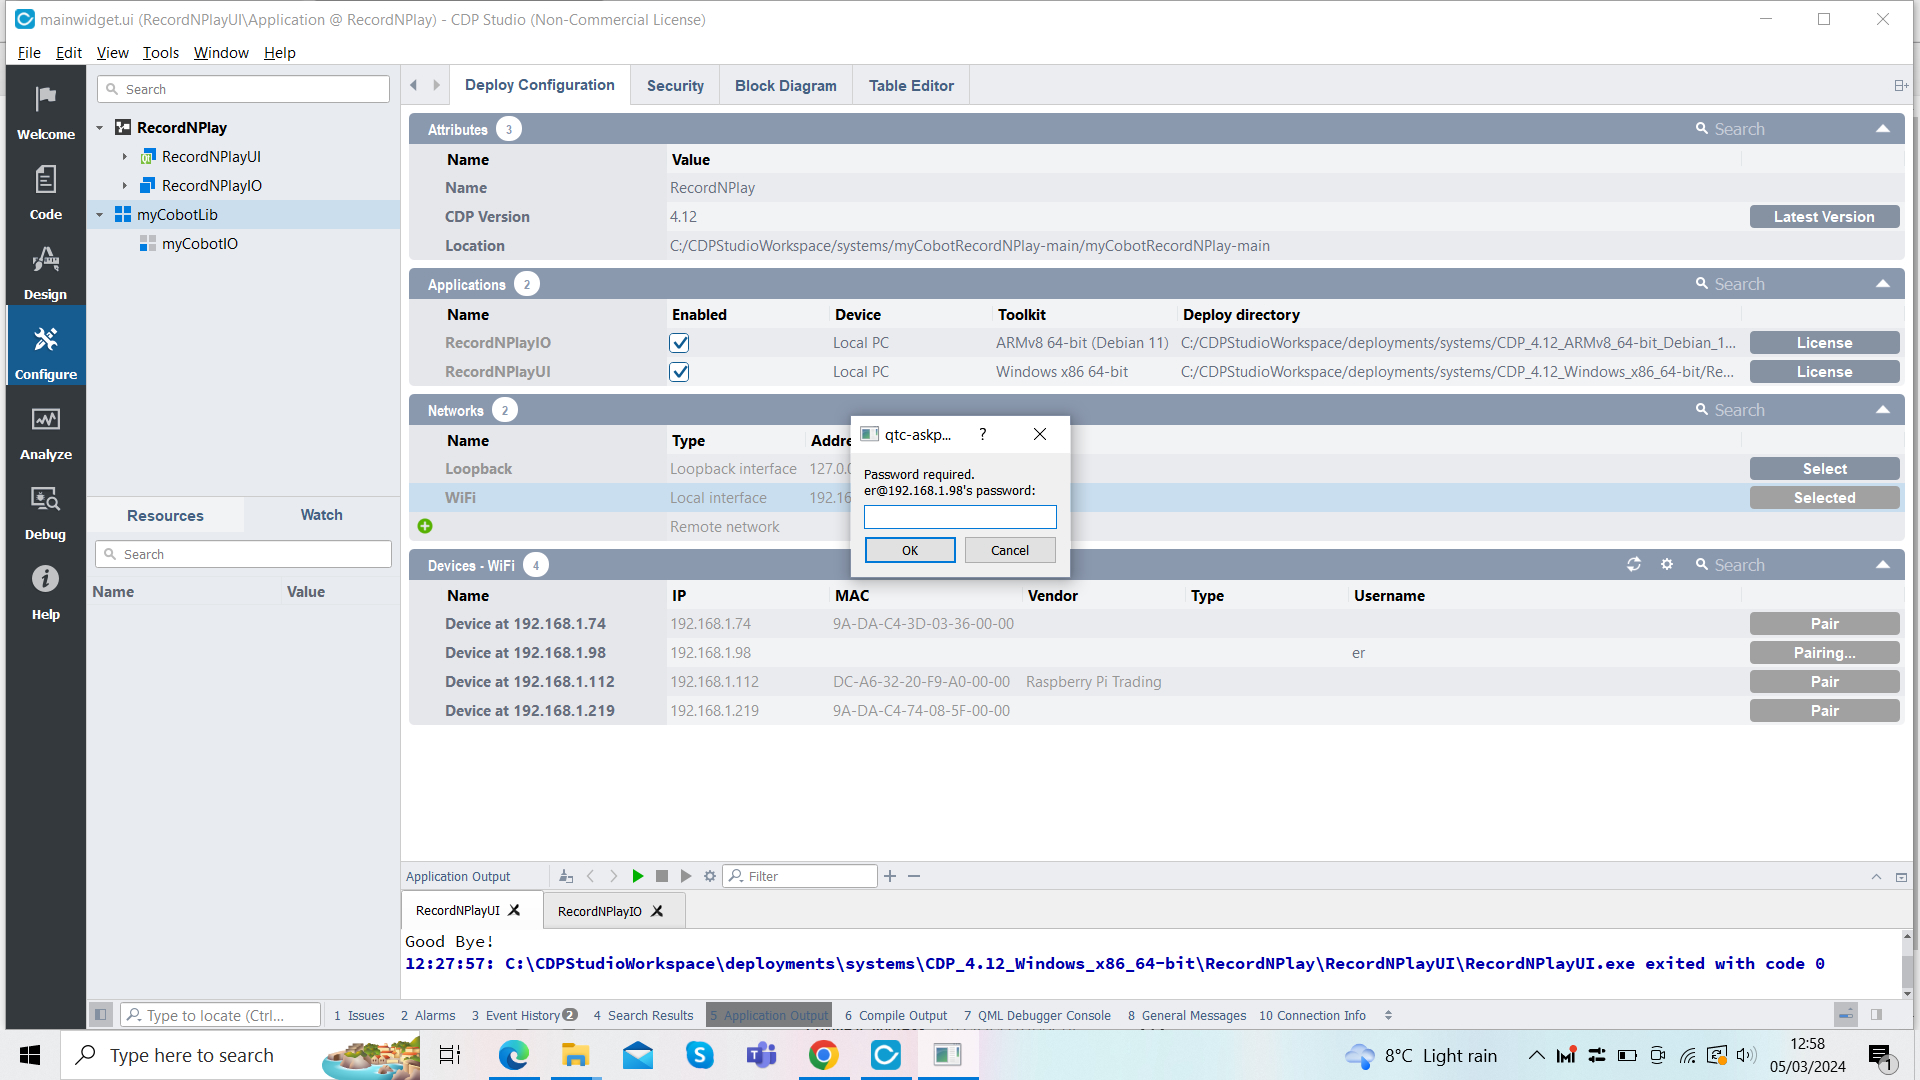
Open the Deploy Configuration tab. Under Networks, press the Select button for ‘WiFi’. The ‘Devices – WiFi’ table below should start showing any devices available to pair with CDP Studio.
Click the Username field for your myCobot (based on its IP address) and enter ‘er’, then click the Pair button next to it. You will be prompted to enter the password – the default is ‘Elephant’.
Under Applications, change the Device for RecordNPlayIO application to your myCobot device name, then change the Toolkit to ARMv8 64-bit (Debian 11). When you run the RecordNPlay project, this will then be deployed over the network to the robot arm.
07 Run the project
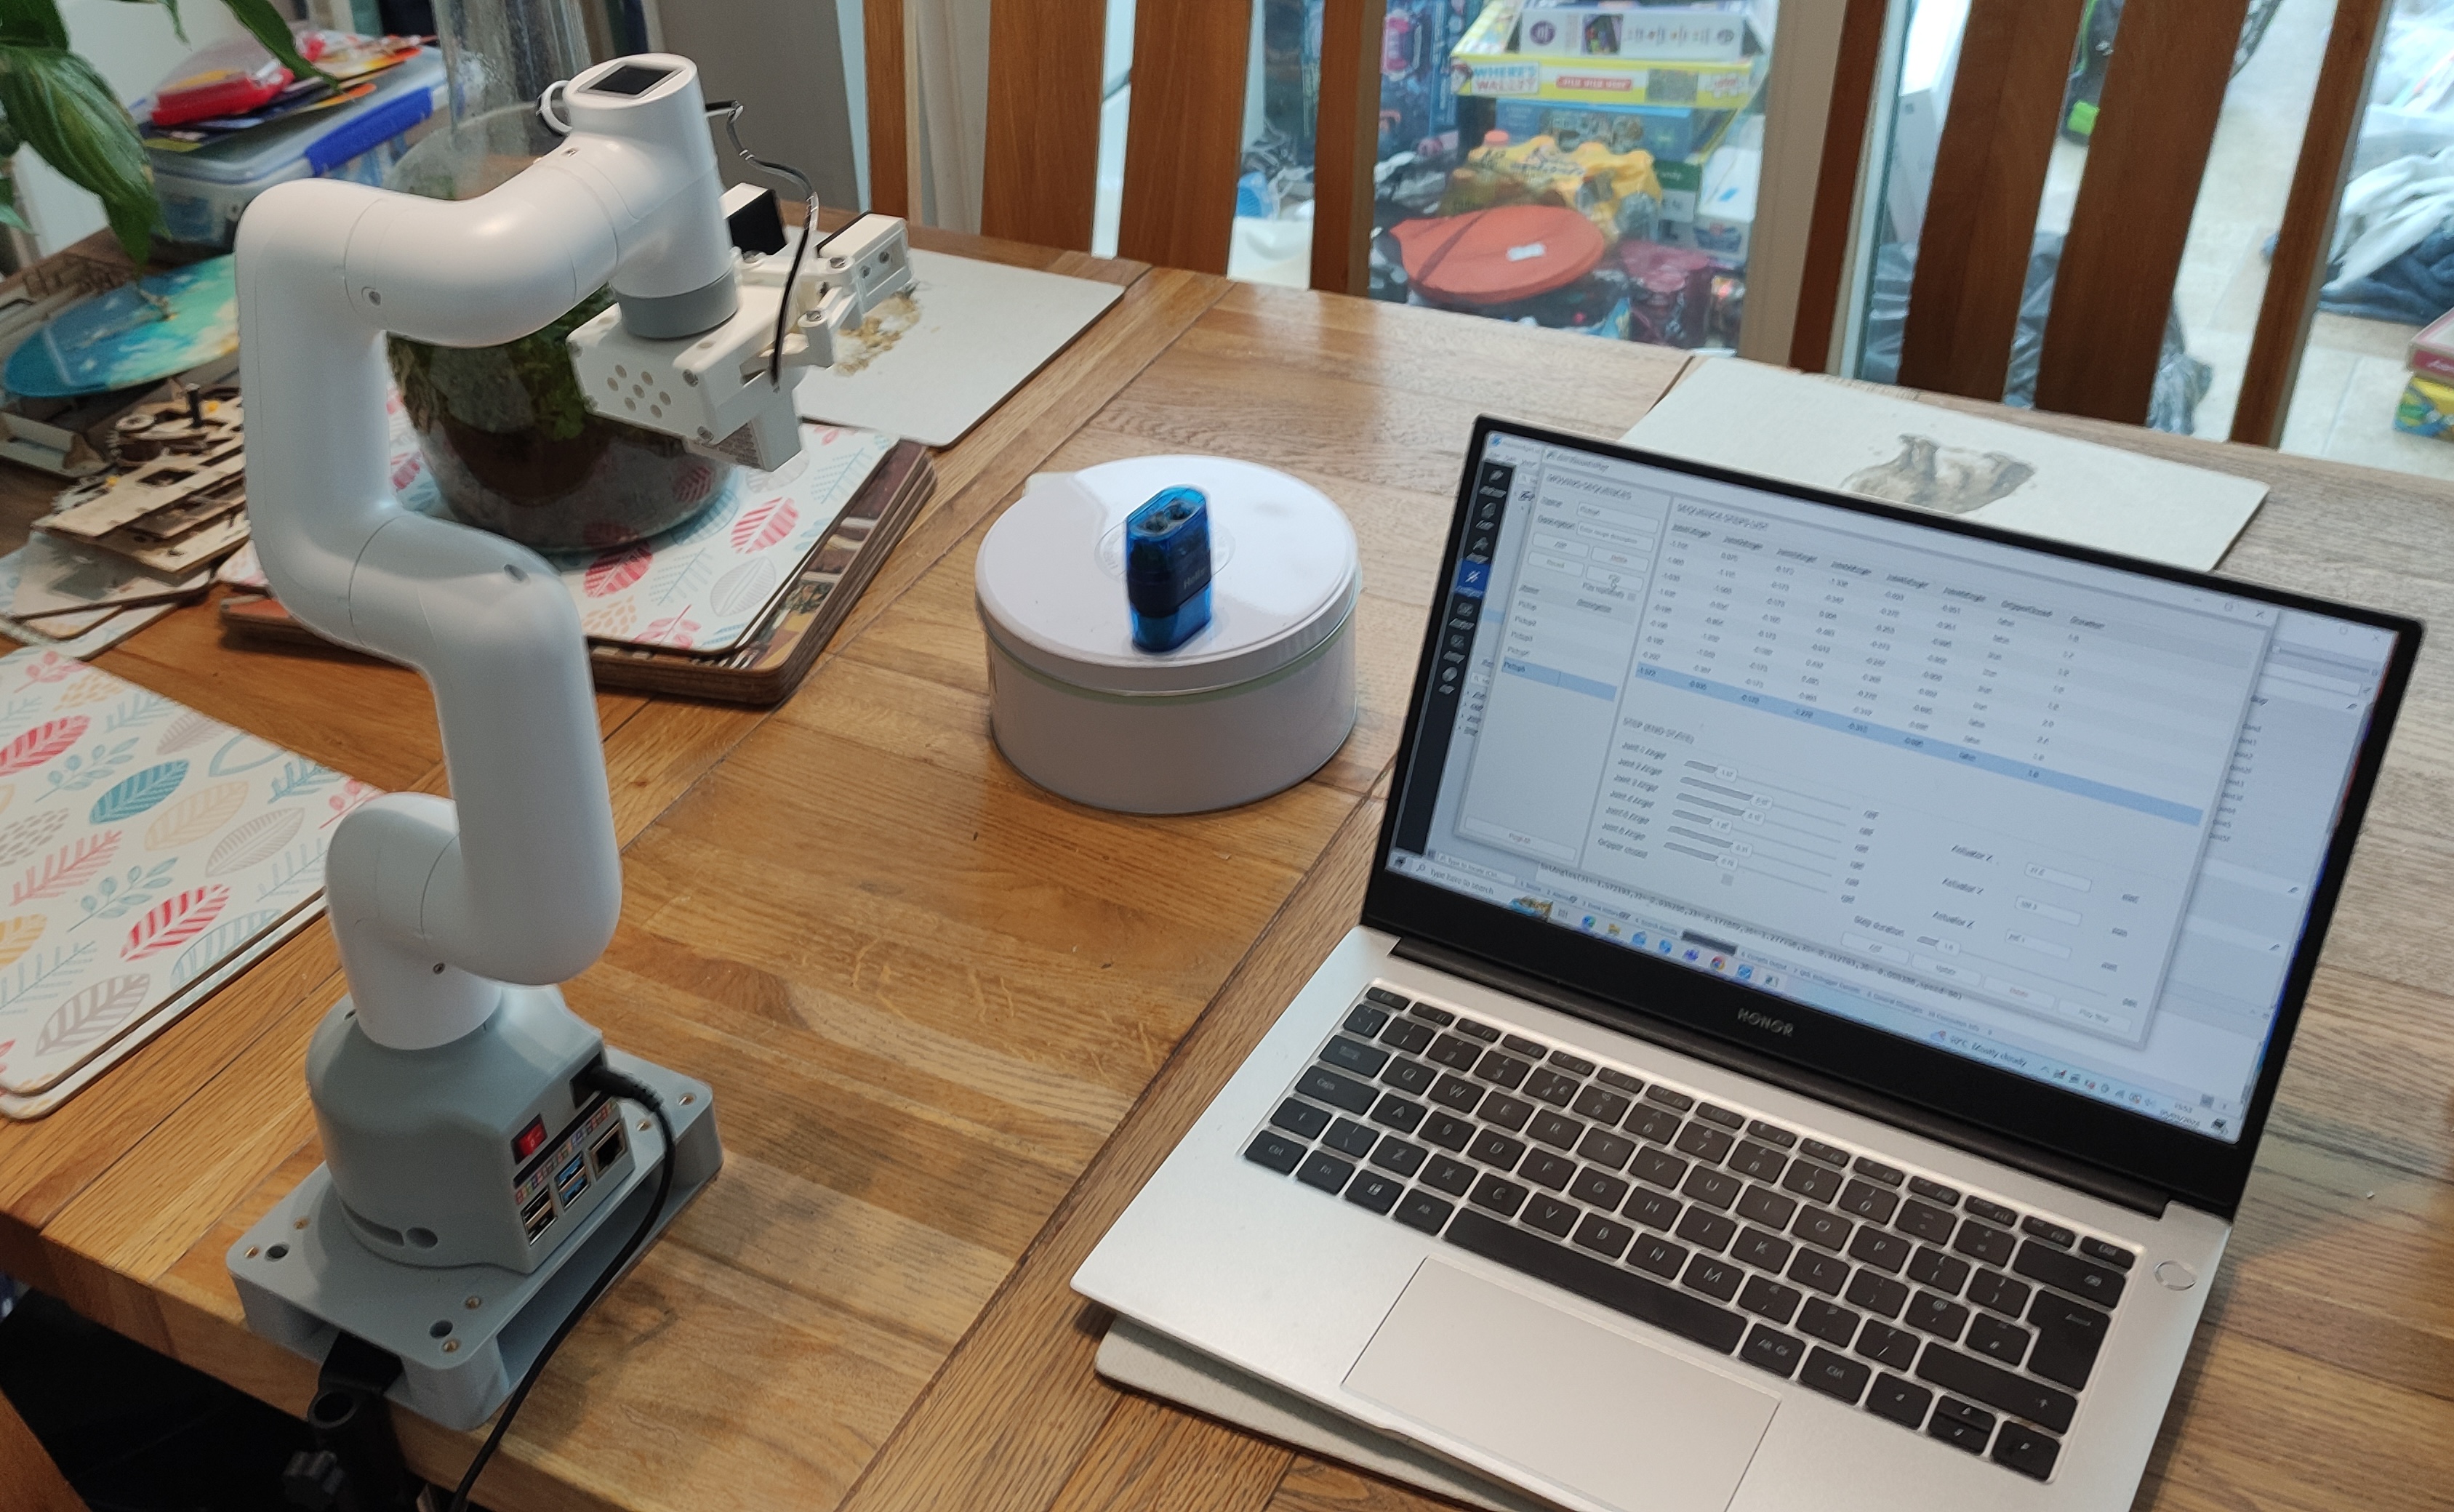
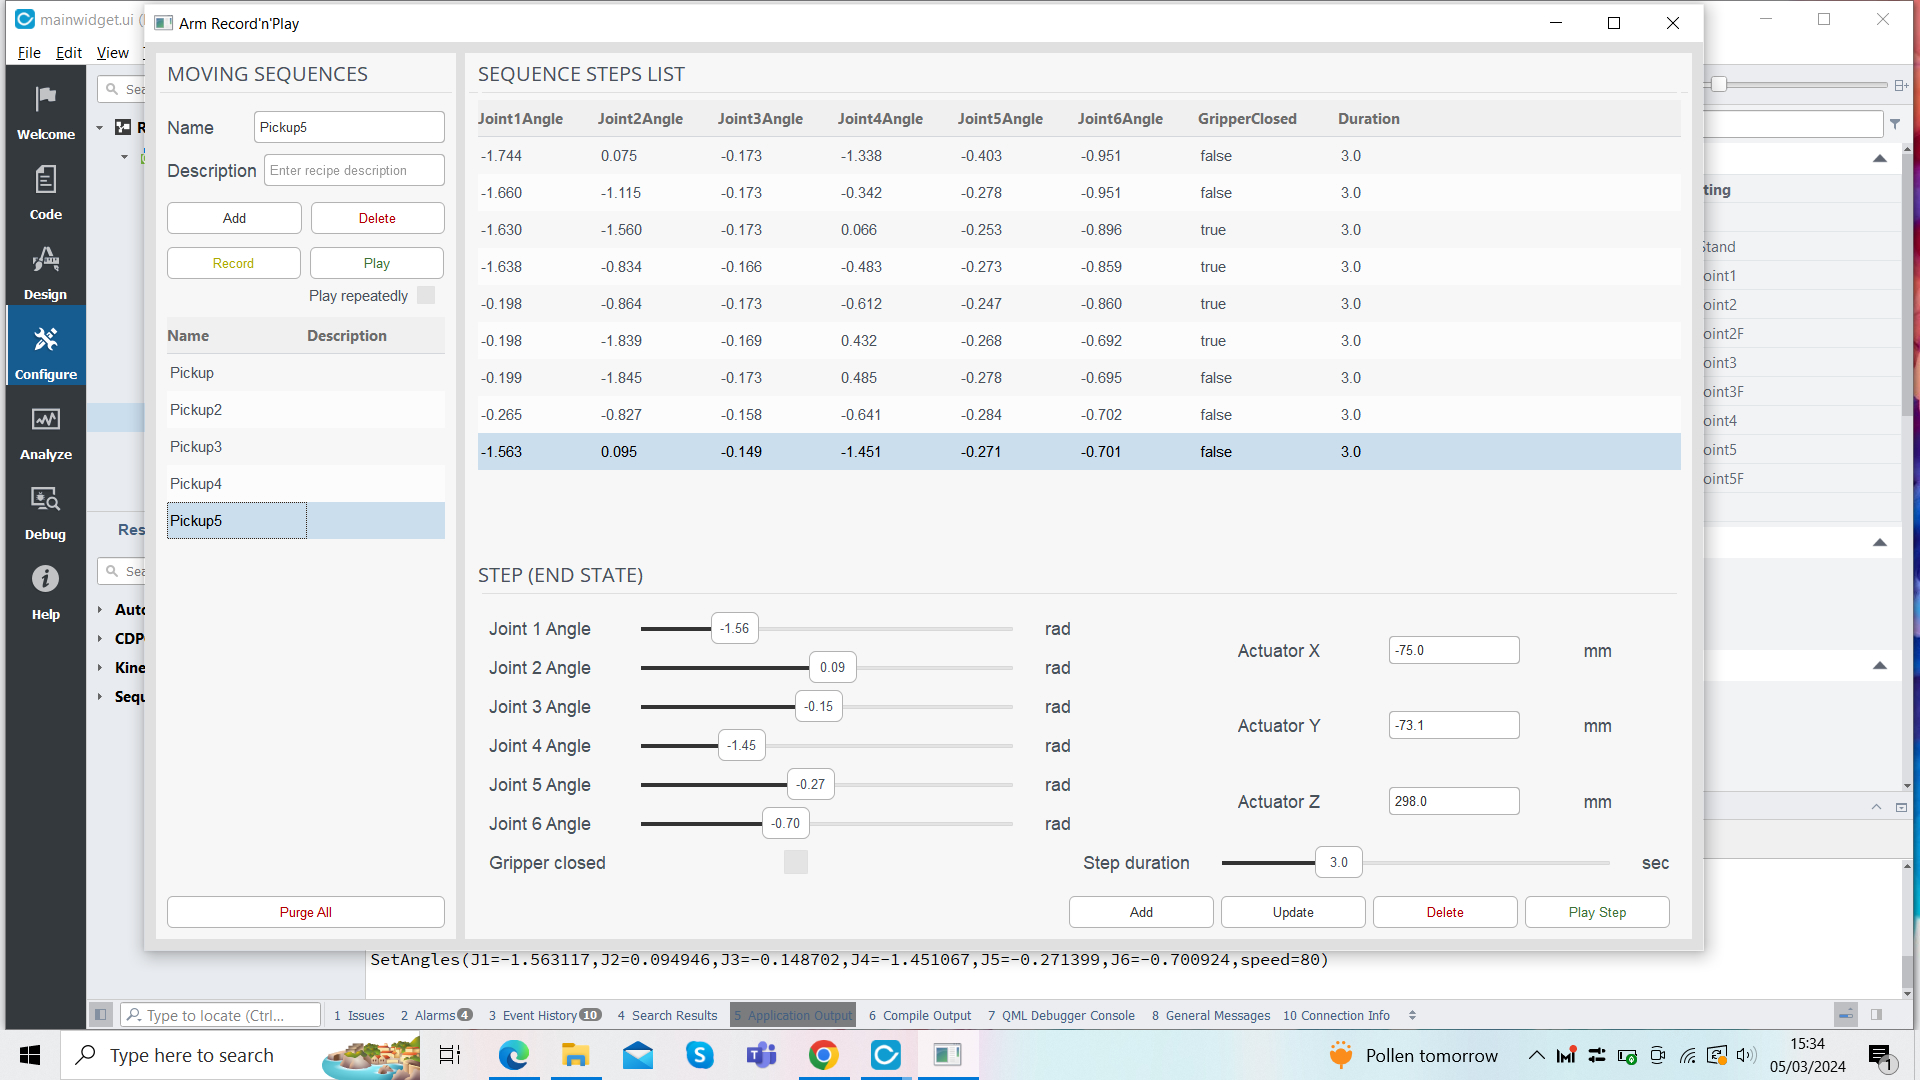
Right-click RecordNPlay in the left panel and select Run & Connect. After a few moments, a new Arm Record‘n’Play window should appear, showing the GUI for recording arm movements. First, enter a name for the sequence and click Add. Then click Record to start recording steps. You can move the sliders, but it’s a lot easier to move the robot arm around and then click its LED panel button to add each position as a step. Recorded steps are shown in a list and can be updated or deleted individually using the buttons at the bottom right. The ‘Step duration’ bar sets the time for which an arm position is held.
Try recording some steps and then hit the top-left Play button to play the sequence. If you have a myCobot arm connected, it should follow the movements you recorded; if not, select ArmVisualizer in the project’s left panel, then the DHChain Visualizer tab to view a 3D representation of the arm with its six joints. As you move between two steps, the visualisation shows both and the movement of the arm’s head with a red line. The gripper status is indicated by a green (closed) or grey (open) dot.
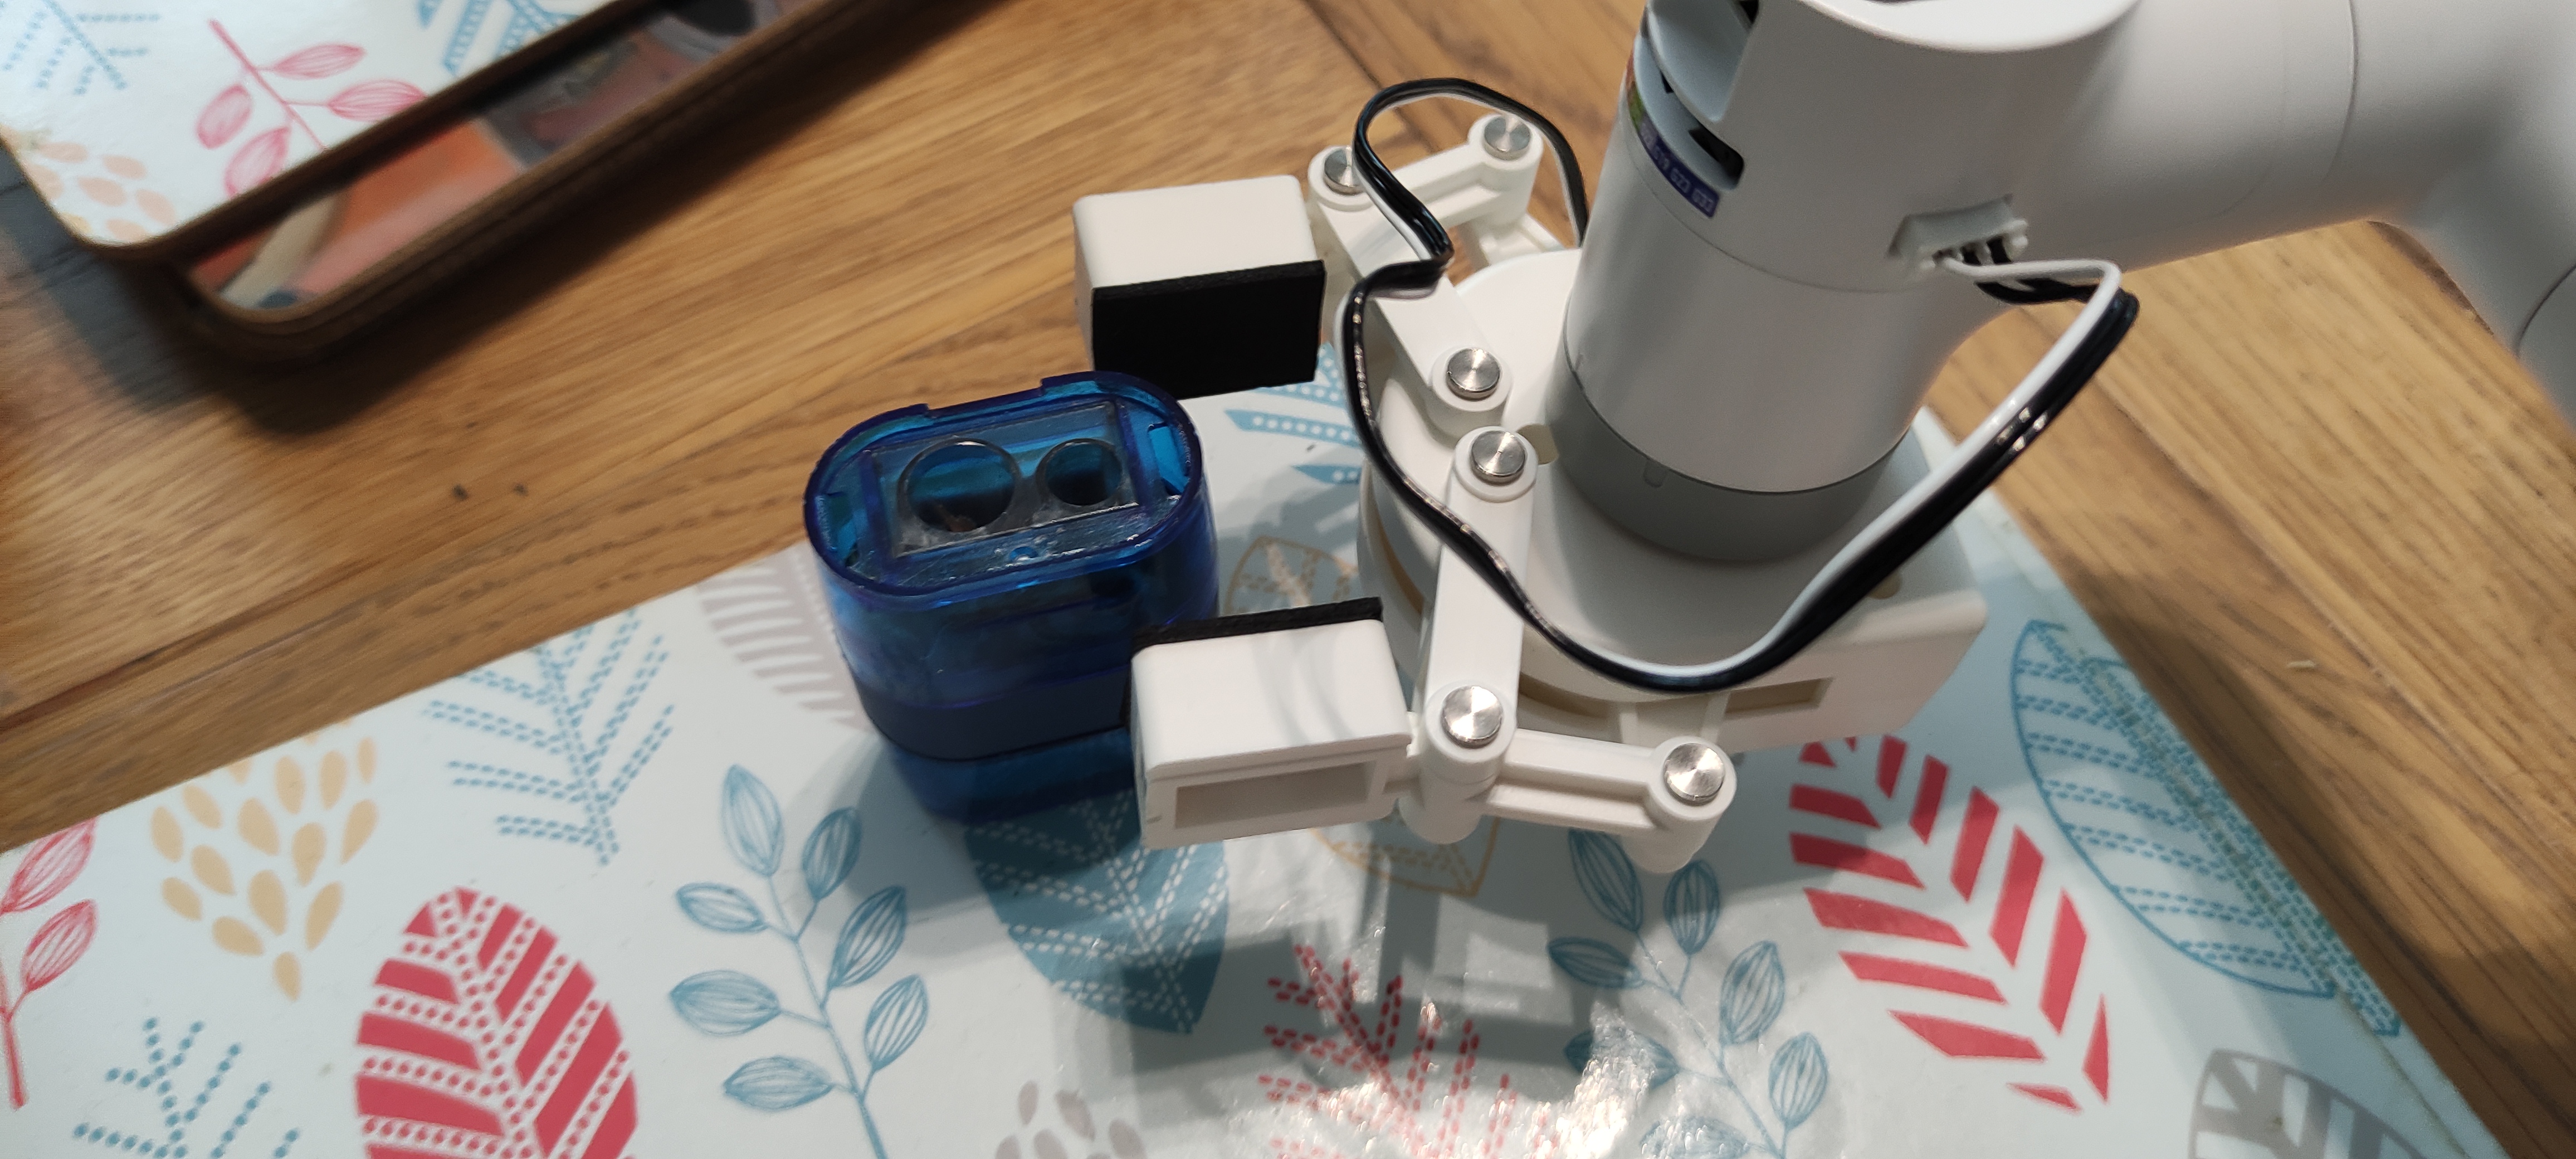
08 Pick and place
Now, let’s get our arm to pick up an object and place it down in another location. We placed a pencil sharpener on top of a biscuit tin, high enough to give the arm plenty of space to pick it up without the bottom of the gripper hitting the table.
Move the arm between positions and press the LED panel button to record each step. You can also open and then close the gripper manually to program it. Make sure the arm is stationary, in the right position, before closing it. Then lift the arm up and move it round and down to where you want to place the object. After opening the gripper to drop it, move the arm straight up so you don’t bump into the item. You can adjust step positions in the GUI if needed. The steps are stored in an SQLite database too, so you could always edit that manually.

09 Kinematics
This project makes used of CDP Studio’s Kinematics framework, in the form of the DHChain component. The basic concept of kinematics is that if you input joint angles for a robot arm, or chain of links, the framework can calculate the end position in 3D space – as shown in our project’s ArmVisualizer pane, with the X/Y/Z coordinates shown in the Arm Record‘n’Play GUI.
The method can also be used in the reverse direction, to convert a desired 3D end position into the required joint angles; this is known as ‘inverse kinematics’.
Kinematics has many uses in the field of engineering, helping to calculate positions and velocities of moving parts such as those in an industrial robotic arm, or a bionic limb or exoskeleton. An example real-world case is the use of CDP Studio and kinematics is for controlling deck cranes on ships.
10 Exploring the project
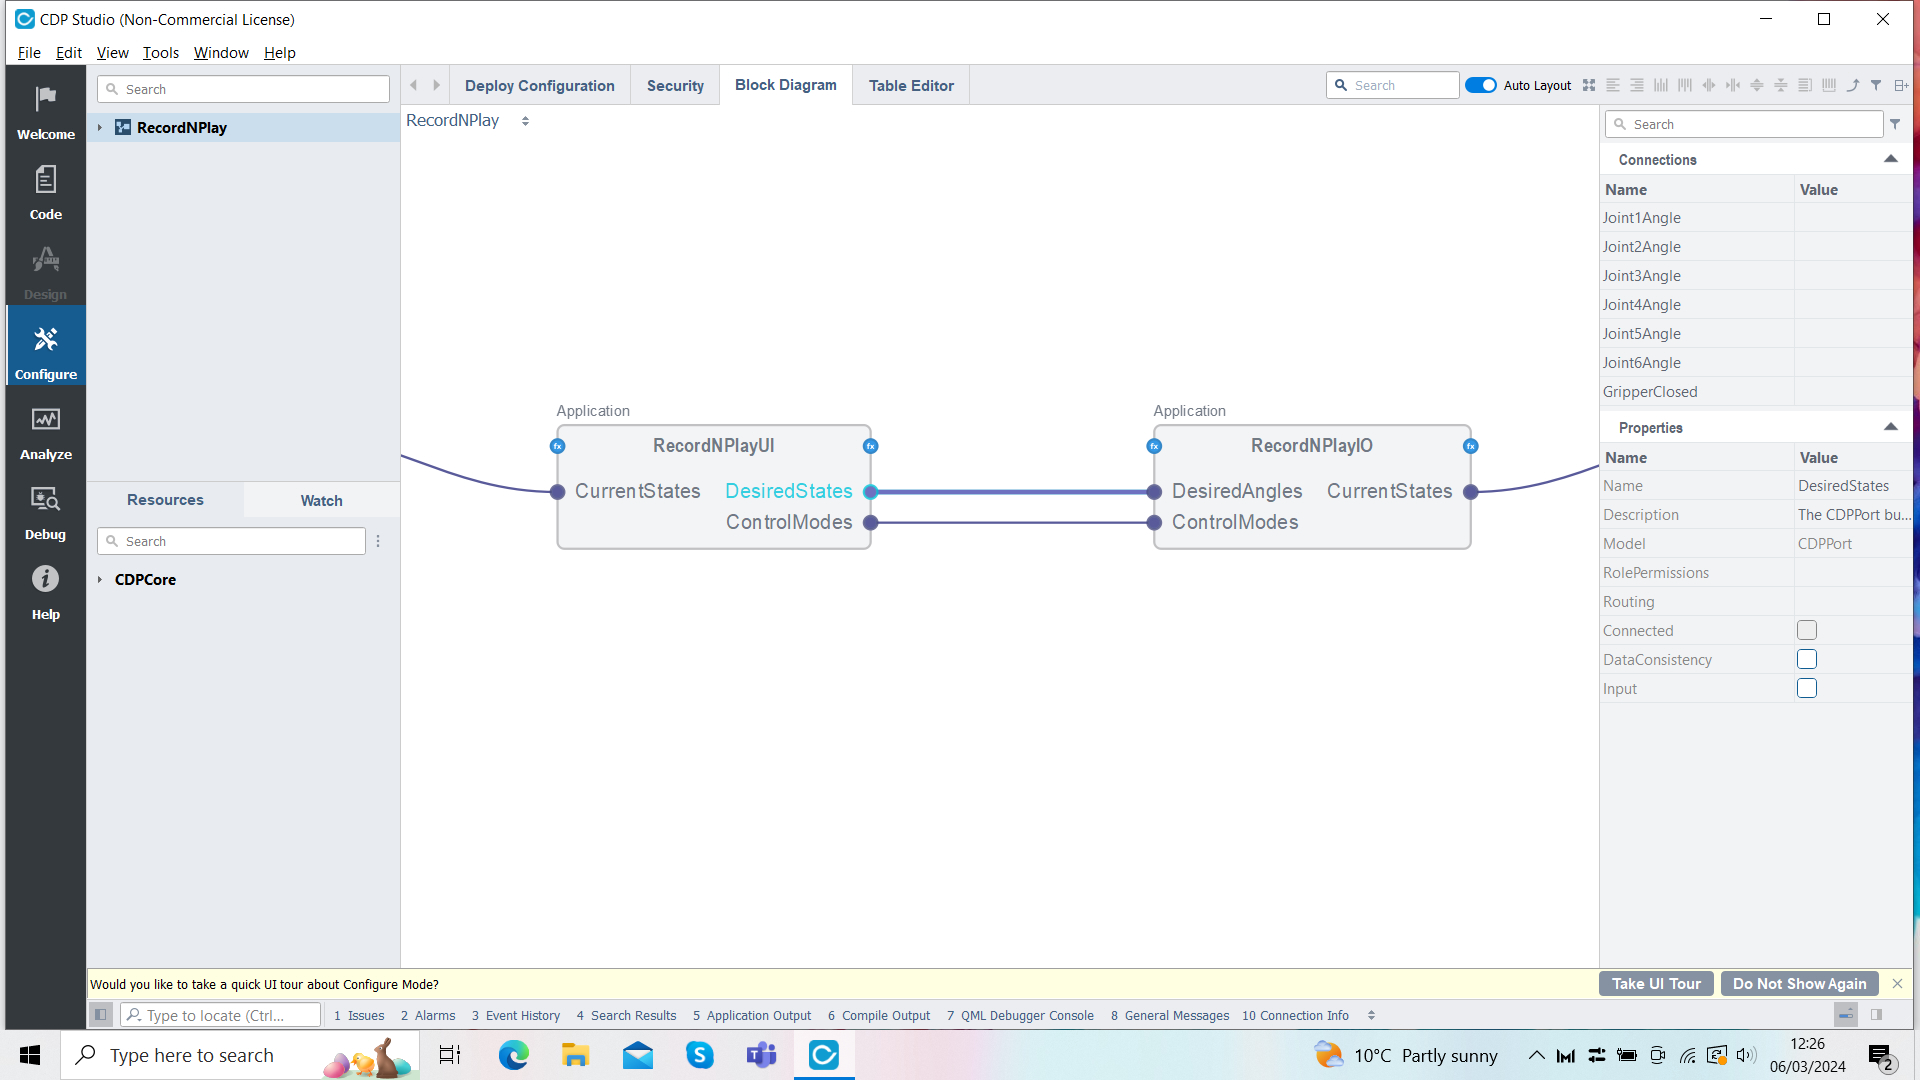
You can click the Block Diagram tab to see how the project’s block-based components have been put together. At the highest level, there are two main blocks: for the RecordNPlayUI application for the GUI step recorder, and the RecordNPlayIO one for communicating with the myCobot arm. Here, the UI block’s DesiredStates port links to the IO block’s DesiredAngles port; it sends the angles set for the six joints, along with the gripper status, so that the arm will move accordingly. The ControlModes link is used to determine whether the arm should maintain a position or be allowed to move freely, for when you’re recording moves. CurrentStates is a feedback port from IO that’s used by UI to know what is the current position of the arm joints, gripper and LED button; this information is used by the recording process in UI.
