Autor: tmedia

  • Ren’py game engine review

    Ren’py game engine review

    Reading Time: 2 minutes

    We think Ren’py might be a good answer. Not because it’s mainly used for creating visual novels (VN) – while easy to deride, they’re a legitimate genre and difficult to make in their own way – but because it’s designed to make it easier to develop. Not only does it have great starter guides, but it also has very advanced functions for more complex game elements, like game-generated animations.

    While it’s been compatible with Raspberry Pi for years, it’s never worked as well as it might. On earlier models you needed to tweak some of the memory usage settings as Ren’py could try to use more than was available. Now that Raspberry Pi 4 is here with much more RAM, it works far better – nearly comparable to full-fat desktop machines.

    Creating a game

    Your humble reviewer spent the last few weeks making a game with it – an item management sim called BBQ DAD – and discovered a huge and helpful community rivalling the one found around Raspberry Pi. Games can easily transcend the intended VN style without too much wrestling, and it has great tools for testing and building your final product. Although you can’t quite release to Raspberry Pi just yet.

    They're a dad that likes to cook on a grill, or as we like to call it, the grillification of video games

    Verdict

    9/10

    A great starting point to learn about game development, and even get your first game out into the world.

    Run Ren’py games on Raspberry Pi

    Ren’py games can be run on Raspberry Pi with some tweaks. After downloading and configuring the launcher for Raspberry Pi, and getting a game, run the Ren’py launcher. Hit Preferences and change the Projects Directory to the folder with the game in. Click Return, select the game from the menu, and hit Launch Project.

  • Build a home music system with Raspberry Pi

    Build a home music system with Raspberry Pi

    Reading Time: 6 minutes

    What you’ll need to build this home music system

    Hardware assembly


    The JustBoom DAC (digital-to-analogue converter) HAT provides high-quality audio output for our project. It also blocks the GPIO header, which we need to power the touchscreen. Luckily, the HAT has a GPIO breakout, so we soldered a two-pin header to the 5V and GND for the touchscreen so the whole system can be powered by a single connector. You can also use two power supplies if you prefer. Mount the DAC HAT on the GPIO pins and secure. We used 20mm 2.5M screws to secure the HAT to the computer and screen controller standoffs. Connect the 5V and GND pins for the touchscreen to their partners on the DAC HAT.

    The DAC HAT provides high-resolution output at line level. You can swap this with an amplifier HAT and use passive speakers instead

    Prepare Raspberry Pi OS

    The case prevents access to the microSD card, so make sure you’ve got a basic setup of Raspberry Pi OS before assembling everything. For this project we’re going to be using Chromium, so we need the ‘standard’ OS image with a Desktop (but we don’t need the Recommended Software version). Burn this image with your preferred method and make sure you’re connected to the network with SSH enabled or hook up a mouse and keyboard if you prefer. Finally, as ever, make sure you’re running the latest version of everything with sudo apt update && sudo apt upgrade.

    Mount into the case


    The Raspberry Pi 4B case used here will not accept the assembly with the DAC HAT. If you’re not using a HAT, you can skip this step. Otherwise, carefully remove the two wall mounting screw holes and then line up the HAT with the top ventilation spacers and remove any that are blocking the two phono sockets and the 3.5mm socket from sitting flush in the case. Measure twice and cut once! The plastic is soft, so it’s fairly easy to do. Once the assembly is sitting comfortably in the case, you can screw in the touchscreen and it should now sit up securely.

    We’ve modified the case and removed the back so everything fits. The screen takes its 5V feed from the GPIO breakout on the DAC HAT.

    Enable DAC output

    No sound will come from the DAC HAT by default. Luckily, the required drivers are already installed and waiting to be enabled. From the command line, run the following:

    sudo nano /boot/config.txt
    

    Find the line that reads:

    dtparam=audio=on
    

    Remove the line (or add a # to the front to comment it out) then add these lines:

    dtparam=audio=off
    dtoverlay=justboom-dac
    lcd_rotate=2
    

    That last line flips the screen if you’ve found, as we did, that the touchscreen display is now upside down. Reboot your Raspberry Pi computer and from the command line, test audio output:

    aplay /usr/share/sounds/alsa/Front_Center.wav
    

    You should hear a calm voice say ‘front centre’.

    Install Mopidy


    Mopidy is a headless music server. This means it has no user interface of its own, so we’ll add one later. To install Mopidy, we need to add its repository to APT. Run the following commands one-by-one:

    wget -q -O - https://apt.mopidy.com/mopidy.gpg | sudo apt-key add -
    sudo wget -q -O /etc/apt/sources.list.d/mopidy.list https://apt.mopidy.com/buster.list
    sudo apt update
    

    Now install Mopidy and set its user’s permissions:

    sudo apt install mopidy
    sudo adduser mopidy video
    

    Finally, set Mopidy to run as a background service on boot:

    sudo systemctl enable mopidy
    

    Configure and test Mopidy

    Before Mopidy can be run, we need to configure a few things. The default settings are sensible but if you want to access the web interface (once installed) from another device, we’ll need to allow that.

    sudo nano /etc/mopidy/mopidy.conf
    

    The file will be empty except for some comments. After the comment block, add this:

    [http]
    hostname = 0.0.0.0 
    output = alsasink 

    Save the file with CTRL+X and then start Mopidy:

    sudo systemctl enable mopidy
    

    In a browser, go to http://:6680/ (replace with the name of your Raspberry Pi – it’s ‘raspberrypi.local’ by default). If you get a rather boring welcome page displayed, all is working well.

    Install the UI & file support


    Mopidy is made up of modules. Out of the box it can’t do very much, but with some add-ons it becomes powerful. Next we’re going to install Iris, a user interface, and support for playing music stored on the local system. Run these commands:

    sudo pip3 install Mopidy-Iris
    sudo pip3 install Mopidy-Local
    sudo sh -c 'echo "mopidy ALL=NOPASSWD: /usr/local/lib/python3.7/dist-packages/mopidy_iris/system.sh" >> /etc/sudoers’
    sudo systemctl restart mopidy
    

    This installs the Iris and Local modules then gives Iris permission to run Mopidy commands as the superuser. Finally, we restart Mopidy to pick up the changes. In a web browser, go to http://:6680/iris/ to see our shiny new interface. The Iris interface works exceptionally well with the touchscreen set up in kiosk mode

    Just add music

    Our installation is now ready to play music, so we should probably get some! Mopidy supports a wide range of formats including MP3 and FLAC. Whatever you decide to use, create a space for your music and upload some files there. You’ll find a Music folder already exists in your home directory. We need to tell Mopidy where to look for your files. Edit the Mopidy configuration file:

    sudo nano /etc/mopidy/mopidy.conf
    

    Add append the following:

    [local]
    media_dir = /home/pi/Music
    

    Restart Mopidy to pick up the configuration changes and then initiate the first music scan:

    sudo mopidyctl local scan
    

    Now in Iris, you should be able to see your albums appear. Try playing one!

    Kiosk mode

    To get Iris running on the touchscreen, we can make Chromium run in ‘kiosk’ mode so no other elements of Raspberry Pi OS Desktop can be seen. The first step is to install ‘unclutter’, a handy app for hiding the mouse pointer when not in use.

    sudo apt install unclutter
    

    Now we’ll create a script to launch Chromium with all the correct settings:

    nano ~/kiosk.sh
    

    Add the code shown in the listing. When run this will enable cursor hiding, prevent some Chromium error messages from being displayed and then start Chromium in kiosk mode, going directly to the Iris website in full-screen.

    Implement the kiosk script

    Before we can use the script, it needs to be flagged as an executable:

    chmod +x ~/kiosk.sh
    

    Now try it out by running ~/kiosk.sh. If you’re entering commands remotely via SSH, use this command instead:

    DISPLAY=:0 ~/kiosk.sh
    

    All being well, Iris should start full-screen and be controllable by touch. We recommend going into settings and enabling ‘Wide scrollbars’ to make it easier to control with fingers. You can also choose between light and dark themes, the darker theme being a little kinder on the eyes when used with the touchscreen.

    Run on boot


    The final step for our music system is to make it run on boot and go straight into kiosk mode. We’ll ask the Desktop itself to do this. Enter the following in the command line:

    sudo nano /etc/xdg/lxsession/LXDE-pi/autostart
    

    Add this line, including the ‘@‘ sign:

    @/home/pi/kiosk.sh
    

    Save the file and reboot your system. The desktop will appear and then Iris will boot full-screen. Your touchscreen music system is now ready for use. You can control everything from either the touchscreen, a web browser on any device, or your smartphone.

    #!/bin/bash
    unclutter -idle 0.5 -root &
    sed -i 's/"exited_cleanly":false/"exited_cleanly":true/' /home/pi/.config/chromium/Default/Preferences
    sed -i 's/"exit_type":"Crashed"/"exit_type":"Normal"/' /home/pi/.config/chromium/Default/Preferences
    /usr/bin/chromium-browser --noerrdialogs --disable-infobars --kiosk http://127.0.0.1:6680/iris &
    

    Load up the music

    If you want to add some audiophile-grade music to your collection, you can use your Raspberry Pi computer to rip CDs to FLAC, a lossless compression system. The files are are large, but no music detail is lost. A very easy-to-use ripper is ‘A Better CD Encoder’ aka ‘abcde’.

    sudo apt install abcde
    

    Hook up a CD drive to the USB port, insert a CD, and enter this:

    abcde -o flac
    

    Abcde will guide you through the whole process, including automatically naming the tracks. Place the resulting directory in your Music directory and go to Settings in Iris to initiate a rescan.

  • Project Zed: Raspberry Pi robot

    Project Zed: Raspberry Pi robot

    Reading Time: 3 minutes

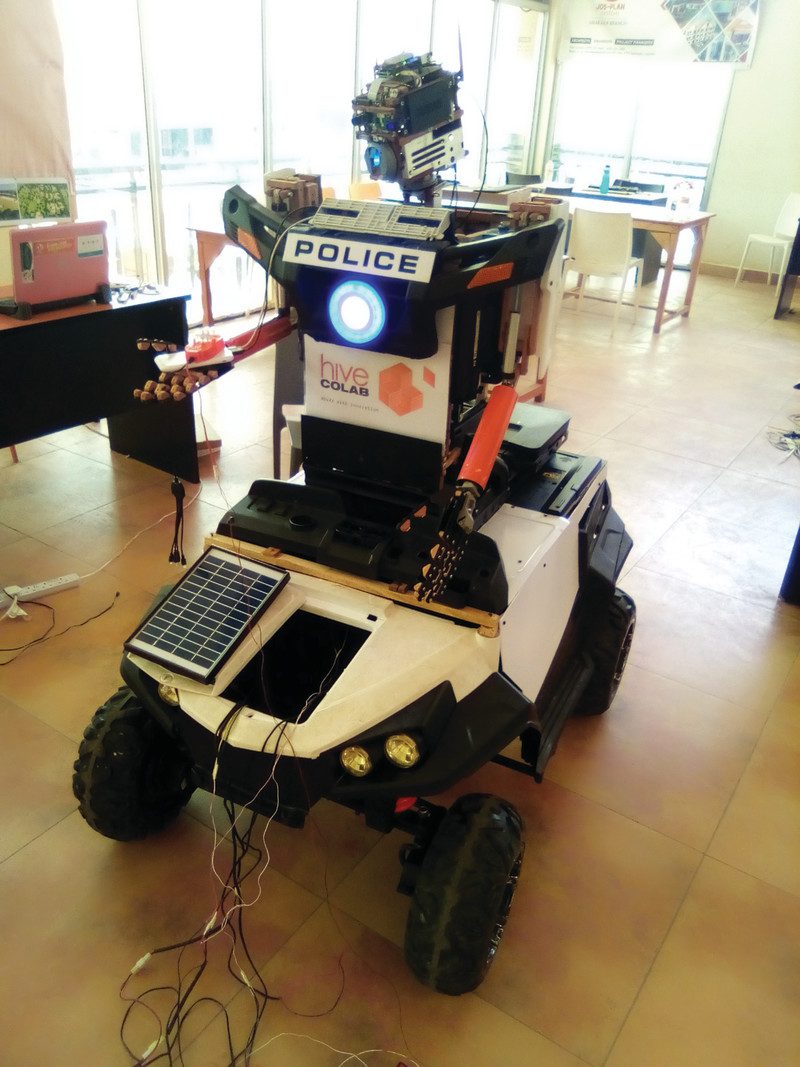
    Joseph Uding’s robot-building education started with Stan Winston’s Hollywood animatronics and MIT’s robotics online courses. He’s now a project officer at Hive Colab’s department of Robotics and AI.

    The single-board computer features prominently in Joseph’s Project Zed robot, created as a means of encouraging citizens to take sensible health precautions. “A friend said ‘build a robot that can help in fighting Ebola in West Africa’. That was in 2016 and we didn’t take it seriously because no cases were in Uganda, but when 2020 came I got to work. With a robot, he says, “you can carry out random tests and collect information from someone without risking important medical workers.”

    Raspberry Pi enabled Joseph to add personality and voice-based interaction to the robots he’s built, as well as delivering preset messages such as “don’t forget to wear a face mask”.

    The robot can move around, telling people to put on their masks and to keep their distance

    Parts and labour

    Project Zed is, by necessity, a masterclass in upcycling: 3D printers and next-day component deliveries aren’t reliably available in Uganda, but Joseph believes that if you can have a clear idea of what you want to make, you can make it from almost anything. “The first thing is to see the problem you want to solve with the robot you want to make.” His project took him just three weeks.

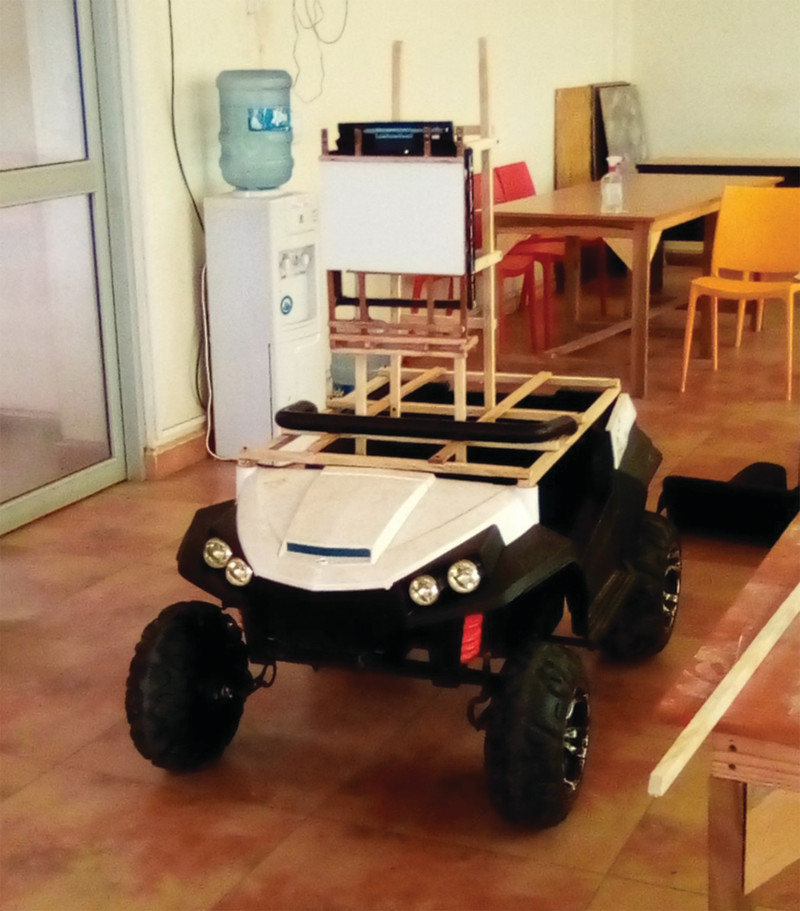
    After work one day, he went to visit some guys who fix printers and asked them for old dead ones. “They smiled and gave me about four spoiled old printers. From there I got DC motors and plastic parts to use when housing the robot.” The motors would be used to replace those in a broken RC car that would act as the robot’s base and help stabilise it.

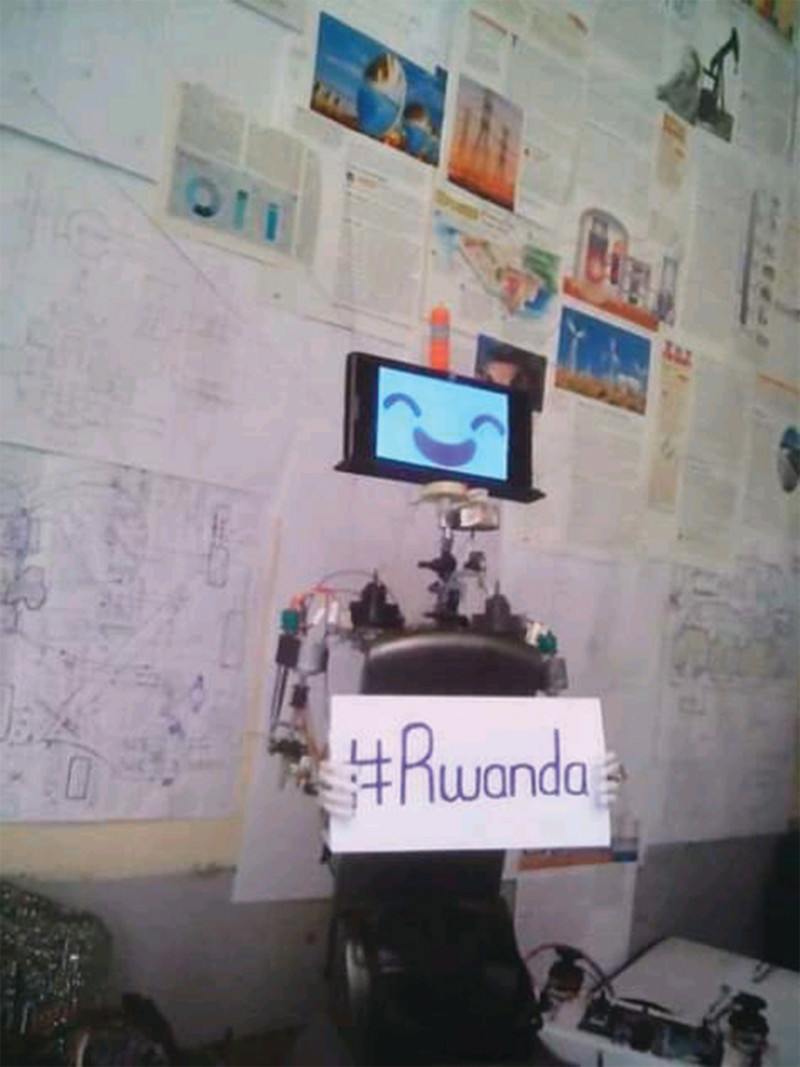
    Joseph’s first ever robot, TIM, made from a TV antenna, with facial expressions by Google Assistant on an old mobile phone

    The initial designs were in lightweight wood he sourced himself – “just like the way planes are made” – which was light and easy to work with. Plastic from the old printers was used for the casing.

    Aside from the Raspberry Pi to control things, the half-humanoid, half-RC car robot has a Roboclaw 2 motor controller and a Google Coral AI USB accelerator .

    It can be controlled from a distance of up to roughly 400 metres and can listen, talk, and see objects. “It can move its arms up and down, but not the fingers yet,” says Joseph. “It’s limited to doing one thing at once – bending down to pick something up or moving itself along – because it has only one Raspberry Pi for the head where the AI is based.”

    Joseph upcycled an old remote-control car for his robot’s base

    Software trials

    Joseph first tried using the open-source TensorFlow and YOLO for object detection, but really had in mind something more like a Movidius Neural Compute Stick to handle face detection (which he didn’t have). Instead, having consulted projects such as the Personal Assistant Robot, he turned to SSH and live video streaming, which did a great job. “I can control the robot from anywhere around the world using my cell phone or PC any time I want to,” Joseph explains – something with clear potential in war or disaster zones where medical workers’ lives would otherwise be at risk.

    “Doing such projects where you don’t have the actual resources helps you to be good at recycling things and also teaches you how to be super-creative in life,” he says, modestly.

  • Mind Patterning

    Mind Patterning

    Reading Time: 2 minutes

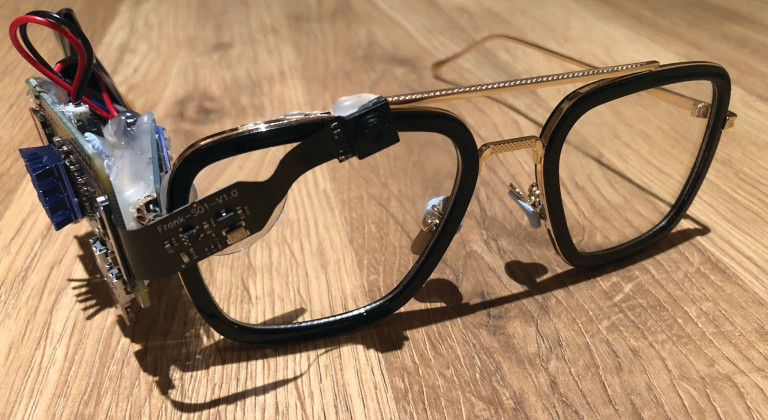
    Since then he’s made several Raspberry Pi projects, including Spider-Man specs – hence his profile pic. His Mind Patterning headset is intended “to kick off a much larger project using mind-reading capabilities.”

    The project reads brainwave data with a MUSE headband and uses TensorFlow machine learning to train a model on the data to recognise a relaxed or non-relaxed mind state.

    Training the mind-patterning headband to discern whether Mike’s happy or unhappy (will it still work when he finally becomes a robot, though?)

    Mind over matter

    Michael used a Raspberry Pi 4 for the Mind Patterning project “because it allows lots of applications to run simultaneously.” The Bluetooth setup required for Raspberry Pi to import data from the headset turned out to be one of the trickier aspects of the build since the latter is really designed to work with iOS or Android.

    “Using Raspberry Pi was essential for the TensorFlow tech required for training a neural network on the recorded EEG data,” he explains. “The code is where the design and development was [see his GitHub repo]. I used some libraries from elsewhere in order to get the EEG data logged and accessed. So many people use Raspberry Pi and it ensures that there is always support and information out there to learn from and assist,” he notes.

    Raspberry Pi 4’s flexibility and processing power meant Michael needed little else to realise his project.“It has so much hardware on board, including the power for the machine learning, which is where the multicore and lots of RAM really helped,” he says.

    One of Mike’s other projects recreates the EDITH glasses from Spider-Man: Far From Home

    Trial and error

    “Initial testing of the model training and inference was done with the PipelineRunnerTest.py file,” explains Michael. “This creates artificial sets of training and neural network testing data. It calls CSV preprocessing (which loads and trains the model), then runs that against the test data.”

    This approach allowed him to see quickly how well the model would work if given real-world data, and to make adjustments. “I was trying to get the raw EEG sensor data at first, but then realised I needed to get the data processed into alpha/beta/theta wave data before passing to the neural net.”

    Michael hopes to develop the project to read more mind states, possibly even emotions, and sees future potential for the mind-patterning idea in simulating human responses via a neural network.

    “With more tweaking and more data, it could be used to interact with the hardware without having to manually press buttons, but I’m sure Elon Musk’s Neuralink is going to be far, far more effective than anything I could ever do,” he says.

  • Sponsored! Add AI to your project & pi3g will supply the kit

    Sponsored! Add AI to your project & pi3g will supply the kit

    Reading Time: 2 minutes

    pi3g plans to celebrate AIY Projects and Coral by giving away five AIY Voice Lot v2, AIY Vision, or Coral USB Accelerator units to The MagPi readers. And we will make sure the world gets to see your creation!

    All you have to do is tell us what you plan to make with your AIY Voice Kit, AIY Vision Kit, or USB Accelerator. If your project is selected, pi3g will send you the kit you need and you will appear in a future edition of The MagPi magazine.

    The AIY Voice Kit v2 enables you to explore voice recognition and natural language.

    Using AIY Vision Kit you build an intelligent camera that identifies objects.

    Both AIY Voice v2 and AIY Vision kits include a Raspberry Pi Zero WH and the cardboard DIY cases (for easy assembly and no soldering required!).

    The Coral USB Accelerator brings the Edge TPU (Tensor Processing Unit) to Raspberry Pi. TPU is Google’s purpose-built chip designed to run AI at the edge: your projects are capable of performing fast and efficient AI calculations. Add features such as real-time object recognition and classification, speech processing, and smart decision making. All while maintaining data privacy! It goes great with Raspberry Pi 4’s USB 3.0 port.

    So don’t delay! Let us know today what you could do with artificial intelligence.

  • Run Windows 98 on Raspberry Pi with DOSBox-X

    Run Windows 98 on Raspberry Pi with DOSBox-X

    Reading Time: 7 minutes

    Copyright alert!

    DOSBox is an emulator and we use it with open-source FreeDOS code. Be mindful of copyright when downloading image files, and only use proprietary software that you own and in accordance with the licence terms.

    To run Windows 98 software on Raspberry Pi you’ll need
    :

    Find a copy of Windows 98

    Getting hold of Windows 98 is no longer easy as – unlike MS-DOS, or Windows 3.1 and 7 – Microsoft is no longer allowed to distribute Windows 95, 98, and Me through its Visual Studio Subscriptions program due to an intellectual property claim by Sun.

    That means you’ll have to find a second-hand or unsold stock copy – eBay is a good bet for this – or rummage through your loft for old installation discs. The Windows product key is the really important bit here as the software is useless without it: check for key stickers on your old laptop or desktop PCs.

    You’ll also need a boot floppy to run most versions of the installation disc.

    Image install media

    It’s easiest to install Windows 98 from images, so we’ll want to copy both boot and install media. You can use another computer to image your discs and then copy them over, but if you have USB CD and floppy disk drives that play nicely with Raspberry Pi – not all do – then you can use dd in a Terminal window.

    CD example:

    dd if=/dev/sr0 of=win98.iso
    

    Floppy example:

    dd bs=512 count=2880 if=/dev/sda of=win98boot.img
    

    In this tutorial, we’ve put all our media images in our home directory, but you may wish to create dedicated CD and floppy directories to house them in.

    Install DOSBox-X

    Open a Terminal window and enter:

    sudo apt install automake libncurses-dev nasm libsdl-net1.2-dev libpcap-dev libfluidsynth-dev ffmpeg libavdevice58 libavformat-* libswscale-* libavcodec-*
    git clone https://github.com/joncampbell123/dosbox-x.git
    cd dosbox-x
    ./build
    sudo make install
    dosbox-x
    

    DOSBox-X should open at its Z: prompt. Now exit, because we’ll be using a custom config file for our Windows 98 shenanigans.

    Before we get started in earnest, set Raspberry Pi’s desktop resolution to 1280×720 under Preferences > Screen Configuration, accessible from the main menu: this improves full-screen performance under Windows 98.

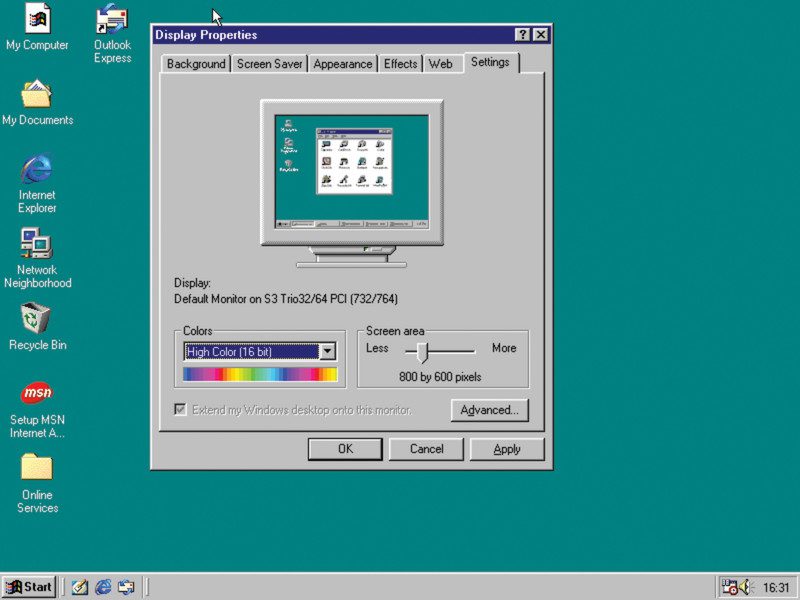
    If you set Raspberry Pi to a 1280×720 resolution, then Windows will happily run at 800×600, but you may need lower settings for some software

    Configure networking

    Download our win98_install.conf and win98.conf files from The MagPi GitHub and put them in your home directory.

    [sdl]
    autolock=true
    fullresolution = desktop
    output = opengl [dosbox]
    title=Windows 98
    memsize=64
    cycles=60000
    vesa modelist width limit=0
    vesa modelist height limit=0 [render]
    # aspect ratio correction
    aspect = true [cpu]
    cputype=pentium_mmx
    core=normal [sblaster]
    sbtype=sb16vibra
    irq=5 [ne2000]
    # If you want networking in Windows, set ne2000=true.
    # This also requires that you set realnic= to a suitable value for your PC - that should be 1 for Raspberry Pi 4 wlan
    ne2000=true
    nicirq=10
    realnic=1 [fdc, primary]
    int13fakev86io=true [ide, primary]
    int13fakeio=true
    int13fakev86io=true [ide, secondary]
    int13fakeio=true
    int13fakev86io=true
    cd-rom insertion delay=4000 [render]
    scaler=none [autoexec]
    imgmount 2 win98hd.img -size 512,63,130,1023 -fs none
    imgmount d win98.iso
    imgmount a win98boot.img -t floppy
    # If you have a bootable Win98 disc replace the above line with:
    # imgmount 0 -el-torito D -t floppy -fs none
    boot A:
    

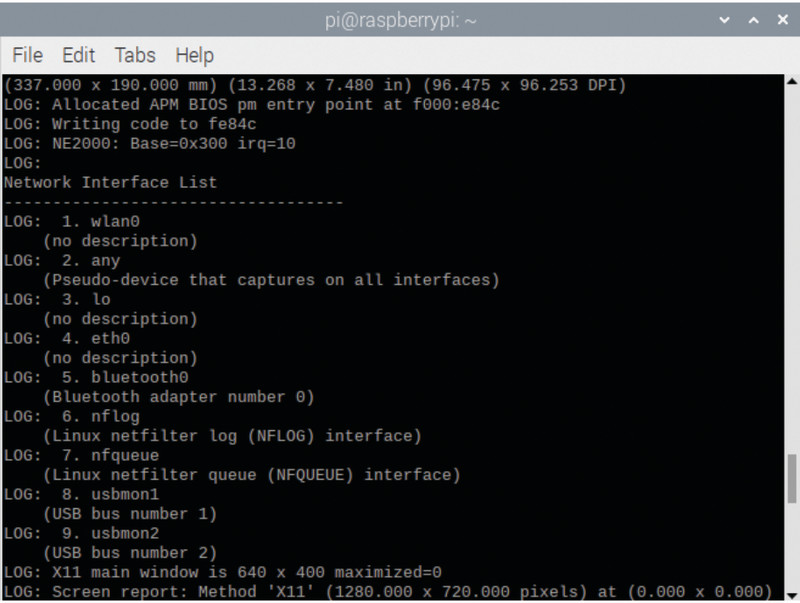
    These files enable NE2000 networking, with NIC 1 selected. This is correct if you’re using Raspberry Pi 4’s integrated wireless LAN. However, if you encounter any issues or wish to use a different internet connection, set reallnic=list in the DOSBox-X config file and check the Network Interfaces List that DOSBox-X will show in the Bash terminal window.

    You’ll need the PCAP library to give DOSBox-X network access.

    sudo apt install pcap*
    sudo setcap cap_net_raw+ep /usr/bin/dosbox-x
    

    Check that this worked:

    getcap /usr/bin/dosbox-x
    

    Note that you’ll have to rerun the setcap command whenever you upgrade DOSBox-X.

    Set reallnic=list in your config file and DOSBox-X spits out a numbered list of network interfaces. Set reallnic to the number you want to use.

    Create a Windows 98 disk image

    From a Terminal, run:

    dosbox-x -conf win98_install.conf
    

    Now, from inside DOSBox-X:

    imgmake win98hd.img -t hd_2gig -nofs
    

    We’re creating a 2GB hard disk image here, as 4GB images (although supported on other systems) currently throw up virtual disk geometry errors on Raspberry Pi.
    We’ve included, and partially commented out, lines to automatically mount and boot the images we’ll use for installation in our win98_install.conf file, so once you’ve created this image, you can either uncomment them and restart DOSBox-X or enter them manually from at the DOS command prompt, as detailed in the following step.

    [sdl]
    # set fullscreen true if you want to launch in fullscreen mode
    fullscreen=false
    autolock=true
    fullresolution = desktop
    output = opengl [dosbox]
    title=Windows 98
    memsize=512
    cycles=60000
    vesa modelist width limit=0
    vesa modelist height limit=0 [render]
    # aspect ratio correction
    aspect=true [cpu]
    # pentium_mmx is recommended for Windows 98 installs but causes audio distortion in some games: switch cputype to auto if this occurs
    cputype=pentium_mmx
    core=normal [sblaster]
    sbtype=sb16vibra
    irq=5
    dma=1
    hdma=5 [ne2000]
    # If you want networking in Windows, set ne2000=true.
    # This also requires that you set realnic= to a suitable value for your PC - that should be 1 for Raspberry Pi 4 wlan
    ne2000=true
    nicirq=10
    realnic=1 [fdc, primary]
    int13fakev86io=true [ide, primary]
    int13fakeio=true
    int13fakev86io=true [ide, secondary]
    int13fakeio=true
    int13fakev86io=true
    cd-rom insertion delay=4000 [render]
    scaler=none [autoexec]
    imgmount 2 win98hd.img -size 512,63,130,1023 -fs none
    # imgmount a win98boot.img -t floppy
    imgmount d win98.iso Win98Soft.iso boot win98hd.img 

    Boot your Windows disc

    Enter the following at the DOS command prompt:

    imgmount 2 win98hd.img -size 512,63,64,1023 -fs none
    imgmount a win98boot.img -t floppy
    imgmount d win98.iso -t iso -fs none -ide 2m
    boot A:

    Start Windows 98 Setup from CD-ROM, press ENTER to continue with setup as prompted, opt to configure unallocated disk space and enable large disk support, then press ENTER to restart.

    DOSBox-X will restart its guest system and you – or your config file – should rerun the above mount and boot commands again.

    Choose to start setup from CD-ROM again and the installer will format your blank disk image. Press ENTER when prompted to carry out the pre-installation check.

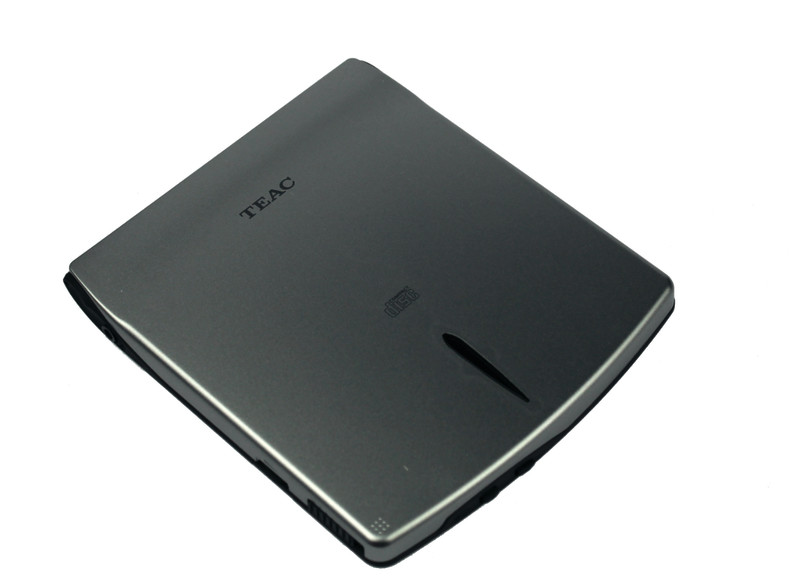
    Simple CD-ROM readers like the Teac CD-210PU work well

    Install-time configuration

    Agree to the EULA, then enter your Windows 98 Product Key. Click Next to accept the default C:\WINDOWS install directory. A ‘Typical’ install from the next set of options works for most users; select ‘Custom’ if you’re using a non-Latin character set.

    Enter your name when prompted and move on to component selection, where you’ll find those additional character set options. Name your system, enter your network name, then set your keyboard, language, and location.

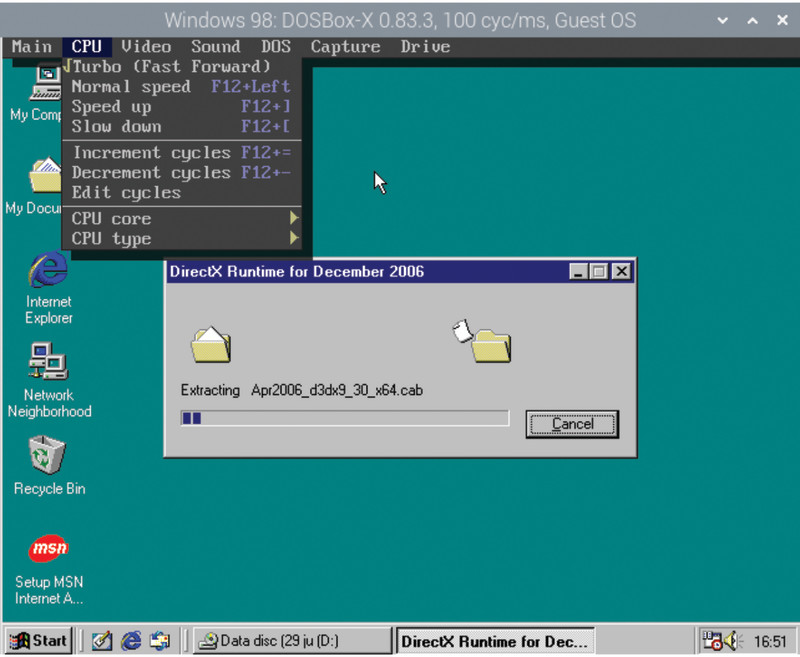
    Skip creating a startup disk by clicking Next, then cancel when you’re prompted to insert a disc. The installer is finally ready to copy Windows 98’s files. Enable Turbo Mode from the DOBox-X CPU menu to speed this time-consuming process along. The guest system will reboot when finished.

    Enable Turbo mode to speed up lengthy installations – just remember to switch it back to Normal speed when you’re done

    Windows driver initialisation

    At the DOBox-X Z: prompt, type:

    boot win98hd.img
    

    This boots into Windows 98 and, along with mount commands for the hard disk and a couple of ISO images, is already in our supplied win98.conf file, which you can use by launching DOSBox-X with:

    dosbox-x -conf win98.conf
    

    Windows 98 will take several minutes to initialise its drivers and may reboot during this process.

    Set your time zone and network settings – the virtual network card’s IRQ should be set to 10 – when prompted. Setup will continue and the system will reboot.

    At its first real boot, Windows will ask you to set a network password that will also be used for your system and then install more drivers from the CD.

    Copy your install media
    

    You should have functional sound, Voodoo graphics, and networking. Tell Windows that you’re using a LAN connection. If anything fails to install correctly, use the Add New Hardware wizard and Device Manager to find and configure the relevant items.

    To make future driver installation easier, copy the /wing98 folder from the install CD image to your virtual hard disk using Windows File Manager. You can direct Windows to default to checking this directory in place of the CD by opening regedit, navigating to

    HKEY_LOCAL_MACHINE\Software\Microsoft\Windows\CurrentVersion\Setup and changing SourcePath= to the location where you copied the files. That’s SourcePath=C:\\WIN98\ in our case.

    Update your drivers

    DOSBox-X allows you to mount multiple disc images using its imgmount command, and switch between them by pressing F12+LEFT-CTRL+C. Our config file includes an example and we’ve created an ISO image full of drivers, demos, and free software to get you started at The MagPi GitHub.

    Install, in this order: 7-zip, Windows Installer 2.0 (instmsi), Internet Explorer 6, dotnet 1, dotnet 2, the visual C++ resdistributable, the K-Lite Codec Pack, Windows Media Player (MPClassic), and the Sound Blaster 16 driver.

    Enable Turbo Mode to speed up the slowest installers, but switch to Normal speed before you type anything.

    Install some software

    Now you have a Windows 98 PC, you’ll want something to run on it. Our software disc includes some freeware and shareware applications, including Dink Smallwood and the first episode of Doom.

    Online auctions can supplement your collection and some publishers have made parts of their back catalogue available for free. That includes Dynamix’s Tribes 2 mech combat sim, three of EA’s Command & Conquer RTS series and some of 3000AD’s Battlecruiser space sims.

    Innoextract can extract Windows 98 compatible files from GOG packages, KernelEx runs Windows XP software, and Brasero can burn downloaded software to disc images for easy mounting. Install Brasero with:

    sudo apt install brasero

    Boot to Windows

    If you want Raspberry Pi to really feel like a Windows 98 PC, you’ll want it to boot directly to DOSBox-X’s guest operating system. Open your config file, set fullscreen=true, and add any disc images you plan on using to the autoexec section. Also make a note of the shortcuts you’ll need to swap CD and floppy images.

    mkdir /home/pi/.config/autostart
    mousepad /home/pi/.config/autostart/dosbox.desktop
    

    Add the following to the new text file and save it:

    [Desktop Entry]
    Type=Application
    Name=DOSBox
    Exec=/usr/bin/dosbox-x
    

    Copy your config file to DOSBox-X’s default config file location:

    cp /home/pi/win98/conf /home/pi/.config/dosbox-x/dosbox-x-0.83.3.conf
    

    Now reboot Raspberry Pi into Windows.

  • CrowPi2 review – Raspberry Pi laptop and learning kit

    CrowPi2 review – Raspberry Pi laptop and learning kit

    Reading Time: 6 minutes

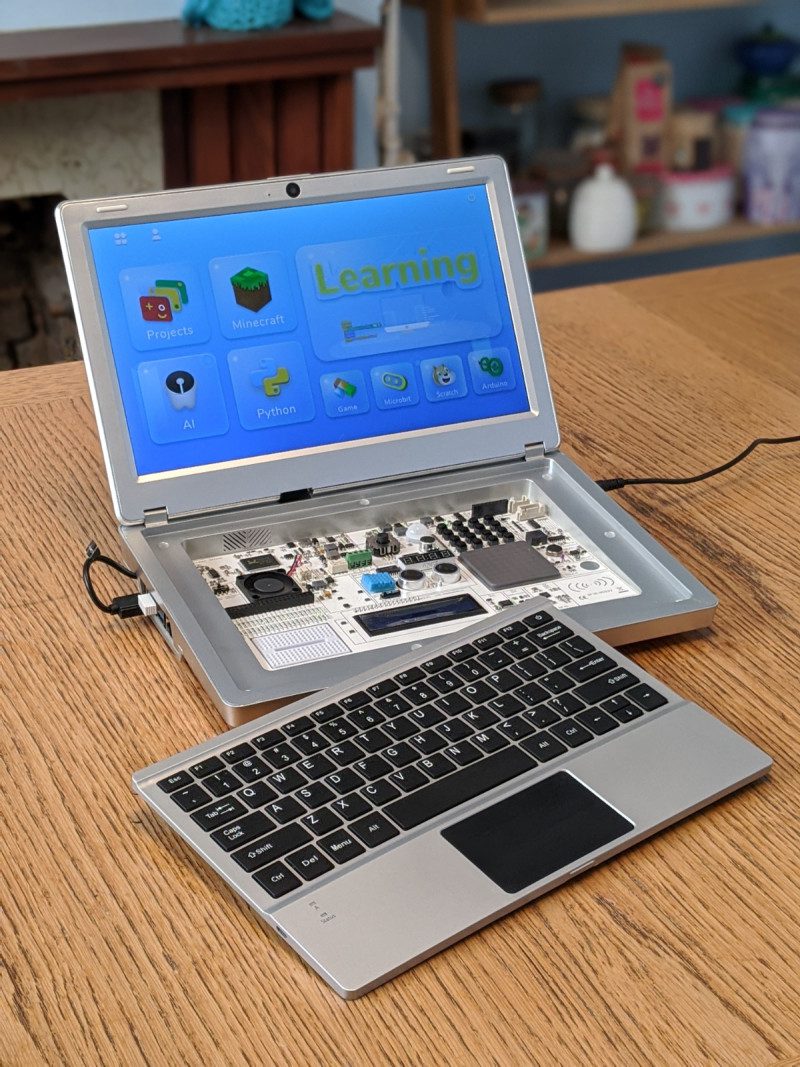
    CrowPi2 is is a huge step up in ambition. The touchscreen is replaced with a full IPS display, keyboard, and a trackpad with mouse combo, turning the CrowPi learning environment into a laptop.

    At the time of writing, CrowPi2 is in the last days of a successfully funded Kickstarter campaign, and the device will head to the Elecrow store shortly. The price reflects the Kickstarter and shipping cost.

    There are three versions available: a Basic kit that contains the CrowPi2, a Starter Kit (which we are reviewing here) which also comes with a Raspberry Pi 4 with 4GB RAM, and an Advanced kit which comes with a 128GB microSD card and a few extra sensors.

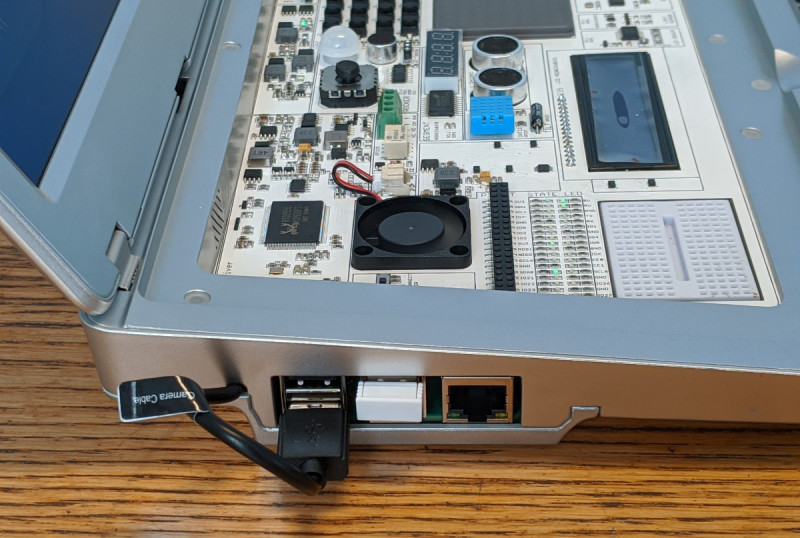
    The CrowPi2 itself is a plastic laptop clamshell with an 11.6-inch 1920×1080 IPS screen and a wireless keyboard (which can be removed from the housing and used separately). The case also comes with a 2MP camera, speakers, and a headphone jack. And a lot, lot more.

    The CrowPi2 Development board

    The real magic for CrowPi2 begins when you lift out the removable keyboard and take a look at the Development board beneath.

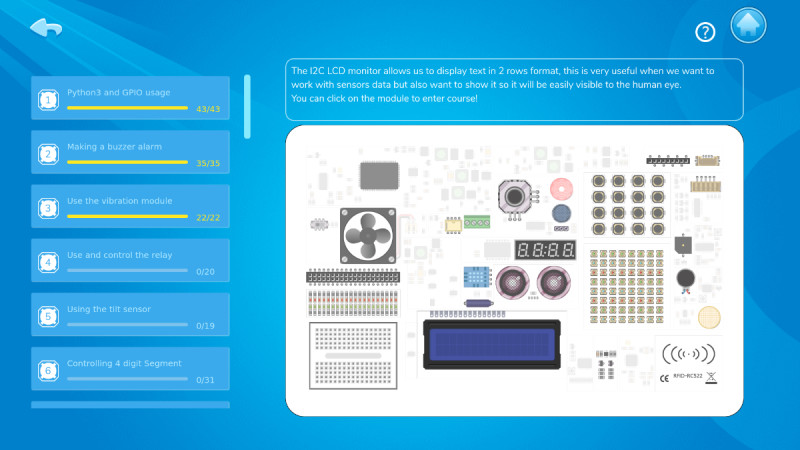
    CrowPi2 Development Board

    On the Development board you’ll find [“deep breath” – Ed]:

    • Thumb joystick

    • Segment display

    • Relay

    • LED

    • DHT11

    • Tilt switch

    • LCD

    • PIR motion sensor

    • Sound sensor

    • IR receiver

    • I/O interface

    • Servo interface

    • Step motor interface

    • 8×8 button matrix

    • Buzzer

    • Vibration motor

    • Touch sensor

    • 8×8 RGB LED matrix

    • Light sensor

    • Ultrasonic sensor

    Alongside all that is a 40-pin GPIO socket and breadboard with a GPIO toggle switch that you can use to connect/disconnect all the components on the Development board and use pure GPIO I/O as regular.

    There’s also a Raspberry Pi cooling fan (permanently on).

    To be clear. This isn’t the list of components in the box. That’s just the permanently fixed electronics kit on the CrowPi2 Development board.

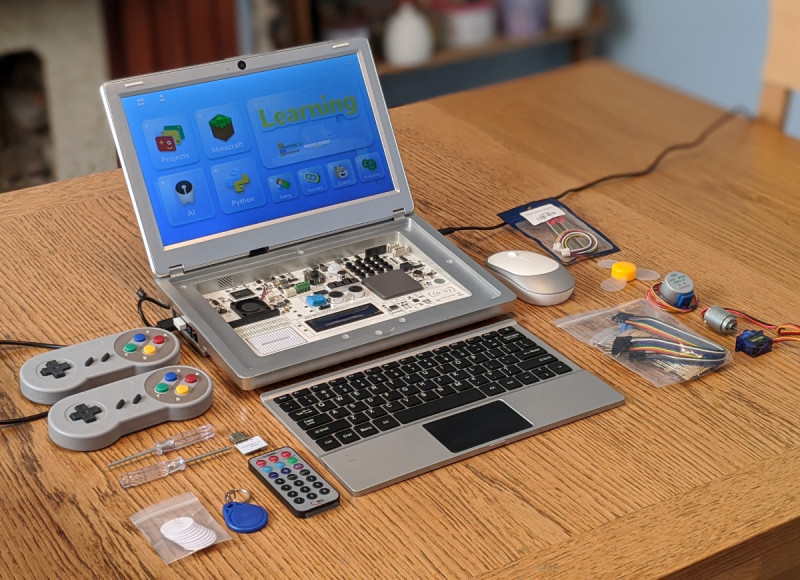
    All the extra kit in the CrowPi2 box

    The box contains a further 31 modules [“deep breath” – Ed], including:

    CrowPi2 components and box contents

    • IR remote controller and receiver

    • Stepper motor

    • Servo

    • SDC motor with mini fan

    • RFID card and tag

    • NFC card

    • Moisture sensor

    • Components pack (we see jumper wires, resistors, buttons, LEDs, a potentiometer, diodes, and capacitor.)

    • Two game controllers

    • Two 32 microSD cards: one with the custom Raspberry Pi OS system and another set up for RetroPie so you can quickly play games with the two controllers.

    • Minecraft paper cut-outs to assemble (to make boxes and other elements from the game)

    • User manual. Elecrow promises a Python and Scratch programming book to follow.

    Honestly, it’s baffling the amount of electronics kit that’s on display here.

    Learn code and electronics with CrowPi2

    All this would mean little if it was simply components slung in a box. Thankfully, CrowPi has spent a lot of time honing version one, and CrowPi2 is a very well-rounded learning platform.

    Our unit came with the Raspberry Pi 4 and a customised version of Raspberry Pi OS pre-installed. Setup was a case of plug in and turn on. We disassembled Raspberry Pi 4 from the case and fitted it back in to test the process, and it was very easy.

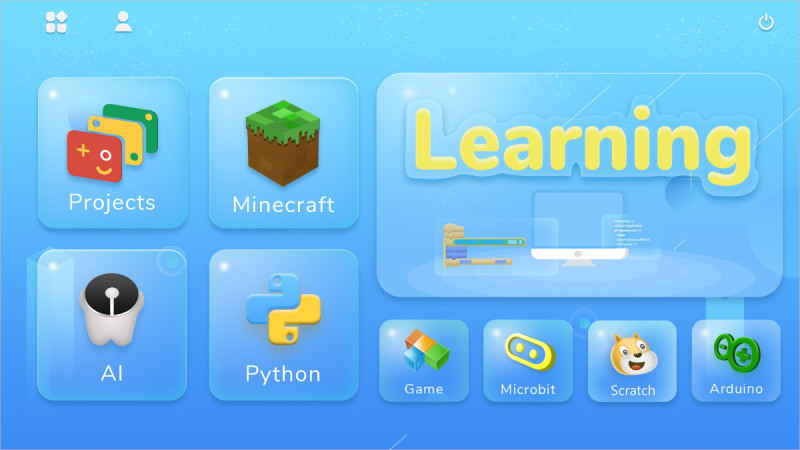
    A custom version of Raspberry Pi OS boots into a friendly interface with links to projects, learning materials and various other friendly welcome features like Minecraft and AI examples. (You can boot into regular Raspberry Pi OS or other operating systems and still use the device).

    The CrowPi2 customised Raspberry Pi OS interface

    Clicking the icon in the top right bounces you out to the regular Raspberry Pi OS desktop environment (and you can quickly click a Menu icon to get back to the CrowPi2 environment).

    The tutorials are excellent. There are 16 Scratch tutorials and 32 Python lessons. Both make excellent use of the electronics components, having you build a flashing LED, automatic fan, tilt light – and, in the case of Python, working up to using sensors, RFID tags, voice recognition, and speech. A further AI section has five Speech Recognition courses and seven Face Recognition lessons (using OpenCV and the built-in camera).

    CrowPi2 Learning Python to control the Development board

    It was as we worked through these courses that the CrowPi2 came alive in our hands and we decided it was something special, worthy of our recommendation.

    Design decisions

    Objectively speaking, CrowPi2 as a laptop is far from perfect and we’d be remiss not to mention the following (especially given our recommendation).
    Some design decisions are questionable. The keyboard is flimsy with a lot of flex, the key response isn’t great and we shudder at the thought of typing out whole documents.

    Raspberry Pi 4 with 4GB RAM is tucked into the side of the case; an access panel underneath enables you to get to the computer

    We’ve been worn down by countless terrible trackpads on Raspberry Pi laptops. While the CrowPi2 trackpad doesn’t disappoint us any more than pi-top 2 or NexDock 2, it’s still clunky. At least Elecrow included a mouse.

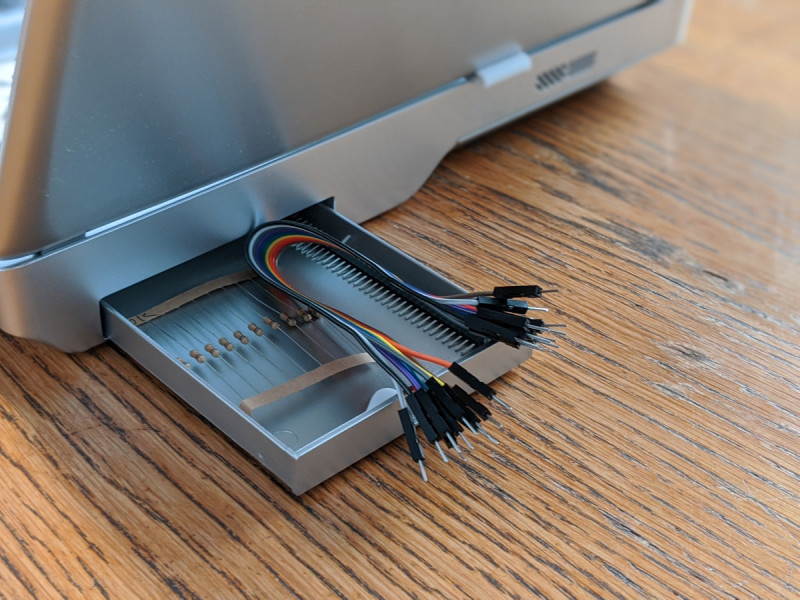
    There are oddities like the camera USB cable that sticks out from the side to fit into one of the USB connections. There is no internal battery, and a storage compartment at the back doubles up as a power bank container should you want to work on the go.

    A storage box on the rear of the laptop is used for accessories or to add a power bank for using the laptop on the move

    On the side is a brightness/volume adjustment rocker. Confusingly, you press up first to adjust the brightness; down first to adjust the volume. The On button turns the device on, but not off.

    Two things you’ll need to get started aren’t included: an AA battery for the mouse, and (less forgivable) a Micro-USB cable to charge up the wireless keyboard. Given the sheer weight of kit included, this is an odd choice.

    The fan whirs constantly; The unit is almost two inches thick.

    What we have here, however, is enough value for money and quality learning resources to make us overlook all of those flaws. Your mileage may vary though, and please buy with open eyes.

    The laptop that isn’t one

    Get past the idea of CrowPi2 as a laptop and it starts to make sense (see the NexDock 2 if that’s what you’re after).

    After a while, we stopped thinking of it as a laptop and began to admire CrowPi2 as a compact electronics learning kit powered by Raspberry Pi 4. An electronics starter kit for the computer age.

    It’s an all-in-one unit you can plug into a wall, put a kid (or willing-to-learn adult) in front of it, and let them get on with discovering how electronics components and computer code work together.

    The learning materials go from simple Scratch up to advanced AI solutions. There’s a real journey inside CrowPi2 and we’re learning new techniques ourselves from it.

    It’s the integration that impresses us: the combination of the Development board, all the components, and interactive tutorials. All in one place, all ready to go as soon as you connect the power.

    Put it all together and you get a lovely piece of kit that we consider perfect for teaching and learning electronics and coding. We would have loved this to bits as kids. And let’s face it, that’s what Raspberry Pi is all about.

    9/10

  • UCS Universal Housing review

    UCS Universal Housing review

    Reading Time: 2 minutes

    It comes with an IP40 rating: “Protected from tools and small wires greater than 1 millimetre. Not protected from liquids.”

    The modular cases come with either a solid lid or a side panel for an embedded display. We got three sizes to experiment with: 125×87 mm, 145×125 mm, and 237×195 mm

    Made to measure

    Matching accessories (which we haven’t tested) include stands, wall mounts, stacking adapters, and fibre-optic light guides – much of what you need to deploy multiple Raspberry Pi computers in a range of environments.

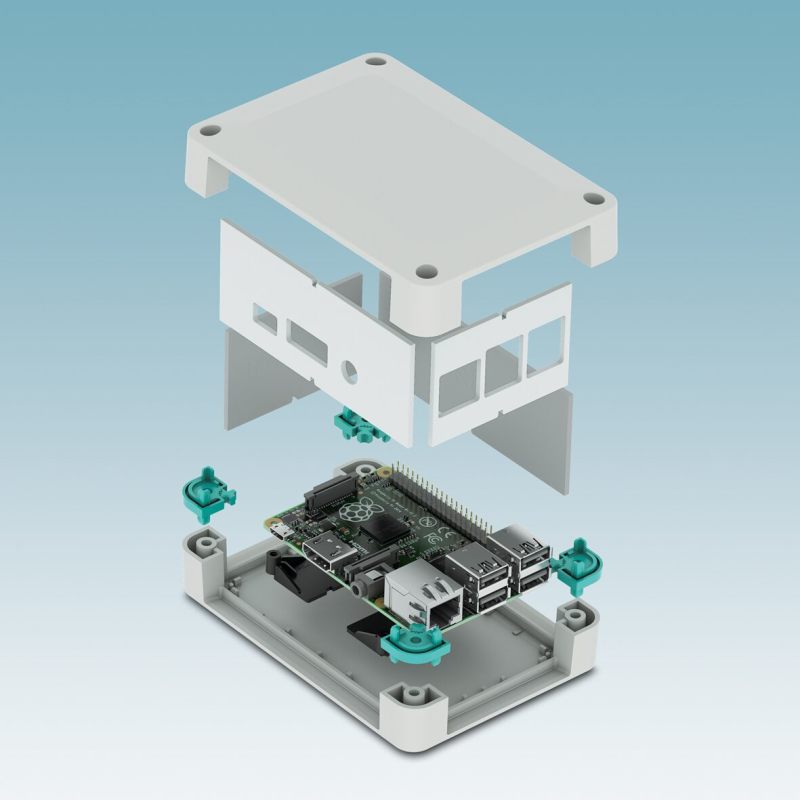
    Inside the cardboard box, we received two half-shells, four side panels (with openings for the Raspberry Pi connectors), adhesive pads to stick the Raspberry Pi to the shell, and Torx screws.

    We used a Torx T7 screwdriver to fix the adhesive pads to our Raspberry Pi 4 and a Torx T10 to screw the two outer shells together. The presence of Torx screws will help prevent prying hands from getting into the shell, and the microSD card is tucked safely inside.

    Documentation is excellent, and a data sheet covers technical data and assembly instructions. On the whole, we like the build process and the case has an aesthetically pleasing style that lifts it above its industrial roots.

    Verdict

    8/10

    Build quality is excellent and the versatility of applications will ensure the UCS Universal Housing finds itself happy in a wide range of industrial settings.

  • Masafumi Ohta interview

    Masafumi Ohta interview

    Reading Time: 3 minutes

    What is your background in making and programming?

    I graduated from a Japanese technical high school with a major in electric engineering. I have learned not only soldering to make electronic DIY, but also welding and programming with Apple IIe and punch cards.

    I also came across the Sharp pocket computer PC-1416G (called Pokecon) as one of the learning materials at that time. It is for studying BASIC, though. I was trying to analyse its hardware to make some games with its assembly language. I investigated the internal system call to develop a mini graphical game with ‘poke, peek, and call’ commands, like IchigoJam.
    I tore it down, looking into the hardware itself. It was really fun for me to play with it – I am sure that is why I love programming and making.

    We’ve met the Japanese community in person, and they’re incredibly creative

    How did you learn about Raspberry Pi?

    Frankly speaking, I was not so interested Raspberry Pi at first because I was still interested in OpenSolaris as a contributor. However, I saw it at an open-source event and tried it, and got interested and thought I would love to try to make some Linux servers with it. Now there are five original Raspberry Pi computers [used for] DLNA, MPD, Shairport (AirPlay), and Icecast streaming. They work really well. I’ve replaced one of them with Raspberry Pi 3 because of the lack of CPU power, though. Four of the Raspberry Pi boards are almost eight years old and work great.

    What are the maker and Raspberry Pi communities like in Japan?

    The Japanese Raspberry Pi community is still growing, but getting commoditised into business-to-consumer (B2C), [but] consumers often change their mind and B2C product life is really short lately.

    The raspberry pie to celebrate the start of the Raspberry Pi User Group

    On the other hand, the Japanese Raspberry Pi B2B business community is now growing rapidly. There are tons of use cases lately: AIoT, prototyping at an automotive company for self-driving, sensors at a vineyard, and more. Now I am planning to found a Raspberry Pi business community to help their businesses. There are also many more makers lately.

    Do you have any involvement in other East Asian communities?

    Yes, now I am concerned deeply with East Asian communities, especially helping the Taiwanese. CutiePi is the one of the projects I’m helping spread the word about. I will also help a couple of Taiwanese Raspberry Pi projects this year.

    I have been attending COSCUP every year to expand and encourage their community. I am now staying in touch with some Taiwanese IT companies to use Raspberry Pi for their B2B business, and thinking of founding a Raspberry Pi business community there with them.

    Supporting a community staying at home

    “I am collaborating with the community in many ways: sending some official swag, holding events with them. Lately, almost all of the events are online or cancelled, and I have to find a way to help them […] – there are many more problems in communicating with others, especially as we cannot meet face-to-face. I hope the situation will get better and we can start growing again our Raspberry Pi community.”

  • PiMowBot

    PiMowBot

    Reading Time: 2 minutes

    Dirk aimed to keep the build costs to around €300 – nearly two years later he estimates the project has cost him nearer €1500, though this includes the cost of two 3D printers and two previous prototypes. Now it’s built, there are no significant running costs. “Solar power is free and the built-in hardware is robust and reliable and has no real wearing parts, except the battery,” Dirk says.

    A prototype version of PiMowBot shows off its generous solar panel

    False starts

    The core parts are a Raspberry Pi Zero, Raspberry Pi Camera Module, and Witty Pi mini (a clock and power management module) plus GPS, solar panel, battery, motor, and motor controller.

    As well as the Raspberry Pi OS and the Witty Pi software, Dirk made use of standard lines of code from earlier versions of his robot mower. He coded most parts of PiMowBot in REBOL3 since he’s been using the open-source functional programming language for nearly two decades. Python and GPIO Zero are used to communicate with the I2C devices, sensors, and motor control drivers.

    Getting a precise orientation reading was a challenge due to the influence of magnetic north, but Dirk overcame this by getting PiMowBot to automatically go through a calibration process each time it’s set up.

    He wanted to keep things as straightforward as possible, experimenting with various motors and drivers such as a Waveshare Motor Driver HAT to control the gearing, braking, and acceleration. However, the geared motors drew too much current, prompting a switch to an L298N dual H-bridge module. Further refinements included adding a more powerful motor, which also meant Tim needed to redesign the 3D case.

    The final version of PiMowBot was complete by the start of this year, with build instructions and the software all available from Dirk’s website.

    The 3D-printed housing has plenty of room for all the electronic parts

    Mow-tivational

    “The PiMowBot has two operating modes: an autonomous operating mode without induction wires in the ground, and a remote control mode to directly control the lawn-mower robot via its web UI and the location and orientation sensors on the lawn,” explains Dirk. He’s used the Camera Module for previous Raspberry Pi projects and is keen to further refine the optical object/obstacle detection with real-world testing during the summer months.

    Although PiMowBot was intended as a “sophisticated hobby project” to work on in his and Tim’s spare time, Dirk is planning new models, including an XXL PiMowBot model and an intelligent system in which multiple PiMowBots operate alongside each other and share the mowing task. All hail our future mowing gods!

  • Remote access your Raspberry Pi securely

    Remote access your Raspberry Pi securely

    Reading Time: 5 minutes

    Some people take things further and use a third-party service to help protect their Raspberry Pi. In this tutorial, we’re taking a look at remote.it to set up a work network using Raspberry Pi as a remote access gateway.

    With remote.it, you can access a Raspberry Pi remotely without port forwarding. You do this by accessing the remote.it server as a proxy, or by using remote.it’s software to form a peer-to-peer network. Remote.it claims this is a safer way to set up a gateway than a traditional VPN.

    Create an account

    To connect to your Raspberry Pi remotely you’ll need to set up an account. Open the web browser and head to https://remote.it. Click on ‘Sign up’ and enter your email address. You will be emailed a verification code. Enter this code and pick (and confirm) a password. Make sure you choose a safe password (read the How To Geek guide on strong passwords).

    Turn on SSH and VNC

    To connect remotely, SSH and VNC must be activated on Raspberry Pi.

    Click on the main menu and choose Preferences > Raspberry Pi Configuration. Choose the Interfaces tab and set both SSH and VNC to Enabled.

    The VNC icon appears in the menu bar. Make sure you are not using the default password. (Choose the System tab in Raspberry Pi Configuration and click Change Password.) See the Raspberry Pi documentation ‘Securing your Raspberry Pi’ article for more information on keeping your computer safe.

    Update and install

    Make sure your Raspberry Pi is connected to the internet (using wireless LAN or an Ethernet cable). Open a Terminal window and enter the following commands:

    sudo apt update
    sudo apt install remoteit

    When the packages are installed, the Terminal outputs the configuration information:

    Continue your device configuration at http://find.remote.it or http://raspberrypi.local:29999 or http://192.168.0.41:29999

    The IP (internet protocol) address will be unique to your network.

    Register the Raspberry Pi

    Open the web browser on your Raspberry Pi and navigate to http://find.remote.it. The window will search for devices running remote.it software (including your Raspberry Pi).

    When your Raspberry Pi is found, the screen will display ‘Unregistered device’ along with the gateway details and IP address. (If this approach does not work, try one of the other two URLs listed in the configuration information above). Click on Register to add your Raspberry Pi to remote.it. You will be asked to enter the Email and Password for your remote.it account.

    The Name field displays ‘raspberrypi’ (you can change the name to something else if you prefer). The Services window displays the three default services: ssh, vnc, and remoteit Admin Panel. Click Register again to add Raspberry Pi to your remote.it account.

    Start a connection

    You now connect to Raspberry Pi via remote.it. There are two approaches: via a web service, or using remote.it’s dedicated software.

    First, let’s look at the web service. This provides a link to a proxy connection, and all data passes through one of remote.it’s proxy servers.

    Open a web browser on your other computer and navigate to app.remote.it (enter your remote.it login credentials).

    Click Connect and choose ‘Raspberry Pi – VNC’. The ‘VNC – Connection’ window appears, displaying host and port information.

    Connect via VNC Viewer

    Open your VNC software (we’re using VNC Viewer) and choose File > New connection. Cut and paste the combined proxy and port information into the VNC server field. Ours looks like this: proxy50.rt3.io:31249.

    Double-click the icon and click Continue at the alert window. Enter ‘pi’ as the username and your Raspberry Pi OS password. Click OK to access the Raspberry Pi OS desktop remotely.

    Connect via app

    The drawback to the web service is that all your data passes through a proxy computer. For a more private connection, the remote.it app for Windows and macOS enables you to form a peer-to-peer (P2P) connection.

    Data does not pass through remote.it servers (only the connection information), the data throughput is faster so the screen response time is better, and the connection will stay active as long as both devices remain connected. Finally, the URL remains the same and can be bookmarked (unlike the proxy connection which needs to be re-entered into VNC Viewer whenever you start the connection).

    To create the P2P connection, you need to download remote.it’s desktop software. Click on ‘Get Desktop app’ from the app.remote.it website (or visit the download page) and click Download for Windows (or macOS, depending on your computer). Double-click the install file and follow the installation instructions. Open the remote.it software. You may see ‘We need to install or update our service in order to maintain background connections.’ Click on Install Service and Yes to the User Account Control alert.

    Enter your remote.it account credentials into the app to sign in.

    Under Devices, you will see your Raspberry Pi. Click it and click Connect next to VNC. The VNC icon will turn blue once connected.

    You can launch VNC Viewer directly from the app (using the launch icon) or copy and paste the connection information into VNC Viewer (as in the previous step).

    Cloaking your port

    You can access Raspberry Pi remotely using remote.it. However, your VNC port is now open and listening. You can check this with the lsof (list of files) command:

    sudo lsof -i -P -n | grep LISTEN

    As well as the remote.it connection, it will show vncserver running on port 5900. The solution to this is to use a script, provided by remote.it, that cloaks this port. With the cloaking script active, people cannot scan your Raspberry Pi to find the open port because the port will not respond to incoming traffic. Meanwhile, remote.it can get through because remote.it software establishes the connection.

    Upload scripts

    You can use script remote.it with any language that runs on your Raspberry Pi. It’s best to practise with a test script. Head to the Uploading a Device Script page on remote.it’s website and click show-device-info.sh to download the file.

    In the app.remote.it web interface, choose Scripting and click Upload. Change the option to ‘Executable script or program’ and click ‘Choose file’. Use the File Explorer window to find the file and click Upload.

    Running the script

    Scripts are run from the Devices window. Place a tick in the checkbox next to your Raspberry Pi and put a check next to ‘Show advanced columns’. (This will display the StatusA, StatusB, StatusC, and extra columns used by the test script). Click Actions > Execute Script; highlight show-device-info.sh and click Next.

    Highlight the ‘Check to allow all devices to update the status columns during Job execution’ box. (This option displays information in the columns as the script runs.)

    The cloaking script

    Now download the cloak-vnc.sh script from remote.it’s GitHub page. Upload it in the same manner as the show-device-info.sh script. And run it from the Devices window.

    This time you’ll get two options in the Bulk Execution window: ‘Cloak Service’ and ‘Uncloak Service’. Highlight ‘Cloak Service’ and click Finish and Submit. Scripts can take some while to run. Choose Scripting in the sidebar and you will see the script progress. You can also cancel and delete scripts from this window.

    On average it takes three minutes for the job status to update. So your script may actually complete and update the cells before the Job Status catches up. It should respond within three to four minutes.

    Cloaked and connected

    Now connect to your Raspberry Pi via the remote.it app for a secure connection. Your port will be cloaked on Raspberry Pi and because you’re connecting via remote.it’s service, you will not be sharing your IP and port information publicly. And the P2P service ensures that your data is not flowing through remote.it’s service.

  • PiCar-V Kit V2.0 review

    PiCar-V Kit V2.0 review

    Reading Time: 3 minutes

    Many robots use the two wheels of a DC motor to provide tank-like steering. PiCar-V 2.0 takes things up a gear with an additional servo motor to steer the front wheels via a rack mechanism (called the Servo Linkage Plate).

    A further two servos provide a pan-and-tilt mechanism for the included USB webcam (not an official Raspberry Pi Camera Module, unfortunately).

    You have to bring your own Raspberry Pi board and microSD card to the table, plus two 18650 rechargeable Li-ion batteries (3.7 V) and a charger. Even so, there’s a lot here for your money.

    Days to build

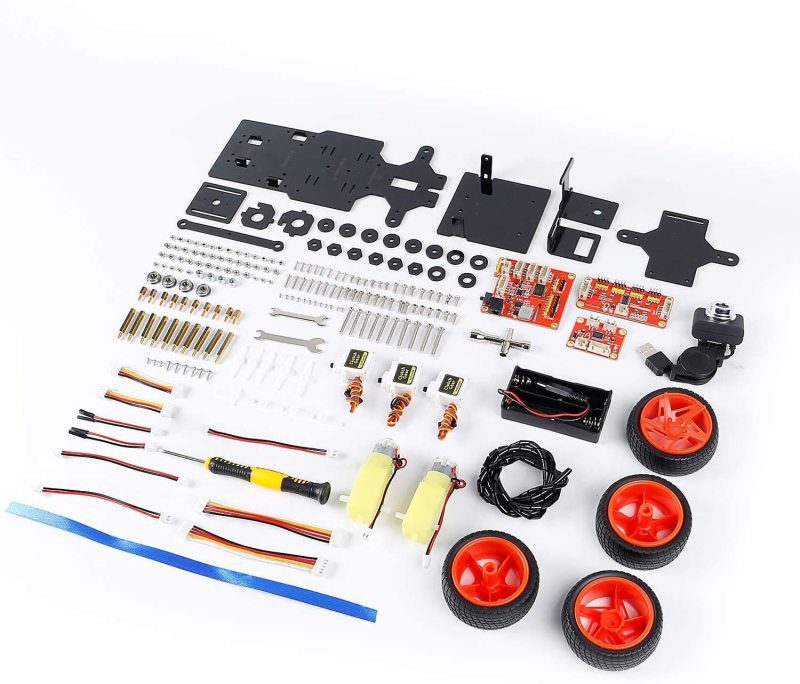
    Oh, my days, there are so many items in the box. By our count, there are 128 separate components, including four wheels, three servos, two DC motors, the chassis, battery back, three HAT boards, and a wild amount of screws, standoffs, and nuts.

    When you lay it all out, it can seem a little daunting

    The very first step for each front wheel involves the wheel, a flange bearing, three connector plates, three more hex fixing plates, an M4×25 screw, and an M4 self-locking nut.

    Everything you need is in the box, including a screwdriver, socket wrench, and two small wrenches. Fortunately, there’s an 88-page full‑colour booklet to walk you through the build and usage.

    Even so. This is a taxing build. The assembly guide is available online as a PDF, so why not take a good look through it to gauge your comfort factor with the build process before buying?

    We found the build straightforward, if fiddly. The two exceptions being attaching the front wheels to the steering mechanism, and screwing on the plates to the rotating servo mechanism (without rotating the servos themselves).

    It’s mostly time-consuming. Like jigsaws, Lego, and Meccano kits, there’s a lot of fun to be had in long and detailed builds.

    The setup regarding Raspberry Pi OS is a little outdated (recommending NOOBS or Balena Etcher, while Raspberry Pi now recommends the purpose-built Raspberry Pi Imager tool. But the steps still work, and it walks you through setting up Raspberry Pi OS, enabling SSH, and connecting to the PiCar-V robot over your local network.

    Bring it together

    The result is a good-looking car, if imperfect. The design prevents access to the HDMI port once PiCar-V V2.0 is assembled, so you can’t attach a screen to debug Raspberry Pi OS if you lose the SSH connection. The design also means that the physical build is interrupted halfway as you set up the software on Raspberry Pi.

    Once complete, the frame is bendy and, in truth, we’d prefer the Upper Plate to have a little more heft. We didn’t encounter any problems in use, however.

    There’s also a nest of wires between the boards, and the USB camera cable extends over the front-left wheel. Some cable ties will come in handy.

    Software support is extensive and everything is available on the GitHub repo. You’ll need to install Python and use pip to install PyQt5 and the requests library on Raspberry Pi.

    When all is set up, you can run the server on Raspberry Pi and run the client software on your PC. The client software displays the webcam view, and you control the rover with W, A, S, D and the camera pan and tilt with the arrow keys. Android and iOS apps are available.

    There is an example Python program that uses OpenCV to track a red ball. SunFounder has also provided a tutorial for programming the robot with Dragit (a Snap-based visual programming tool). You can read this, and lots of other documentation on the SunFounder Learn site. When everything is finished and you’re done with the example code, there are eight digital and four analogue channels on the Robot HAT, plus two spare I2C ports. Plenty of space for expansion with extra sensors.

    Verdict

    8/10

    We like this kit, but it has its flaws. You get a lot of components and some pieces of kit should be of a higher quality. It requires patience, but the supporting documentation is excellent. A nice robot car with potential for expansion.

  • 25 no-problem projects in The MagPi magazine #96

    25 no-problem projects in The MagPi magazine #96

    Reading Time: 2 minutes

    Raspberry Pi 4 web hosting with Mythic Beasts

    Hire a Raspberry Pi in the cloud and run web services at twice the speed and half the cost! Mythic Beast’s new Raspberry Pi 4 web hosting service is now live.  

    Mythic Beasts Raspberry Pi 4 web hosting

    Run Windows 9x software

    Boot a Raspberry Pi into Windows 98 and run classic software.This tutorial from KG Orphanides is a great way to rediscover computing from the 1990s.

    Run Windows 98 software on Raspberry Pi

    Make making accessible

    Ensure that everyone can join in with the fun of your builds by making them accessible to the widest possible audience.

    Make making accessible

    Masafumi Ohta interview

    Masafumi founded ‘Japanese Raspberry Pi Users Group’ in October 2012, It’s thanks to the efforts of people like Masafumi that we’ve been able to see some of the amazing work from makers in Japan and even other parts of East Asia.

    Masafumi Ohta interview

    We deliver to your door

    Buy The MagPi magazine issue #96 from the Raspberry Pi Press store and we will deliver it straight to your door. Plus! Take a 12-month subscription in print and we’ll give you a free Raspberry Pi Zero computer and starter kit worth £20.

  • Win! One of ten Argon NEO cases for Raspberry Pi 4!

    Win! One of ten Argon NEO cases for Raspberry Pi 4!

    Reading Time: < 1 minute

    Subscribe

  • Helene Virolan interview

    Helene Virolan interview

    Reading Time: 3 minutes

    The Girls Into Coding (GIC) events were incredibly successful, so Helene has decided to commit fully to the organisation: “Earlier this year, we set higher ambitions and established GIC as a Community Interest Company aiming to offer more girls more opportunities to develop.”

    When did you first learn about Raspberry Pi and CoderDojo?

    I first learnt about the Raspberry Pi about five years ago at a Raspberry Jam in Covent Garden, Central London. Someone at a Code Club meetup recommended going, so Avye and I did. Avye really enjoyed going to these kinds of events so we continued to go to other Jams. They encouraged her to craft, code and design, and allowed me to discover new things.

    At one in particular, I was approached by the organiser of a CoderDojo and was invited to become a mentor. I accepted and soon volunteered as a Scratch mentor. Since my introduction to Raspberry Pi, I’ve enjoyed tinkering with the various iterations, and last year I attended the Picademy in Cambridge to become a Raspberry Pi Certified Educator.

    As well as being a mentor at a CoderDojo, Helene is a Raspberry Pi Certified Educator

    What is Girls Into Coding?

    Girls Into Coding was an idea that Avye had when she was ten. By this age she had moved from attending workshops at CoderDojo to preparing and delivering them herself at the Kingston University Dojo and at other community events. After repeatedly observing that most attendees at her workshops were boys, Avye identified a need to help more girls to access these events and was determined to encourage more girls to give STEM a go. As a result, she decided to set up ‘Girls Into Coding’(GIC), a series of events targeting girls.

    Girls and women are under-represented in STEM and the new generation has a chance to change that. Girls Into Coding is our way of contributing to that change. Moreover, GIC was set up to encourage girls to explore and enjoy STEM subjects and to encourage them to pursue further activities, education, and careers.

    We provide learning opportunities for girls aged 10 and 14. We’ve created workshops and education events to immerse young people in a range of STEM activities. Our workshops are led by Avye and specialist STEM educators, and assisted by volunteers. The workshops consist of robotics, physical computing, and 3D printing. As well as participating in hands-on workshops, the events give the girls an opportunity to listen to lightning talks throughout the day, delivered by inspiring female role models who are doing cool stuff in the tech world.

    Do you have any advice for anyone wanting to mentor or help teach computing subjects?

    I would encourage anyone to be a mentor, even if they do not have the computing knowledge at first. You can learn as you go along. Preparation is key. Spend some time preparing the session in advance, give yourself enough time to get used to the content, and practise.

    Mentoring is a very rewarding experience. It can be daunting at first but after a few mentoring sessions, your confidence will grow and before you know it you will soon find out that you can do it and have fun in the process! Be brave and do not overcomplicate it! There are lots of online tutorials that are available for those starting out. They are a very good place to start.

  • Whidbey Island Distillery

    Whidbey Island Distillery

    Reading Time: 3 minutes

    “Anyone can come by and see the stills run and learn about them in more detail,” says son Jim, cheerfully. Given its location on a rather pretty island just north of Seattle, Washington, and the quality of the liqueurs and whiskeys produced there, it’s little wonder the Heisings have plenty of visitors. Their blackberry liqueur, distilled from one of Bev’s recipes, is the highest-rated of all spirits in North America by Tastings.com. The other special ingredient in the business’s success is Raspberry Pi.

    The Raspberry Pi 2 inside this box is the ‘brains’ of the automated still control setup

    Distilling whiskey with Raspberry Pi

    Although he’s responsible for the monitoring equipment and tech that keeps it running, Jim says it’s really a ‘mom and pop’ business. His mum comes up with all the recipes while “dad figures out how to adapt our stills and manufacturing process to produce them in large quantities.”

    Steve is a former aerospace engineer, while Jim has more than 20 years’ experience as a self-taught software engineer and startup founder. He built most of the hardware and software for the still, which dad Steve designed. “Hardware is relatively new for me, but I learned enough to get by with tinkering and asking a lot of questions,” reveals Jim.

    Distillation doesn’t require much technology to run, Jim explains, but it’s very labour-intensive and using technology can make a big difference to what a distillery can do. “Many smaller distilleries struggle because they spend so much time distilling that they have little time for anything else,” he says. Often, they will modify alcohol bought in from a larger concern and put their own label on it. The Heisings wanted to make their own.

    Raspberry Pi enables their stills to run completely automated 95% of the time. Jim explains that its CPU is powerful enough and has plenty of RAM (he’d love direct 12 V DC power via the header pin too, though). Other setups he’s used couldn’t. “We have 15+ temperature sensors, a barometer, multiple D2As (digital-to-analogue converters) connected to high-voltage variable SSRs (solid-state relays), multiple low-voltage D2As for pumps, and multiple relays for solenoids.”

    “Having I/O systems we could communicate with through USB was a bit of a game-changer,” he says, “because we could run and debug the whole control system from a laptop, then simply unplug the USB cable and plug it into Raspberry Pi to let it run completely hands-off.” Jim credits “amazing” I/O products from Tinkerforge. “We connect Raspberry Pi via USB to Tinkerforge’s products, import a simple SDK, then we have an enormous set of options for I/O at our fingertips.” You can see the source code and wiring diagrams at GitHub.

    Bev Heising develops the recipes while former aerospace engineer Steve works out how to produce them in volume

    Ever evolving still

    The Whidbey Island setup is still evolving, says Jim. “Every day we’re making changes and we continue to build new stills for our distillery. At some point in the future, we may even offer kits for other distillers to make their own, but only if we can find some time (which is always hard).”

  • VueScan review

    VueScan review

    Reading Time: 2 minutes

    Recently, VueScan released a version of its software that works on Raspberry Pi, so we decided to check it out on Raspberry Pi OS.

    Problem solver

    Getting VueScan is pretty easy – head to hamrick.com and it will recommend you a version to download for the OS you’re using. There are instructions on how to install the version from this download; however, we recommend hitting the link for other versions and finding the ARM32 DEB file for installation. It’s a bit easier, only involves a single file, and will then appear in the program menu under Accessories. VueScan can be used for free, although it will embed a watermark onto your scans. It’s a good way to test if your scanner will work with it, though, especially as we had some issues with a scanner that was listed as being supported.

    Troubleshooting was quite easy, however. Common problems are listed and, once you’re through that shortlist, you’re taken to the website to find out more. The developers behind the software are a contact form away from giving you some support on the software.

    Once you have the scanner working, while you can just hit Scan and get a good picture, you have a lot of options to play with as well. Any function the scanner has, you can change, and you can even add some post-processing to the scanned images: fixing colours, making the imager sharper, and even allowing for character recognition (OCR) so the text of the image can be highlighted. Your mileage might vary on how well that OCR works, though – it’s highly dependent on how good your scanner is and the item you’re scanning.

    Verdict

    8/10

    It’s a great piece of software that makes scanning on Raspberry Pi much easier than it’s ever been.

  • Ghost of Tsushima – PSShare Photo Gallery

    Ghost of Tsushima – PSShare Photo Gallery

    Reading Time: < 1 minute


  • Build a DOS emulation system

    Build a DOS emulation system

    Reading Time: 6 minutes

    Forked from the original DOSBox emulator, DOSBox-X has more precise hardware emulation, supports a wider range of software, and can effectively run more DOS-related operating systems (up to Windows ME). It also has a sophisticated graphical interface to help you manage tasks such as configuration and virtual disk-swapping.

    DOS emulation: you’ll need

    Create your DOS directories

    Let’s create the directory structure that we’ll use to house the software we’ll run through DOSBox-X:

    mkdir -p dos/{floppy,cd,games}
    

    The floppy and cd directories will house disk images which we’ll be able to switch between in DOSBox-X. This tutorial and our template config files presume you’ll keep everything in a /home/pi/dos/ directory, so be sure to change any paths if you’re using a different username or dos directory names.

    While our generic config file should handle most DOS software well on Raspberry Pi, you can also create separate .conf files for specific programs to better match their requirements and automatically run commands.

    Tweak your graphics

    Assuming you’re using a standard 1920×1080 display with your Raspberry Pi, you’ll find some more demanding DOS software struggling at full resolution, particularly if you have DOSBox-X configured to use OpenGL and aspect ratio correction.

    On the desktop, open the main menu, go to Preferences and select Screen Configuration. Right-click on your display – most likely marked HDMI-1 – and from the Resolution menu, select 1280×720. Running your entire GUI at a lower resolution will lighten the load of rendering and upscaling for the emulation and have no adverse effect on games from an era when 800×600 was the norm.

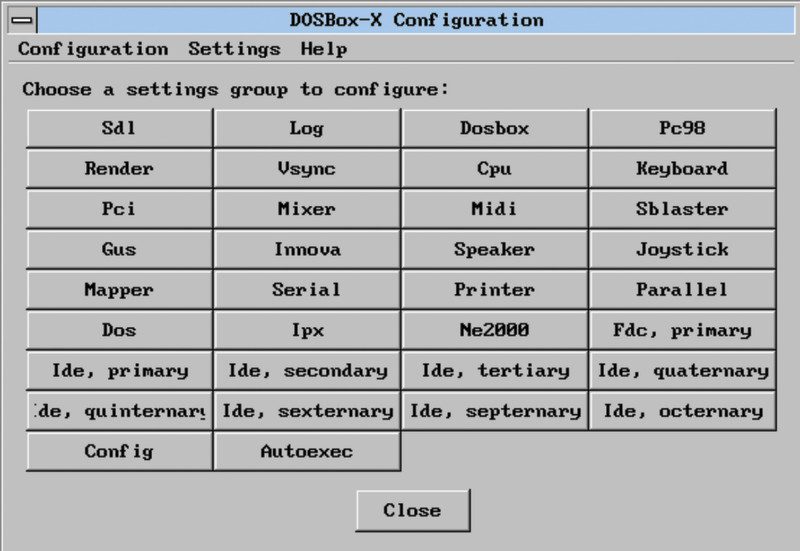
    One of DOSBox-X’s key advantages is a graphical interface that covers each element of your emulated PC’s configuration, from CPU emulation to scaler

    Install DOSBox-X

    In a Terminal, enter the following:

    sudo apt install automake libncurses-dev nasm libsdl-net1.2-dev libpcap-dev libfluidsynth-dev ffmpeg libavdevice58 libavformat-* libswscale-* libavcodec-*
    git clone https://github.com/joncampbell123/dosbox-x.git
    cd dosbox-x
    ./build
    sudo make install
    dosbox-x
    

    DOSBox-X should open at its Z: prompt. You can’t paste commands into it from the clipboard, but there are some modern convenience features: tab auto-completes, you can scroll through your command history using the up arrow, and you can add startup commands to a config file.

    Type exit to quit and ensure that the config directory, which we’ll need in the next step, is created properly.

    Export a config file

    Restart DOSBox-X and tell it to generate a config file that we can later modify in a text editor, based on the program’s default settings and then exit.

    CONFIG.COM -all -wcd
    exit
    

    The file we’ve just made can be found in /home/pi/.config/dosbox-x and, at time of writing, is named dosbox-x-0.83.3.conf.

    As well as being human-readable and conveniently editable in a text editor, you can modify this long and extensively commented file from within DOSBox-X using the configuration GUI in the main menu. This is handy, since DOSBox‑X’s configuration has more options than that of vanilla DOSBox.

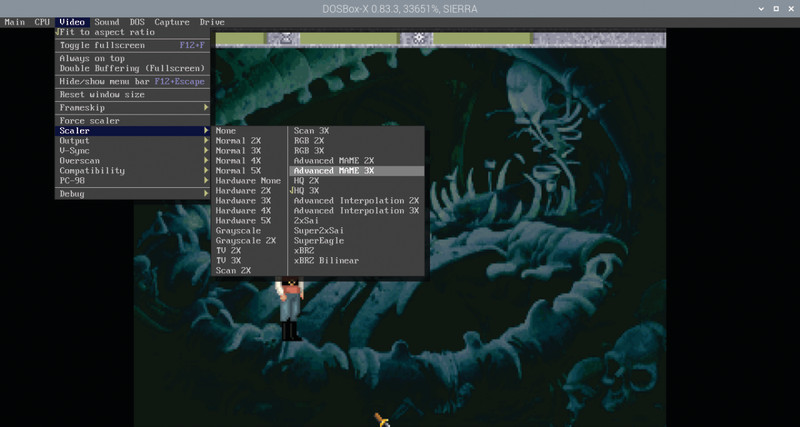
    A menu system allows you to easily make changes to your emulated system and mounted media on the fly, and complements a set of keyboard shortcuts

    Customise your config

    For this tutorial, we’ve created some config files that you can download from The MagPi GitHub page. The code box will run most DOS software. As well as editing your main DOSBox-X config, you can launch DOSBox-X with a specific config file – useful if you wish to easily switch between different OS setups – using the following command-line switch:

    dosbox-x -conf yourfile.conf
    

    We’ll take advantage of that later to help install Windows 3.11. Note that your custom config files need only include lines that vary from the defaults. In the following steps, we’ll create a config file optimised for playing late-era DOS games on Raspberry Pi 4 with 4GB or 8GB RAM.
    Graphics, scalers, and performance

    The default config is already well optimised to run DOS software on most systems, but we should make a few adjustments to improve performance on Raspberry Pi’s hardware.
    Leave the fullscreen setting as false, as you can enable and disable fullscreen mode using DOSBox‑X’s menus or the F12+F keyboard shortcut; fullresolution should be left as ‘desktop’.
    To get proper aspect ratio correction and reasonable graphical fidelity at 1280×720, you should set the output to opengl, aspect to true, and select a scaler up to interpolate low-res graphics. Scaler choice is largely a matter of personal taste, so use the Video menu options to try a few. If your sound becomes choppy, you’re pushing Raspberry Pi’s capabilities too far.

    autoexec.bat

    At the end of the config file is autoexec, where we’ll put all our MOUNT and IMGMOUNT lines to assign drive letters to directories and floppy or CD images, and any commands to run at boot.

    In our sample config, we’ve used MOUNT to set /home/pi/dos as DOS’s drive C. It’s here that we’ll copy and install all our software to.

    If you use the IMGMOUNT command with multiple file names of CD or floppy images, you’ll be able to swap between those images in order to swap between media. To swap floppies, use F12+LEFT-CTRL+D. To swap CD or DVDs, use F12+LEFT-CTRL+C.

    One of DOSBox-X’s key advantages is a graphical interface that covers each element of your emulated PC’s configuration, from CPU emulation to scaler

    Using DOSBox-X

    Like DOSBox, DOSBox-X uses the open-source FreeDOS operating system, rather than Microsoft’s proprietary MS-DOS. Navigation through directories isn’t too different to using a Bash terminal, particularly as a number of Bash commands have been included, such as LS as an alternative to DOS’s DIR, and CD .. alongside the usual DOS CD.. command. To run a .exe, .com, or .bat file, just type its name without the extension.

    To capture and release your mouse, use the LEFT-CTRL+F10 shortcut. The autolock entry under SDL config enables capture-on-clock.

    Buy Windows 3.11

    Now we’ll install Windows for Workgroups 3.11, released in December 1993. The biggest challenge is finding a copy to install – usually ageing floppy disks, or disk images if you made backups. We’re working from a set of disk images.

    If you don’t already have one and don’t fancy the second-hand market, you can, surprisingly, find it included in Microsoft Visual Studio Subscriptions (formerly MSDN Subscriptions), currently priced at £33.54 per month, for the benefit of developers working on backwards compatibility.

    Install Windows

    Copy the contents of each installation disk or image to a /win311 subdirectory of the dos directory tree we made earlier; you can do this as you normally would on the desktop or at the command line, or by using DOSBox-X’s IMGMOUNT to mount them and using the DOS COPY command while switching disks. At the command line, start DOSBox-X with a Windows-suitable config file – download ours from GitHub.

    dosbox-x -conf win311.conf
    CD WIN311
    SETUP
    

    Windows 3.11 will install itself. Reboot.

    CD WINDOWS
    WIN
    

    Using Windows 3.x

    If you’ve only ever used Windows 95 or later, Windows 3.x’s interface may feel somewhat alien. There’s no Start button and if you want to quit back to the DOS prompt, you have to open Program Manager’s File menu and select Exit Windows…

    The default Program Manager folders, each full of shortcuts to helpful software and settings, are clearly labelled. To explore your mounted DOS drives, open Main and then File Manager. Accessories include MS Paint precursor Paintbrush, a Sound Recorder, and even a Media Player.

    A line at the top left of each opened window allows you to move and close it, while minimise and maximise buttons are at the right.

    RPG classic Worlds of Ultima: Martian Dreams is legally available for free from GOG.com, but you’ll have to use innoextract 1.8 to pull the files out of it

    Boot Raspberry Pi to DOS

    Once you’ve configured DOSBox-X – and any relevant window managers – to your satisfaction, you can complete your pitch-perfect 1990s PC simulation by booting straight to DOS. Open a Terminal window and type:

    mkdir /home/pi/.config/autostart
    mousepad /home/pi/.config/autostart/dosbox.desktop
    

    Add the following to the new text file:

    [Desktop Entry]
    Type=Application
    Name=DOSBox
    Exec=/usr/bin/dosbox-x
    

    This will use DOSBox-X’s default config file. You’ll need to enable fullscreen in your DOSBox-X config for this to launch correctly, and opengl-dependent aspect ratio correction is also strongly advised.

  • Ghosts of Tsushima – First Minutes 4K Gameplay PS4Pro

    Ghosts of Tsushima – First Minutes 4K Gameplay PS4Pro

    Reading Time: < 1 minute

    Ghosts of Tsushima – First Minutes 4K Gameplay PS4Pro

  • Piano-Playing Robot

    Piano-Playing Robot

    Reading Time: 3 minutes

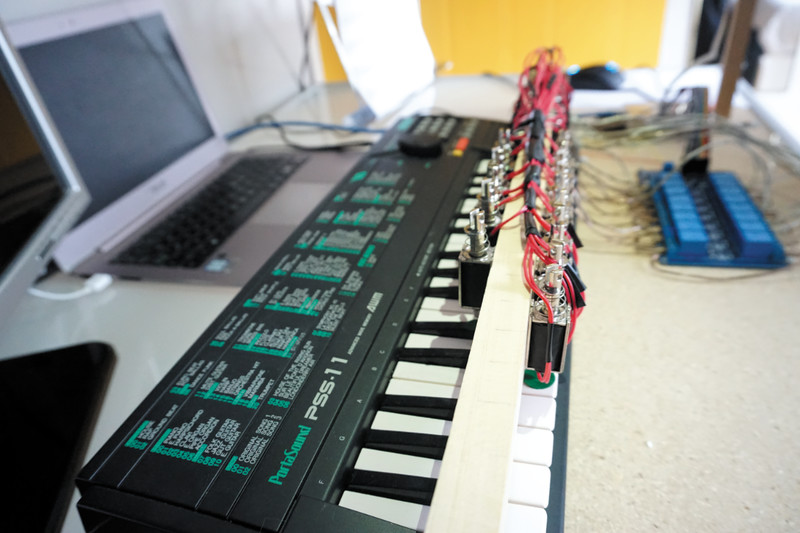
    It took him around four months, on and off, to develop his Piano-Playing Robot. As shown in his YouTube project video (), it features 15 solenoids mounted on a wooden frame placed on top of an electric piano keyboard.

    “Basically, the system is quite simple,” reveals Étienne. “Each solenoid pushes on a piano key and is controlled by a specific GPIO pin of a Raspberry Pi 3 Model B.” Since the latter doesn’t have enough electrical power to activate the solenoids directly, an electromechanical relay module acts as a buffer between the two.”

    Fast ‘fingers’

    The system can read a MIDI file, convert it into on and off signals for each note, and play it. A basic UI allows the user to choose between scales, arpeggios, or melodies.

    “As of now, the robot can play a full scale in just under two seconds,” reveals Étienne. “That is, at the fastest rate, it plays about eight keys per second.” This impressive speed makes it possible to get the timing of the notes just right.

    “However, the system is limited by the push and pull times of the solenoids, which add up a few tens of milliseconds,” he says. “At a first glance, it may not seem like much, but in a fast melody it can make a difference. Our robot still has a long way to go to overtake human-beings: the fastest pianist in the world claims to be able to reach up to almost 20 keys per second!”

    Mounted on a wooden frame, the solenoids respond quickly and can be triggered simultaneously to play chords

    Sight reading

    So far, he has programmed the robot to play six scales, six arpeggios, and five different melodies. The most impressive feature, however, is its ability to read previously unseen sheet music – using a Raspberry Pi Camera Module – and play it.

    “A camera was added to the system to read and decode new musical scores that had never been shown to the robot before,” says Étienne. “It then scans, decodes, and plays them.”
    To do this, it uses a free open-source tool called Audiveris. “It is a complex program for optical music recognition (OMR), which is recognition of musical symbols. Unlike optical character recognition (OCR), this task requires decoding the configuration of symbols in two dimensions. In addition, the order of magnitude of the symbols is extremely wide (sometimes ranging from tiny dots above musical notes to symbols that are drawn across a large part of the page).”

    Raspberry Camera Module is used to read sheet music, its images being analysed using optical musical recognition

    In brief, the recognition process is done with classifiers and neural networks that make matches with symbols previously learned. “For my project, the decoding part was done on a laptop since Audiveris was more easily compatible with Windows,” he explains. “On average, it takes around 30 seconds for the robot to decode a sheet of music containing a few staves.”
    Étienne is hoping to add extra features to the robot. “In particular, I would like to extend the concept to 88 solenoids. This way, the robot would theoretically be able to play all the existing melodies on the piano! Obviously, there is a lot of development to do in terms of Optical Music Recognition, but I like to imagine a piano concert performed entirely by a robot!”